Need an easy way to send simple email newsletters right from your WordPress dashboard? The MailPoet Newsletters plugin could be just what you’re looking for. Find out how easy it is to set up in our MailPoet Newsletters review.

Why You Need an Email Newsletter
Think of all the websites you visit every day — how many of them do you remember and return to?
Probably not very many.
Most of your website visitors are the same. They may enjoy your content, but once they leave your site, they aren’t likely to return.
That’s why having an email newsletter is so important: It can turn many of those one-time visitors into loyal fans.
Unlike social media, there’s something more personal and powerful about speaking to your audience right in their email inbox. And with email, you have more freedom to create and send the content you want, without having to worry about arbitrary character limits or dwindling organic reach.
MailPoet Newsletters makes it easy to send email newsletters right from your WordPress dashboard — here’s how.
MailPoet Newsletters Plugin – An Overview

Mailpoet is a simple yet powerful email marketing WordPress plugin designed specifically for WordPress users.
It lets you create and send email newsletters right from your WordPress dashboard. You can even manage your email list without leaving your dashboard. This makes it stand apart from other email marketing solutions like Aweber, MailChimp, etc.
The best thing about this plugin is that creating and sending your newsletters is simple and straightforward. Because you’re using WordPress and are already familiar with the interface, so there’s no learning curve to tackle even if you’re an absolute beginner to email marketing.
To make things faster, it offers you beautifully designed built-in templates that can be fully customized to match your brand.
MailPoet Plugin Features
MailPoet is loaded with excellent features to make your email marketing efforts a success. Let’s have a quick look at the features that it offers.
1. Pre-built Templates
MailPoet offers more than 50 beautifully designed templates for you. This lets you have a quick start so you don’t have to start from scratch. Just tweak a few changes like your brand name, logo, etc and you’re good to go. If you want to customize it further, that’s possible too, because every bit of these templates are customizable.
2. Blog Updates on Autopilot
Keep your readers updated about what you’re publishing on your blog. The blog updates on autopilot options lets you share your blog with your users as soon as you hit the publish button, helping you grow your mailing list. You can also schedule the updates on a weekly or monthly basis.
3. Welcome New Subscribers
Properly greeting new subscribers can make a difference between the emails users’ notice and the emails they ignore. You can set up a welcome series with simple mail automation and workflows and MailPoet takes it from there.
4. List Segmentation
With MailPoet, segmenting your email list is easy. With segmentation, you can categorize your leads into a distinct group based on their interests and behavior, and send them personalized emails based on the common interest, which is proven to boost conversions compared to non-segmented emails.
5. Signup Forms
It lets you add signup forms to your sidebars and footers so you can turn your users into customers.
6. Analytics

With its analytics feature, it’s easy to track opens, clicks, and unsubscribes. This lets you know how your newsletters are performing and you can also optimize them for better engagement and conversion.
How to Set Up Your MailPoet Newsletter
Let’s now check out how to create your first newsletter with MailPoet.
Step 1: Installing MailPoet
First off, install and activate MailPoet in your WordPress dashboard. You can download and use the plugin for free until you have 1,000 subscribers.
Once downloaded you can start creating your newsletters.
Step 2: Creating Your first Newsletter with Mailpoet
To create your newsletter, go to MailPoet » Emails on your WordPress dashboard. You’ll now see 4 different options on your screen.
- Newsletter
- Welcome Email
- Latest Post Notifications
- WooCommerce
Click on the Create button under Newsletter.
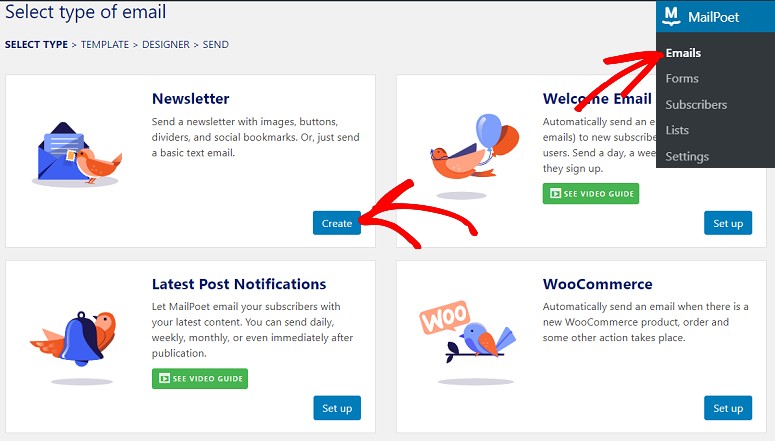
This will take you to a new screen where you can select a template for your newsletter. Select the one that best matches your brand. If you don’t find one, don’t worry. You can customize your template later.

Step 3: Customizing Your Email Template
Upon selecting the template you’ll be directed to a new screen where you can start customizing it using its drag and drop builder, to meet your requirements.
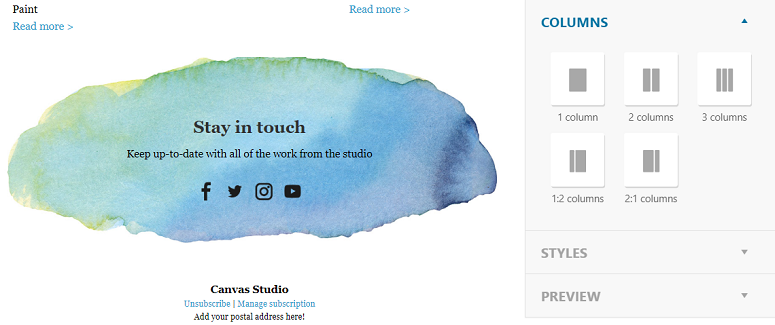
On your left, you’ll have the page builder and on your right, you’ll see all your styling elements like content, column, style, and preview.
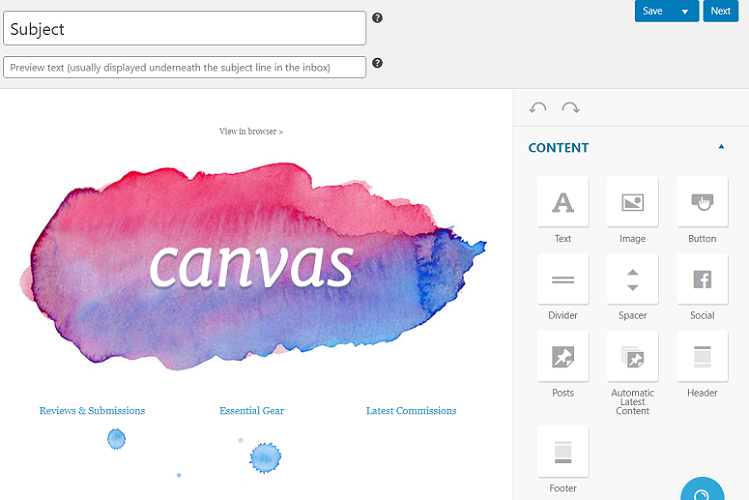
On the top of your screen, you’ll see two fields where you can add your subject line and preview text. So add your text there.
To change any element in the template just hover your mouse over the specific section and you’ll see the settings, delete, copy and move icons. To make changes, use the settings icon. You can also delete or duplicate a section if you want.
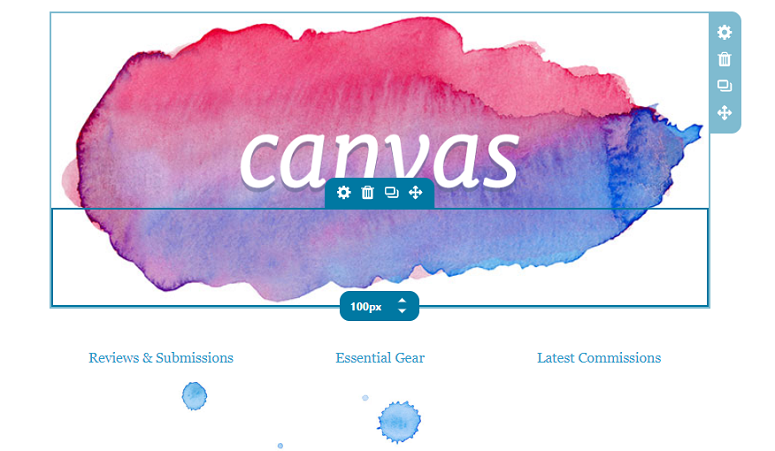
To move a section from one place to another use the Drag to Move icon and then drop it wherever you want to place it. You can also add columns and styles like background color, etc. by using the options on your right.
Once done, hit the Next button at the bottom right corner of your screen. This will autosave your changes and take you to a new page from where you can send your newsletter.
Step 4: Sending Your Newsletter
The final step is to send your newsletter. Upon clicking on the Next on the previous step, you’ll be taken to a screen with several different field options. The first is to add your subject line.
In the second, you can select a list in order to segment your audience. Finally, add the email addresses of the sender and the receiver.
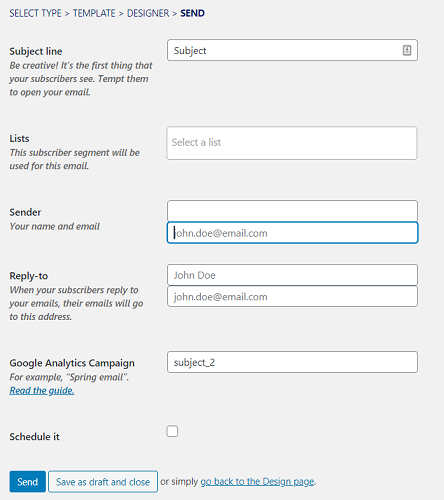
You can also schedule your emails by checking the Schedule it option. Upon checking this option a new field will open up where you can add a date and time when you want to send your emails.

Once everything is added hit the send button (if you want to send it immediately) or the schedule button (if you want to schedule it for later).
That’s how easy it is to send email newsletters with MailPoet.
Send Advanced Emails With MailPoet Premium
The free version of the plugin only allows you to send emails to up to 1,000 subscribers, and offers limited statistics and other features.
With the premium version of MailPoet, you get:
- The ability to send emails to over 1,000 subscribers
- An advanced statistics dashboard with detailed stats for each subscriber and newsletter, including easy integration with Google Analytics
- Improved deliverability, spam score testing, and automated bounce handling to make sure your subscribers receive your newsletters
- Priority support, including individual optimization of your settings
MailPoet also has a few add-on plugins available on WordPress.org that allow it to integrate with other services like WooCommerce, Contact Form 7, and Gravity Forms.
Our Verdict on Using MailPoet
If you’re looking for an easy way to manage simple email newsletters right from your WordPress dashboard, MailPoet is a good choice. It’s one of the most popular and highly rated email newsletter plugins in the WordPress.org directory.
For more advanced email marketers who need more options for triggers, segmentation, analytics and reporting, or better deliverability, a standalone email newsletter service like AWeber, ConvertKit or Constant Contact which is a great alternative to MailChimp.
One basic feature that MailPoet is missing is better designs for the opt-in forms. The opt-in forms just default to your theme’s form styling. If you want better-designed opt-in forms or more options for high-converting forms like pop-ups, fly-ins, etc., and features like A/B split testing, we recommend using a plugin like OptinMonster. OptinMonster can easily integrate with MailPoet if you’d like to use both.
We give MailPoet Newsletters 4 out of 5 stars. Here is the breakdown of our review scores:


 4.0 / 5.0


 3.0 / 5.0


 5.0 / 5.0


 4.0 / 5.0


 4.0 / 5.0


 4.0 / 5.0
Comments Leave a Reply