
Are you looking for a free business email you can rely on?
A business email is one of the best ways to help build trust for your company. It can quickly show people that you are serious about your business. Since your company name will be part of the professional business email address, it can help build your brand further.
To add to this, business emails often have better security protocols and come with additional tools to help you manage your emails better.
In this article, we will show you 2 of the best ways to get a free custom business email and how to set it up in less than five minutes.
But first, let us look at what a business email is.
What is a Business Email?
A business email uses your own domain name instead of an email service provider like Gmail or Yahoo.com. For example, a business email would be structured like ‘[email protected]’ for individual email addresses.
However, you can also structure business emails in different ways.
- Departments: [email protected]
- Position: [email protected]
- Function: [email protected]
- Product: [email protected]
- Location: [email protected]
- Role: [email protected]
Your email client will know exactly who they are talking to from the business email, further building your reputation and trust and, in the long run, improving your SEO and brand.
Before we look at how to get a business email free, it is important to understand what to look for when picking the right business email provider.
- User-friendly interface: Ensure the email service provides an easy-to-use interface for smooth communication and efficient use.
- Cost of upgrades: Check the pricing structure and potential expenses for upgrading your business email service. Consider features like increased storage, cloud storage, or addons.
- Additional tools: Look for features such as calendars and task management. Also, check for collaboration tools to help with productivity within the email platform.
- Backups and restoration: Confirm that the service includes dependable backup and restoration options to safeguard important data in case of accidents or system failures.
- Support: Check the quality and availability of customer support, ensuring timely assistance for any technical issues or other problems that may arise.
- Integration: Check for integration with other business tools and software your team uses to help with workflow.
- Mobile use: Ensure the email platform offers reliable and user-friendly mobile apps, allowing team members to stay connected and productive on the go.
- Storage space: Check the available storage space and whether it meets your business’s current needs. Also, check if the storage is enough for future growth without incurring excessive costs.
- Uptime: Verify the email service’s uptime guarantee to minimize disruptions, ensuring your team can access their emails without downtime.
- Ad-free: Go for an ad-free business email service to maintain a professional appearance and eliminate distractions that may be associated with free email providers.
With that said, the 2 options we have provided below meet all the requirements mentioned above. Now, let’s jump into learning how to get a free business address.
How to Get a Free Business Email Address
There are 2 main ways you can get a business email. You can either get it from a hosting provider like Bluehost or an email service provider like Gmail through Google Workspace, formerly Gsuites.
With most popular web hosting providers, a business email comes completely free with the hosting plan you get. However, even though the business email is free, you still need to pay for hosting.
On the other hand, Google Workspace is a great option if you are just starting out. You do not need a website to host your business email, but you need a domain name, which comes at a cost.
Google Workspace is also not free; it starts at $6 a month. But since you do not need a website hosting service, like Bluehost, it balances out in the end.
But as an added bonus, you can work with both Bluehost and Google Workspace to meet your emailing needs. This relationship ensures you enjoy the best features of both of these business powerhouses.
For example, you can access all your favorite Google apps from an easy-to-use Bluehost control panel. You can also store or back up all your emails and content on the Google Cloud drive offered through this partnership.
Google Calendar also allows you to schedule blog posts, newsletters, and other communications. At the same time, you can enjoy the speeds, uptime, and security that come with Bluehost emailing and hosting. As a result, working with Bluehost and Google Workspace can help improve team collaboration.
Despite these many advantages, using the two can lead to an increase in costs, especially if you are just starting out. For this reason, let us focus on how to set up free emails with both tools separately.
If you want to jump to one of the methods listed below, click the links below.
- Method 1: Get a Free Business Email with Bluehost
- Method 2: Get a Business email with Google Workspace
Method 1: Get a Free Business Email with Bluehost
Bluehost is a domain registrar and hosting service popular for offering WordPress sites and eCommerce stores fast speeds and great uptime at affordable prices.
To use its free business email service, you first need a domain name, email hosting, and email storage, which come as part of any hosting plan you get from Bluehost.
Bluehost also offers you a limited number of business emails with the basic plan and unlimited business emails with every plan after that.
This web hosting company stands out for its many integration abilities, connecting with widely used tools such as Outlook, Gmail, and Mailchimp. This helps you enjoy a smooth and convenient email experience as you can manage your inbox with tools you already know and use.
Added to that, Bluehost uses strong data privacy protocols to protect your sensitive information and maintain high security. These privacy measures cover every part of your emailing, providing you with peace of mind.
It also comes with advanced spam protection. This feature filters out spam, improving your email score. This, in turn, ensures your content lands in the primary inboxes of people actually interested in your content.
With the use of smartphones being so important today for a business owner or a startup, Bluehost allows you to access your email on your phone. Whether iOS or Android, setting up your business email account on your mobile device is easy, ensuring you stay connected wherever you are.
Step 1: Set Up Hosting and Domain Name
As mentioned, Bluehost’s free business emails are tied to a hosting package. Therefore, the first step is to purchase a hosting plan.
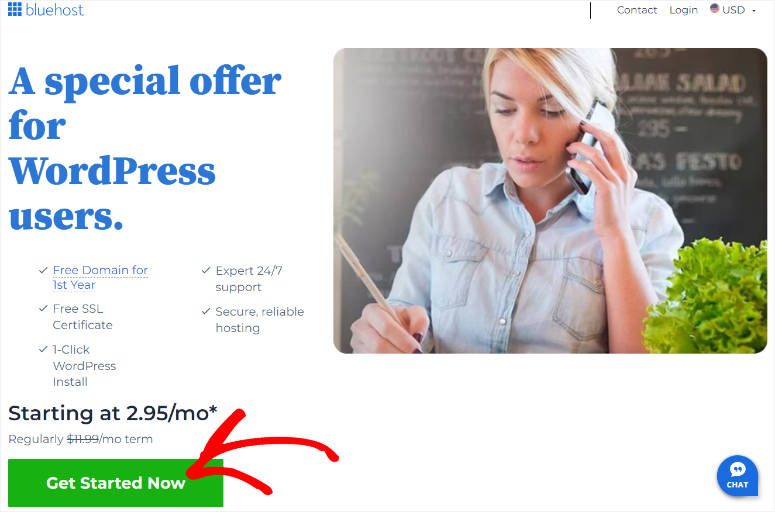
To do this, head over to the Bluehost website and select Get Started Now, which will redirect you to the pricing page.
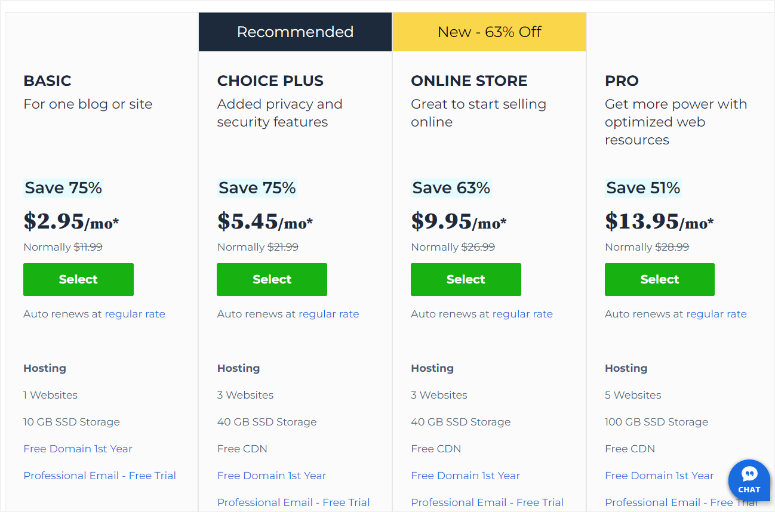
Bluehost offers four options: Basic, Choice Plus, Online Store, and Pro. Select one that suits your business needs and budget.
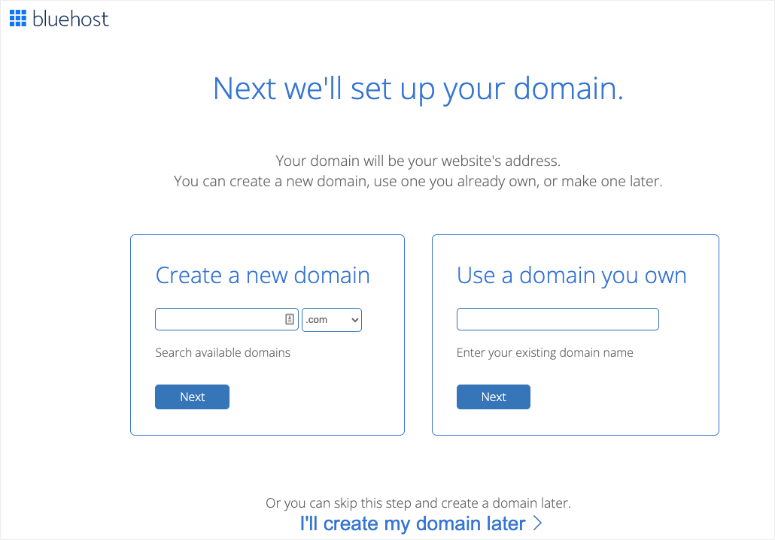
After you select a plan, Bluehost will ask you to enter your existing website URL or create a new one. Remember that Bluehost gives you a free domain name with every web hosting plan you purchase. If you create a new custom domain at this point, you will not be charged extra.
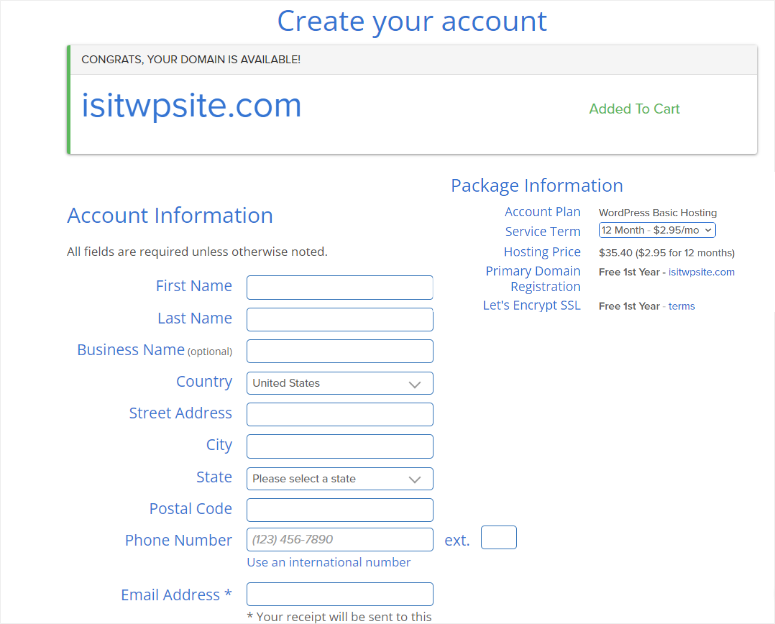
On the next page, Bluehost will check the availability of the custom domain name you want to create. If available, it will be Added To Cart. Then, follow up by filling out the Account, Package, and Package Extras information.
Finally, key in your payment details to purchase and create your account. With Bluehost, you can either pay with a Visa Card, Master Card, American Express Card, Discover Card, or Paypal. This makes it convenient for you to pay with whatever method you find best.
You will receive a confirmation email with details on how to log into your Bluehost dashboard and cPanel account, where you will manage your professional email address, hosting, and domain moving forward.
Step 2. Create a Business Email Account Free
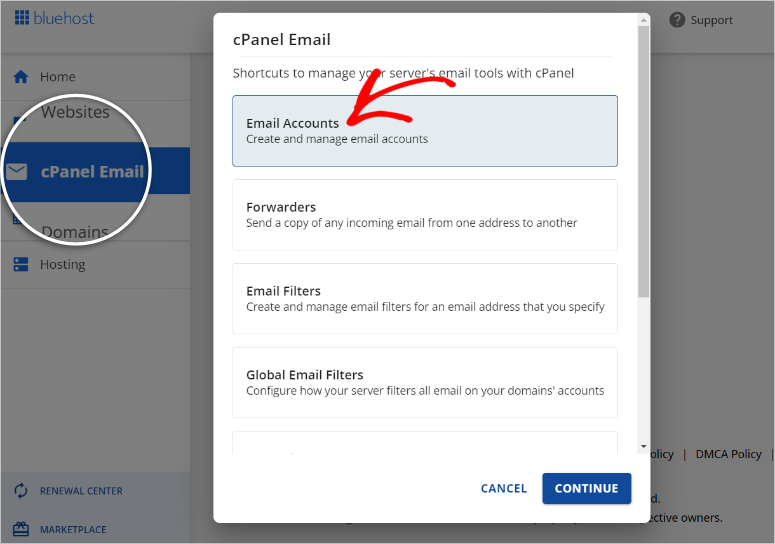
Once you confirm your account in your email inbox, head to the Bluehost dashboard. Then, on the left menu, select Cpanel Email, and a popup menu will appear.
Here, select ‘Email Accounts,’ then hit Continue to take you to cPanel.
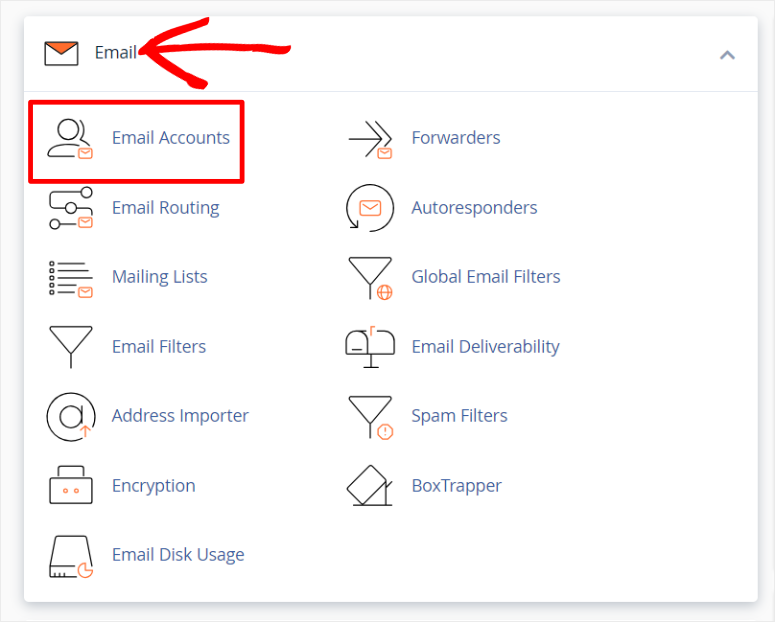
Next, in your cPanel, find the Email tab. Here, you will find various emailing tools such as Forwarders, Spam filters, Mailing Lists, and more, making it a top way to get the best free business email.
To get started setting up your free business email, select Email Accounts.
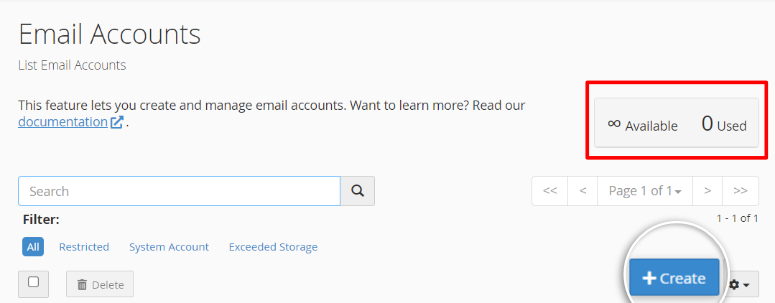
On the next page, you will see the number of free emails available, the number of email addresses you have already used, and the option to create a new professional email address. Since this is your first business email, select Create.
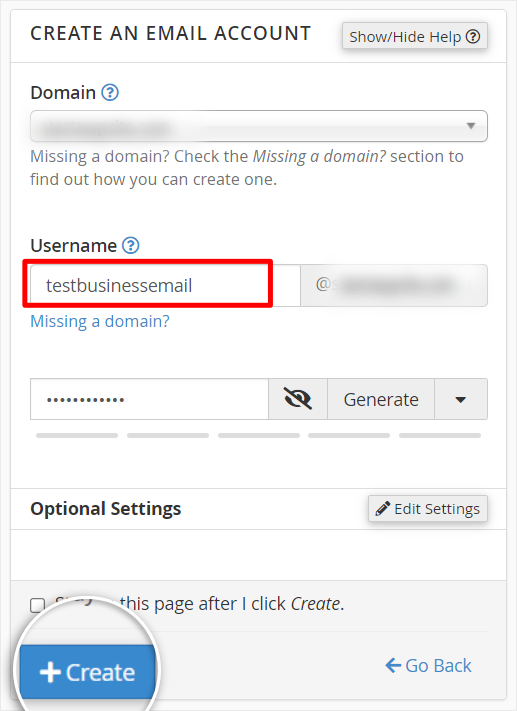
On the next page, first, select the domain you want to create a business email for in the dropdown menu.
Next, enter the username for your business email account and then enter or generate a password. Finally, select Create to proceed.
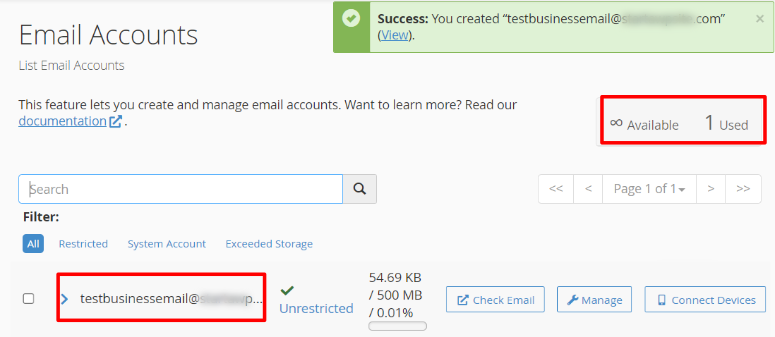
Bluehost should redirect you back to the Email Accounts page automatically. A green popup window should appear, letting you know the process was successful. You should also see the email account you just created added to this page with options to Check Email, Manage, and Connect Devices.
To add to that, you will also see the number of used email accounts increase by one and the number of email accounts you can still create displayed. This can help you plan out how you will use your email addresses better.
In this case, we have used one email and still have infinite emails we can create.
Congratulations! You have a free business email with a domain using Bluehost.
Step 3. Use the Business Email Account
With your business email free account created, the next step is sending and receiving messages.
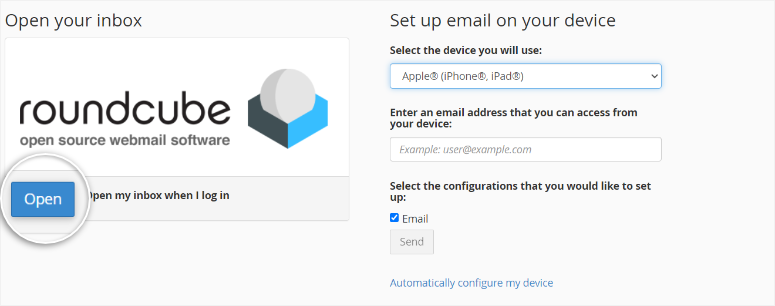
To do this, click Check Email next to the business email name you have just created to be redirected to the webmail interface.

Under the Roundcube logo, select Open to log into your inbox.
Here, you will quickly notice that the webmail interface is very similar to most email inboxes, meaning you will not experience any learning curve.
Like most other email providers, you will see your Inbox, Sent, Draft, Spam, Delete, and Archive folders in the left-hand menu.
The top-most menu contains options like Calendar, Contacts, and Settings at the top right. Below that is the email taskbar with options to Refresh, Compose, Reply, Reply All, Forward, Delete, Archive, Mark, and more.
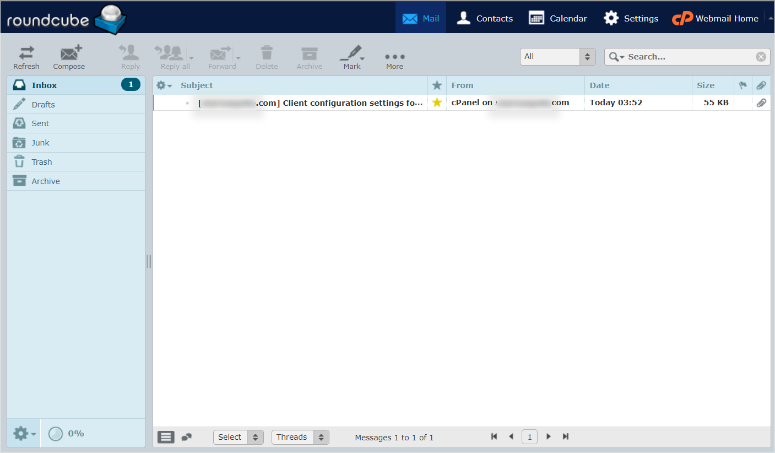
Use this email interface as you would any other email provider, such as Gmail. You can send and receive emails, archive them, leave emails as drafts, and so on.
Step 4: Connect Bluehost Email with Gmail or your Device
Sometimes, using webmail may be difficult since it may not be a tool you use every day. As a result, Bluehost allows you to connect your business email to your devices or Gmail for easier management.
To connect your devices, go back to the Email Accounts page in cPanel and find the business email you want to connect. At its far right, select Connect Devices.

On the setup page, you will find Mail Client Automatic Configuration Scripts. Below it, you will see a script to connect your business email to your iOS devices, Mozilla Thunderbird, Outlook, and more. You will also find Mail Client manual settings configurations.
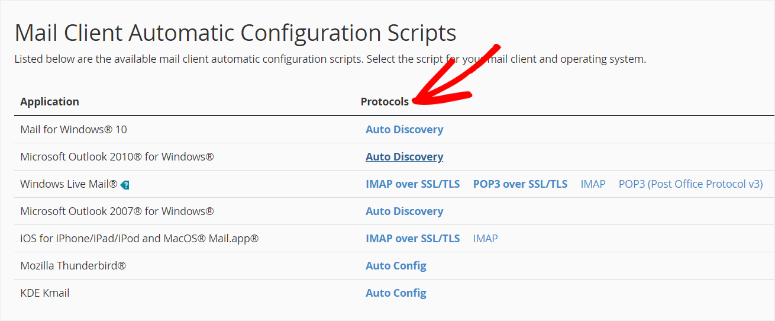
To use Email applications like Microsoft Outlook 2010 and Mail for Windows, you will need to run the configuration scripts. The application will then automatically detect the email account’s settings and also provide detailed instructions to complete the setup process.
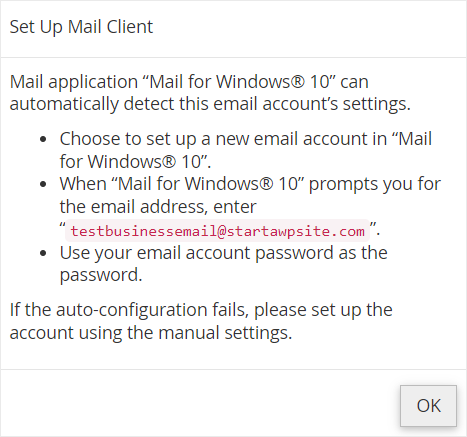
However, for iOS, you will also need to set up the Bluehost email account on your device. If you want to learn more about this setup process, follow this tutorial on how to set up email on iOS Devices.
Next, let us connect the business email to Gmail.
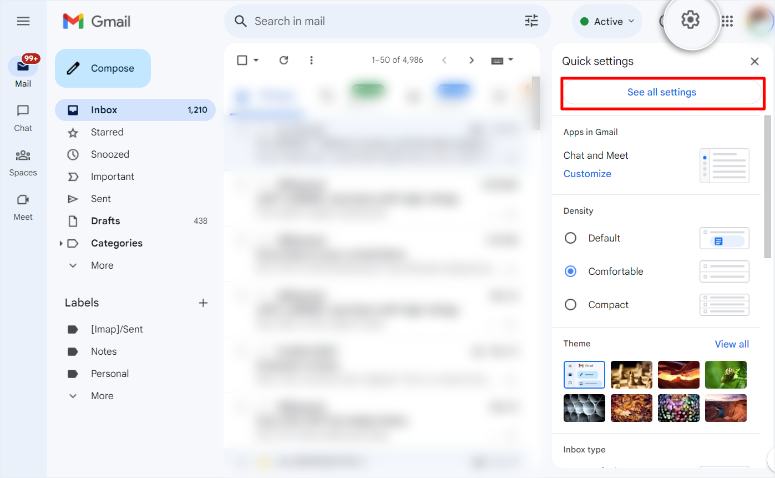
To do this, log in to your Gmail account and proceed to the Settings icon. Once selected, you will see a dropdown menu displaying plenty of customization options. Here, select ‘See All Settings.’
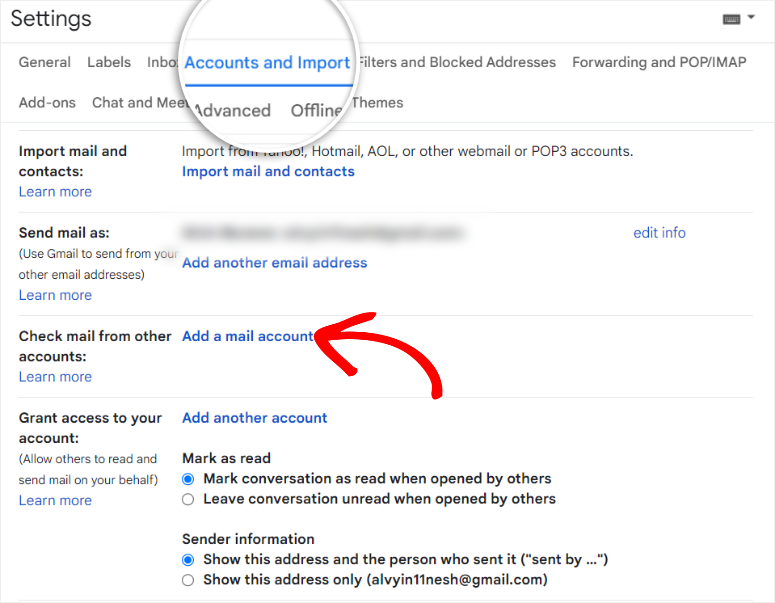
In the Settings window that will load next, go to the Accounts and Import tab. Next, scroll to ‘Check mail from other accounts’ and select Add a Mail Account.
A new window will appear where you enter your Bluehost business email address in the “Email address” field. Proceed by selecting “Next.”

In the next window, select “Import emails from my other account (POP3)” and then select Next to proceed.
You will then be required to enter your username, password, POP Server, and port 995. Finally, select Add Account.
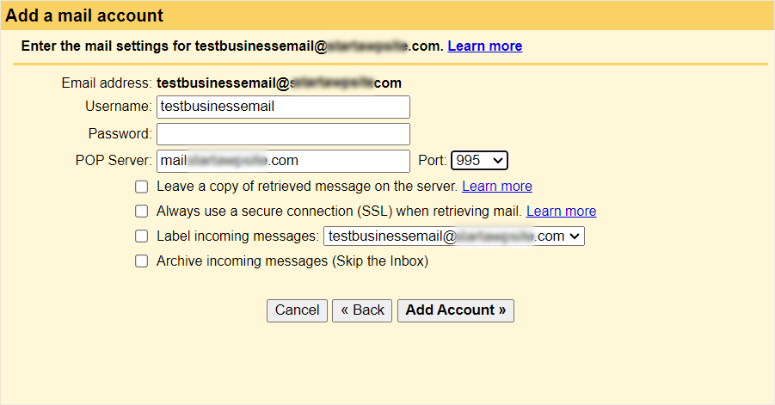
Once this is done, Gmail will then send an email to your Bluehost webmail for verification. Open the link and click it to confirm you are the owner.
Finally, you can configure the Bluehost emails in your Gmail account by adding a label so you can always identify them.
The final step is to Save the setting in your Gmail account. You can now receive your business emails from Bluehost right in your Gmail account.
Congratulations! You have just fully set up a business email for free with Bluehost.
Next, let us use Google Workspace to set up a business account.
Method 2: Get a Business email with Google Workspace
As mentioned, if you use Google Workspace to set up your business email, you will need to purchase a plan starting from $6 a month. However, with a 14-day free plan trial to test it out before you make your decision, you have nothing to lose.
You can use this cheap business email, even without a business website. However, the costs may add up as you also need to purchase an email domain.
But on the bright side, it comes with all the amazing app integrations and productivity tools you have come to expect from Gmail, such as Google Meet, Google Calendar, Google Drive, and more. These tools can help streamline workflow and everyday business activities to help improve productivity.
On the other hand, Google Workspace also comes with more business-focused tools such as Google Analytics, Google Tasks, and Google Cloud Search.
Such business solutions can help you get more insight into your business, helping you understand your audience better. They can also improve management by simplifying your team’s working experience by reducing the need for many tools.
Now that you understand more about Google Workspace let’s see how you can create a business email with it.
Step 1: Get a Google Workspace Plan
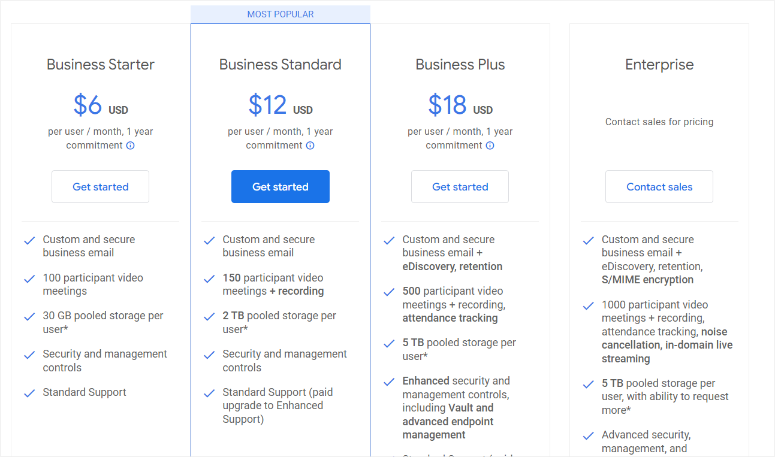
Head to Google Workspace’s official site and select one of the 4 plans offered by clicking the Get Started button.
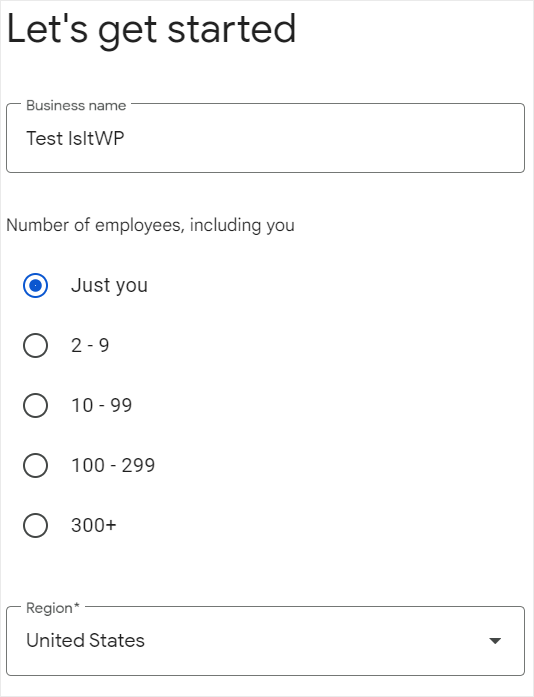
On the next page, enter the Business Name, Number of Employees, and Region.
If you are alone or starting out under ‘Number of Employees’, we suggest you go with ‘Just You’ to avoid increased monthly fees.
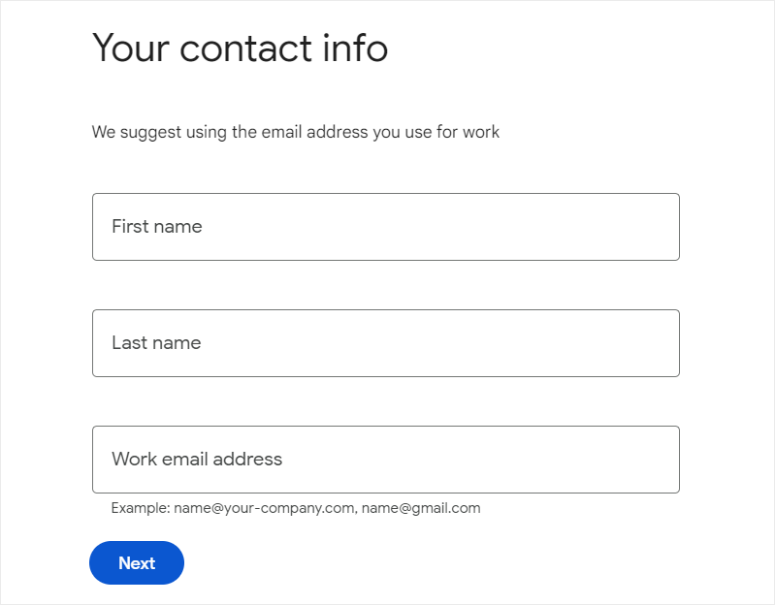
Follow this by filling in your name and current email address, and then proceed to the next page.
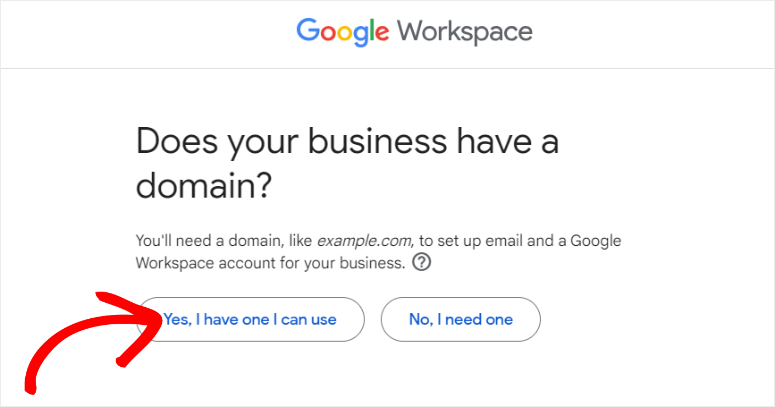
Next, you will be asked whether you have a domain name. If you do not have one, Google will direct you on how to purchase one when you select ‘No, I Need One.’ Again, this will incur additional costs on top of the Google Workspace monthly cost.
For this tutorial, we will select ‘Yes; I have One I Can Use,’ which will start the verification process.
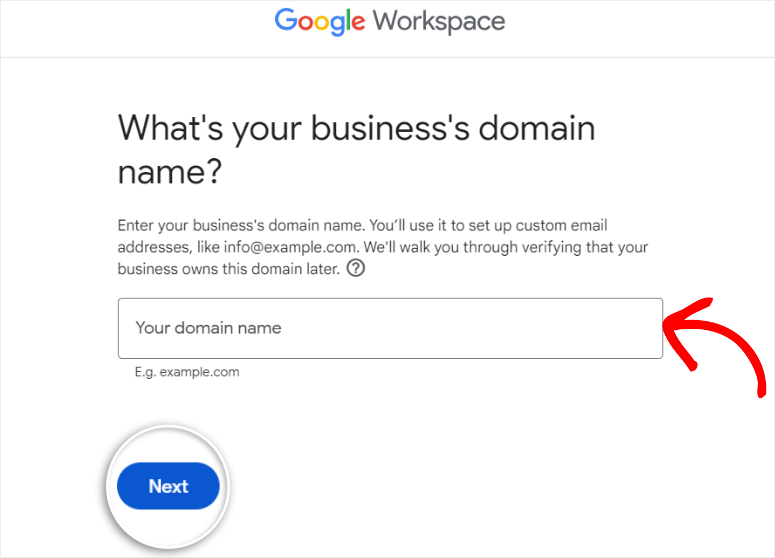
On the next page, type in your domain name and hit Next. Google Workspace will first verify your domain name before proceeding to the next page.
Next, Google Workspace will ask you if you want to stay up to date by sending you occasional tips and offers. Select either ‘OK’ or ‘No Thanks.’
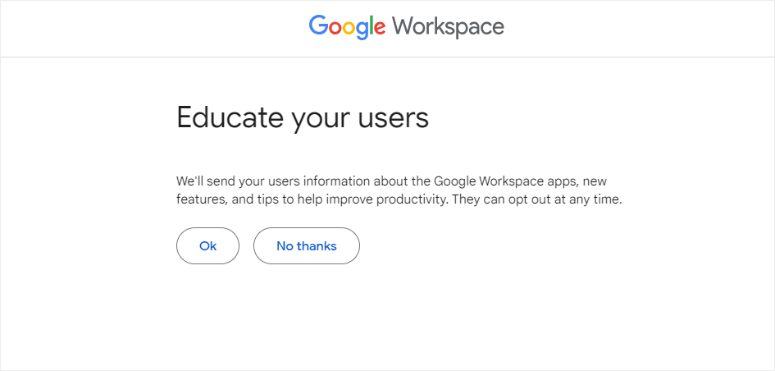
You will do the same thing on the next and similar page, where Google Workspace will ask you if you would like to educate your users. Here, the tool will send your users information about Google Workspace apps, new features, and tips to help improve productivity. Again, select ‘OK’ or ‘No Thanks.’
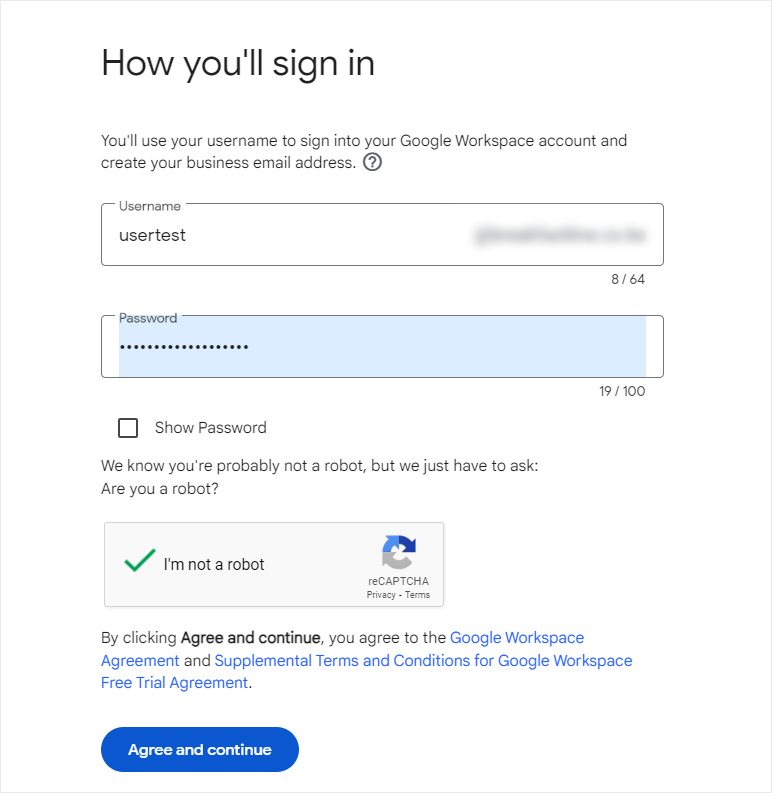
On the new page, you will enter a username and password for your new email. This username will also act as your first business email address. Once you make your decision on the username to use, select Agree and Continue.
Next, add your personal information and go through the checkout process to pay for the plan you want.
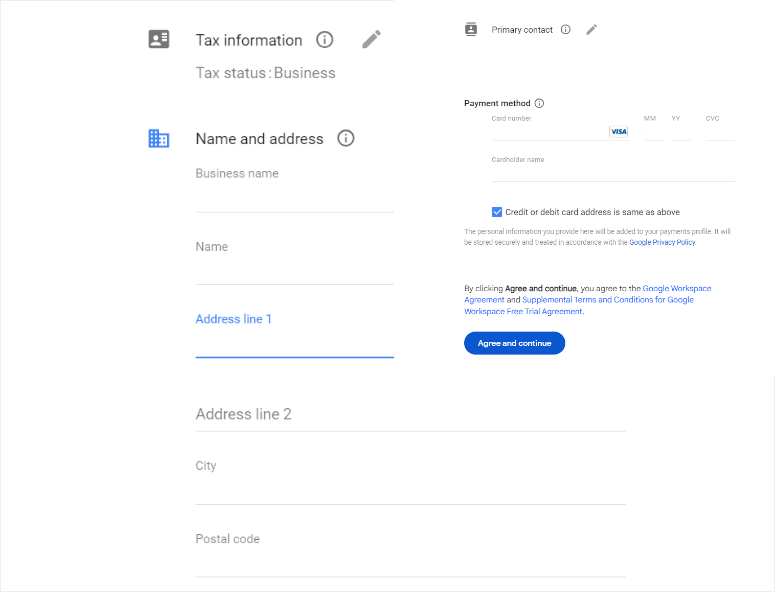
Once this is done, select Continue. At this point, you should have successfully created a business email with Google Workspaces.
Step 2: Verify Domain Name
Next, use the business email account you have just created to log in to your Google Admin Console (admin.google.com). Here, Google Workspace will show you a tutorial on how to set up your business email. Go through it and make sure you have everything ready.
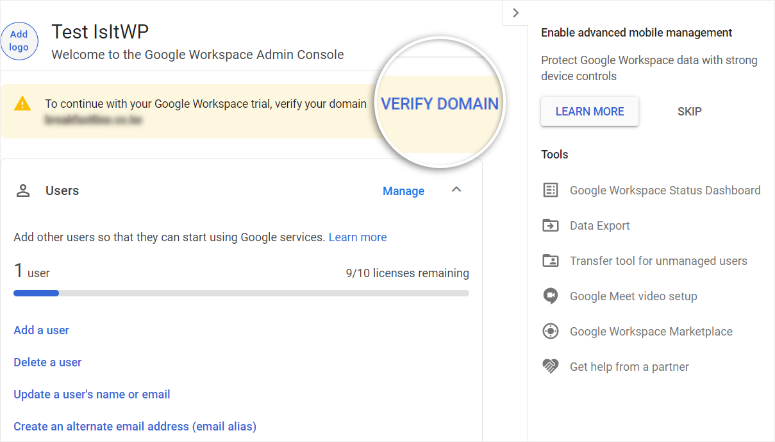
The first step is to verify your domain name. To do this, select Verify Domain on the warning message on your Google Admin Console dashboard homepage.
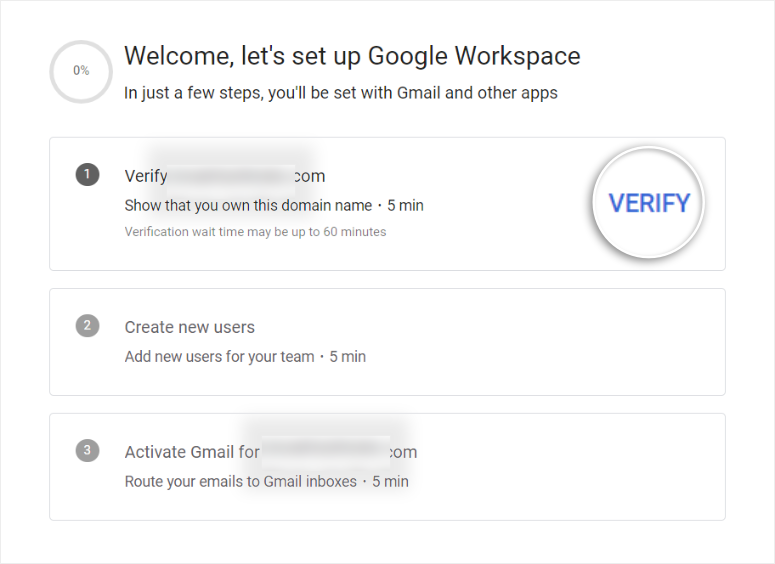
In the next window, you will see 3 options to set up your Google Workspace.
- Verify your domain
- Create new users
- Active Gmail for your domain
For this setup tutorial, we will focus on verifying the domain and activating Gmail since we only have one user.
Let us start the verification process of the domain by selecting ‘Verify.’
Once you hit verify, you will be redirected to a step-by-step verification page with codes to complete the process. Again, read through the steps and ensure you have everything set.
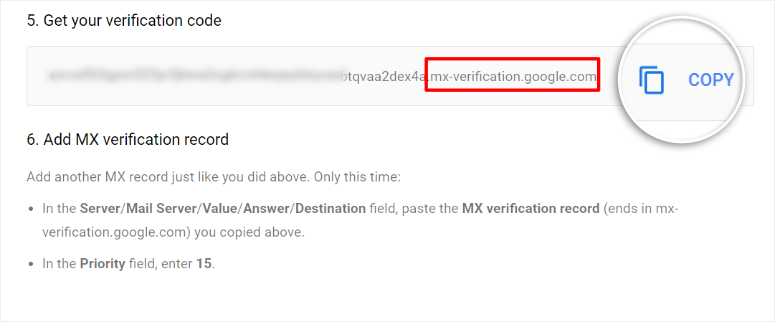
Next, scroll down the page and copy the verification code provided. This code will always end with mx-verification.google.com. So check on this to make sure you have the right code.
- Important: Leave this verification page open; use it as a guide and copy the codes.
Next, head back to your Bluehost dashboard to locate TXT records in the domain settings so you can add the verification code.
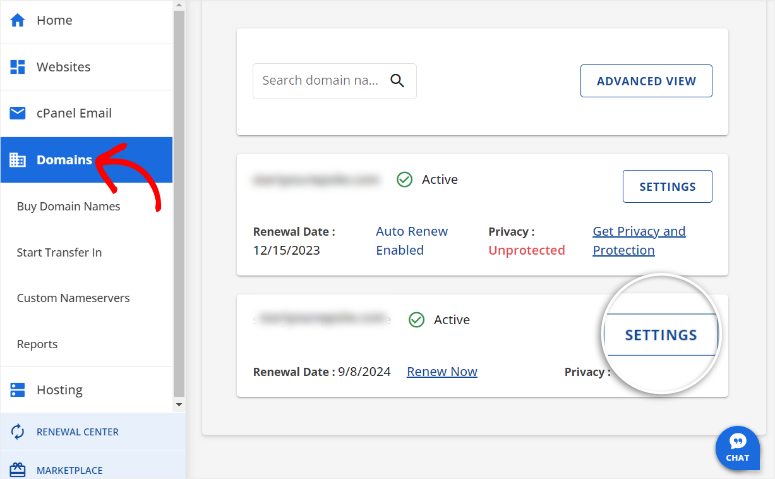
To do this, go to Domains in your Bluehost dashboard. On the page, scroll down to locate the domain name you want to connect to the business email and select Settings.
On the new window, scroll to the bottom and find Advanced Tools. Then, select the dropdown arrow to expand the options. Then, go to ‘Manage’ Advanced DNS Records on the right.
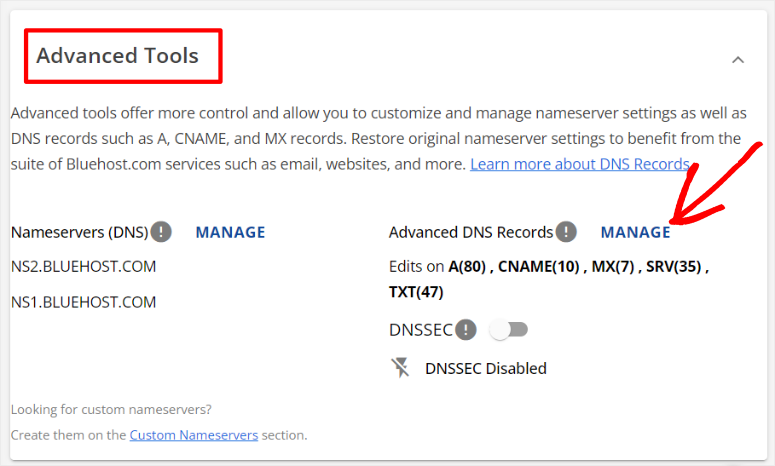
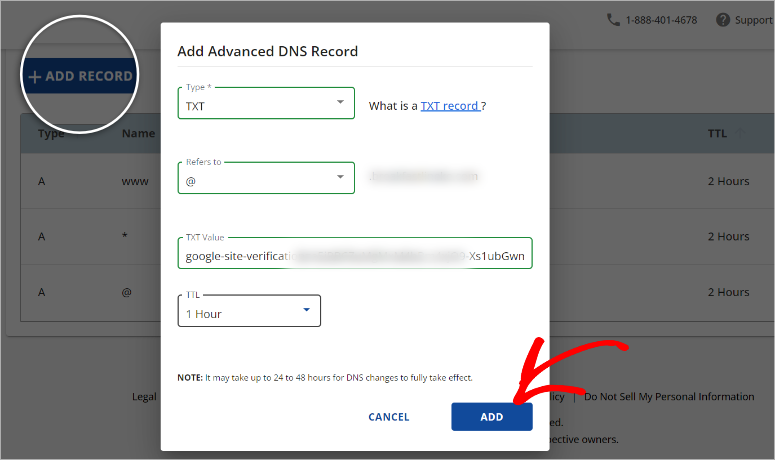
In the next window, select Add Records to access Advanced DNS records. Next, type in the following information in the fields provided.
- Type: TXT
- Refers to: @
- TXT Value: Insert the verification code you copied earlier from Google Workspace ending with mx-verification.google.com.
- TTL: 1 hour (here, insert the number recommended by your web hosting provider. However, the number will not affect the process.
Finally, hit Add to add the verification code to the DNS records.
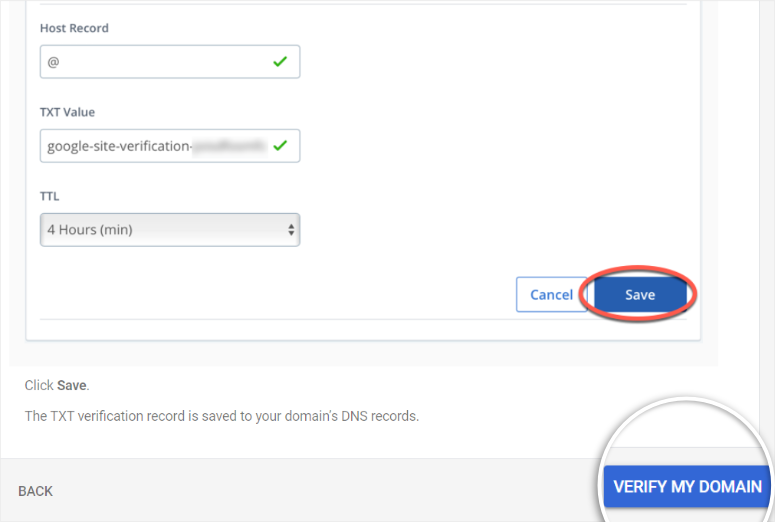
With this complete, head back to Google Workspace’s verification page you left open and select Verify my Domain.
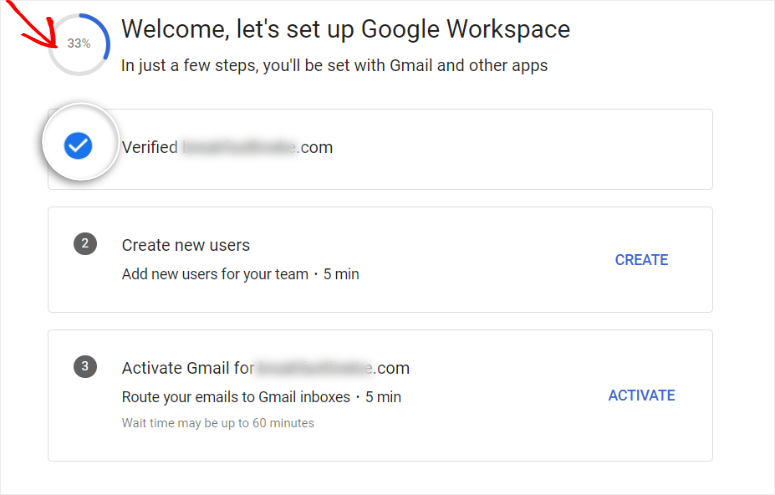
Once the page reloads, you should be redirected to the Google Workspace setup page. You will notice a blue tick next to your domain name, confirming it is verified.
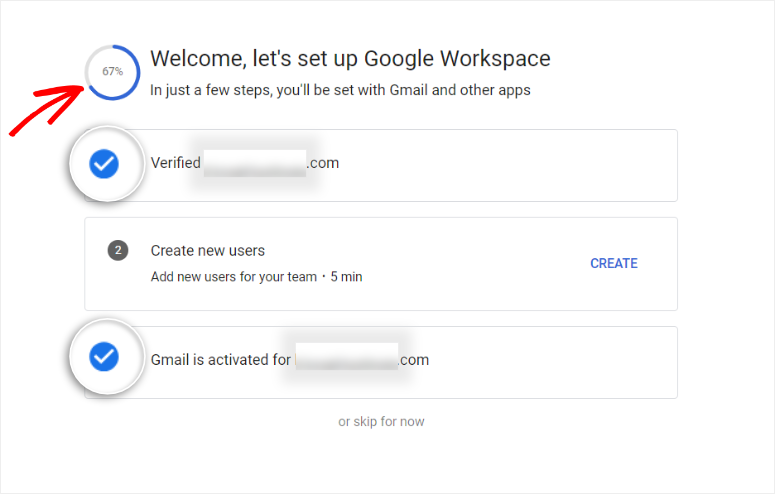
You will also spot a circle chart at the very top, displaying the verification progress. You can use this chart to gauge what else you need to do and how many steps you will need to take.
Step 3: Activate Gmail
With the domain verified, let’s proceed to set up emails to Gmail servers by selecting ‘Activate.’
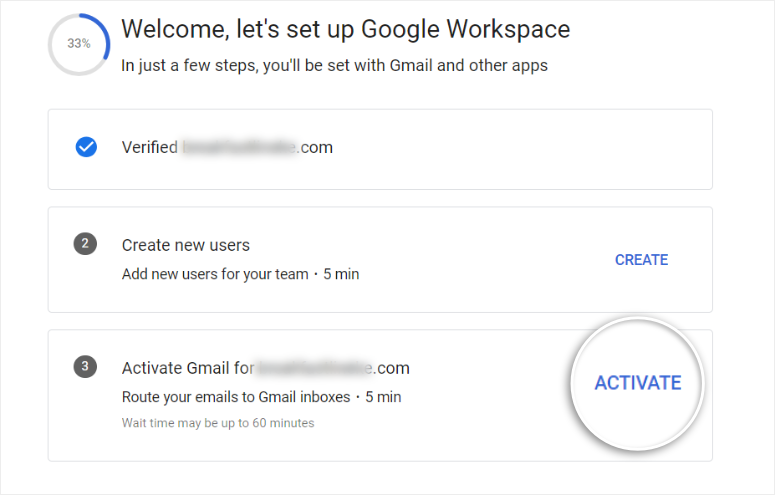
Google Workspace will then redirect you to the Activate Gmail process. The first page of this process is the Overview. Here, all you have to do is check the two boxes and select Continue.
This will take you to the ‘Route Emails to Gmail page.’ Here, you will be provided with instructions and codes to add to your Bluehost dashboard.
Again, we suggest you leave this page open to ensure you follow all the instructions and add the codes correctly.
Google Workspaces will automatically detect the domain host you are using and offer you better, customized instructions to complete the setup process.
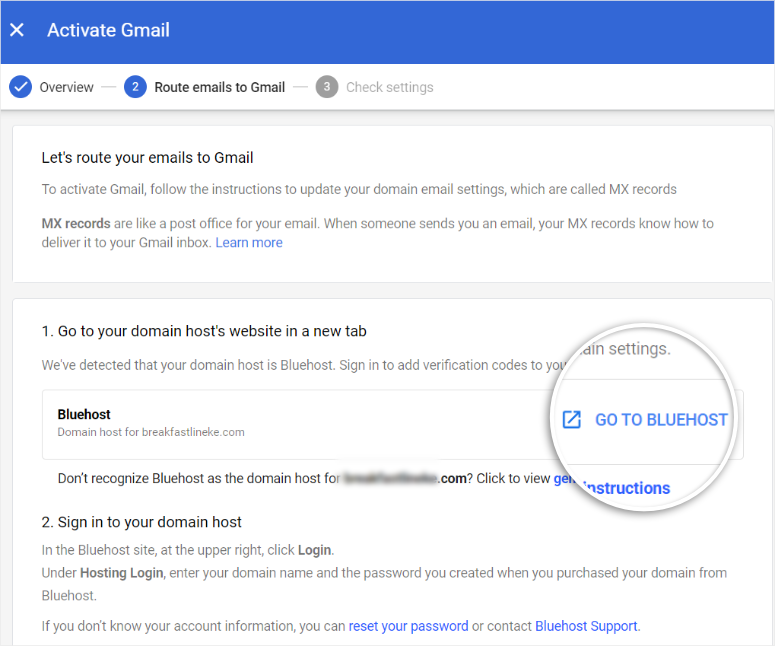
Carefully read the ‘Route Emails to Gmail page’ first before you do anything else.
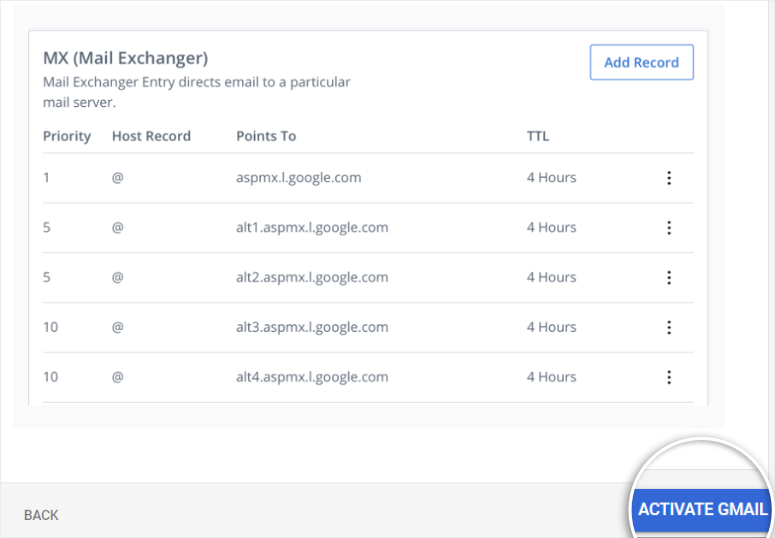
Remember, these steps can change, so it is important to use the current instructions displaced on the page. Once done, you will see 5 MX records displayed at the bottom of the page. You will copy these codes one by one and add them to your Bluehost dashboard.
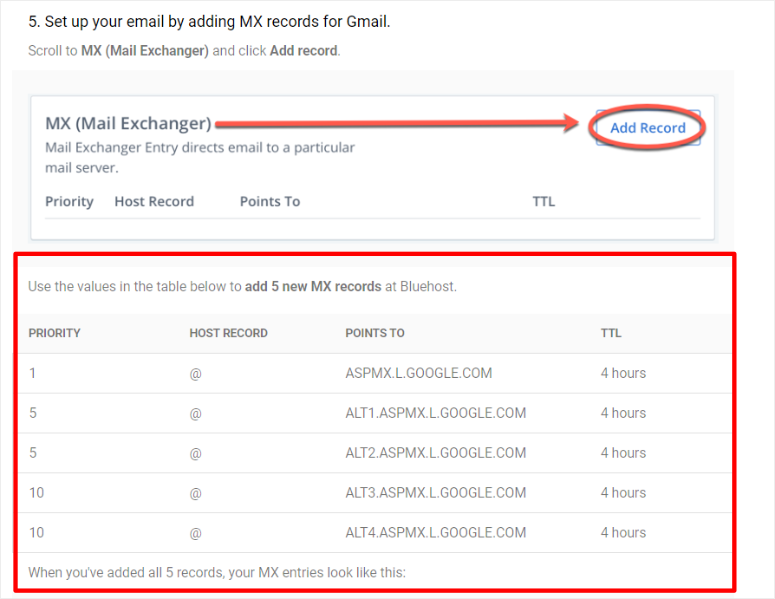
With your MX records ready and opened, proceed back to your Bluehost account. To change MX records, you will follow the same path you used above for TXT records.
That is:
- Go to Domains, then select the domain you want to use
- Select Settings.
- Scroll down to Advanced Settings and select ‘Manage’ Advanced DNS Records on the right.
- Finally, hit the Add Records button to open the ‘Advanced DNS Records’ popup.
Next, enter the first MX record from the ‘Route Emails to Gmail’ page, similar to the ones displayed in the screenshot above.
- Type: MX
- Refer to: @
- Mail Server: ASPMX.L.GOOGLE.COM
- Priority: 1
- TTL: 1 Hour
Once you have filled out all the fields, Select the Add button to connect the code to the MX records.
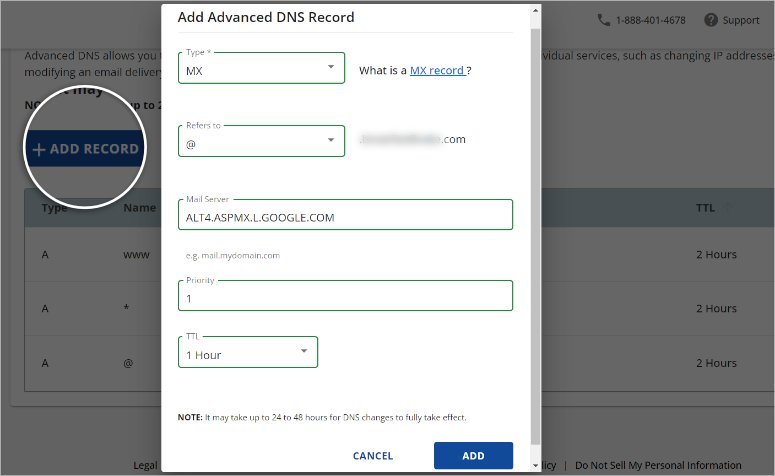
Remember that you have 5 MX records you still need to add. Follow the same process as above to add the remaining 4.
Once complete, delete any default MX records provided by your host so that the new Google Workspace servers do not conflict with them. After this, the final MX records should look similar to the screenshot below.
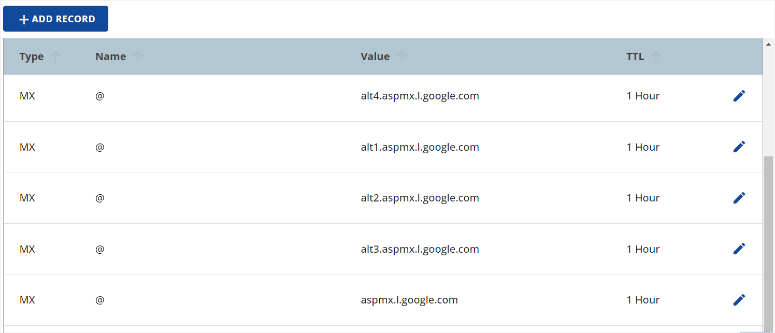
Now, head back to the ‘Route Emails to Gmail’ page in your Google Workspace dashboard and select ‘Activate Gmail.’
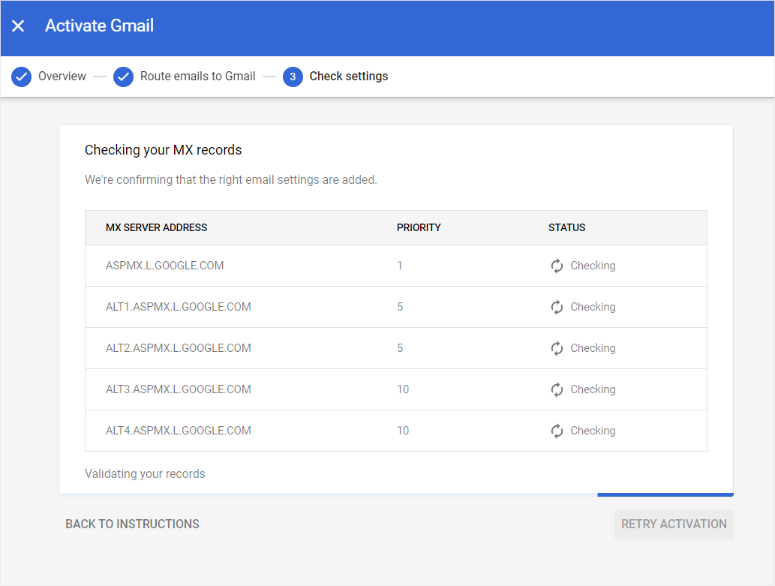
Next, Google Workspace will direct you to the Checking Settings page to confirm if you have followed the right process. It will check each individual server address and priority number. It will also check to confirm you deleted the default MX records from your host.
After the check is complete and every MX record is verified, the page will reload to direct you back to the Google Workspace setup page.
You will notice the progress chart has increased, and blue check marks next to your verified domain and Gmail activation, letting you know that the process was a success.
Google Workspace will then log you out automatically and take you to the admin.google.com login page so that you can start managing your emails from your Google Admin Console.
Remember that you should log in with the business email you have just set up. An ‘@gmail.com’ or personal email address will not work.
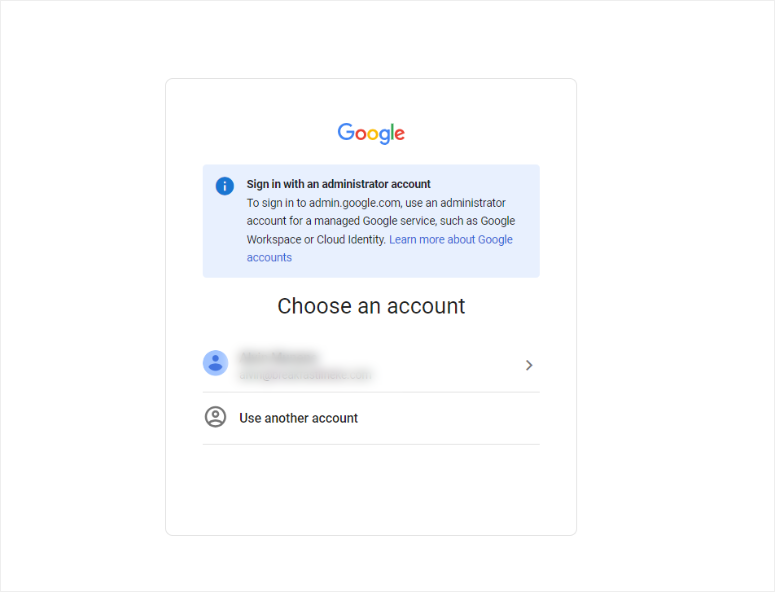
Once you have logged in to the Google Admin Console, you should confirm whether both the domain connection and Gmail activation were successful.
To do this, go to Domains » Manage Domains. On the right, you will see your domain listed. Check under the Status column, you should see the primary domain ‘Verified’ and ‘Gmail Activated.’
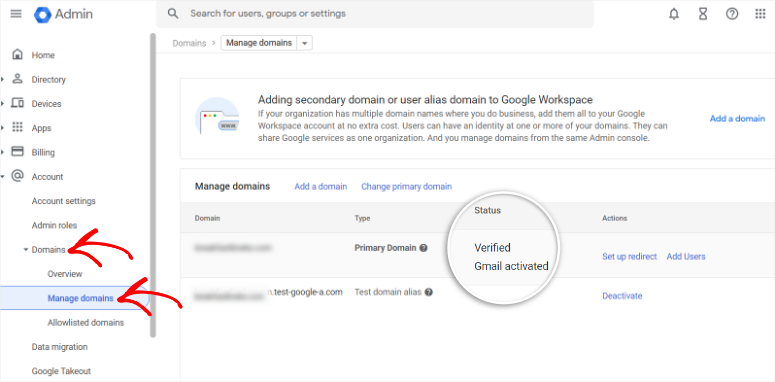
Congratulations! You have just set up your business email using Google WorkSpace. Now, the only thing left to do is to send and receive emails.
Luckily, it is super easy to access your business emails with Google Workspace.
All you have to do is log in the same way you would log in to any personal Gmail account. You will also find out that the inbox layout is similar to the personal Gmail inbox. From the layout, you can also add an email signature easily to ensure you look more professional.
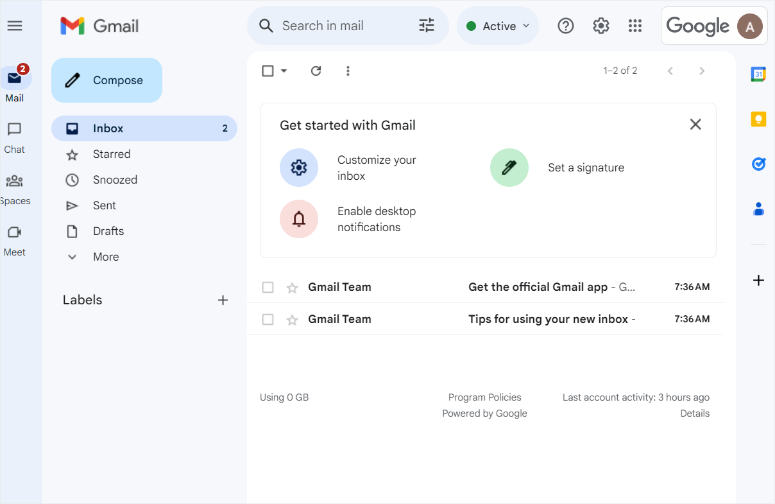
If you want to test if emailing is working, you can always send an email to your personal email and then send another from your personal email to your new business Google Workspace email.
Plus, you can easily access all of Google Workspace by selecting the App Launcher icon at the top right corner of your inbox, just as you would with your personal Gmail inbox.
You can use Google Docs, Sheets, Slides, Meet, and more. You can also access Google Ads, News, Saved, Jamboard, and more.
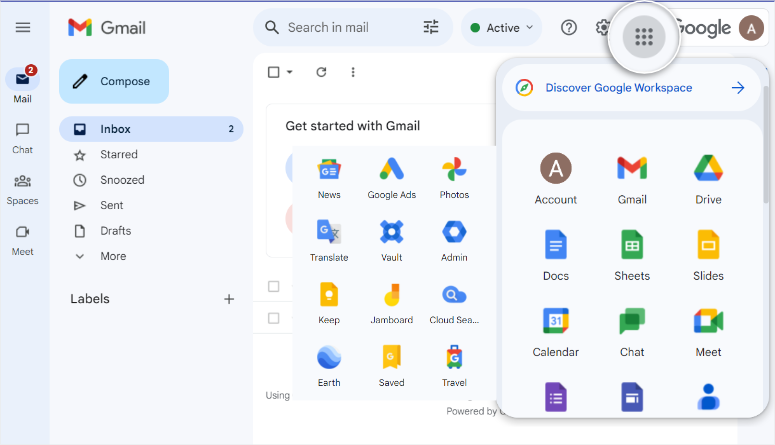
Well done! You have just created a business email with Google Workspace.
We hope you found this article helpful as you look for the best free business email account. If you have any more questions about business emails, check out the FAQs listed below.
FAQs: How to Create a Free Business Email
Can a business have a free Gmail account?
Yes, businesses can use free Gmail accounts, but Google also offers a paid service called Google Workspace with additional business features.
Can I convert personal Gmail to business?
Yes, you can upgrade your personal Gmail to a business account by subscribing to Google Workspace.
How much is a business email with Google?
Google Workspace plans start at $6 per user per month, offering professional email, collaboration tools, and other business features.
What is the daily email limit for Bluehost?
Bluehost’s email sending limit is 750 recipients per hour for the shared basic hosting plan. To
get the exact number of emails you can send daily, calculate 24 x 750 = 18,000 emails per day, per business email.
How do I increase my email quota on Bluehost?
To increase your email quota on Bluehost, you may need to upgrade your hosting plan.
Can I set up a free business email with Zoho Mail?
Yes, Zoho Mail offers a free plan suitable for small businesses and startups with basic email requirements. The free plan provides a limited number of email accounts, storage space, and essential email hosting features. However, the setup process can be a little complicated and may need some technical experience.
That’s it! We hope you have enjoyed learning about the best ways of getting a free business custom email address. If you want to learn more about how you can streamline your business better, here are 7+ Best Email Automation Tools to Improve Your Email Marketing.
To add to that, check out the articles articles as well.
- Brevo Review: Email Marketing Service on a Budget
- 10 Best Conference Call Services for Small Businesses
- 8 Best Email Marketing Services for Small Business
In the first article, you will check out the features and pros & cons of Brevo, a popular email marketing service. While the last two articles will teach you about conference calls and marketing services that can help grow small businesses.

Hey,thanks for sharing!But should we use such email for business purpose?
Yes, you can use it.
I am going to start a new business. This handy tips will helped me to create a free business email account. But doesn’t have any problem to use a free account?
so is there any way you can all of this for no money at all?
If you have an hosting account, like Bluehost, then you can set up a business email for free…
Please help me how to create email and website free to our new business