Building an auction site is one of the best ways to sell online. It provides a platform where both sellers and buyers have more control over the sale’s outcome.
Auction sites create competition amongst buyers which can lead to more engagement and interaction, spurring more sales.
If you want some evidence for this, all you have to do is look at eBay, the largest auction site in the world. This auction marketplace focuses on peer-to-peer selling and buying, resulting in a dependable and engaged eBay community of collectors and enthusiasts.
But even if eBay has the lion’s share when it comes to online auctions, there are still many opportunities and niches that you can venture into.
In this article, we will walk you through the steps to building an auction site like eBay and offer tips and tools to ensure a solid starting point for success.
Why an Auction Site?
As mentioned, the bidding system of auction websites creates more engagement and interactions on your site.
Think about it:
When you make a bid for something on an auction site like eBay, you check back to see if anyone else has outbid you. You also come up with strategies to win auctions, which often involves looking at past auctions on the site.
You can even look at other buyers’ profiles out of curiosity, even if it does not provide a significant advantage in the auction. On top of that, you may scroll through the site to find similar products in case you don’t win the current auction.
All your actions on the online auction site increase engagement and interaction rates. And remember, other people on the site are carrying out actions similar to yours. This can help the bid site grow by sending good SEO signals to Google.
Most importantly, bidding is fun and exciting.
Auctions are time-bound, meaning bidders must act quickly to secure the item they want. The timer that is always ticking on the page helps add to the urgency and excitement. It also helps to add FOMO to the selling process, further adding to the excitement.
In the end, you can discover new items and bargains that lead to more sales for the bid site. It is no surprise, then, that bidding and auctions are often considered addictive. And also partly why eBay has such a large community.
Here are other advantages of building an auction site. The best thing about building an auction site is that bidders, vendors, and site owners benefit from the platform.
Auction advantages to the bidders:
- Wider Selection: Bidders can find unique, rare, or hard-to-get items.
- Competitive Prices: They can get great deals through bidding wars or starting prices lower than retail.
- Convenience: Users can shop from anywhere, anytime, without needing to travel to physical auctions.
- Transparency: They can see detailed descriptions, photos, and seller history for more informed bidding.
- Secure Transactions: Reputable auction sites handle payments securely and offer buyer protection programs.
- Discovery: Find niche items or collections you wouldn’t encounter in traditional and normal online stores.
- Reviews and Ratings: They can quickly see past auction information, reviews, and ratings to make confident purchases.
- Variety of Auction Types: Bidders can choose from different types of actions, such as timed auctions, sealed bids, or reserve auctions.
Auction advantages to vendors.
- Competitive Market: Vendors can potentially sell their items for higher prices through bidding wars driven by interested buyers.
- Fast Sales: They can sell items quickly with a set end date for the auction.
- Reduced Hassle: Avoid the time commitment of yard sales or managing multiple individual offers.
- Targeted Audience: Reach collectors or enthusiasts specifically interested in your items.
- Seller Protection: Reputable sites like eBay offer fraud protection and secure payment methods.
- Detailed Listings: Vendors can quickly showcase items effectively with clear descriptions and high-quality photos.
- Marketing and Promotion: They can benefit from the site’s existing audience and marketing efforts.
- Clear Fees: Vendors can quickly understand the associated costs upfront before listing your items.
Auction advantages for the site owner.
- Place priority on site-owned items: The bidding site owner can prioritize their auction items to get more views and sales.
- Transaction Fees: They can add an additional income stream through commissions on vendor sales.
- Growing User Base: Attract buyers and sellers, creating a network effect for continued growth.
- Niche Markets: They can cater to specific categories or interests to build a loyal user base.
- Subscription Model: They can add an additional income stream through premium memberships with additional features for increased income.
- Data and Analytics: Gain valuable insights into user behavior and preferences to improve the auction platform.
- Brand Recognition: Quickly establishes the site as a trusted marketplace for buying and selling.
- Community Building: Foster a community of collectors, enthusiasts, and casual buyers.
Checklist for Building An Auction Site
Now that you understand the power of creating an auction bidding site, it is important to know all the requirements before starting.
- A domain name: This the web address of your website such as IsItWP.com or Google.com. Check out our guide on how to register a domain name.
- A web hosting account: This is where your site files are stored.
- SSL certificate: It enables a secure connection on your site for accepting online payments.
- An eCommerce plugin: This allows you to add the Buy Now button, support different payment gateways, offer item search, review, and much more. We always recommend WooCommerce, the best eCommerce plugin for WordPress.
- An auction addon: This eCommerce addon integrates auction features into your WordPress website.
Now, apart from the requirements for creating an auction site, there are also must-have and nice-to-have features that you should consider. These will help you get the most out of your auction site.
Must-have auction site features:
- Detailed listings
- Search and browsing capabilities
- Bidding functionalities
- Secure transactions
- Auction Status
- Reviews and ratings
- Secure user logins and accounts
- Inventory management
- Analytics
Nice-to-have auction site features:
- Multiple auction formats
- Watchlist
- Refined search
- “People are also interested in” section
- Live auctions
- Escrow services
- Loyalty Programs
- Multivendor site
- Fraud detection
- Community and forum features
With that out of the way, let us walk you through how to build your own auction site from scratch.
How to Build Your Own Auction Site
As the requirement checklist above shows, the first things you will need are a domain and hosting. But before that, you need to decide on the auction platform on which you want to build your auction site.
You can choose to build the auction website from scratch and code it from the ground up. But, this can be difficult and expensive for beginners and experienced experts alike.
You can also decide to build your auction site on platforms like Magento, Joomla, Drupal, and so on. But again, you may face difficulty in building your auction site, as you still need a level of coding experience with such platforms.
As a result, we highly recommend using WordPress, the best free and open-source content management system (CMS). It is the most widely used CRM for building websites, including eCommerce and auction sites.
Check out this comparison article between WordPress vs. Joomla vs. Drupal to get better context.
WordPress is also the best way to build an auction bidding site without touching a line of code.
Let us show you how.
Step 1: Set up a WordPress Self Hosted Site
Just like any website, you need to purchase a domain name and web hosting to set up an auction site. On top of this, you’ll also need to purchase an SSL certificate to provide a secure connection on your site so that you can accept online auction payments safely.
When you’re starting out, the combined costs for building the site may seem like quite a lot.
After all, a domain name costs around $14.95 per year, web hosting costs around $7.99 per month, and an SSL certificate costs $49.99.
That’s why we’ve worked out a deal with Bluehost to offer our users a free domain name, free SSL certificate, and 50% off their WooCommerce hosting. With Bluehost, you only have to pay $9.95 per month.
Plus, Bluehost is recommended as the best WordPress hosting provider by WordPress.org.
Click Here to Claim This Exclusive Bluehost Offer »
With Bluehost WooCommerce hosting plan, you can easily set up an auction site without any tedious WordPress + WooCommerce installation steps. You do not need to install WordPress or the WooComerce plugin, as they come preinstalled with the hosting plan.
For a detailed setup guide, you can check out how to set up an eCommerce site with WooCommerce.
You can also check out the latest Bluehost review here.
It is important to point out that you can use any hosting you would like from a different hosting company, not necessarily a WooCommerce or WordPress hosting plan. But, it does make it much easier to use such plans to optimize, run, and manage auctions.
To add to that, you should start with a shared hosting plan, before upgrading to a managed hosting plan after your site grows. This will help you scale in a more affordable way, and keep your earlier overhead cost low.
Step 2: Turn your Self-Hosted eCommerce Store into an Auction Site.
As mentioned, the WooCommerce plugin comes preinstalled with the Bluehost + WooCommerce plan. This automatically turns your site into an eCommerce site.
You can quickly confirm this by checking your installed plugins or finding the WooCormmerce menu option when you log into your WordPress dashboard.
The next step is to select a WordPress auction plugin.
Ideally, you can check the must-have and nice-to-have sections above to find a plugin that meets your needs. To add to that, here is a list of the 9 Best WordPress Auction Plugins to Build the Next eBay.
For this step-by-step tutorial, we went with YITH WooCommerce Auctions.
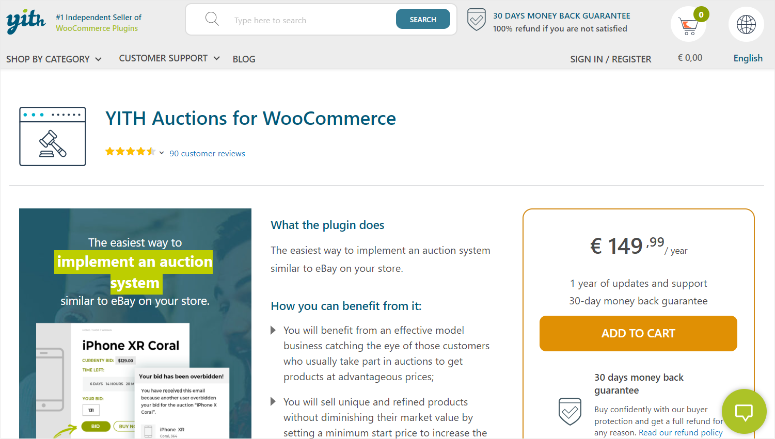
YITH WooCommerce Auctions is the best auction plugin for WordPress because it is easy to set up and use. It quickly integrated with WooCommerce so that you can fully use all the features of this eCommerce plugin to its full potential.
It also offers different types of auction types, a countdown feature, easy user management, and more.
YITH WooCommerce Auctions is a premium plugin, so sadly, it does not come with a free version to get you started. But, the silver lining is that YITH provides a live demo where you see how the WordPress auction plugin functions from a dummy WordPress dashboard.
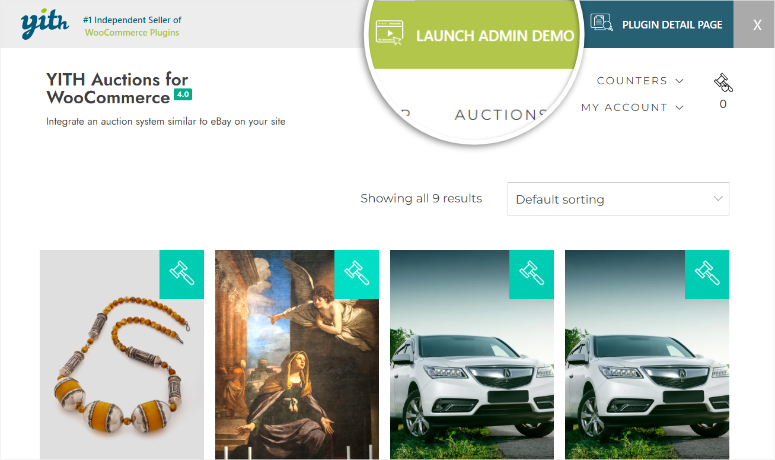
To get started with YITH WooCommerce Auctions, first purchase the plugin from its official site. Then, download the plugin’s ZIP file. While you are in your YITH account, copy the license key; you will need it to activate the plugin.
Next, log into your WordPress account and go to Plugins » Add New Plugin. Then, Upload, Install, and Activate the YITH WooCommerce Auctions plugin like you would any other plugin.
If you face any difficulties, check out this article on how to install a plugin.
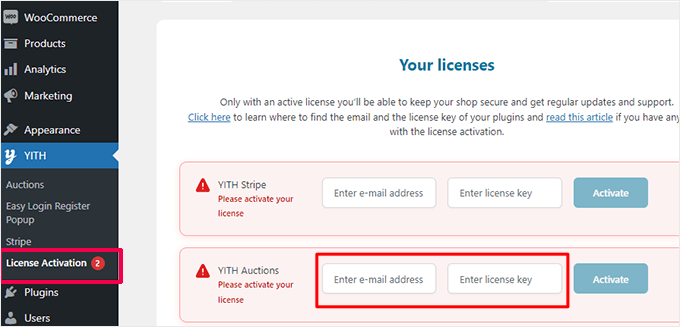
After activating the auction plugin, go to YITH » License Activation, paste the license key you copied earlier, and add the email address you used to sign up for the plugin.
Finally, select Activate, and you should be ready to use YITH WooCommerce Auctions.
Step 3: Configure YITH WooCommerce Auctions
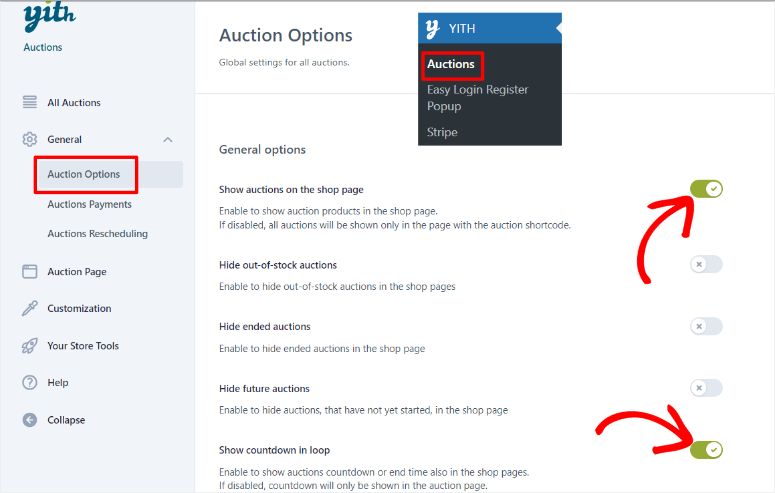
Now that this auction plugin for WordPress is ready to use, head to YITH » Auctions to be redirected to the configuration page.
On this page, first, select General and then “Auction Options,” where you can enable and disable the plugin features with toggle buttons.
By default, YITH WooCommerce Auctions has the options “Show Auctions on the Shop page” and “Show Countdown Loop” already enabled.
When these options are off, you can only show all auctions on the page with the auction shortcode, and the countdown will only appear on the auction page.
Once you decide if you want these options on or off, use the toggle buttons to set up the other options, which include Hiding Out-of-Stock Auctions, Hiding Ended Auctions, and Hiding Future Auctions.
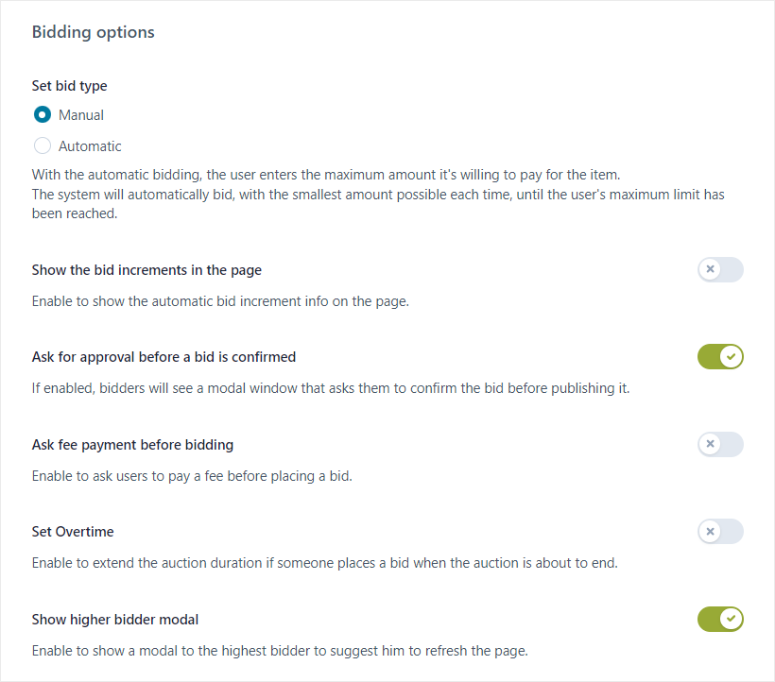
Below this, select if you want a manual or automatic bid type with checkboxes. Then, set all other features using toggle buttons. You can set up the plugin to:
- Show the bid increment on the page
- Ask for approval before a bid is confirmed
- Ask for fee payment before bidding
- Set overtime
- Show a higher bidder modal
Next, go to General » Auctions Payments to set up payment gateways.
First, you will have the option to turn on Stripe payments with a toggle button. But, this will require your users to add at least one credit card to place bids in auctions.
While credit card information can add a level of security, it is important to consider that it can discourage others from using your site. This is especially true if the user is new to your bidding website.
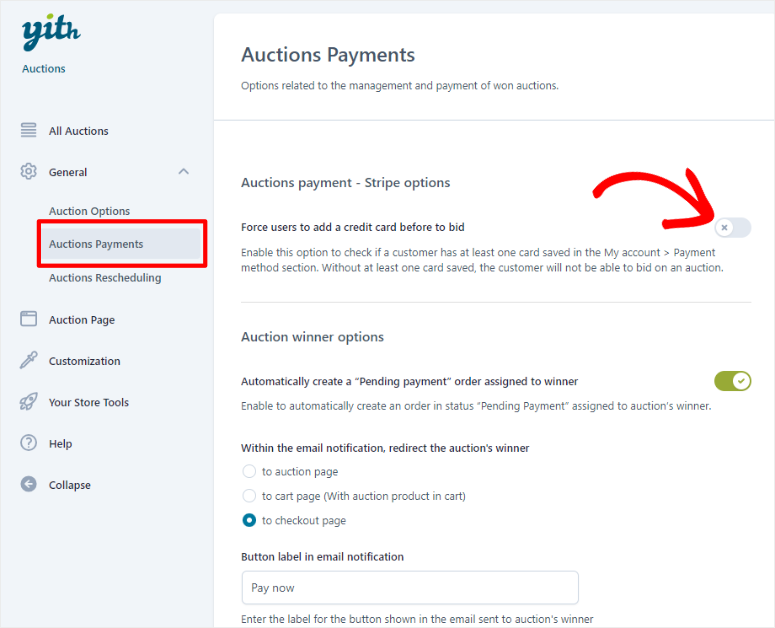
If Stripe payments remain off, YITH WooCommerce Auctions will use Woocommerce payment gateways by default instead.
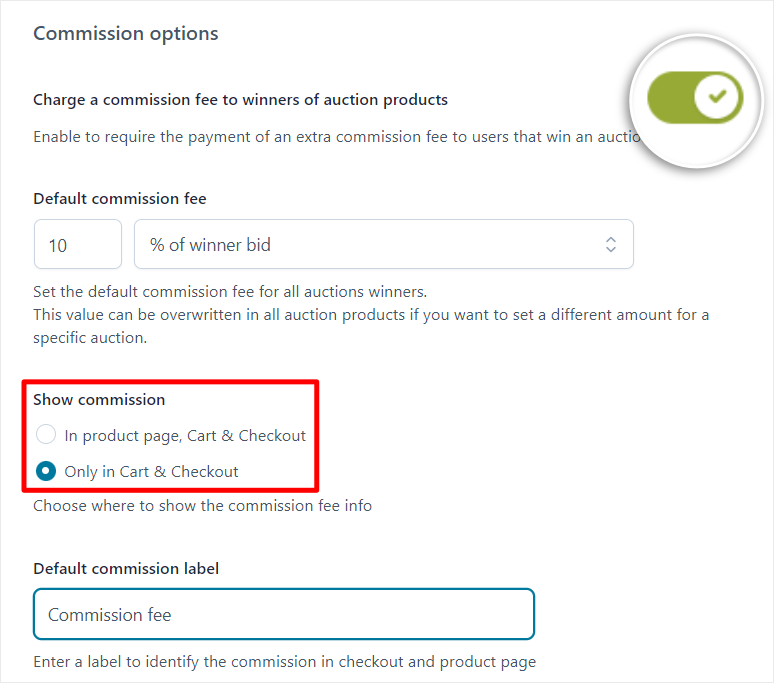
On the same page, Scroll to “Commission Options.”
First, you can enable “Charge a Commission Fee to the Winners of Auction Products” using a toggle button. This will charge the auction winners an additional commission fee, resulting in more revenue for you.
Then, set the Default Commission Fee and where you would like it to be displayed to the winner. You can either display the commission amount on the Product Page, Cart & Checkout, or Only in the Cart & Checkout.
After this, customize the Default Commission Label from “Commision Fee” to something more personalized for your audience.
Below this, set up “Auction Winner Options.”
Here, the first thing you will do is switch on “Automatically Create a Pending Payment Order Assigned to Winner” with a toggle button.
This will automatically create a pending payment order for the auction winner, which is a great call to action and a way to show the user the next step they should take.
At this point, you can also specify where the email notification sent to the winner should direct them. It can be to the Auction Page, the Cart Page or the Checkout Page.
Then, if you want, you can customize the email notification button label from “Pay Now” to something else more ideal for your audience.
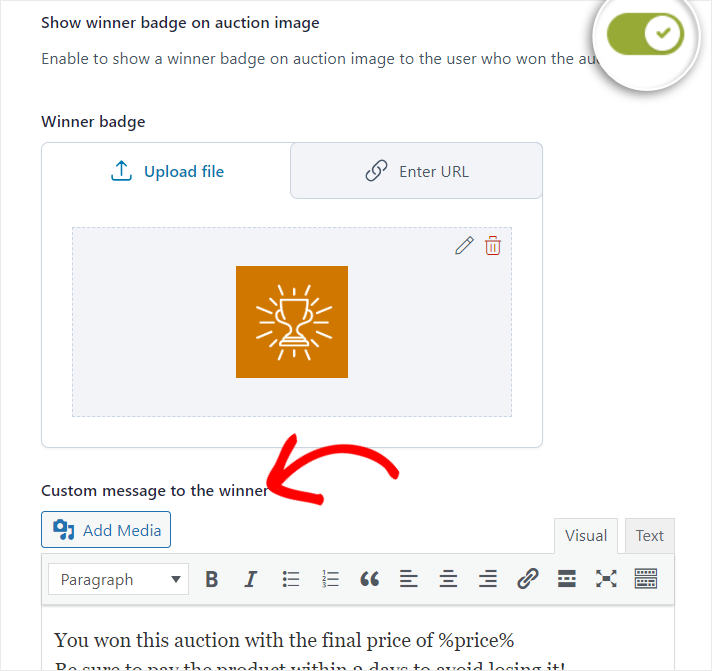
Now, with the winner notification set up, enable the Winner’s Badge with a toggle button and upload the badge image to be displayed next to the winner’s avatar and profile.
Finally, customize a message to the winner, congratulating them for winning the auction and offering the next steps in detail.
Step 4: Add Auction Products
When adding products to your auction site, you will experience the YITH WooCommerce Auctions and WooCommerce integration at full effect. You will see how easy it is to add your auction products using WooCommerce.
There are two ways you can add a product to your auction site.
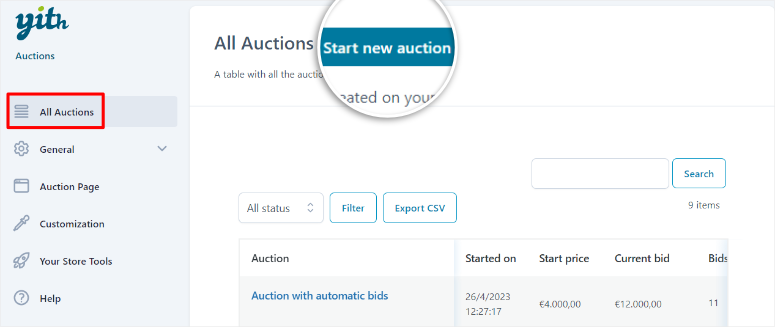
The first way is to go to YITH » All Auctions, and then select “Start New Auction.”
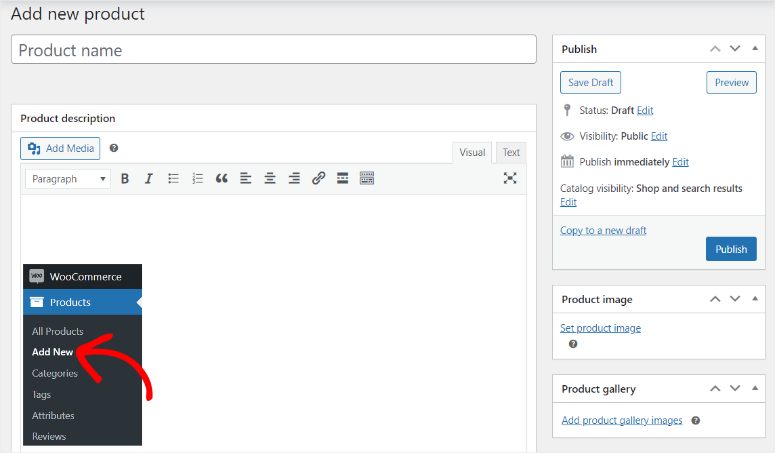
The second way is to go to your WooCommerce menu option in your WordPress dashboard and select Products » Add New.
Both of these routes will take you to a new WooCommerce product page.
The best thing about a WooComerce product page backend is that it looks very similar to the default WordPress post or page backend. As a result, you will not experience a learning curve, ensuring you can start building your auction product pages right away.
So first, you will add a Product Name, Product Description, and Product Image. You can also add a Product Gallery, Product Categories, and Product Tags to help with SEO and user navigation.
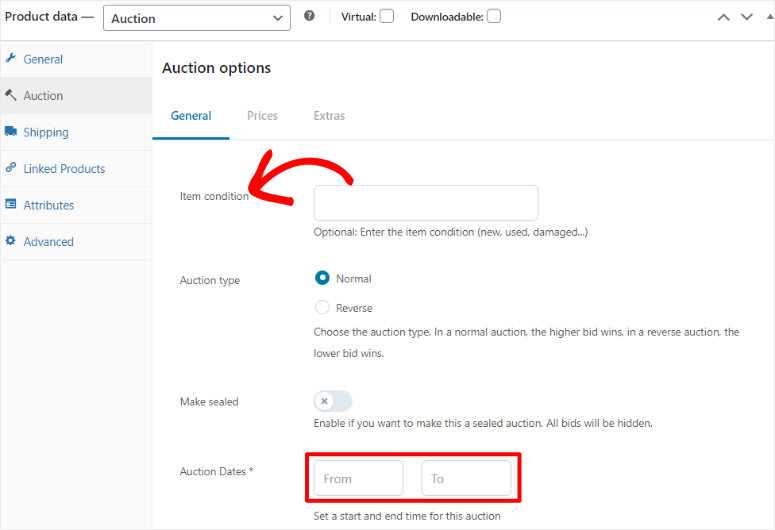
When this is set up, scroll down the page to find the “Auction Options.”
Then, in the “General” tab, add the “Item Condition.” You can set the condition to New, Used, or Damaged. Below this, use a checkbox to set the auction to “Normal” or “Reverse.”
Use a toggle button to enable or disable “Sealed Auctions.” Finally, set the Auction Dates to add the auction’s duration.
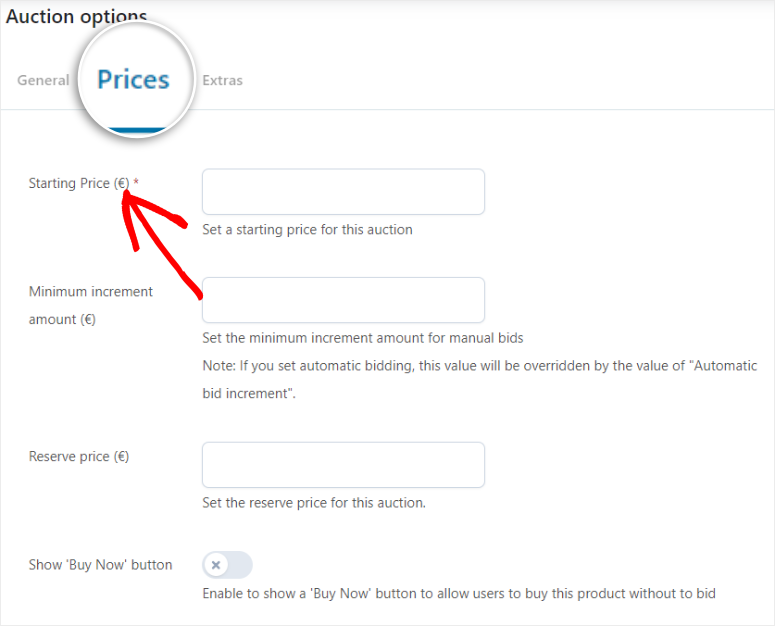
Next, move to the “Prices” tab and set the Starting Price, which is a compulsory option. Then, you can decide whether to add Minimum Increment Amount and Reverse Price options for the auction.
You can also add a “Buy Now” button to the auction for people who want to purchase the item without bidding.
When you are happy with your auction product page, hit “Publish,” and the page will go live in your WooCommerce shop.
All the Auction items will be highlighted with an icon, meaning you can also sell other items the traditional way, all on the same Woocomerce page.

But this can be confusing for people new to auction bidding websites. They may end up trying to bid for an item that is up for sale.
Luckily, YITH WooCommerce Auctions makes it easy to separate auction products and other products on sale.
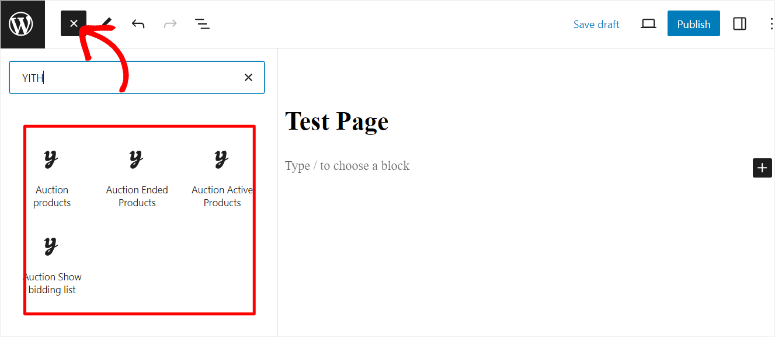
All you have to do is create a new page by going to Pages » Add New Page. Then, on the new page, use the Plus(+) icon to open the block search bar.
Here, type in “YITH,” and you will see 4 blocks: Auction Products, Auction Active Products, Auction Ended Products, and Auction Show Bidding List.
You can drag and drop these YITH blocks to where you want the products to appear on the page and hit “Publish” when you are done.
And just like that, you have created and set up your auction site.
Step 5: Manage Your Auctions
The YITH plugin enables you to choose an auction start time on your product page. That way, you can choose the best time to list and end your auction.
Once the auction begins, any registered users can bid on an item. In the individual auction pages, you can see the following details by default: the current highest bid, time left, the auction end time, and the bid button.
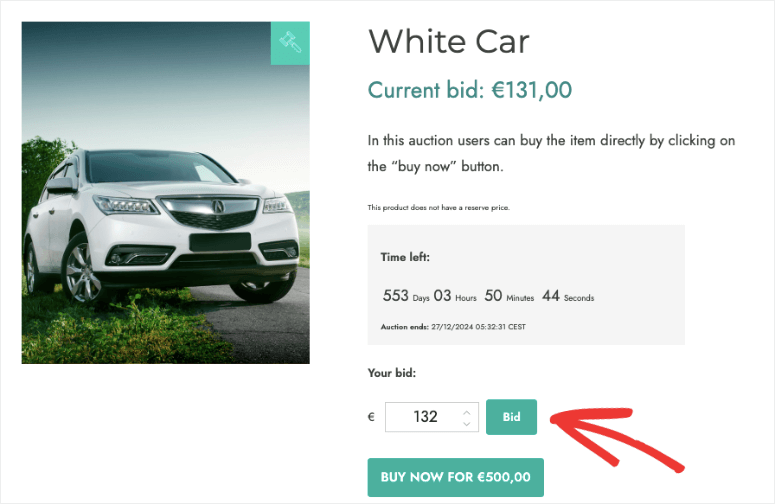
Below the listing, you can also find the details of previous bids, including the username, bid amount, and bid time.
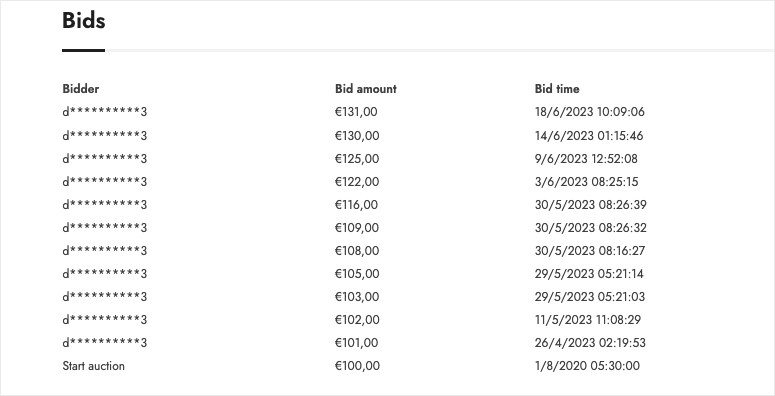
The main benefit of the YITH plugin is that it gives you full control over your bids. You can easily remove any bid in your auction listing page by logging into your WordPress dashboard. All you need to do is select Delete Bid on what you don’t want to display on your auction page.
You can also set a “Buy It Now” price in your auction listings. This allows users to purchase your items right away.
All users who participated in an auction will receive email updates for each new bid, auction grace time, auction end, and more. When the auction item ends, an email will be sent to the auction winner to complete the payment for purchasing the product.
Step 6: Turn your Auction Site into a MultiVendor Marketplace
At this point, your auction site is ready. But if you want to allow other users to also sell products on your site, you can turn it into a multivendor marketplace.
YITH offers a premium multivendor plugin called YITH WooCommerce Multi Vendor / Marketplace. This plugin is great because it comes with features to fully automate vendor management and create passive income.
But, it can be pricey for beginners, especially if you also have to purchase the YITH WooCommerce Auctions plugin as well.
Luckily, there are plenty of affordable and free options that will give you just as much flexibility and control over your vendors.
For this reason, we recommend WC Vendors.
WC Vendors is an amazing auction plugin for WordPress that also allows you to turn your site into a multivendor site with full control over vendors. You can customize every aspect of each vendor and even create different-tier memberships in a user-friendly way.
The best part is that WC Vendors offers a free plugin that can help you set up a multivendor store. But you will need the pro version to unlock all the multivendor features.
To get started, head to your plugin repository in your WordPress dashboard and install and activate the plugin.
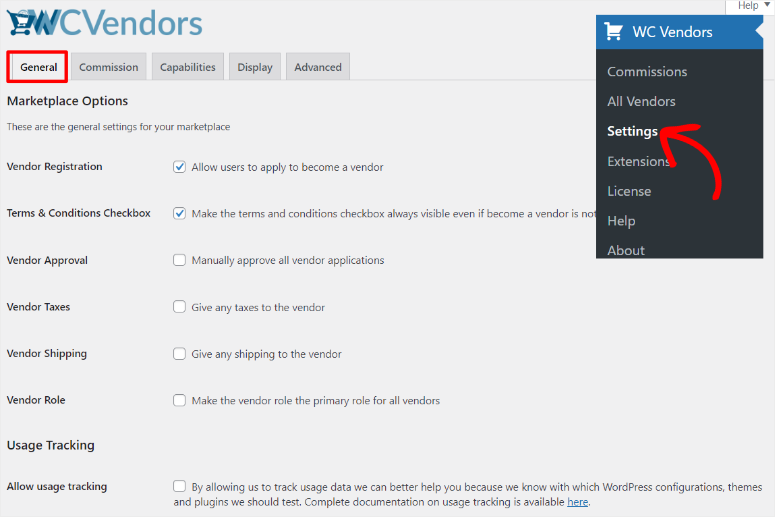
Then go to WC Vendors » Settings and select the “General” tab.
Here, you will use a checkbox to allow users to apply to become vendors. You can also set up the application process so that you can manually approve all members. Then, go through all the other options and use the checkboxes to enable or disable the features.
In the next tab, Commissions, set the global vendor commission in percentage to help you build a passive income stream.
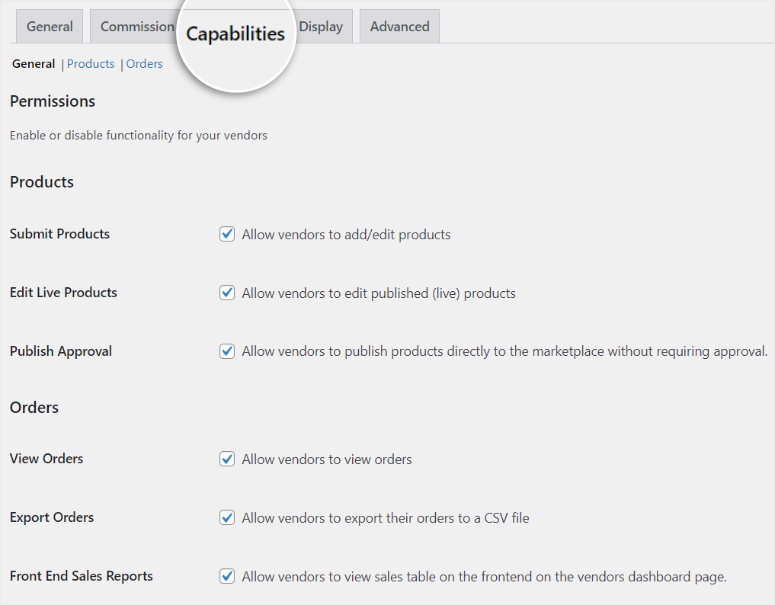
Then move to the Capabilities tab and set the functionalities the vendors will have on your auction site.
Here, use checkboxes to enable or disable vendors’ ability to add or edit products, edit published live products, and publish products directly to the marketplace without approval.
You can also go through all the other options available and use checkboxes to activate or deactivate the vendor functionality.
Once you are happy with the permissions you have provided to the vendors, move to the “Display” tab, still on the same page.
On this tab, you will find pages that will appear on a vendor’s front end.
You will see the Dashboard, Shop Settings, Orders, Vendors, Terms and Conditions, and Orders per Page. If you would like to change any of the pages or remove the ones displayed, use the dropdown menu next to each vendor page to delete or select another.
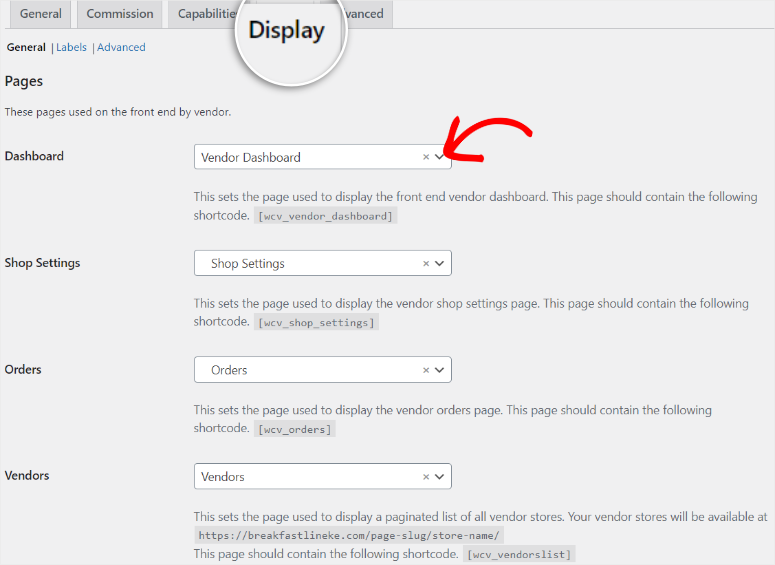
Below this, customize the Vendor Store URL, then use checkboxes to activate the other options. These options include options to display a Shop Header, a Single Product Header, a Shop Description, and many more.
When you are happy with the vendor pages that will appear in their dashboard, hit Save Changes.
Now it’s time to display the account registration option in your navigation bar.
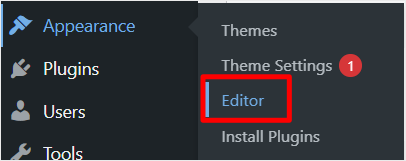
This will allow your users to sign up as vendors directly on your homepage. To do this, go to Appearance » Editor in your WordPress dashboard.
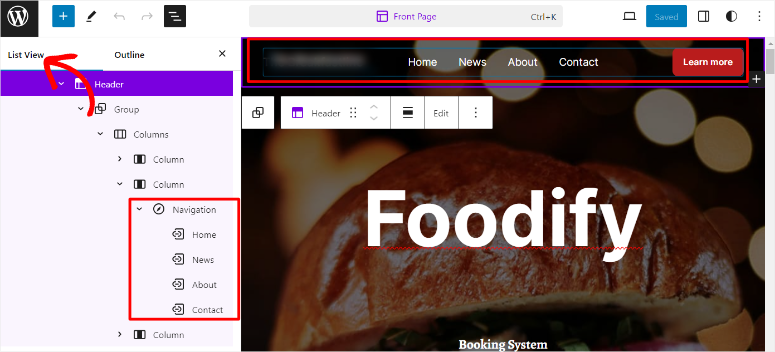
In the Live Editor, select the specific header you want to edit. It might be called “Header Top,” for example. This will open up the header options for customization.
Then, select “List View” to see all the groups and sections that make up your header. Next, locate the “Navigation” section and expand it.
You will see existing links like “Home,” “About,” and “Contact” displayed here like in our example below.
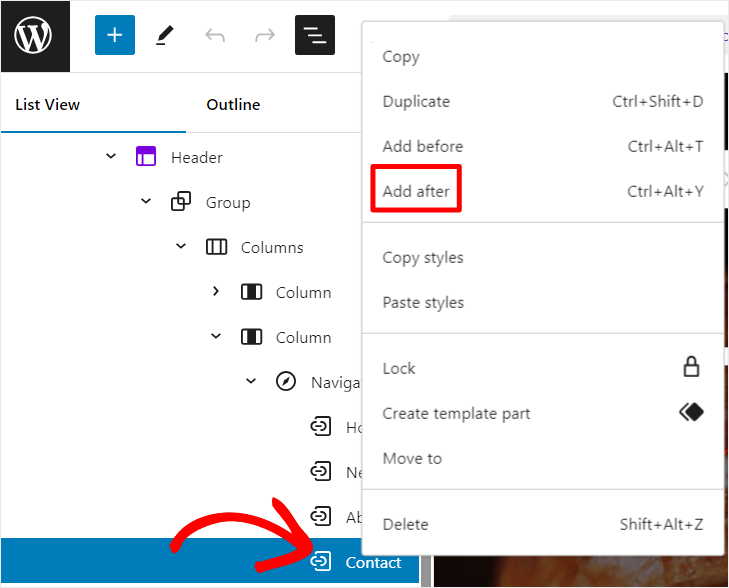
After this, right-click on any existing link in the navigation, such as “Contact,” to open the menu options. Choose “Add After” to insert the “My Account” navigation link right next to Contact.
When this is done, a new window titled “Add Link” will appear in your Live Editor. Use the search bar provided under “Add Link” in your Live Editor to find the “My Account” page and select it.
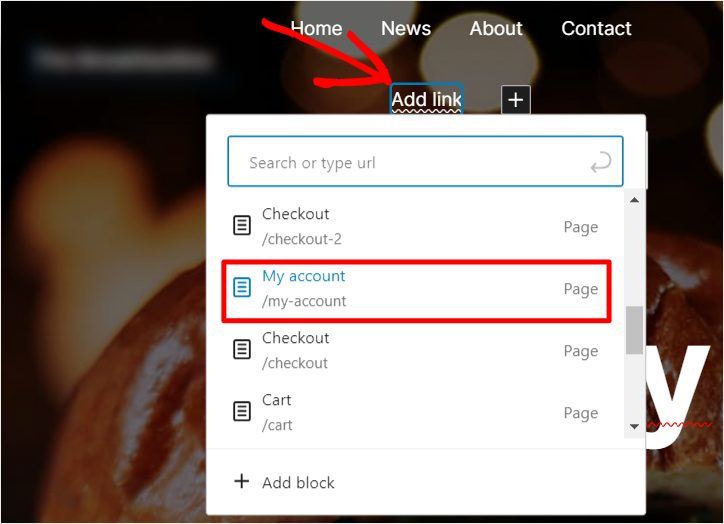
Once you’ve chosen the “My Account” page, simply hit “Save,” and your changes will be reflected on the live website.

Visitors can now register as vendors by selecting the “My Account” link conveniently located in your header menu.
They will also find all the pages you set up for vendors in their account, helping them manage their auctions.
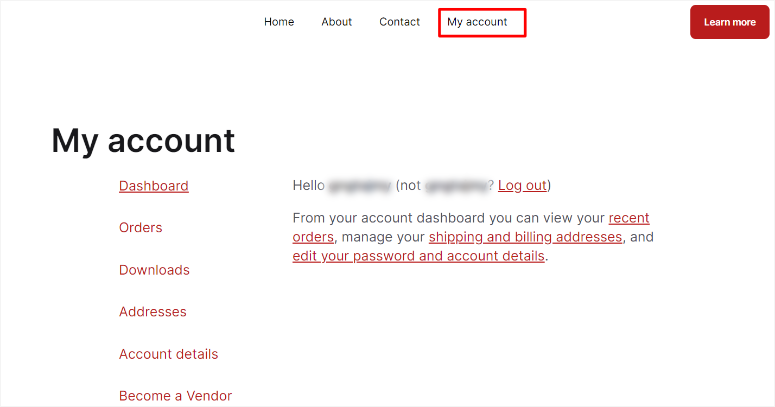
Bonus: You can also create a vendor-specific dropdown menu under “My Account.”
This will give your users more navigation power, allowing them to find exactly what they are looking for right from your home page.
To do this, simply repeat the process above you used to add the “My Account” navigation link to your header. Place the pages you want to add to the dropdown under “My Account.”
For example, you can add the Vendor Dashboard and Shop Settings pages under “My Account.” To make them part of the “My Account” dropdown menu, you just have to drag and drop them into the My Account menu option.
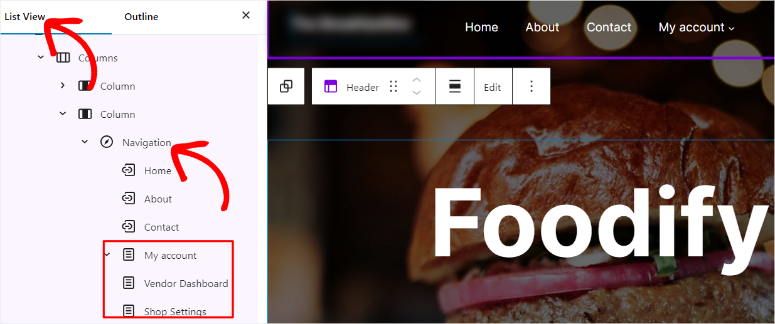
When done, select Save for the changes to appear on the live page.

For more details, you should read this article on how to build an online marketplace in WordPress.
Congratulations! You can now create an auction site and turn it into a marketplace. But, to fully utilize your auction site’s potential, we recommend installing the following plugins.
Recommended Plugins for WordPress Auction Website
Now you know how to build an auction website with WordPress. Let’s check out some of the best plugins you’ll need to install on your site after setting up the auction site.
- WPForms: WPForms allows you to easily use any kind of form on your site, including contact forms, PayPal forms, event registration and login forms, and more. It also comes with automated email notifications. Read our WPForms review.
- MonsterInsights: MonsterInsights is the best Google Analytics plugin for WordPress. With MonsterInsights, you can easily install Google Analytics to track visitor interactions on your site. Read our MonsterInsights review.
- OptinMonster: OptinMonster is the best lead generation plugin. It lets you easily convert your visitors into subscribers and customers. You can create time-sensitive behavior-based campaigns to drastically reduce overall cart abandonment rates and boost sales. Read our OptinMonster review.
- All in One SEO: Improve your WordPress SEO with All in One SEO (AIOSEO). AIOSEO comes with powerful features like local SEO, TruSEO on-page analysis, SEO audit checklist, and more. Read our AIOSEO review.
- WP Super Cache: Improve your WordPress site’s performance by installing the best WordPress caching plugin. Read our WP Super Cache Review.
Great! Now you have all the information and tips you need to build a successful auction site. If you have any more questions, check out our FAQs below.
FAQs: How to Build an Auction Site With WordPress
What is the most popular type of auction?
An English auction is the most popular type of auction. Bidders openly place higher bids in a competitive environment. The highest bid at the end of the auction wins. It is widely used because of its transparency and simplicity, making it easy for participants to understand and engage.
What is the first price auction?
In a first price auction, all bidders submit sealed bids without knowing the bids of others. The highest bidder wins the auction and pays the exact amount they bid. This type of auction is commonly used in government contracts and online advertising because it encourages strategic bidding.
Can Shopify do auctions?
Yes, Shopify can help with auctions through third-party apps like “Auction Pro” or “Simple Auctions.” These apps integrate with your Shopify store to add auction features, allowing you to list items for auction, manage bids, and handle the auction process directly on your Shopify site.
How do I improve auction site SEO?
To improve auction site SEO, start by optimizing product descriptions with relevant keywords to ensure search engines can easily index your content. Use high-quality images and descriptive ALT texts to enhance search visibility. Ensure your site has fast loading times, as speed is a crucial factor for SEO. To add to this, create engaging content such as blogs, guides, and FAQs to attract more visitors and improve your site’s authority.
Can an auction site bring in passive income?
Yes, an auction site can generate passive income through various revenue streams. You can charge listing fees to vendors who want to auction their items. Another way to generate income is to earn a commission on each sale. To add to this, you can display ads on your site to generate advertising revenue. The key is to attract regular traffic and maintain an active user base to ensure a steady flow of income.
That’s it. We hope you enjoyed learning how to create a bidding site. You may also want to check out our articles on how to create a micro job site like Fiverr.
To add to that, here are other articles you may be interested in reading.
- 9 Best WordPress Auction Plugins to Build the Next eBay
- How Much Does It Cost to Build a Website? (Expert Answer)
- 6 Best eCommerce Platforms for Multivendor Marketplaces
The first post lists the 9 best WordPress auction plugins to help you build the next eBay. The next article explains the cost of building a website in detail. While the last post walks you through the 6 best eCommerce platforms to help you build a multivendor marketplace.

i really would like to create a website and i do not want to list items on it, i just want to show the results from other auction website. which plug should i use
Hey, you can take a look at our best WordPress auction plugins guide. There you’ll find different plugins to import results from other sites like eBay.
Question: What currencies can be used?
Hi,
I’m planning to start a Auction cum E com site. I would be registering the domain soon. Can you let me know what needs to be done after that to make the site up and running.
You can follow the step by step provided in this tutorial.
Is it possible to have something like a homebroker (stock market), where people buy and sell goods constantly, building a supply/demand environment that affect the price every time and have it updated realtime?
Question: When you add a vendor, is it only WP Vendors that are allowed. I mean what if someone built a website/store, out side of Wp?woocommerece, stocked with handmade items can they still be signed up as a vendor?
It doesn’t matter what your vendor’s site is made of. Anyone can sign up on your auction site and list their products because auction and sale happen on your site.