Do you want to publish podcasts on your WordPress site? Podcasts can help you reach out to new audiences. You can encourage your site visitors to subscribe to your series and regularly listen to them. That way you can build a long-lasting relationship with your listeners and possibly convert them into leads and customers.
In this article, we’ll show you how to start a podcast on your WordPress site in a few quick and easy steps. So let’s begin.
Step 1: Making a Podcasting in WordPress: Getting Started
Having a blog would be an added advantage if you want to run a successful podcast series. Blogging is more than just a supplement to the podcast. It’s even more accessible than podcasts itself, especially if you transcript them and publish on your blog. Plus, blogging can also give you a massive boost in your credibility.
An important step while setting up your WordPress blog is to select a domain name and good hosting platform.
A domain name is the address of your blog on the internet, like Google.com or IsItWP.com. Web hosting is where people store the content and files of their blogs.
We recommend opting for BlueHost, one of the leading web hosting providers on the market. Bluehost is also an officially recommended web hosting provider by WordPress.org.
When you want to start a new blog, the combined cost of domain and hosting can seem like quite a lot.
That’s why we’ve worked out a deal with Bluehost to offer our users a free domain name, free SSL, and over 72% off on WordPress hosting.
Click here to Claim this Exclusive Bluehost Offer »
If you do not have a blog yet, here’s a guide on How to Start a WordPress Blog (step-by-step).
Step 2: Set Up a Media Host to Create Podcasts
Generally, your podcasts are huge media files that need to be hosted on a reliable platform. So your next step would be to select a good media hosting platform. You might be wondering why would you need a separate host for your media files and not use Bluehost for it.
Well, that’s because you don’t want your website to slow down and become unresponsive due to the consumption of a huge amount of server resources. Media hosting platforms will take care of that and ensure that your website always performs faster.

To get the best results, you can opt for Blubrry which is a podcast specific media host. Blubrry also offers an excellent plugin called Blubrry PowerPress that simplifies the process of handling and managing your podcasts from WordPress.
Step 3: Choosing the Right Equipments
Now that you are ready with your podcast hosting, it’s time to select the right equipments for your podcast setup. The most important equipment for podcasters is a good quality microphone.
If you need an entry-level solution, you can buy Samson CO1U (USB). This is the industry’s first USB studio condenser mic, which helps you record high-quality podcasts by plugging directly into your computer via a USB port.
Alternatively, you can use Heil PR-40 (XLR connection, not USB), which is what professionals use. For this one, you will also need to buy an audio mixer.
Other than that, you’ll need –
- Mic arm
- Shock Mount
- Pop Filter
- Headphones
Let’s now check out the next step.
Step 4: Recording Your First Podcast
To start recording your first podcast episode, you’ll need an audio recording software. Audacity is one of the most popular recording software that you can use.
With Audacity, you can easily record your files and edit them as well. Once you install it, open the software » File » Start a new project. That’s it. You can now click on the Record button and start recording your podcast.
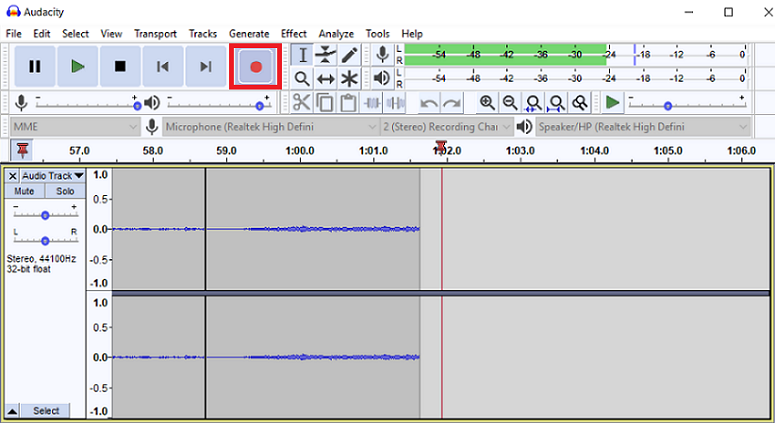
You can edit your file and refine it for your listeners. Remove awkward pauses, coughing, sneezing or anything that you think is unnecessary.
You can also add some background music if you want. For adding background music, go to File » Import. You can then browse through your music files and add the one you like.
Because Audacity is a tool with an extensive list of features, it’s not possible to cover its features in this tutorial. However, you can go through its wiki tutorials to have a detailed insight.
After recording, the next thing you need to do is to export your file. Generally, podcasts files are exported in the MP3 format. By doing that, the files are secured in superior quality and in smaller file sizes. Name your file and save it on your computer.
Step 5: Publishing Your Podcast with WordPress
To publish your podcast on your WordPress website, first log into your admin area. The second step is to go to Plugins » Add New » PowerPress Podcasting plugin by Blubrry.
PowerPress is a free plugin that makes publishing podcasts on your WordPress site super easy. Once the plugin is installed and activated, go to your PowerPress dashboard » Settings. Now click on the Configure Blubrry statistics and hosting services button.
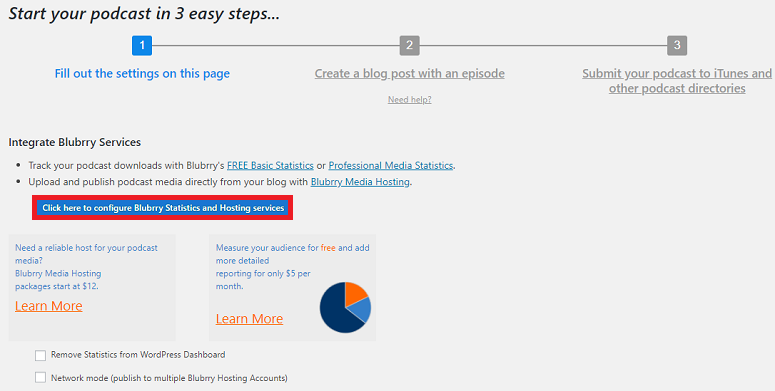
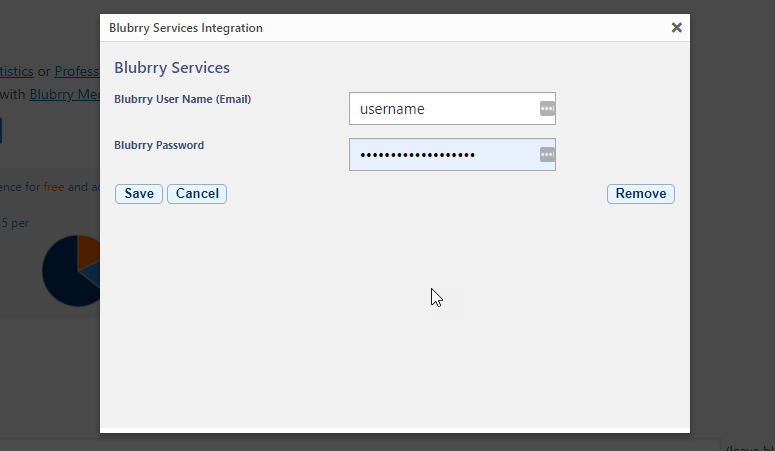
You will have the following window on your screen. Here you will have to enter your Blubrry hosting account details.
Scrolling further down the page, you will see more options. Fill out these fields. The plugin will use the information in your podcast’s RSS feed. Then, this information will be used by iTunes to add your podcast to their directory.
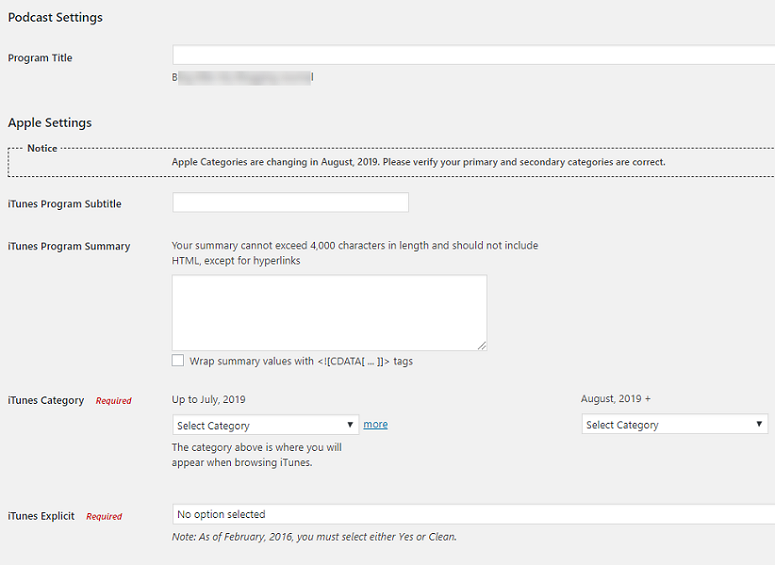
Save the changes that you just made. Your website is all set to start publishing your podcasts now.
Step 6: Adding Media files to your Podcast Hosting
You are not ready to publish your podcasts unless your recorded files are uploaded to your media hosting service. To upload your files, log in to your Blubrry hosting account » Podcaster dashboard » Upload New Media Files.
You will now have the option to Upload New Media. Click on it and start uploading the files that you have previously saved on your computer.
Step 7: Adding Your First Podcast to WordPress
It’s now time to add the podcast to your WordPress website. So go to your WP dashboard » Posts » Add New Page. Add a catchy title and description to your podcast. You’ll also have to create a new category for your podcasts.
Now scroll down and find the Podcast Episode option.

You’ll see an option called the Media URL. Use the icon next to this option to upload the media files that you just uploaded in your Blubrry media. If you are using a different hosting, you can click your URL in the blank field. Now hit the Publish button on your right.
That’s it! Your podcast is live now.
Before you go, here are some additional WordPress plugins to help you improve your podcast website:
- WPForms – Add a contact form to your blog so listeners, guests, and advertisers can get in touch with you. Plus, use the file upload feature to allow users to submit audio files.
- All in One SEO – Easily optimize your website for search engines so that your podcast can get discovered by more people online.
- MemberPress – Make certain episodes available to members only by creating a membership site. Users can become members by creating a free account or by paying a subscription fee.
- MonsterInsights – Monitor your website activity in real-time right from the WordPress dashboard.
- Smash Balloon – If you record and upload podcast episodes to YouTube, you can easily embed a beautiful YouTube feed on your website with Feeds for YouTube Pro.
- Pretty Links – Get neat memorable links that you can share on your podcast to drive affiliate revenue.
We hope this article helped you start a podcast on your WordPress site. If you want to know about more WordPress Podcast plugins read our post on 12 Best WordPress Podcast Plugins Compared (Free & Premium)
Also, you can check out our guide on How to Create A Podcast Landing Page if you want to boost your conversions for your podcast.

Comments Leave a Reply