
Do you want an easy way to enable and disable maintenance mode whenever you need?
Maintenance mode will hide your site from visitors while you run updates or fix broken pages. You can carry out all sorts of tasks like tweaking website settings, changing your theme, or adding more plugins without completely shutting down your site.
Without maintenance mode, visitors may see broken pages and have a bad experience with your site. So, if you want to look professional, you need to set up a stunning landing page to display while your site is down.
Now, at IsItWP, we are always looking for ways to improve our site for you. This includes changing the layout, themes, and site design. Sometimes, these changes are major updates that require us to place the site in maintenance mode.
As a result, we have tested and used several methods to place our WordPress website under maintenance. For example, we have used a custom page template, the built-in WordPress maintenance mode, a maintenance plugin, and our cPanel.
From our experience, we have discovered 3 of the best and easiest ways to do this.
In this easy guide, we’ll show you how to put your WordPress website in maintenance mode using a plugin and without a plugin. We will also show you how to place your site in maintenance mode with a free and premium plugin.
Why You Need a Maintenance Page on Your Site
Maintenance mode allows you to hide your site when things aren’t perfect. Maybe you have scheduled maintenance time, or you found broken pages on your site that you need to fix.
Your site could be experiencing a server update from your WordPress hosting provider. These updates run in the background but could slow down page load speed. That means a bad user experience; nobody wants that for their website.
In worse cases, your site could be attacked by hackers as you try to update it. They could mess with your site or try to steal info from users, creating a security risk.
A maintenance page lets you hide your site temporarily.
In fact, there are all sorts of benefits to having a maintenance page set up. For instance, you can use maintenance mode to:
- hide broken pages from your visitors
- hide your site under construction
- redirect your visitors to another destination when they land on your site
- ensure rankings remain intact
- collect users’ email addresses
- notify all your subscribers as soon as your site is live again
- increase your social followers
Troubleshooting can be done with peace of mind, knowing your site still looks professional.
Not only that, but it’s also a great way to save your SEO by signaling search engines that your website is down for maintenance if done the right way. So, every time the search engine bots crawl your site, they skip indexing any incomplete changes, ensuring that your SEO rankings remain intact.
There’s a default WordPress maintenance mode page that you can add to your website during downtime. But there’s nothing much you can do with it to enhance its visuals or customization. And most users dislike this page because it’s very unprofessional.
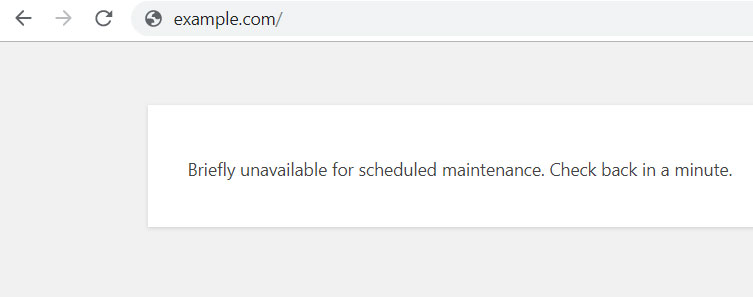
But don’t worry. You no longer have to be stuck with this generic WP maintenance mode message. We will show you how to build a customizable maintenance mode page.
How to Place Your Site in Maintenance Mode
In this guide, we will show you the following methods to place your site in maintenance mode. We will walk you through how to use a free and premium. And also show you how to create maintenance mode without a plugin.
If you want to skip to any section of the article, simply click on one of the links below.
- Enable Maintenance Mode with SeedProd (Free Plugin)
- Use Thrive Suite to put your site in maintenance mode (Premium Plugin)
- Enable maintenance mode without a plugin
With that said, let us begin.
Enable Maintenance Mode with SeedProd (Free Plugin)

SeedProd is the best landing page builder because it is an easy-to-use drag and drop builder with many templates. It includes many coming soon and maintenance mode templates that you can start building with, making the process easier.
This is a free coming soon and maintenance mode plugin for WordPress that lets you set up and enable/disable maintenance mode with just a click.
You don’t need any technical know-how for this, so it’s great for beginners too. It takes just 5 minutes to grab a template, customize it, and make it live.
As a result, SeedProd is a fully responsive and super flexible WordPress plugin that lets you enable maintenance mode pages without coding a single line.
You can use this plugin to design a vibrant and engaging page for your visitors to let them know your website is down for maintenance.
From adding your brand logo to customizing every bit of your page, everything is made so simple and easy with this plugin.
You can add a video to this page to engage visitors for longer. The plugin also supports various other elements on the page, like an email form, countdown timer, social icons, CTAs, and more.
SeedProd offers a Lite version in the WordPress plugin repository that gives you the basic features you need for maintenance mode.
It also has a premium version with access to a powerful WordPress theme builder, WooCommerce features, and so much more.
To give you a taste of what it offers, here’s a sample of the page we’ll be creating in this step-by-step tutorial.
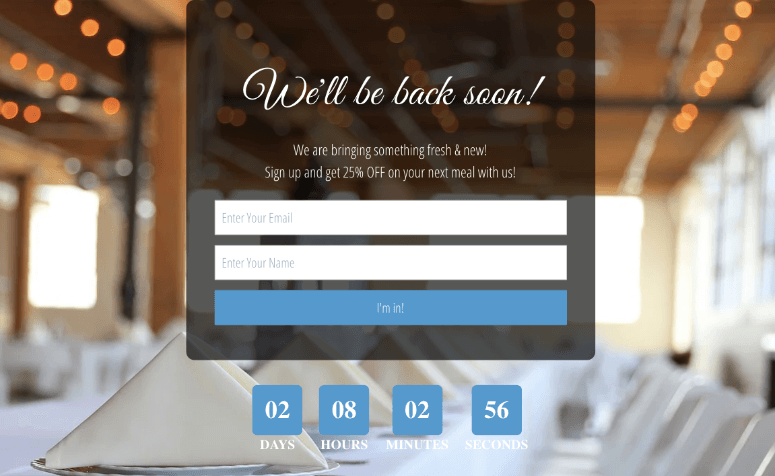
Keep in mind that there are dozens of page templates to choose from, so you can pick one that suits your purpose and business. The steps below will remain the same regardless of the template you pick.
Check out this SeedProd review to learn more.
Having said that, let’s check out how to put your WordPress site into maintenance mode. Let’s begin.
Step 1: Install and Activate the SeedProd Plugin
First, you’ll need to install the SeedProd plugin from your WordPress dashboard. This maintenance mode plugin has 4 plans, ensuring you can choose one that fits your needs. As mentioned, SeedProd offers a free plan that allows you to test it before purchasing.
The good news is that even on the SeedProd Lite, you can still build a maintenance mode page. This is a great option, especially if you are just starting and want to test the maintenance plugin first.
To get the free version of SeedProd, navigate to Plugins » Add New Plugin to locate your WordPress plugin repository. Here, search for “SeedProd,” then install and activate it like any other plugin.
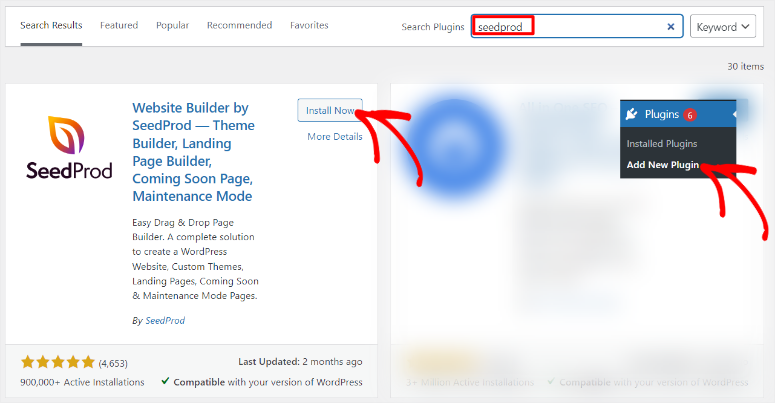
Never set up a plugin before? Don’t worry, we have you covered. Follow our easy guide on how to install a plugin in WordPress.
Once the plugin is activated, you’ll have to validate your license key for the premium version. (Skip this if you’re using the free version). You can find the key in your SeedProd account created after purchasing the product.
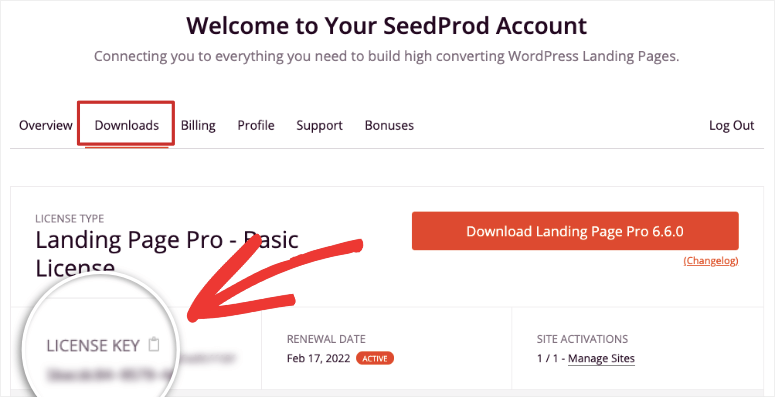
After this, move to your WordPress dashboard under SeedProd » Settings, where you will paste the key in the blank field. Click on the check Verify Key box to validate it.

Once the license key is validated, you’re ready to start using the plugin.
Scroll down the page and click on the Create Your First Page button. This will take you to the SeedProd dashboard, where you can create your page.
Step 2: Set up Maintenance Mode in WordPress
It’s now time to create your maintenance mode page. At the top of the SeedProd dashboard, you’ll see 4 different pages you can create: Coming Soon Mode, Maintenance Mode, Login Page, and 404 Page.
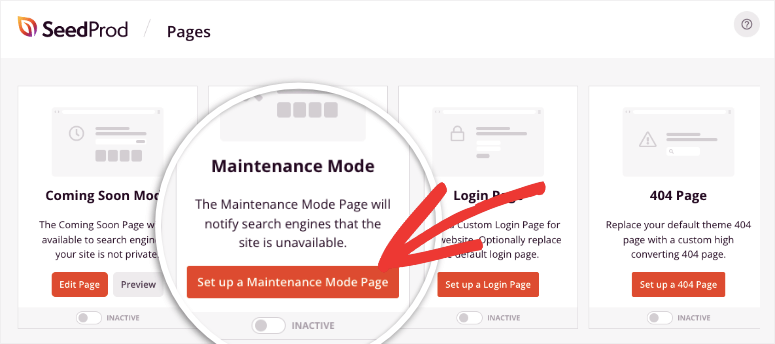
Click on the Set up a Maintenance Mode Page to get started to be redirected to the templates page.
Step 3: Select Your Theme
Once the SeedProd template library opens, select a maintenance mode page template.
SeedProd offers more than 300 different fully customizable pre-built templates from which to choose. You’ll notice a menu bar on top that lets you filter the templates by purpose. But, since you already selected “Maintenance Mode” earlier, this filter will already be selected.
You will see an image demonstrating how the page will appear live for each template. When you hover over a template, you’ll see options to preview or select it.
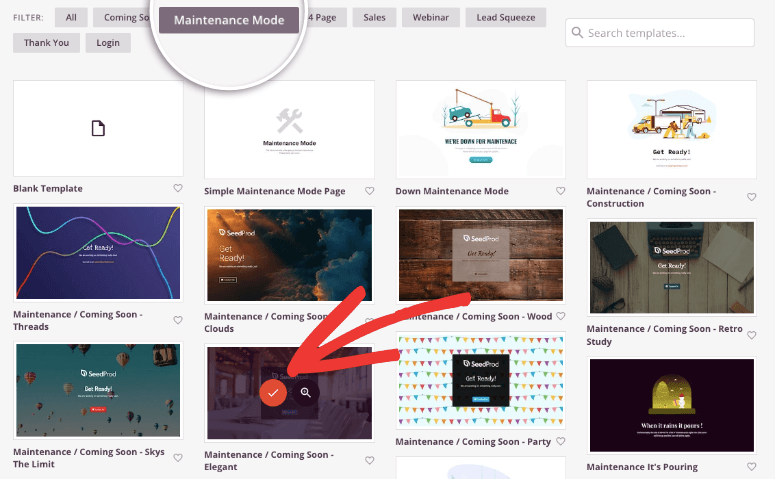
Once you choose a template, SeedProd will take you to the visual page builder, where you can customize the design.
Step 4: Customize Your Maintenance Mode Page
SeedProd’s drag and drop builder is divided into two main sections. On the left is the taskbar with customization options. And on your right, you can edit and preview your page in real-time.
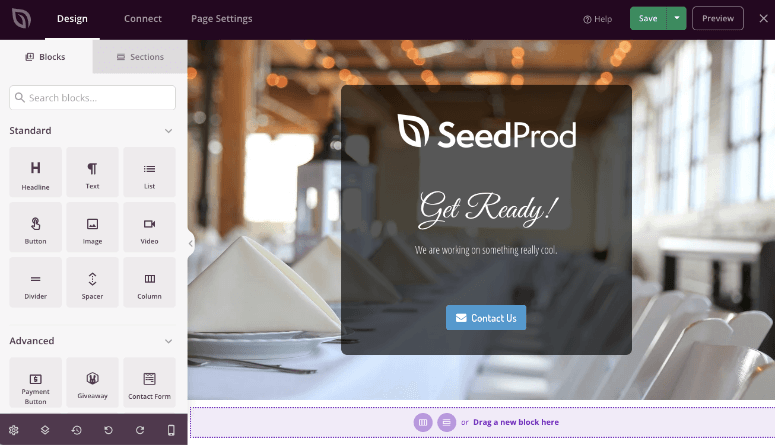
You can customize any existing element on your page by clicking on it. For example, you can click on the headline to change the text, font size, alignment, and more.
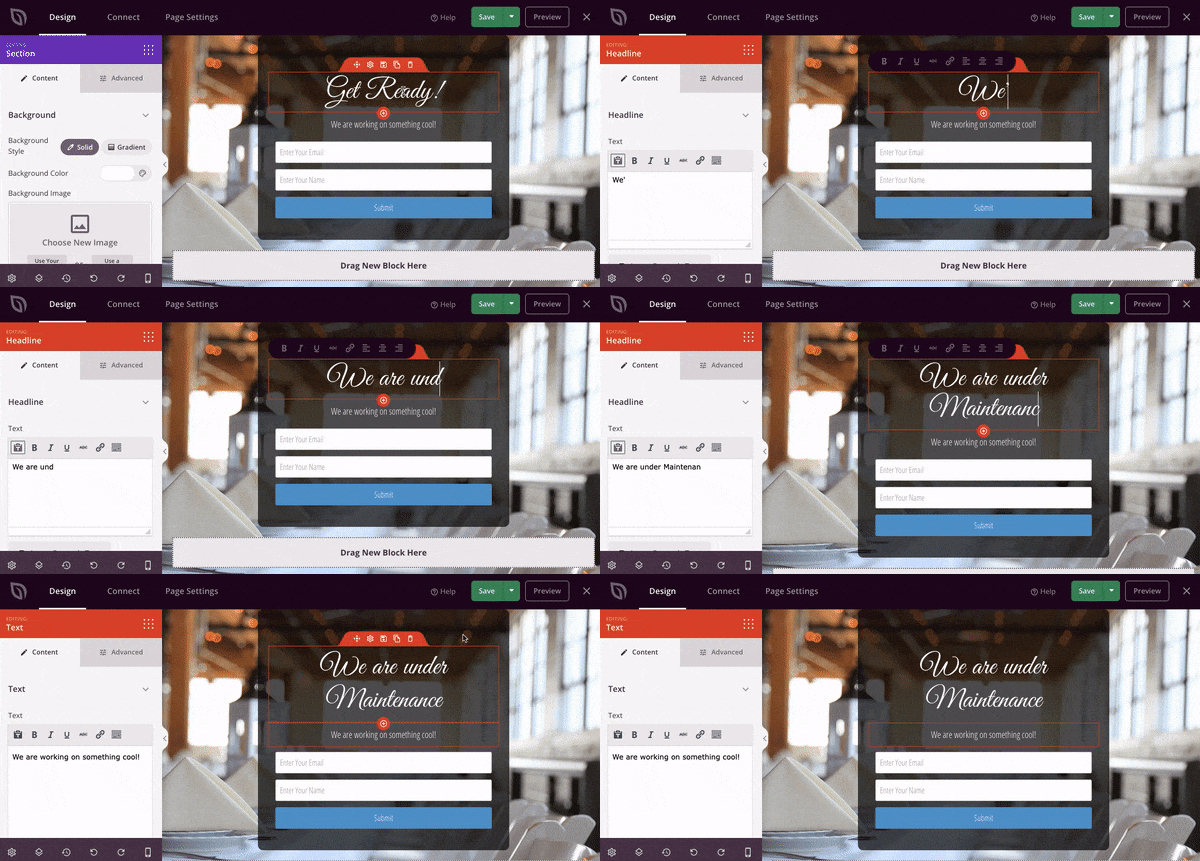
You can also easily add new content to your maintenance mode page using the blocks on the left side of the screen.
SeedProd offers tons of ready-made landing page blocks, including:
- Buttons
- Videos
- Contact Forms
- Email Optin/Subscription Forms
- Social Media Icons
- Countdown Timers
- Custom HTML
- And much more
Simply drag and drop the block you want onto your maintenance mode page. For example, you can add a countdown timer to your page to let visitors know when maintenance will be finished.
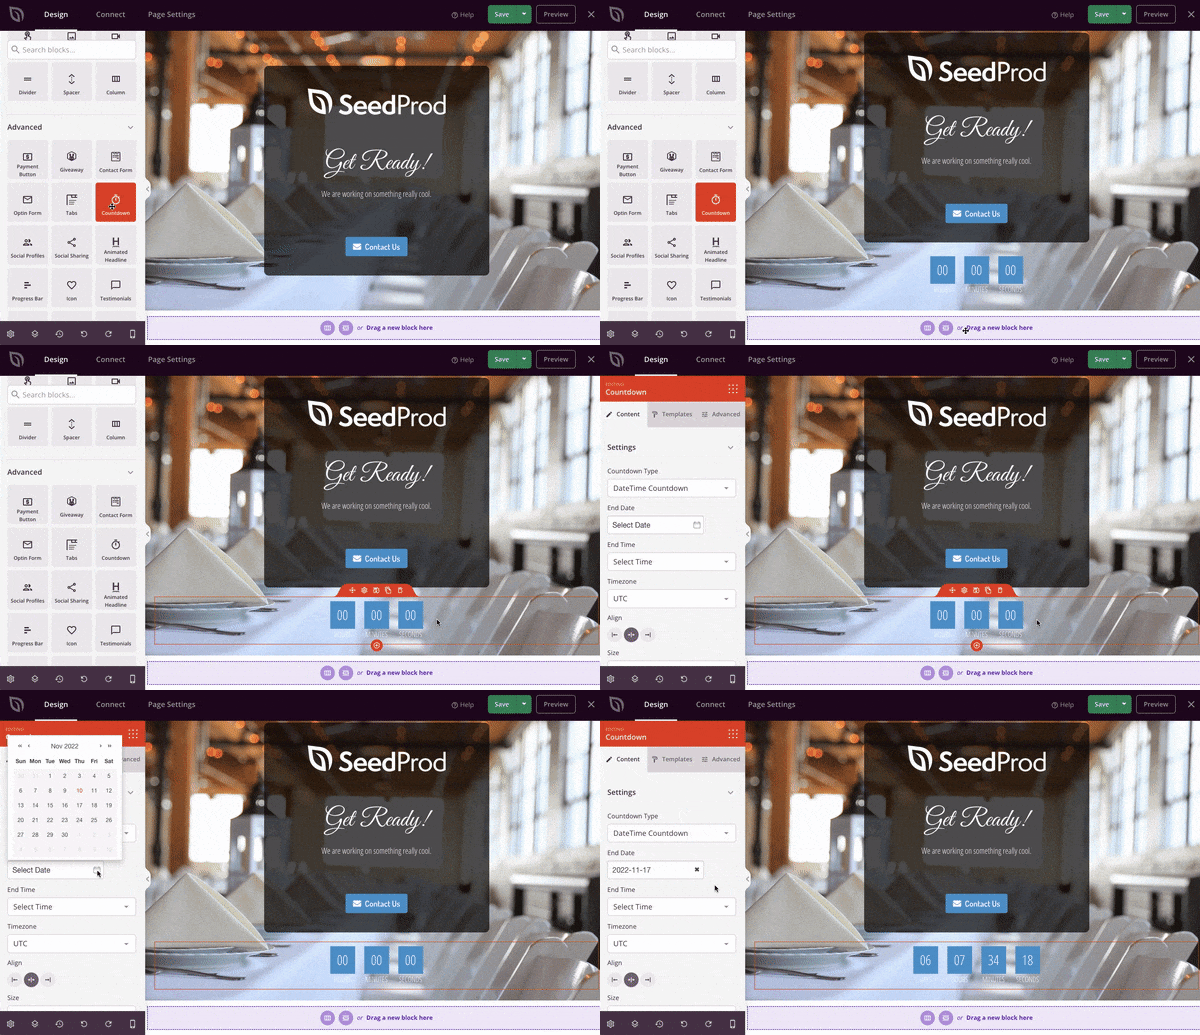
Again, you can click on the countdown timer to customize it. You can set the end date and time, choose the style, color, and more.
SeedProd also offers pre-built sections like FAQs, call to action, features, and many others. These modules make adding more information to your maintenance mode page easy and keep your layout looking great.
We’ll add a testimonial section to showcase our best reviews. Under the Sections tab, choose Testimonials from the left menu. You can then select the style for your review section. Hover over the style you like and click on the (+) Add button.
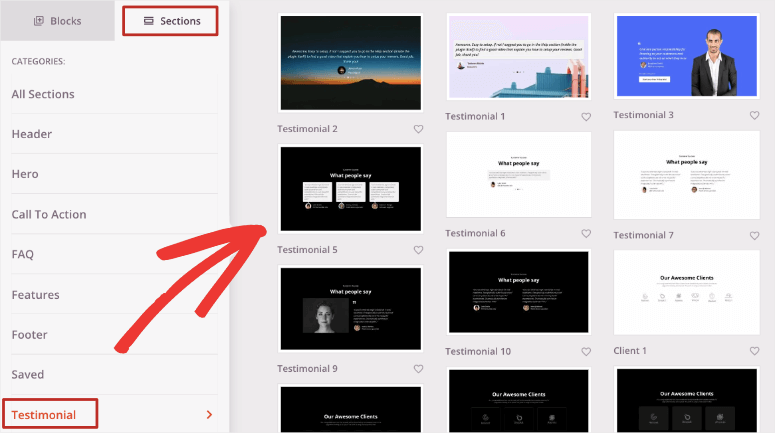
SeedProd will automatically add the section to your maintenance mode page. Then, you can select the section to customize the content.
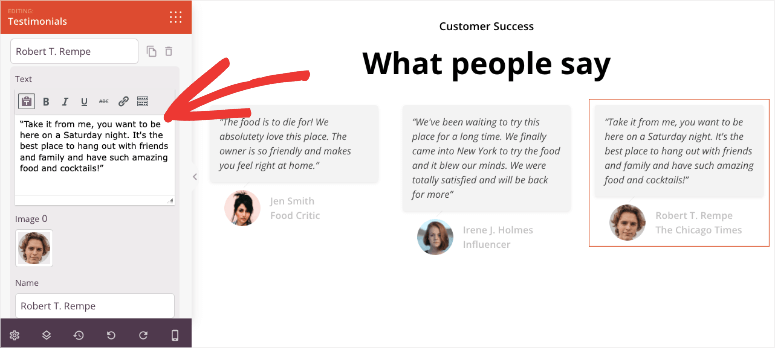
Now, we’re confident that you’ve got a good understanding of how the SeedProd builder works. You can explore more settings to change the logo, background image, social media icons, colors, fonts, and much more.

When you’re finished customizing your maintenance mode page, don’t forget to hit the Save button.
Step 5: Connect Your Email Marketing Service
SeedProd lets you connect the page to your email account to keep your users engaged even when your site is down.
To do this, you can add an optin form to your maintenance mode page. All you have to do is drag the Optin Form block onto the page.
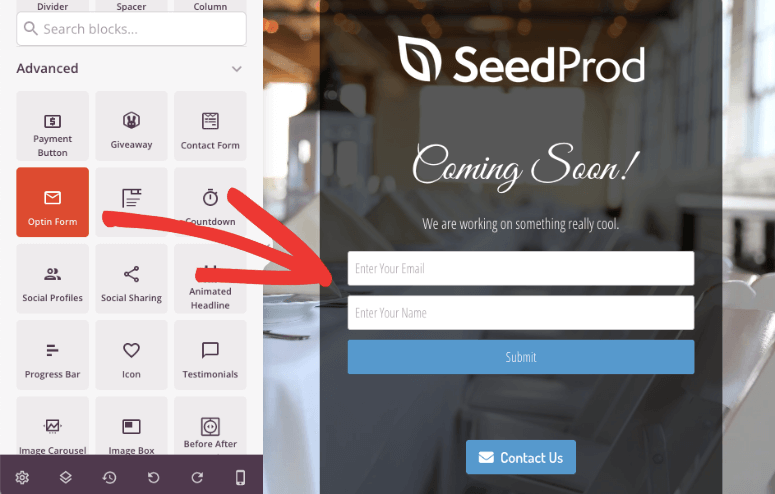
Next, you’ll need to connect your email marketing service. Select the Connect tab at the top of your screen.
This page shows popular email marketing providers like Constant Contact, AWeber, Drip, Mailchimp, and more.
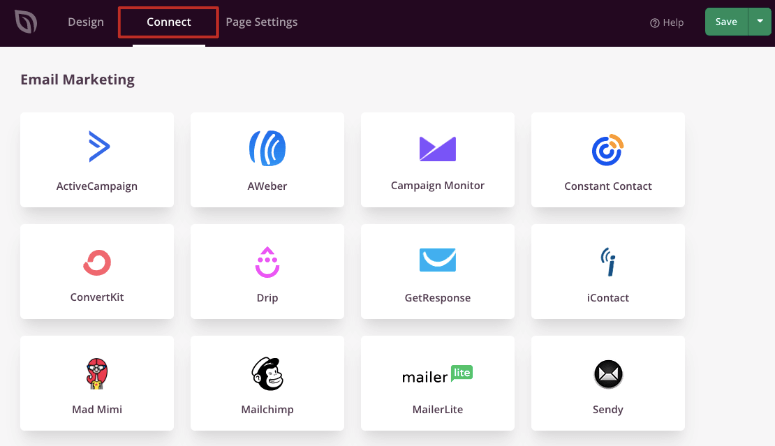
In this section, you’ll also see options to connect to Zapier, Google Analytics, and Recaptcha. You may be interested in linking to these services later.
For now, choose your email marketing provider, fill out your account details, and click the Connect button.
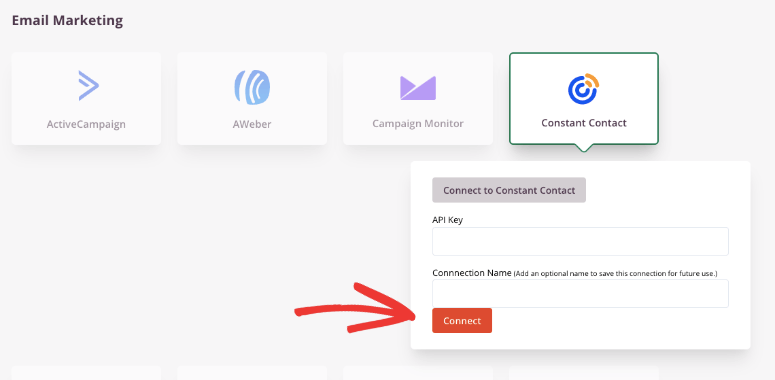
Now, when users submit their email addresses via your maintenance mode page, they’ll be automatically added to your email list.
You can use this feature to send them an automated email series, add them to your newsletter list, and so much more. You can also set automated notifications for you and your team when someone submits the form.
Step 6: Check Mobile-Friendliness
Google prioritizes mobile-friendliness. If you want your website to rank on Google, you need to make sure everything about your website can be viewed on mobile.
SeedProd makes this super easy to do. First, every SeedProd template is automatically responsive so it’ll look good on any device.
To check this, click on the Mobile button at the bottom of the page.
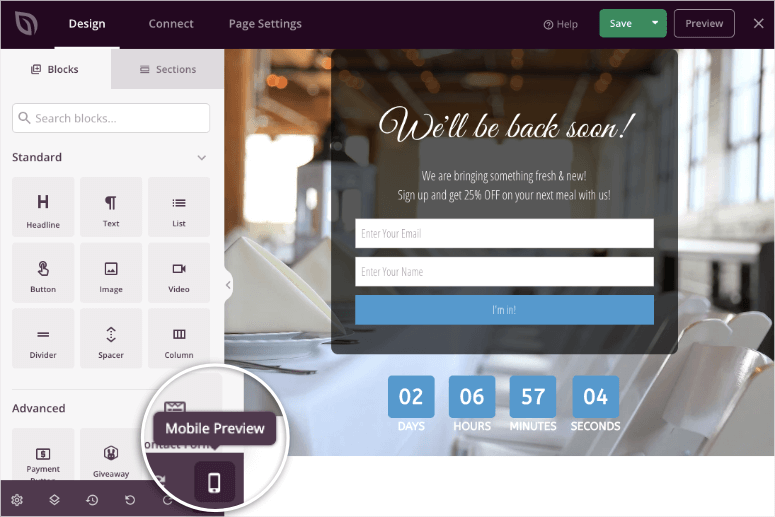
Now, you’ll see a preview of your site on a mobile device screen. You can make any changes you need here.
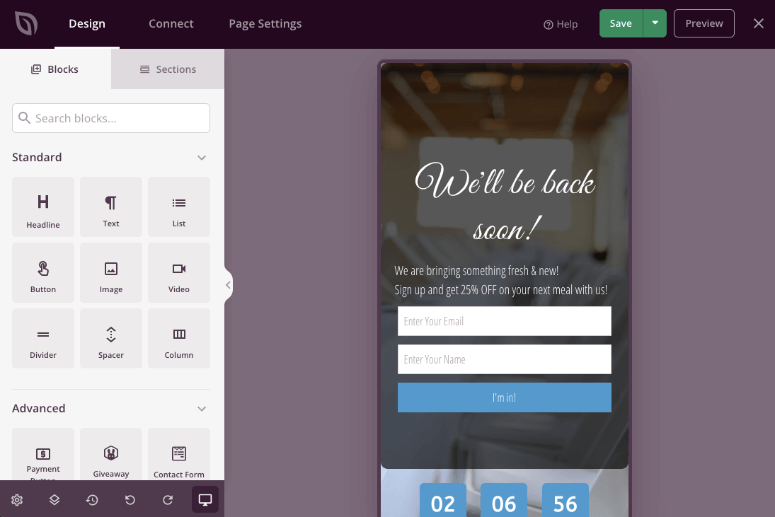
To go back to the desktop preview, just click on the mobile/desktop preview button again.
Step 7: Configure Maintenance Page Settings
Now, your custom maintenance mode page is pretty much ready. You can configure a few important settings under the Page Settings tab.
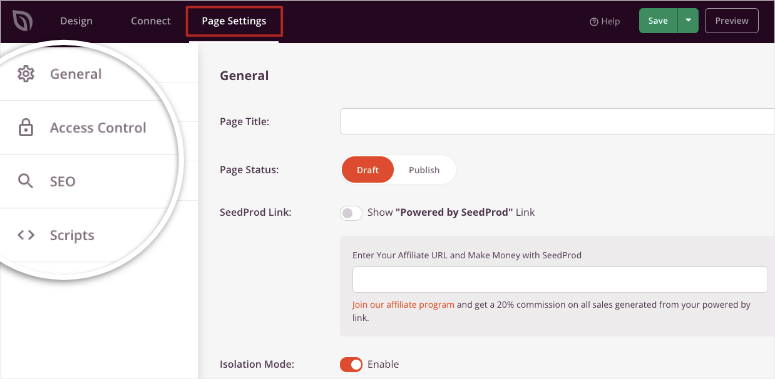
The first tab is the General settings section. Here, you can choose a page title, set your page status, enable or disable redirect mode, and so on.
In the Access Control section, you can create a secret bypass URL to give specific people access to your site.
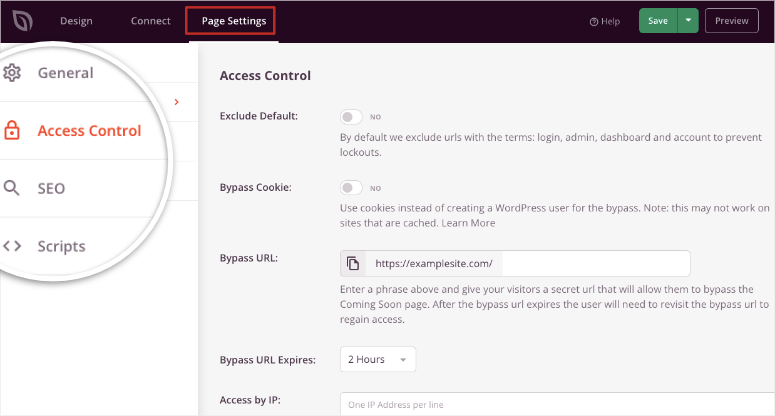
And in the SEO settings, you can optimize your maintenance page for SEO. You can add custom CSS in the Scripts tab if you’re a developer.
Don’t forget to Save settings when you’re finished configuring these options in the plugin’s settings.
Step 8: Publish and Activate Your Maintenance Mode Page
You are now ready to add this page to your live site. For this, you will see two buttons at the top of the page. You can preview your page to ensure you’re happy with the design. Then click on the Save button to save your settings.
Note here that there’s also a dropdown option to save this design as a template you can use later.
Now, you need to enable maintenance mode to make this page live.
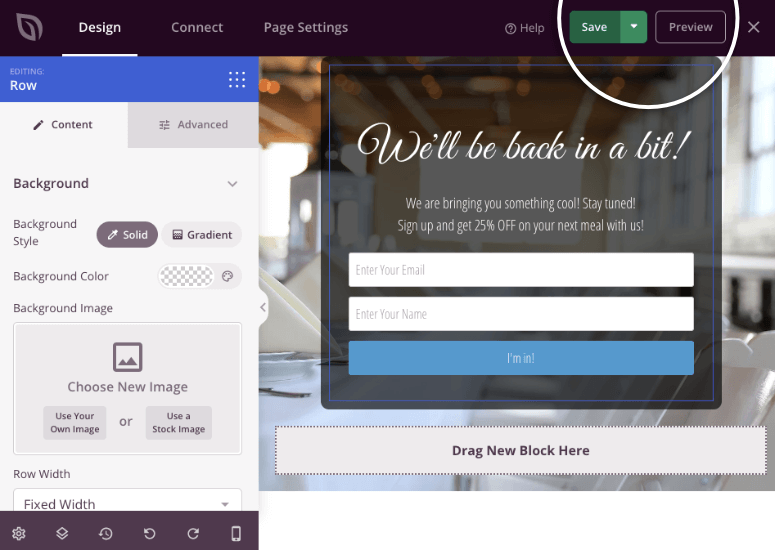
When you exit the builder by clicking on the ‘X’ at the top-right corner of the screen, you’ll see a prompt to enable maintenance mode.
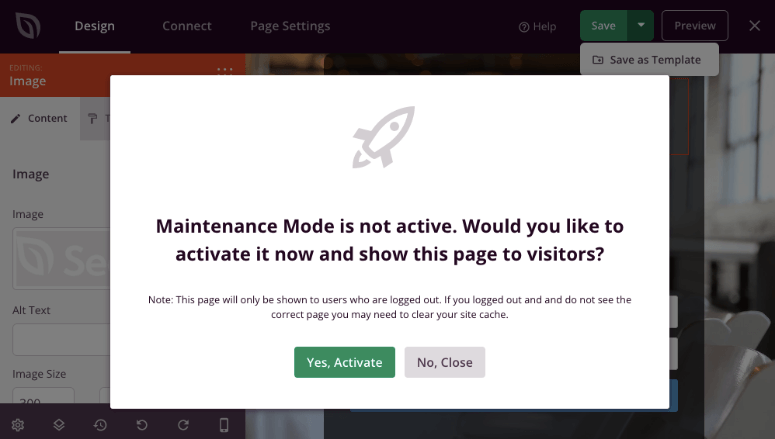
You can activate it here, and your site will be hidden behind the page you just created.
Now, your maintenance mode page is set up for the future as well. This means you can enable or disable the maintenance mode page from your SeedProd dashboard whenever you want. Back on the Landing Pages tab, you’ll see a toggle switch for maintenance mode.
Whenever you need to display the maintenance page, all you have to do is hit this switch. When the switch is off, maintenance mode will be deactivated.
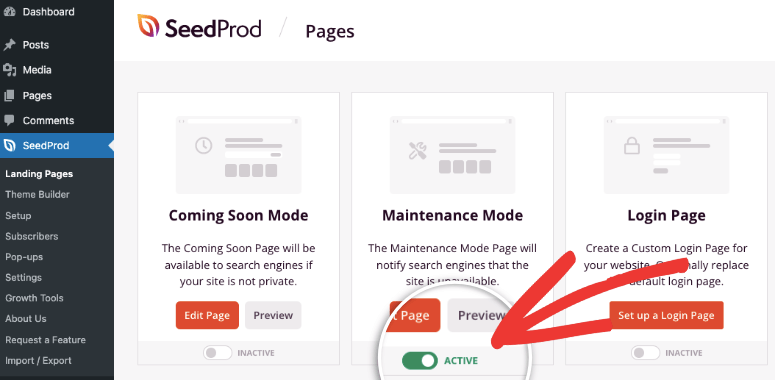
That’s it; you’ve learned how to put WordPress in maintenance mode using SeedProd.

Use Thrive Suite to put your site in maintenance mode (Premium Plugin)

Thrive Suite is a combination of Thrive Themes tools that allow you to create beautiful websites, pages and manage them. While you can buy Thrive Themes tools individually, you need to buy the entire Thrive Suite plan to create a maintenance mode page.
With Thrive Suite, you get Thrive Architect, which allows you to customize and design the maintenance page using a drag and drop builder.
On top of this, Thrive Leads lets you easily add an optin form and collect users’ information from your page. You can then integrate it with popular email marketing tools like MailChimp, ActiveCampaign, Brevo, and more so that you can easily manage your newsletters.
Just like SeedProd, you can activate and deactivate “Maintenance mode” with a button click. Check out the screenshot below to see what we will be building.
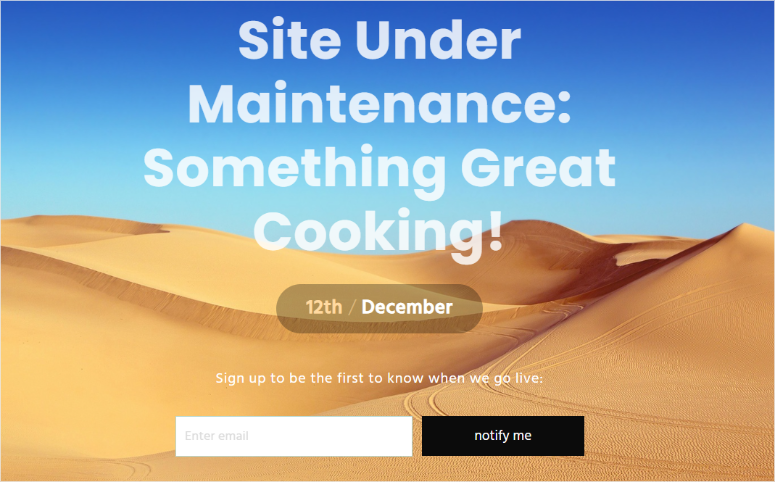
So, how can you use Thrive Suite to enable maintenance mode?
Step 1: Install and set up Thrive Suite
First, you need to purchase Thrive Suite from the official Thrive Themes website. Again, you can purchase individual tools from Thrive Themes, but the maintenance mode feature is only available on Thrive Suite.
After you buy Thrive Suite, you then install the “Thrive Product Manager plugin” from your Thrive Themes dashboard.
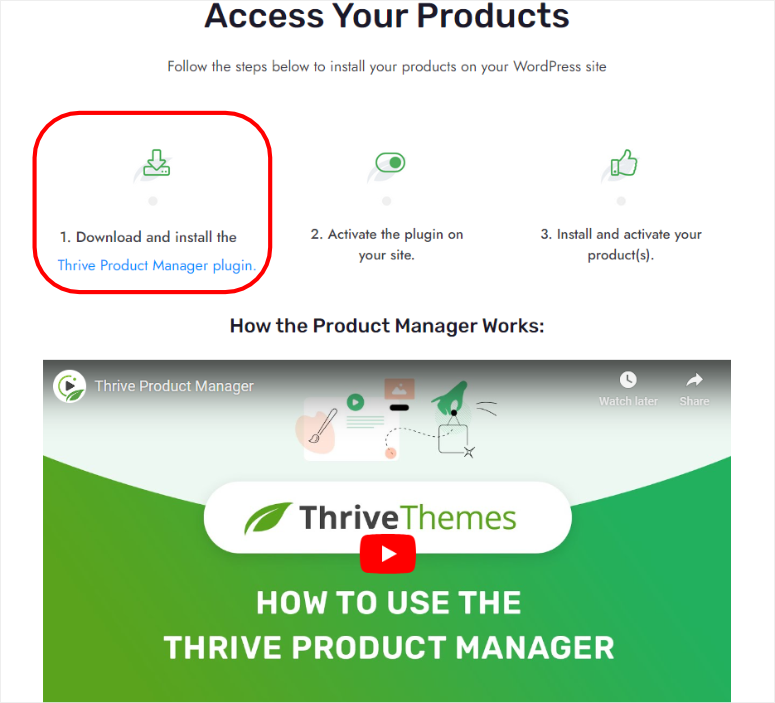
After this, head to your WordPress dashboard and navigate to Plugins » Add New Plugin. Here, install and activate Thrive Product Manager like you would any other.
Next, go to the new “Product Manager” menu on WordPress and log into your Thrive Themes account.
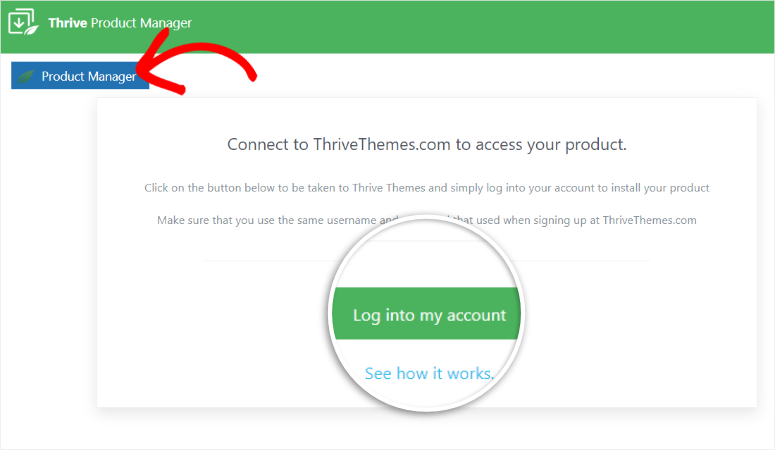
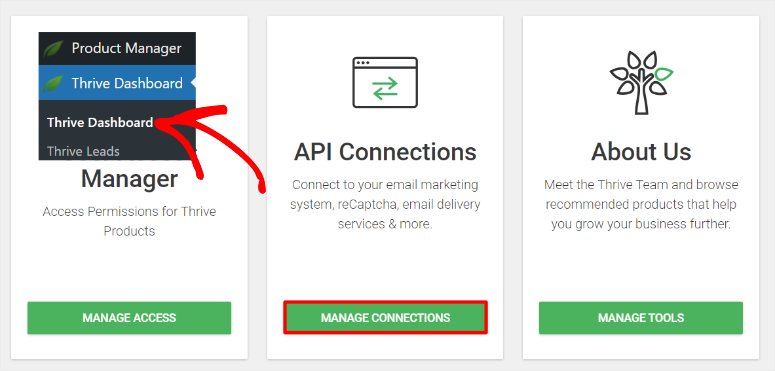
After this, select the new menu option, Thrive Dashboard, to access Thrive Themes’ tools. All the tools here can help make your maintenance page easier. For example, you can use Thrive Automator to integrate your website with other apps and plugins. Or Thrive Quiz Builder can help you build WordPress quizzes to boost engagement.
But, this tutorial will focus on the two most important Thrive Themes tools to help you create a maintenance mode page.
So, on the “Product Manager,” select Thrive Leads to help you collect leads and Thrive Architect to help you build the maintenance page.
Hit the checkbox under each tool, then go to the bottom and select “Activate Selected Products.”
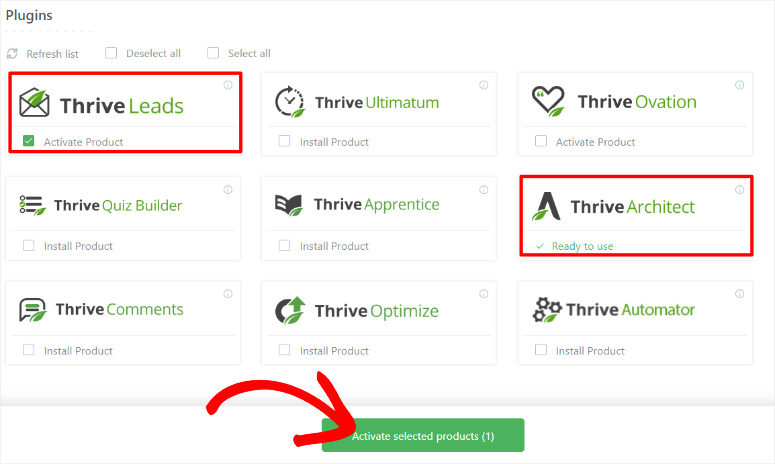
After this, let the tools install and activate. Once this is done, you will get a confirmation message letting you know that they are ready to use. Then, to exit the page, simply select “Go to the Thrive Themes Dashboard.”
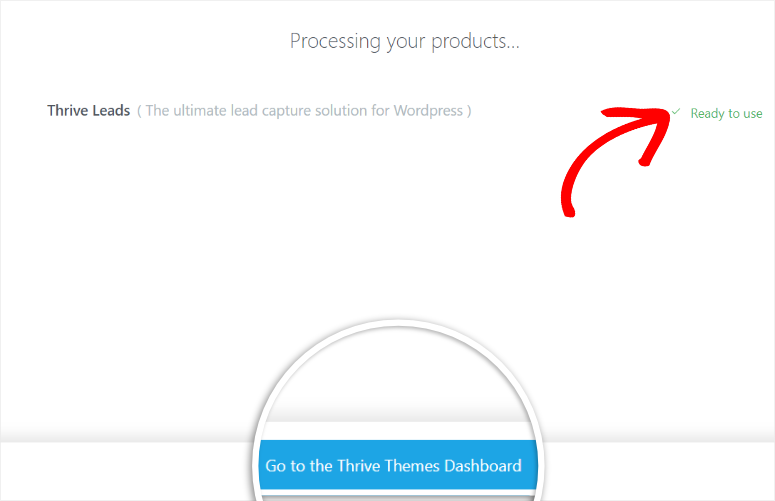
But, since we also want to collect leads from the maintenance page, we will activate an email marketing tool before anything else.
To do this, head to Thrive Dashboard and navigate to Thrive Features. Here, select “Manage Connections” in the API Connections tab.
Next, go to the “Add New Connection” tab and select the Plus(+) icon to open a dropdown menu. You will see options like ActiveCampaign, AWeber, Constant Contact, Drip, and more.
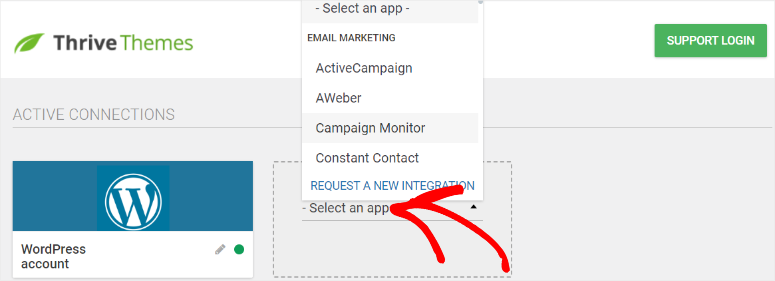
Select the email marketing tool you want to use from the list, and in the popup that appears next, enter the API and any other information needed. After this, Thrive Suite will show you a notification that the connection was a success.
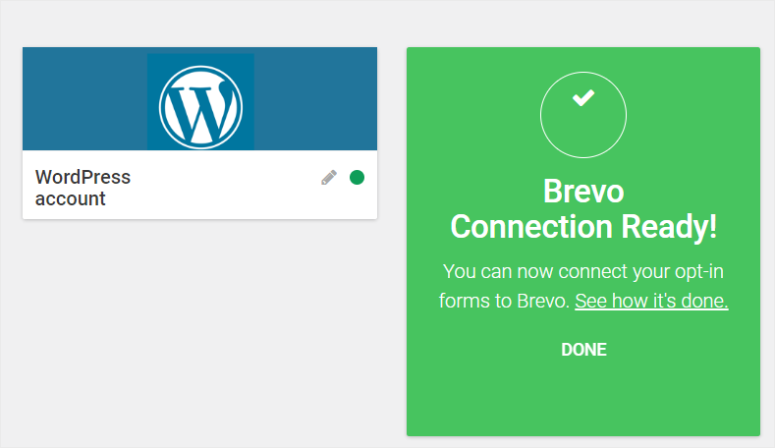
That’s it; Thrive Suite will now send all the leads from your maintenance page to your favorite email marketing tool.
Step 2: Choose a Maintenance Page Template
To get started with this, navigate to Thrive Dashboard » Thrive Features. After this, scroll to the “Coming Soon Mode” tab and select Coming Soon Mode.
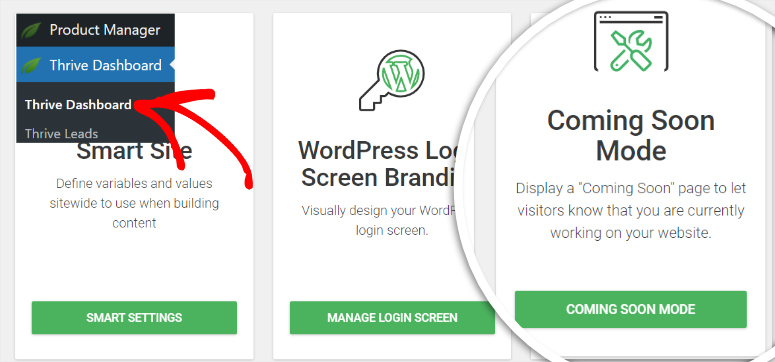
After this step, you will notice that creating a maintenance mode page with Thrive Suite is slightly different.
Since there is no direct maintenance mode feature, we will need to customize the “Coming Soon Mode” feature instead.
But do not worry; the coming soon mode carries the same features as a maintenance mode. It allows you to place your site on standby as you create or modify it. You can also collect leads, just like with SeedProd. All we need to do is change the content to suit the purpose.
Once you select Coming Soon Mode, Thrive Suite will take you to a page where you will need to activate the feature with a toggle button.
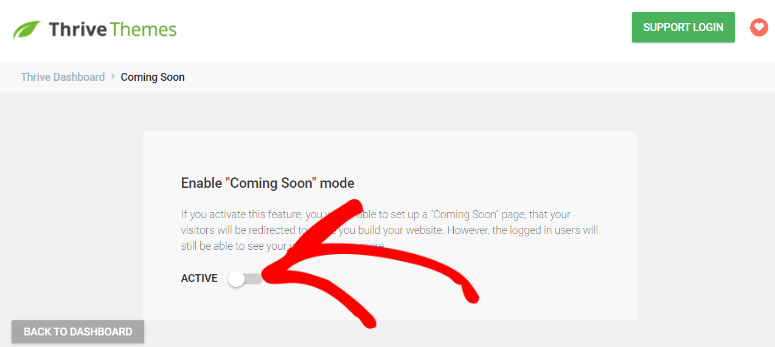
After this, you can either use an existing page or create one. For this tutorial, we will create a new page, so that we can show you all the steps to take.
Next, name your page and hit “Add Page.” Once done, select “Edit with Thrive Architect” to go to Thrive Suite’s drag and drop builder.
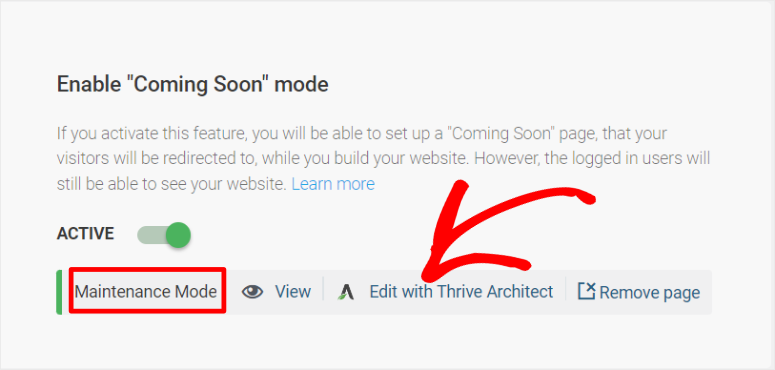
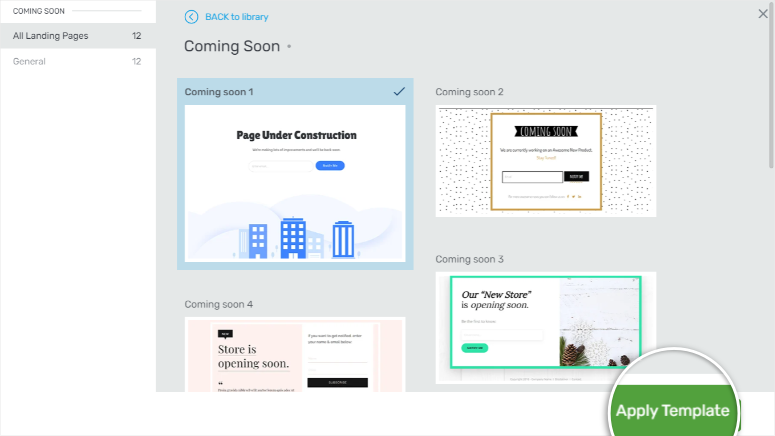
On the next page, select one of the Coming Soon templates provided. With this maintenance page builder plugin, you also get a preview of all the templates to help you quickly see the one that works for you.
Once you select the template, hit “Apply Template” to open the visual builder.
Step 3: Create a Maintenance Page
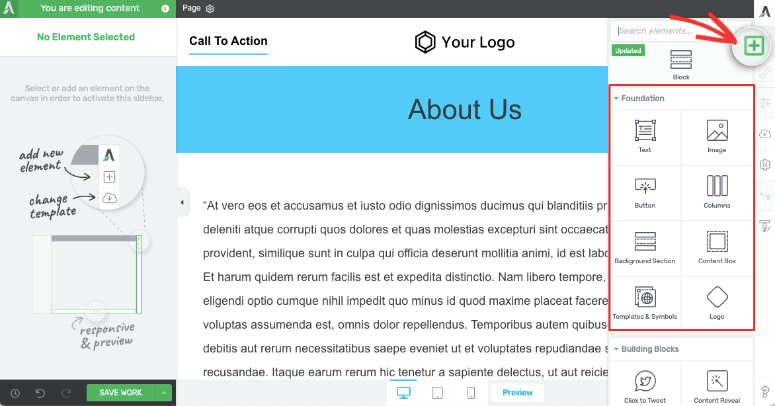
The drag and drop page builder is divided into 3 sections: Settings to the left, the preview window on the center, and Blocks on the far right.
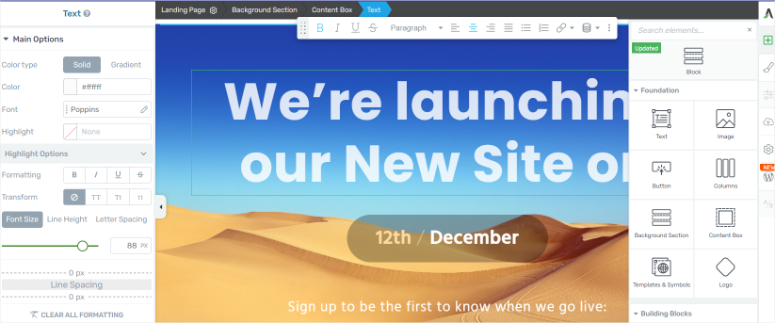
Because we are using a template for this tutorial, elements will already be placed in the preview window. To edit them, select the element, and more setting options will open in the settings area on the left.
As mentioned, we will use the coming Soon template to make the maintenance mode page. So, let us start by editing the content.
Select the header element on the page and edit it to content that is more focused on a maintenance page. For our tutorial, we went with: “Site Under Maintenance: Something Great Cooking!”
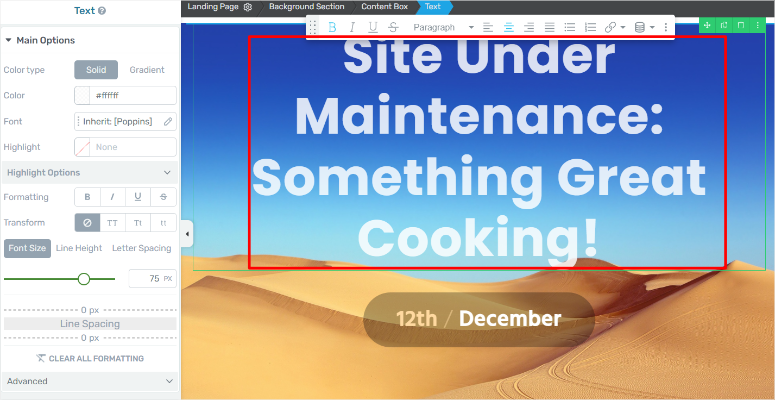
Now, use the header element settings on the left to modify it further. You can change the color, font, and highlight. You can also customize the font size, line height, and letter spacing.
On top of this, you can modify the layout, position, background style, scroll behavior, animations, and so much more. Remember that these customization options apply to every Thrive Architect visual builder page element.
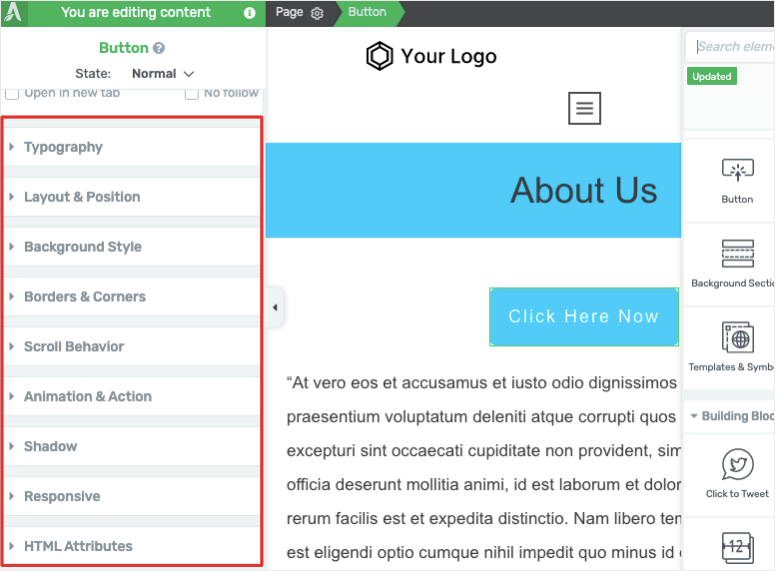
You can also drag and drop these elements anywhere on the page to appear exactly where you want.
When you are happy with the page’s appearance, it is time to customize or add an optin form, depending on your template. This will help you collect leads directly from your maintenance page.
To add an optin form, hit the Plus(+) icon on the bottom or the far right of the drag and drop builder. After this, use the search bar to find the “Lead Generation” block.

Next, select a lead generation template from the popup that appears next. Here, you get lead forms containing just a few fields, like the name and email, or more complex forms with fields like city, address, country, and more.
Here, choose one that fits your needs.
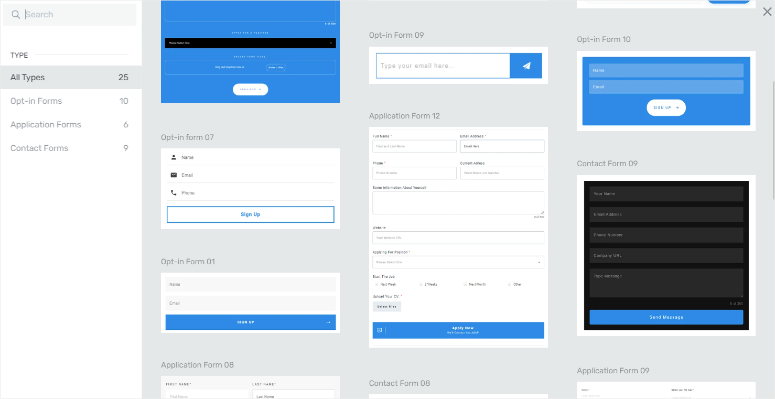
But the template we selected already has an optin form present. So, select it to open more options on the left to customize it.
Now, you can customize the optin form the same way you did all other elements. You can change the font, layout, and more. You can also add new fields to the optin form when you select “+Add New” in the element settings.
On top of this, Thrive Architect allows you to add a Success Message to be displayed to the user after they submit their information. This is a great way to thank them or provide additional information about your site.

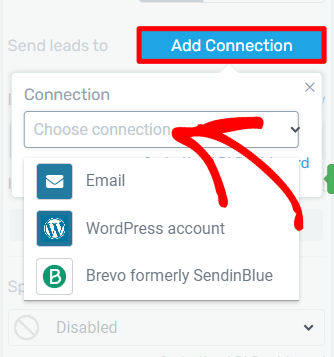
Once you are happy with the optin form, select “Add Connection” under the Send Leads To section. Then, from the dropdown menu, select the email marketing tool you connected to earlier.
After this, select a mailing list from the drop-down menu and hit “Apply.”
Step 4: Publish Maintenance Page
Now that your maintenance page is ready, use the device icons at the bottom of the drag and drop builder to see how it appears on mobile, tablet, and desktop. After this, hit the “Save and Preview” button on the Save Work dropdown menu.

On the preview page, you should see a button at the top labeled “Coming Soon Mode Active.” This lets you know that your site is now in maintenance mode.
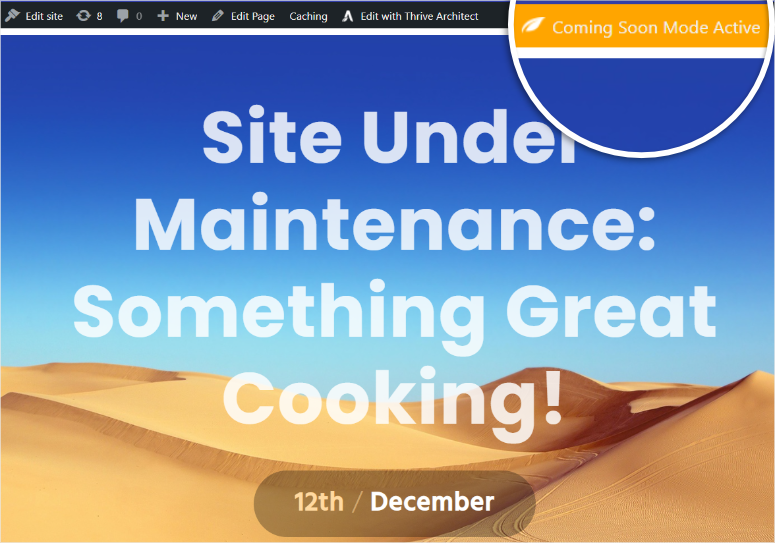
As you recall, before we started editing the maintenance page with Thrive Suite, we enabled “Coming Soon” with a toggle button. This means after editing the page, it should go live automatically. On top of that, the toggle button allows you to switch maintenance mode on and off whenever you want.

Now, the advantage of using Thrive Suite to create a maintenance page is that everyone logged out of your site or users will be redirected to this page regardless of the URL they use to access your site.
But, if a user is logged in, they will be able to view the website, even if it is under construction. This helps you conveniently build the site away from visitors’ eyes.

Well done! You can now build a maintenance page with Thrive Suite.
Enable Maintenance Mode Without a Plugin
To use this manual method, you need basic knowledge of accessing the theme editor, file manager in your web host account and how to edit/update files in WordPress.
We have created an easy code snippet that you can use to enable WordPress maintenance mode without a plugin.
You need to add the following code to your theme’s functions.php file or in a site-specific plugin:
function maintenance_mode() {

if ( !current_user_can( 'edit_themes' ) || !is_user_logged_in() ) {wp_die('Maintenance.');}

}
add_action('get_header', 'maintenance_mode');
Ensure you preview this page’s front end to see that your site is working as expected. To disable the maintenance mode and allow users to access your website, simply comment out the last line like this:
// add_action();
If you’re not sure about editing backend WordPress files, it’s best to use a maintenance mode plugin like SeedProd. When you modify WordPress files like functions.php and .htaccess, a tiny misstep could break pages or even your whole website.
Once you have SeedProd on your site, you can use coming soon and maintenance mode any time you want. Plus, you can set up all sorts of landing pages including:
- Coming soon
- Sales
- Webinar
- Lead Squeeze
- Thank you
- Login
- 404
Well done! You can now quickly place your site in maintenance mode with a method you find most convenient. If you have any more questions, check out our commonly asked questions below.
FAQs: How to Put Your WordPress Site in Maintenance Mode
Which is the best free maintenance mode plugin?
SeedProd is the best free maintenance mode plugin for WordPress. It offers a user-friendly interface, built-in templates, and customizable options to quickly set up maintenance or coming soon pages. To add to this, SeedProd allows you to collect leads through integrations with email marketing services and track page performance. All in the free version, making it highly versatile and beginner-friendly.
Does maintenance mode affect SEO?
Yes, enabling maintenance mode can impact SEO if not handled properly. If your site is down for a long time without proper SEO settings, search engines can attempt to crawl it and encounter issues. But, using plugins like SeedProd or Thrive Suite allows you to manage meta tags and create custom messages. This can prevent any negative impact on SEO rankings during downtime.
Does WordPress offer a default maintenance mode?
Yes, WordPress has a built-in maintenance mode that activates automatically when you update core files, themes, or plugins. You can also activate maintenance mode by adding a code snippet to your theme’s functions.php file. But, this default mode is very basic and doesn’t offer customization options like branding, messaging, or lead capture. We recommend you use dedicated plugins such as SeedProd or Thrive Suite for more control over your maintenance pages.
How secure is maintenance mode?
Absolutely, maintenance mode is secure, but only when using trusted plugins or methods. Plugins like SeedProd and Thrive Suite ensure that only logged-in users or administrators can access the site while the public sees the maintenance page. When properly configured, maintenance mode does not expose your site to vulnerabilities. But, you should avoid directly modifying files like functions.php unless you’re familiar with coding to prevent potential issues.
We hope you enjoyed learning about how to place your site in maintenance mode. Once your site is fully restored, you can create a squeeze page to help you bring in even more leads.
Apart from that, here are other articles you may be interested in reading.
- How to Create a Lead Capture Page in WordPress
- 10 Best WordPress Popup Plugins To Skyrocket Leads
- 7+ Landing Page Tips and Tools to Improve WordPress Conversions
The first tutorial teaches you how to create a lead capture page in WordPress. The next article lists the best popup plugins to skyrocket leads. While the last post shows you landing page tips and tools to improve conversions.

Comments Leave a Reply