Are you looking for an easy way to take orders on your WordPress site?
An online order form lets you sell products and services with or without a full-fledged eCommerce store. So your customers can place their orders, add their shipping details, and make secure payments directly in the form.
Below, we’ll show you step by step the easiest way to create an online order form in WordPress so you can start selling right away.
What Do You Need to Create an Online Order Form?
To create an order form, you’ll need an effective tool that lets you add form fields, product details, and integrate with a payment gateway.
We recommend WPForms, the best online form builder for WordPress.
WPForms is beginner-friendly and works great with any WordPress website and WooCommerce store. It lets you create any kind of WordPress form in a matter of minutes.
The plugin comes with a drag and drop form builder and 1,200+ built-in form templates. All you need to do is pick a template and add your customizations so you can quickly launch the form on your site.
With WPForms, it’s incredibly easy to link your order form with a payment method and collect payments for orders online. You can integrate with popular payment methods including Stripe, PayPal, and Authorize.Net to accept online payments.
Aside from that, here’s what you’ll love about WPForms:
- Zero coding: Easily create a professional order form in just a few minutes without writing any code or hiring a developer
- Smart Conditional Logic: Dynamically change the questions based on the user’s response
- Responsive Mobile Friendly: Works great on mobile, tablets, and desktop
- Instant Notifications: Get custom notifications when a customer places an order
- Email Integration: Send emails automatically to update customers on order confirmation and order status
- Order Management: View all customers’ orders in one place to streamline your workflow
- Spam Protection: Smart captcha and built-in spam protection to block fraud and spam form submissions
Added to all these awesome features, WPForms makes it super easy to embed the form anywhere on your site such as in pages, posts, and sidebars.
Now that we’ve selected the right tool, let’s show you how you can create a custom order form in WordPress.
Creating an Online Order Form Using WPForms
Below, you’ll learn how to make an online order form in just 6 simple steps. Let’s begin!
Step 1. Install and Activate WPForms Plugin
The first thing you need to do is sign up for a WPForms account.
WPForms offers a free version of the plugin but you’ll want to sign up for a Pro plan or higher to get access to payment integrations. It comes with a 100% risk-free money-back guarantee.
When you sign up, you’ll get a plugin to install and activate on your site. Not sure how to upload the plugin to WordPress? No worries, follow our guide on how to install a WordPress plugin.
Once the plugin is activated, you need to visit the WPForms » Settings page to enter the license key.
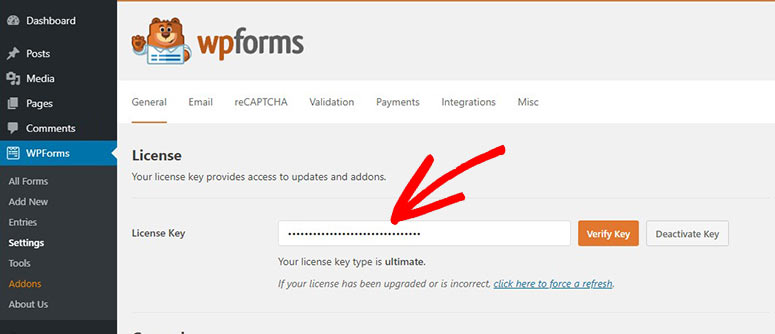
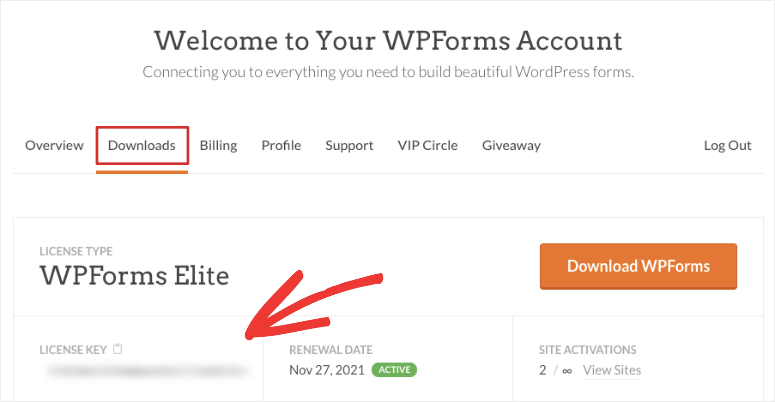
You can find the license key in the Downloads section of your WPForms account on their website.
Once you verify the license key, you can start building the order form.
Step 2. Add a New Online Order Form
To create your order form, open the WPForms » Add New page in your WordPress dashboard.
This will open the WPForms builder on your screen. You need to enter a name for your new form and select the built-in Billing / Order Form template.
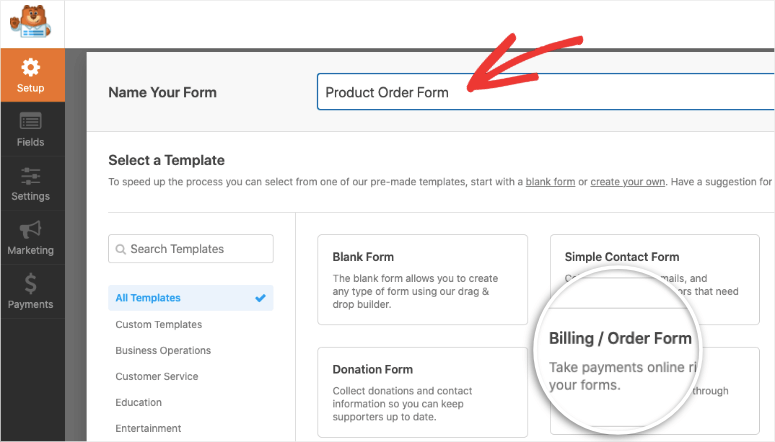
Now, you can see the editing options on the left side and online order form preview on the right side of your screen.
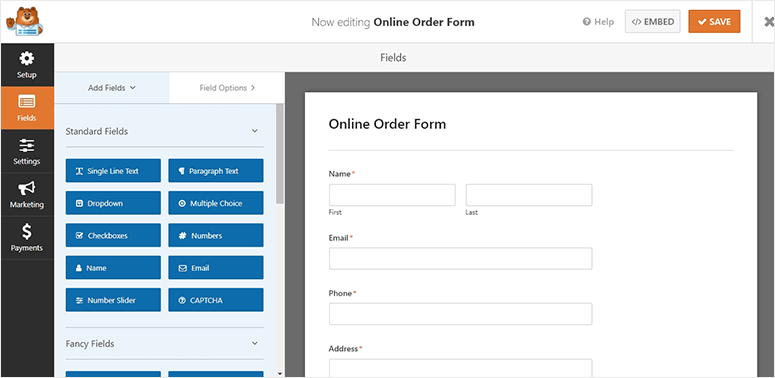
The WPForms order form template is prefilled with all the standard information you’ll need from a customer such as their name, contact, and address.
The most important field you need to edit is the Available Items field. When you select this field, you’ll see options on the left to edit items and prices.
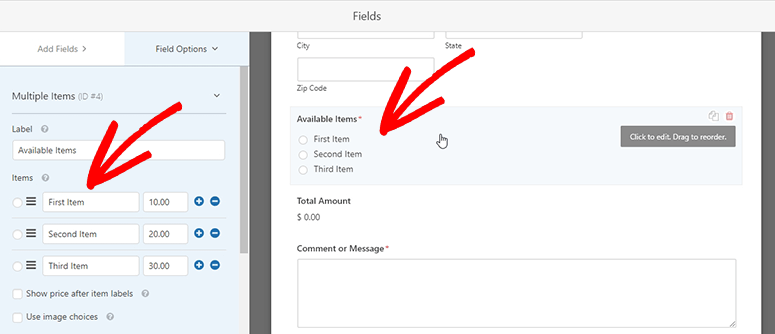
You can change the field label and add or delete items here according to how many products you want to sell.
If you want to add images for each product, check the Use Image Choices box.
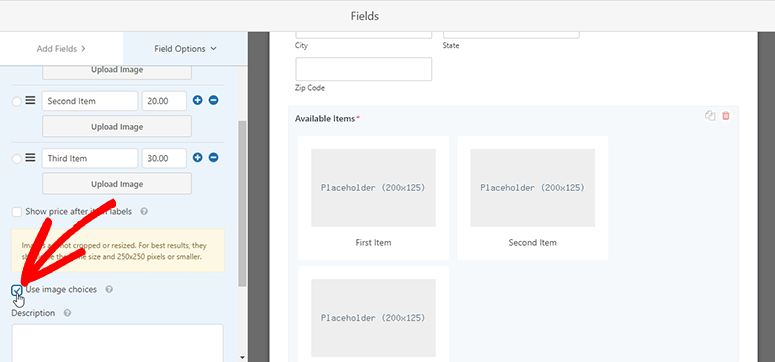
Now you’ll see options to upload images for your products. This will help customers understand what they’re ordering on your website.
WPForms also lets you add more fields to your order form. This includes:
- CAPTCHA
- File upload
- Single line/Paragraph text
- Dropdown/Checkboxes
- Website/URL
You simply need to drag them from the left menu and drop them in your template. And if you select the field, you can edit the field name, placeholder, and more using the form editor.
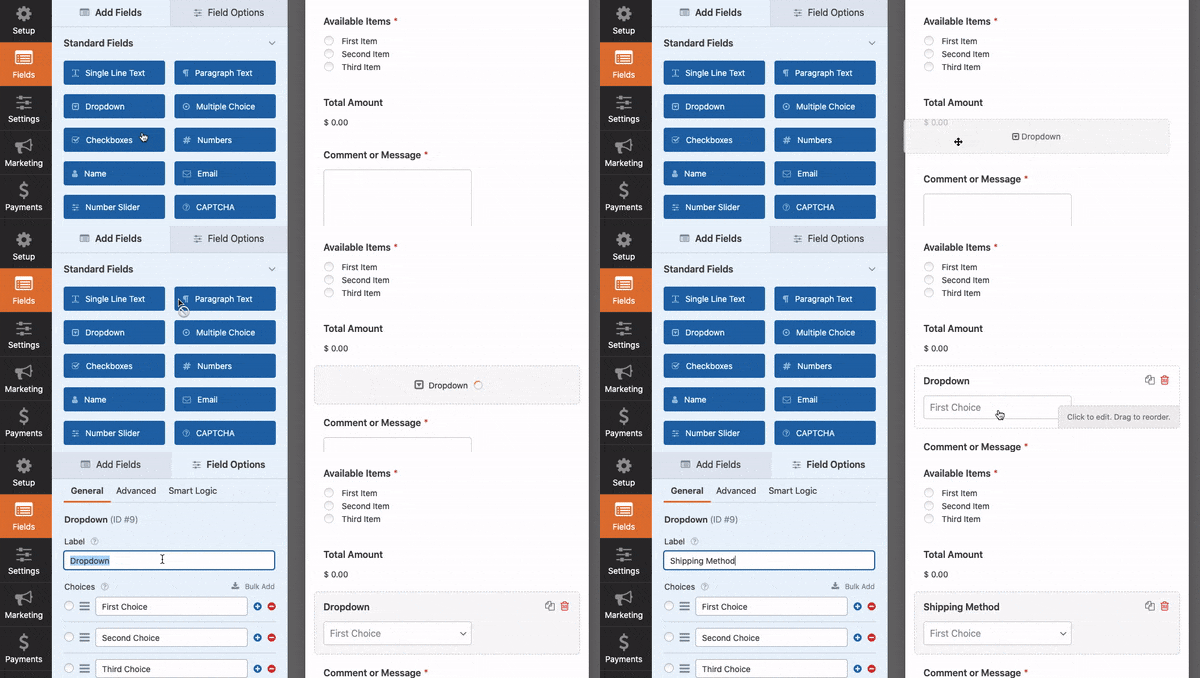
Now your order form design is ready, make sure to hit the Save button to store your changes.
Step 3. Configure and Manage Form Notifications
Notifications are important to keep you or your team informed about new orders. By default, WPForms sends a notification to your WordPress admin email whenever a customer submits an order form.
You can customize these notification alerts, change/add email addresses, and set notification rules.
WPforms also lets you set up automated notifications to send to customers who have placed an order. We’ll show you how to set up both options.
1. Email notifications for you and your team
First to notify you and your team, in the WPForms builder, open the Settings » Notifications tab.
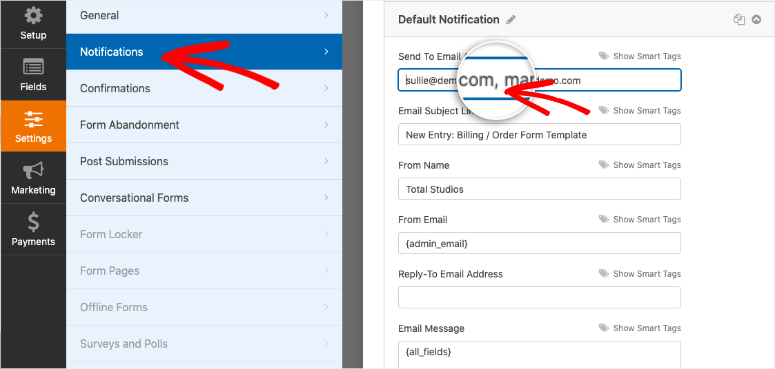
In the default notification, you can add custom email addresses separated by commas. Then change the subject line and body of the email.
At the bottom of the page, you’ll see an option to enable Conditional Logic. This lets you create rules to send notifications only if the criteria are met.
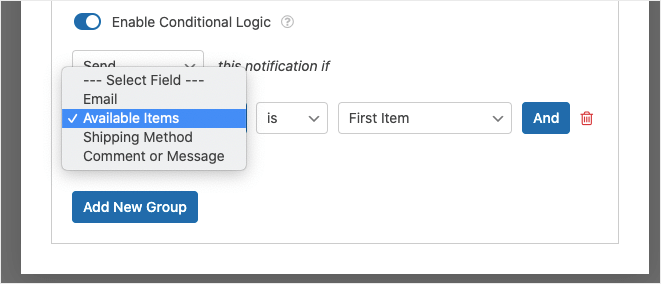
So for instance, if you’re selling different products, you can send notifications to the dedicated product managers. Or if a customer has left a comment, you can notify your team member that they need to check and respond to the comment.
Now we’ll show you how to set up automated notifications to be sent to customers to confirm their orders.
2. Email Confirmation for Customers
First, create a new notification using the Add New Notification button. Then open the Show Smart Tags option next to Send to Email Address field.
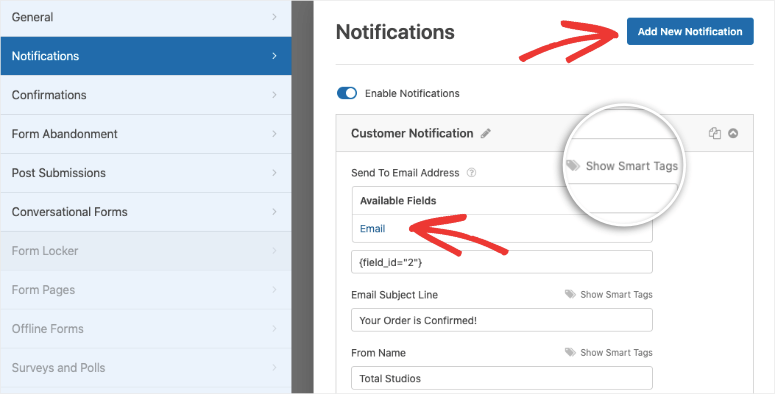
From here, you need to select Email in the available fields and WPForms will send the notification to the email that a customer entered on the order form.
You can add a personalized subject line and message with the notification. You can also include order form details in the notification using {all_fields} smart tag.
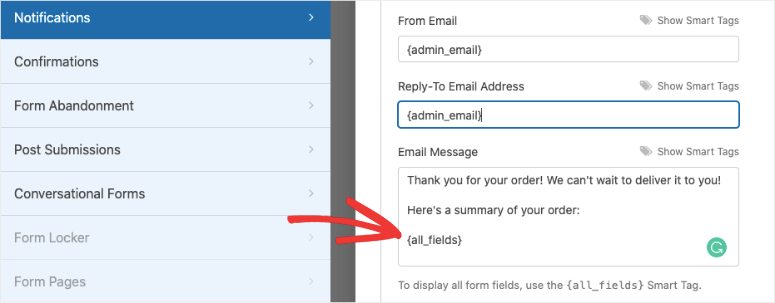
Store your notification settings using the Save button and WPForms will take care of the notification alerts automatically.
Step 4. Set Up Confirmations on Form Submission
Notifications are sent to email addresses while a confirmation message will appear to the users on your website when they hit the submit button on the online order form.
WPForms makes the confirmations interesting with 3 options:
- Message: You can add a custom success message on the order form submission. This is the default option and ensures customers that their order is processed successfully.
- Show Page: With this option, you can redirect customers to a custom thank you page. This will lead to further engagement and brand loyalty.
- Go to URL (Redirect): It allows you to add a specific URL and send customers to a different website upon submitting the order form.
To add a custom confirmation option, go to the Confirmation tab and select an option from the Confirmation Type menu.
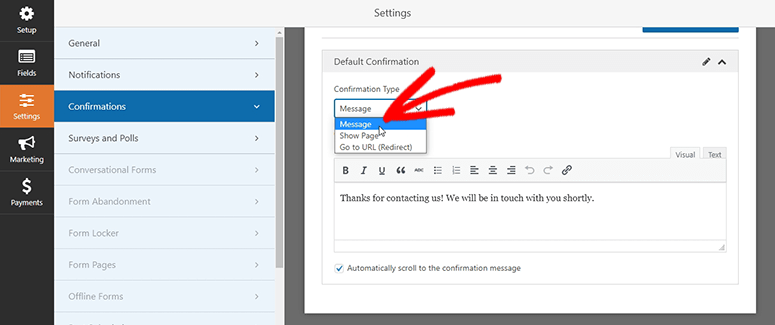
Add a custom message and click on the Save button to continue.
For more details, see our tutorial: How to Set Up the Right Form Notifications & Confirmations.
Step 5. Add a Payment Method to Your Order Form
WPForms lets you collect online payments for customer orders. You can connect a payment option with your order form easily.
It supports PayPal, Stripe, and Authorize.Net to accept payments online. For each payment method, WPForms has an addon that you need to install and activate on your website.
Upon activation, you can visit Settings » Payments in the WPForms builder. This will show you the payment option that you installed using WPForms addons.

If you select PayPal Standard, you need to enter your PayPal email address, select production mode, and manage other settings.
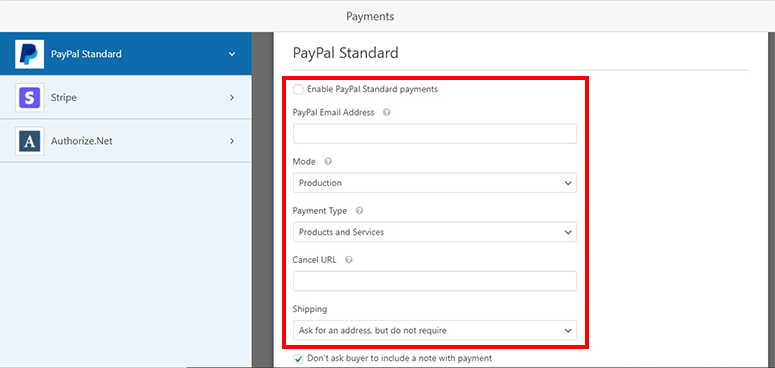
Save your changes and your online order form is ready. Now, you can display it on your website’s posts, pages, and widget-ready areas.
Step 6. Display the Online Order Form in WordPress
Adding the new order form to your WordPress site takes just a few clicks.
For pages and posts, in the WordPress block editor, add a new block and search for “WPForms”.
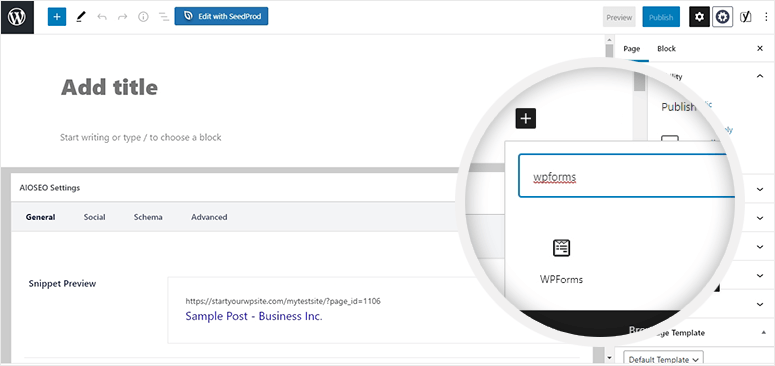
Once you add the block to your page, use the dropdown to select the online order form you just created.
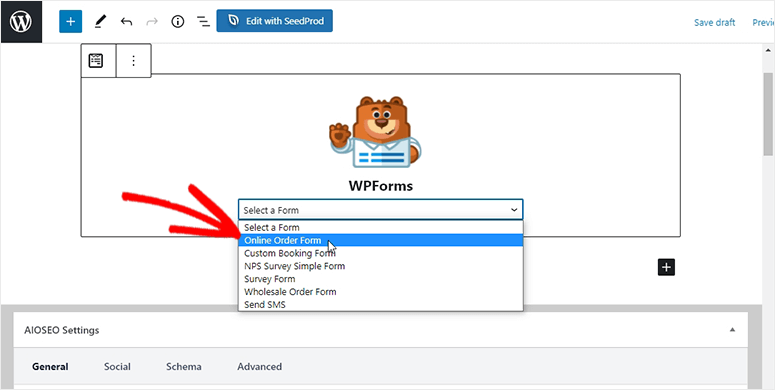
All that’s left to do is Publish or Update your page. You can preview your page to see the online order form in action.
In case you’re still using the Classic editor, you’ll find an ‘Add Form’ button that lets you select your form.

You can also add the order form in your widget-ready areas such as sidebars and footers. For that, head over to the Appearance » Widgets page.
Now drag and drop the WPForms widget into your sidebar or footer. Select the order form in the dropdown and it will be added automatically.
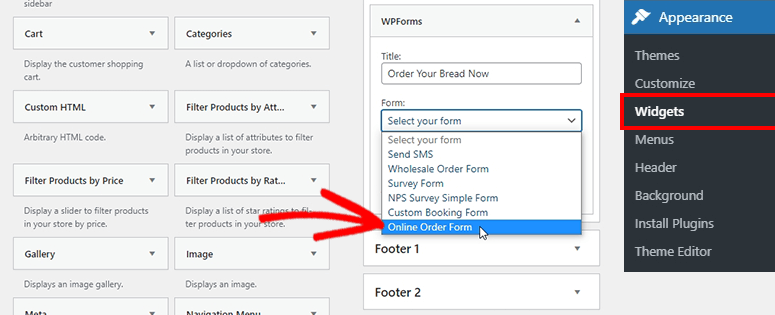
And with that, you’re ready to take orders on your website with a professional order form.
WPForms is hands down the best among form builder plugins. You can continue to use the plugin to build more forms for your site like a contact form or request to call back form so potential leads can get in touch with you to clear their doubts. This will help you overcome sales objections and increase your chances of making a sale.
That’s all we have for you today. We hope this tutorial has helped you learn how to create an online order form in WordPress.
For your next steps, you’ll want to use these resources to get more leads and grow your sales:
- How to Create a Stunning Splash Page
- How to Make a High-Converting Squeeze Page
- The Ultimate List of Tools and Software for Small Businesses
These posts are packed with tutorials and tools to help you succeed and make your online business a success.

Comments Leave a Reply