Do you want to make it easy for people to buy event tickets directly on your website?
By selling tickets on your site, you can avoid commissions and convenience charges levied by third-party platforms. Plus, you’ll get full control over design, ticket offerings, payment options, and more.
In this step by step guide, we’ll show you how to sell event tickets on WordPress with ease.
What You Need to Start Selling Tickets Online
When you sell anything online, you need to provide visitors with good user experience. This means it should be easy to find and view event details and buy tickets instantly.
To make sure the entire user journey goes smoothly, you’ll want to use a powerful tool that takes care of all aspects involved.
We recommend using WPForms to create an online registration form where customers can select their preferred ticket and checkout using their favorite payment option.
WPForms is the best form builder for WordPress. You can create any form you need for your site to take bookings, registrations, callbacks, quotations, and more. There are 1,200+ readymade templates to sell products, tickets, and online sessions.
Plus, WPForms makes it incredibly easy to add online payment options such as PayPal and Stripe. You can also set up automated email notifications to confirm payments and deliver the tickets instantly.
It even lets you create an event registration form so you can allow users to register and pay for your online events with ease.
WPForms offers an easy and simple way to accept payments on your site. It is one of the best WordPress payments plugins available in the market.
Added to that, here are some highlights that you’ll find helpful
- Easy to embed anywhere on your site
- Responsive mobile friendly designs
- Easy entry management
- Built-in spam protection
- Smart conditional logic to dynamically change fields based on a customer’s response
- Email integration with popular services like ConstantContact and Mailchimp
We’ll show you just how easy it is to use WPForms to create and sell tickets online for any event.
How to Sell Events Tickets on WordPress
Below, you’ll find the 6 simple steps to selling event tickets successfully on your website.
Step 1: Install and Activate WPForms
To follow along in this tutorial, you’ll need to sign up for a WPForms account. There’s a lite version of WPForms that lets you create basic website forms for free. If you want to use payment integrations, you’ll need to sign up for a Pro plan or higher.
There’s a 100% risk-free money-back guarantee so you can try the form builder before you make a commitment.
When you create a WPForms account, you’ll see a license key and a downloadable plugin file in your account.
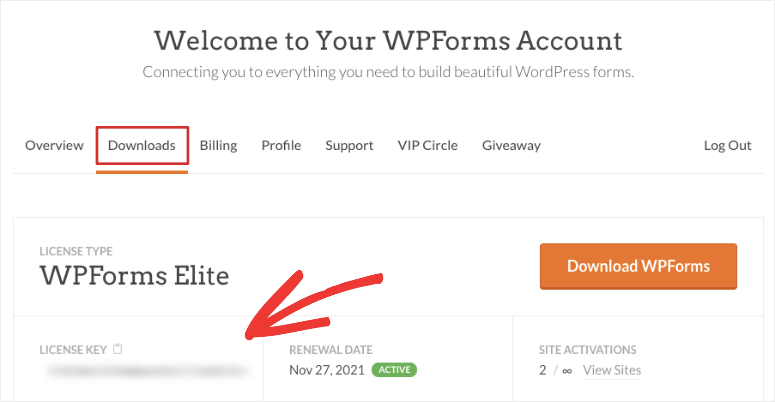
First, you’ll need to upload this plugin to your WordPress site. Never done that before? Follow our guide on how to install a WordPress plugin.
Then, WPForms will appear in your WordPress menu. Open the WPForms » Settings page to activate your license.
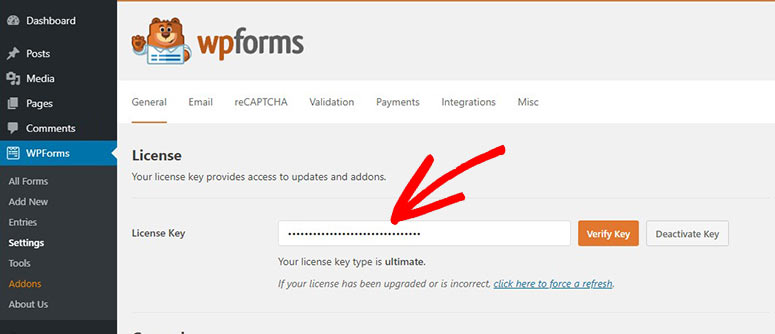
Enter your license key here and hit the ‘Verify Key’ button. Now, you can start building the events ticket form.
Step 2: Create an Order Form
To sell tickets, you can use the premade order form template from WPForms. It comes prefilled with the fields you’ll need.
Navigate to the WPForms » Add New page. Here you’ll see a list of templates that you can use to create any kind of form for your site.
First, you can add a name for your form at the top and then search for the Billing/Order Form template and select it.
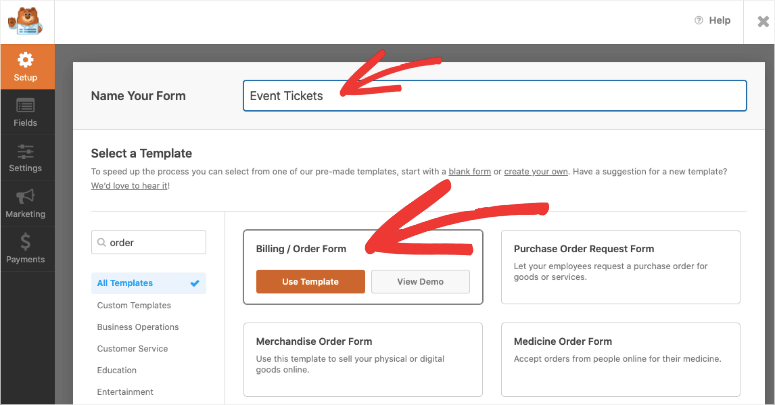
This will open up the form builder where you’ll see a preview of your form on the right along with a settings menu on the left.
Step 3: Customize the Order Form
The order form template is designed to fit your needs of selling just about anything online. This means you won’t have to make too many changes. Having said that, WPForms lets you customize every element of your form. You can change the field labels, add more fields, and delete the ones you don’t need.
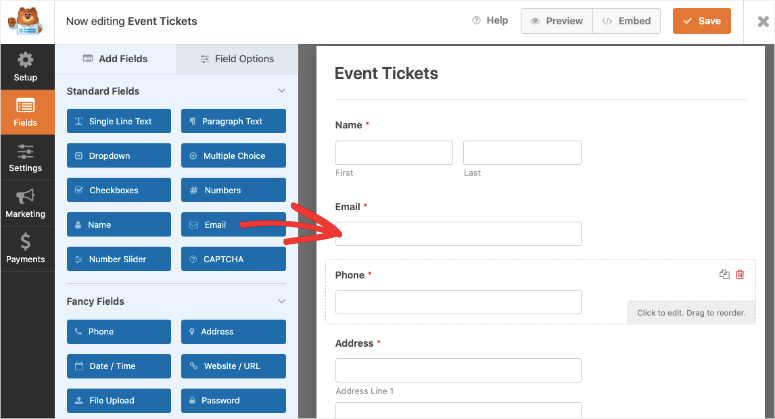
If you need to add more form fields, simply select it and drag and drop your desired field from the left menu into your form preview.
To customize a field, select it and you’ll see options to edit it on the left. The main field you’ll need to customize here is the ‘Available Items’ field. When you select the field, you’ll get options to:
- Change the field label
- Change the label of the items
- Add or delete items
- Add pricing
- Show pricing in the form against each item
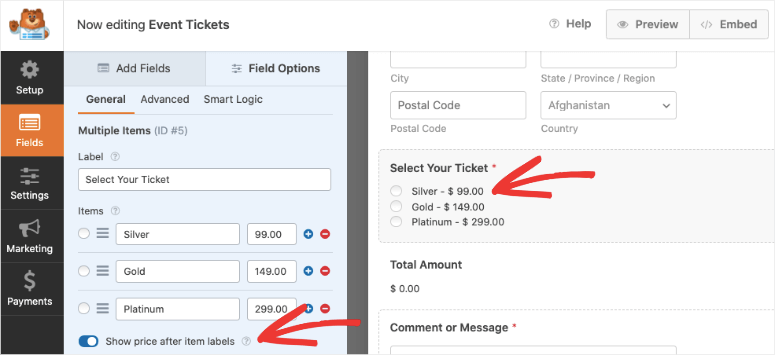
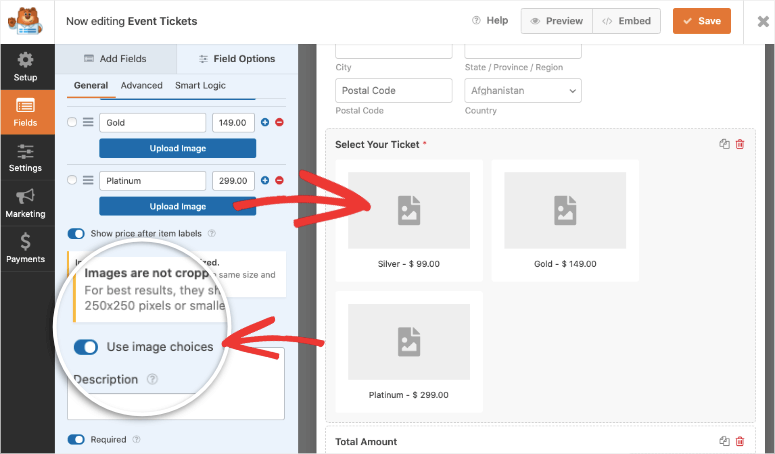
You can even include images to make your form more visually appealing. All you have to do is enable the ‘Use Image Choices’ option and then upload your product images.
WPForms recommends that your images be resized to 250x250px or smaller for the image to look good in the form.
If you would like to change the layout of your products, open the Advanced tab for this field and you’ll find the column and inline options.
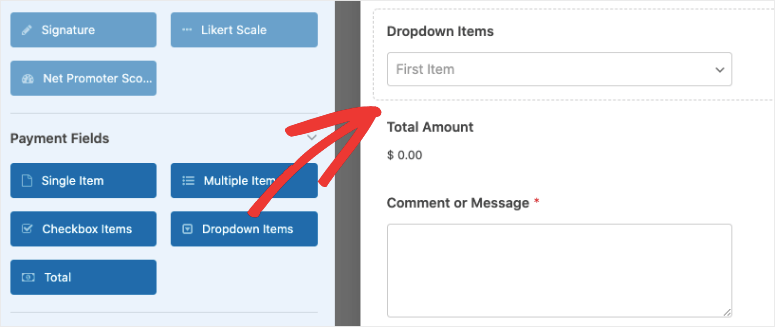
Now, if want to give users the option to select the number of tickets they want, we suggest using a dropdown items field for that. From the form field options on the left, under ‘Payment Fields’, drag and drop the Dropdown Items field.
When you select the field, you can change the label to ‘how many tickets you need?’ or something similar. Then add the number of tickets along with the price for them.
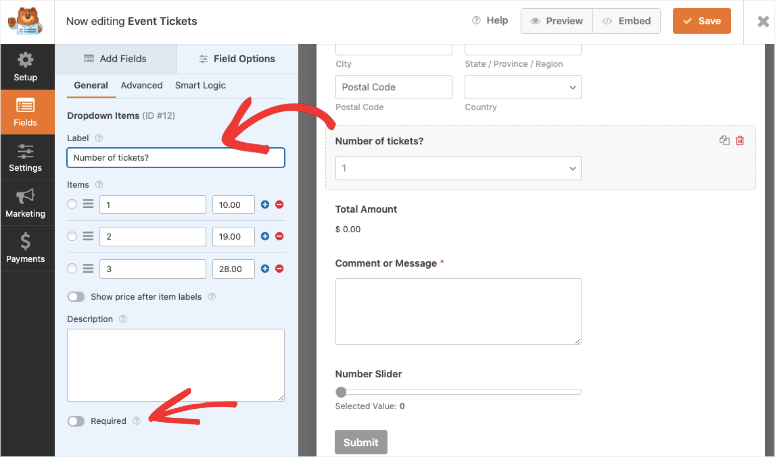
We suggest making the order items field a ‘required’ one. You can do this by enabling the ‘Required’ option at the bottom-left corner.
This will make sure customers select their ticket before they are allowed submit the form.
And with that, your events ticket form is ready. You can store your progress using the Save button at the top.
Now you can set up the payment gateway to collect online payments.
Step 3: Connect to a Payment Gateway
WPForms has a built-in payment integrations that are easy to enable in just a few clicks. From the Payments tab on the left, you’ll see options to enable PayPal Standard, Stripe, or Authorize.Net.
We’ll show you how to enable PayPal but the steps will remain pretty much the same for other payment options.
When you select PayPal, a popup will appear to install and activate the PayPal addon. Click on the ‘Yes, activate’ button and WPForms will install the addon for you.
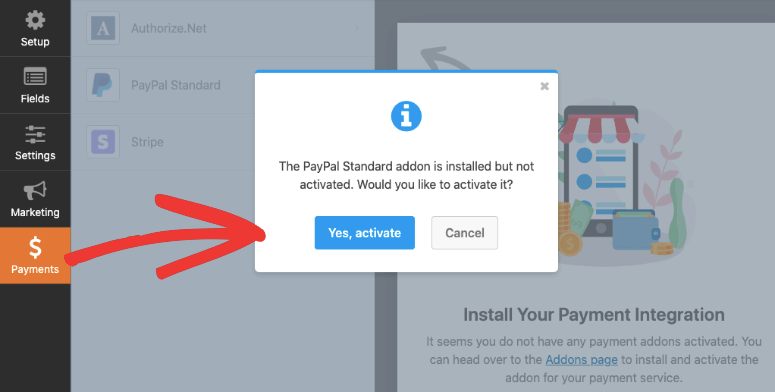
Then WPForms will ask you to refresh the page and you’ll see the PayPal option activated. Now you can select PayPal and enter your details such as PayPal email address, mode, and payment type.
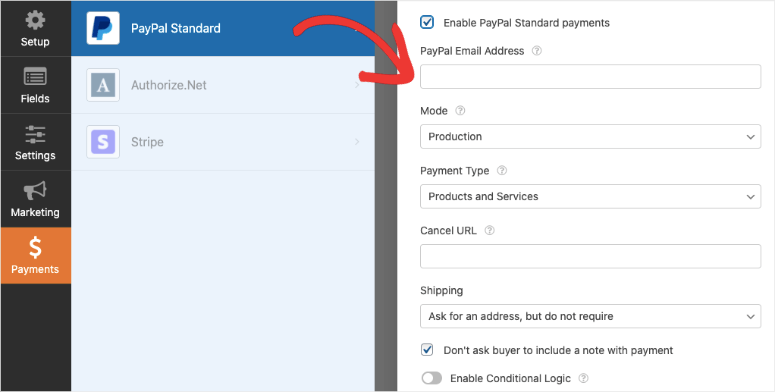
WPForms also has additional settings so you can configure settings such as shipping and payment notes.
If you want to give customers the option to pay by credit card, you can enable the Stripe payment option here.
When you’re done, hit the Save button at the top to store your payment settings. Now you’ve successfully created form to sell your event tickets easily. Next, you can set up automated emails to be delivered to customers as soon as they make their purchase.
Step 4: Set up Automated Notifications
After your customer makes their purchase, you’ll want to instantly deliver the tickets to them. You can do this in two ways using WPForms:
- Trigger an automated email
- Display an onscreen confirmation message with ticket details
1. Trigger an automated email
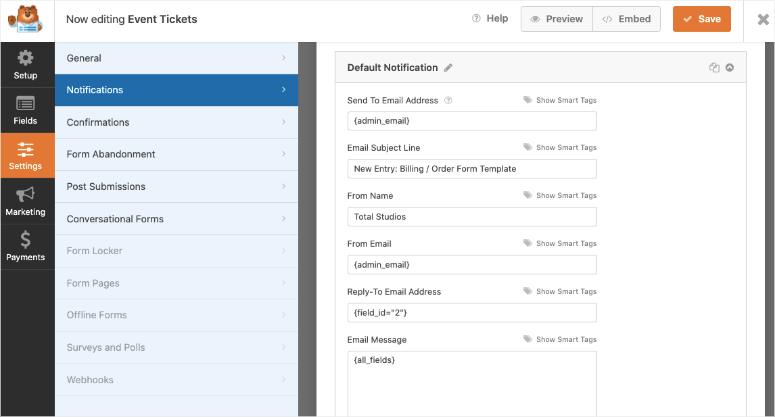
Under the Settings » Notifications tab, you can set up email notifications. WPForms already has a default admin notification set up. This will trigger an email to your WordPress admin email address as soon as an order is placed.
We recommend leaving the default notification as is. You can change the WordPress admin email and other details if you like and save the notification.
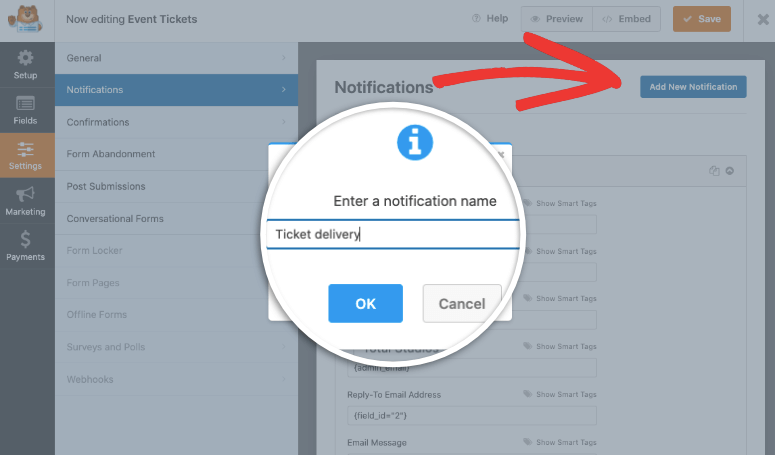
To set up the ticket delivery email, create a new notification using the ‘Add New Notification’ button. A popup will appear for you to add a notification name.
Once you do that, you can customize the notification. First, you need to configure the email field to auto detect the customers email address from the ticket form.
In the ‘Send to Email Address’ field, click on the Show Smart Tags button and select the Email option.
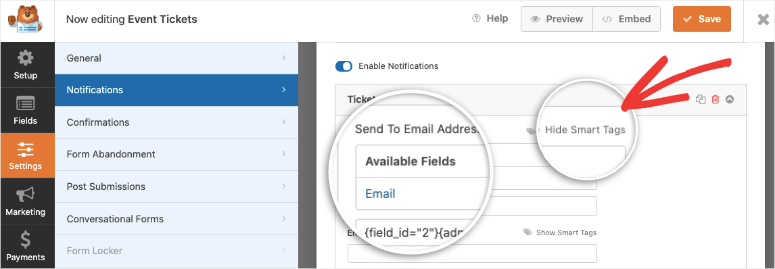
It’s that simple. Now you can customize the subject line and from name.
Next, in the Email Message field, you can add a personalized message and include the ticket download link.
If you would like to include the details they entered in the form, use the {all_fields} smart tag. The tag will autofill the form details in the body of the email.
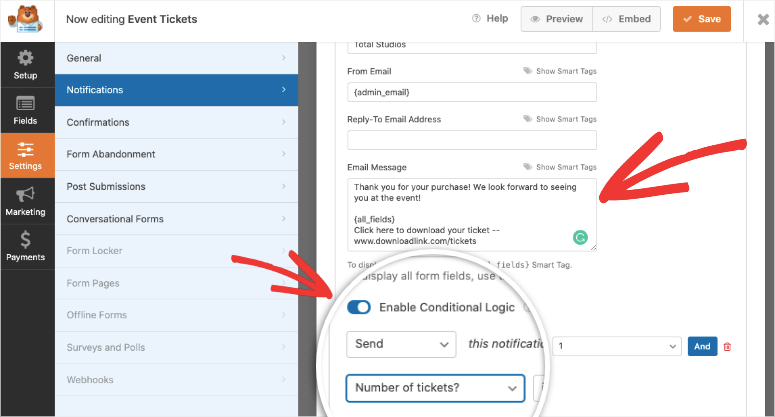
WPForms also helps you deliver different ticket links based on what the customer selected. To do that, first switch on the enable conditional logic option. Then you can select the form field and the item.
The email notification will be delivered only if these conditions are met.
Like this, you can create as many automated notifications as you like to deliver your tickets.
For more details on this, use our guide on Setting Up the Right Form Notifications.
Step 5: Sync Your Email Account
WPForms lets you sync your form to your email service provider. This way, your customer’s email addresses and other details will automatically be stored in your email account.
Then you can send marketing emails to them to update them about event promotions, dates, cancellations, and more.
Keep in mind, you’ll need to get their consent before you send out marketing emails. We suggesting adding a checkbox in the form to ask them to opt in to receive your newsletter or updates.
To integrate the form with your email marketing account, open the Marketing tab and select your email provider. WPForms will prompt you to install and activate the email marketing addon just like you did with PayPal.
Then you can follow the onscreen instructions to connect your email account.
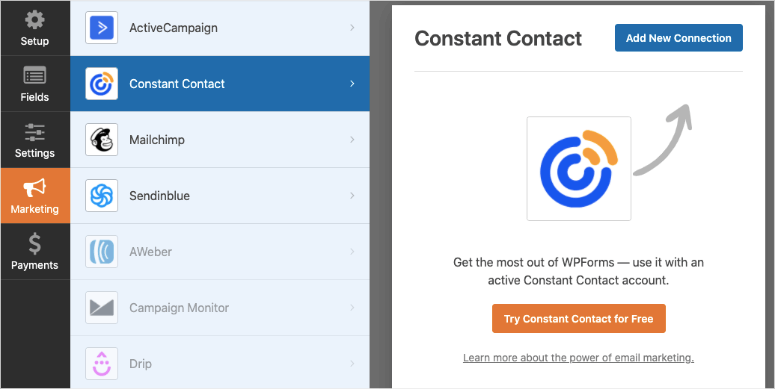
Once you’re connected, you can segment your leads based on what they order from you so your list stays organized.
You can even add your customers to automated drip campaigns to keep them engaged in your brand.
Now you’re ready to publish the order form on your WordPress site.
Step 5: Add the Events Form to Your Site
WPForms lets you add the events ticket form anywhere on your website such as posts, pages, or even your sidebar.
Inside the WordPress block editor, you can search for the WPForms block. Add it to your post or page, and you’ll get a dropdown to select the form you created.
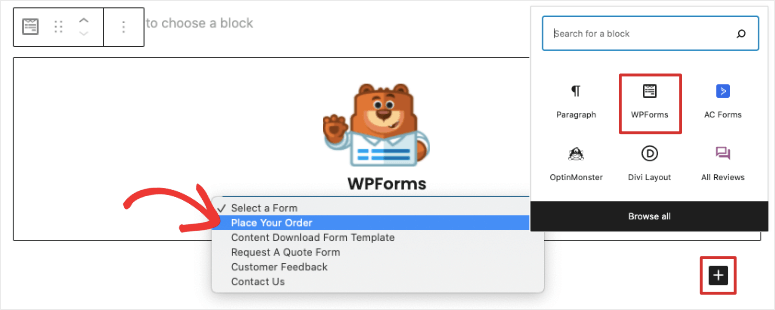
WPForms supports classic editor too! When you’re editing a post or page, you can use the Add Form button and select the form.

All you need to do next is preview and publish your post or page. Then you’ll see the product form appear on your website.
To add the form to a widget-ready area such as a footer or sidebar, navigate to the Appearance » Widgets page.
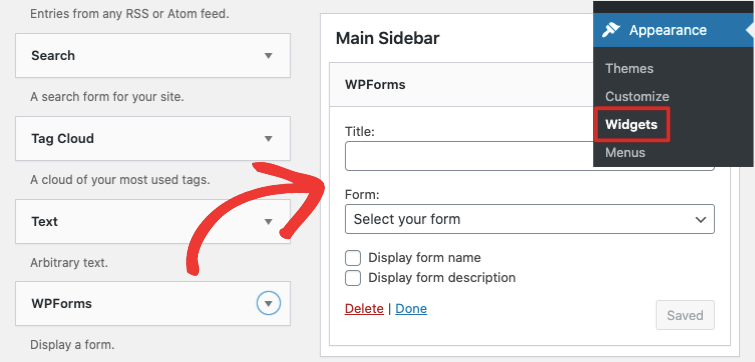
Drag and drop the WPForms block into your sidebar and select your form from the dropdown menu.
Once you save your menu, the events ticket form will appear in your sidebar giving people an easy way to buy your ticket while they’re browsing your site.
Now that your form is live on your site, you can promote your event to drive sales and revenue. Here’s our exclusive pick of WordPress tools to help you do that:
- SeedProd – Create stunning landing pages for your events. The builder has a built-in ‘Contact Form’ widget that lets you embed any form you create with WPForms with just a click. Follow our guide on how to create a sales page in minutes.
- OptinMonster – Display targeted conversion campaigns such as popups, slide-ins, floating bars and more. You can embed your ticket form inside popups that appear on click, on exit, scroll depth, and more.
- TrustPulse – Showcase user activity on your site such as recent sales and signups to build trust and cofnidence in new visitors.
That’s all we have for you today. We hope you found this tutorial helpful and if so, you’ll be interested in these resources:
- The Complete WordPress Security Guide (Beginner Friendly)
- Powerful Customer Acquisition Tools For Exponential Growth
- Best Marketing Automation Tools for WordPress
We’ve included a security guide because you’ll need to protect your site from hackers. This is extremely important when handling payment information and personal data of customers.
The other guides will help you smoothen workflows and maximize profits.

Comments Leave a Reply