Are visitors seeing an error message on your WordPress site saying “Your connection is not private”? Are you worried that you’ll lose traffic and sales?
The error can stop people from coming to your website, and what’s worse, they may not visit again because they don’t trust that your website is secure.
“Your connection is not private” message can appear for a number of reasons but thankfully, it’s easy to fix.
In this step by step guide, we’ll explain why you’re seeing this error and how to troubleshoot and fix it.
What Is “Your Connection Is Not Private” Error?
In the simplest terms, the error message “Your connection is not private” appears because the browser such as Google or Firefox has marked your site as insecure or unreliable.
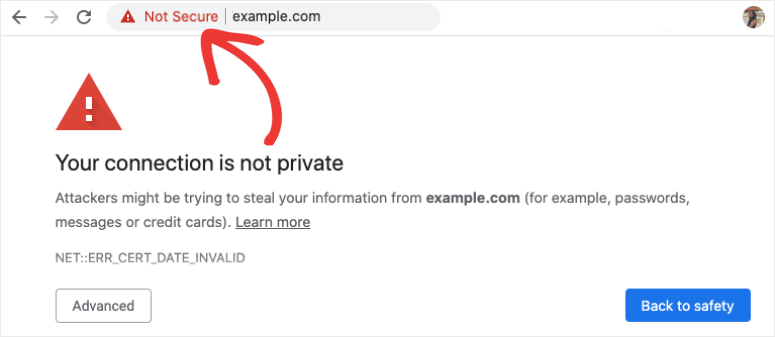
This often happens when there’s a problem with your SSL connection or the browser is unable to verify the SSL certificate.
Usually, web hosts issue free SSL certificates to secure your website. For instance, with every Bluehost plan, you get a free SSL certificate along with a domain name for 12 months.
If you don’t have an SSL certificate installed, you can fix the issue by getting one right away. An SSL certificate will ensure any data sent to and from your website is encrypted and safe from hackers. Once activated on your site, you’ll see a padlock next to your site’s URL in the address bar.

For more details, follow our guide: How to Add SSL and HTTPS in WordPress (Step by Step).
If you already have SSL and are seeing this error, we’ll show you how to fix your SSL connection, however, we must add that sometimes this error pops up on visitors’ browsers due to an issue on their end.
It could be caused by their WiFi network or operating system. For instance, if they are using a public unsecured WiFi network, the browser they’re using will display this prompt.
So we’ll cover steps you can take on both sides: the browser as well as your website’s SSL certificate. Here’s what we’ll cover to remove the ‘Your connection is not private” error.
- Check Browser Settings
- Check Browser System or Device Settings
- Check Your Website Settings & SSL Certificate
If you’ve already tried a few measures, feel free to skip ahead to the one you think will help resolve the issue. With that said, let’s get started.
Steps to Fix “Your Connection Is Not Private” Error?
There are plenty of steps you can take to remove the error you’re seeing on your browser that says “Your Connection Is Not Private”. We’ll start with the easiest ones and work our way down.
Check Browser Settings
This security error message is displayed by your browser so let’s start there by checking if it’s a browser issue.
1. Reload the page
The simplest way to overcome browser errors is to refresh the page. This re-establishes the SSL connection and the page usually loads without the error.
You can do this easily using Command + R keyboard shortcut on Mac or CTRL + Reload button on Windows. This works most of the time.
You can also try to close your browser and open a fresh browser session. Then try visiting your website to see if the error has disappeared.
2. Clear browsing history
If you’ve visited a website before, your browser will store that data in its cache. This means your browser can be displaying old or outdated data when you try to visit the same site.
You can clear your cache and cookies to reset your browser. We’ll show you how to do this in Google Chrome, however, the steps remain similar for other browsers.
Keep in mind that when you do this, you’ll be logged out of all websites and sessions. You’ll have to enter your credentials and log back in.
In your Chrome window, you’ll see a three-dot menu in the top right corner. Open the menu and select More Tools » Clear Browsing Data.
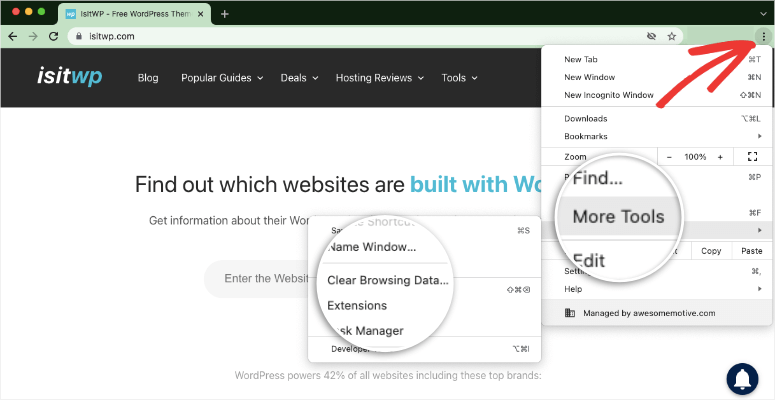
This will take you to the Chrome Settings page and you’ll see the ‘Clear Browsing Data’ popup appear.
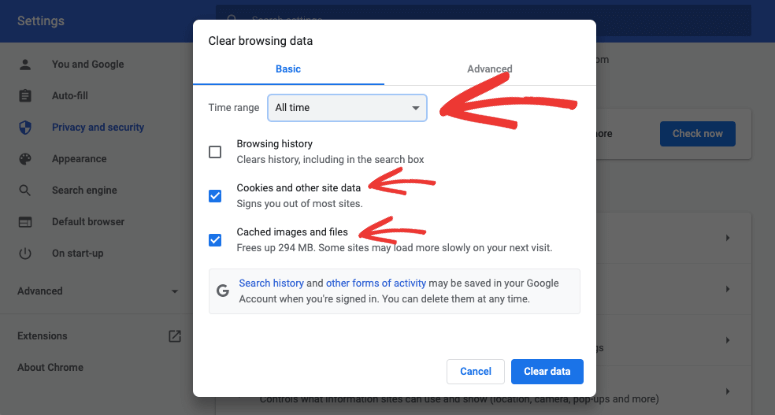
Under Basic settings, set the time range as ‘All time’. Make sure you’ve checked the boxes “Cookies and other site data” and “Cached images and files.”
Then hit the ‘Clear data’ button and your browsing data will be deleted.
Once you’ve done that, you can visit your website again with a fresh connection to your website’s server.
For more details on clearing cache, follow this guide from WPBeginner: How to Clear Your Browser Cache in All Major Browsers (Fast Way).
3. Try incognito mode
If you don’t want to clear your browsing data, you can access your website using incognito mode. When you go incognito, your browser will not use or store any website data on your computer.
To access incognito or private mode, click the three dots in the top-right corner of your browser.

Now click on the New Incognito Window button and visit the site you’re trying to access.
4. Use a different browser
Sometimes, error messages may be specific to just one browser. You can try visiting your website on other browsers. A few popular ones include Chrome, Mozilla Firefox, Edge, Opera, Safari, and Internet Explorer.
If you find the error occurs only on one browser, simply uninstall and reinstall the browser. This should fix the issue.
If it’s not a specific browser issue, we have more steps you can try below.
Check Browser System or Device Settings
Sometimes, if your device’s settings aren’t up to date or you’re using security software, it can cause these kinds of browser issues.
1. Check computer date and time
There are times when your operating system’s date and time aren’t set correctly. This can cause the error “Your connection is not private” because your browser relies on your computer’s date and time settings to check an SSL certificate’s validity.
Simply put, this means your SSL certificate can appear to be invalid or expired because your date and time are wrong.
Setting it to the correct time should remove the error.
You’ll find the date and time settings under Settings » Time & Language » Date & Time in Windows. If you’re using Mac OS, these settings are under System Preferences » Date & Time.
The best option is to set date and time automatically and set time zone automatically.
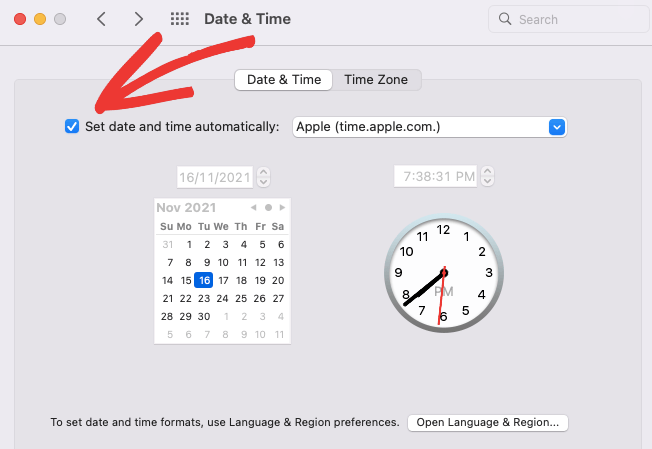
Once updated, refresh your browser and revisit your site.
2. Turn off antivirus
If you have an antivirus program it might cause issues if it doesn’t properly recognize your SSL certificate. Temporarily disabling your antivirus software may help. Then, open your site to see if the error persists.
3. Disable VPN
A VPN will use a remote server to hide your IP address so that you can stay anonymous online. This kind of software uses security layers that can sometimes block certain SSL certificates. We recommend turning off your VPN service and trying again.
If all of these measures do not work, you’ll need to check if there’s a problem with your website or SSL certificate. We’ll take you through the steps of that next.
Check Your Website Settings and SSL Certificate
Your SSL certificate encrypts any data sent to and from your website. This makes the connection between your server and visitors’ browsers secure.
If a hacker tries to steal the data while it’s in transit, they’ll get a bunch of gibberish code. So they won’t be able to use it.
If your SSL certificate is invalid or configured incorrectly, it can result in browsers displaying the error “Your connection is not private.”
Here’s what you need to do if you feel it might be an error caused by your own website:
1. Clear website cache
Similar to browser cache, you can clear your own website’s cache. There are plenty of plugins to clear your website cache with a single click.
We have a detailed guide on this: How to Clear Your Cache in WordPress (Ultimate Guide).
2. Check expiry date
The first checkpoint would be to see if your SSL certificate is valid.
You can check your certificate’s expiration date by clicking on the padlock icon next to your website and selecting the ‘Connection is secure’ option.
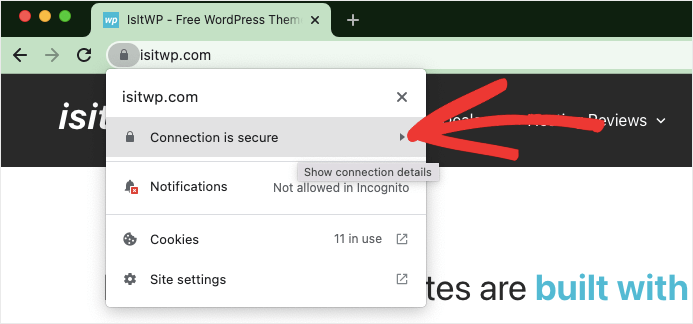
In the same menu, you can see the SSL status. Click on “Certificate is valid” to view details.
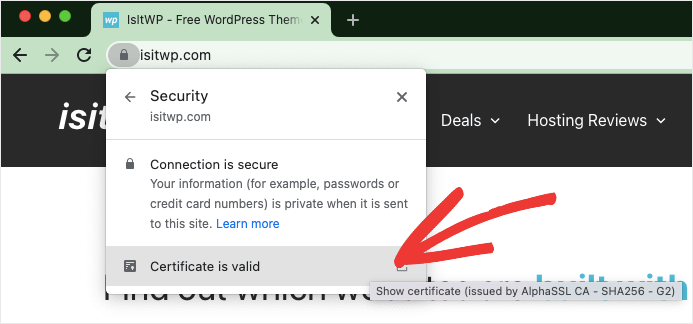
A popup will appear with the details of your SSL certificate. You can see the expiry date and other details.
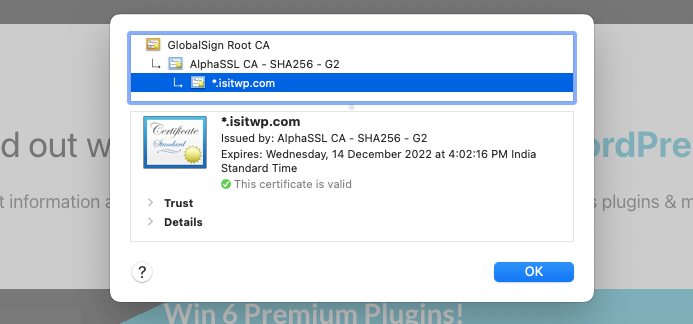
In case your certificate shows expired or invalid here, then you’ll need to reinstall your certificate inside your web hosting account.
3. Check certificate domain name
If you recently migrated your site to a new domain name, made major changes, or even installed an SSL certificate, this error may appear due to the wrong domain name being added to the certificate.
The easiest way to check this is by contacting your web host and asking for this information. You can also check it yourself by accessing your SSL certificate inside your web hosting dashboard.
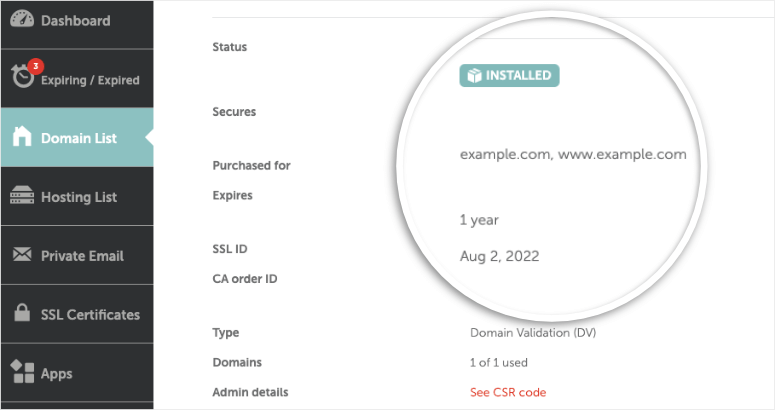
If you aren’t able to find it there, you can log into your hosting account’s cPanel and find the SSL/TLS section.
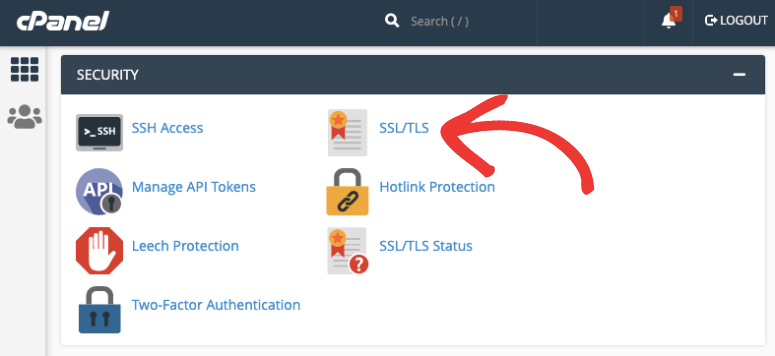
Click on Generate, view, upload, or delete SSL certificates. This will take you to a new page where you can view its details and check the primary domain name.
4. Check Google Search Console
When you install an SSL certificate, you’ll need to let Google know that you’ve made the change. You can make this change inside Google Search Console and change the property name to “https://”.
If you skip this step, Google will continue to collect data from the HTTP version of your site and display the ‘not private’ warning.
To update your site to HTTPs, you’ll need a Google Search Console account and a Google Analytics account. If you don’t have these, you’ll want to sign up for an account now and add your property to them.
For more details, see our step by step guide: How to Add Google Analytics to WordPress.
Once you’re inside the dashboard, navigate to Sitemaps and resubmit your sitemap with the updated HTTPs version.
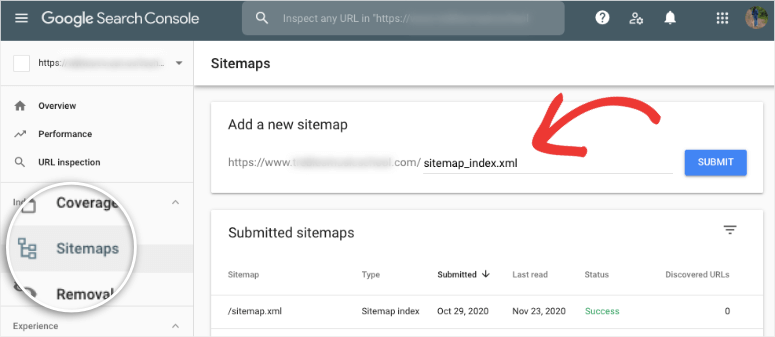
In case you’ve added any disavow link files on Search Console, open the Google Disavow Tool and click on your HTTP version. You’ll need to download the file and upload it to the new profile.
Then delete the old profile permanently to avoid any conflicts.
Now head over to your Google Analytics account, go to Admin » Property Settings » Property Name. Here, use the dropdown menu to select ‘https://’ here.
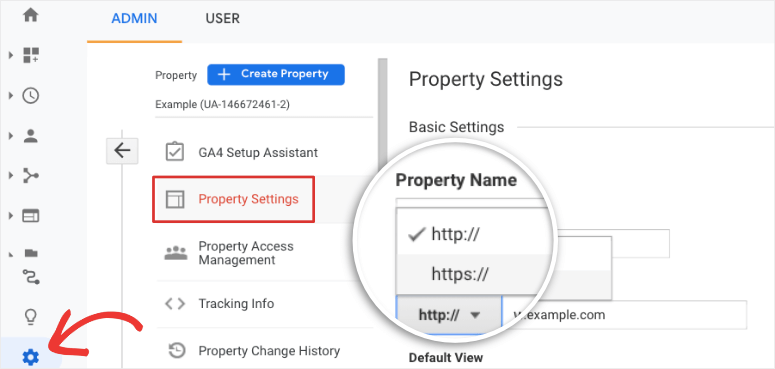
You’ll need to repeat this step under the View Settings tab. Go to the Website’s URL section and select ‘https://’.
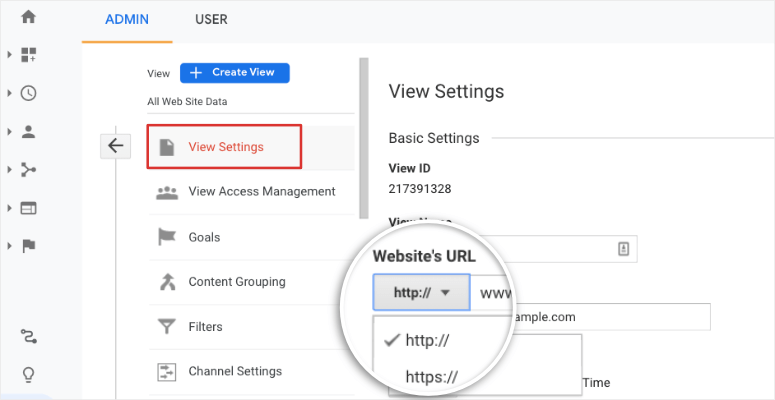
With that, you’ve successfully moved your website from HTTP to HTTPS. This will resolve the ‘Your connection is not private’.
5. Solve Mixed Content Issues
When you migrate from HTTP to HTTPs, there are chances that a few pages, especially old ones remain on HTTP URLs.
This results in mixed content on your site so browsers may display the “not private” error on some pages or even all pages of your site.
Thankfully, you don’t have to manually search for error pages. There are plugins that do it for you like Really Simple SSL or SSL Insecure Content Fixer.
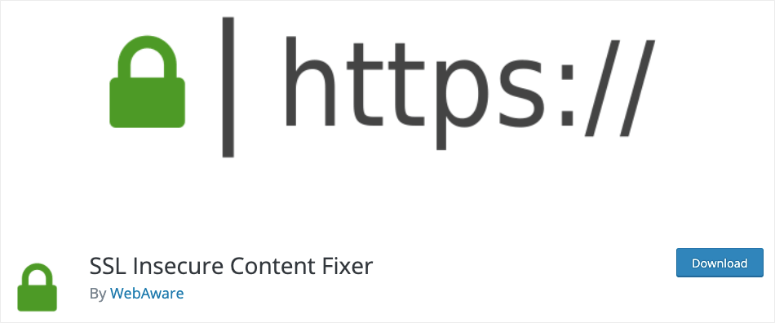
Once you install one of these plugins, you’ll just need to click a button to fix mixed content issues. Then the warning message should go away.
For more details on this, we recommend following this guide from WPBeginner to Fix Mixed Content Error in WordPress.
6. Test SSL server
Finally, you can make sure all configuration settings are working properly by running an SSL server test.
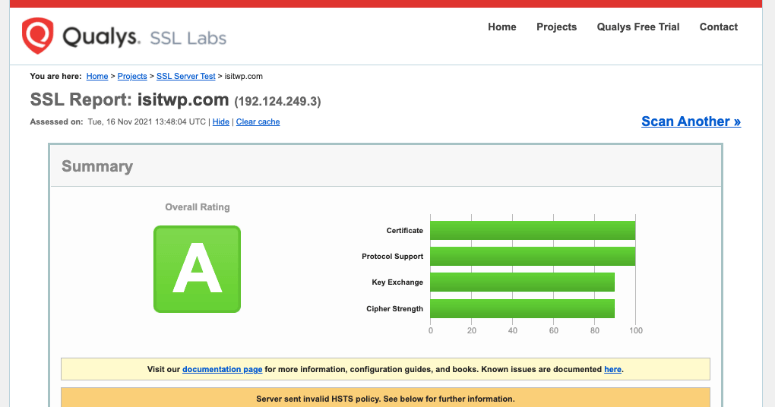
It’s a free tool where you can simply enter your domain name and run the test to get a deep analysis on your SSL certificate.
This includes TLS protocol, cross-browser testing, and SSL/HTTPs set up checks. The scanner will also show you the details of each test along with any errors it finds.
Those are all the steps you can take to solve the error “Your connection is not private”. We hope you found this tutorial helpful in fixing the warning message.
To improve your website’s security, we recommend making sure you’ve got the basics right.
First, always use a reliable web host like Bluehost, HostGator, or SiteGround. These hosts have robust security measures implemented to protect your site from hackers and other malicious elements.
Second, we recommend installing a security plugin like Sucuri to monitor and scan your website regularly. Sucuri will also put up a firewall to filter out bad bots, malicious traffic, and spammers.
Also, you may want to check our guide on how to fix the “Your account has been suspended” message issue on your website.
For your next steps, you’ll want to ramp up your website security to make sure you never get hacked or blacklisted. These posts will help you do that:
- The Complete WordPress Security Guide (Beginner Friendly)
- 8 Best WordPress Firewall Plugins for Security & Protection
- How to Harden Your WordPress Site to Keep Hackers Out
You’ll find tools and measures to tighten up your website security to make sure you don’t face such warnings on your site again.

Comments Leave a Reply