
Do you want to create a one product store to promote and sell your product online?
As the name suggests, a one product store only focuses on selling a single product. This is perfect for small businesses or solopreneurs who create limited high-valued products or digital goods.
Selling only one product doesn’t only make your business operations easier, but it also helps customers make their purchase decisions faster. With the right product, you have more chances to build a brand presence and grow your business online.
In this post, we’ll show the easiest way to create a one product store in WordPress. But first, let’s learn the benefits of selling a single product online.
Why Create a One Product Store?
You may think having an online store dedicated just to one product is not very profitable.
However, you’ll be glad to know you don’t need to create a full-fledged e-commerce site with multiple products to grow your online business.
In fact, there are many advantages to creating a one product store. Here are some of them:
- Cheaper to set up: The initial costs and resources required to create a one product store are much lesser than setting up a whole e-commerce site.
- Reach out to the customers: With only one product to promote, businesses can easily choose a target audience and cater to their requirements. They can focus on a particular niche and get greater results.
- Effective marketing: It’s easier to create high converting marketing campaigns and strategies to position your brand in the market.
- Easy to maintain: You can easily manage and maintain all the business processes and keep updating new features on your one product store.
Creating a one product store is a great way to sell a fresh and innovative product on the internet. You can streamline your workflow and market your product with ease.
With that, let’s learn how to sell a single product in WordPress without setting up an entire eCommerce site.
Creating a One Product Store in WordPress
When it comes to selling products in WordPress, the first option people go for is WooCommerce. But this option is built for eCommerce sellers that need to manage multiple products and inventory.
The most lucrative method for creating one product store in WordPress is to use an order form with a payment option.
With a product order form, you can add your product prices, images, and descriptions. You can even accept online payments directly on these forms.
To create a professional-looking product order form, you’ll need a good form builder plugin with payment integration features. We recommend using WPForms.
WPForms is the most powerful form builder for WordPress sites. This drag and drop form builder comes with tons of features that let you sell your products without any trouble.
To get started, WPForms offers a template library where you can find 1,200+ pre-built form templates to sell products and services on your site. This saves so much of your time and you can set up your product and start selling within 5 minutes.
The WPForms drag and drop builder is super user-friendly so even users who are not tech-savvy can edit and customize their product order form. No need to touch a line of code.
Plus, there are options to integrate payment providers like PayPal, Stripe, and Authorize.Net. You can add multiple payment options on your order form so customers can make payments in just one click.
Additionally, here are some of the reasons why you should use WPForms to create a one product store in WordPress.
- List one product or multiple versions of your product along with descriptions and images
- Easily accept online payments from customers directly on your order forms
- Connect your product order form with email marketing services such as Constant Contact, Mailchimp, and more
- Send automated email notifications to your customers, yourself, and your team members
- Prevent your form from spam and hackers with Google reCAPTCHA
Now that you know which form builder to use, let’s learn how to easily sell your single product on WordPress.
Step 1: Install and Activate WPForms
First, you need to sign up for a WPForms account. You’ll find a free version of the plugin in the WordPress repository.
However, you need to upgrade to a pro plan to accept online payments and add additional functionalities to your one product store.
After you sign up, you’ll get access to your WPForms account dashboard. Here, open the Downloads tab and find your download file along with the license key.
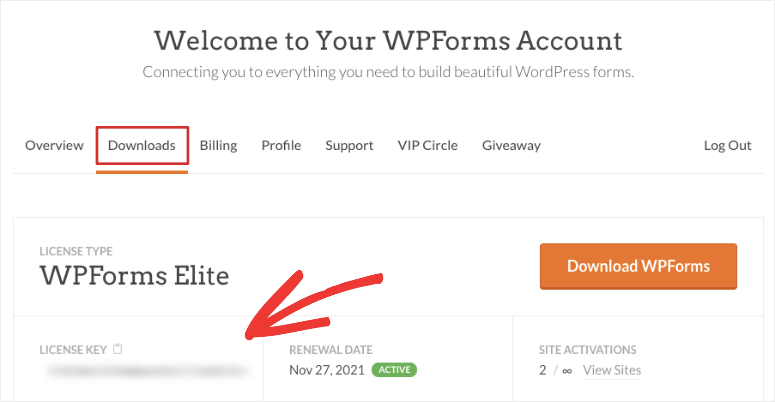
You’ll need to download the plugin file and install it on your WordPress site. If you need more help, check our guide on how to install a WordPress plugin.
Once you install WPForms on your site, navigate to the WPForms » Settings tab from your admin panel. To activate your pro features, you need to enter your license key here.
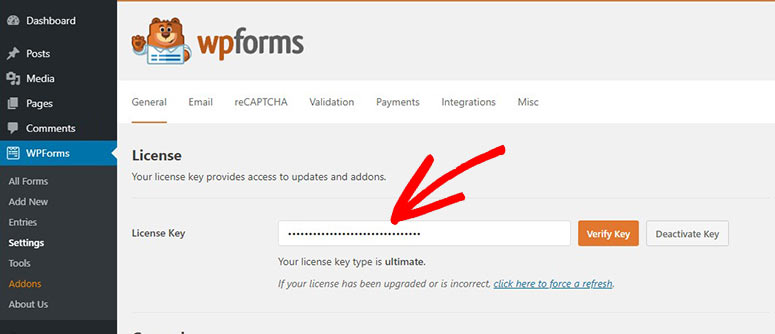
Then, click on the Verify Key button and you’ll see a verification success message.
Now, you need to set up the payment options for your one product store.
Step 2: Connect your Payment Service
Before you create your one product order form, you must connect your payment service provider to your site. This way, you can easily add the payment options to your forms in a few clicks.
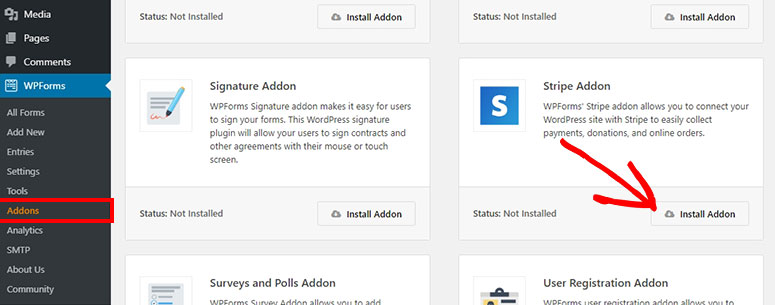
On your WordPress dashboard, head over to the WPForms » Addons tab and you’ll see a collection of WPForms addons. Here, you’ll find addons for payment providers such as Stripe, PayPal and Authorize.net
Now, select the payment option of your choice and click on the Install Addon button. For this tutorial, we are going to install the Stripe Addon. You can install any other payment addon to accept payments on your forms.
After the addon is installed, open the WPForms » Settings page and click on the Payments tab.
Here, you’ll see options to connect your Stripe account and set up your currency.
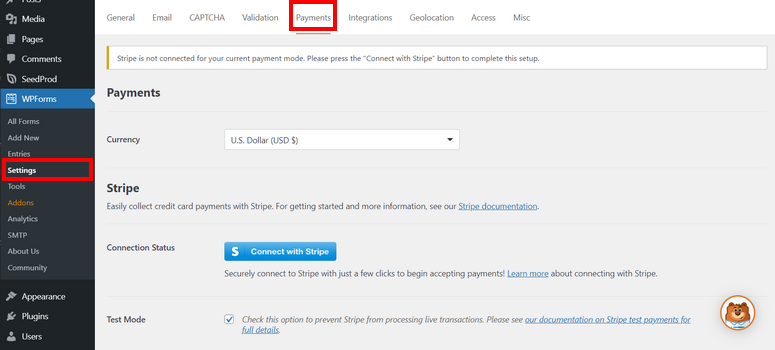
If you select any other payment provider like PayPal, you’ll see settings for the PayPal account here.
Also, WPForms allows you to use the Test Mode to check your connection status and payment integration before your one product store goes live. This option helps you set up your product and payment options without any issues.
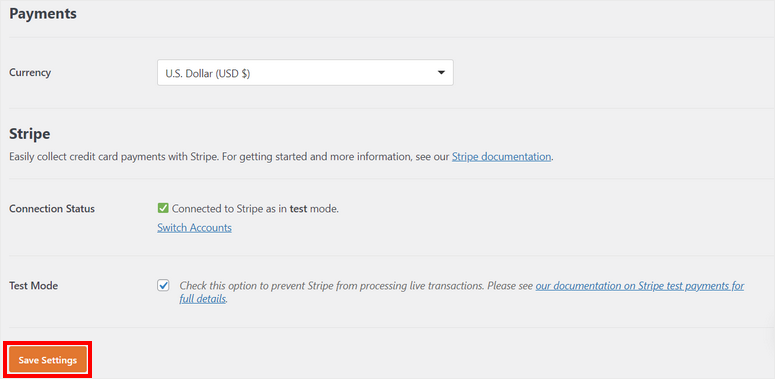
Make sure you click on the Save Settings at the end.
Now, you’re ready to create a one product order form and set up a payment option.
Step 3: Create a Product Order Form
To create a one product order form, you need to open the WPForm » Add New tab on the dashboard. This will launch the template library.
As mentioned earlier, WPForms comes with a template library that has over 100 form templates so you can create any type of WordPress form. You’ll find many product order form templates such as:
- Billing/Order Form
- Merchandise Order Form
- Purchase order Request Form
- Mattress Order Form
- Custom Product Order Form
- T Shirt Order Form
- Coffee Bean Order Form
- and many more
You can choose any of these templates as per your preference. For this tutorial, we’ll start with the Billing/Order Form template.
It includes all the form fields to promote your product, make customizations and accept payments. You can preview the form template if you like and see a demo of the form.
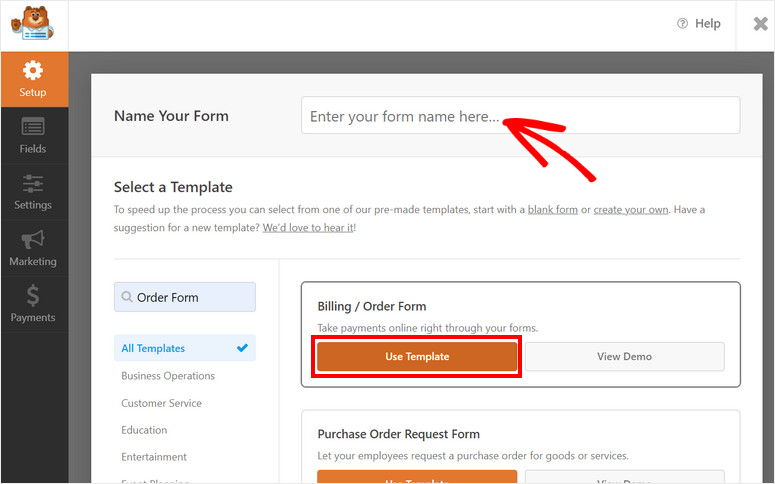
To get started, enter a name for your form and click on the Use Template button. This will open up the drag and drop form builder.
Step 4: Customize your Form
The form template already includes all the necessary information to sell your product and collect information from the customers.
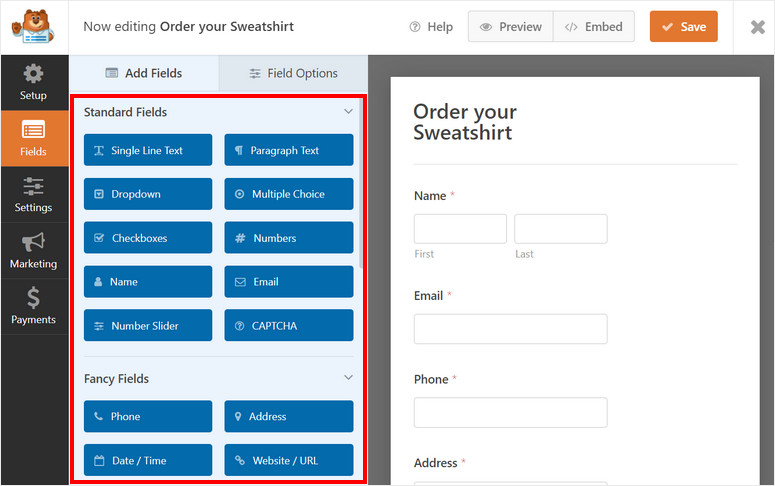
At the same time, WPForms lets you customize each element of the template and even add additional fields according to your requirements.
You’ll find all the form fields on the left side and the form preview on the right side of the page builder.
To insert a new form field to your one product order form, simply select it and drag and drop it into the form preview.
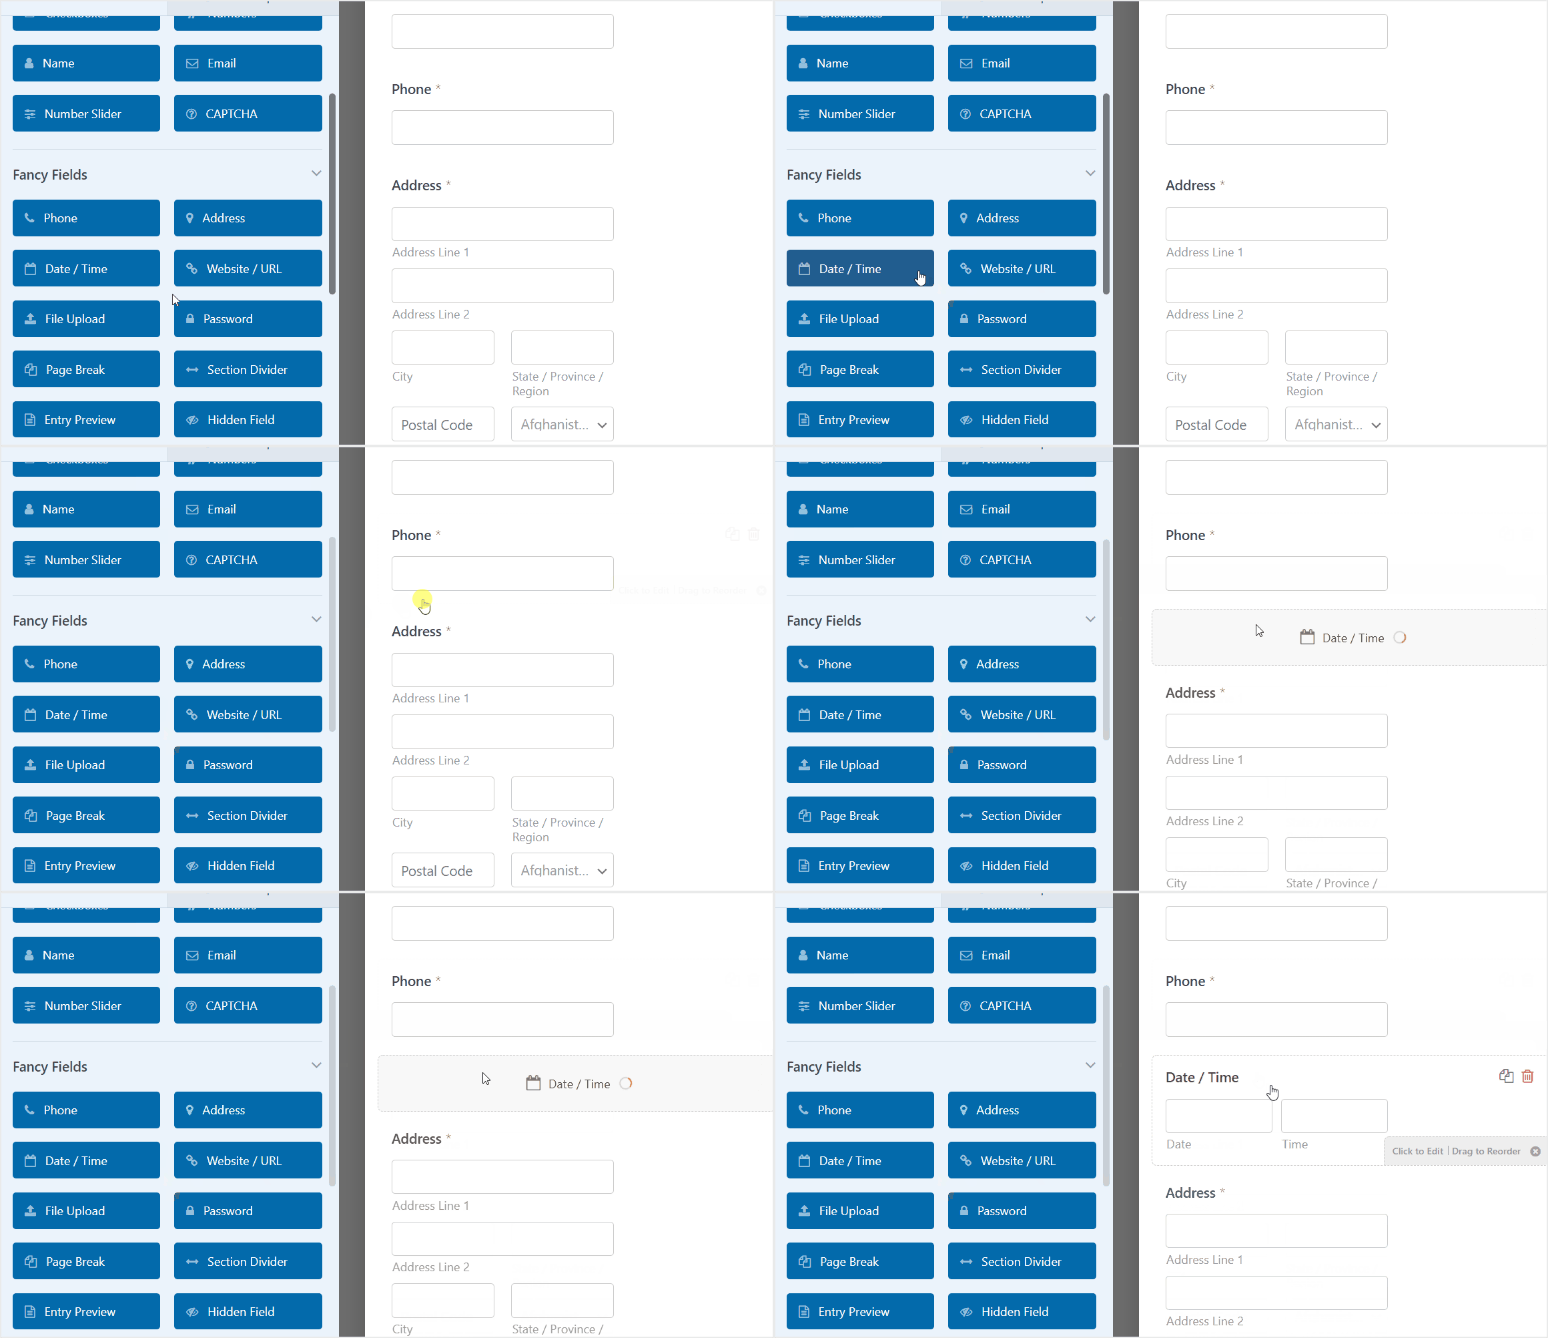
To customize any form field, simply select it in the form preview and you’ll see field options in the left menu.
Let’s edit the Available Items field on the form template to add your product details. When you select the field, you find options to change the label, add or remove items, add pricing, and more.
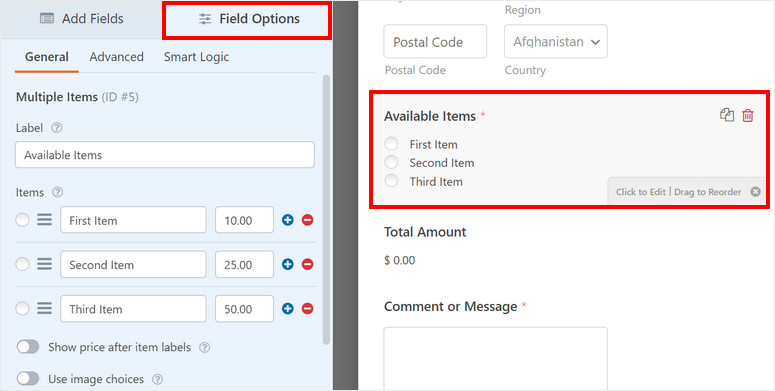
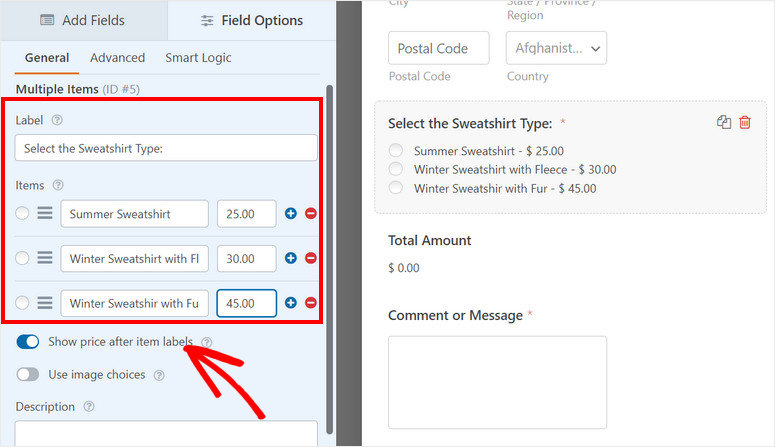
So you can add your custom label for the field and add items for the product variations. Here, we are adding 3 options for the customers to choose from. We’ll also add the prices along with them.
You can enable the Show price after item labels option to show the prices on the front end of the form.
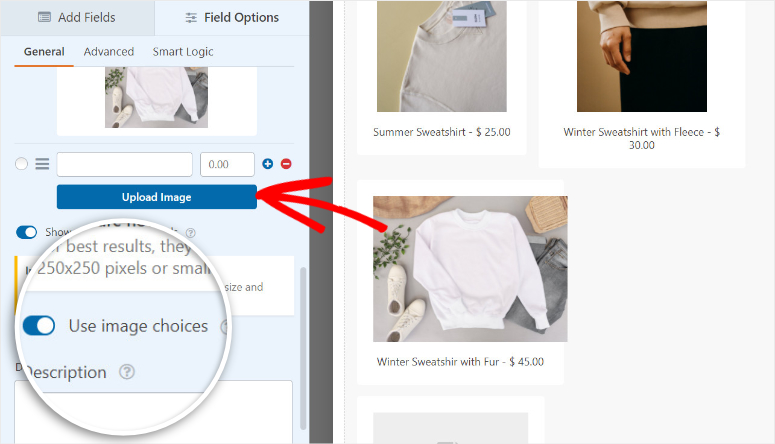
What’s more, you can even add images to your items so that your customers get an idea about your product. This helps them to make their decision as they see what they are going to buy.
For this, you’ll need to enable the Use Image Choice option and then upload your product images. WPForms recommends that you use image sizes up to 250x250px or smaller for the image to look great.
Additionally, you can change the layout of your product items from the Advanced tab. Here, you can choose the field style and layout.
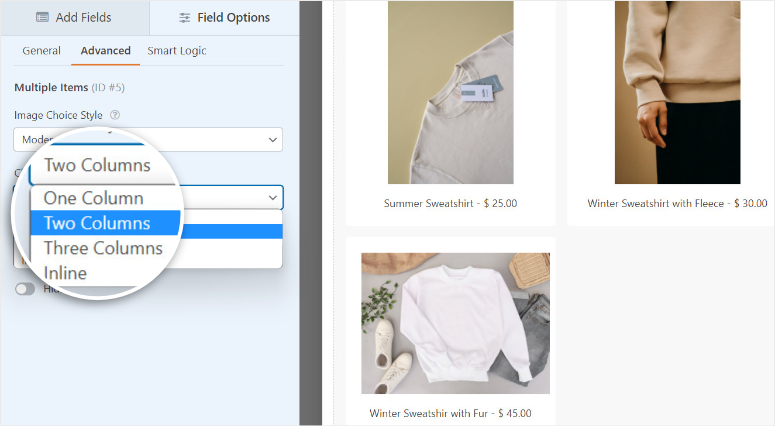
Now, your product catalog is all set up. Don’t forget to click on the Save button on the top of the builder to store your progress.
Let’s set up a payment option on your one product order form to accept online payments.
Step 5: Add Payment Option
Because we are using Stripe as the payment option, you’ll need to insert the Stripe Credit Card form field to the form first.
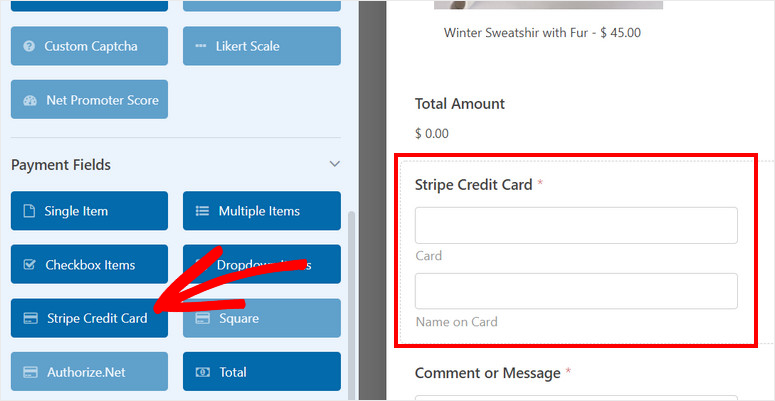
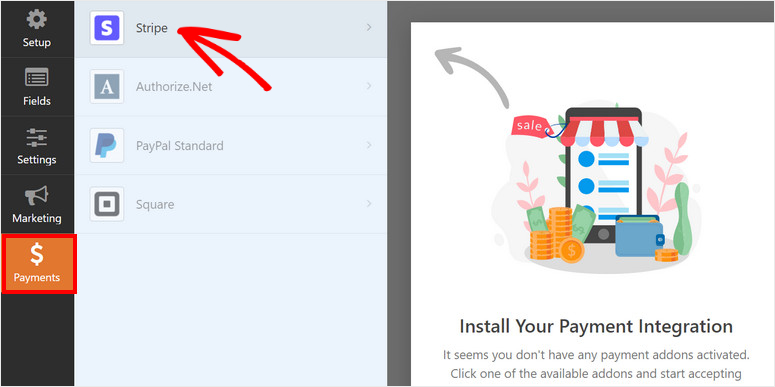
Now you can set up Stripe payments. From the left menu panel in the form builder, open the Payments tab. Here, you’ll find options to add different payment options depending on the addon you install.
As we installed the Stripe Addon for this tutorial, click on the Stripe option and check the Enable Stripe payments option there.
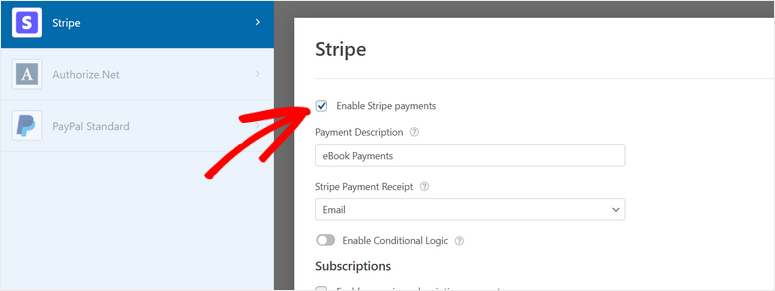
Now, you can change your payment description and choose where to send your Stripe payment receipt. To send the payment receipt directly to the customer, select the Email option from the dropdown menu.
After you add the payment option, click on the Save button so you don’t lose your changes.
Next, you’ll need to set up the notifications and confirmations for your product order form.
Step 6: Set up Notifications and Confirmations
WPForms lets you control what happens after a customer places an order on your one product store. You can send email notifications and confirmations to:
- Send yourself and your team members an email with order details
- Send customers an email to confirm their order
- Show a confirmation or thank your message after a successful purchase
- Redirect customers to another page after form submission
To set up email notifications, open the Settings » Notifications tab on the menu on the left. Here, you can see the default notification is already set up. This notification sends an email to your WordPress admin email address.
In the Send to Email Address field, you can add the email addresses for you and your team members to get notified with new order details.
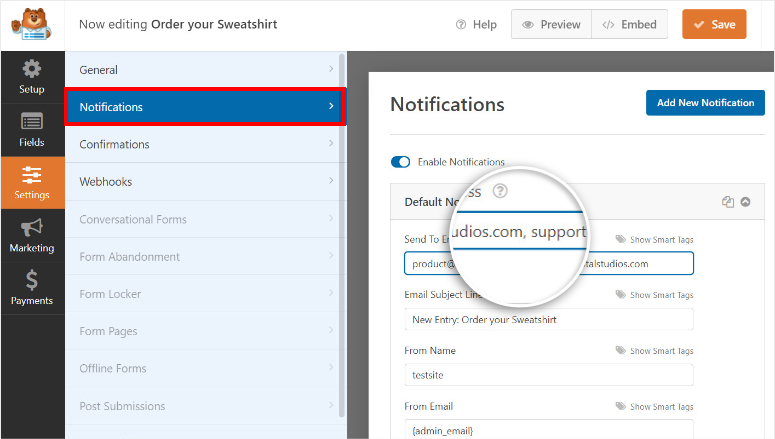
Also, you can create a notification for your customers to confirm their purchase orders. For this, click on the Add New Notification button on the top right of the page.
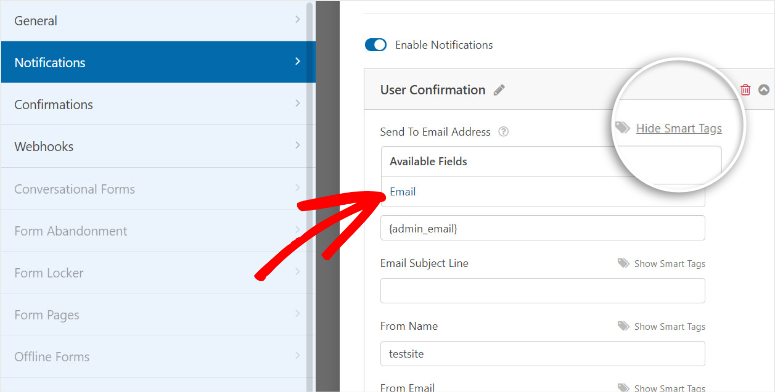
Then, you can use the Show Smart Tags button to select the Email form field. This will send the email notification to the email address entered by the customers in the form.
Now you can customize the subject line, form name, and email body as per your preferences.
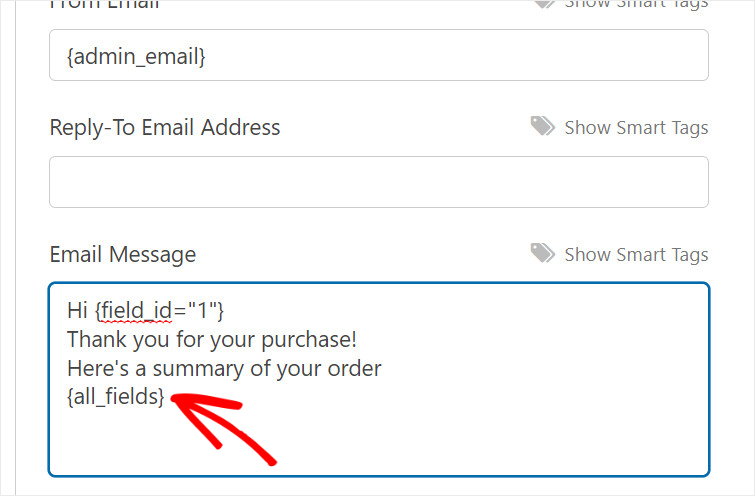
To add all the customer entered information and product order details on this email, use the {all_fields} smart tag.
This will fetch all the information from your order form and automatically add them to the email notification.
For more details on this, you can check out our guide on how to set up the right form notifications.
Furthermore, WPForms lets you display a confirmation message on the front end of your one product store after the customer makes their purchase order.
In the Confirmations tab, you’ll get to choose from 3 options.
- Show a custom message
- Redirect to a different page on your site
- Redirect to external website or page
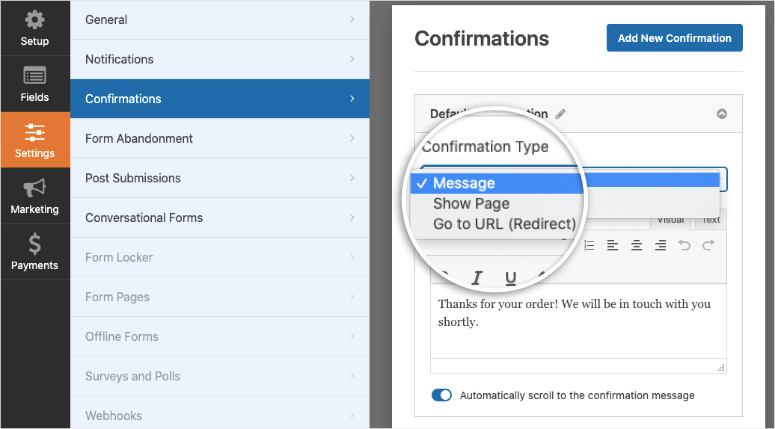
If you want to show a thank you message to your customers, enter your custom message in the editor.
Once you’re done, save your settings. Now, all you need to do is publish your one product order form on your WordPress site.
Step 7: Integrate with Email Marketing
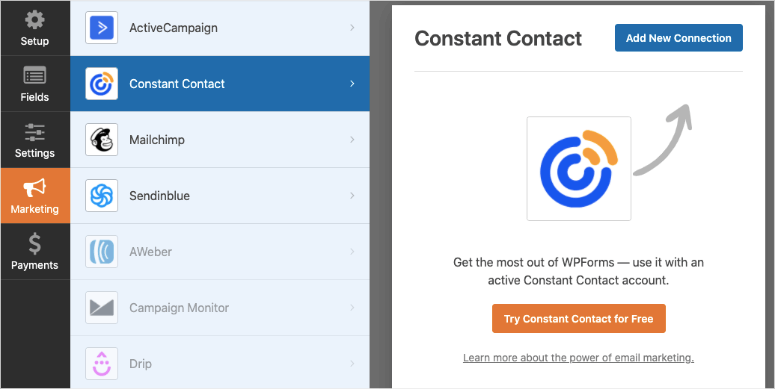
WPForms lets you connect your order form to your email marketing account. This way you can tag your customers and add them to email lists to send them automated updates and other emails.
In the Marketing tab, you can select your preferred email provider. Then follow the onscreen instructions to sync your form to your email account.
Now all that’s left to do is add the form to your website so customers can start placing their orders.
Step 8: Publish your One Product Store Form
With WPForms, you can create a one product store without setting up a shopping cart system. It lets you add your product order form on any WordPress page, post or sidebar and start selling right away.
If you’re using the WordPress block editor, search for the WPForms block and add it to your page or post.
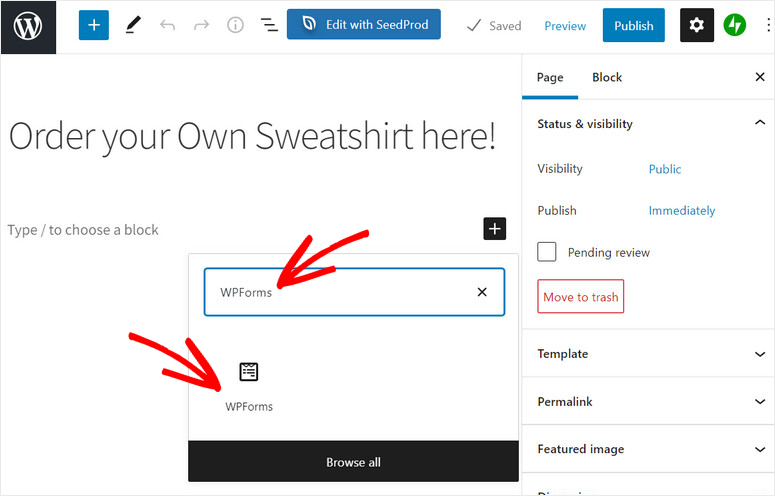
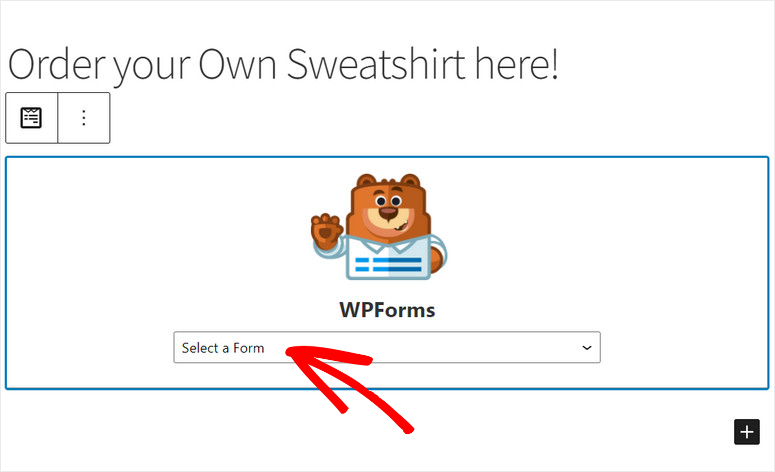
Then, you’ll see a dropdown menu that lets you select the form you just created.
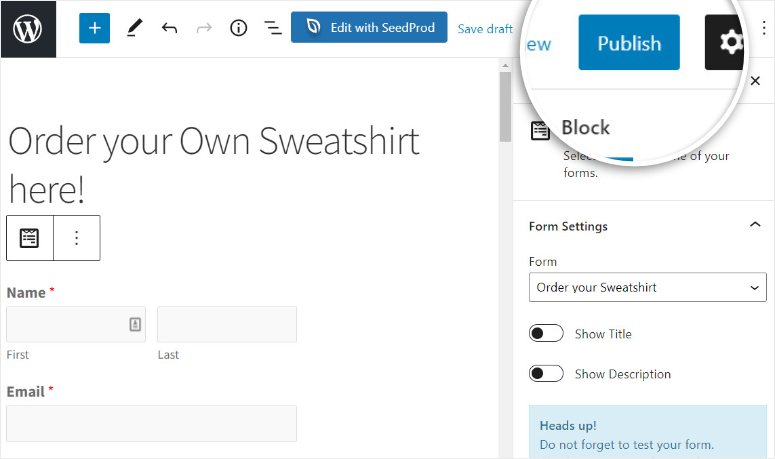
After you add the product order form, you’ll see the form preview on the text editor. The last step is to click on the Publish button and sell your product on your site.
If you use the WordPress classic editor, you can use the Add Form button and select your product order form to add it to any page or post.

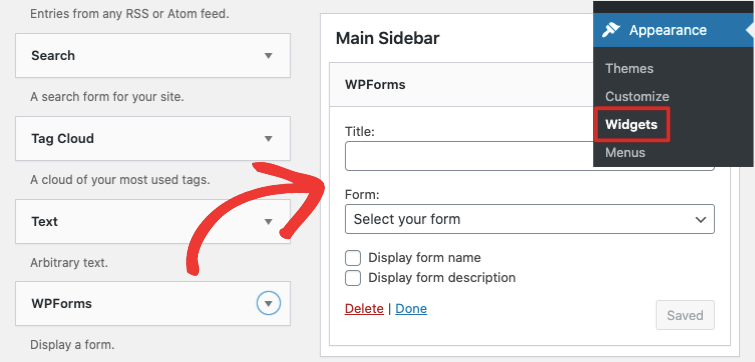
To add the product order form to a widget-ready area like a footer or sidebar, head over to the Appearance » Widgets tab. Now, drag and drop the WPForms widget into the sidebar or footer menu on the right.
Then, select your form using the dropdown menu and save your changes.
Congrats! You have successfully created a one product store on your WordPress site without any coding.
Now, your customers will be able to view your product catalog, make their selection and check out with online payment options effortlessly,
WPForms is the best form builder plugin that lets you create WordPress forms for any purpose. You can easily integrate a payment option so you can sell anything including physical and digital goods without the help of a third-party service.
With WPForms, you can create other forms for your website such as:
- Review and testimonial
- Contact forms
- Event Registrations
- Surveys and polls
- Signup forms
- and so much more
If you want to create a dedicated landing page for your product, check out SeedProd. It’s the best landing page builder for WordPress with readymade templates and an easy WPForms integration.
And that’s all! We hope this tutorial helped you easily learn how to create a one product store in WordPress.
Next, you can check these resources to promote your product and boost your sales:
- Top FOMO Plugins to Skyrocket Conversions in WordPress
- 11 Powerful WordPress Lead Generation Plugins Compared (2021)
- How to Create a Free Landing Page in WordPress
These post will help your generate more leads for your online store and convert them into paying customers. The last one will help you create a dedicated page to market your product online without any cost.

Comments Leave a Reply