
Want an easy way to allow your users to save their form progress in WordPress?
With the save and resume form functionality, you can add the option to save partially filled forms and let users complete the submission later. This helps to reduce your form abandonment rate as users can come back and submit the form whenever they want.
In this article, we’ll show you how to allow your users to save WordPress form progress in a few steps.
But first, let’s learn about the benefits of letting users save and resume form submissions.
Why Save WordPress Form Progress?
If you have a long form, then you’ll want to allow your users the option to save their progress. Complex forms usually take a longer time to fill. And sometimes, the user may not have all the information at the moment especially if they have to submit important documents and personal data.
They may start to fill out a form and later realize that they need to submit their ID proof which they don’t have on hand.
In many cases, users face technical issues such as device shutdowns and poor internet connection. This is also one of the reasons you receive partially filled form submissions on your site.
However, you can’t completely avoid longer forms.
So the save and resume option works really well for forms that need
- Confidential data: The person may need time to check if they can share this with you.
- Financial information: They may need to get this info from their bank, lawyer, or employer.
- Document uploads: This includes photos, ID proof, bank statements, tax returns, and salary slips.
- Survey information: If your questionnaire is too long, they may want to come back later to finish it when they have time.
If you add the save and resume option on these forms, the users can save the progress they’ve made and continue the form submission at a later time. This relieves the users from the pressure of completing a lengthy form at one go.
At the same time, it saves the website owners from missing out on valuable submissions and boosts their form completion rate. They can even utilize partial form submissions to get in touch with users and generate more leads.
With that said, let’s look at how to allow users to save WordPress form progress and resume it in the future.
Easiest Way to Save WordPress Form Progress
To add the save and resume functionality on your forms, you’ll need a good form builder plugin that offers this feature. We recommend using WPForms.
WPForms is the best form builder plugin for WordPress sites. It lets you create all types of forms such as contact forms, payment forms, application forms, order forms, and more.
With its drag and drop form builder, anyone can create and customize professional WordPress forms in minutes. It also comes with over 1,200 pre-built form templates so, you don’t need to start from scratch.
The best thing is it gives you the option to save WordPress form progress using its Save and Resume addon. This adds a save and resume link on your form. By clicking on this, users can save the form progress and continue it later.
It provides them with a continuation link that they can use to get access to the partially filled form anytime they want. So, if you have a lengthy form with a lot of fields, then this is the perfect solution for you.
Other than this, WPForms offers many powerful features. Some of them are:
- Easy to use and set up
- Advanced form notifications and confirmations
- File upload and content submission
- Spam protection services like Google reCAPTCHA
- Supports webhooks for 3rd party integrations
- Built-in entries management system
- Email marketing integration with Constant Contact, Drip, and more to send follow up emails
- Form fields for eCommerce and payment options
Now that you know which form builder to use, let’s learn how to add the save and resume functionality on WordPress forms.
Step 1: Install WPForms Plugin
First, you’ll need to sign up for a WPForms account. There’s also a free version available in the WordPress repository.
But, you need to upgrade to a pro plan to get access to the Save and Resume addon and additional features.
After you sign up, you can access your WPForms account dashboard. In the Downloads tab, you’ll find your plugin download file along with your license key.
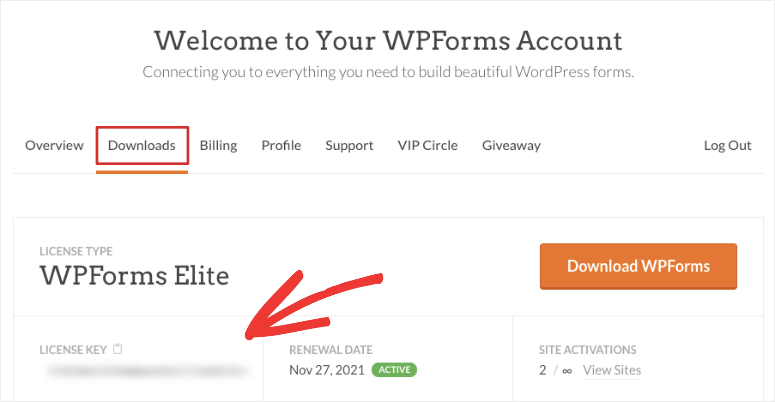
You need to download the plugin file and install it on your WordPress site. If you need help with this, see our guide on how to install a WordPress plugin.
Once you install and activate the WPForms plugin, open the WPForms » Settings on your WordPress admin dashboard. To activate the pro features, you need to enter your license key here.
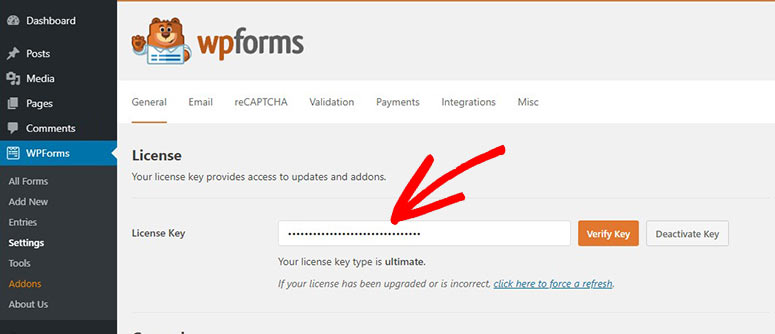
Then, click on the Verify Key button and you’ll see the verification success message.
Now, you need to set up the Save and Resume addon on your WordPress site.
Step 2: Install Save and Resume Addon
WPForms lets you install the plugin addons directly from your admin dashboard.
So, navigate to the WPForms » Settings tab and you’ll find the Save and Resume addon if you scroll down. Then, click on the Install Addon button and activate it.
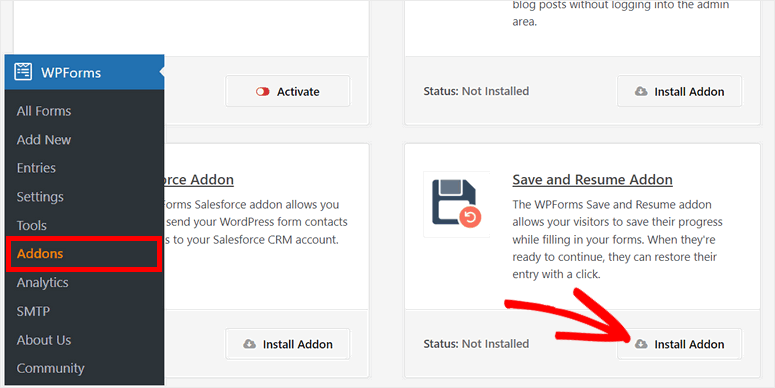
After you install and activate the addon, you can easily allow your users to save the WordPress form progress and continue the submission later.
Now, you’re ready to create a form and add the save and resume functionality with WPForms.
Step 3: Create a New WordPress Form
To create a new form, go to the WPForms » Add New tab on your admin panel. In the next window, you’ll see the form template library.
Here, you’ll find form templates for all purposes such as registration form, donation form, order form, and more. For this tutorial, we’ll choose the Simple Employment Application Form template but feel free to pick any template that suits your goals better.
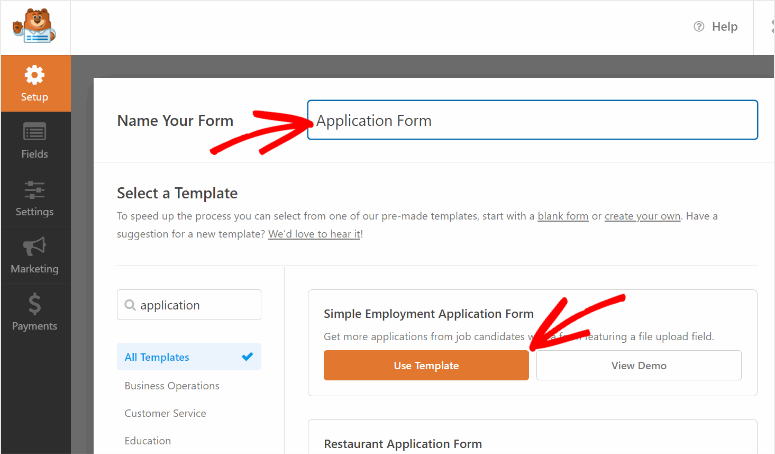
After you enter a suitable name for your form, you can click on the Use Template button. This will launch the visual form builder.
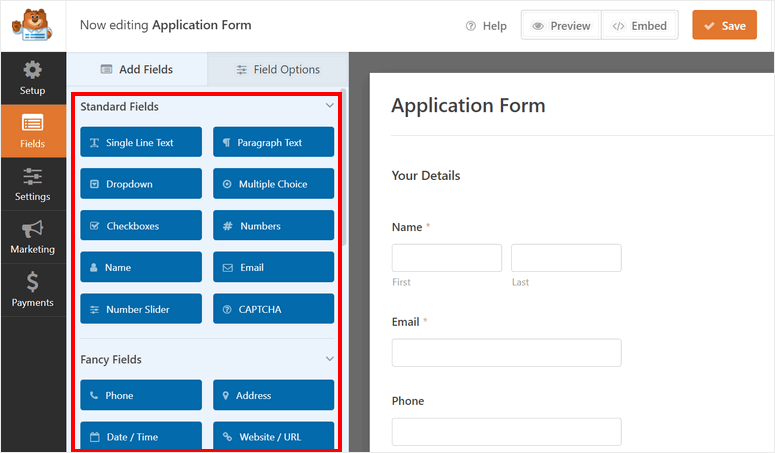
WPForms offers a drag and drop builder that is super user-friendly. Even if you’re a beginner, you can build a WordPress form without any coding.
You can simply drag and drop a form field from the left panel to the form preview and rearrange the order as you like.
To customize the existing form fields, just click on the form field and you’ll see the field options appear in the left panel.
For example, we’ll edit the file upload field. When you select this field, you’ll see options to change the label, description, and choose the file extensions.
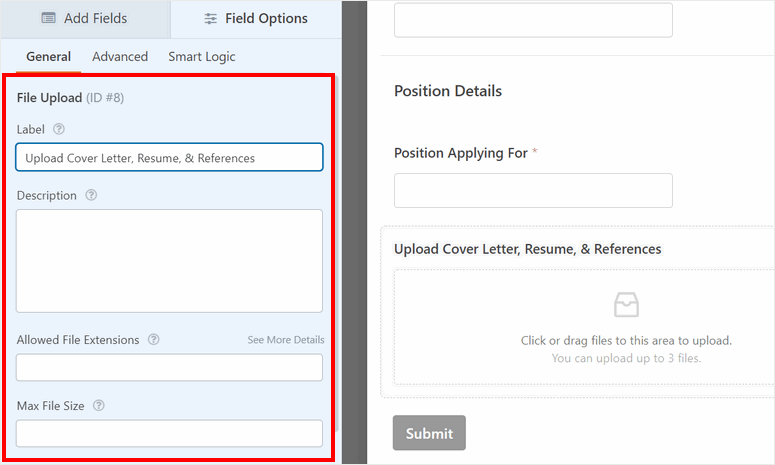
You can also add Smart Logic to show/hide this field based on a user’s reponse to previous questions.
Keep in mind, the templates from WPForms are ready to go so you’ll only need to make minimal changes here. The form template already includes all the necessary form fields to collect the right information such as personal details, addresses, and file uploads.
Once you finish creating your WordPress form, save your progress. Next, you can add the save and resume feature.
Step 4: Configure Save and Resume Settings
To allow your user to save their form progress and continue it later, you need to set up the Save and Resume option.
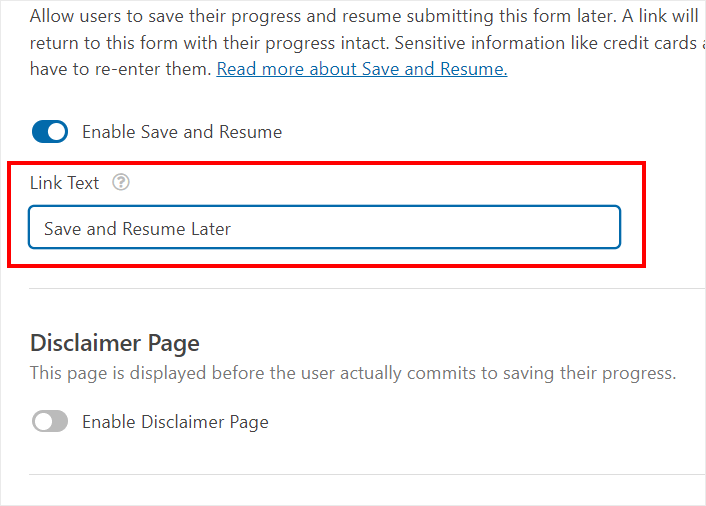
For this, go to the Settings » Save and Resume tab on the left menu of the form builder. Then, toggle on the Enable Save and Resume option.
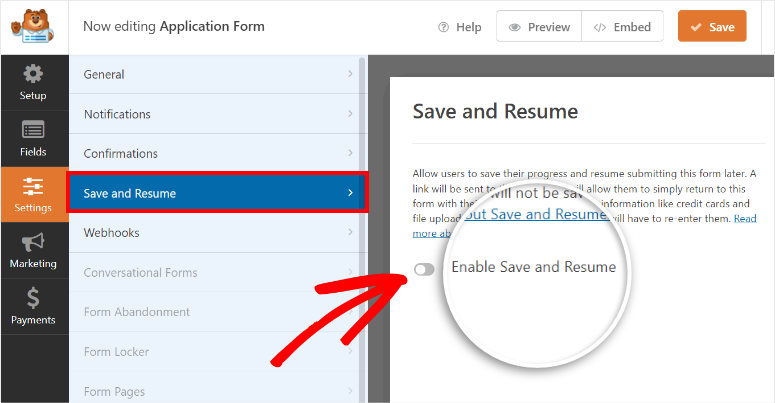
This will open all the settings for configuring the save and resume feature on your WordPress form.
Now, we’ll show you how to set up each option one by one.
Customize Save and Resume Link Text
The first option you’ll see is the Link Text. This is the hyperlink text that will show up on your form. So, users will click on the link instead of the submit button to save their form progress.
The default text is “Save and Resume Later”. But, you can customize the text as per your preference.
Display Disclaimer Page
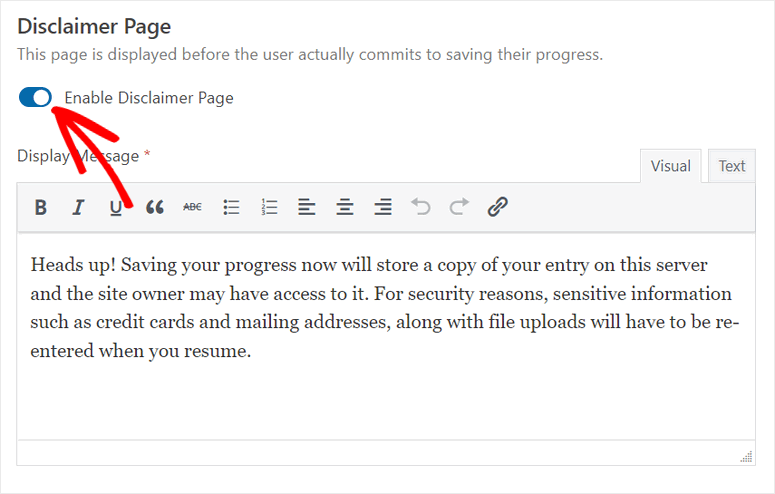
Next, you can choose to show a disclaimer message to your users to inform them that their data will be stored. The user can choose to continue or cancel the save and resume option.
You can enable the disclaimer page option to show a message to your users. Then, you’ll see a text editor with the default disclaimer message. You can edit the text or leave it as it is.
Customize Confirmation Message
After the users choose the save and resume option and approve the disclaimer message, you can show them a confirmation message.
Like the disclaimer text, you’ll see there is a pre-written text for the confirmation page. You can customize the message if you want.
However, you need to make sure you include all the important instructions for users to resume filling their forms later.
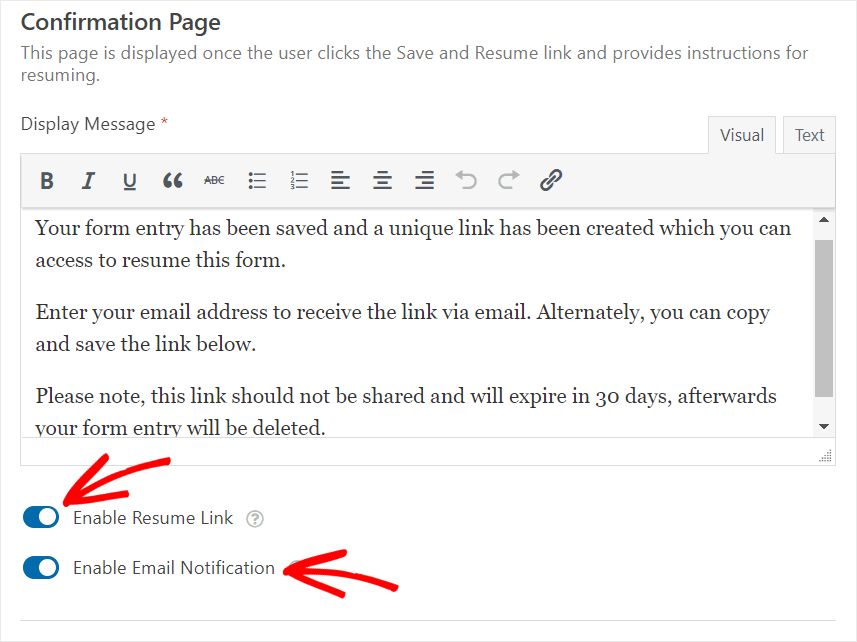
The WPForms Save and Resume addon lets you give two options to the users for resuming their form submission. They are:
- Enable Resume Link: Adds a save and resume link which users can copy and use to complete the form later.
- Enable Email Notifications: Asks for users’ email addresses and sends the link in an email notification. So, users can simply open the email later and click on the link to fill out the form anytime they want.
You can enable both options at the same time as well.
Customize Save and Resume Email Notification
If you enable the email notifications option, you’ll see the text editor down below.
To add the save and resume link on the email notification, you need to use the {resume_link} smart tag.
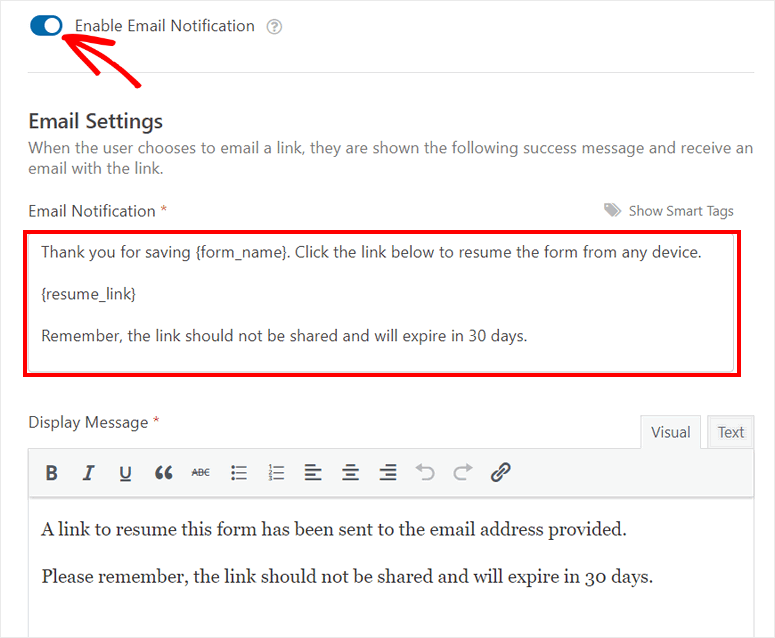
In the end, you’ll see the Display Message option. This is the final confirmation text that notifies the users that the email which includes the form resume link has been sent.
Don’t forget to click on the SAVE button on the form builder so you don’t lose your settings.
Step 5: Connect with Email Marketing Provider
WPForms lets you seamlessly integrate popular marketing services with your WordPress forms. With this feature, you can send the users automated emails to remind them to fill up their incomplete forms.
You can add the users who choose to save the form progress to your email list. This way, you can tag these contacts and add them to your drip series in an email marketing service like Drip or Constant Contact.
To set this up, click on the Marketing tab inside the form builder, and select the email marketing provider of your choice. Then, you can follow the instructions on the screen to sync your form to your email account.
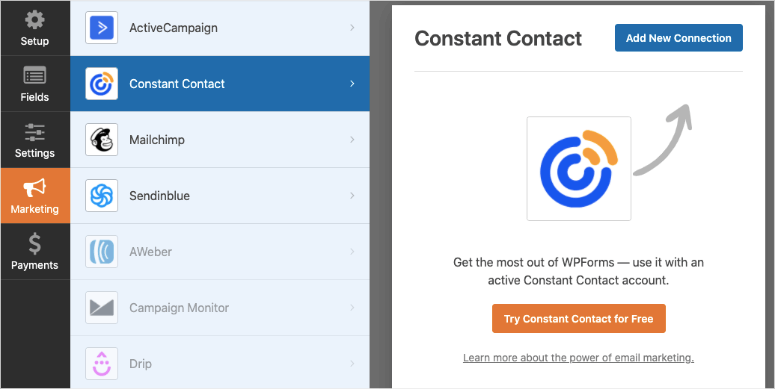
Depending on which email service you use, you may need to enter an API key to connect your account. You can find the key on your account dashboard.
All you need to do now is add your form to your WordPress site.
Step 6: Publish your WordPress Form
WPForms lets you insert your form easily on any WordPress post, page, and sidebar in a few clicks.
If you use the WordPress block editor, you can search for the WPForms block and add it.
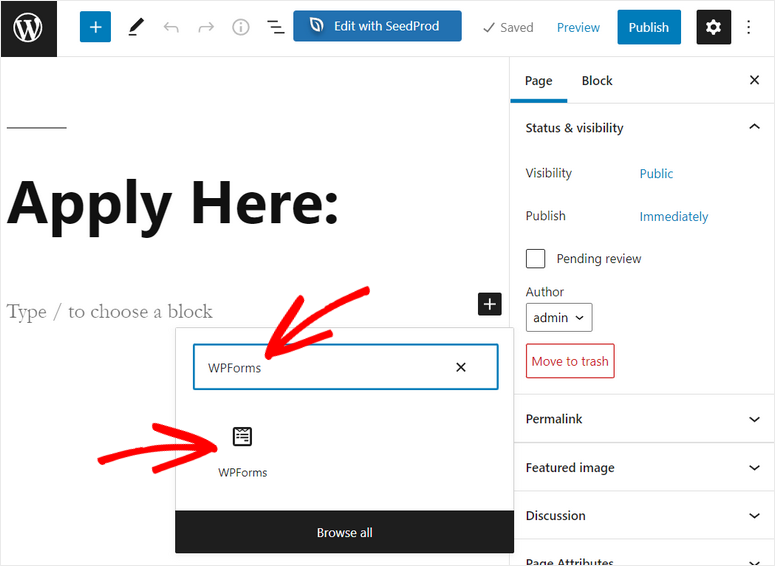
After that, you’ll see a dropdown menu where you can select the form you just created.
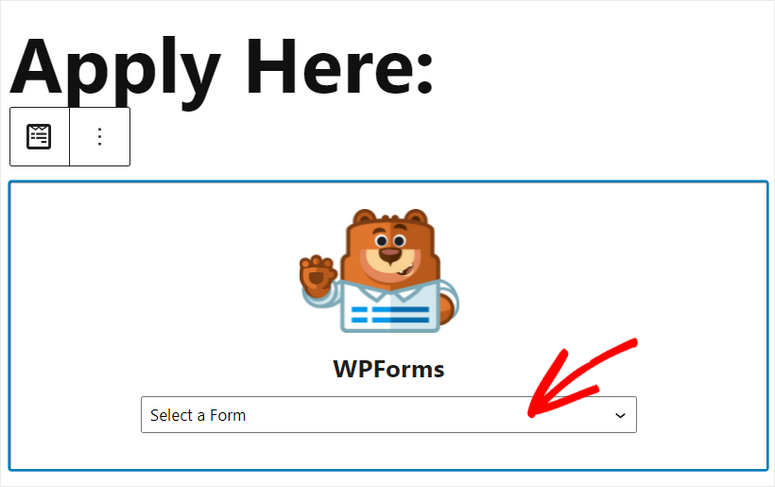
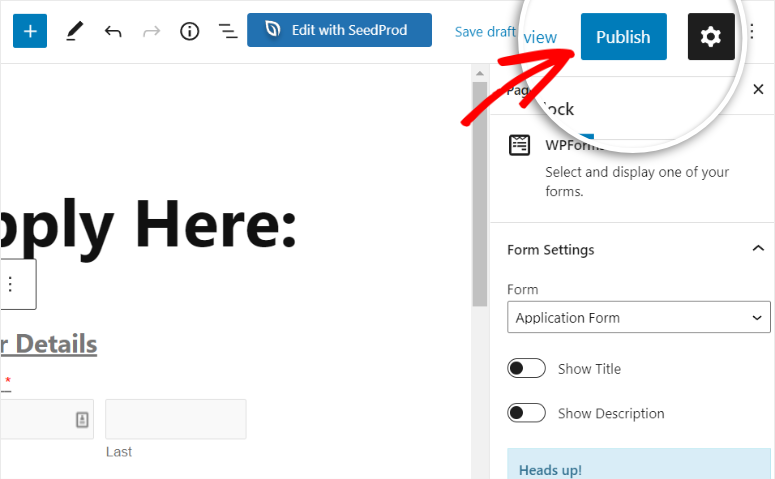
Then, you’ll see the form preview on the text editor. To insert the form on your site, just click on the Publish button on the top-right corner.
If you are using the WordPress classic editor, you can click on the Add Form button and easily select your form.

You can also insert your WordPress form on a widget-ready area like a footer or sidebar. For this, head over to the Appearance » Widgets tab and drag and drop the WPForms widget into the sidebar or footer menu on the right.
Next, you can select your form from the dropdown and save your changes.
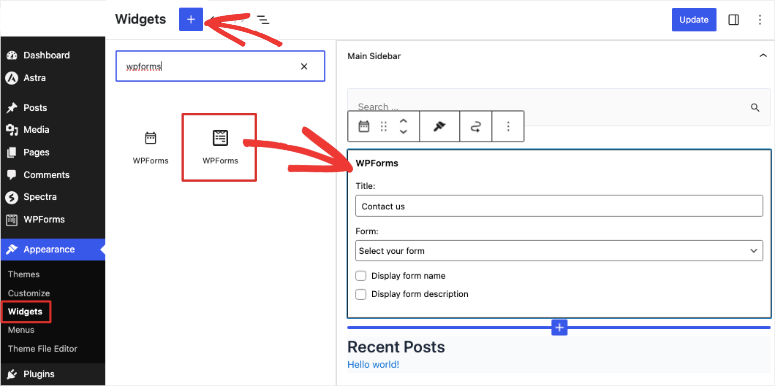
Congrats! You’ve successfully published your WordPress form. Now, let’s check how the save and resume functionality works on your website.
Step 7: Save WordPress Form Progress
After you add your form on your WordPress site, you can check if the save and resume later link is working properly or not.
On the front end, you’ll see the link is placed beside the Submit button.
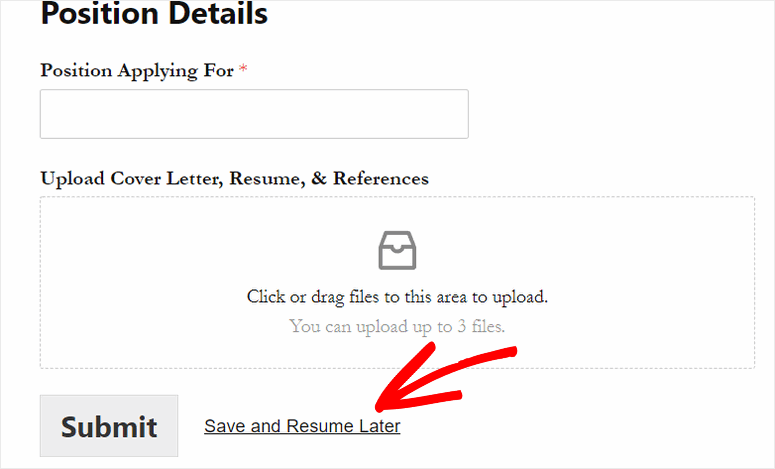
When the user clicks on the Save and Resume Later link. They’ll see the disclaimer message in the next window.
If they want to save WordPress form progress, then they can click on the Continue button. If not, they can click on Go Back.
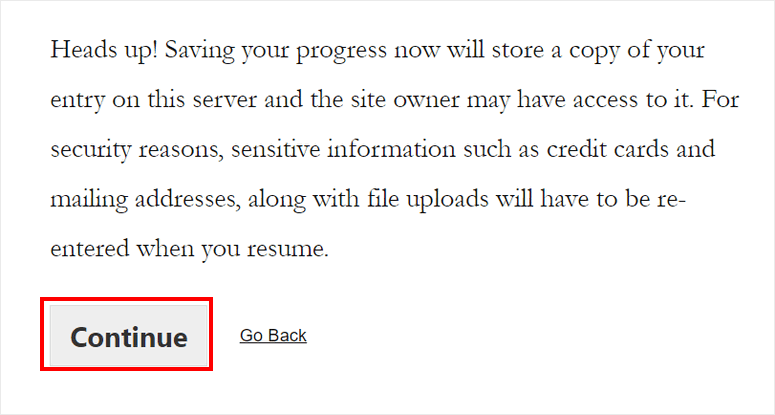
After they click on the Continue button, they’ll see the confirmation message along with the resume link option.
If you’ve added the email notification option for your form, the users will need to enter their email address and click on the Send Link button.
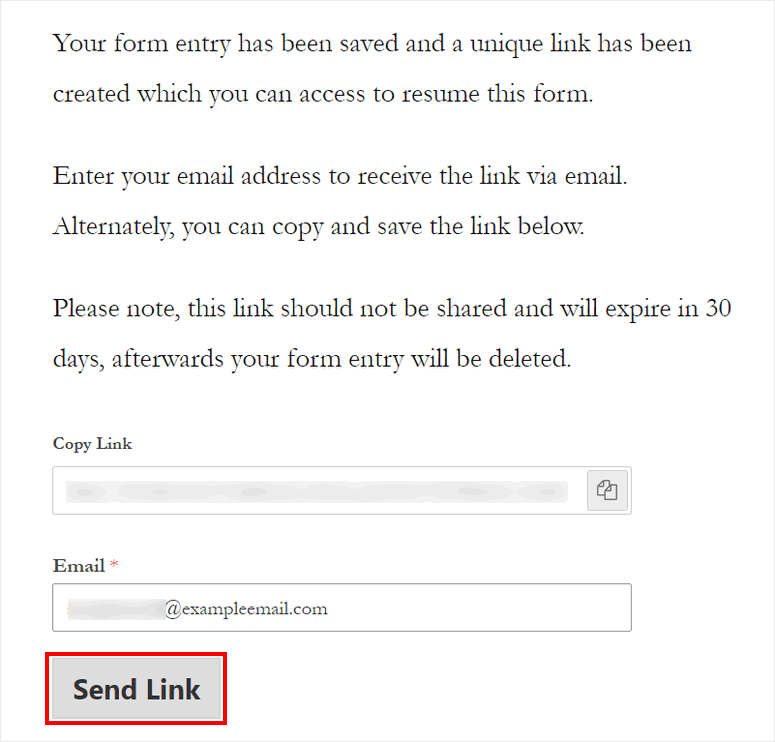
Then, your users will receive the email notification with the resume link in their inbox.
Additionally, WPForms lets you view the partial form entries on the admin dashboard. Navigate to the WPForms » Entries page and you’ll see the entries for all your WordPress forms here.
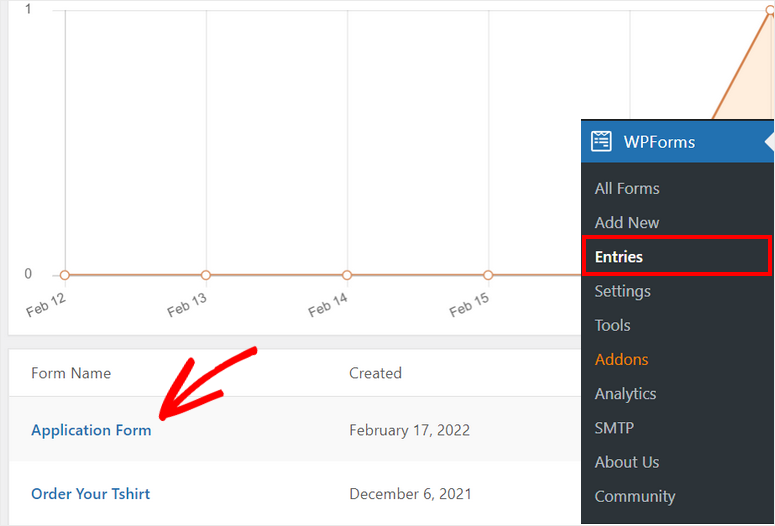
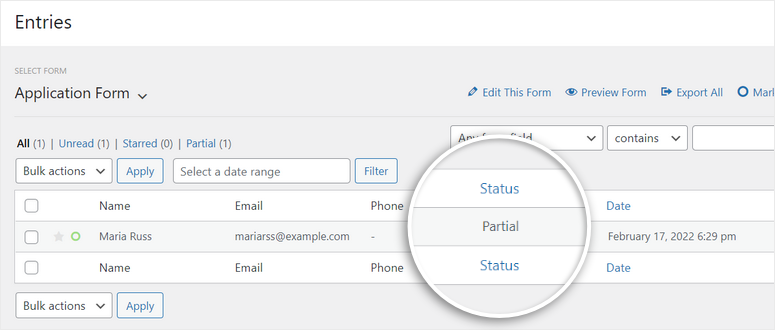
Select the form with the save and resume functionality and you can see the status of form entries as Partial. When the user resumes and submits the form later, you’ll see the status change to Completed.
Like this, WPForms offers many other powerful features such as payment options, email marketing integration, form notifications, and more.
Now that you know how to use the WPForms builder, you can also create other forms for your website like
- Review forms
- Inquiry forms
- Reservation forms
- Survey and polls
- Newsletter signup forms
- Booking forms
- And so much more
If you want a page builder to customize your website and more functionalities, you can check SeedProd. It is the #1 website builder plugin for WordPress that allows you to create stunning themes, landing pages, and more.
And that’s all! We hope this article helped you learn how to allow users to save form progress on your WordPress site.
Next, you can check these resources we’ve handpicked for you:
- How to Set Up WordPress Form Tracking in Google Analytics
- How to Set Up the Right Form Notifications & Confirmations
- Best Email Capture Tools & Form Builders for WordPress
These posts will help you add more features to your WordPress forms such as form tracking and email notifications & confirmations. The last one will help you find the right tools to build your email list.

Comments Leave a Reply