
Want an easy way to create and manage an event calendar in WordPress?
With an event calendar WordPress plugin, you can create a custom calendar for all your events and embed it on any part of your website. This allows you to schedule events, book registrations, and sell tickets without having to touch a line of code.
In this article, we’ll show you how to create an event calendar for your WordPress site using Sugar Calendar.
Before we begin, let’s be sure if Sugar Calendar is right for you.
Why Use Sugar Calendar to Create a WordPress Event Calendar?
Sugar Calendar is the best event calendar plugin for WordPress sites. It let you display offline and online events like webinars and conferences that are happening every week, month, or the whole year.
You can inform visitors about current and upcoming events and give them easy access to book a seat.
With Sugar Calendar, you can:
- Create multiple color-coded calendars to organize your schedule.
- Categorize events so new website visitors can easily discover what they’re interested in.
- Add detailed information about the events such as event name, location, time, number of attendees, and more.
- Make your event look appealing with images and videos.
- Link to the registration page for your events so visitors can directly register for events they find interesting.
- Get visitors to sign up for updates and email notifications.
- Duplicate events for easy creation of new events.
- Set up time zone conversions for visitors around the world.
- Monetize your events using payment options.
You can even integrate third-party services such as Google Calendar, iCal, and more to sync your events and create a calendar feed.
All the calendars you create will be fully responsive and load fast on any device. This helps to improve the user experience which in turn will improve the search result rankings for your website and event pages.
The best part is that it has a simple interface that is perfect for beginners and non-technical users.
Once you set up the plugin on your WordPress site, you’ll get access to an easy-to-navigate events management dashboard where you can create, edit and manage multiple calendars without any hassle.
With that, let’s learn how to create a WordPress event calendar and manage them in just a few easy steps.
How to Create and Manage an Events Calendar in WordPress
Sugar Calendar makes it easy for all types of website owners to set up an event calendar and add it to their site in minutes. There’s no need to hire a developer for this. Simply follow the steps below to create an events calendar in WordPress.
Step 1: Install Sugar Calendar Plugin
First, you need to sign up for a Sugar Calendar account.
You can also download the free version of the plugin from the WordPress repository. But keep in mind that you’ll have to upgrade to the pro version to get access to advanced features like events ticketing, calendar feeds, event URLs, and more.
After you sign up, you’ll find your plugin download file and the license key from your Sugar Calendar dashboard.
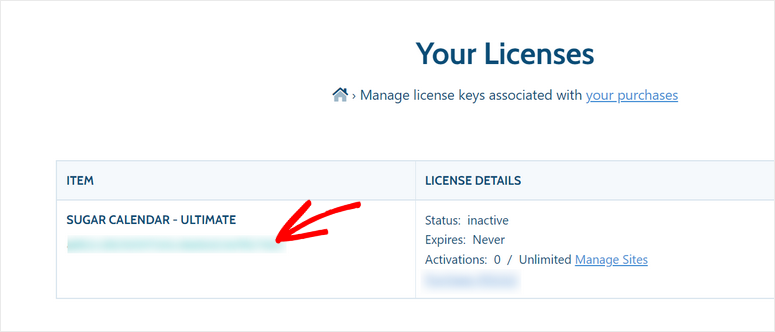
You need to install the plugin on your WordPress site. For more details, you can check our guide on how to install a WordPress plugin.
Once you install and activate Sugar Calendar, navigate to the Calendar » Settings page on your WordPress admin panel. Here, you need to enter your license key.
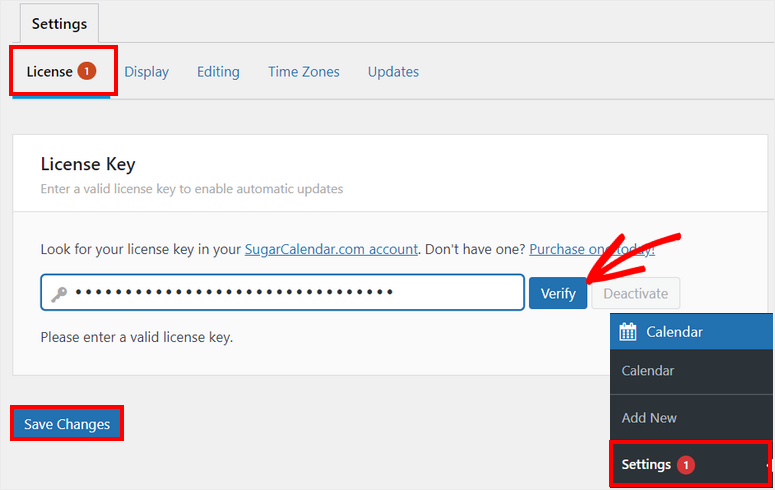
Then, click on the Verify button to activate your pro account. Don’t forget to save your changes at the end.
Now, you’re ready to create your custom events calendar in WordPress.
Step 2: Create a New Calendar
Sugar Calendar gives you two main sections: Events and Calendar. You can create a calendar for your website first and add events later.
From the WP admin menu, go to the Calendar » Calendars tab. You’ll need to click on the Add Calendar button to create a new calendar.
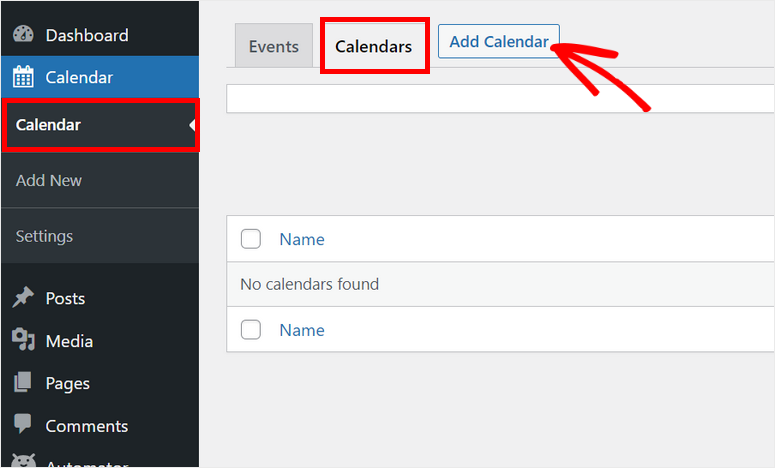
Then, you’ll see a popup box that lets you customize the calendar. You can enter a name, slug, and description for your WordPress event calendar.
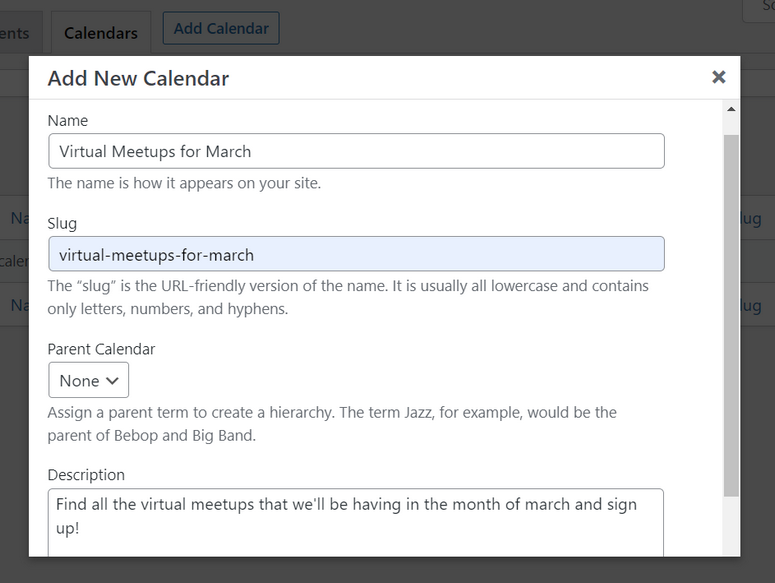
If you scroll down, you’ll see the option to select a custom color for your calendar. This will help you separate events from different calendars on the dashboard.
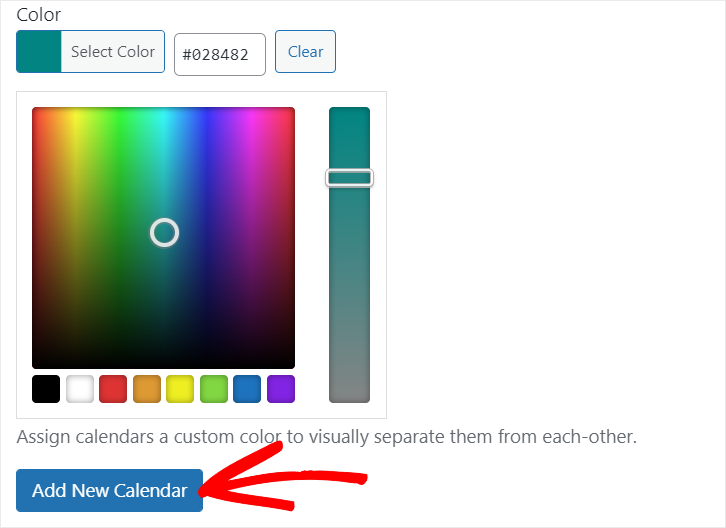
Once you’re done, click on the Add New Calendar button to save your settings. Now that you’ve created your calendar, you can add events to it.
Step 3: Add New Events in the Calendar
Sugar Calendar lets you add as many events to your calendar as you want. To create a new event, open the Events tab and click on the Add Event button.
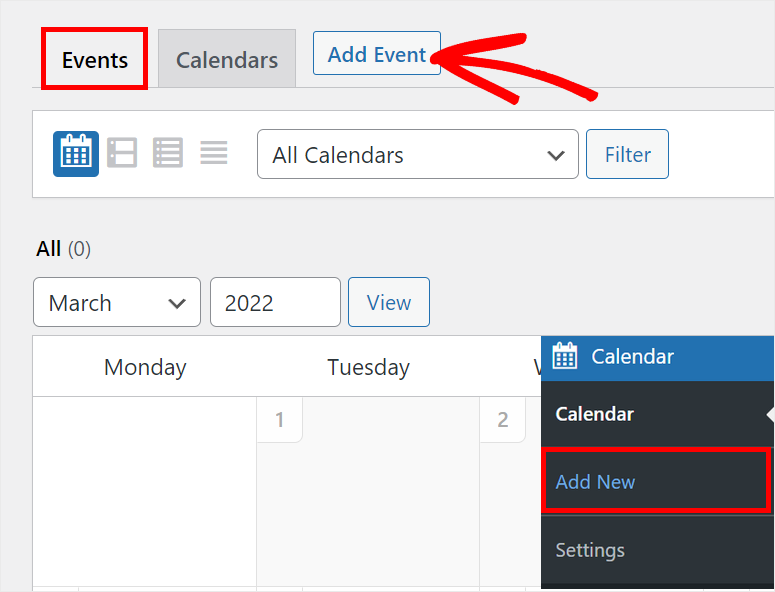
This will launch the events editor where you can add event details like name, duration, location, and more.
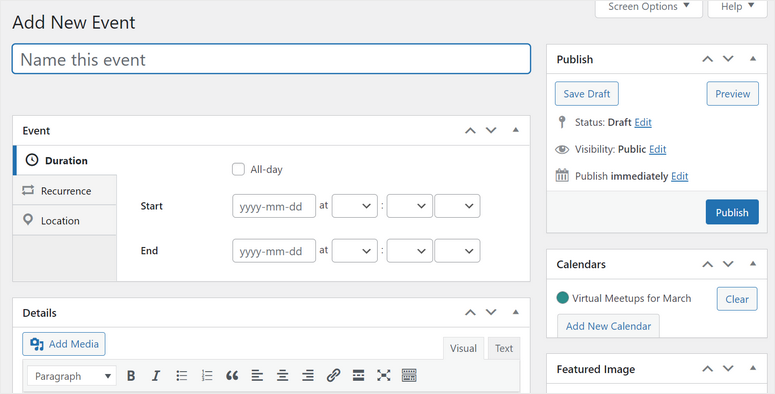
You’ll notice that the interface is very similar to WordPress so there’s no learning curve here. It’s incredibly easy to navigate and use.
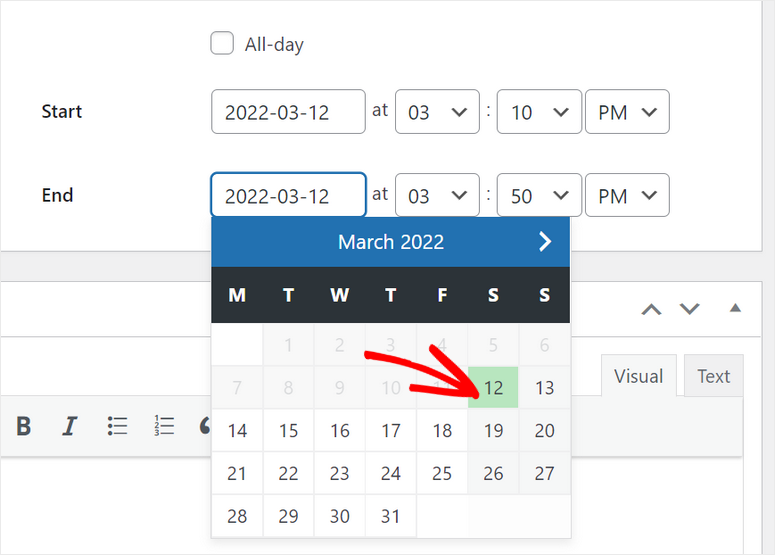
After you enter a name for your event, you can set up the start and end date of your event. It allows you to choose a single date or range of dates for longer events.
You even check the All-day option for all-day events and occasions like birthdays and holidays.
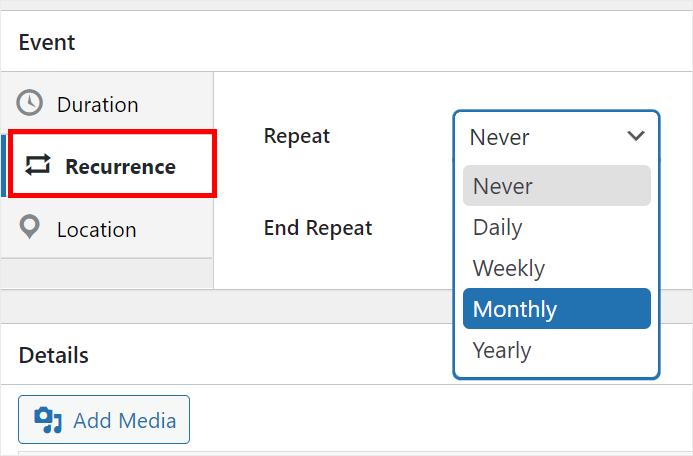
And if you want to create an event that repeats every other week, month, or year, you’ll want to click on the Recurrence option. Then, select the repetition interval and end date. It’s that simple.
There is also an option for adding the location for your events. If you’re hosting a physical event, you can add an address or location link. If it’s hosted online, you can add a Zoom invite or webinar link here.

Next, there’s also a Details section where you can add more details about your event and a custom message. You can get creative by adding images, videos, and links to make it look appealing.

After you finish setting up your event details, look over to the right-hand side of the page.
On the Calendars section, select the calendar that you just created. Then, click on the Publish button there to add this event to your calendar.
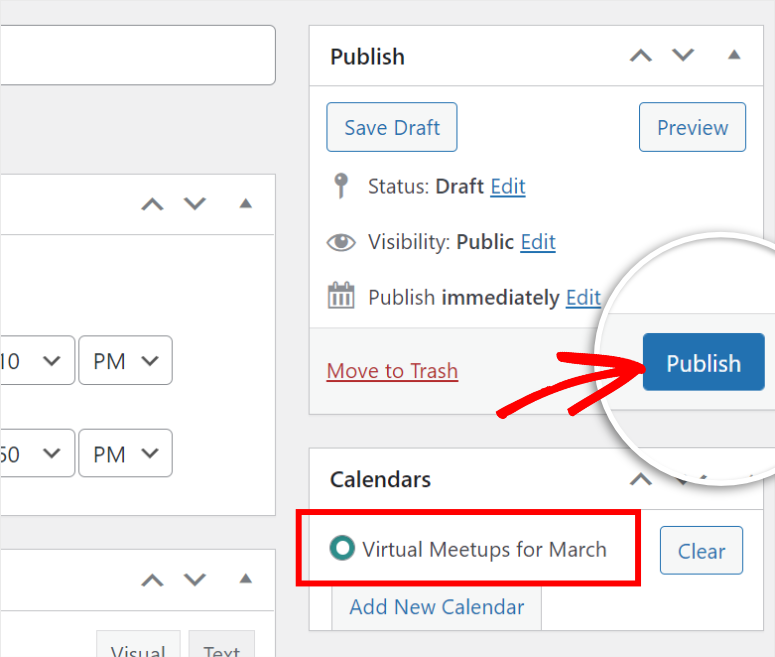
Like this, you can create multiple events and add them to your calendar. You can even create specific calendars for different purposes and projects as you like. We’ll show you how to manage your calendar next.
Step 4: Manage Your Events and Schedules
To manage your events, you can open the Calendar tab on the admin panel and you’ll see all your events there. There are options to view events for a single calendar or all calendars.
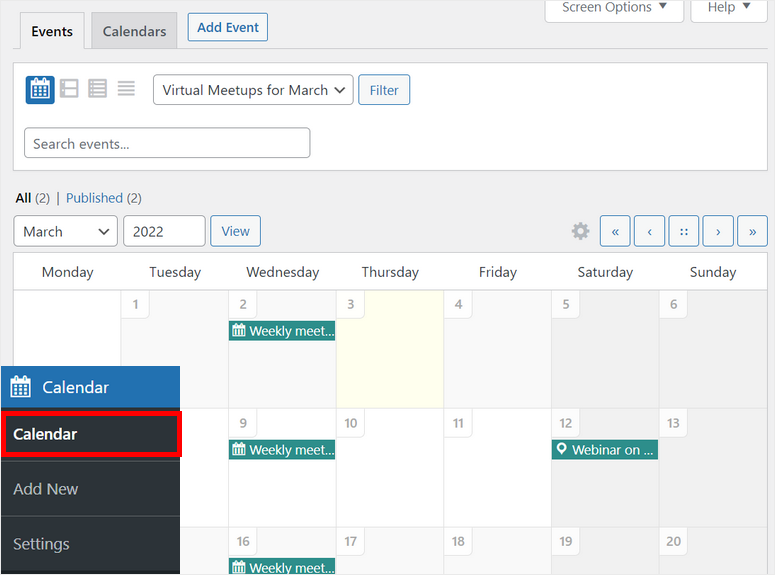
If you want to make changes to any event, just click on it and you’ll see the option to edit. You also get the option to Duplicate the event. This way, you don’t have to create a similar event from scratch.
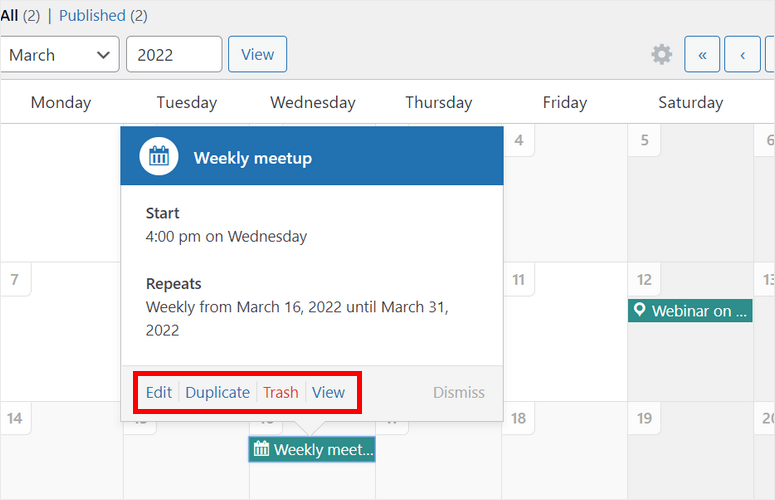
Now, all you need to do is publish your events calendar on your WordPress site.
Step 4: Insert the Events Calendar on Your Website
Sugar Calendar lets you easily add your event calendar to any page or post with the help of shortcodes.
All you have to do is create a new page or post, then search for the Shortcodes block and add it on the Gutenberg editor.
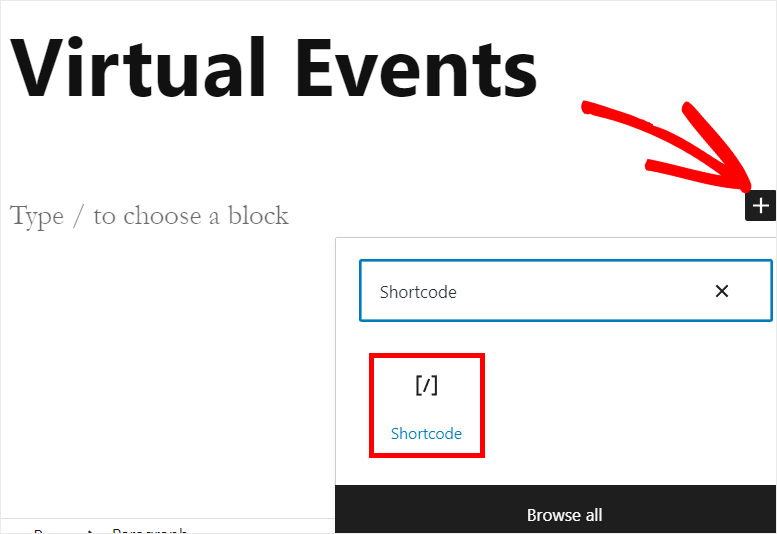
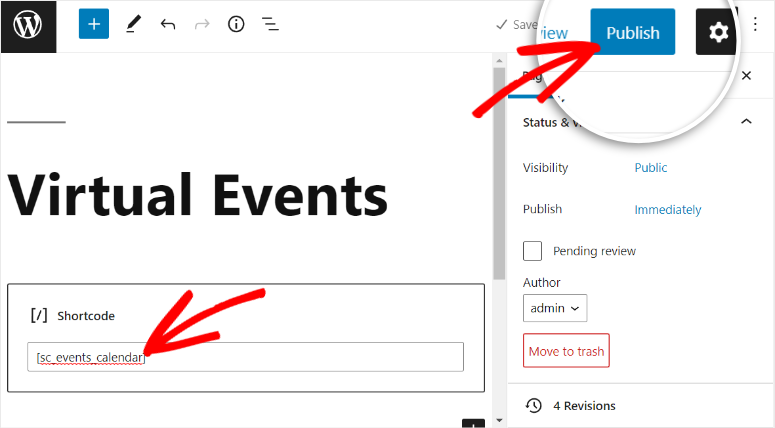
After that, you need to enter this shortcode: [sc_events_calendar] in your text editor.
Then, you can simply click on the Publish button on the top-right corner of the page or post.
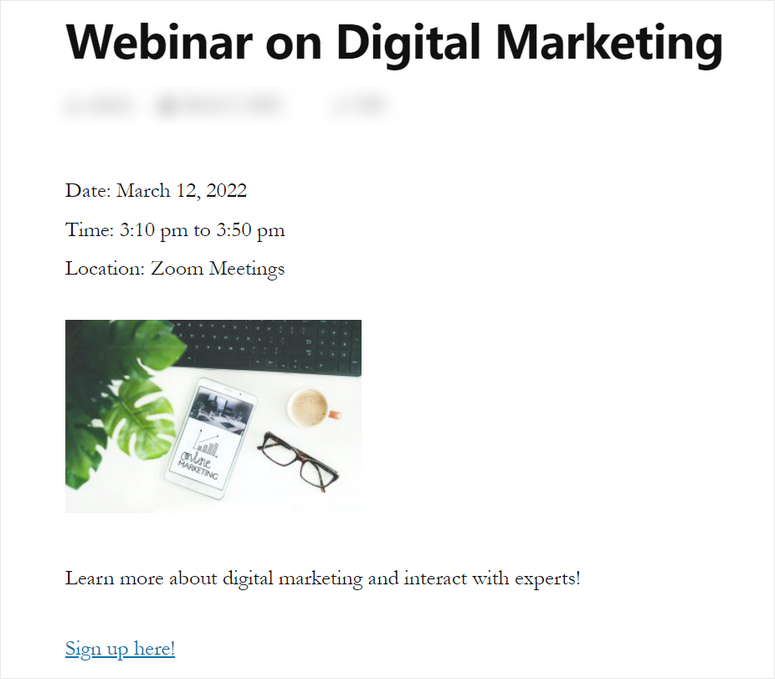
Your website visitors will be able to see the event calendar on the front end. The plugin automatically adjusts to your theme so the fonts, colors, and style will match the rest of your site.
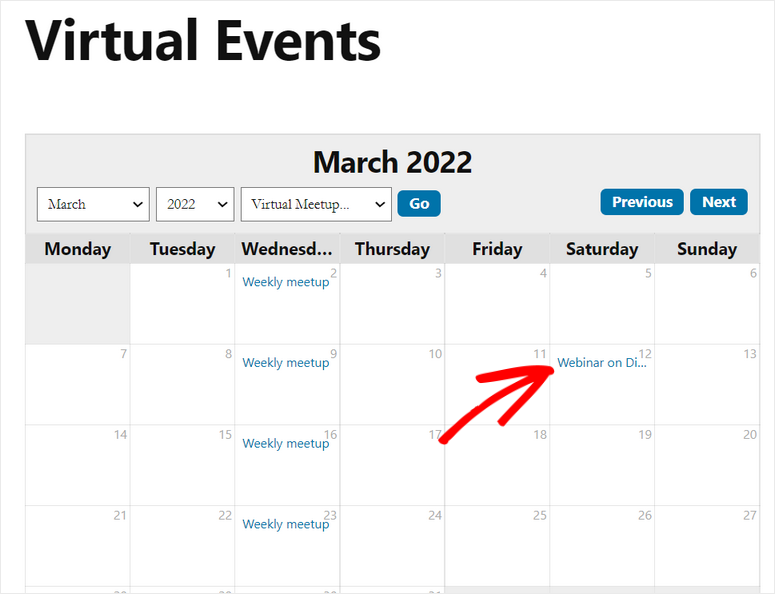
There are dropdown menus that let visitors choose the month, year, and which calendar they want to filter. When the visitors click on any event on this calendar, they’ll be able to see all the information about the event.
Congrats! You’ve learned how to easily manage events and schedules using Sugar Calendar.
Sugar Calendar is the most lightweight events calendar plugin for WordPress. It lets you create beautiful calendars that showcase your events and schedules on your site.
Additionally, you can change the time zone and custom date format for your event calendars. This allows you to provide a personalized and interactive experience for your visitors.
And that’s it for today! We hope this article helped you learn how to create and manage an events calendar effortlessly.
Next, we’ve handpicked these useful resources for you:
- Best WordPress Events Plugins Compared
- Best WordPress Themes for Events
- How to Add a Custom Booking Form
These posts will help you find the best events plugins and themes for your site. The last one will help your create a booking form for your events in a few clicks

Comments Leave a Reply