Are you looking for a great backup solution for your WordPress site?
Duplicator, UpdraftPlus, and Solid Security, formally BackupBuddy, are three of the best plugins to help you back up your site.
They stand above the rest because of their simplicity of use, many features, and security.
Even though they are all great, you need just one backup solution so we need to find out which among them is the #1 backup plugin for you.
In this article, we will break it down for you! We will look at what makes each plugin stand out, the areas they excel, and the features they can improve.
Here’s what we’ll be covering:
Feel free to use the quick links to jump ahead to the section that interests you the most. Now first, let’s do a quick overview of all three plugins.
Why Choose Duplicator?

Duplicator is a popular, easy-to-use backup WordPress plugin with many beginner-friendly features. You can quickly back up your site any time you need. It also comes with automated and scheduled backup options.
The plugin integrates with cloud solutions like Google, Amazon, Dropbox, and more. With this, you can either store your backups locally on your computer or send them to the cloud.
Your backup package can also be downloaded to be cloned or migrated. You can move your site to a new server or domain, or even create a website template that you can use to create multiple websites with the same features and tools pre-installed.
Stand-out Features
- Easy setup
- Free version
- Complete site backup
- 1 click restoration
- Easy full-site migration
Check out the full Duplicator Review here »
Why Choose UpdraftPlus

UpdraftPlus is another powerful backup solution for WordPress. It’s known for its security and multiple backup storage options.
Apart from site backups, UpdraftPlus lets you clone and migrate your site too. It has a simple design that beginners can enjoy and use with ease.
It also comes with more advanced features for experienced users that allow for better customization of your backups.
Stand-out Features
- Password protected backups
- Incremental backups
- Manual and scheduled backups
- Easy restore from the WordPress dashboard
- Cloning and migration
- Multisite support
Check out the full UpdraftPlus Review here »
Why Choose Solid Backups
BackupBuddy, now Solid Backups, has been around since 2010, making it one of the oldest backup plugins on the market.
Years later, thousands of users still consider it a good backup solution because of how it is designed.
It also offers free features like a malware check and 1 GB of cloud storage.
Solid Backups is one of the few plugins offering good email backups, giving its users a quick way to access their files whenever and wherever.
Stand-out Features
- Easy backup and restore
- Scheduled automatic backups
- Great for offline site development
- Unique storage options
- Instant email notifications
Check out the full Solid Backups Review here »
Setup & Installation
Duplicator, UpdraftPlus, and Solid Backups are some of the easiest plugins to install. They require no technical experience.
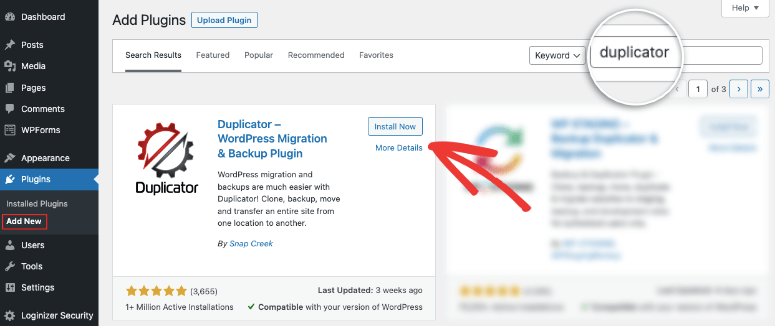
Duplicator and UpdraftPlus have free versions available in the WordPress plugin repository.
To access the free version of the plugins, go to your WordPress dashboard, then Plugins » Add New, and search for it by its name. Then simply install and activate the plugin.
If you’re looking to use their premium version, all you need to do is go to their official website, download the plugin file, and upload it to your site.
Solid Backups does not have a free version so you can only download the premium version on its official site.
Let’s take a more detailed look at each plugin here:
Duplicator
To get Duplicator Pro, head to their officail website. Select a package that suits your needs, then go to My Accounts. Here download the plugin’s zip file and copy the ‘License Key’ which is unique to you.
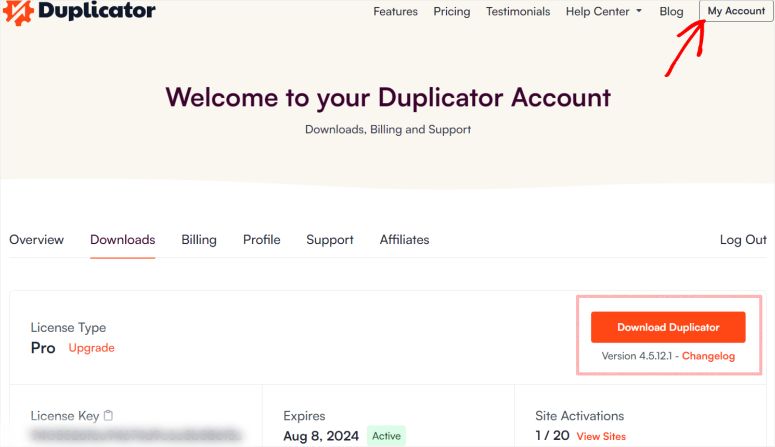
Next, you need to upload this plugin file under the Plugins » Add New page.
In your WordPress menu go to the Duplicator Pro » Settings » Licensing page and paste the code here.
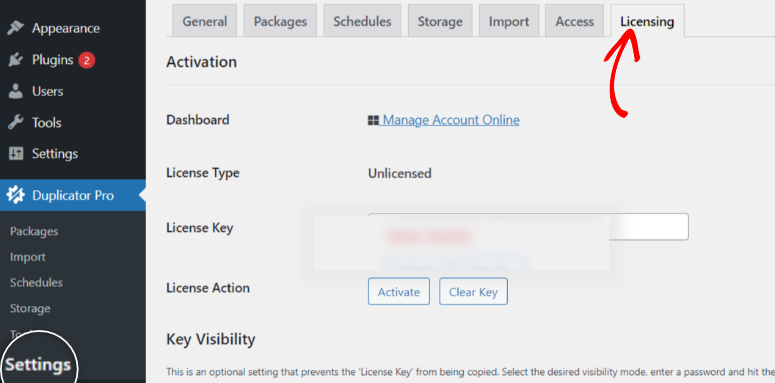
And that’s it! You now have Duplicator Pro installed and activated in WordPress!
With Duplicator, you may need to load different pages to find the feature you need. These extra steps may seem longer.
Remember, each of these plugins aims to make its setup user-friendly in its own way.
Duplicator uses different feature pages with as little content as possible to get a clean uncluttered look, ensuring less confusion.
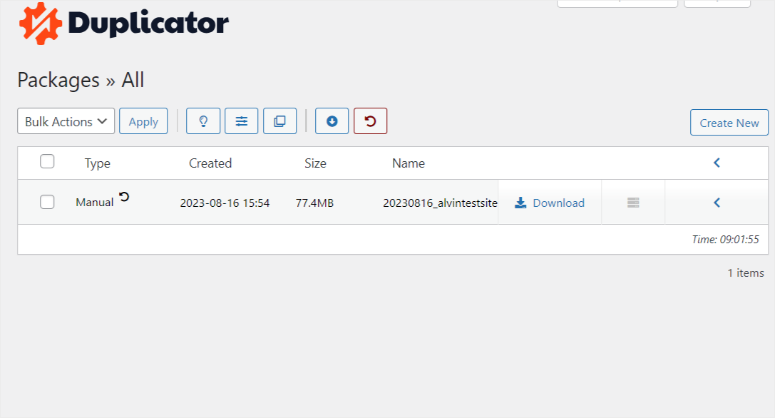
The use of white spaces in the page design gives beginners a sense of calmness, helping them find what they need quickly, which, in turn, makes the plugin easy to use.
UpdraftPlus
To install UpdraftPlus Premium, first sign up for UpdraftPlus plan.
Then you’ll get access to the UpdraftPlus plugin file that you can download to your local computer.
In your WordPress dashboard, go to the Plugins » Add New page, and upload the UpdraftPlus file here
Once installed, activate the plugin.
Go to Settings » UpdraftPlus Backups, then locate the ‘Premium/Extensions’ tab.
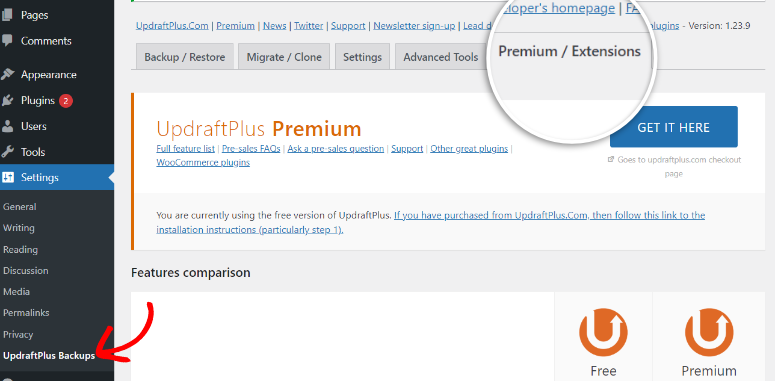
Enter your UpdraftPlus account details, connect, and claim your add-ons. Your page will refresh after that. Configure your backup settings in the UpdraftPlus settings to complete the setup.
Unlike the other two plugins, which menus are added to the left WordPress dashboard menu directly, UpdraftPlus is a little different. It will be added as a Setting submenu.
You will need to go to Settings » UpdraftPlus Backups before you are redirected to the plugin’s menu.
The downside to this approach is the plugin is out of view after installation, making it tricky to locate.
Even though the UpdraftPlus menu is a little hidden initially, once you find it, you will be redirected to a one-page menu.
You can now access all its features on this page under different, well-arranged, and visually appealing tabs.

You will not need to load any new pages to back up your files; just click on the Backup/Restore tab to display the options here.
The logs and backups are timestamped, ensuring everything is well organized.
To make it easy to find everything, the fonts and colors used in UpdraftPlus are bold and loud.
Solid Backups
Solid Backups does not have a free version like the other tools on this list. Therefore, you can only download the premium version from their official website.
After buying Solid Backups from iThemes, download and install it. Then, log in to your iThemes Account in WordPress.
Next, go to Setting » iTheme Licensing, and enter your Username and Password to log in to iThemes.
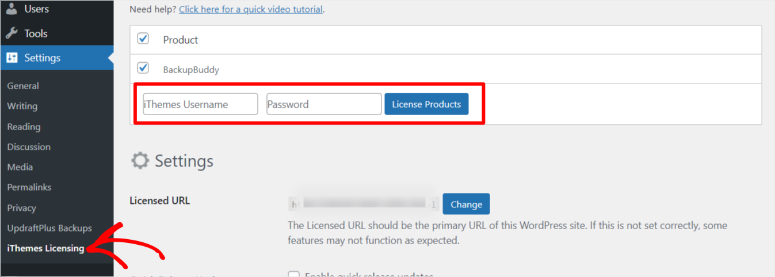
After signing in, Solid Backups will automatically identify your premium package. Next, simply set up the backup location and how often you want to back up your site, and you are done.
Solid Backups also follows a similar design to Duplicator, where they focus on clean pages.
BackupBuddy, now Solid Backups, ensures new WordPress users have an easy time locating everything by focusing on large icons and as little text as possible.
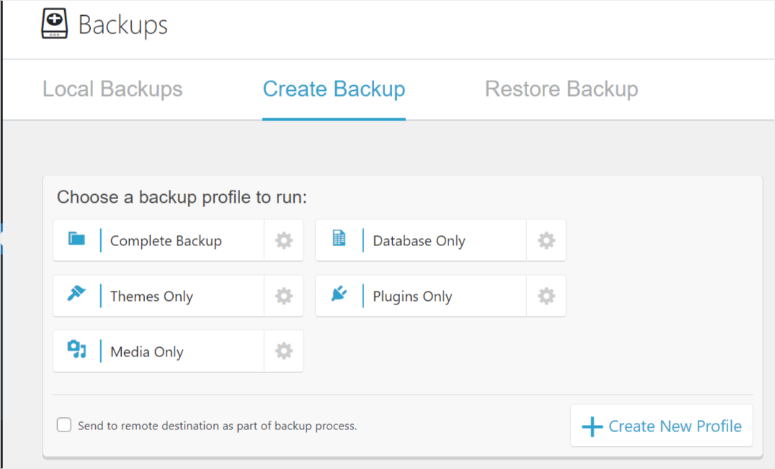
The design is straightforward, and you can easily spot the backup feature on the plugin menu.
It does not feel overwhelming as everything you need is well displayed and easy to locate.
Setup and Installation Winner: Duplicator
It has the most simple setup and installation process. Plus, the dashboard is so easy to use and navigate. We didn’t come across anything complicated. Plus, everything comes with little notes in case you didn’t understand any part of the process.
Backup & Restore
Coming to the most important part of this comparison, the backup and restore features of each plugin. Let’s take a look at what they have to offer.
Duplicator
The best backup plugins aim to make file storage convenient, secure, and hard to corrupt. To achieve this, Duplicator uses packages.
A Package is a combination of files that add up to make the full backup.
To get started with Packages, go to Duplicator Pro » Packages, then Create New.
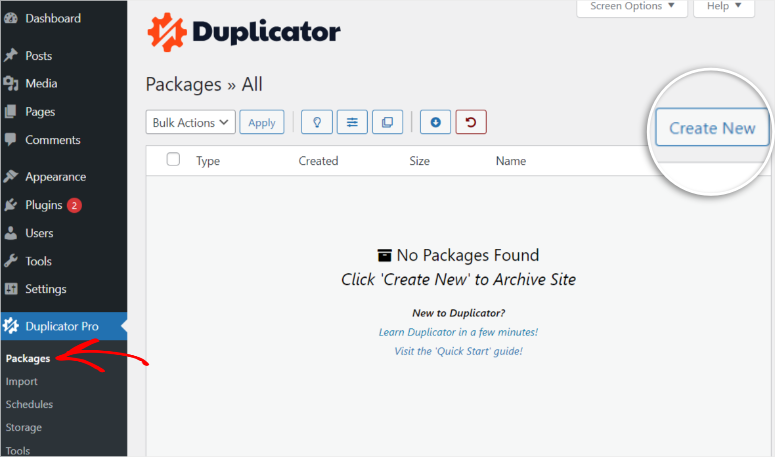
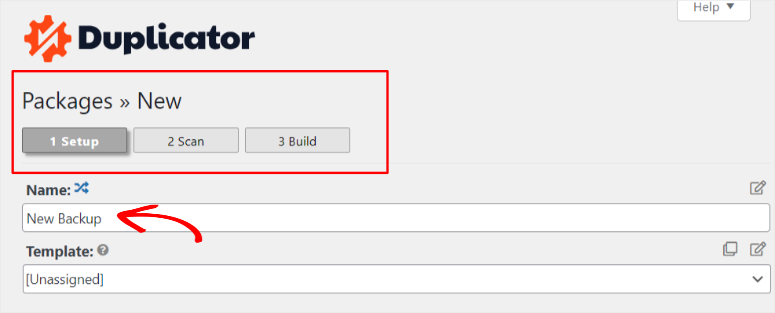
For most processes in Duplicator, the plugin will offer a progress bar to show what steps you need to take to complete the task.
This can help you know if you are on the right track or in case you have missed anything.
During package creation, the steps you need to take are displayed at the top.
On this page, create a name of the backup and choose a template, if any.
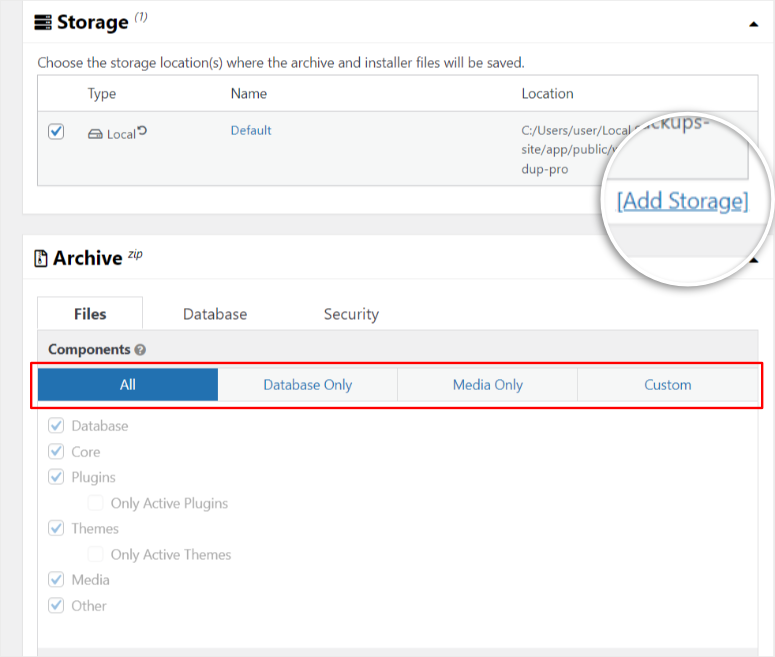
Next, choose the backup location. You can store it locally on your PC or add an external cloud by clicking Add Storage.
Finally, decide whether you want to backup all files, just the media files and the database, or create a custom backup.
Proceed to the next page, where the plugin will scan for errors and malware.
Ideally, all the items after the scan should be in green and read ‘Good’ to indicate no errors.
After being given the green light by the plugin, go to Build to create the backup file.
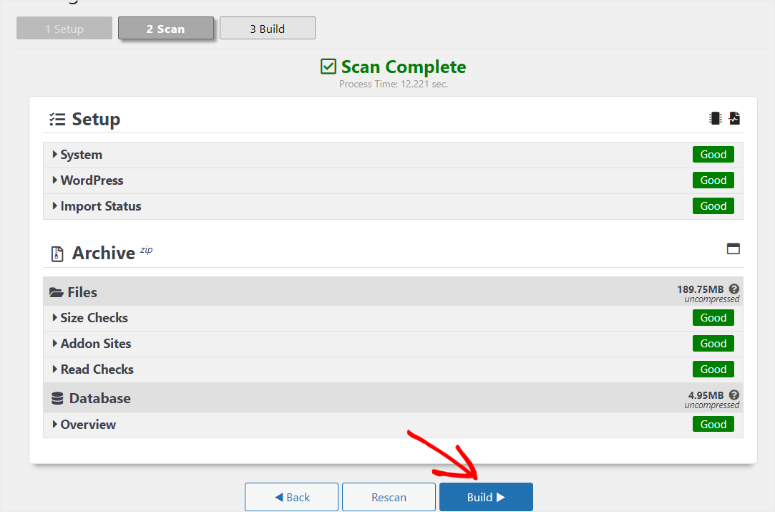
Once the backup is created, the page will reload. You can choose to download the backup or send it to cloud storage. In this instance, we will download the backup file to our PC.
Duplicator’s step-by-step backup process is easy and quick.
To add to this, the templated approach can be used repeatedly, resulting in a much smoother process.
A backup plugin is only as good as its restoration process. As mentioned, the package Duplicator creates ensures the backup and site restoration processes are just as fast.
A package comes in two parts: The Archive File and the Archive Installer File.
The Archive File is the actual backup file and what we will use to restore the site in this case.
On the other hand, an Archive Installer File or Installer File, as it is commonly known, allows you to install an entire WordPress site on an empty website from your Archive File backup.
It comes in handy to shorten site duplication, cloning, or migration processes, as you do not need to install WordPress first on the new site; the plugin will do everything for you.
You can find both files in Packages under the list of backups you have created.
Click on the small arrow on the far right next to the backup file. A dropdown menu showing both package files will appear; download the Archive File.
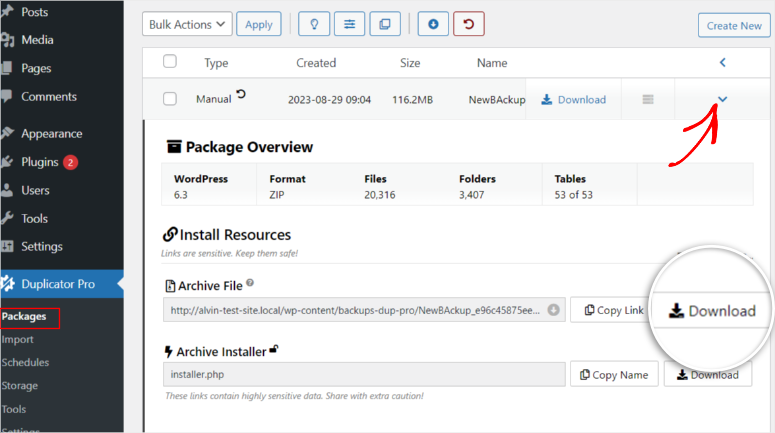
To restore a site with the Archive File, go to Duplicator Pro » Import.
You will see the options to either Import File or Import Link.
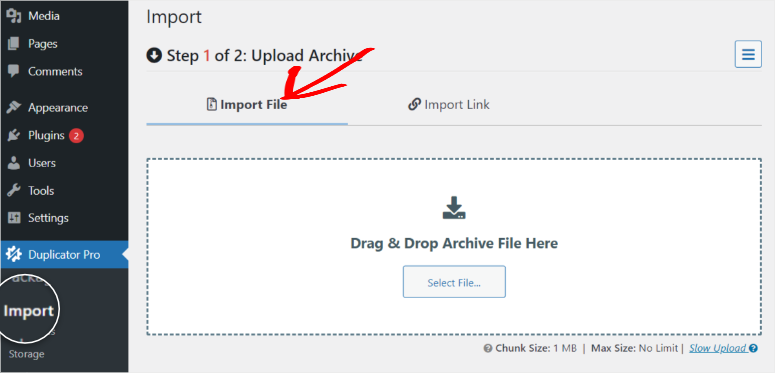
Drag and drop the backup file we previously downloaded to the PC, and the plugin will start uploading it.

The plugin will do another quick scan just to make sure the file does not have malware or is corrupt before you continue.
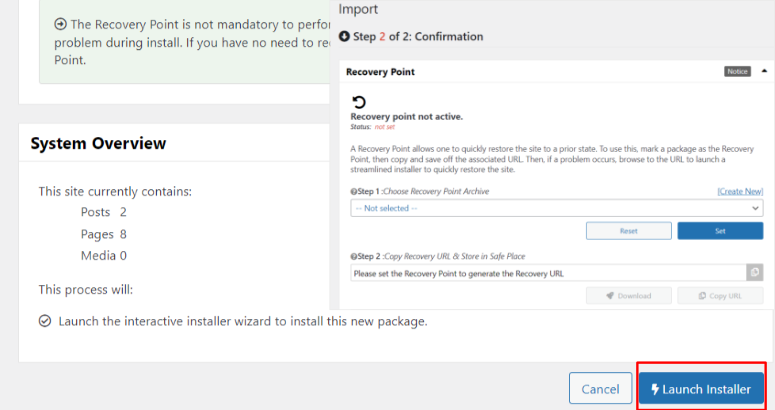
Here, decide if you want this to be your recovery point, which will allow you to quickly restore the site moving forward. You can also choose to use a URL as your recovery point.
The recovery point creates a fast and easy restore option, meaning you will not need to go through this long process.
Once this is done, launch the Installer.
The Installer is fully automated. Just follow the validation process, and the plugin will extract the files leading to a full recovery of your site.
Once the recovery process is complete, you will be asked to log in to your WordPress site again as an added security feature.
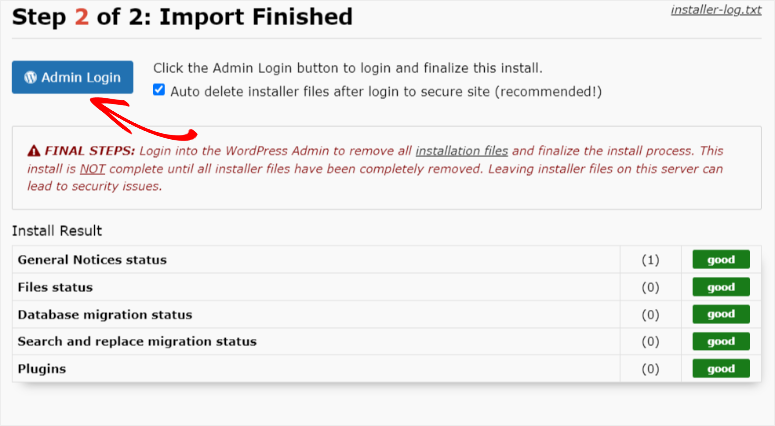
We know this process may seem a little long, but, as mentioned, there is a simpler and faster way to restore your site with Duplicator after the first backup.
Automatically, if you build a full package like the one above, without excluding any of the core WordPress files or database tables, you can use the file as a recovery point.
Look for the recovery icon next to the name of the backup package. Once you spot it, go to the far right and click on the arrow icon to reveal the package’s dropdown menu.
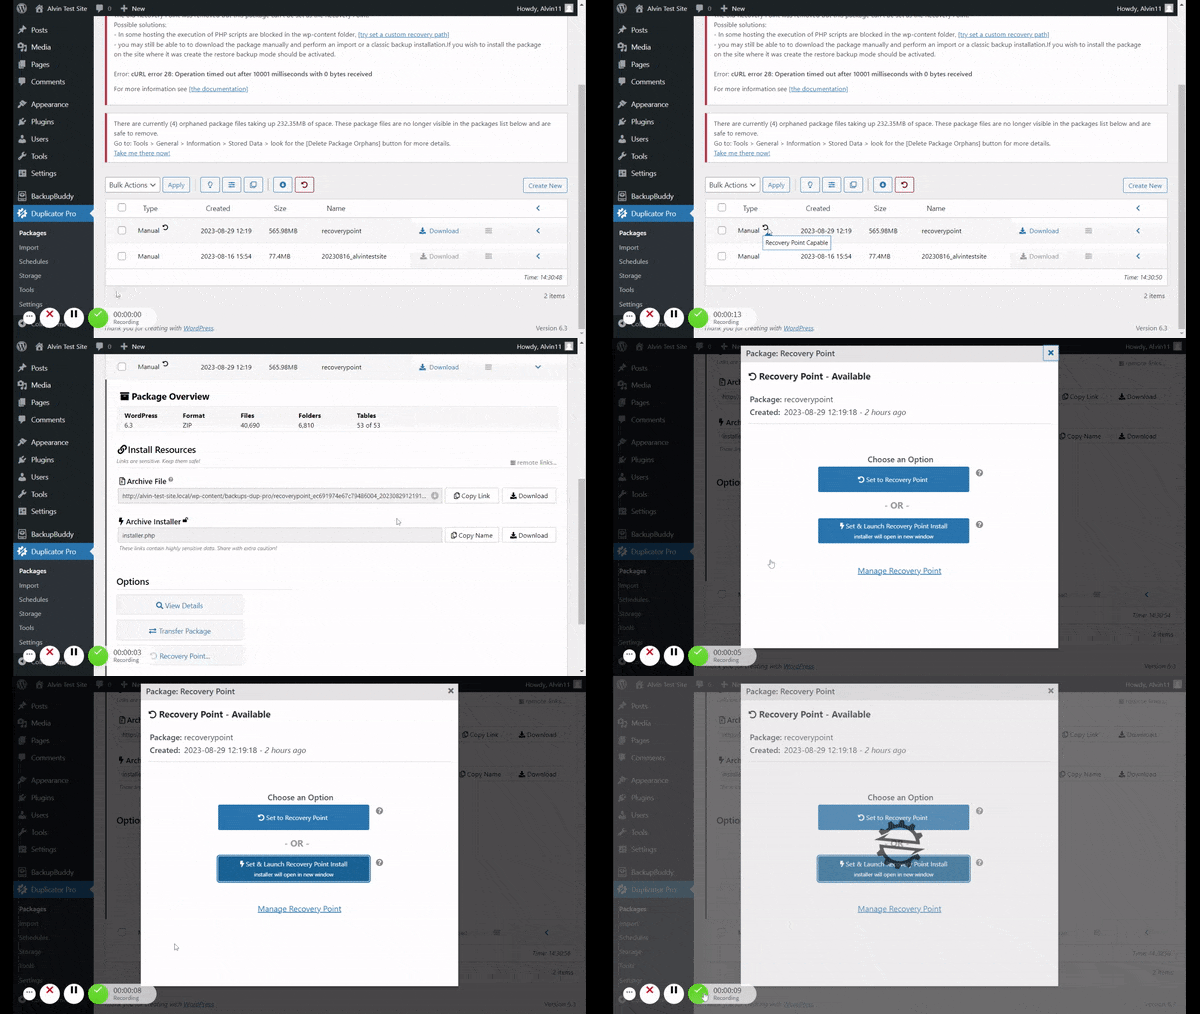
Launch the Recovery Point installer wizard, which will load in a new tab. The recovery wizard will check for any issues like with the long recovery method.
If none, accept the terms and conditions and go to Restore Recovery Point, then confirm installation since it is a manual process.
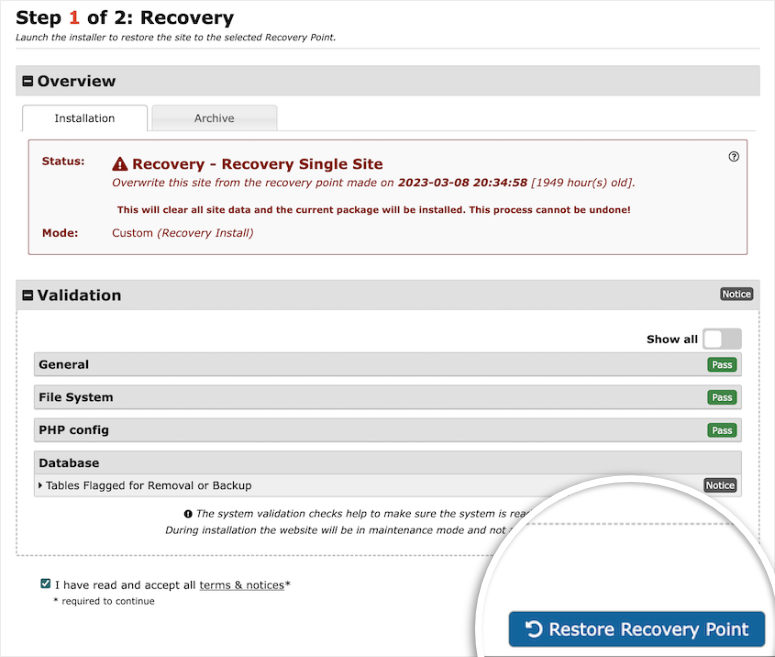
Duplicator will start the recovery process. Once complete, it will ask you to log in again like with the longer recovery process.
Simple! You are done.
UpdraftPlus
UpdraftPlus has some of the best backup functionalities. Let’s start with its backup process.
It is important to mention that the UpdraftPlus backup process is a little different.
To get started, go to Setting » UpdraftPlus Backups » Backup Now. This will open a pop-up window.
Check or uncheck the boxes in the pop-up window telling the plugin the exact files you want to save and where to send the backup file.
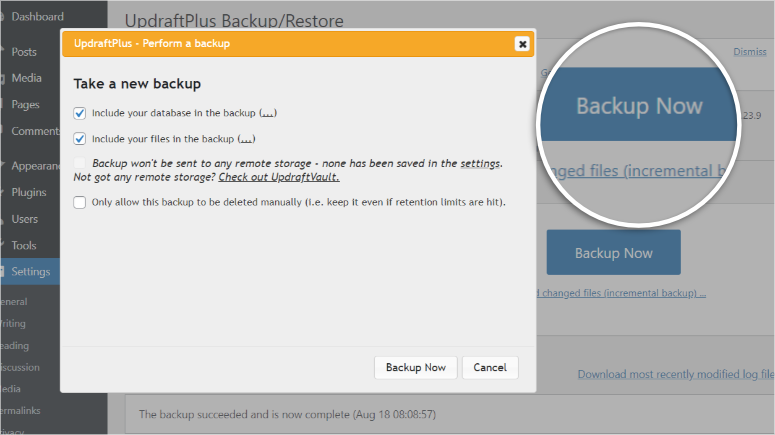
You can also mark the box that says ‘Only allows this backup to be deleted manually’ for added protection.
Click the Backup Now button to start the backup process.
Once the backup is created, you can download the media, themes, plugins, and database backup files separately.

UpdraftPlus mainly splits the backup into multiple files to increase security, manage your files better, and make it easy for its other features, like incremental backups, to work smoothly.
The split files can add some difficulty when you need to back up, restore, or migrate your site as a newbie.
If you need further assistance, check out this article for a step-by-step tutorial on how to use Updraftplus to back up and restore your site.
You may wonder if splitting files makes recovery harder with UpdraftPlus. Since the plugin saves the files in your WordPress dashboard, you do not need to do a manual recovery by downloading the files first.
Instead, all you have to do is Restore from the backup options you have.
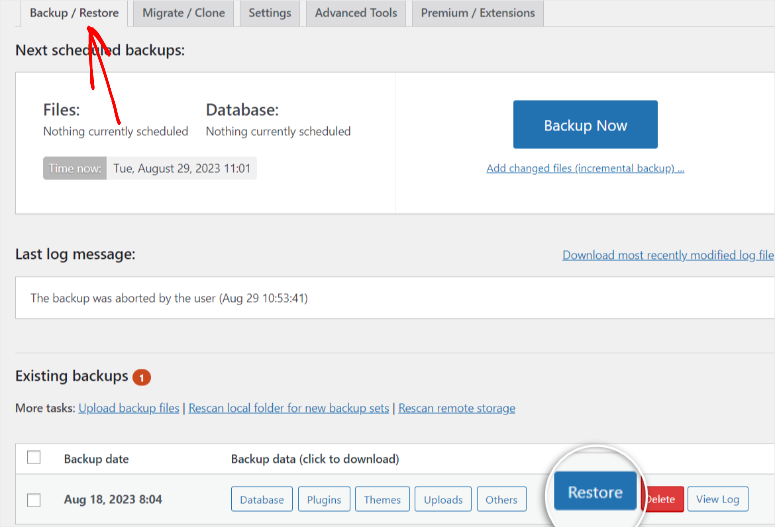
Go to Settings » UpdraftPlus Backups » Backup/Restore. Using the backup date, find the file you want to use and hit the Restore button.
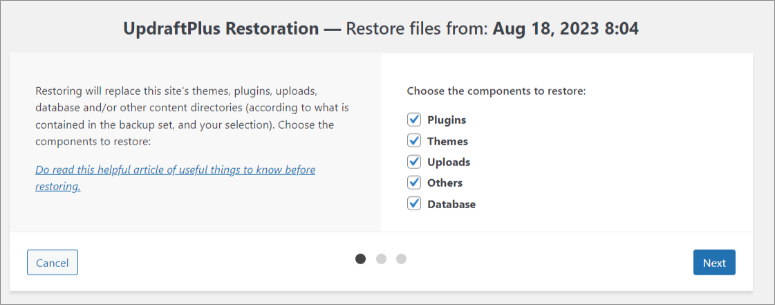
Choose the components you want to restore and go to the next page.
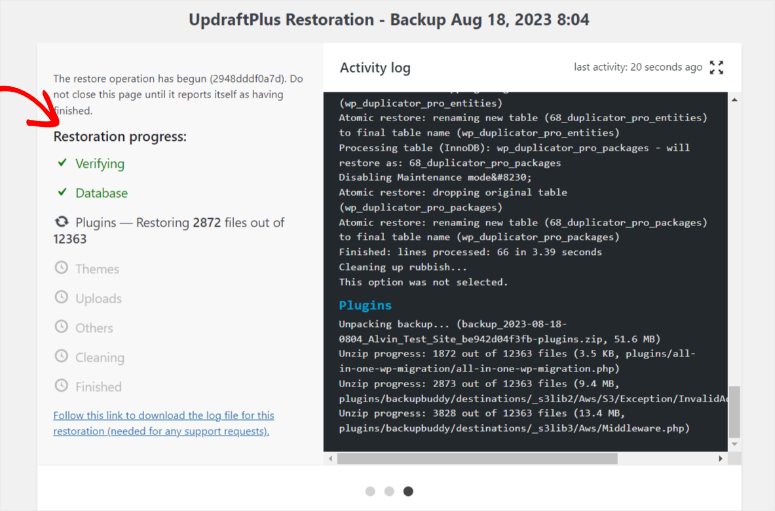
The restoration process should start, let the plugin run through all its processes.
Once the recovery process is complete, the plugin will ask you to Return to UpdraftPlus Configuration.
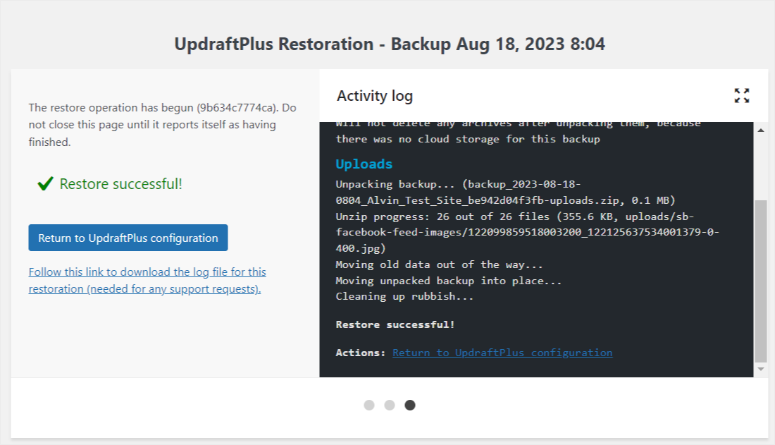
That’s all there is to it.
Solid Backups
As mentioned, Solid Backups focuses on making the backup process easy by using large icons to showcase the different backup options.
Go to the Solid Backups menu and proceed to the Backups submenu.
On the Create Backup tab, you can choose to do a complete, database, themes, plugins, or media backup.
If you do not like any of the default backup options, you can Create New Profile and customize it to your liking.
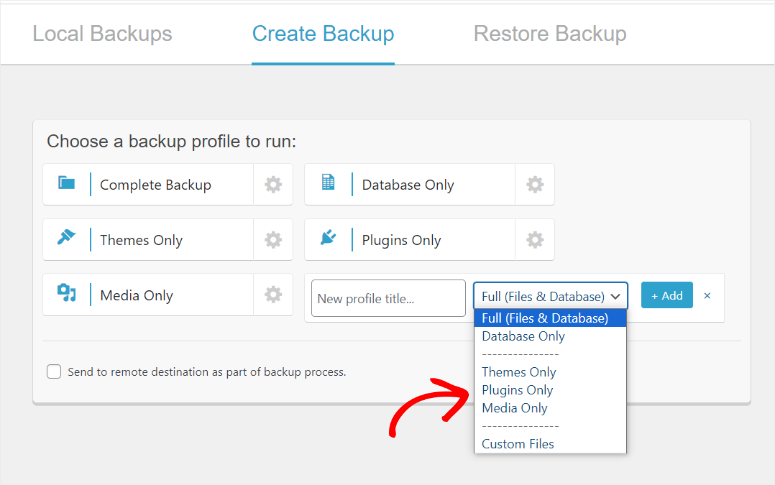
The process is highly automated, and you only need to click on the option you want.
On the next page, you will see a loading icon as the plugin processes your data. Once this is done, the backup process is complete. You do not need to do anything else!
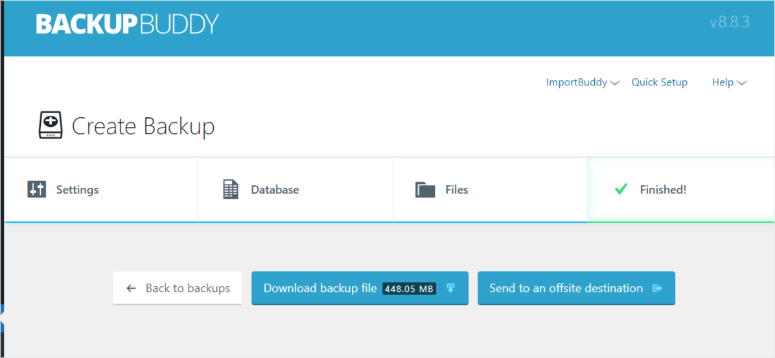
You can now download the zip file or send it to an offsite destination with a click of a button.
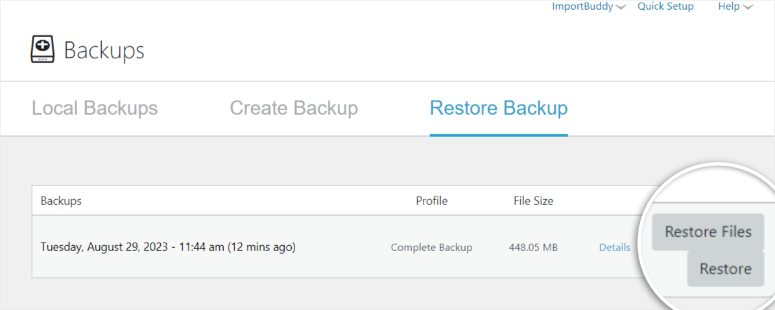
To restore a site, all you have to do is go to the BackupBuddy menu and proceed to the Backups submenu. In the Restore Backup tab, go to Restore Files.
Next, manually select the files and Folders you want to restore and proceed to the next step.
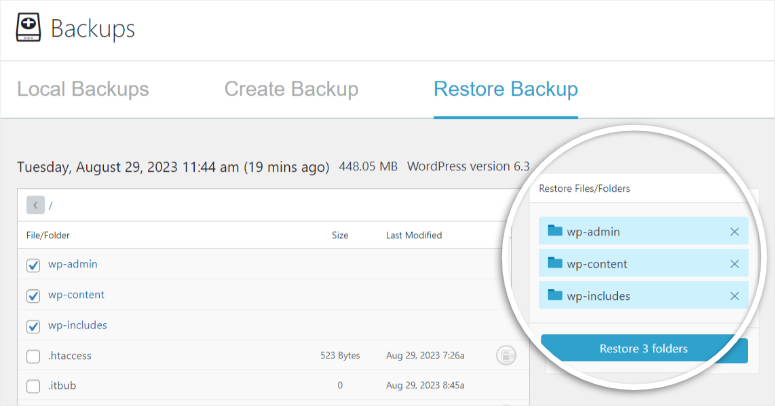
The plugin will take over the restoration process by unzipping and uploading files from your backup to your WordPress Site. Once The process is complete, you can Visit Site or View Restores.
The process is visual and fast, making it look like a video game loading process.
Backup & Restore Winner: Solid Backups
Reason: This was a close race, with Solid Backups and Duplicator leading. We must give the point to Solid Backups for the simple, visually appealing process. Duplicator offers plenty of options in a simple and detailed way. You can customize your scheduled backup in any way you like.
UpdraftPlus has multiple unique features and Duplicator can provide amazing backup options for large files. However, Solid Backups has dedicated cloud storage for added convenience.
Scheduled Backups
Scheduled backups are a great way to automate the process and give you peace of mind.
Duplicator
Duplicator has a simple yet detailed backup scheduling process.
First, in your WordPress dashboard, go to Duplicator Pro » Schedules » Add New.
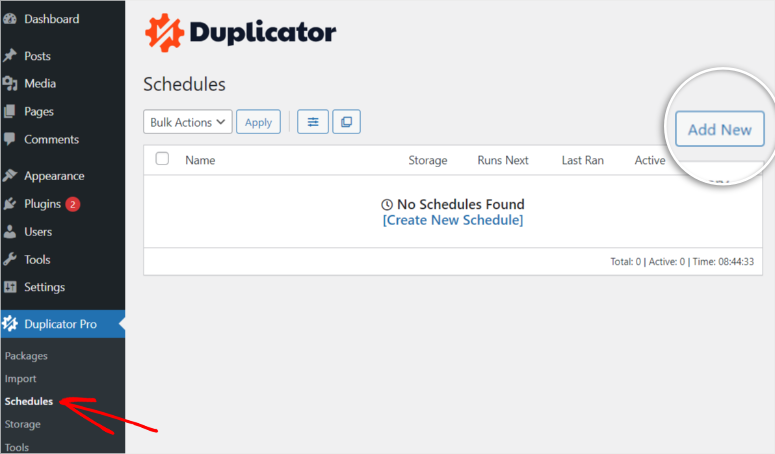
On the page added, name the file and select a template, if any.
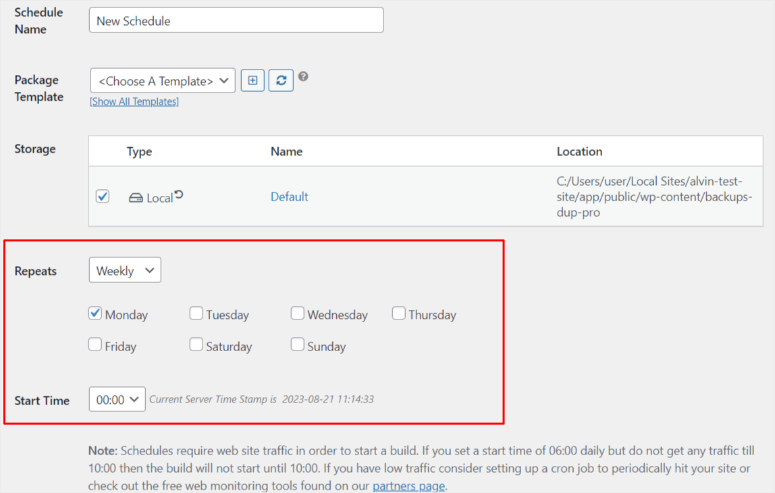
Select the storage option you want by either going for a cloud or local solution. In this case, we will go for local storage.
Select the backup frequency, which can be scheduled down to specific days of the month, specific days in a week, specific days, and exact times of the day.
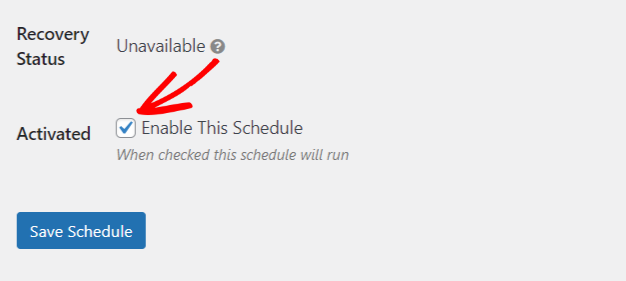
Check the enable box and save the schedule.
Duplicator has grown because of its efficiency and many unique features.
One backup feature that makes Duplicator efficient and unique is it can handle ANY sized website.
There have been confirmed backups created with Duplicator of sites over 100GB. This is an achievement not many plugins can boast about.
It all comes down to the package technology the plugin uses. It allows for quick and easy backup creation, regardless of the site size.
UpdraftPlus
UpdraftPlus is designed to make practical scheduled backups that you can depend on.
To set scheduled backups with UpdraftPlus, first, go to Settings » UpdraftPlus Backups in your WordPress dashboard. On the plugin menu, go to the Settings tab.
Change the backup from manual to Scheduled Backup. Next, choose the type of scheduling you want, ranging from every hour to monthly.
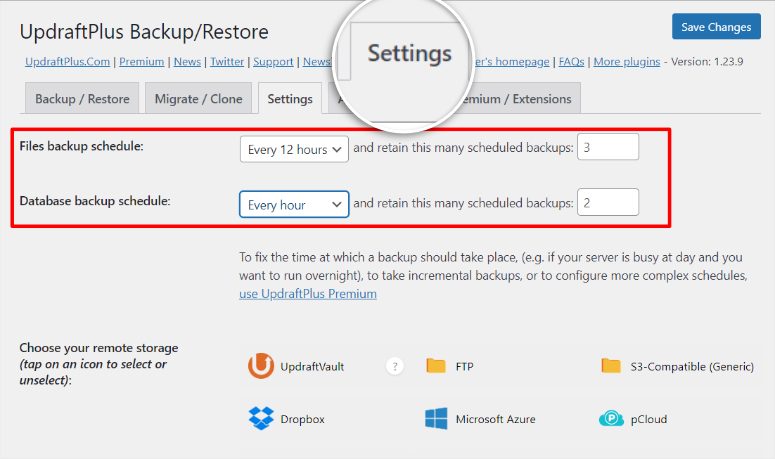
Next, select the number of backups to retain. This way, you have more backup options.
You will need to select the database and file backups separately. UpdraftPlus has many cloud storage options; pick one that is ideal for your needs.
Next, check and or uncheck files to exclude before you Save Changes.
The UpdraftPlus scheduling process may not be ideal for beginners because of how rigid the process is. You can only choose a schedule from the dropdown options provided.
But UpdraftPlus comes with other great features as well. One is incremental backups.
This feature only saves the new data added after your last full backup. It is a great way to save time and resources by eliminating repetitive backups.
With a full backup, all the source files, themes, and content from years or months back are re-saved every time you back up your site. This means you may have multiple copies of the same data saved over and over.
An incremental backup can save you time and resources that are often wasted with full backups.
One of the greatest fears of any website owner is that updates and changes can break their site. And this is the main reason to have scheduled backups.
However, UpdraftPlus goes a step further by ensuring even if you do not have a backup, your data is still safe through pre-update backups.
The plugin will create a full backup of your site before any updates to plugins, themes, and cores. So, whatever happens, your data and website are safe.
For these reasons, UpdraftPlus is a popular backup option for e-commerce and WooCommerce sites that are large and constantly being updated both in the back end by site owners or the front end through acquiring new customers.
Solid Backups
Solid Backups also has a straightforward scheduling process.
Go to BackupBuddy » Schedules » Add Schedule.
Create a name for the scheduled backup and select if you want a full backup or a specific type of backup file.
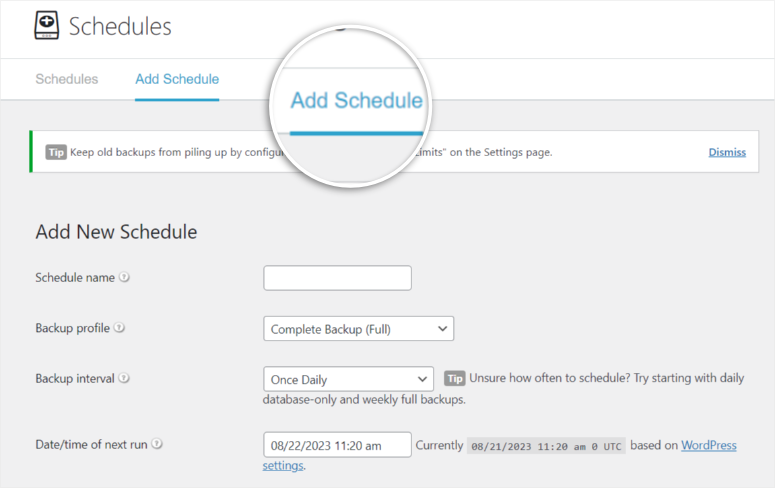
For the backup interval, select from the dropdown the frequency. You can also choose the date of the next backup.
Add a remote storage location. If you want, check the box allowing the plugin to delete the local backup after creating a successful offsite backup.
Finally, enable backup and Add Schedule.
The Solid Backups schedule process looks clean, but the dropdown menu may be confusing.
Furthermore, its scheduling options are limited as you can only select from the dropdown menu.
Most backup plugins do not have a dedicated cloud solution because they want you to pick the most ideal for your needs.
However, this comes with a few drawbacks. Your backup files may be less protected since you may use your cloud storage to do other things other than keeping backups, creating vulnerabilities.
Furthermore, you may end up deleting the files accidentally when your cloud storage gets full.
Solid Backups helps you avoid this problem by offering you 1GB of dedicated storage space designed for backups called Stash Live.
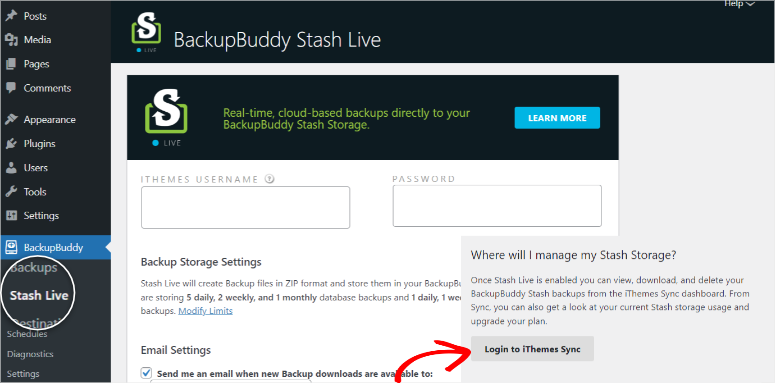
One of its most impressive features is that it actively tracks changes in your site and pushes this new data to your Stash Live storage which is a great incremental backup solution.
The iThemes dashboard also allows you to run remote sync. It takes snapshots of your site periodically and sends the live backup of your site to your email, where you can easily download it.
If you want to access these files, all you have to do is log into your iThemes Sync account and download the files.
Scheduled Backups Winner: UpdraftPlus
Reason: While all plugins have scheduled and automated backup options, we’re giving this one to UpdraftPlus for its incremental technology which makes it a great option for eCommerce sites.
Security and Malware Protection
Safety should be one of the top concerns of every site owner.
A security breach can affect more than just your site. Your personal or financial information may be affected as well.
Before we get into details, remember that all these tools use industry-standard AES-256 encryption, part of the reason they are some of the best backup plugin solutions.
Duplicator
As mentioned earlier in this post, one of the best features of Duplicator is scanning your site for malware and errors before building a package.
We should also add that it scans your backup before using it on your site, and conducts a health check and further tests. After the tests, it offers ways to improve your site.
As an added security measure, Duplicator allows you to give specific access powers to individual users.
Each user can be granted feature-specific access according to their role. This ensures that if you have multiple users, they can only access the features they use.
To use this feature, go to Duplicator Pro » Settings » Access.
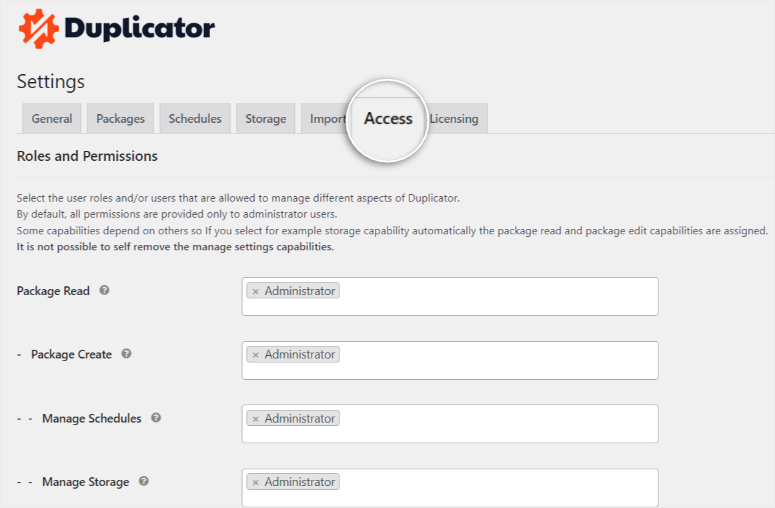
User-specific permissions reduce the chances of human error and increase accountability.
To add to this, the installer file is password protected, adding another layer of security and ensuring that only authorized individuals with the password can initiate the site restoration process.
UpdraftPlus
UpdraftPlus does not scan the files before creating a backup. However, since it separates the files in the form of databases, media files, plugins, and uploads, there is more control of the data access points. And the information is not all accessible at the same time.
UpdraftPlus Premium ensures your files are secured by offering password protection to backup files.
Even if hackers somehow get your WordPress password, you still have an added layer of protection.
UpdraftPlus’ password protection is also handy for sites with multiple admins. It provides limited access to your most important data and controls who can access it.
But with this plugin, it is not enough to just protect your user information with a password.
UpdraftPlus Premium automatically anonymizes user personal data. So even if someone actually gets your data, it will not be very useful to them.
Solid Backups
Solid Backups works with its parent company iThemes to improve security.
The best way to secure your site with Solid Backups is by downloading the iThemes security plugin.
This plugin is a premium addon, meaning you will need to pay extra for better site security.
Such third-party extensions may add vulnerabilities even if used to improve security.
For security, the fewer access points, the better.
Solid Backups scans your files for any malware. However, it is a more manual process while offering plenty of indepth information.
More information is often great for seasoned WordPress users. The downside to this is that it may offer information overload, which can be confusing for beginners.
Furthermore, the information provided does not offer any easy-to-fix solutions like Duplicator.
The scan only checks if backups are clean and may fix tiny errors in some files during backup.
Security and Malware Protection Winner: Duplicator
Reason: Duplicator is strong on controlling access by giving each user-specific privileges and offers accountability and security.
UpdraftPlus offers good security protocols through password protection and automatic file anonymity. However, it does not scan files before and after backups which can sometimes be risky.
Solid Backups offers a lot of information during the scans. It can also fix small bugs. But you may need coding experience if you get a bigger problem.
Plugin Support & Documentation
Good support can improve user experience and ensure that you use the plugin to its full potential with ease.
Duplicator
Duplicator has compiled one of the most comprehensive documentation on a plugin. However, having such a large documentation can be confusing.
That is why Duplicator has arranged its user guide in a one-page block format. So that whatever you need can be easily found without scrolling through pages.
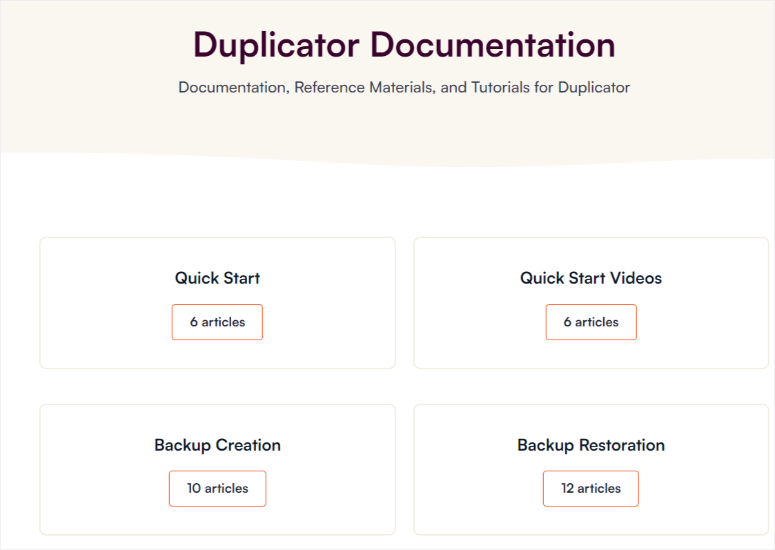
Once you open the tab on the main page, the documents are also arranged in a way that ensures you can still follow the information step by step.
Duplicator has a simple yet detailed support form. Fill out your name, email, area you need support with, subject, and message. And that’s it.
They usually get back to you within 24 hours.
UpdraftPlus
UpdraftPlus’ documentation is in blog format, on their YouTube channel, FAQs, and forums.

Their forum allows both their tech support and other users to help. This is a great way to build a community.
However, the forum does not always answer all your questions, and it can take time to get a response, especially if you need to take action right away.
To contact UpdraftPlus, you must first be a paying customer before filling out their support form.
They state that they will get back to you in 24 hours. However, the form may look complicated and crowded for a newbie, which can discourage many from contacting support.
Solid Backups
Solid Backups has a more straightforward support window where you can select what you need from a dropdown menu.
But, since the plugin uses iThemes’ support, their customer care team may not be fully dedicated to Solid Backups.
You will find Solid Backups documentation on the iThemes site. The information can be a little hard to find since iThemes uses the same documentation portal for all its products.
Once you find the plugin’s documentation on the site, the text and link format they use may require you to do a little searching until you find what you are looking for.
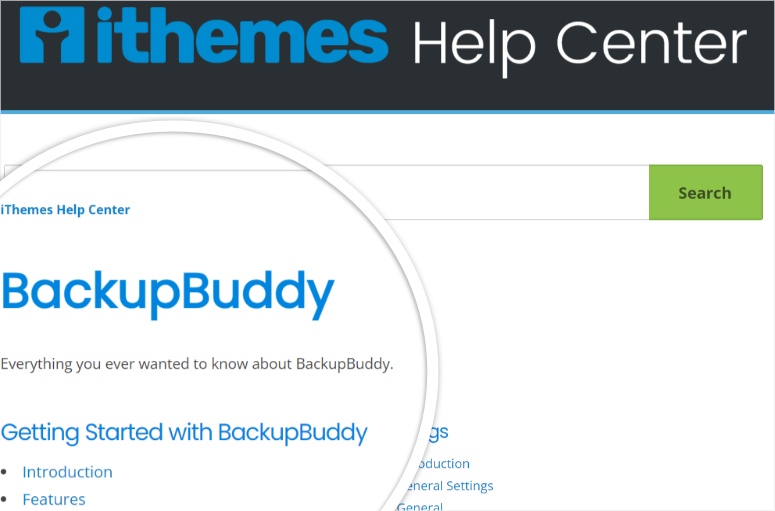
However, you can use the search bar to make it easier.
Support & Documentation Winner: Duplicator
Reason: Picking a winner here was a little tricky. It was a close call between Duplicator and UpdraftPlus. However, we love how simple and straightforward the Duplicator contact form is. The documentation structure ensures you can quickly understand their tutorials and need little handholding.
Pricing Plans
Duplicator Pricing
As mentioned, Duplicator offers a free version of the plugin. It has 4 packages you can choose from.
The price starts at $99 for two sites to $499 for the elite package for up to 100 sites. However, this plugin is often 50% off to all its new users, making it even more affordable.

Duplicator Pro offers a 14-day money-back guarantee, no questions asked. So for whatever reason, you feel it is not a good fit, you can ask for your money back.
UpdraftPlus Pricing
Like Duplicator, UpdraftPlus offers a free plugin version you can use before purchase. This can help you assess whether it is right for you.
It offers flexible payment options because you can choose a manual or a subscription plan.
Instead of looking for a refund after they automatically deduct the amount from your account, you can decide to pay manually from the beginning. This way, you are the only one who can start the payment process.
UpdraftPlus also offers an annual subscription, with the lowest starting at $70 for two sites and the biggest package at $195 for unlimited sites.

They also carry out promos often that you can take advantage of and save money.
You can request a refund in the first 10 days of subscribing by filling in the support form.
Solid Backups Pricing
This backup plugin has a very straightforward pricing model. Basic, Plus, and Agency.
However, it does not have a free version, meaning users cannot try it out before buying it.
Their lowest subscription, which is $99 a year, serves one site, while their largest subscription serving 10 sites, is $299.

To get addons like security features, you will need to make an additional purchase of $749.
For a refund, you must request it in the first 30 days.
If it is a recurring subscription, they will send an email 1 week before the due date, creating the perfect opportunity to cancel.
Pricing Winner: Duplicator
Reason: Because of the many discounts and an affordable price point, we will give it to Duplicator. Even though it may appear more expensive in the beginning, the features offered in each package make it value for money.
Final Verdict
As you can see, these three backup plugins offer amazing benefits. Apart from backups, they have plenty of amazing features you can try. They are easy to use and have detailed security features to keep your data safe.
Each of these plugins shines in different areas.
- Duplicator offers a simple way to backup and restore your site. It comes with great customer service, is easy to use, and has many advanced features.
- UpdraftPlus has incremental technology, robust security features, and a smooth design perfect for eCommerce sites
- Solid Backups excels in providing an easy backup process and unique backup options.
But in the end, there can only be one winner.
Our #1 pick goes to Duplicator.
Duplicator stands out because of its user-friendly features. Its package technology can handle backups of any size, giving a solution to people with large and quickly growing sites.
You can scan your files before and after the backup process for errors and malware, adding another layer of protection. Other features like user-specific access control add security and accountability by granting strict privileges to different users.
Duplicator uses a templated approach to carry out and streamline most processes. Still, if you find some difficulty in using it, Duplicator has extensive easy-to-follow documentation that can help you.
Whether an experienced developer or a new WordPress user, Duplicator’s simple design and comprehensive features make it the go-to choice for website backups.
Even though Duplicator came out on top, UpdraftPlus and Solid Backups are still stand-out backup plugins that anyone can enjoy using.
That’s our complete comparison between Duplicator vs UpdraftPlus vs Solid Backups. Next, we’ll answer common questions are users ask us often.
FAQs: Which is The Best Backup Option?
Can I use Duplicator to move my website to a different domain?
Yes, Duplicator’s Archive Installer File allows you to easily migrate your site to a new domain without the fear of errors or malware interference. The process is streamlined and efficient.
Does UpdraftPlus offer incremental backups?
Yes, UpdraftPlus provides incremental backups, saving only the new data added after the last full backup. This feature optimizes backup processes, saving time and resources.
Is Solid Backups suitable for WooCommerce sites?
Yes, Solid Backups’s dedicated cloud storage, Stash Live, is a valuable solution for WooCommerce sites. It offers incremental backups and remote sync, ensuring your e-commerce site’s data remains secure and up-to-date.
How do I choose the right backup plugin for my WordPress site?
Choosing the right backup plugin depends on factors like ease of use, backup process, security features, and support. Duplicator offers simplicity and detailed features, UpdraftPlus focuses on security and cloud options, while Solid Backups provides unique storage solutions. It is up to you to choose what works for you best.
Do backup plugins provide security measures?
Yes, backup plugins offer security features. Duplicator scans for malware and errors before creating backups. UpdraftPlus offers password protection for backup files and anonymizes user data. Solid Backups scans for malware and provides insights before fixing simple errors.
That’s all we have! We hope this post helped you find the right backup solution for your WordPress site. You may also want to read more of our helpful guides:
- How to Protect Your WooCommerce Site (Steps + Security Tools)
- 8 Best WordPress Firewall Plugins for Security & Protection
- How to Restore a WordPress Site From a Backup (5 Ways)
The first 2 posts will help you secure your website against online threats and hackers. You can bookmark the last post and come back to it when you need to restore your site.

Comments Leave a Reply