Did you know that you can now use AI-generated images in WordPress?
AI tools have quickly evolved in the past few years. We are at a point where you can create beautiful images and even animate them with a few clicks.
In the past, content creators needed to buy stock images, which were often overused by many other sites. Or take their own pictures for uniqueness, which can be expensive and time-consuming.
Luckily, using AI images tackles these problems. In this article, we will look at different ways you can use AI images in WordPress.
Importance of AI Images for Your Website
As mentioned, AI has quickly evolved over the past few years. Many content creators fear this change as there is a belief that such tools will take away a lot of jobs. While this notion may be true on the surface, the solution is finding ways to work with the new AI technology.
One of the best ways to take advantage of this situation is to capitalize on AI image creation for your WordPress website.
First, it is incredibly fast to generate AI images. Most tools use text-to-image modules, which means you only need to type out the description of the picture you want to create.
Plus, it is just as easy to edit the images as you will use the same text-to-image process. You do not need to learn complex tools such as Photoshop to crop out sections, edit colors, and so on.
What really impressive about AI-generated WordPress images is how affordable they are. Most tools offer free credit to get you started.
After that, you can purchase a plan that is within your budget and needs. Some AI image tools even offer pay-as-you-go plans, so you only purchase credits when needed.
Here are other reasons to use AI-generated images on your site.
- Creativity: Offers unique and creative visuals that might not be easily achievable through traditional methods.
- No Copyright Issues: Avoids potential legal issues related to image copyright infringement.
- Adaptive: Can be updated and adjusted quickly to match changing content or design trends.
- SEO Benefits: Original images can help improve search engine rankings as they can help you look like an expert in the field.
- Improve Engagement: You can get as creative as you want, and AI will help you create vibrant and beautiful images to capture user attention.
- Customization: Provides tailored images that fit specific requirements and themes.
- Consistency: Ensures a consistent style and quality across all images on the site.
- Scalability: Easily produces many images, ideal for content-heavy websites.
How to add AI Images in WordPress
Now that you better understand the importance of AI-generated images for your business let us look at how to use them.
We will walk you through 3 easy ways to add AI images to WordPress. But we have also included additional bonus methods to ensure you select the one that is most convenient for you.
With that said, let us get into it.
Add AI images with SeedProd
SeedProd is the best drag and drop WordPress website builder. It can help you create custom themes and page layouts. On top of this, it can help you create individual landing pages and easily add conversion elements to improve sales. The best part is you can do all this without code experience.
SeedProd now goes further by helping you generate AI images right in your WordPress dashboard. You can edit and improve them without design experience, making it a great choice for beginners and small businesses.
But with SeedProd, you can use AI on a lot more than just images.
You can also use it to create content, improve existing page content, translate your content to +50 languages, and help you get new content ideas.
But, in this tutorial, we will only look at using SeedProd to help you add AI images to your site.
If you want to learn about everything this page builder offers, don’t worry. We got you covered.
Check out this article for the latest SeedProd review.
Now, for SeedProd to help you with AI-generated images, it uses DALL·E. This is one of the best and first text-to-image AI modules. Plus, it uses Deep language and Natural Language, ensuring that it can generate images with even simple prompts, making it great for beginners.
To top it off, it was created by OpenAI, the same team behind ChatGPT, so you can be sure it is user-friendly and practical.
So, let us see how SeedProd can help you generate AI images.
Step 1: Install and Setup SeedProd
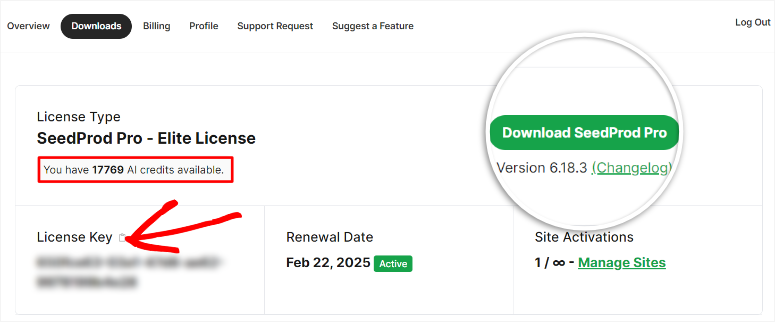
SeedProd offers both a free version and a pro version. Sadly, you can only access the AI features in the pro plan. To add to this, you will also need to purchase the AI package plan to access credits to generate the images.
To get started, head to the official SeedProd Website and purchase a plan. Don’t worry, SeedProd offers 4 plans, ensuring you can find one within your budget. After this log into your SeedProd account and also purchase the AI package plan to access the credits.
Then, move to the Downloads tab and save the SeedProd Zip file on your PC. On this page, also copy the License Key; you will need it later to activate the pro plan.
After this, head to your WordPress dashboard and go to Plugins » Add New Plugin. Here, upload the SeedProd ZIP file you just copied to your WordPress dashboard and activate it.
SeedProd will then redirect you to the activation page, where you paste the License Key. Finally, hit “Verify Key,” and that’s it; you are ready to use SeedProd.

Step 2: Create a Theme or Landing Page
One thing we love about SeedProd is that it can quickly help you create WordPress themes and pages with its simple drag and drop builder. The best part is that you can add AI images to either option.
For this step by step tutorial, we will add the AI images to a landing page.
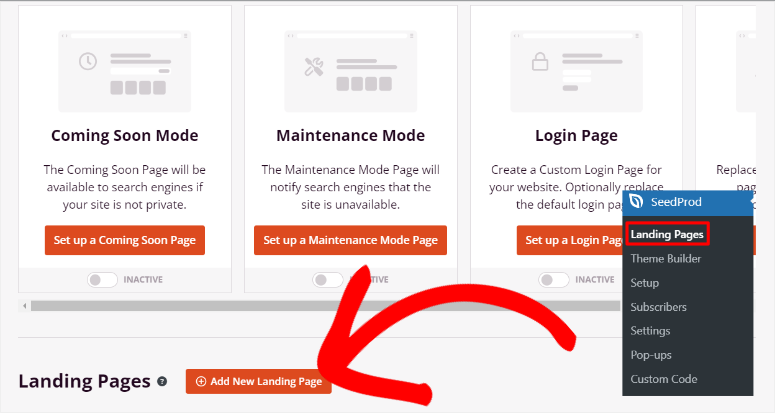
To get started, go to SeedProd » Landing Pages. Here, you will see quick options to create pages like Coming Soon Mode, Maintenance Mode, Login Page, and 404 Page. But, to get all page creation options, select “+ Add New Landing Page” under these options.
On the next page, select one of the templates from the over 300 options available. To make it easier for you to find what you need, SeedProd has a filter and a search option.
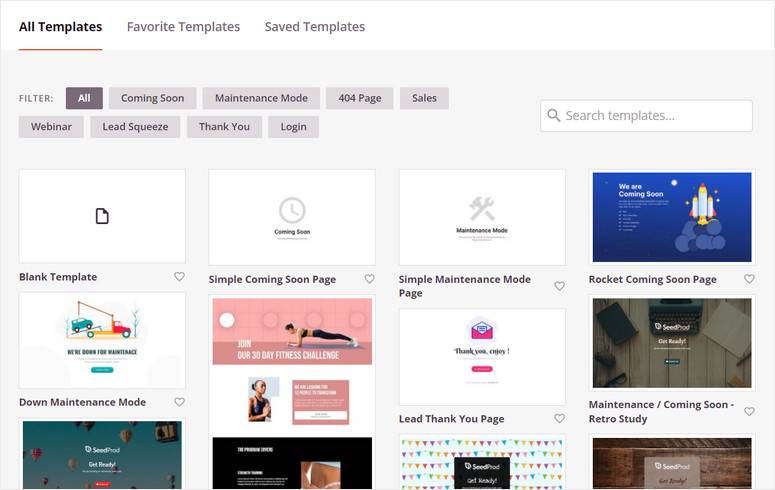
After selecting the template you want, SeedProd will open a popup for you to enter the page details. On this window, enter a Page Name and Page URL. Make sure the URL is unique to your site to avoid any conflict.
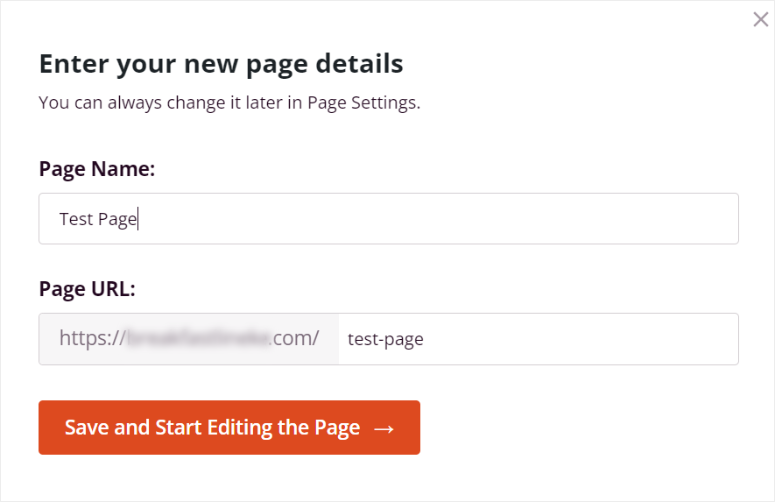
After this, SeedProd will open its drag and drop page builder, where you can use the AI features.
Step 3: Add AI Images to your Page
Once you are on the SeedProd drag and drop builder page, you will notice the Block section on the left, which contains over 90 blocks to help you add elements.
The blocks are divided into Standard, Advanced, WooCommerce, Easy Digital Downloads, and Widgets. This helps you quickly locate a block, saving you time and energy. You will also get custom blocks you have created in this section to help you quickly reuse your blocks.
On the right there is a preview window that shows you how the page will look like when it goes live. Drag and drop different blocks and sections in this area to modify your page.
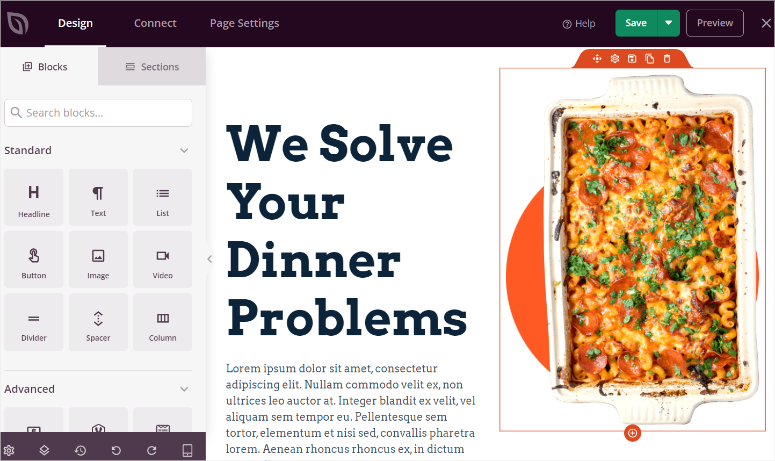
Now that you understand the SeedProd interface better, there are 2 ways you can insert AI images into the page. First, you can select any placeholder image on the page, open its settings on the left, and select Edit With AI.
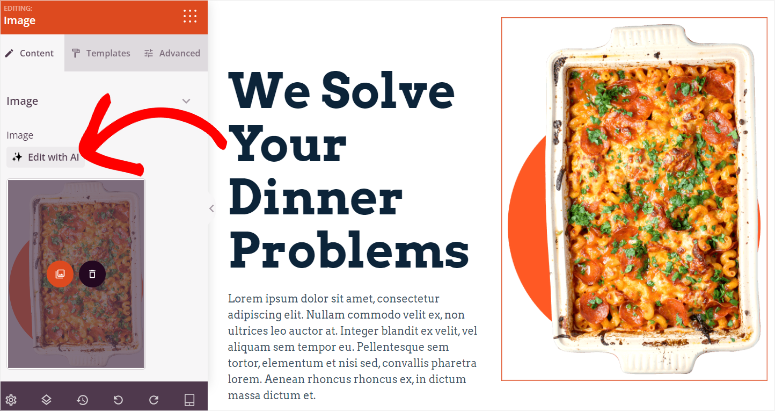
But for this tutorial, we want to create the AI image from scratch.
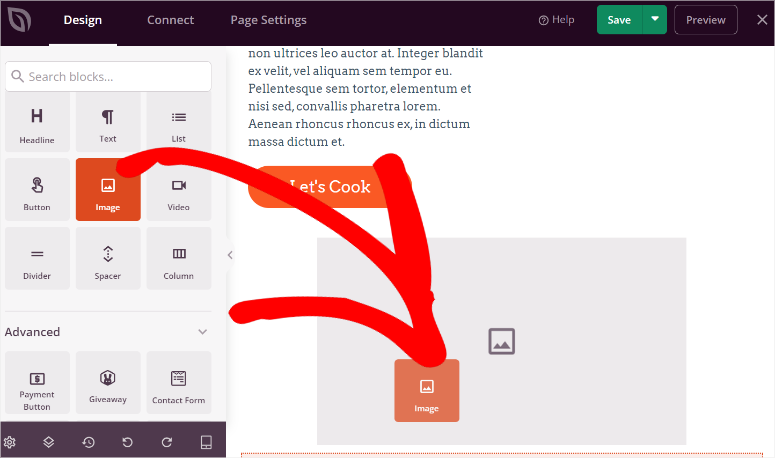
To do this, locate the Image block on the left and drag and drop it to where you want it to appear on the page.
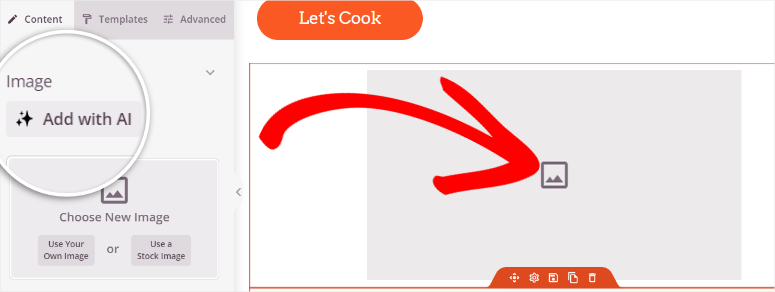
After this you will see options to Use Your Own Image, where you upload them from your PC, and Use Stock Images. Above this section, select “Add with AI” to open the image prompt panel.
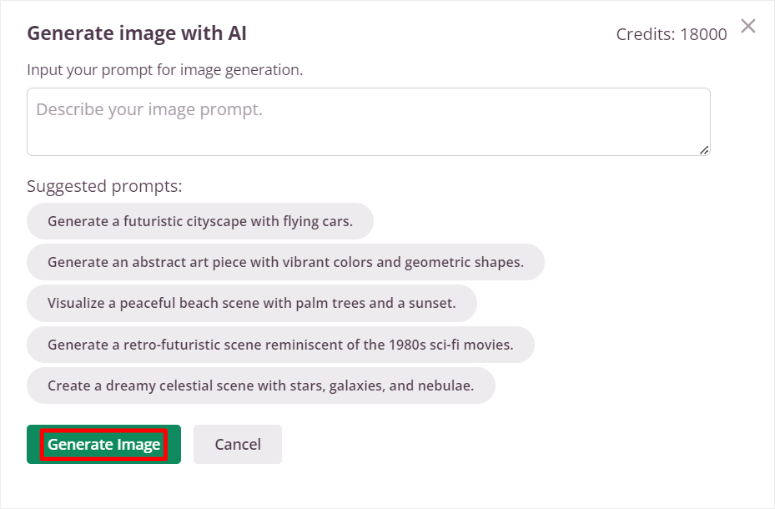
On the far right corner of the image prompt panel, SeedProd shows you the number of credits you have left so that you can track your spending and control how many images you want to create.
You also get suggested prompts to quickly create your AI images without typing anything.
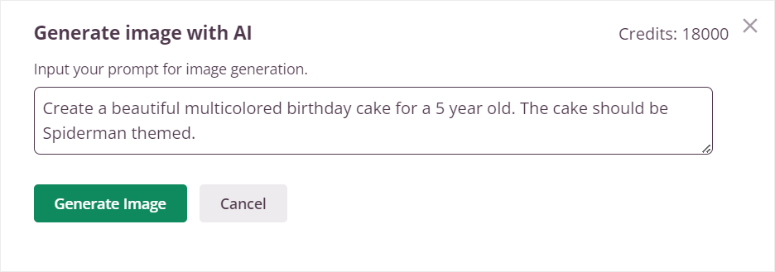
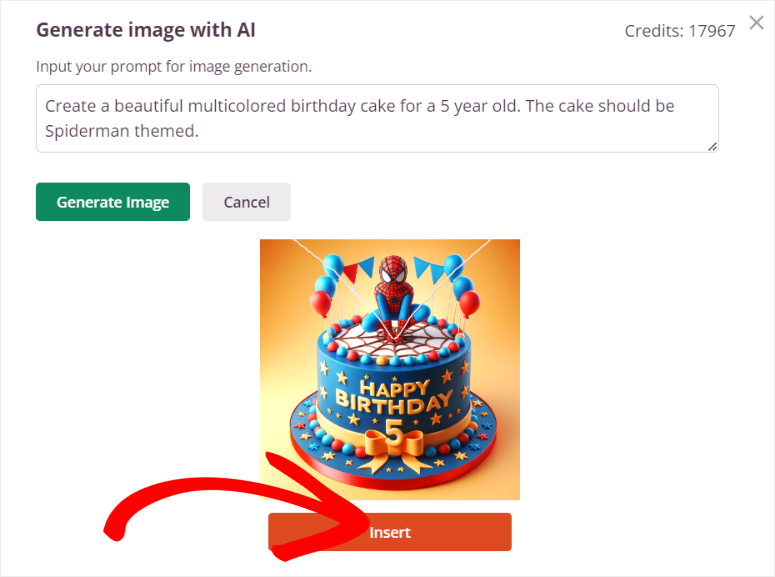
Here, type a description in the prompt box. Remember that the more detail you add to your prompt, the better the output image matches your vision.
After this, hit “Generate Image” and give SeedProd a few seconds to create it.
Next, SeedProd will display a preview image so that you can first see if it is what you are looking for. If not, modify the prompt in the text box provided and hit “Generate Image” to start the process again.
But if the image matches your vision, select “Insert” to add it to your page. And that’s it; you have just created an AI image in WordPress using SeedProd.
Step 4: Edit AI Image with SeedProd
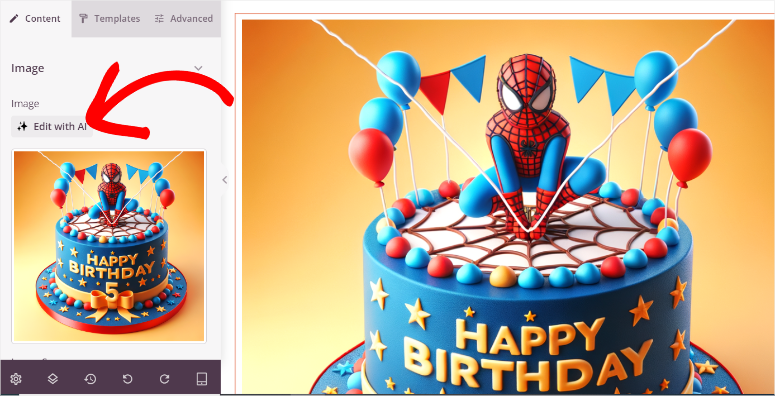
Now, if you want to edit the image, you first have to select it in the preview window. You can reposition the image, save it as a block, duplicate it, or delete it.
Next, edit the actual AI image by selecting Edit With AI.
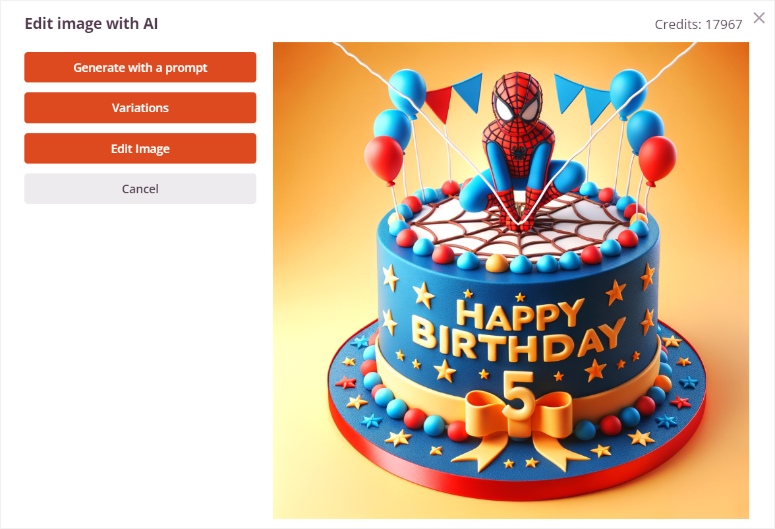
This will open options that include Generate with a Prompt, which allows you to create a new AI image. Then, below this, you get options that include Variations, Edit Image and Cancel.
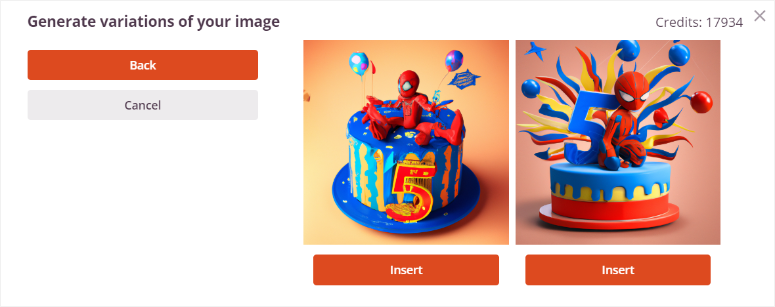
Select Variations » Generate Variation, and SeedProd will generate 2 image versions. These two options keep the same theme and idea of the image but change the perspective and angles. It can be a great way to ensure image consistency across the page.
Next, you can select Edit Image. Here, use the mouse to erase an area in the image you want to change. Then, type in the full image description plus the changes you would like in the erased area.
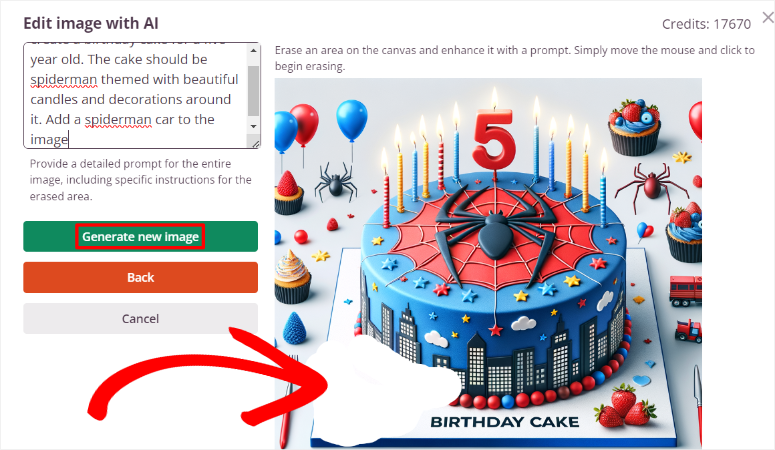
Finally, hit Generate New Image, and SeedProd will offer you 2 options to select like before. Once you are happy with your AI image, hit “Insert” to add it to your page.
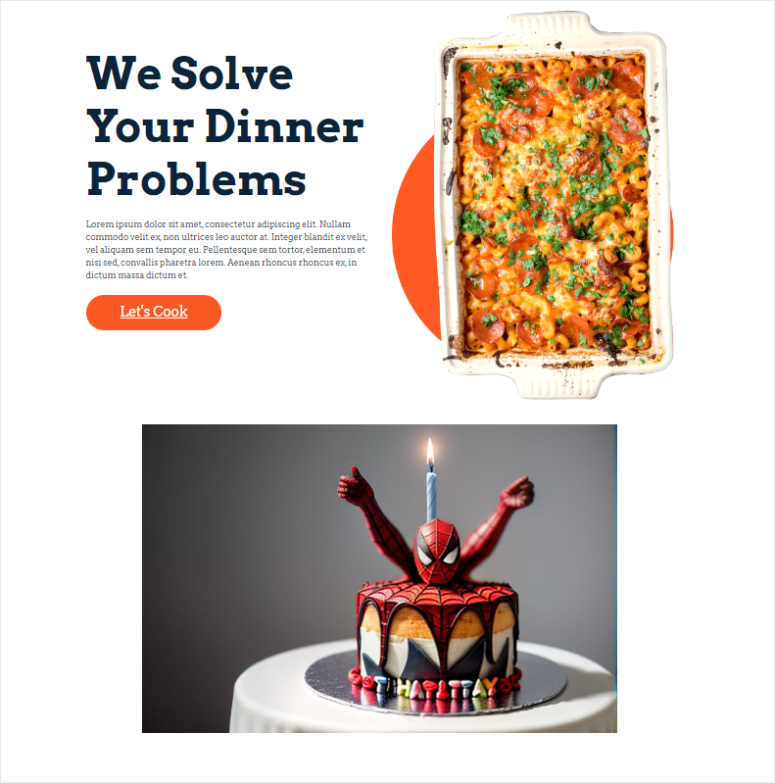
That’s it! You can now add an AI image to your WordPress website with SeedProd.
Add AI Images with Divi Builder

Divi Builder, a product from Elegant Themes, is one of the best drag and drop website builders today. It comes with over 370 full website layouts to help you get started with site-building. The main aim of this visual site builder is to make the process as easy as possible for you.
As a result, they were one of the first companies to integrate AI features by creating Divi AI to work with their drag and drop builder. This feature can help you generate and improve text and site images with AI speeding up and improving your site-building process.
Check out the latest Divi Themes and Divi Builder review here.
So, how can you use Divi AI to create AI images in WordPress?
Step 1: Install and set up Divi Builder
Divi offers 2 plans that can give you access to Divi AI. You can purchase the Divi Pro plan, which includes Divi Themes, Divi Cloud, Divi Builder, Divi AI, and more. Or you can just purchase Divi Builder and get Divi AI as an addon.
For this tutorial, we will use Divi Pro so that we can explore everything Divi Ai can do.
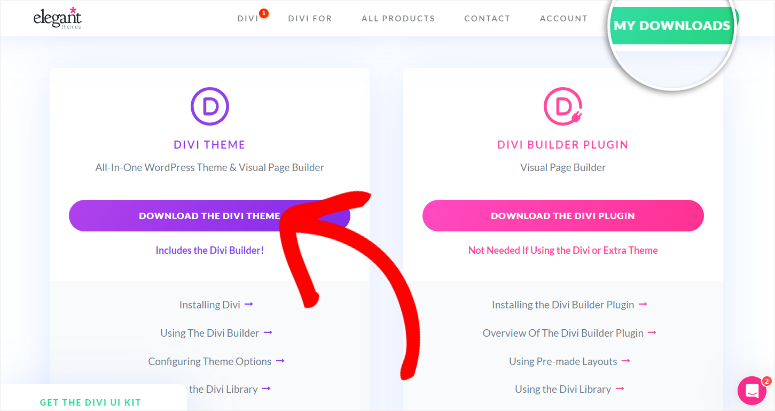
To get started, head to the official Divi site and purchase your plan. After this, log into your Divi account and go to the Member Area. Here, navigate to Account » My Downloads. Then, download Divi Theme to your PC.
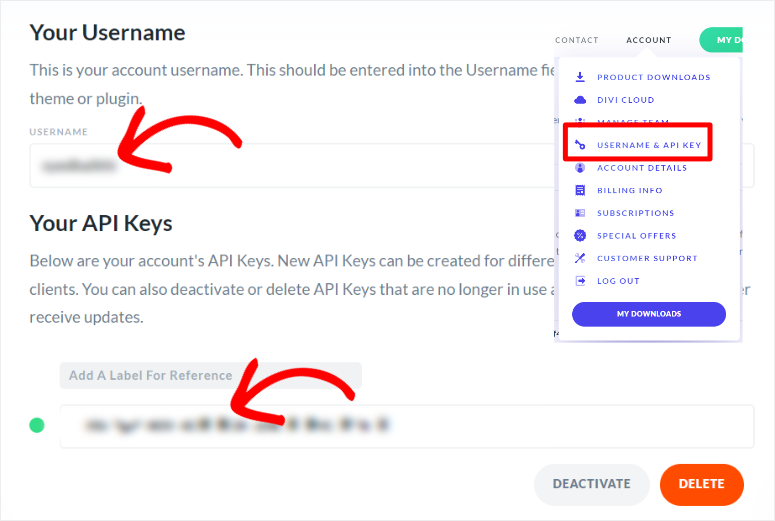
After this, navigate to Account » User Name & API Key to copy the Username and API Key to activate the theme and builder in your WordPress dashboard.
Then, go back to your WordPress dashboard and navigate to Appearance » Themes, and select “Add New Theme.” You will then upload and activate the DIVi Theme ZIP file to your WordPress dashboard.
After this, go to Divi » Dashboard and paste the Username and API Key to activate it.
That’s it. You can now use Divi Themes and Divi Builder.
Step 2: Add AI Image to a Page or Post
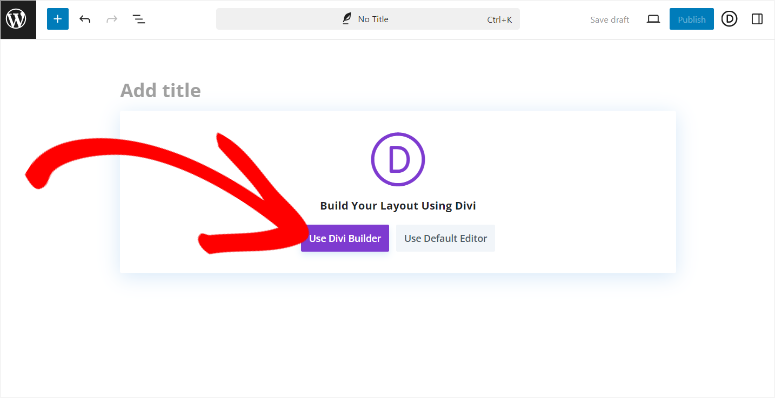
Once Divi is ready to use, open any existing page or post. You can also create a new page or post on your WordPress dashboard to help you add the image generated with AI. Then on your native WordPress block editor, select Use Divi Builder to change to the visual builder.
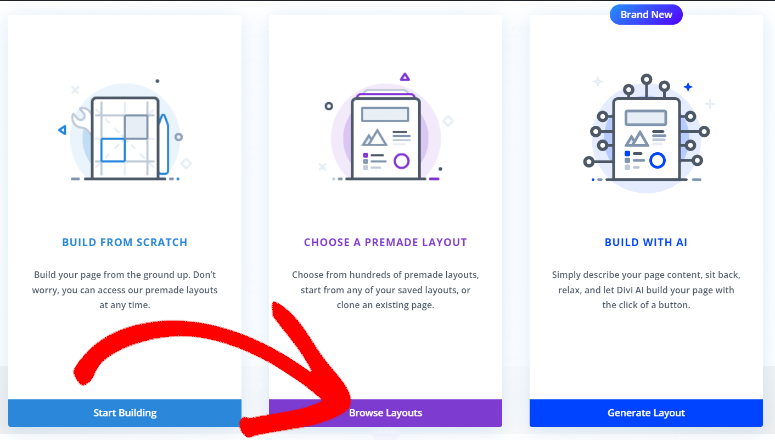
After this, select if you want to Start from Scratch, Choose a Premade Layout, or Build with AI. For simplicity, we will go with Choose a Premade Layout.
Next, select one of the 370 layout packs provided by Divi and upload it to your WordPress dashboard. After this, you can either replace the placeholder image with an AI image or create one from scratch.
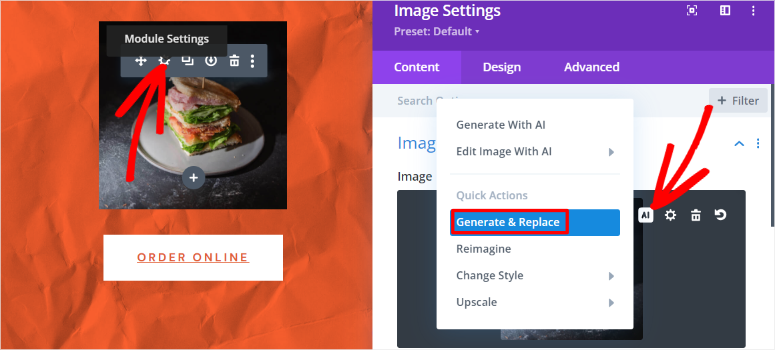
To replace the placeholder image, simply select the image module and hit the “Gear icon” to open settings. Then, in the new window, select the AI icon to open more options.
Finally, select “Generate and Replace” to create 4 new images you can use to replace the placeholder one.
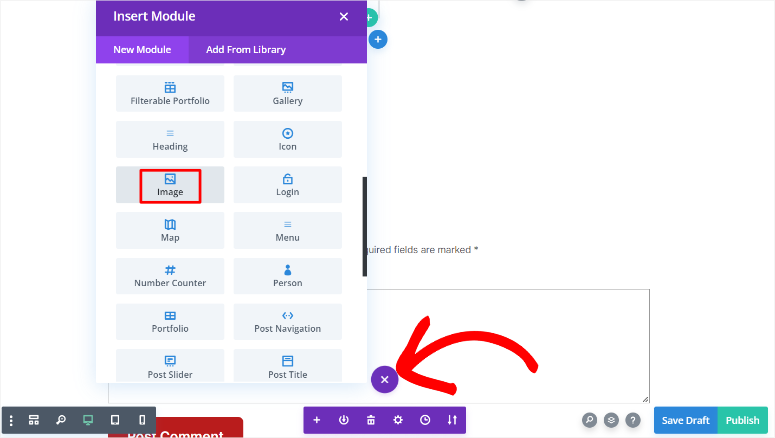
But to create a new AI image, select the Plus (+) sign to open the module window.
Then, find the Image module and drag and drop it to the location on the page where you want it to appear.
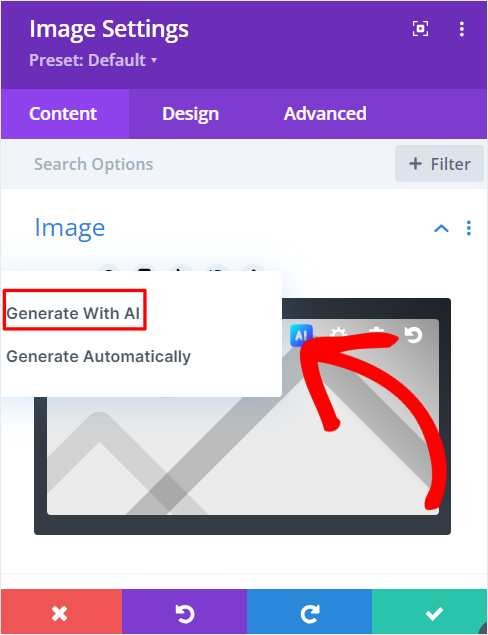
In the image module, select the AI icon to bring up settings. Then, select “Generate with AI” to open a popup window.
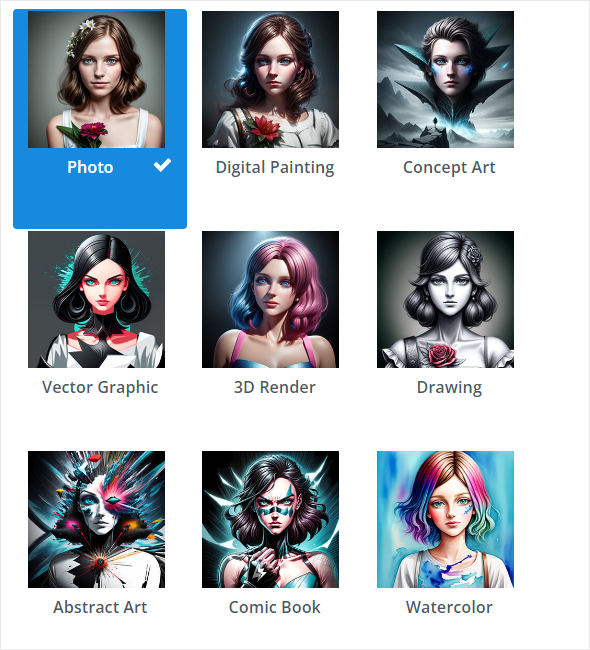
In this window, first, select the Image Style for your AI image. You have options such as Photo, Digital Paint, Concept Art, Drawing, and more. The good thing about creating AI images with Divi is that you can change the image style later.
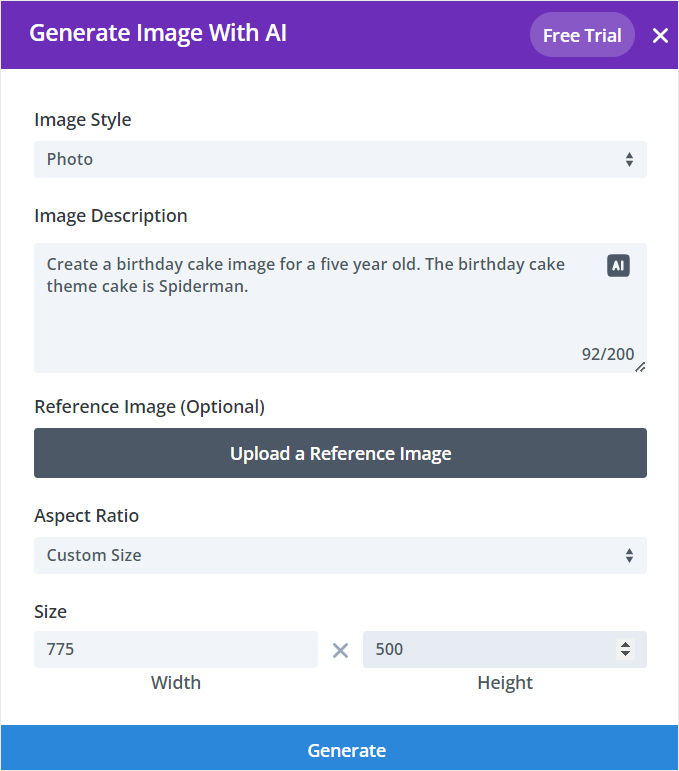
Below this, type out the description of the image you want to create in detail. As we have mentioned above, try to be as detailed as possible to ensure the photo matches what you are looking for.
You can upload a reference image to help Divi create an even more accurate image. This can be highly useful if you have already created an AI image before and you would like to build consistency across your site images.
Next, select Aspect Ratio and choose one of the options that include Square, Landscape, and Portrait. Or, you can add custom dimensions in the box provided to get an image that fits your exact site specifications.
Finally, hit “Generate” and let Divi create your AI image.
Divi AI will then generate 4 AI images for you to choose from. If you do not like any of them, select “Get Four More” so that Divi can create more options for you. If you find one you want, hit “Use this Image,” and it will be added to your page.
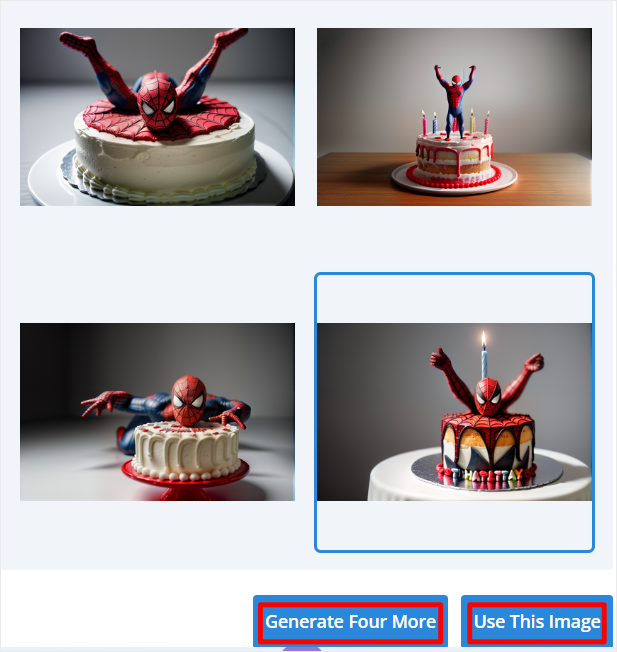
Well done! You can now add an AI image with Divi. Let’s see how you can customize it.
Step 3: Customize your Divi AI Image
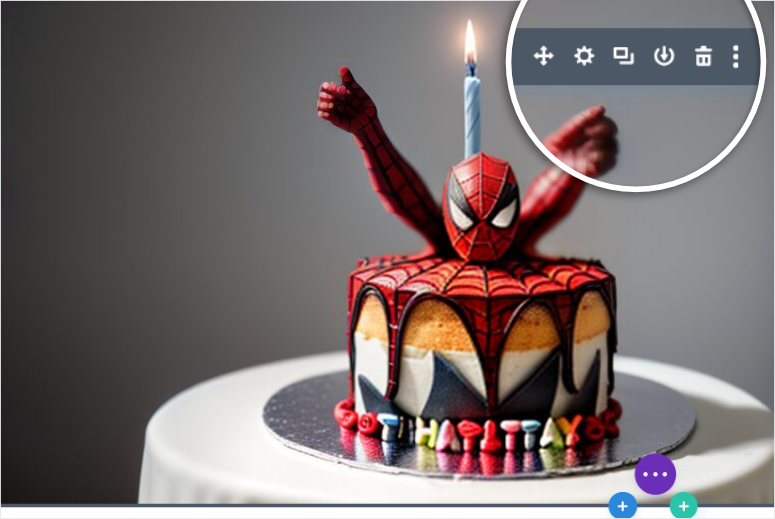
Now, on your Divi preview page, hover over the image module you just created and select the gear icon to open the settings box. Remember, you can also drag the settings window to make it larger and give you more working space.
Then, hover over the image in the popup window and select the AI icon to open the AI image settings.
After this, select Edit Image with AI » Modify on the AI menu to open a new settings popup.
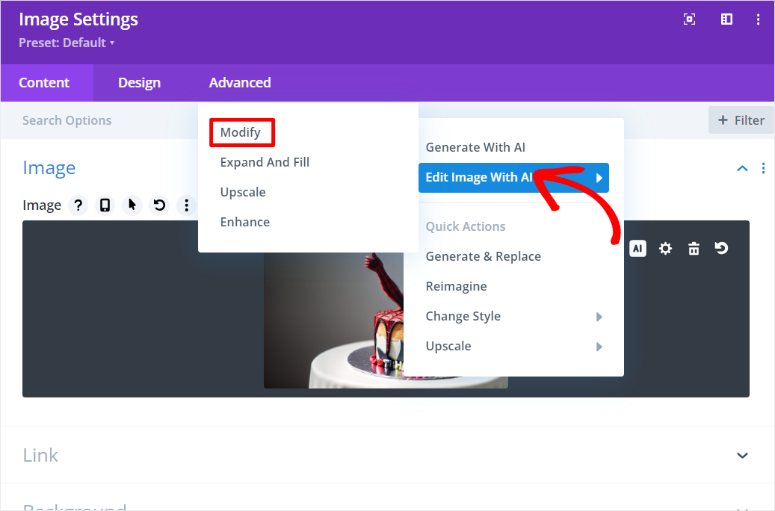
In the next popup, you also get the other AI editing options, which you can quickly shift to by selecting their tab.
Now, under “Modify,” go to the Image Selection tab, where you can paint over the area of the image you want to change with your mouse. Then, type out the changes you want to make on the painted area in the Image Fill Description box.
Then, select “Generate Modified Image” to make the changes.
Divi allows you to be more specific on the types of image changes you want to make. To help with this, you can adjust the Brush Size and Brush Blur. You can also define Modification Type by selecting either Modify Element or Add Element.
On top of this, you can change the Modification Strength to set up how heavily you want the image changed.
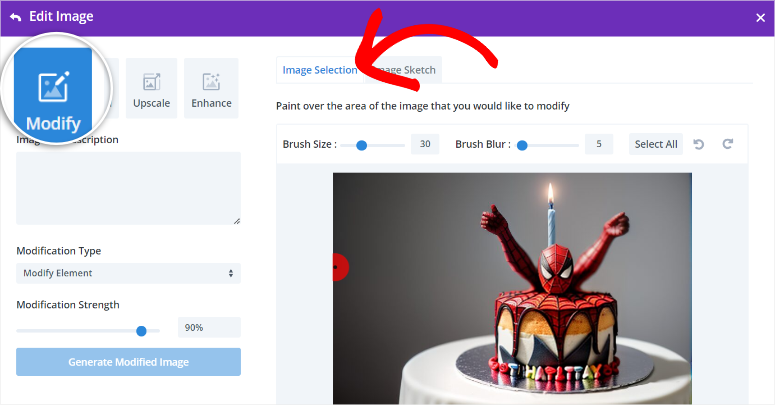
After this, move to the “Extend: tab, where you can quickly modify the image size. You also get a Background Fill Description box and Canvas Size to help you extend your image.
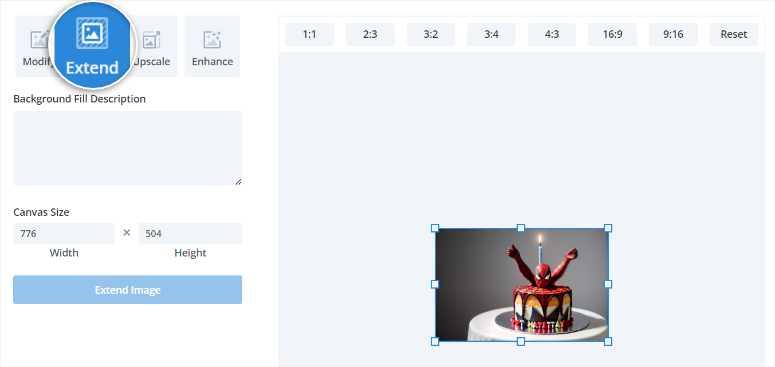
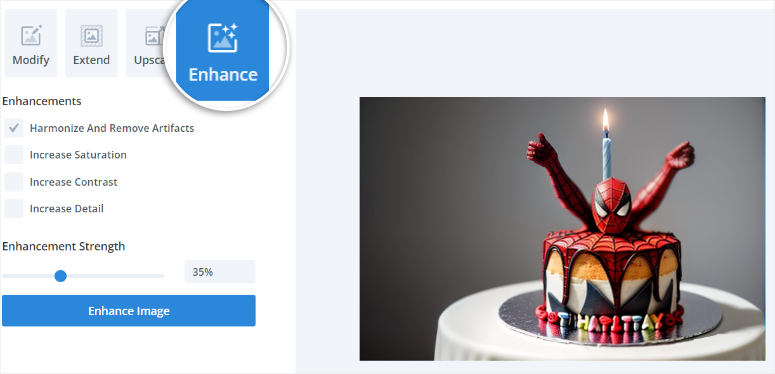
Then, change the Image Scale and Image Dimensions on the Upscale tab. Finally, go to the “Enhance” tab to improve your image using checkboxes. You can:
- Increase Detail
- Harmonize And Remove Artifacts
- Increase Saturation
- Increase Contrast
Here, you can check all the boxes if you want. Plus, you get an “Enhancement Strength,” which indicates how different the regenerated image will be from the original.
Once you are happy with your image, you can save it as a module to use it across your Divi properties or duplicate it to use it on the same page multiple times. You can also reposition it to a different area on your page with a drag and drop option.
Well done. You can now use Divi to create AI images in WordPress.
Generate AI Images with OpenAI
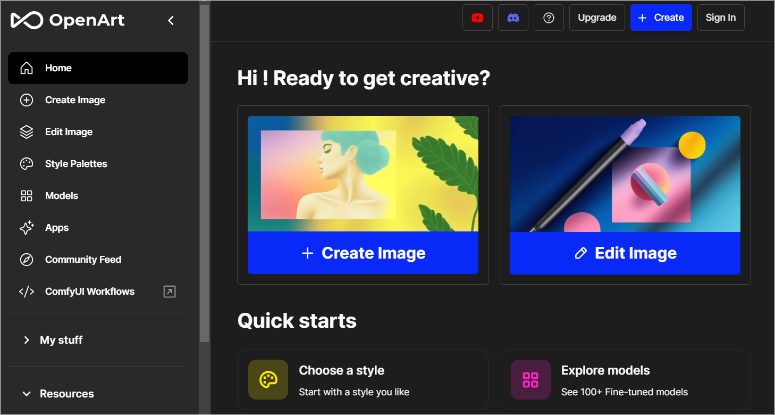
Now, you can decide to add your AI images to WordPress manually, and the best option is to use OpenAI platforms OpenArt and ChartGPT. But remember, with these methods, you will have to upload the images to your WordPress site yourself.
This can get overwhelming and confusing quickly. But, the upside is that it can be more affordable since you do not need to purchase a page builder like SeedProd and Divi Builder.
It is also important to point out that with these OpenAI platforms, you will generate your AI images through their integration with DALL·E, another OpenAI tool. In the past, with DALL·E 2, you would sign up to the website itself and generate the images from there.
But with the evolution of DALL·E 2 to DALL·E 3, OpenAI tries to make it more user-friendly by having you generate both text and written content from one platform, i.e., ChatGPT 4. But if you want to use its image generation platform, use OpenArt.
Plus, since the same company makesDALL·E ChatGPT and OpenArt, the integration is smooth and easy to use.
You will, however, need to purchase AI credits to generate the images. ChatGPT 4 offers 50 credits you can get started with to test it out. While OpenArt offers 20 AI credits. We will walk you through how to use both OpenAI platforms below.
Step 1: Generate AI images on OpenAI
Create an Image in ChatGPT 4
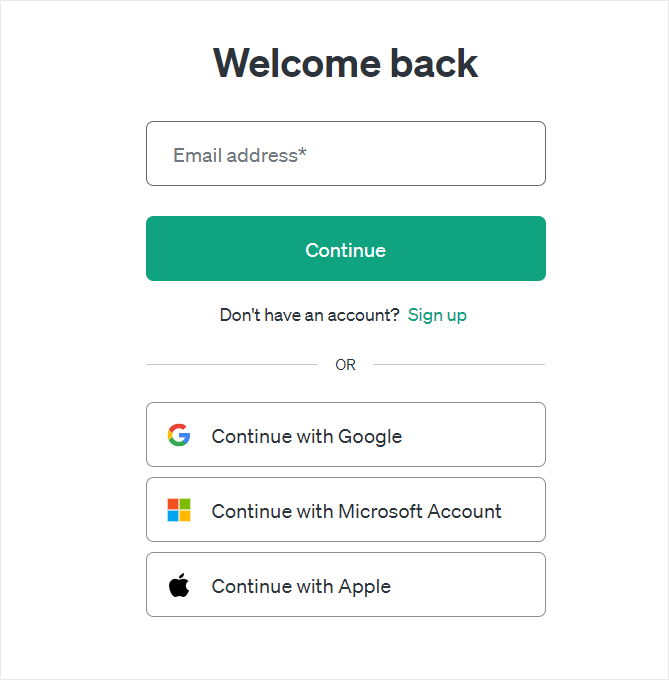
First, head to the ChatGPT 4 platform and sign up. This OpenAI tool makes it very simple to register as a user, as you can use a username and password, a Google account, a Microsoft Account, or your Apple ID.
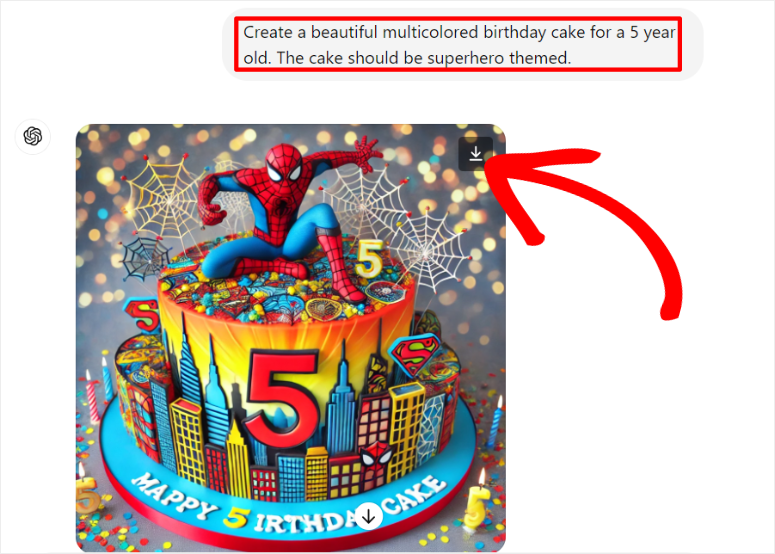
Once logged in to your ChatGPT 4 account, all you have to do is describe what kind of image you want to create and offer as much detail as possible. Remember to mention something like “Create an image of…” in order to give the AI tool a direct command on creating a downloadable image in its response.
Once the image is created, you can save it to your PC using the download button on the image.
Create an Image in OpenArt
Now, the AI image creation process in OpenArt is very similar to ChartGPT 4. The biggest difference is that you will not need to tell it to create an image specifically. Plus, you get plenty of AI image features to use.
You will just type out your prompt, and OpenArt will take care of the rest.
First, head to the OpenArt website and sign up or log in. Again, this is a very simple process, as you can use the same options as in the case of ChatGPT 4.
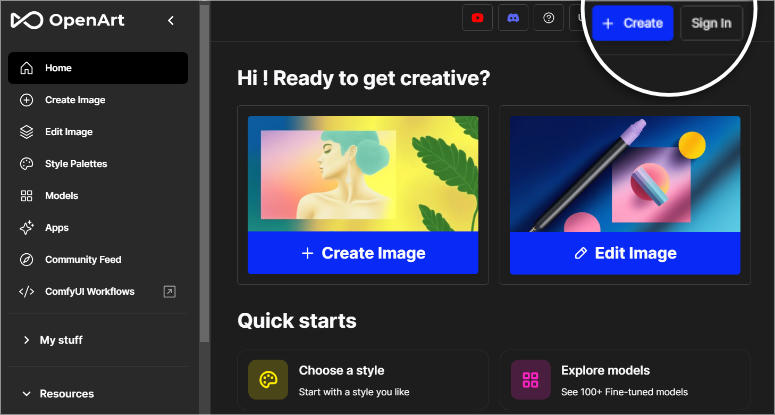
Once you are in your OpenArt account, select “+Create Image” to open the prompt box on the left.
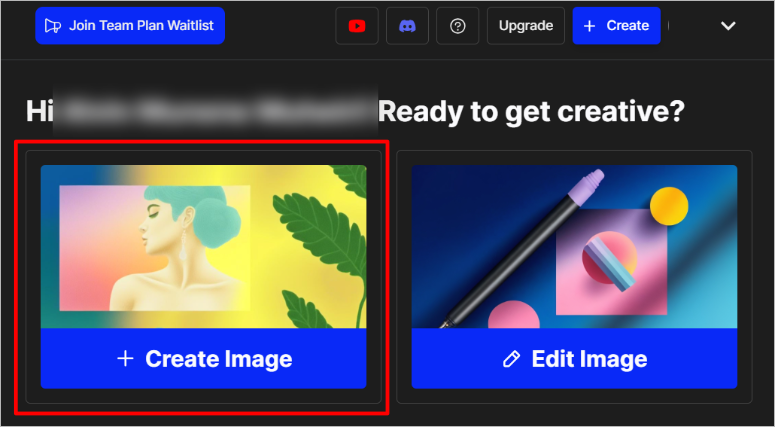
Next, type out the image description for the AI tool to generate the image. With OpenArt, you can select Enhance Prompt, and ChatGPT will improve your text prompt. When you are happy with the prompt, hit “Create.”
The image will appear on the window on the right. After this, select it to expand it and edit it.
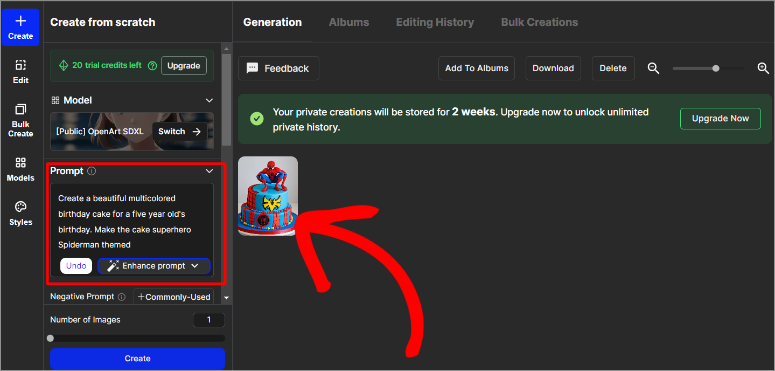
Here, you can edit the image, remove the background, move it to albums, and more. Once you are happy with the image, download it in the best format for your site.
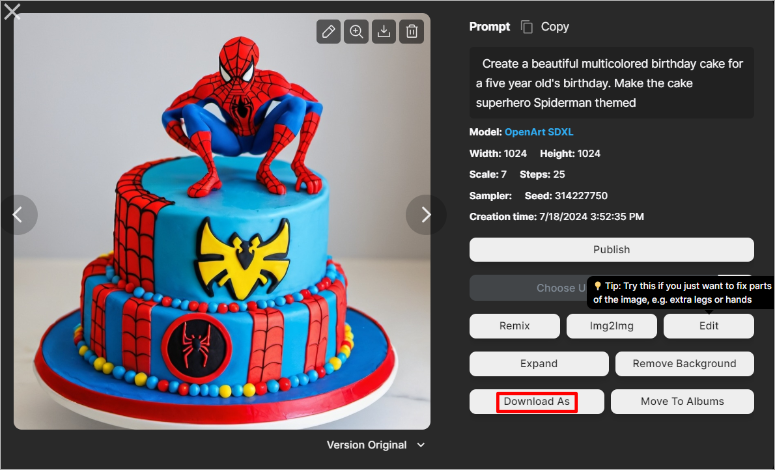
At this point, you are ready to add it to your site.
Step 2: Upload the OpenAI Image to WordPress
Next, go to your WordPress dashboard and upload it to your WordPress library as you would any other image.
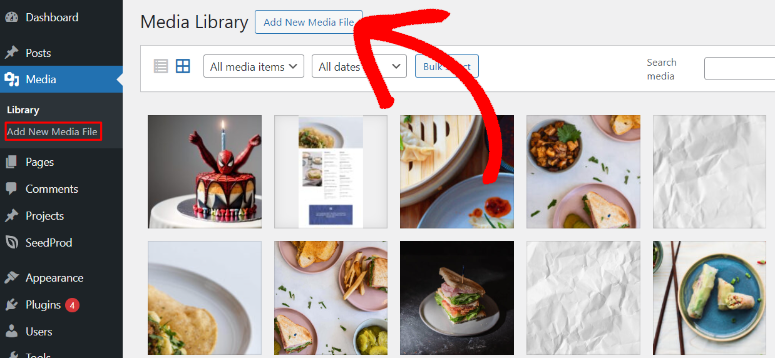
To do this, select Media » Add New Media File. Then, drag and drop your AI image from your local storage to the upload area. That’s it. You can now use this image on any of your posts or pages.
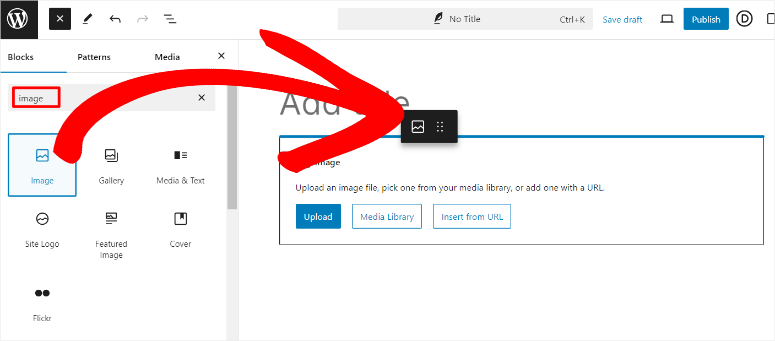
You can also upload the image directly to any post or page. All you have to do is open an existing page or post. Then, use the visual editor’s search bar to find the Image block. Once you do this, drag and drop your AI image to the block’s upload area and update the page.
Well done! You can now manually create an AI image with OpenArt and ChatGPT 4 through their integration with DALL·E and add it to your WordPress site.
Bonus Tip:
Now, as mentioned, with this method, you will have to upload the AI images manually to your WordPress site after generating them with the OpenAI platforms.
But you can use Uncanny Automator to autogenerate the images directly on your WordPress site.
Uncanny Automator is the best automation Plugin for WordPress. It can help you by automating content scheduling, order management, customer engagement, course enrollment, and more. Most importantly, it integrates with OpenAI modules, ensuring a quick and effective text-to-image generation.
The best part is you can use Uncanny Automator and WPForms to allow users to generate their own AI images from your site’s front end, increasing engagement.
Once you have Uncanny Automator installed and set up, all you have to do is configure the OpenAI API settings with your credentials.
After installing WPForms, create a form with fields for the image description and size.
Then, create a new recipe with Uncanny Automator and choose the trigger event as “Form Submission” with WPForms. Remember, this Uncanny Automator supports only one trigger per recipe.
Then, add an action to generate an image using DALL·E, where you specify a text-based prompt. Uncanny Automator will process this prompt with DALL·E’s algorithms to create and store vivid, original images directly in your WordPress media library.
With this set up, both you and your users can generate AI images using the WPForms form on your site’s front end.
Bonus AI Image Generation Tools
Even though the AI tools above can help you create AI images in WordPress, there are still plenty of tools out there you can use. Let us quickly go through our top alternative tools to help you generate AI images for your site.
- AI Power: AI Power is a great AI image generating plugin that allows you to create images directly within WordPress. To get started, install and activate the AI Power plugin from the WordPress plugin repository. Once activated, navigate to the AI Power tab in your WordPress dashboard and select “Generate Images.” Follow the prompts to create high-quality images tailored to your content. This tool also simplifies the process, making it easy to enhance your posts with visually appealing graphics without needing extensive design skills.
- MidJourney: MidJourney is a cutting-edge AI platform that creates unique, imaginative images from text prompts. To use MidJourney, sign up on their website and join their community in Discord. You can generate images by providing creative descriptions in their Discord channels, and MidJourney will transform your words into stunning visuals. These images can then be easily uploaded to your WordPress site, adding a custom and engaging touch to your content.
- AI Content Writing Assistant: This AI content writing assistant plugin also excels at creating stunning AI images. This feature, powered by DALL·E, allows users to generate custom images directly in WordPress. With a wide range of customization options, you can create images that perfectly match your website’s theme and style, making your posts more engaging and visually striking. The plugin also offers high-quality content generation, scheduled content creation, and various writing styles and tones.
Congratulations! You can now easily create AI images for your WordPress website. If you have any more questions, check out our FAQs below.
FAQs: How to Create AI Images for Your WordPress
How can I create a great AI image prompt for a generator?
To create a great AI image prompt, be specific and descriptive. Include details such as the subject, style, colors, and any particular elements you want in the image. For example, instead of saying “a beach,” you might say “a tropical beach at sunset with palm trees and a hammock.” The more precise your description, the better the AI can generate an image that matches your vision.
Is OpenArt the same as ChatGPT 4?
No, OpenArt and ChatGPT 4 are not the same, though they are platforms from the same company, OpenAI. On one hand, OpenArt is an AI tool specifically designed for generating images and focuses on visual content. On the other hand, ChatGPT 4 is a text-based AI that generates human-like text based on prompts.
What Types of Images Can I create with AI?
With AI, you can create a wide range of images, including realistic photos, artistic renditions, illustrations, abstract art, and more. They can generate everything from simple icons to complex scenes. As a result, they cater to diverse needs such as marketing materials, website graphics, social media posts, and personalized artwork.
Can page builders create AI Images?
Yes, some page builders can create AI images. For example, SeedProd and Divi Builder have integrated AI features that allow users to generate and customize images directly within your WordPress dashboard. This makes it easy to enhance web pages with unique, AI-generated visuals without needing separate image creation tools.
We hope you enjoyed reading about how to create your WordPress AI images. Now, after you make your AI images, they become your intellectual property. Learn how to secure them by reading this article on 10 Best WordPress Content Protection Plugins.
To add to this, here are other articles you may be interested in reading.
- How to Harden Your WordPress Site to Keep Hackers Out
- 10 Best WordPress Gallery Plugins Reviewed & Compared
- How to Embed Instagram Feed in WordPress (5 Easy Steps)
The first article teaches you how to harden your WordPress site to keep hackers out. After this, you have a post listing the best WordPress gallery plugins. Finally, read about how to embed an Instagram feed in WordPress.

Comments Leave a Reply