
Are you looking to build a squeeze page to help you with conversions?
A squeeze page, also called a lead page, is a type of landing page designed to help you “squeeze” out very specific information from site visitors while offering something in return. As a result, a squeeze page has one clear objective and call to action.
At IsItWP, we always want to create a smooth experience for all our users. One of the ways we do this is by creating a user-friendly lead acquisition process. To help with this, we have built plenty of lead pages with different tools to see what works best for us. This experience has enabled us to understand the best, most effective, and simplest ways to create squeeze pages.
In this article, we will show you 2 of the best and easiest ways to create a squeeze page. We will walk you through how to set up the tools and optimize your lead page to get the best results.
What is a Squeeze Page?
As mentioned, a squeeze page is a type of landing page with one clear objective. This objective often involves collecting leads, but you can use it to make sales. In return, you offer the user something of value, such as a free eBook, discount, webinar, and so on.
But you might be wondering; aren’t we just describing a landing page?
Although a squeeze page and a traditional landing page are similar, they have a couple of differences.
For instance, a landing page is a broader term for any page where visitors “land” after clicking on a marketing link or ad. While it can also collect information, a landing page can have various goals. You can use it to promote a product, encourage sign-ups, drive traffic, or sell your products.
On top of this, depending on the purpose, a good landing page includes more content, such as product details, testimonials, images, or videos. It can offer several paths for engagement, not just one like with a lead page.
The whole point of a squeeze page is to be destruction-free with one clear focus for your visitors.
With that said, here are the key characteristics of an effective squeeze page.
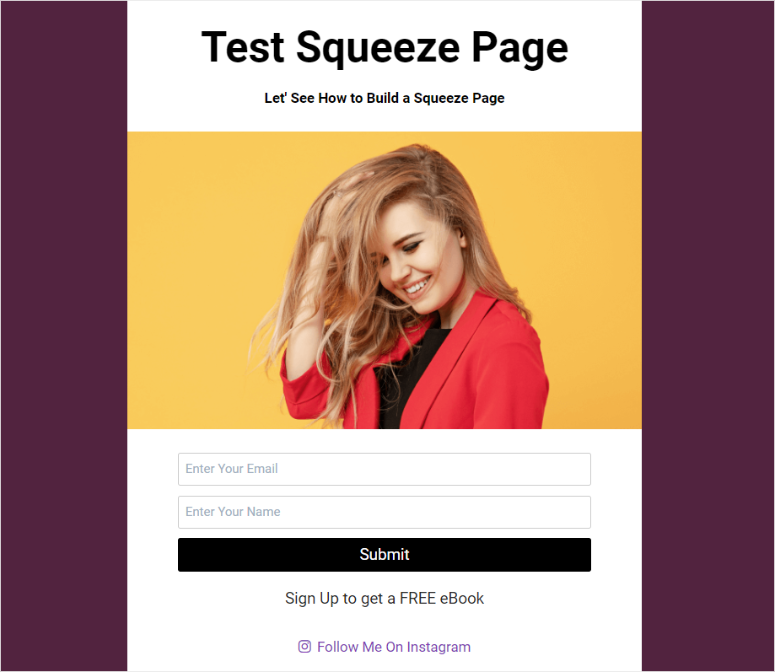
- Minimal design: Usually, there are no external links or navigation options to keep visitors focused on the offer.
- Clear and short copy: The text on the squeeze page should be straight to the point, offering information for the call to action.
- Strong headline: A strong, clear headline that immediately conveys the value of the offer.
- Optin form: A simple form where visitors can submit their email or other contact details.
- Call to action (CTA): A clear and persuasive CTA button that encourages visitors to sign up.
Check out the screenshot below to see how a squeeze page should look.
How to Create a Squeeze Page
Now that you understand what a squeeze page is and know the key characteristics to include, let us look at how to create one.
Here are the 2 methods we will teach you in this tutorial. To skip to the method you want to read on, simply click on one of the links below.
Great! Let us get into it.
Create a Squeeze Page with SeedProd
SeedProd is the best WordPress landing page builder because of its easy-to-use drag and drop interface. This makes it easy for you to design professional-looking squeeze pages without coding.
It comes with conversion-focused elements like countdown timers, optin forms, social proof, and calls to action. As a result, you have all the tools to make creating a high-converting squeeze page easier.
But what really sets SeedProd apart is the wide variety of prebuilt squeeze page templates designed for different objectives and optimized for conversions. On top of this, you can use the drag and drop page builder to customize these templates further to match your brand and squeeze page purpose.
You get squeeze page templates like investment squeeze page, opportunity squeeze page, eBook squeeze page, lead squeeze wait, and so many more.
Check out this SeedProd review for more details.
Now that you understand why we recommend SeedProd to create your squeeze pages let us show you how to build one with this landing page builder.
Step 1: Install and Set Up SeedProd
First, we should mention that SeedProd offers a free version of the plugin. With SeedProd Lite, you can quickly create a “Coming Soon” or “Maintenance Mode” page with the drag and drop builder. You can also create basic landing pages to help convert visitors.
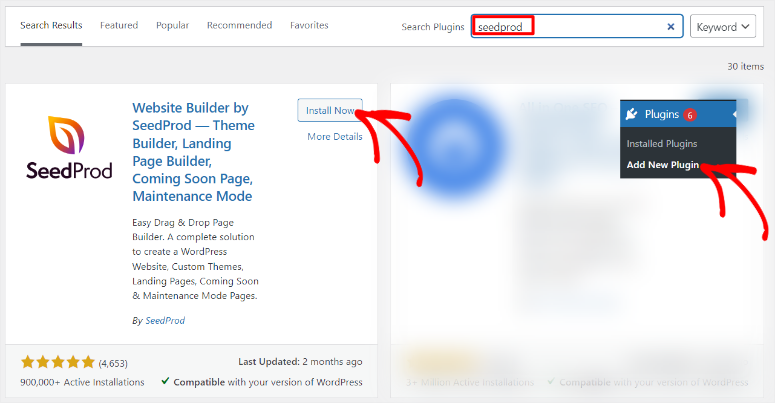
To get SeedProd Lite, all you have to do is go to your WordPress plugin repository and install and activate the plugin as you would any other. Another way to access this free plugin is to go to WordPress.Org and use the search functionality to locate SeedProd.
If you face any issues, check out this article on how to install plugins.
But, we will use SeedProd Pro to create the squeeze page for this tutorial.
To get the premium version of SeedProd, go to the plugin’s official website and purchase a plan. The good thing is that SeedProd offers 4 plans, ensuring you can quickly get one within your budget and meet your needs.
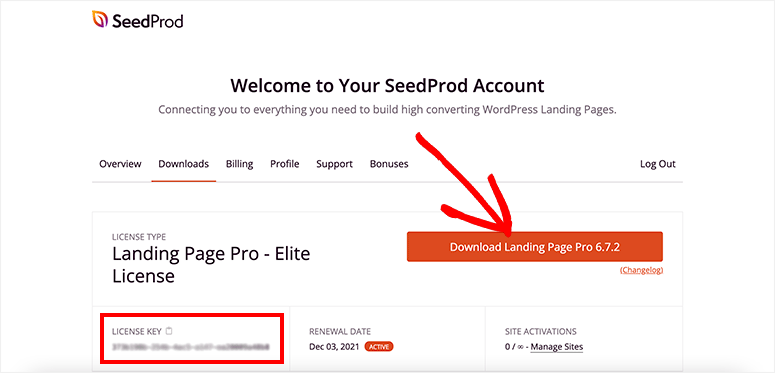
Once you purchase your plan, log into your SeedProd account and navigate to the Download tab. Here, save the SeedProd ZIP file to your PC and copy the “License Key.” This code will help you later activate the pro version of the WordPress plugin.
Now, go to your WordPress dashboard, navigate to Plugins » Add New Plugin, and select the “Upload Plugin” button. After this, drag and drop the SeedProd ZIP to WordPress and select “Upload.” Once the plugin installs, select the Activate button.
Next, you will see a new menu option in your WordPress dashboard labeled “SeedProd.” After this, go to SeedProd » Settings, where you will see the “License Key” text bar. Here, paste the License Key you copied to this text bar and hit “Verify Key.”

That’s it. You can now install and set up this landing page builder. Next, let us see how to create a squeeze page with SeedProd.
Step 2: Create a Squeeze page
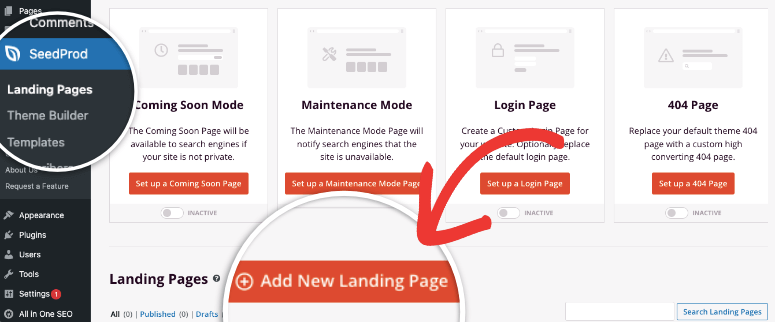
Next, select SeedProd » Landing Pages in your WordPress dashboard to find an overview of the SeedProd page dashboard. This is where you can view, manage, and create different landing pages for your website.
Now, select the “+Add New Landing Page” button to open the template page.
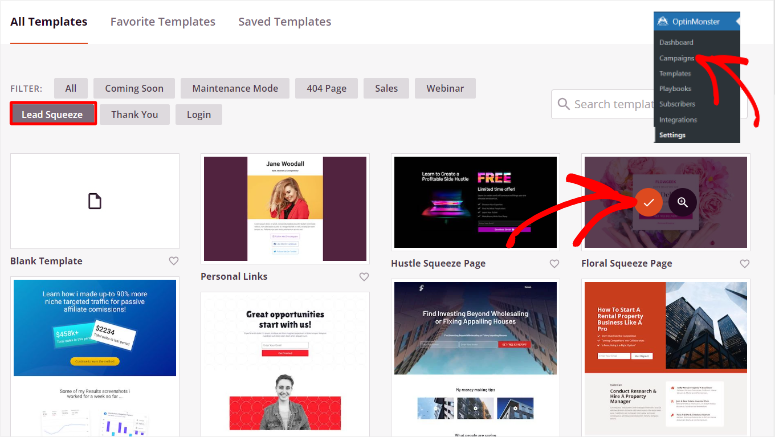
The template page offers a search bar to help you quickly find what you are looking for. Each template also has a clear image, giving you a quick preview of what the template design looks like. On top of this, if you hover over a template and select the magnifying glass, SeedProd will open the template on a full page, offering you more details.

To quickly get the squeeze page templates, use the filter option.
To do this, go to the top of the page next to “Filter,” where you will see tabs like Coming Soon, Maintenance Mode, 404 page, and more. Here, select the “Lead Squeeze” tab to open only the squeeze page templates.
Next, look through the templates and see which works best for you. Once you find one, hover over it and hit the “check mark” icon to open the page details popup.
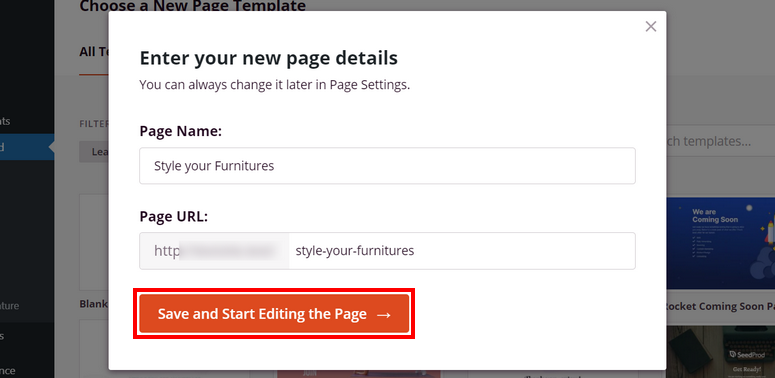
On this popup, create a Page Name and Page URL where your squeeze page will be located. Once done, select “Save and Start Editing the Page,” and SeedProd will redirect to its drag and drop landing page builder.
Remember, to create an effective squeeze page you need to keep it simple and minimalistic. But this does not mean you do not need to add high-converting page elements.
With that said, let us show you how to add these page elements with SeedProd.
On the drag and drop builder page, you will notice the “Blocks” tab on the far left. You get Standard blocks like headlines, text, lists, and more. Below this, you can select “Advanced” blocks, such as a contact form, optin form, countdown, and more.
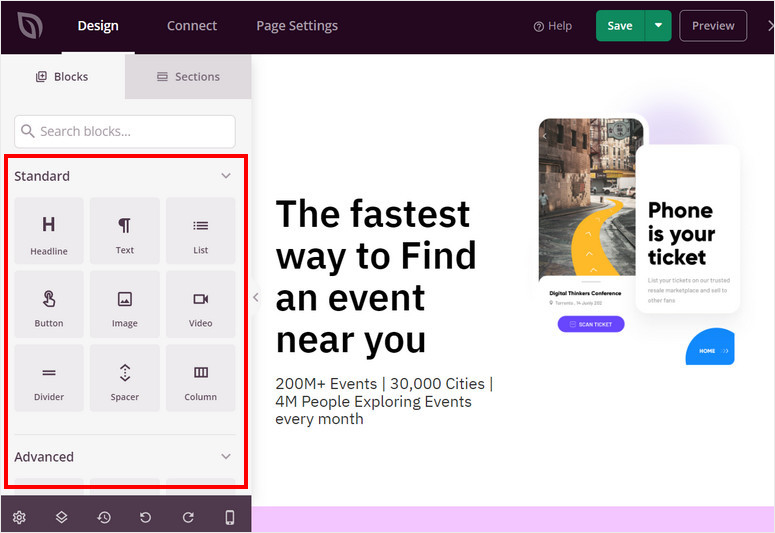
Next to the Block tab, you can select the “Sections” tab. This can help you quickly add pre-designed, customizable content blocks to your squeeze pages or landing pages. These sections are designed to save time and help you structure your pages effectively without building from scratch.
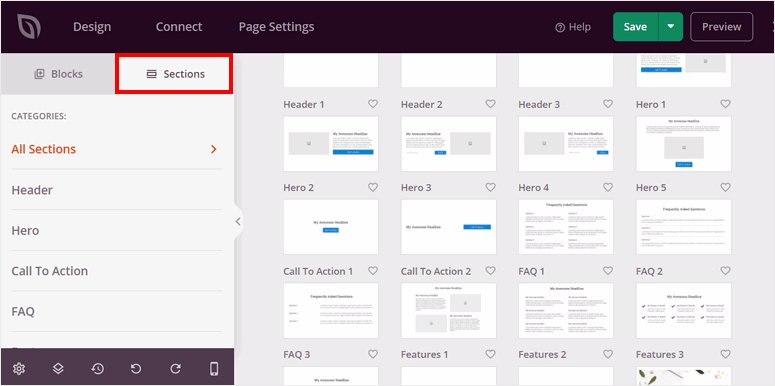
Then, on the right, you will see the preview window with the template and all its preadded content placed. You can drag and drop any block or section to the preview window and position it as you want it to appear on the live page. You can also delete the blocks on the preview window and replace them with new ones.
Now that you understand how to use the SeedProd squeeze page builder, you can customize your page in any direction you want to match your needs.
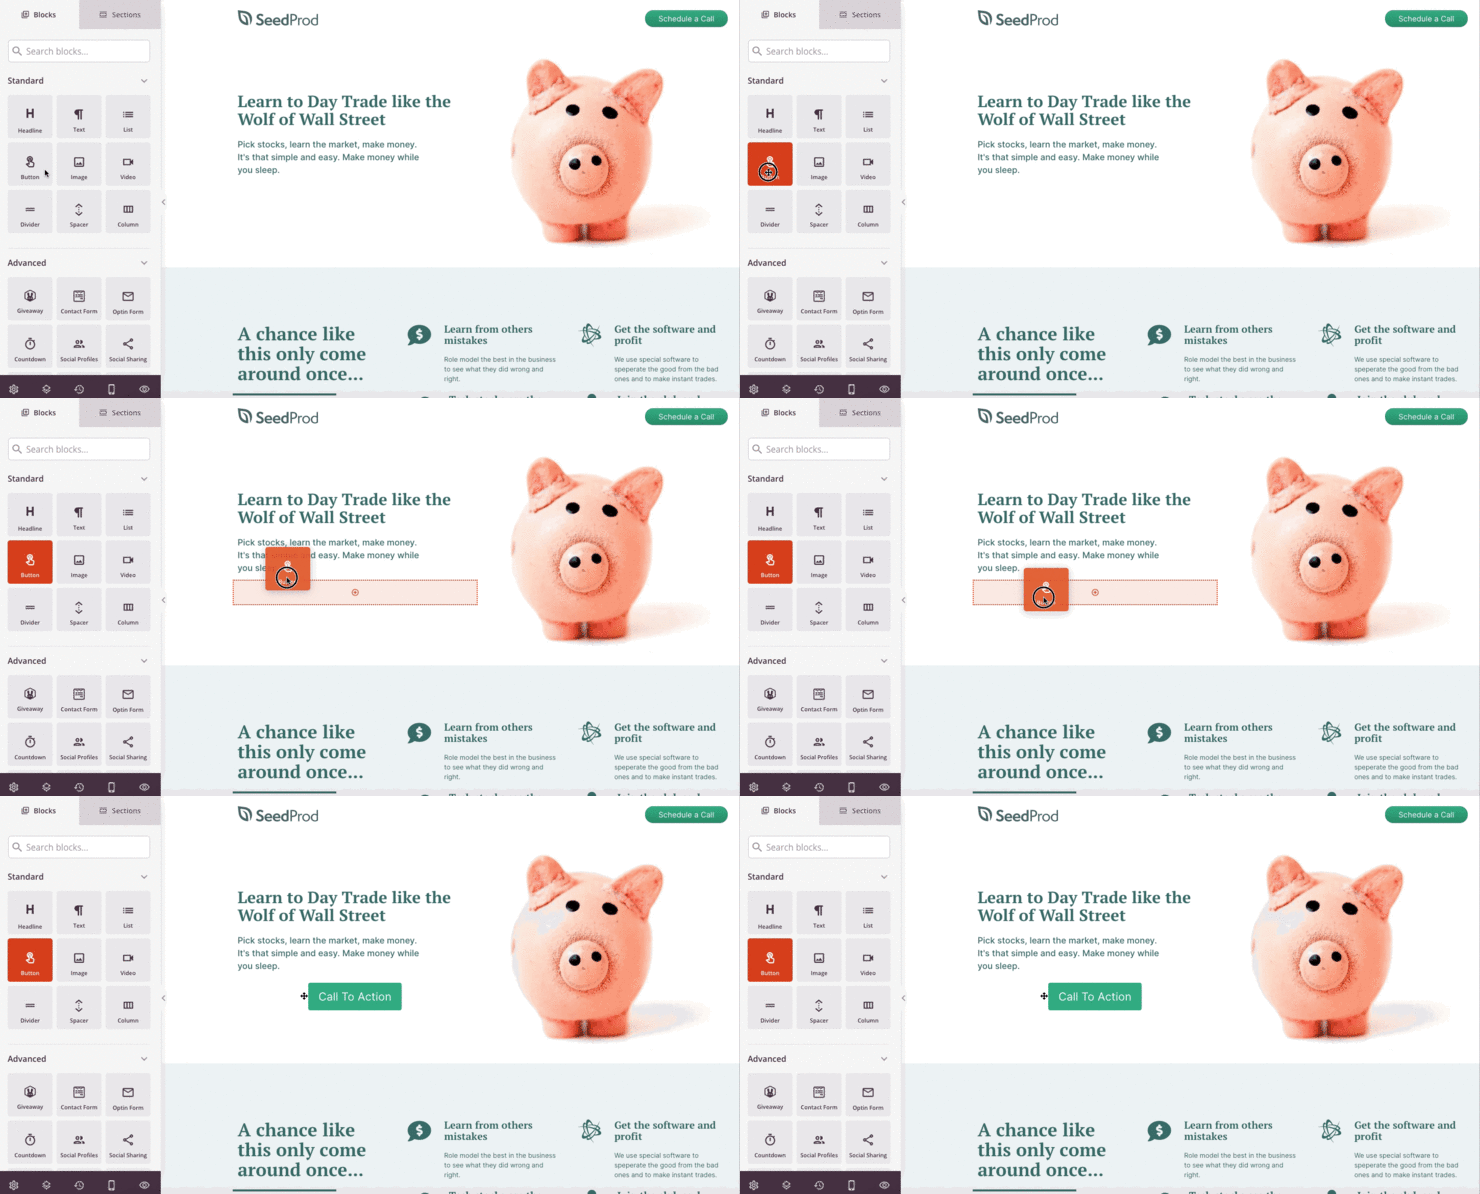
So first, use the Standard blocks to customize the headline, images, text, videos, lists, and more.
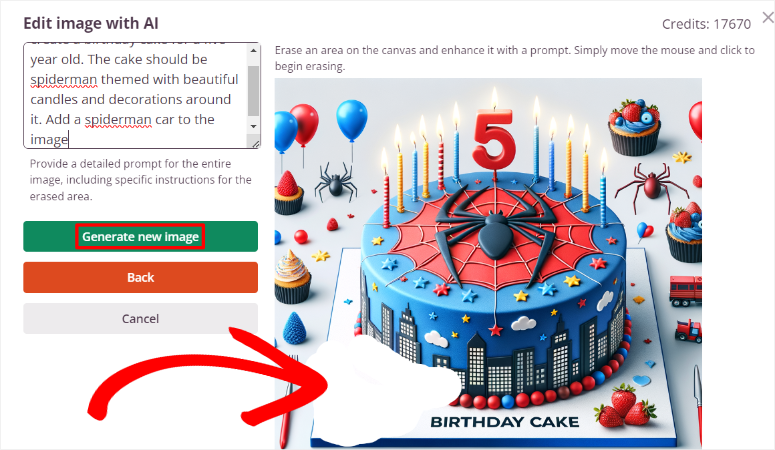
On top of this, SeedProd allows you to add AI images directly to your WordPress dashboard. You can use this feature to make your squeeze page more unique and increase conversions.
Once done, move to the Advanced blocks, where you can add elements to help improve conversions. You can add a countdown timer, video popup, star rating, Google Maps, and more.
Once you are happy with your landing page, it is time to add a reward for your users for providing their information. You can also refer to the reward as a lead magnet as this is the tool that motivates your users to provide their information.
Step 3: Add a Reward to Your Squeeze Page
As mentioned, rewarding your users is one of the best ways to improve conversions on your squeeze page. While this is not a lead page requirement, it can help build trust through the give-and-take nature of rewards. It can be anything like an eBook, PDF, webinar, free tools, trial period, and more.
To do this, go to the “Advanced” block section on the SeedProd builder and find the Optin Form block. Drag and drop it to the part of the page you want to appear.
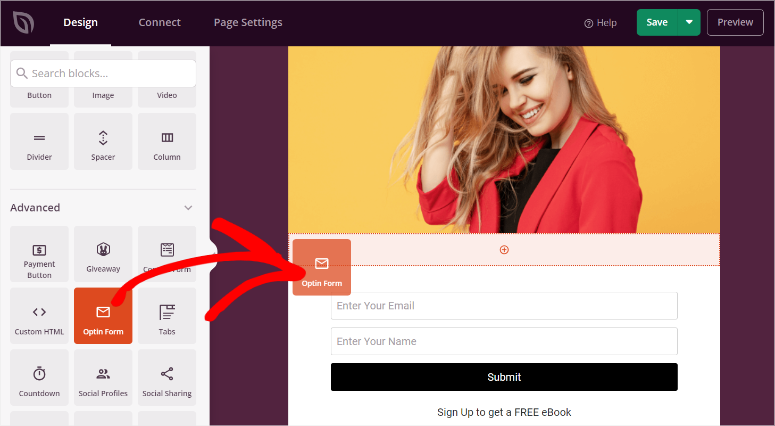
After this, select it in the preview window to open more options.
After this, go to the Content tab for the optin form block and navigate to “Fields.” It should be already prefilled with the email and name sections. You can customize the position, position, size, color, and more of the optin form’s fields. On top of this, you can select optin form templates to make it fit better on your page.
Below this, find the “Submit Button” section. Again, you can customize the text, width, font size, and more.
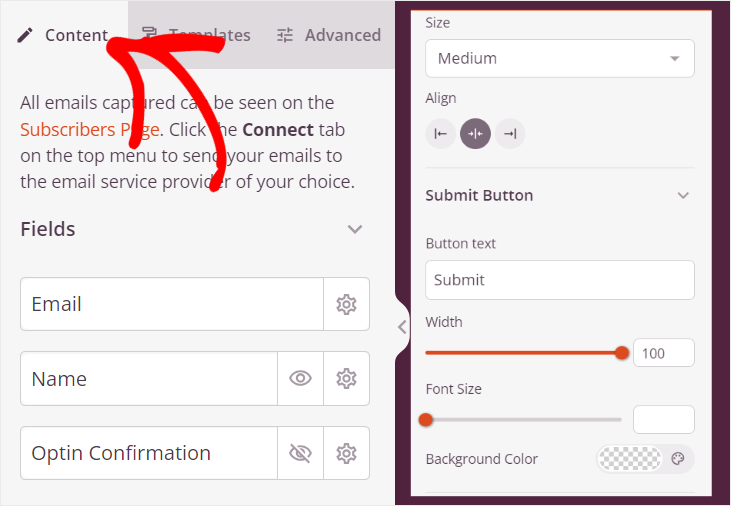
This tutorial will focus on the “Success Action” section under the abovementioned features. This is where you will place your reward link or offer instructions to your users on how to get it.
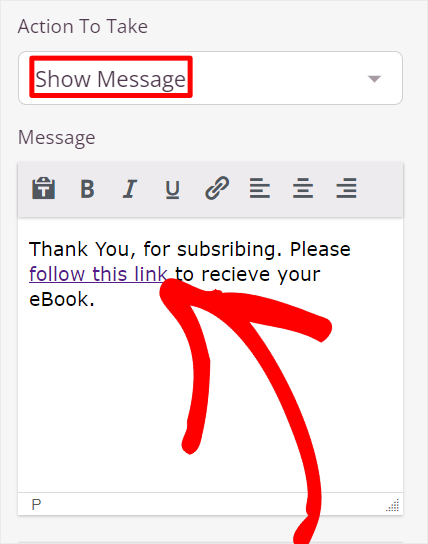
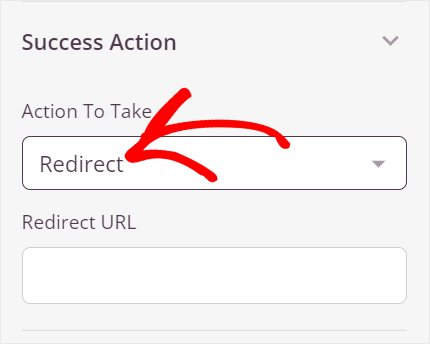
So, under “Action to Take,” use the dropdown to decide if you want SeedProd to show a message on the same page after they subscribe or redirect them to another page.
If you select “Show Message,” customize the text in the “Message” box. Here, you can directly add the downloadable link to the eBook, PDF, or whatever lead magnet you want to offer the user for subscribing.
If you choose “Redirect,” SeedProd will ask you to add the Redirect URL. This will take your user to another page to receive the reward after submitting their information.
Bonus: Offer giveaways on your squeeze page.
Apart from providing a downloadable product as your lead magnet to subscribed users, you can provide a giveaway.
This creates an immediate incentive for people to sign up because giveaways generate excitement and engagement around your brand. With the right promotion, your giveaway can go viral, leading to a wider reach and more subscribers, especially when you integrate social media sharing options.
Many individuals might hesitate to subscribe, but offering a chance to win something valuable can push them to take action.
For this, we recommend using RafflePress, the best giveaway plugin.
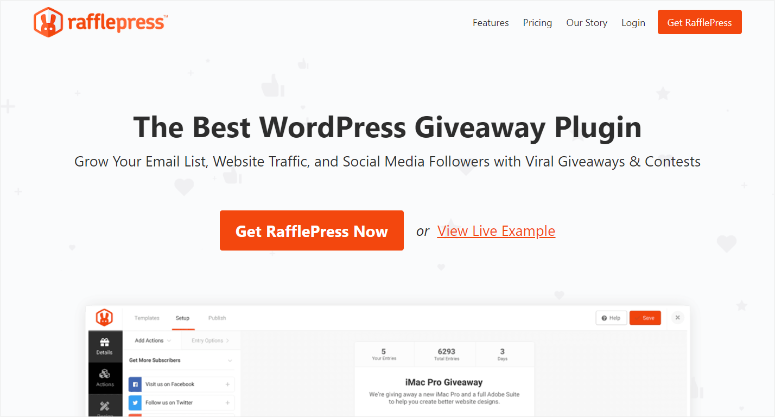
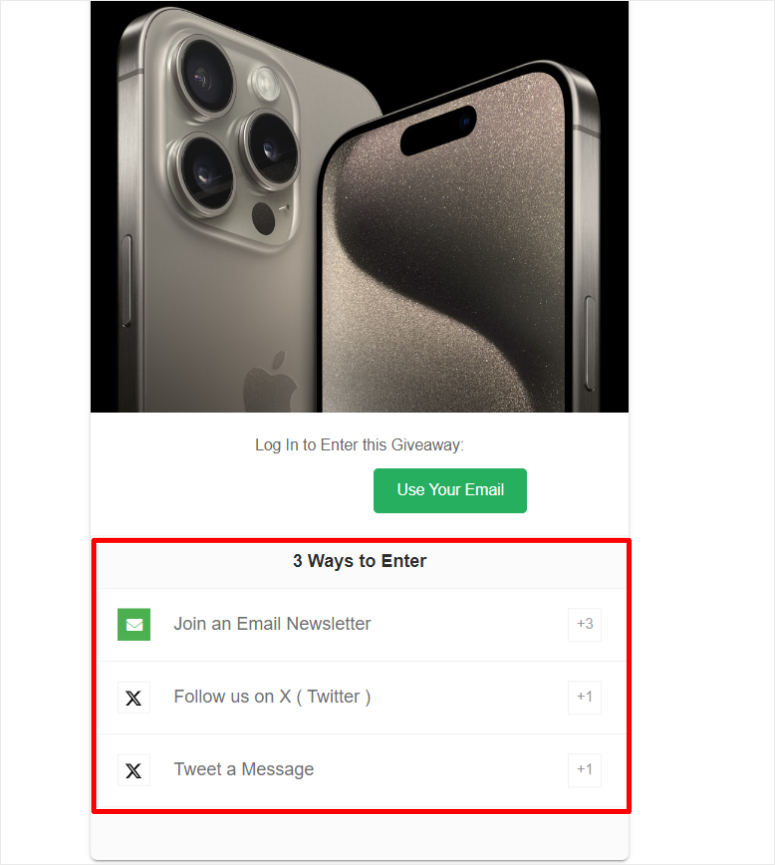
The good thing about using RafflePress to run giveaways is that you can create a point system. This allows you to award a different number of points for an action, increasing the odds of users completing multiple actions on your Squeeze page. On top of this, you can make certain actions compulsory for users to be added to the giveaway draw.
For example, you can set it up so your users receive 3 points for subscribing and 1 point for following you or liking a social media post.
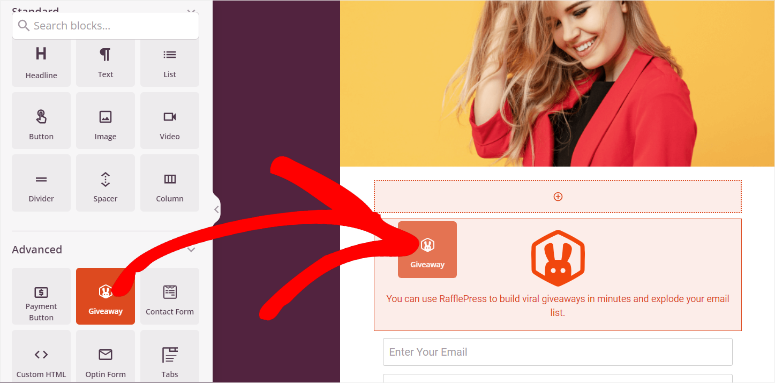
What we like best is that you can easily connect RafflePress with SeedProd. As a result, once you create a giveaway, all you have to do is use the Giveaway block in the SeedProd builder. You can then place the giveaway block on any section of the page.
Check out this article to see how to create a giveaway with Rafflepress.
But, that’s not all you can do with this giveaway plugin. You can also integrate it with popular email marketing platforms like Mailchimp, ActiveCampaign, and ConvertKit, allowing you to add new subscribers to your marketing lists automatically.
It comes with anti-fraud features that ensure giveaway entries are legitimate, helping you avoid fake participants and ensure that real people engage with your contest.
Check out this RafflePress review to learn all the ways you can use it to maximize engagement.
Step 4: Connect the Squeeze page to an Email Marketing Tool
Now with your squeeze page and rewards ready, the next mission is to ensure you add the subscribers to your email list.
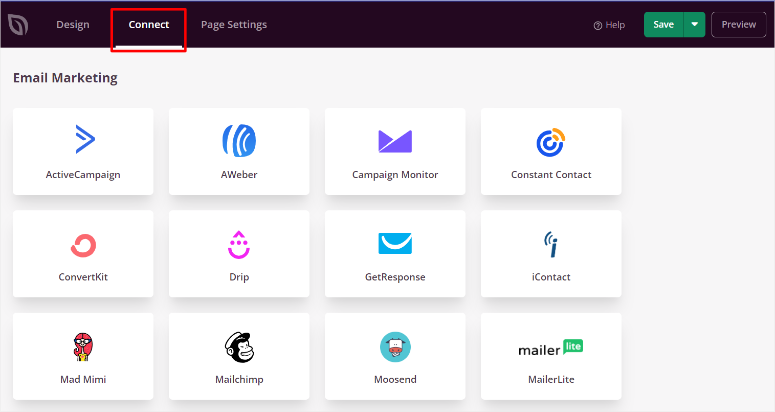
SeedProd allows you to integrate it with the most popular email marketing tools quickly and easily. You can connect this page builder to Drip, GetResponse, MailChimp, Sendy, MailerLite, Brevo, and more. If your email marketing tool is not listed, do not worry; you can also use Zapier to connect it.
To do this, head to “Connect” in your SeedProd page builder. Here, you will see a tab for all the email marketing tools you can connect it with.
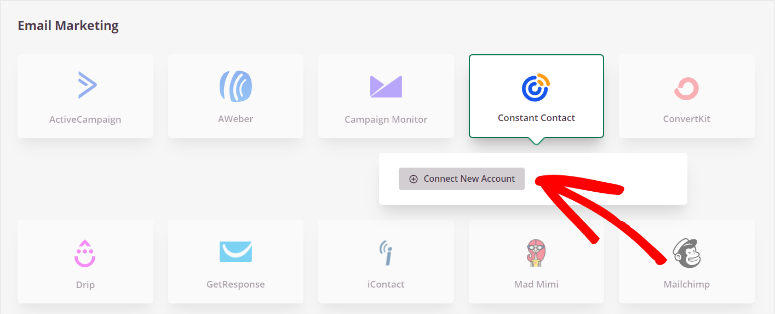
All you have to do is hover over the option and select “Connect.”Then, select “+ Connect New Account” from the dropdown menu. After this, enter the API Token and Account ID for the email marketing tool you want to use.
And that’s it! You will now receive the leads for your favorite email marketing tool.
Step 5: Publish your Squeeze Page
Now that your squeeze page is ready, the only thing left to do is make it live. To ensure you have not missed anything, select the “Preview” button on the top right corner of the page builder. This will redirect you to a page where you can view your squeeze page from a user’s point of view.
You can also use the Mobile Device icon at the bottom of the page builder to see how it will appear on different screen sizes.

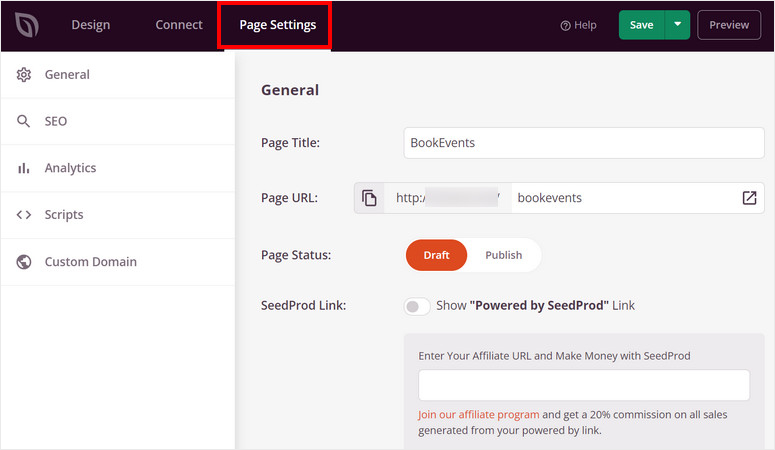
Once you are happy with the page’s appearance and function, go to the “Page Settings” tab on your page builder.
Here, confirm the Squeeze page title and URL. After this, use the “Page Status” toggle button to change the page from Draft to Publish.
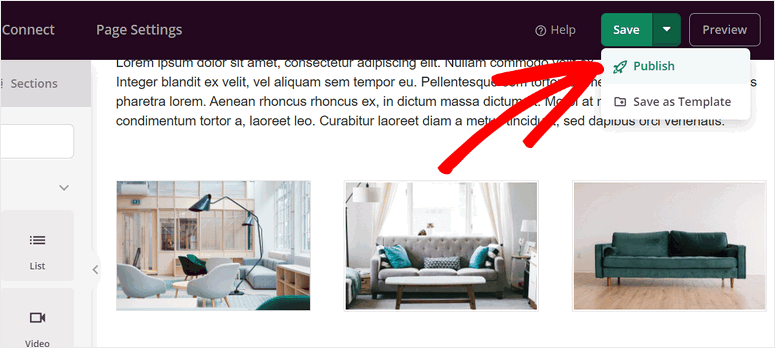
Alternatively, you can use the “Save” button at the top of the page builder and select Publish from the dropdown menu.
That’s it. Your squeeze page is now live.

As you can see, SeedProd makes it very easy to create, customize, and publish your squeeze page. Now, let us see how to create a squeeze page with OptinMonster.
Create a Squeeze Page with OptinMonster
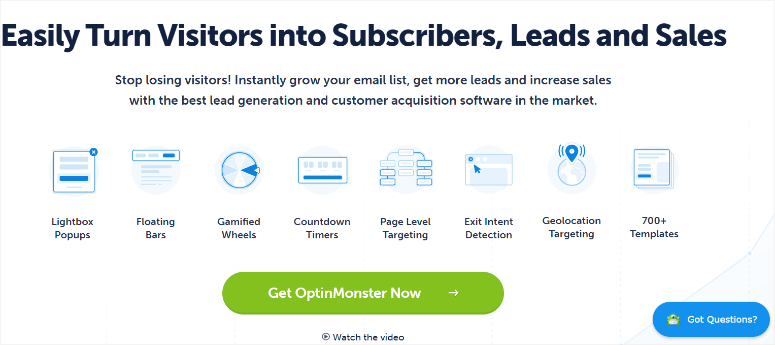
OptinMonster is the best WordPress plugin to help you grow leads and improve conversions. It can help you quickly create beautiful optin forms with its drag and drop builder. Plus, you get over 700 templates with which to start building your campaign.
Now, as you have noticed, we used SeedProd to build an independent squeeze page with its URL and dedicated page.
But with Optinmonster, we will create a squeeze page on a popup!
This means you can place your squeeze page popup on any or every page on your website.
OptinMonster allows you to create campaign triggers based on location, device, time spent on the page, scroll depth, and more. On top of this, You can use OptinMonster’s Exit-Intent technology, which detects when visitors are about to leave your site and triggers a popup just before they exit.
This is a highly effective way to capture email addresses from visitors who might otherwise leave without taking action. As a result, you can customize your squeeze page to appear to the most relevant visitors and, at the best time, increasing your conversion rate.
What really makes OptinMonster the perfect way to build a squeeze page is its retargeting functionalities.
You can display a popup squeeze page to returning visitors who haven’t subscribed yet. Or adjust the offer based on their past actions on your site. This persistent yet non-intrusive method increases the likelihood of conversion.
Check out this OptinMonster review for more details.
Now that you understand the advantages of creating a squeeze popup page with Optinmonster let us walk you through how to create one.
Step 1: Install and set up OptinMonster
Like with SeedProd, OptinMonster also offers a free version of the plugin. This free version allows you to create different types of popup campaigns and connect them to email marketing tools, eCommerce platforms, and CRMs. You can easily access the OptinMonster Lite in your WordPress plugin repository.
To do this, go to Plugins » Add New Plugin and use the search bar to find “OptinMonster.” After this, install and activate it like you would any other plugin.
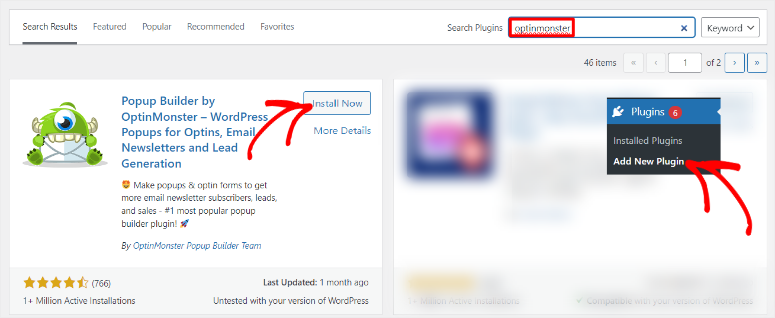
After this, go to OptinMonster » Settings » General, where you will select “New? Claim Your Free Account.”
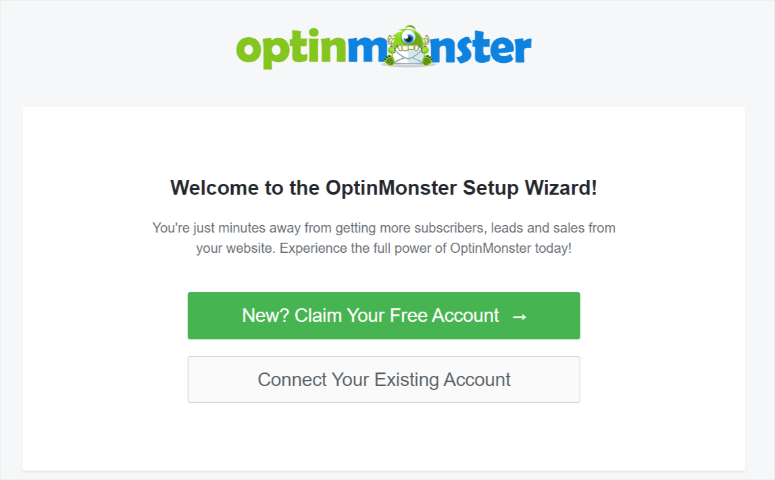
Then, use the setup wizard to help you create a new free OptinMonster account. Apart from this, you will also be able to connect to your email provider, define the type of website you are running, and more with the setup wizard.
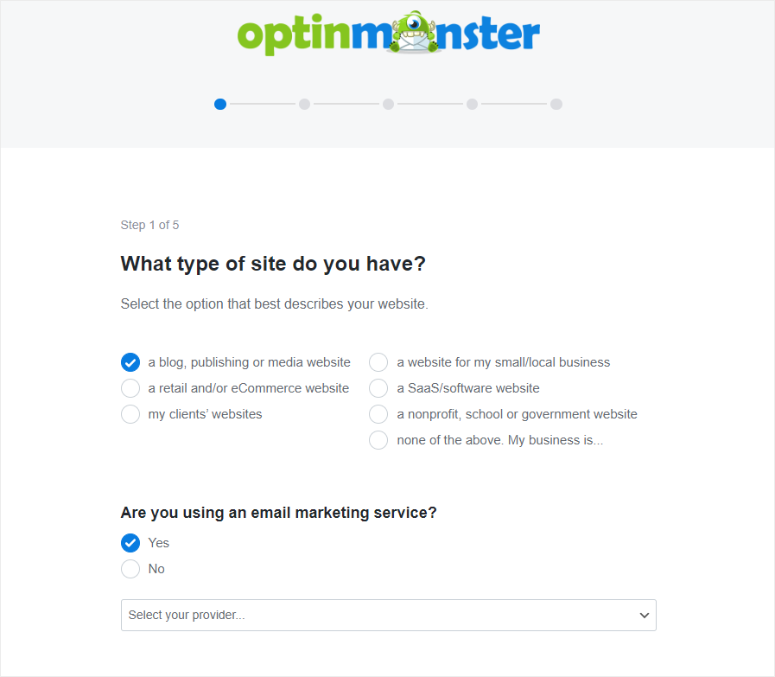
But for this tutorial, we will use the premium version of OptinMonster.
Most plugins require you to install a premium version, leading to extra steps that can be overwhelming. But, what we like about OptinMonster is that you will use the same free plugin you installed from your WordPress repository to activate the premium version.
So to do this, go to the official OptinMonster website and purchase a plan. Again, OptinMonster offers 4 premium plans, ensuring you can find one that fits your budget and needs.
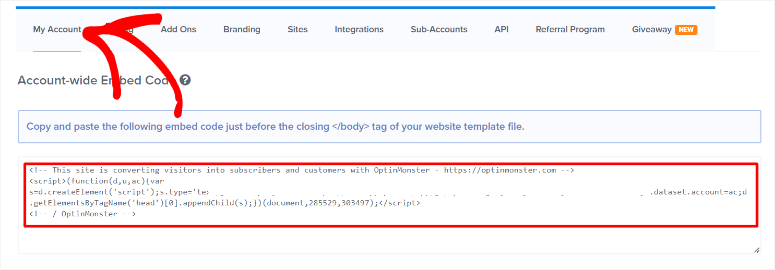
Once you purchase a plan, there are 2 ways you can connect OptinMonster to your WordPress dashboard. Since this leads plugin can work with any website, not just a WordPress site, you can use an embed code.
To get this embed code, head to your OptinMonster account and select “My Account.” Then, under “Account-wide Embed Code,” copy the code provided. After this, go to your WordPress website and paste the code just before the closing </body> tag of your website template file.
But if you are using WordPress, the connection process is simpler.
All you have to do is make sure that you have properly installed the free OptinMonster plugin. Then, log in to your premium OptinMonster account using the same browser your WordPress dashboard is located.
After this, navigate to OptinMonster » Settings » General. But this time, you will select “Connect an Existing Account.”
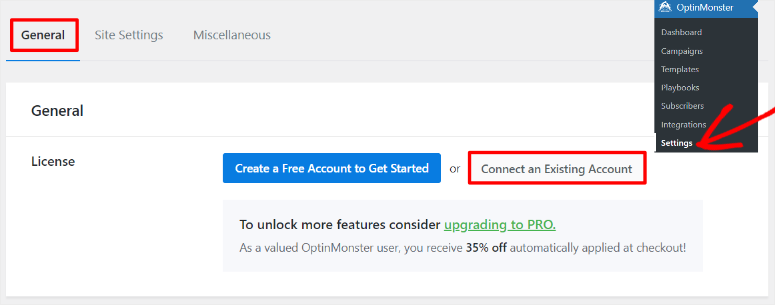
Then, in the next popup window, select “Connect to OptinMonster.” After this, you should get a confirmation message on your WordPress dashboard stating that the connection was a success.
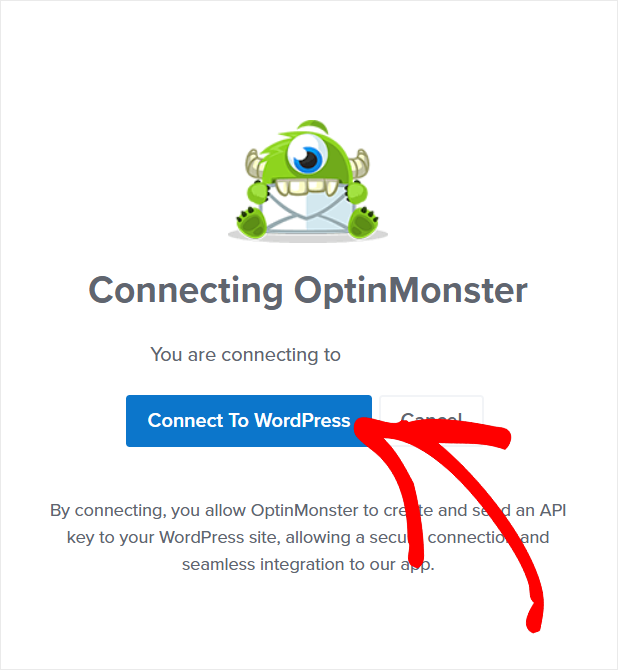
That’s it! You are now ready to use OptinMonster to create a squeeze page popup.
Step 2: Create a Squeeze Page Popup
One thing that you will quickly notice about OptinMonster is that you can create your campaigns from your OptinMonster account or from your WordPress dashboard. You will follow the exact same process with whichever method you select.
For this tutorial, we will use our WordPress dashboard because it offers a more convenient process for us.
To do this, go to OptinMonster » Templates, where you can select a campaign type and template for your campaign.
You get a search and filter function on the left side of this page to help you quickly find what you are looking for. On top of this, you can select templates that are designed for desktops or tablets but responsive to mobile devices. On the other hand, you can also select templates that are optimized specifically for mobile.
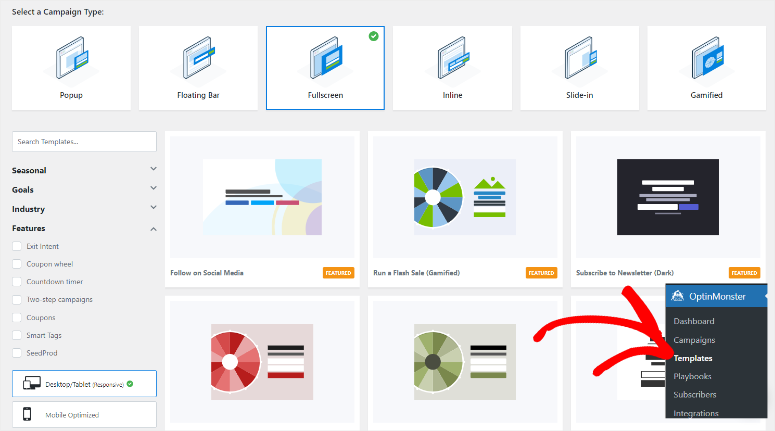
To create a squeeze popup page, we will use a Fullscreen campaign. This ensures the squeeze popup captures the user’s full attention by covering the entire page.
To do this, select “Fullscreen” to open templates under this campaign type.
We should also note that OptinMonster offers fullscreen campaign templates that are highly customized and already come with built-in rewards or lead magnets.
For example, you can use the Get a Coupon Code template, Subscribing for eBooks template, Unlock Instant Access template, and so on. If you are running a seasonal campaign, OptinMonster also offers you templates like the Thanksgiving Offer template, Giving Tuesday Offer template, Christmas Discount template and more.
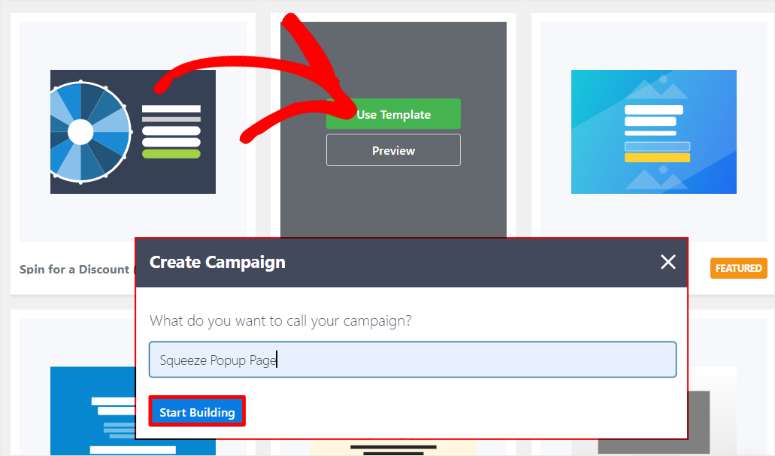
For this tutorial, we will use the “Subscribe to Newsletter” template to demonstrate the creation process. So hover over the template and select “Use Template,” then in the popup that will appear next, create a campaign name and hit “Start Building.”
Like SeedProd, OptinMonster has blocks arranged on the left and the preview window placed on the right.
You get “Standard” blocks like Columns, Text, Button, Video, Countdown, and more. On top of this, you can also select the “Smart Blocks,” which include Progress Bar, Smart List, and Social Media.
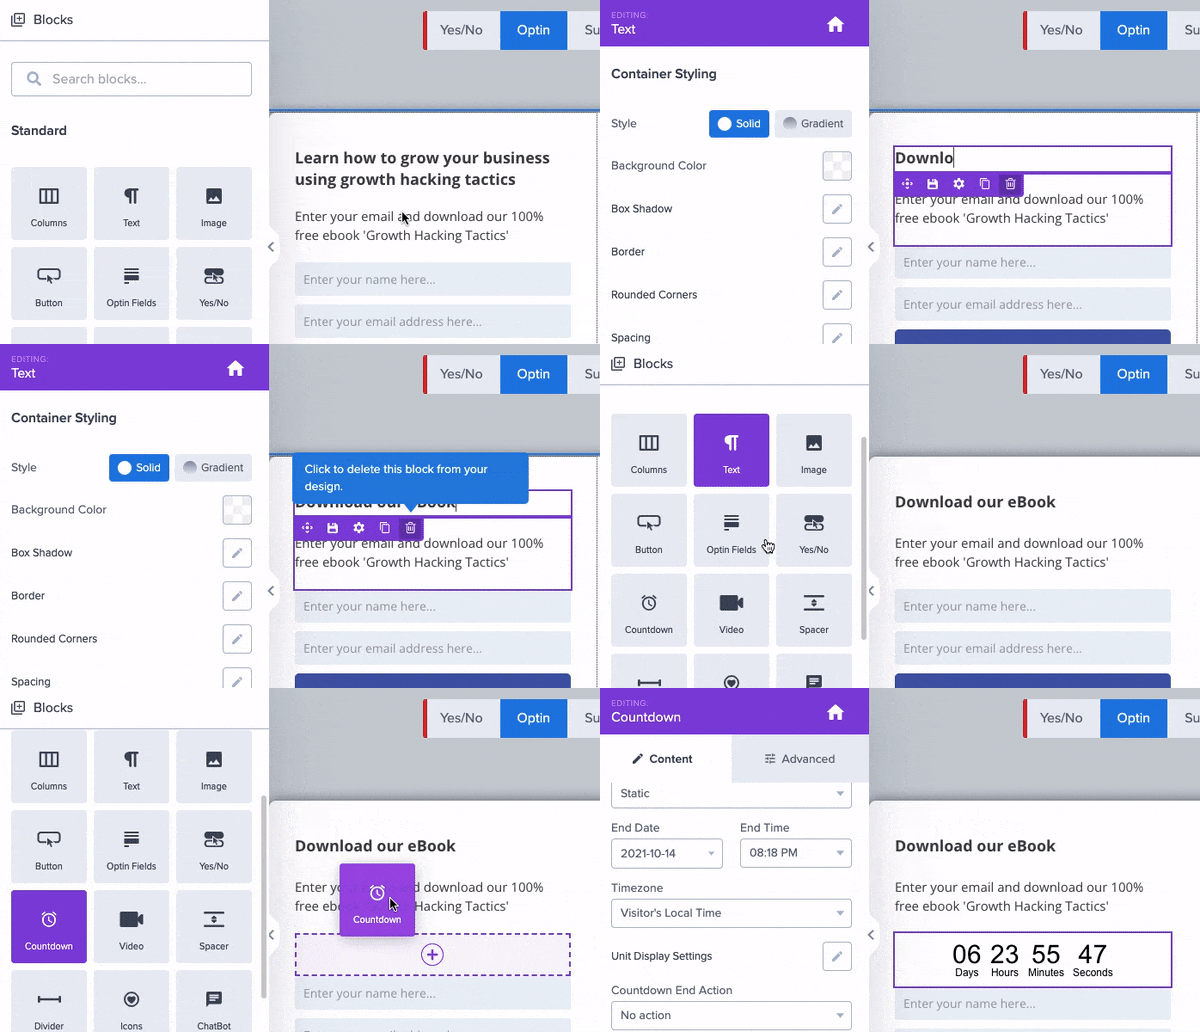
But since we are using a template, you will see placeholder images, text, and other elements already pre-placed in your squeeze popup page. To customize these elements, select them to open more settings on the left.
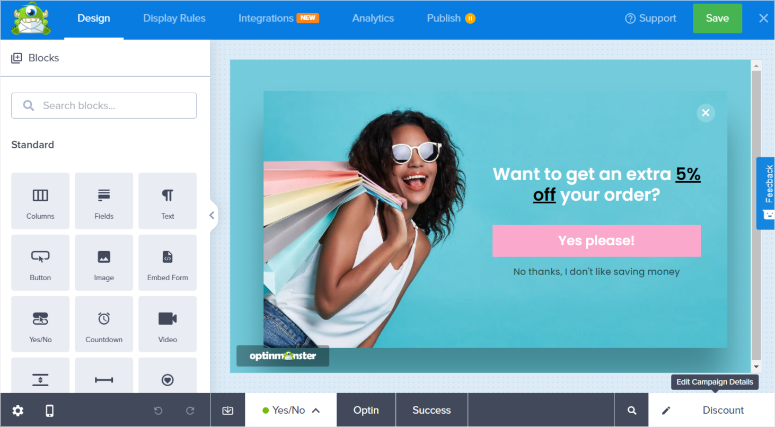
Apart from this, you can customize the background colors, box shadow, borders, spacing, and more. Once you are happy with your popup’s appearance, it is time to add Display Rules.
Step 3: Add Popup Display Rules
To tell OptinMonster when and where to display this popup squeeze page, move to the Display Rules » Conditions in the drag and drop builder page.
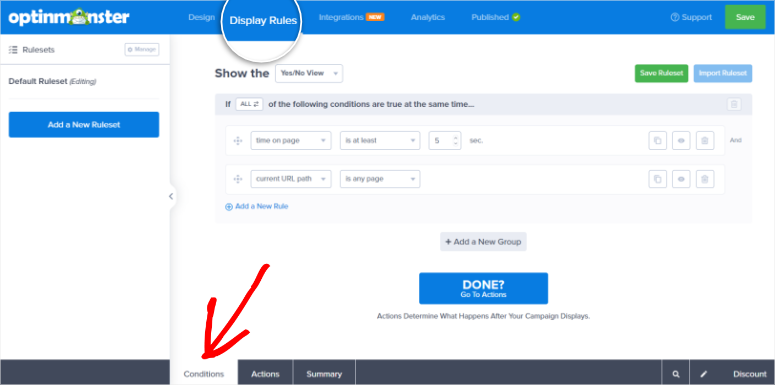
Now, there are two types of rules you can create with OptinMonster.
- The if “Any One” rule: In this case, the popup window will display if ANY of the conditions are met. This is a great option to create a broad subscriber list.
- The if “All” rule: In this instance, ALL the rules in place must be met before the popup is displayed. This can help you narrow down your subscriber list to very specific requirements.
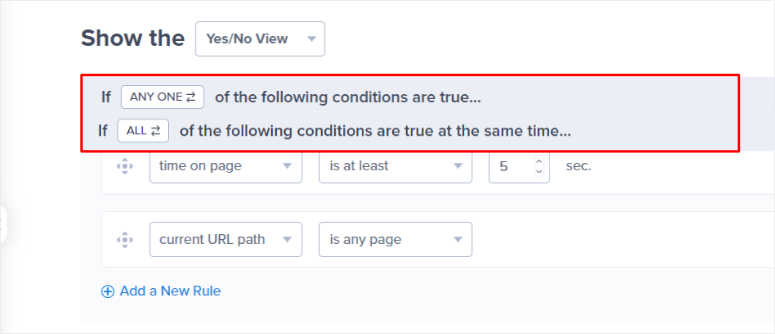
For this tutorial, we will create an “All” rule.
So move to the first rule text line and select the first dropdown option. You can choose from a list of Who, When, Where, Onsite Retargeting, and eCommerce. These functions further branch to more options like Page targeting, Exit Intent, New Visitor, and more.
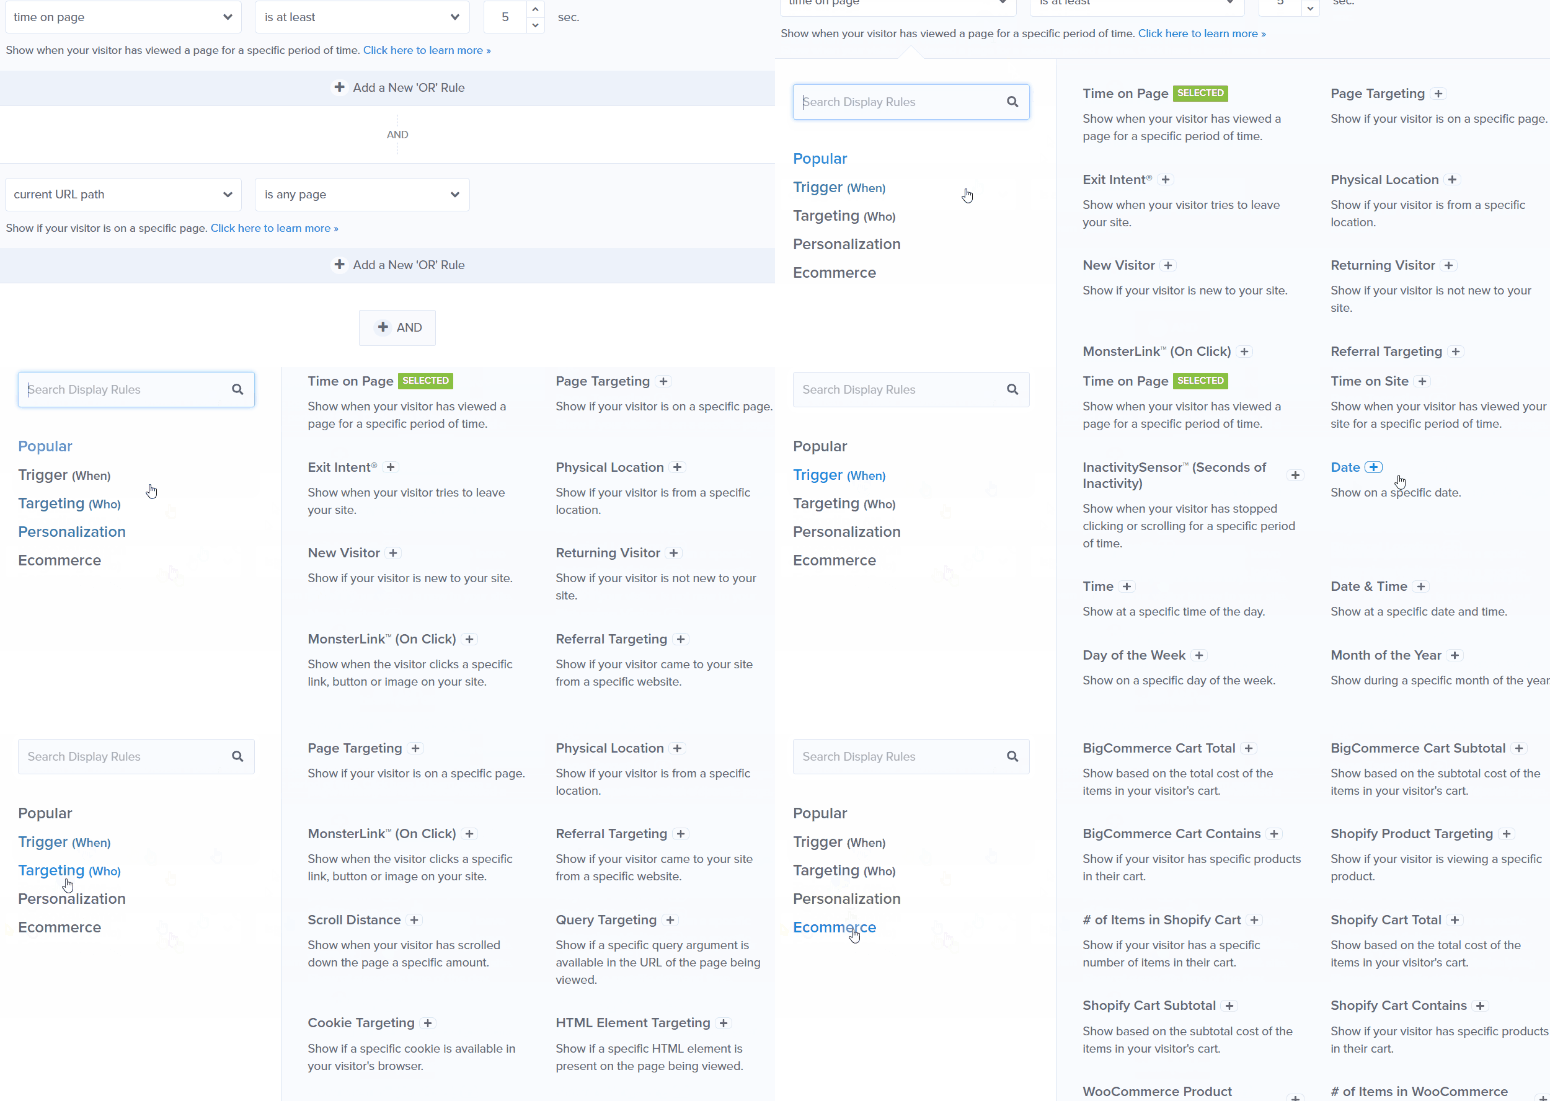
For our tutorial we will select “Who” and “Physical Location” in the first dropdown menu. This allows us to ensure the popup only appears for people located in a specific place.
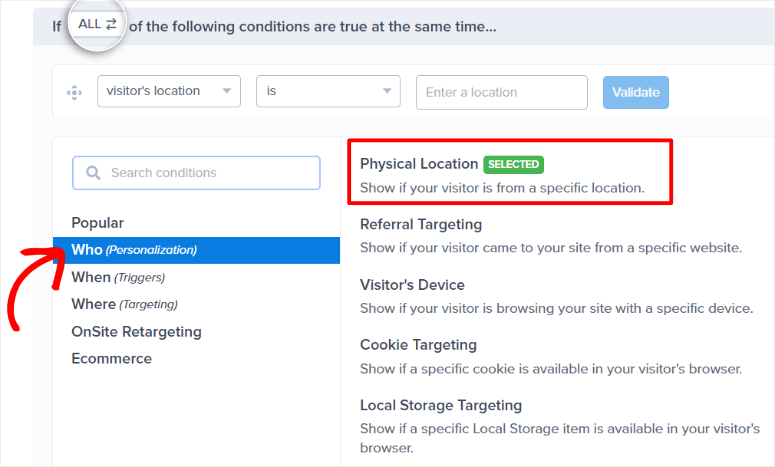
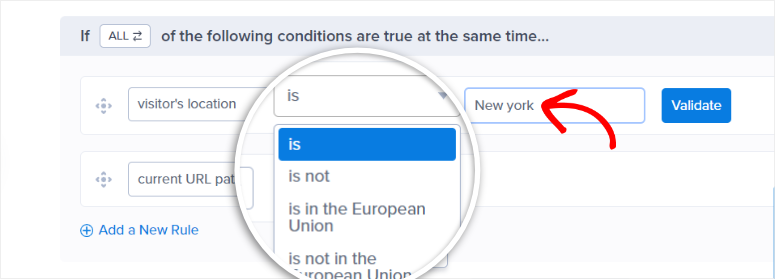
After this, we will move to the next dropdown and select “Is.” Then finally, on the last dropdown, we will choose a place. For our tutorial, we went with “New York.”
Now, move to the first dropdown on the second rule text line. For this rule, we will go with Exit Intent.
This will ensure that OptinMonster notices when a user is about to leave the page and displays the popup before they exit. We will then select “On all devices” in the next dropdown. As a result, regardless of the device a user is using, they will see the popup squeeze page.
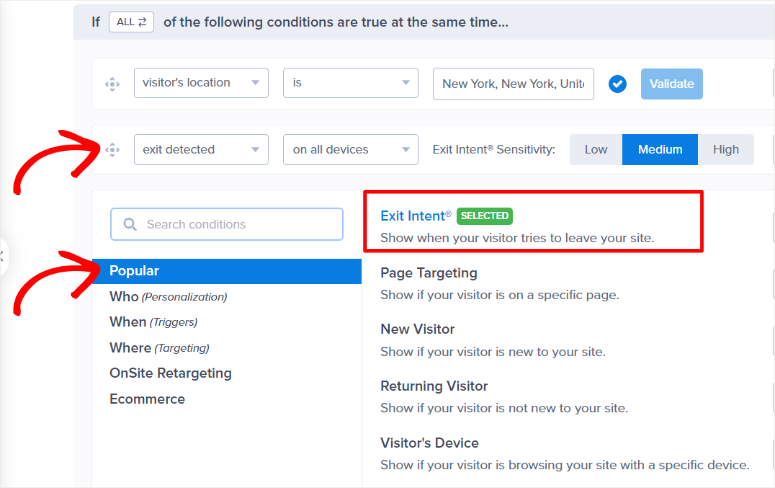
Remember, if you want to use only one display rule, you can delete the second command line using the “Trash” icon. But, creating a second display rule helps narrow down your targeting and makes it more effective.
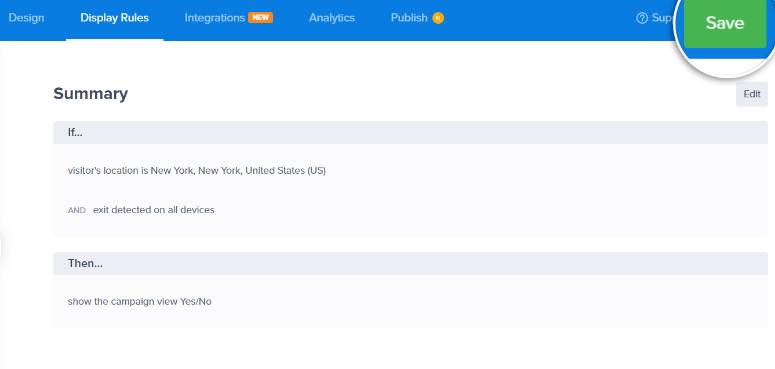
Now, once you create the display rules, it should read:
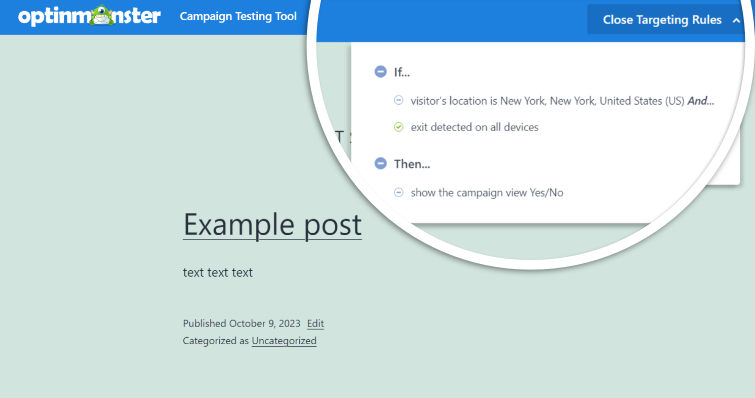
Show the popup window when the visitor’s location is in New York. Display the popup using Exit Detection technology on all devices.
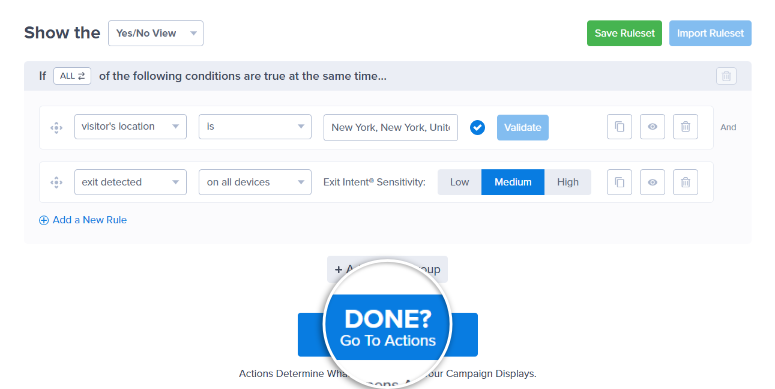
Now that you have set up “Conditions” for display let’s move to the Action tab.
First, go to the Capture Attention section to add animations and sound effects with dropdown options.
Some of the animations you find under “Animate with MonsterEffects” include Bounce, Flash, Pulse, and more. On the other hand, the sound effects you get under the “Play a MonsterSound” include Ping, Pong, Flam, and Arpeffio.
Next, use the toggle buttons to enable “Close on background click?” and “Display a page slide?”
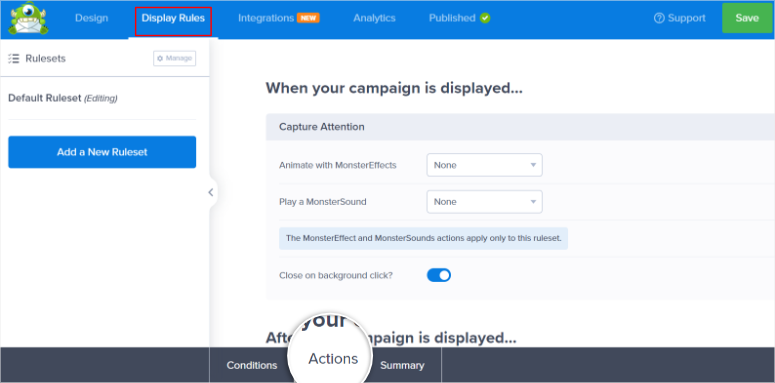
After this, move to the “Cookie Settings,” where you will set up how the popup will interact with the user after they first see it. This excellent remarketing tool from OptinMonster can help you convert users even if they do not subscribe the first time they visit your site.
You have options like displaying the popup after X number of days if they converted or closed the window. You can also tell OptinMonster to display the popup the next time the visitor lands on your page or if the display conditions are met.
Play around with these options to find one that works for you.
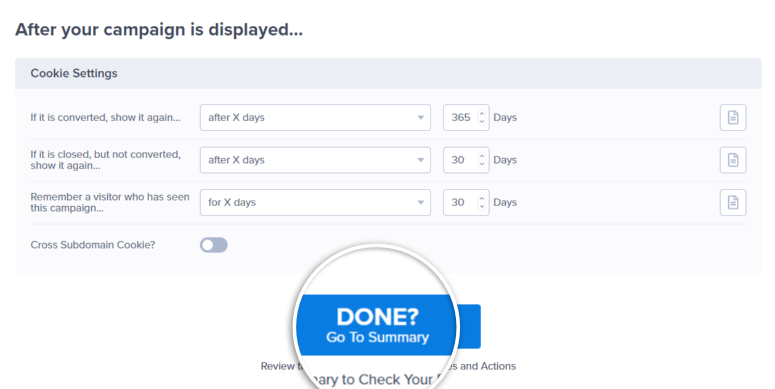
When done, move to the “Summary” page, where you will see how your display rules will work when the page goes live. When you are happy with your squeeze popup, hit Done to move to the next step.
Step 4: Connect to an Email Marketing to and Publish
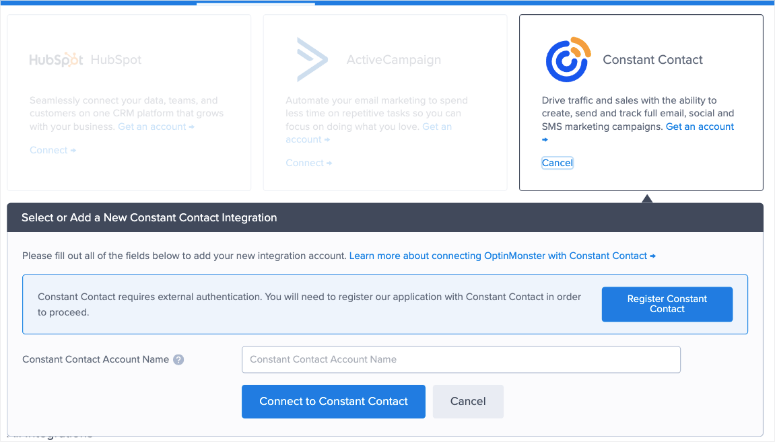
Now, move to the Integration tab at the top of the page builder. Here, you will see different email marketing tools that you can connect to OptinMonster. For example, you can integrate this leads plugin with HubSpot, Brevo, ActiveCampaign, Aweber, and more.
If you do not see the email marketing tool you want listed, you can use Zapier to connect.
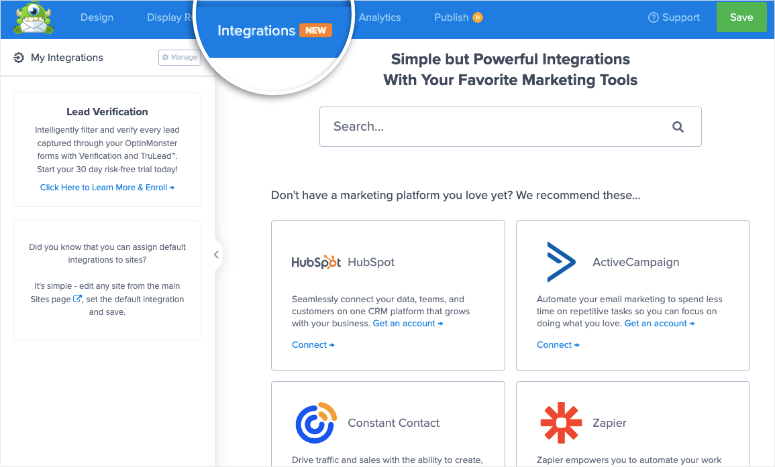
All you have to do is hit “Connect” in the tab of the email marketing tool you want to integrate. After this, depending on the email marketing tool you want to use, enter the API or the Account Name and connect.
That’s it. Now, all your leads will be sent to the email marketing tool you have connected to.
Check out this article if you want to learn how to automatically verify your leads using Monster Leads, another OptinMonster tool. This can help ensure that all your subscribers are real people interested in your products.
With everything set, move to the Publish tab at the top of the page.
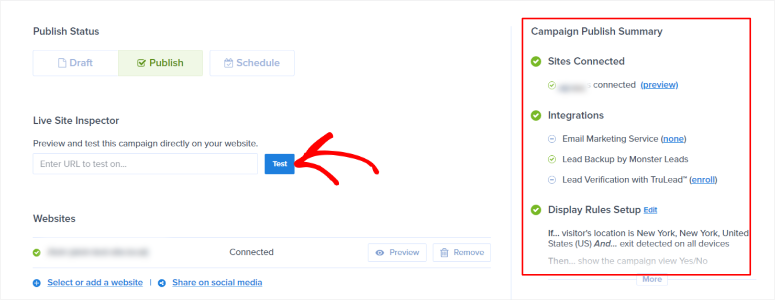
To make sure that the squeeze page popup is working perfectly, go to the “Live Site Inspection” section. Here, paste the URL of the page to which you have added the squeeze popup and hit “Test.” After this, OptionMonster will redirect you to that page so that you can see how the popup works from the user’s point of view.
It will also display the OptinMonster Campaign Testing Tool at the top with the display rules you have created.
Now, with everything set, it is time to make the squeeze popup page live.
There are many ways you can publish the popup squeeze page with OptinMonster. The first and simplest is simply hitting the “Publish” button on the campaign builder page. After this, the popup window should appear on the pages you have set with targeting rules.
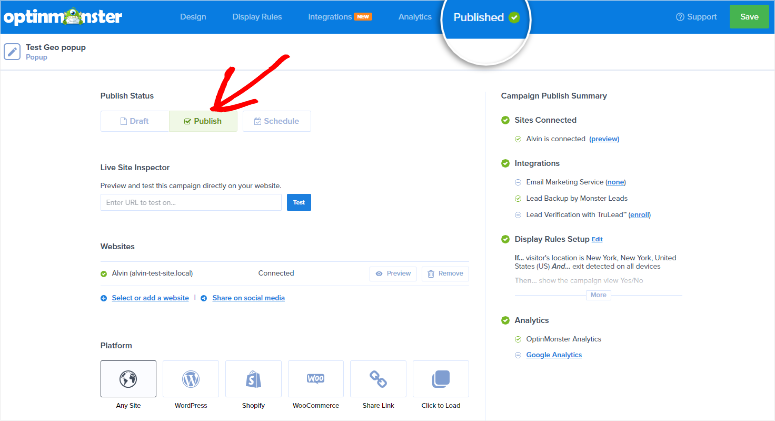
Alternatively, you can use the “Share Link” button and share the campaign directly with your users. While using this link, OptinMonster allows you to add a page title, meta description, and an image. Another way to publish this campaign is to copy the embed code and paste it on any page you want it to appear.
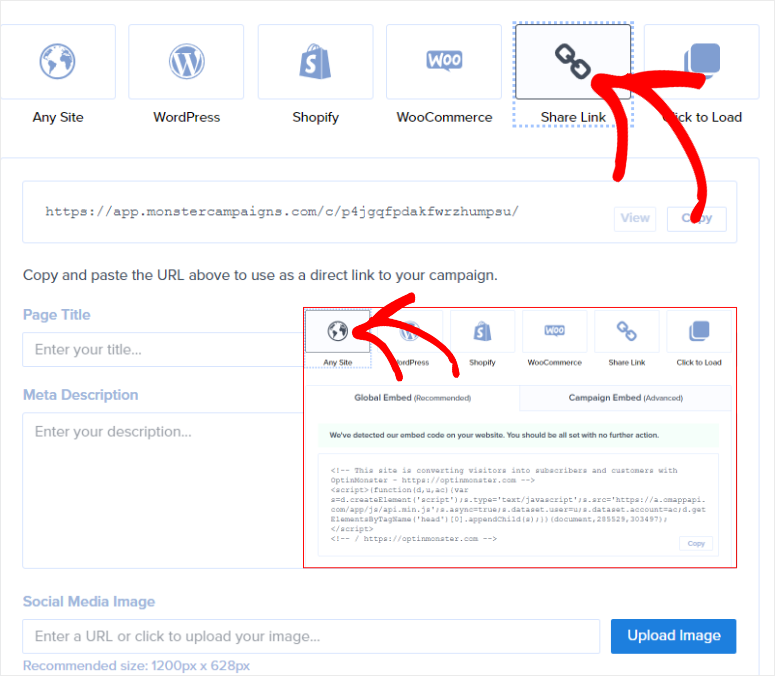
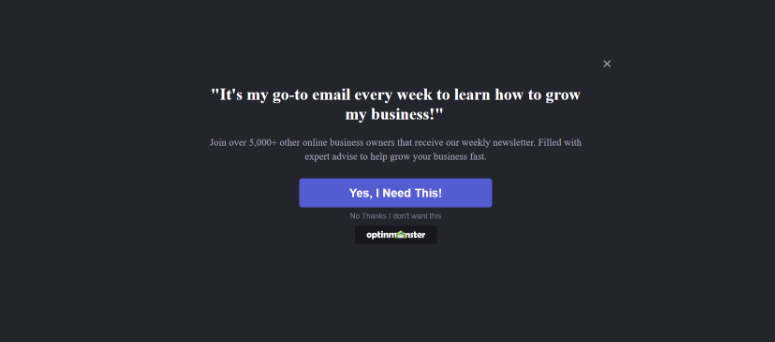
That’s it! Now, you can ask users to become subscribers using the fullscreen squeeze page popup window created by optinMonster.
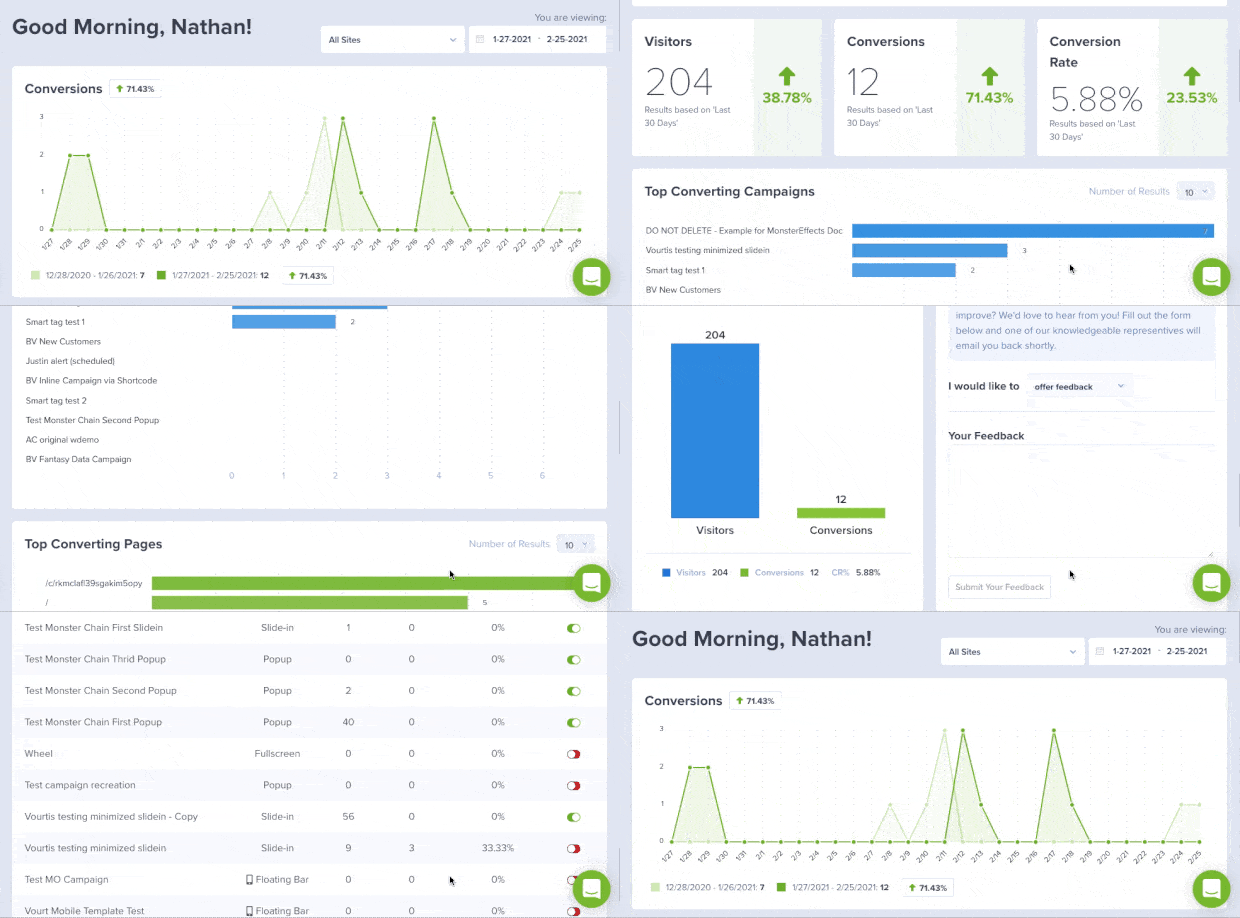
To track your subscriber list, you can use the built-in OptinMonster tracking system.
To access this, go to OptinMonster » Subscribers, and you will see all your analytics data generated by the plugin. You can also connect OptinMonster to Google Analytics for a more detailed overview of your lead generation campaigns.
Bonus: Improve engagement in your squeeze page popup campaign
One thing that impressed us about OptinMonster is that it allows you to gamify your campaigns. For example, you can select a template with a spin-the-wheel feature. In fact, you get several fullscreen templates with the spin-the-wheel feature like Spin for a Discount, Run a Flash Sale, Spin for a Discount, and more.
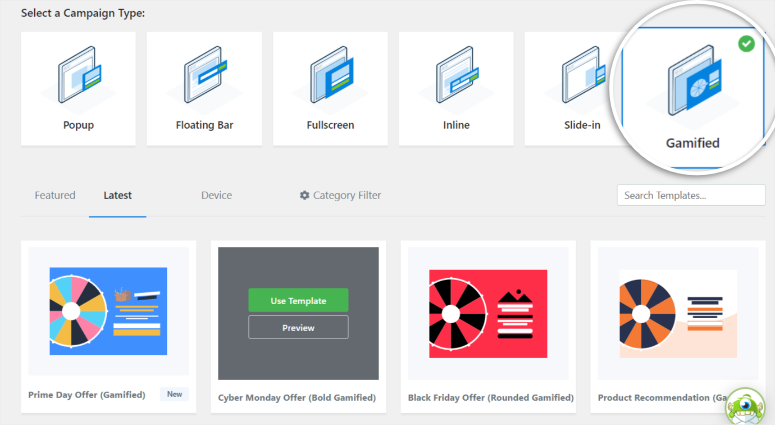
The advantage of gamifying your squeeze page popup is that it makes users feel more involved and engage better. As a result, they are more likely to sign up and become a subscriber.
Apart from selecting a template with the spin-the-wheel feature, you can also use the coupon wheel block in the drag and drop builder. This means you can place this engagement feature on any template you want.
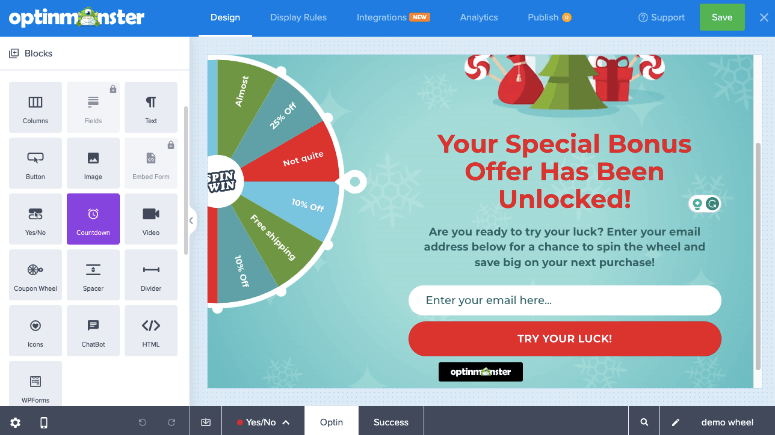
You can customize the colors, inner wheel icon, pull direction, and more. But, most importantly, you can customize the win chance, switch off sections of the wheel, and add the coupon codes directly to the wheel.
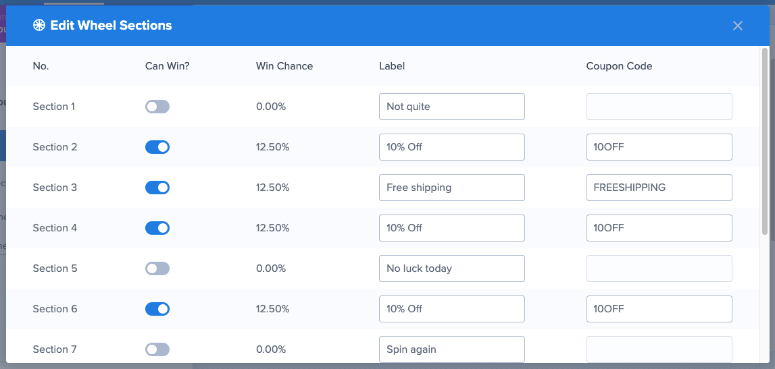
This fully automates the process, improving the user experience and encouraging visitors to take part in the game.
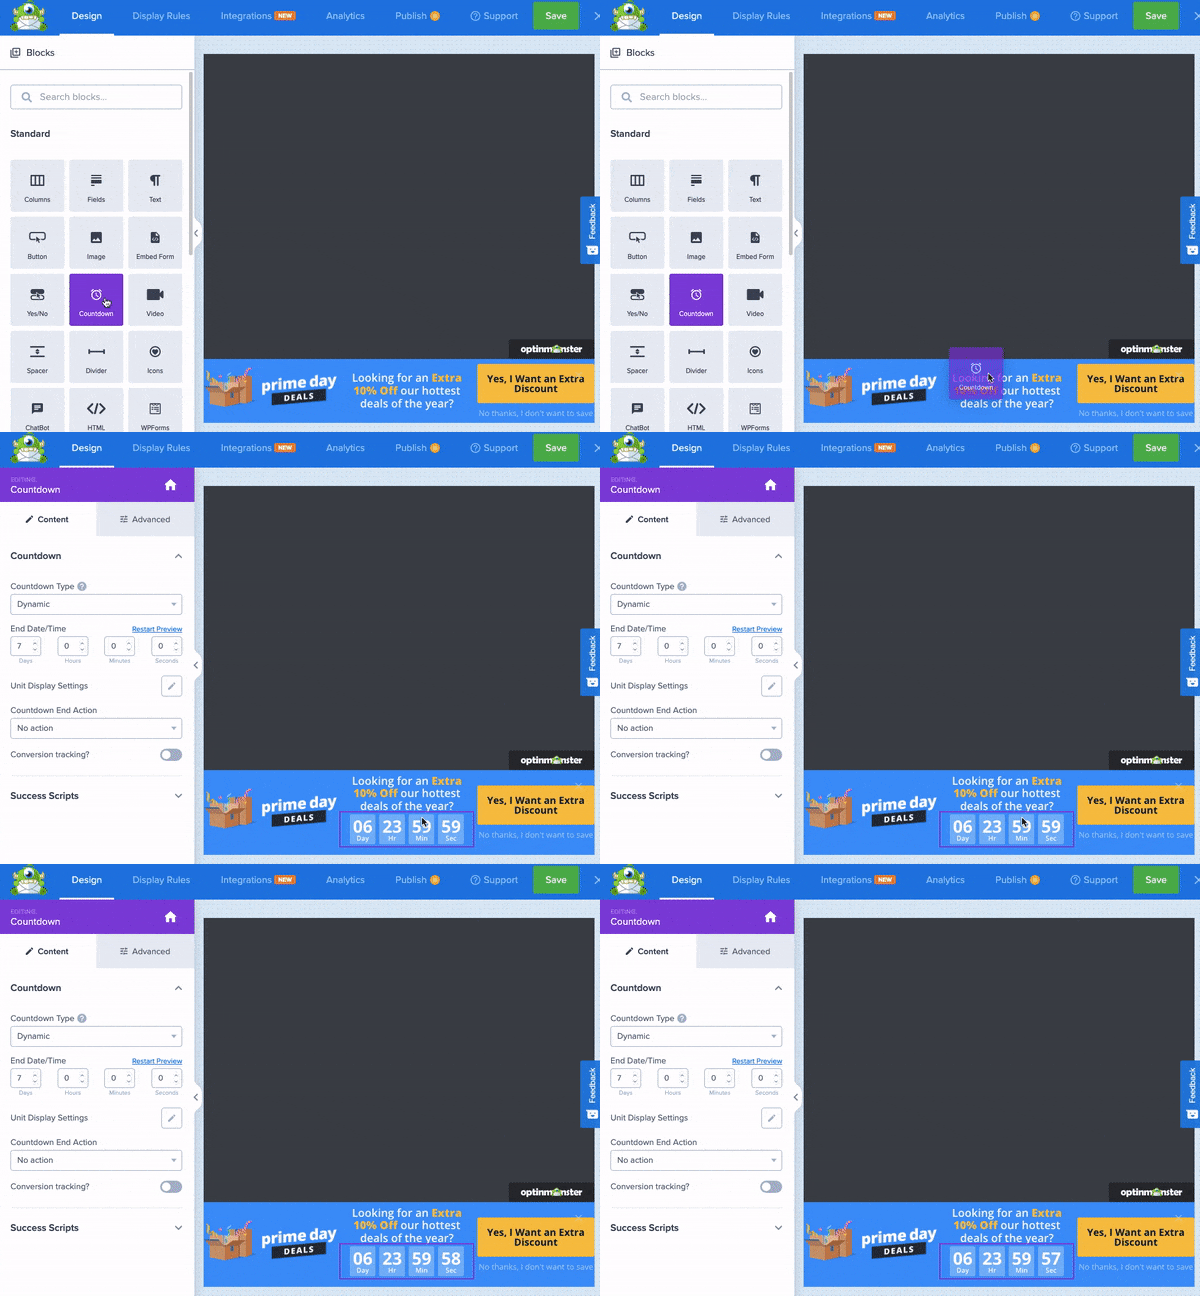
Another way to improve engagement is by adding a countdown timer or a progress bar. These features build a sense of urgency, encouraging users to complete the optin form.
Great job! You can now create a squeeze popup page using OptinMonster and a traditional squeeze page with SeedProd. Both give you a wide range of customization options and encourage users to subscribe to your email list.
Check out the commonly asked questions below if you have any other questions.
FAQs: How to Create a Squeeze Page in WordPress That Converts
What is the difference between a landing page and a squeeze page?
A landing page has various goals like product promotion, sign-ups, or sales. It can include multiple CTAs and more detailed content. On the other hand, a squeeze page focuses solely on capturing visitor information, usually through an optin form, with minimal content and a single CTA.
Can I use OptinMonster and SeedProd to create squeeze pages simultaneously?
Yes, you can use OptinMonster for popup-based squeeze pages and SeedProd for dedicated squeeze pages. Both tools can work together to capture leads through different formats. This allows you to create different squeeze page campaigns with different objectives running at the same time.
Can I use a popup window as a squeeze page?
Absolutely. A popup squeeze page collects visitor information, like an email address, in exchange for an offer. Tools like OptinMonster make it easy to create popups with customizable opt-in forms and trigger them based on user behavior, such as exit intent or time on the page.
Is SeedProd free?
Yes, SeedProd offers a free version with basic features, allowing you to create simple landing pages. But, you’ll need to upgrade to a paid plan to access advanced features like premium templates, custom blocks, and integrations with email marketing services.
We hope you enjoyed learning about how to create a squeeze page. Here is an article on 7+ tips to help you improve landing page conversions.
Apart from that, here are other articles you may be interested in reading.
- Thrive Leads Alternatives: OptinMonster vs. Thrive Leads
- 15 Best Content Marketing Tools and Plugins for WordPress
- How to Add Push Notifications to WordPress to Drive Traffic
The first article compares Thrive Leads and OptinMonster, two of the best lead generation plugins. The next post lists the 15 best content marketing tools. While the last article walks you through how to add push notifications to your site.

Comments Leave a Reply