Do you want to restrict user login to one device in WordPress?
One issue SaaS, Membership, online courses, and subscription site owners can agree on is that they lose a lot of revenue from sharing accounts. Many users give out their passwords and accounts to others, reducing earning potential.
For example, Netflix went on a worldwide crackdown to reduce account sharing, which they stated affected over 100 million households. This led to billions in lost revenue and illegal use of the subscription service.
At IsItWP, we have seen similar problems from many of our sister companies that create WordPress plugins and software. We have seen how difficult it is to control sharing of passwords and accounts.
Restricting account sharing in WordPress has proven to be an effective solution to stop this issue. By limiting users to one active session on one device, we have been able to prevent unauthorized access, discourage credential sharing, and maintain better control over user behavior.
In this article, we will walk you step by step through the methods we use to ensure one-user-one-device. We will show you different techniques so that you can choose the best one for your business.
Importance of Restricting User Login to One Device
As mentioned, single-device login can help reduce account sharing. But it can do much more than this. For starters, it can help improve site security by giving you more control over who and where your site can be accessed.
Even if the same user has several devices, it automatically logs them out of the previous device when they login to a new one. As a result, this system helps you enforce a one-device login limit at all times.
Here are other reasons to restrict user login to one device.
- Content Protection: Ensures exclusive access to premium content, preventing revenue loss caused by shared logins.
- Accurate User Metrics: Provides reliable insights into actual user engagement and traffic, which is crucial for analytics and decision-making.
- Improved User Experience: Reduces login conflicts when multiple sessions are active, ensuring smooth access for legitimate users.
- Legal Compliance: Helps users stick to licensing agreements or subscription terms that require single-user access, avoiding potential legal issues.
- Load Management: Reduces server strain by limiting connections that run at the same time from one account, improving site performance and stability.
- Fraud Prevention: Blocks malicious attempts to exploit shared credentials, reducing the risk of fraud.
Better Control for Admins: Gives you more control over user behavior and session management, allowing better enforcement of site policies.
As you can see, limiting user login sessions to one device has many benefits. But, every business has different models and what works for one may not work for another. So, to ensure you find a method that works for you, check out the 2 ways to enforce a one-session-per-user policy.
With that said, let us walk you through all these methods of ensuring a single active session on your WordPress website.
Use the Loggedin – Limit Active Logins Plugin (Free and Simple)

Loggedin – Limit Active Logins plugin is the solution for you if you are looking for a free and simple way to automate limiting user login to one device.
This login restriction plugin allows you to set up the maximum number of active logins for each user. It also blocks any new login when the log-in limit is reached, forcing logout for additional people.
Step 1: Install Loggedin – Limit Active Logins
As mentioned, Loggedin – Limit Active Logins is a free plugin. As a result, you can access it by going to All Plugins » Add New Plugin in your WordPress dashboard. After this, use the search bar to find the tool from your WordPress plugin repository.
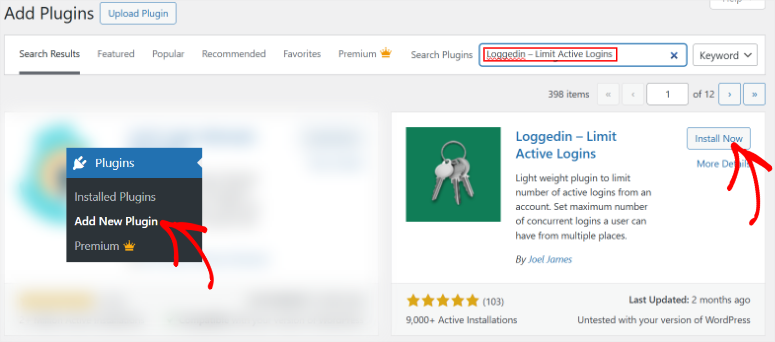
Then, install and activate it as you would any other plugin. If you face any issues check out this article on how to install a plugin.
Step 2: Set up Loggedin – Limit Active Logins
Next, navigate to Settings » General, then scroll to “Loggedin Settings.”
First, you will notice that by default, this device-based user login plugin sets the maximum number of active logins as 3. You can customize this number to fit your site. As a result, any other login attempt beyond the set number will be automatically rejected, even if the other browsers are closed.
But, to customize your user experience further, go to Login Logic, where you get 2 checkbox options.
- If you select “Allow,” the plugin will stop old sessions to create room for the new login, sticking to the limit set.
- If you select “Block,” the plugin will reject any new login attempts until the current sessions expire.
On top of this, you can manually control the people who have logged in to your WordPress site with the “Force Logout” feature. By entering the User ID, you can force the user to log out of all devices. This is a great way to improve site security and manage user access.
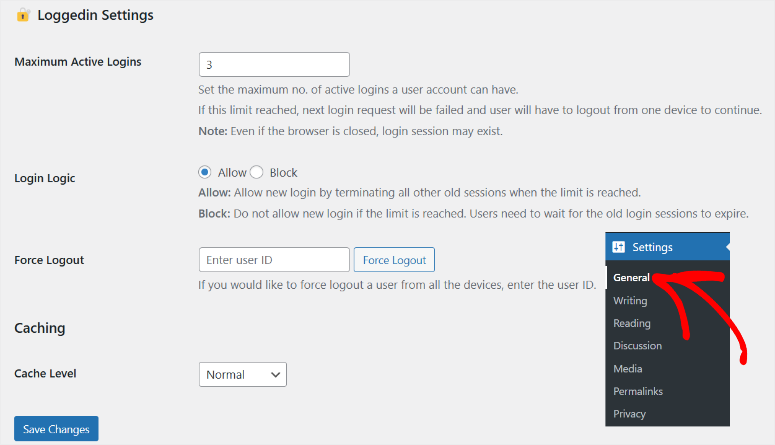
Now since WordPress relies on caching to regulate login attempts and track sessions, this plugin allows you to set the “Cache Level.’ Loggedin – Limit Active Logins, therefore, gives you 4 Cache Level options you can choose from.
- Normal: This mode caches session data in a standard way, balancing performance and reliability. It works well for most sites without advanced caching mechanisms.
- Asset Only: Limits caching to static assets like JavaScript or CSS, minimizing dynamic login session management interference. This mode is useful when managing dynamic content-sensitive environments.
- Advanced: An optimized caching system is used to handle sessions more efficiently. It is ideal for sites with high traffic, as it ensures the plugin interacts with more complex caching layers like object caching.
- Off: It entirely disables caching for the plugin, forcing it to check the database or session storage directly for every request. This mode ensures accurate session tracking but may slow down performance.

Once done, hit “Save” at the bottom of the page, and you can now easily restrict your user’s login sessions to one device.
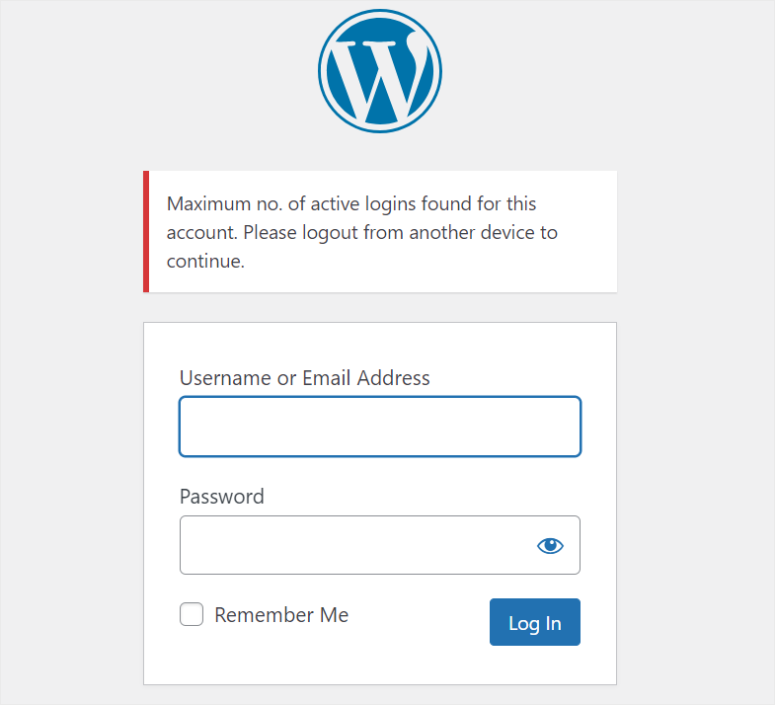
This method to limit users from sharing accounts is quick and easy. But it has limited customization options that can reduce efficiency for larger teams and user bases. If you want advanced customization options, we recommend method number 2.
Use WPCode (Free but Advanced Method)
As you have seen above, Loggedin – Limit Active Logins is a simple plugin that only allows you to restrict all users from simultaneous logins. But what if you want to make some exceptions to this login protocol?
What if you want to allow yourself, team members, or certain users to bypass this login restriction to help manage your site better?
This can be helpful if you need multiple team members to access a single account. For example, you might want to test functionality or troubleshoot errors, especially in staging or development environments.
At the same time, allowing multiple users to share one account can help you manage your resources better.
For this reason, we recommend WPCode.

WPCode is the best WordPress code snippets plugin. It comes with a drag and drop interface and a large snippet library that allows you to insert code on your site without developer experience.
It has a Smart Conditional Logic feature, allowing your site to load the code snippet only when it matches certain conditions, such as logged-in members, specific URLs, and more.
Most importantly, it checks any manual code snippets you add to ensure they work perfectly and do not break your site. Since we will manually add the login bypass code, this feature is highly useful.
With that in mind, you will need some basic code experience to use this method.
Step 1: Install WPCode
Now, even though WPCode offers a premium version, the free version can still help add this code. To get WPCode Lite, go to your WordPress plugin repository and search for it.
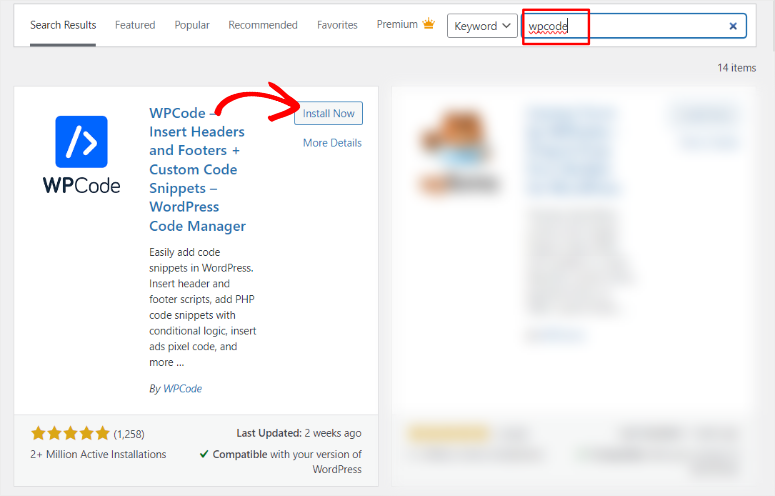
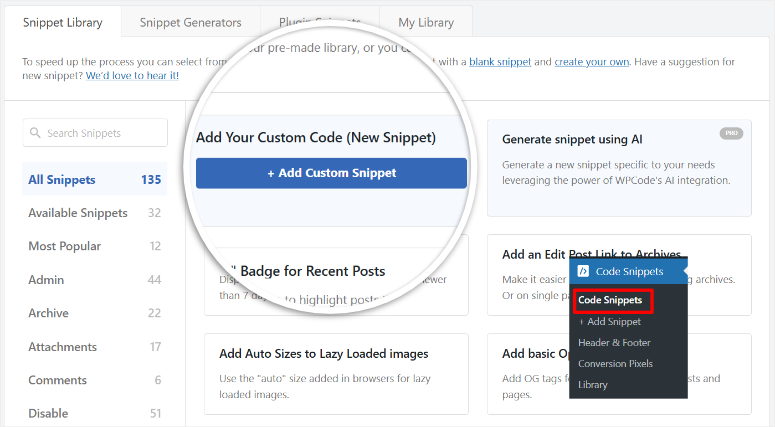
Once installed and activated, head to Code Snippets » + Add Snippet.
This redirects you to the snippet library with over 130 pre-added codes. Here, select “Add Your Custom Code (New Snippet) to open the code type popup window.
Step 2: Manually Add PHP Snippet
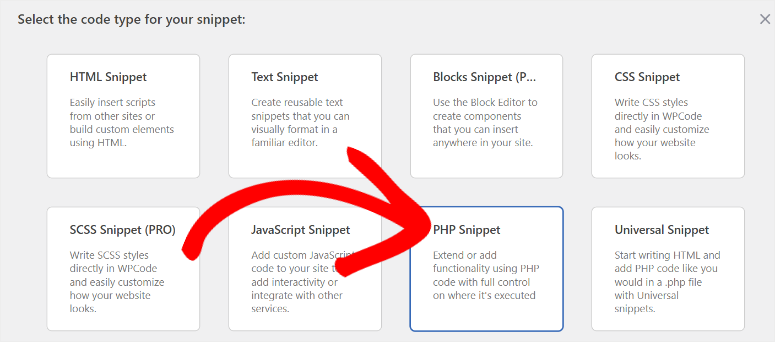
Then, select PHP Snippet on this window to open the drag and drop interface.
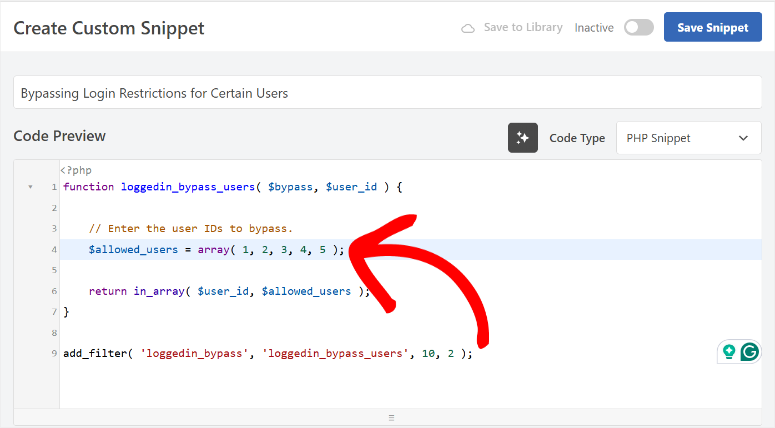
First, enter the snippet’s title to easily identify and reuse the code in other areas of your site. Then, in the WPCode snippet area, paste the following code:
function loggedin_bypass_users( $bypass, $user_id ) {

    // Enter the user IDs to bypass.
    $allowed_users = array( 1, 2, 3, 4, 5 );

    return in_array( $user_id, $allowed_users );
}

add_filter( 'loggedin_bypass', 'loggedin_bypass_users', 10, 2 );
Next, go to code line 4, which starts with "$allowed_users = array" and replace the numbers with the actual User IDs you want to bypass the login protocol. Remember to separate each User ID with a comma like the number examples.
But, using specific User IDs can lead to a long code, especially if you have a big team. As a result, you can easily break your site.
To avoid this, you can use roles instead.
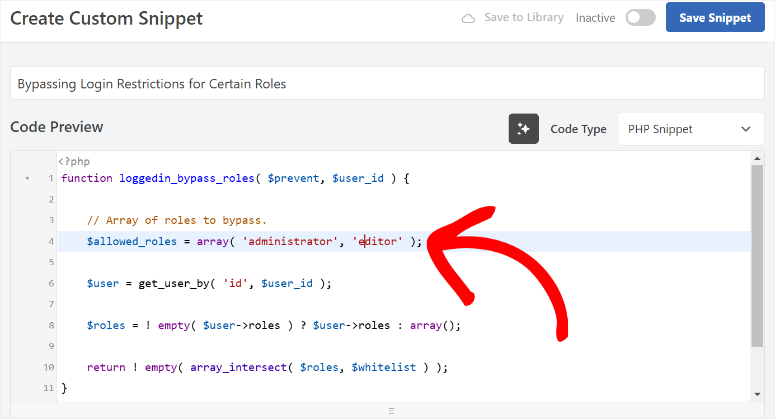
To do this, copy and paste the code below in the WPCode snippet area.
function loggedin_bypass_roles( $prevent, $user_id ) {

    // Array of roles to bypass.
    $allowed_roles = array( 'administrator', 'editor' );

    $user = get_user_by( 'id', $user_id );

    $roles = ! empty( $user->roles ) ? $user->roles : array();

    return ! empty( array_intersect( $roles, $whitelist ) );
}

add_filter( 'loggedin_bypass', 'loggedin_bypass_roles', 10, 2 );
Then, once again, go to line 4, which starts with "$allowed_roles = array" where you get placeholder roles ‘administrator’ and ‘editor.’ You can replace the text on this line with relevant site roles that apply to your site. Remember to separate the roles with a comma and place single quotation marks (‘ Example Role’) around each role.
Step 3: Publish Snippet Code
Once done, go below the WPCode snippet area to find the Insertion tab.
Here, navigate to “Insert Method,” where you can insert the code with Auto Insert or Shortcode. Then, use the “Location” dropdown to tell WPCode where the snippet should appear.

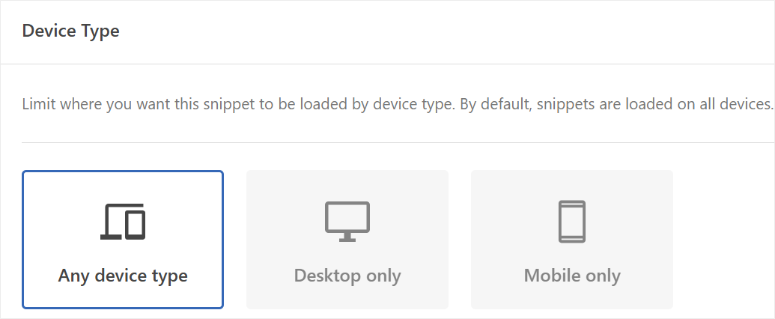
Finally, go to the “Device Type” and select if you want the snippet to appear on Any Device, Desktop Only, or Mobile Only.
When you are happy with your code to bypass login restrictions, hit “Save Snippet” and use the toggle button to activate the code at the top of the page.

That’s It! You can now restrict login to one device and allow certain users to bypass this protocol. If you have any more questions, check out the commonly asked questions below.
FAQs: How to Restrict Account Sharing in WordPress
Best free tool to set a one-device login limit for free?
The best free tools to restrict multiple logins on WordPress are Loggedin – Limit Active Logins and WPCode Lite. Loggedin – Limit Active Logins allows you to set a maximum number of active logins per user, ensuring they can only access your site from one device at a time. On the other hand, the free version of WPCode, allows you to go a step further by letting you customize who can access your site by role and IP address.
Can IP whitelisting stop simultaneous logins?
IP whitelisting can help control access but is not the solution for stopping simultaneous logins. While it ensures only users from approved IP addresses can log in, it does not completely limit multiple sessions on different devices. This method works better for controlling access in static IP environments, such as offices, rather than for dynamic user bases. Instead, you can use plugins like Loggedin – Limit Active Logins and WPCode Lite.
Can I allow certain users to bypass my One-session-per-device policy?
Yes, you can allow specific users to bypass the one-session-per-device policy using tools like WPCode. This plugin lets you add custom PHP code snippets to your site. These custom codes can exclude specific user IDs or roles from login restrictions. For example, you can create a list of user IDs or roles like administrators to exempt from the restriction, enabling multiple logins for those accounts.
What security plugins can help control user login?
Wordfence Security and iThemes Security are two excellent security plugins for controlling user logins on WordPress. Wordfence offers features like two-factor authentication, login attempt limits, and real-time traffic monitoring to block unauthorized access effectively. On the other hand, iThemes Security enhances login security by enabling strong password enforcement, brute force protection, and the ability to lock out suspicious IPs.
Congratulations! You can now easily restrict multiple device logins for free. Check this article on How To Limit Login Attempts in WordPress for even more control over user logins.
On top of that, here are other articles you may be interested in reading.
- How to Properly Create a Custom Login Page in WordPress
- How to Stop Brute Force Attacks on WordPress Websites
- 9 Best WordPress Security Plugins Compared
The first article shows you how to create a custom login page to increase user experience and security. The next post focuses on how to stop brute-force attacks. While the last article lists 9 best WordPress security plugins.

Comments Leave a Reply