Do you want to add appointments and events to your Google Calendar automatically?
This way, you avoid confusion and errors while setting up appointments manually, saving time and reducing the risk of mistakes.
At IsItWP, we understand the value of automating appointments directly in Google Calendar. We use Google Calendar to set up user events and partner appointments easily.
As a result, through this tutorial, we want to share the same easy step-by-step process we use. We will focus on how to use WPForms and Zapier to automate booking appointments in Google Calendar on WordPress.
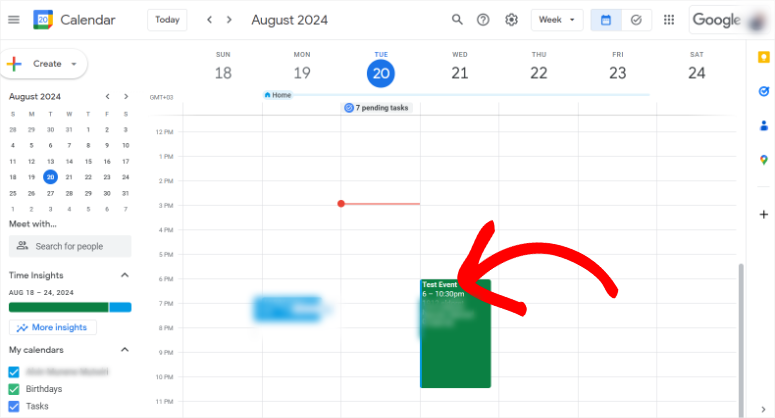
Check out the screenshot below to see the result of this automation process.
Why You Should Add Events to Google Calendar

Google Calendar makes it easy for users to schedule and send appointment invitations. Anyone who has used Google products can quickly confirm your availability with just a few clicks.
You can set it up so that you show your users the most convenient time slots so that they can book a time best for both you and them.
On the other hand, Google Calendar integrates with many WordPress tools and plugins. This ensures that you can set up booking forms in different ways using different tools.
As a result, you can easily view all your events in one convenient location, regardless of how the user sets up the appointment.
In fact, you can color different events in specific colors, ensuring you quickly identify, track, and manage them with ease.
Here are other reasons to use Google Calendar for appointment booking.
- Automatic Time Zones: It automatically adjusts for different time zones, making it ideal for booking appointments with people in various locations.
- Syncing Across Devices: Appointments are synced across all devices, ensuring users receive reminders and updates wherever they are.
- Supports Multiple Calendars: Users can manage personal, work, and shared calendars at the same time, making it easier to coordinate appointment bookings without conflicts.
Why You Should Use WPForms to Set Up Appointments
WPForms is, without a doubt, the best drag and drop form builder. It can help you customize any type of form you need for your site and place it conveniently on an existing page using a shortcode or the WPForms block. You can also add the forms on any existing page and place them exactly where you want.
What we really like about WPForms is that it comes with over 1800 templates that you can quickly start building with. Among these templates, you will find plenty of event-specific templates like the Video Release Form, Vendor Registration Form, Simple RSVP Form, Event Planner Form, and more.
You also get Appointment-specific templates like the Hair Appointment Booking Form, Dentist Appointment Form, Tattoo Appointment Booking Form, and more. If you do not find a form template that matches your needs, you can use the drag and drop builder to customize the existing ones. Or use the blank canvas to start from scratch.
Here are other reasons to consider WPForms when setting up events and appointments.
- Smart Conditional Logic: Supports smart conditional logic to tailor the booking process based on customer inputs
- Payment Gateways: Allows payment integration with PayPal or Stripe for fee collection during booking
- Mobile Friendly: Provides mobile-responsive form templates, ensuring bookings can be made on any device
- Email Notifications: Provides instant email notifications for both clients and administrators upon booking
- Confirmation Messages: Customizable confirmation messages and redirects after successful appointment scheduling
- Recurring Appointments: Allows for the creation of recurring appointment forms to handle ongoing bookings
- Spam Protection: Offers spam protection with built-in CAPTCHA and Honeypot features
- CRM Connections: Supports integration with CRM tools for better customer management
- Reporting Features: Includes advanced reporting features to track and analyze appointment bookings
- Import/ Export Features: Allows for easy export of appointment data to CSV or Excel for record-keeping
- Multi-page Forms: Supports multi-page forms for more complex appointment workflows
With that said, check out the latest WPForms review here for all the information you need about this form builder.
As you can see, using Google Calendar can help you view all your appointments in one place. While you can use WPForms to create forms that allow your clients to set up these appointments directly from the front end of your website.
In a nutshell, you can take advantage of all the amazing features from both WPForms and Google Calendar to make appointment booking easier.
The only drawback of this integration is that WPForms does not connect directly to Google Calendar. Instead, you will need to use Zapier to make this integration. With this process, you will need to create a “Zap” using Zapier to create a communication channel between WPForms and Google Calendar.
Let us show you how!
Step 1: Create a Zapier Account
Before you create a Zap, you need to have a Zapier account. To get one, all you need to do is head to the tool’s official website and hit “Start Free with Google.” This lets you quickly set up a Zapier account using your Google account.
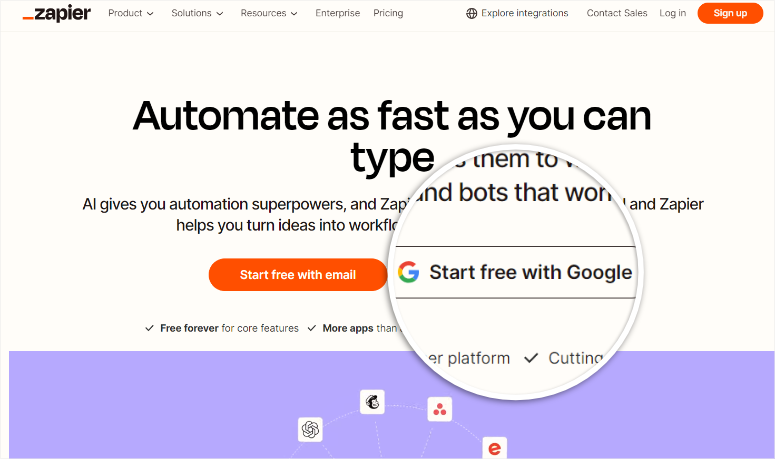
After this, grant Zapier the permissions it needs, and that’s it; you are ready to create your first Zap.
The good news is you can start with a free Zapier account to make the Google Calendar-WPForms connection because it is a two-step Zap. For multi-step Zaps, you need a premium Zapier account.
With this free account, you can automate up to 100 tasks and create unlimited Zaps. You can also use the AI-powered feature to generate a Zap code, form mapping, and more.
Step 2: Install WPForms in WordPress
With your Zapier account ready, the next step is to install WPForms to your WordPress dashboard. Remember that WPForms offers a forever free version that allows you to set up and manage simple forms.
But to make Zapier connections, you need a Pro Plan or higher!
To get this package, head to the official WPForms website and select a plan within your budget and one that meets your needs.
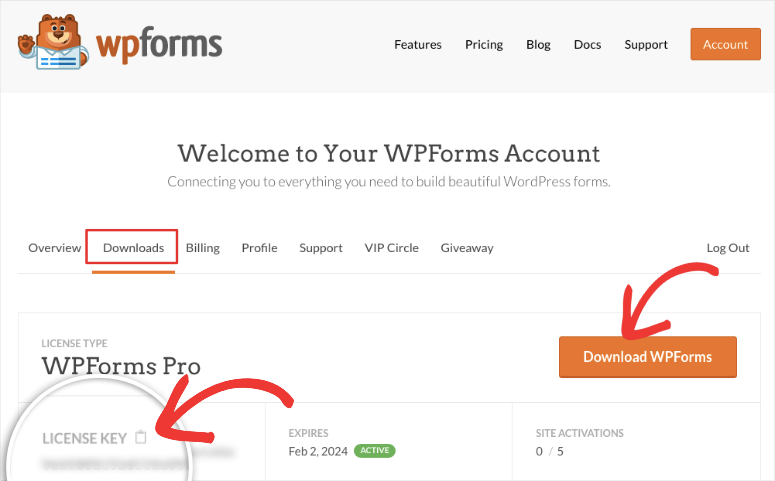
Once you have a subscription, log into your WPForms account and navigate to Downloads. Here, hit “Download WPForms” to save the plugin’s ZIP file on your PC. On this page, also copy the “License Key,” which you will need to activate the pro plugin.
Next, go to your WordPress dashboard and select Plugins » Add New Plugin. Then, upload the WPForms plugin Zip file and select “Upload.”
After this, Activate the plugin like you would any other. If you face any issues, check out this article on how to install a plugin.
Once done, go to the new WPForms menu option in your WordPress dashboard and select “Settings.” Next, find the License Key text bar in the “General” tab and paste the activation code you copied earlier. To complete the WPForms Pro installation process, select “Verify Key.”
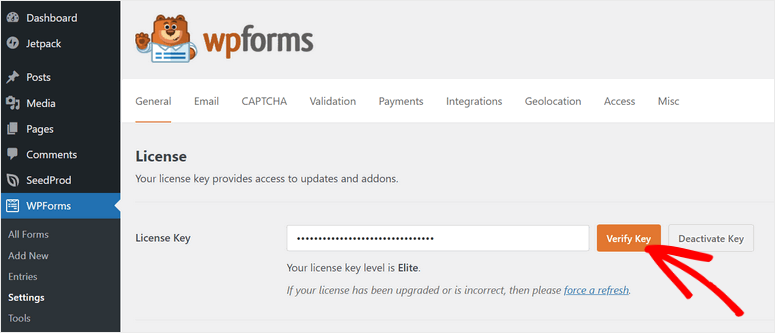
That’s it! You are ready to use WPForms to create booking forms.
- Tip: Please make sure that you open your Zapier dashboard and your WordPress backend in different tabs to make the next steps easier.
Step 3: Install The Zapier WPForms Addon
With WPForms ready to use, you will need to install the Zapier addon to allow you to connect the form builder with Google Calendar.
To do this, go to WPForms » Addons in your WordPress dashboard.
Here, you will find plenty of WPForms addons you can use. Use the search bar at the top of the page to make it easier to find the addon you are looking for. Once you find the Zapier addon, simply install and activate it.
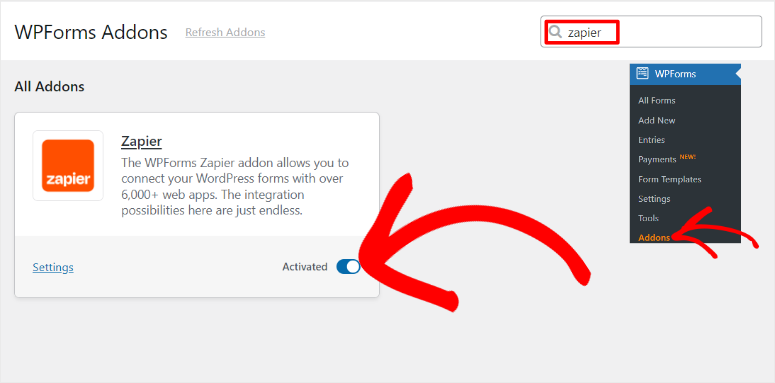
That’s it; you can now use the Zapier addon to connect WPForms with other tools like Google Calendar.
Step 4: Create a WPForms Event Form
To allow your users to submit events and set up appointments, you need to create an events form with WPForms.
To do this, head to WPForms » Add New in your WordPress dashboard to open the WPForms template page.
Here, you will see the 1,800+ WPForms templates you can start with. You get a search bar at the top and template categories on the left to help you quickly find what you want.
For this tutorial, we will use the Event Planner Form template because it includes all the relevant fields to help your users easily make a booking page.
To use this form, hover over it and select “Use Template” to open the drag and drop builder.
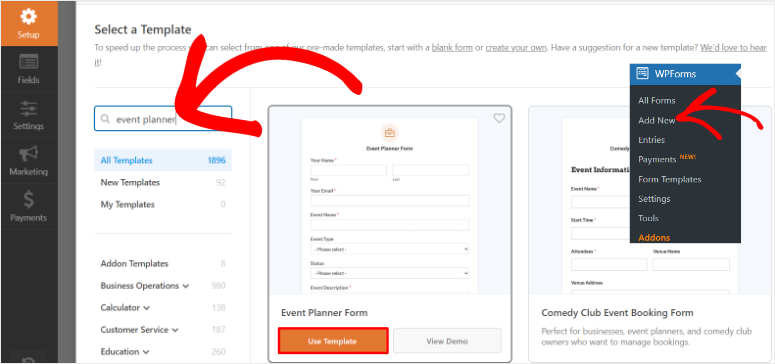
As mentioned, since you are using the Event Planner Form template, it already has all the necessary fields. You will see existing fields like Event Name, Event Type, Status, Event Description, Event Start and Stop Dates, Event Time, and more.
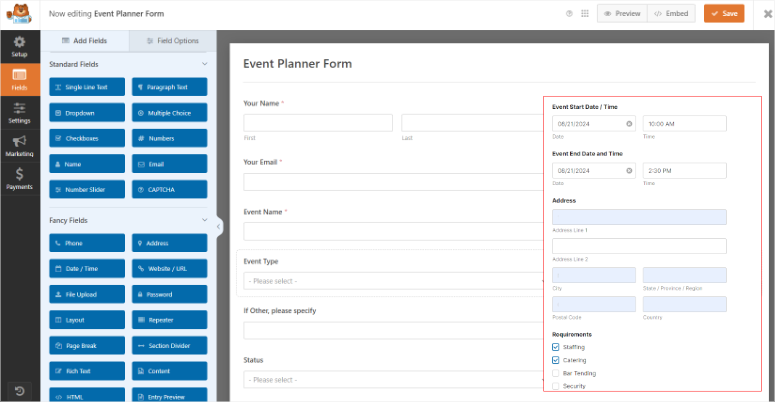
Now, you can use the visual builder to drag and drop fields from the left to the preview window on the right.
On top of this, you can move existing fields up and down the preview page to place them where you want. You can delete existing fields using the trash can icon when you select a field. To personalize your form even further, you can also edit the field names.
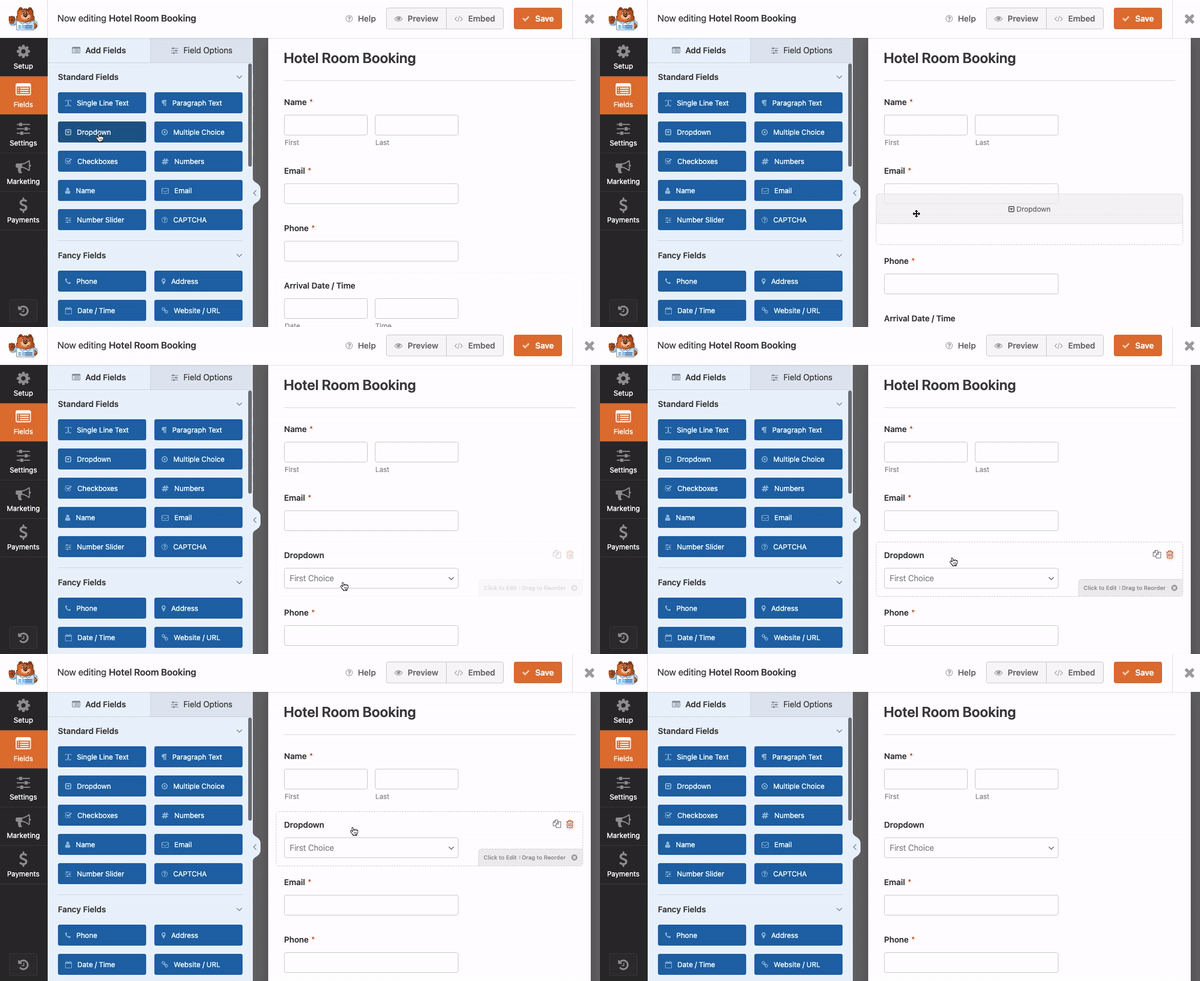
Now, to make a Zap with Zapier, you need at least one submission from your event form. This form submission will help you map the different WPForms fields to the Zap and also test the connection.
To create this test form submission, you first need to publish the event form you just created.
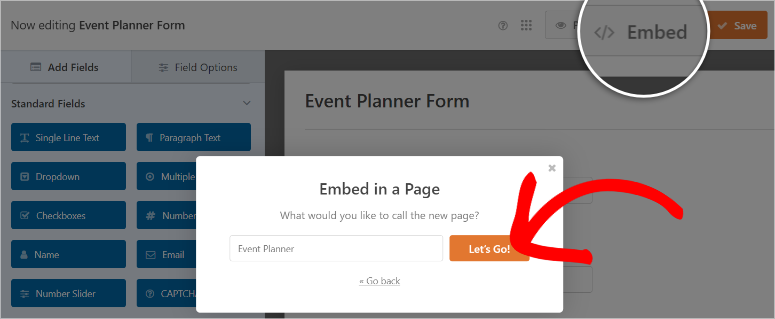
So, when happy with your form, select “Embed” at the top of the drag and drop builder page. On the popup that appears next, select Create New Page.
Then, on the following popup, name your page and select “Let’s Go.”
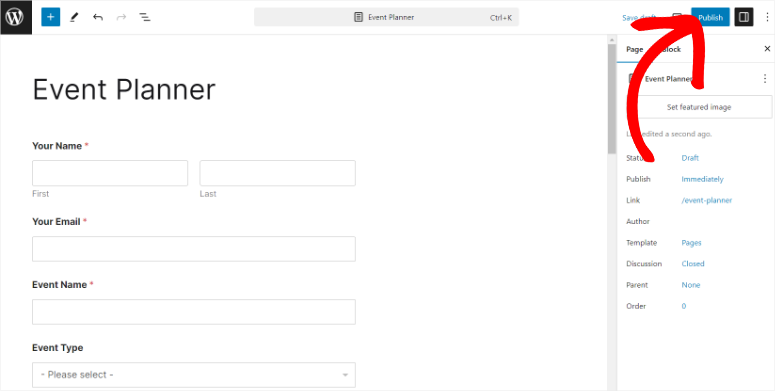
This will redirect you to the WordPress default page builder with your event form already placed. Once you review the form and confirm it has no errors, select Publish at the top of the page.
After this, visit the published page as a user and provide all the necessary information needed on the event form. Once you fill out the form, select “Submit.”
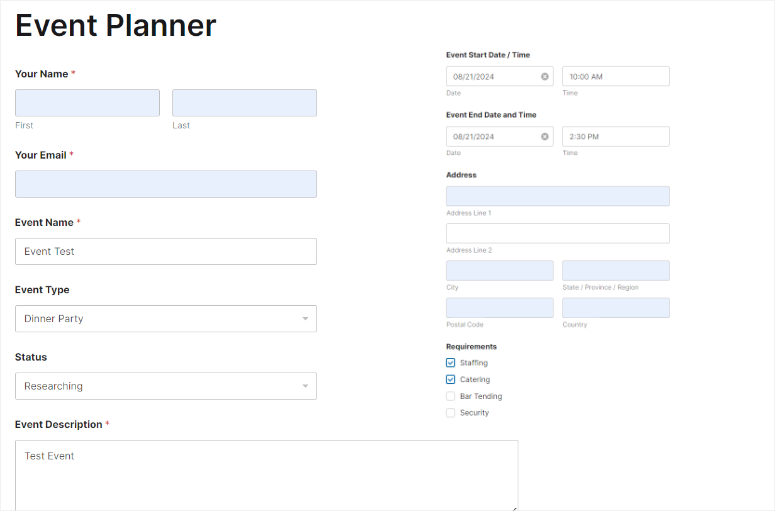
With that done, you will see a Thank You message sharing that the form was successfully submitted.

Great! You just created an event form with WPForms and made a demo submission to help with the Zapier connection.
Step 5: Create a WPForms Zap
Next, go to the tab on your browser where you opened your Zapier account and select “Create” from the top of the page. From the dropdown menu, select Zaps to open the Zapier drag and drop editor page.
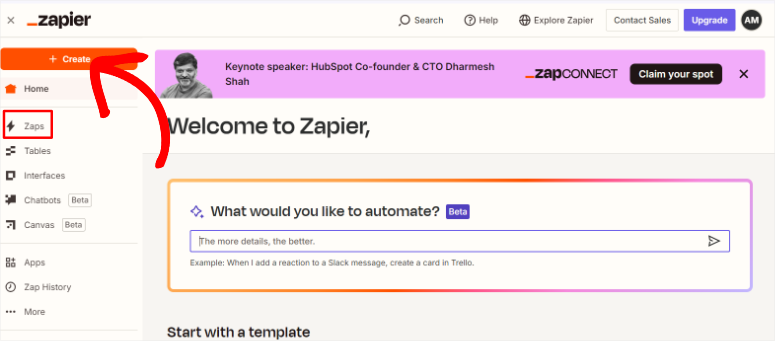
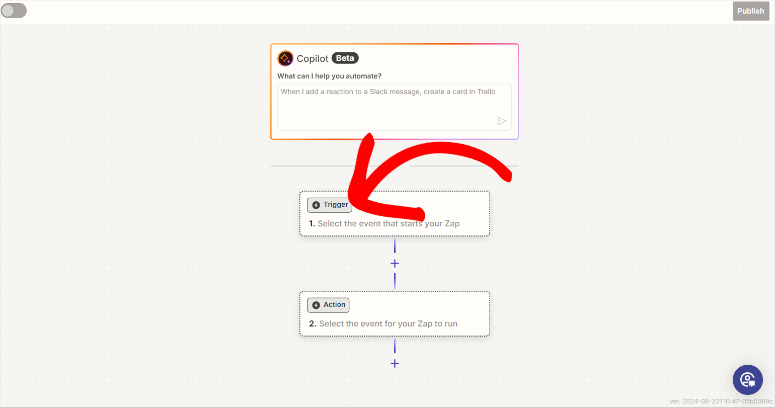
The Zapier editor page is designed with a workflow interface that allows you to see the progress of the Zap you are creating in real time. You also have the option to use Copilot to help you create the Zap code.
But for this tutorial, we will select the “Trigger” tab to open more features and start the Zap building process.
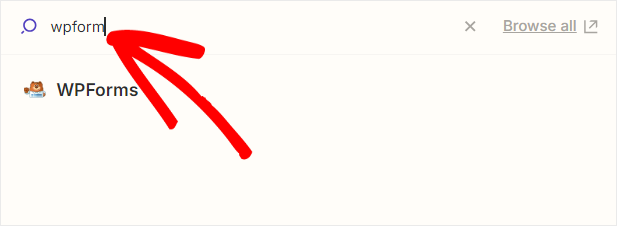
On the next popup, you will see the +7000 apps and tools you can use Zapier. Use the search bar to find “WPForms.” Next, select the form builder plugin and hit Continue to begin the connection process.
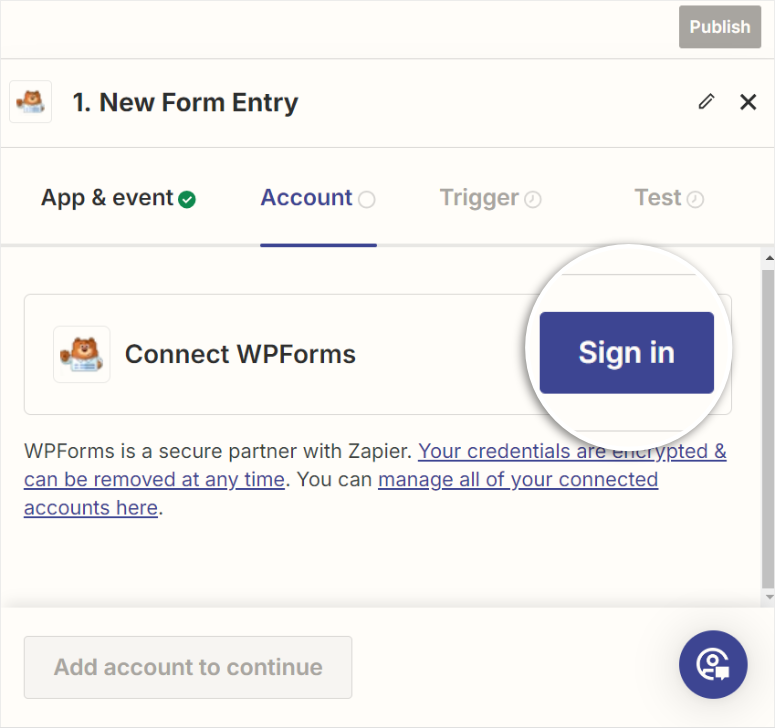
To integrate WPForms with Zapier, you need to log into your WPForms account in Zapier. So, on the next screen, select Sign In to open the connection window.
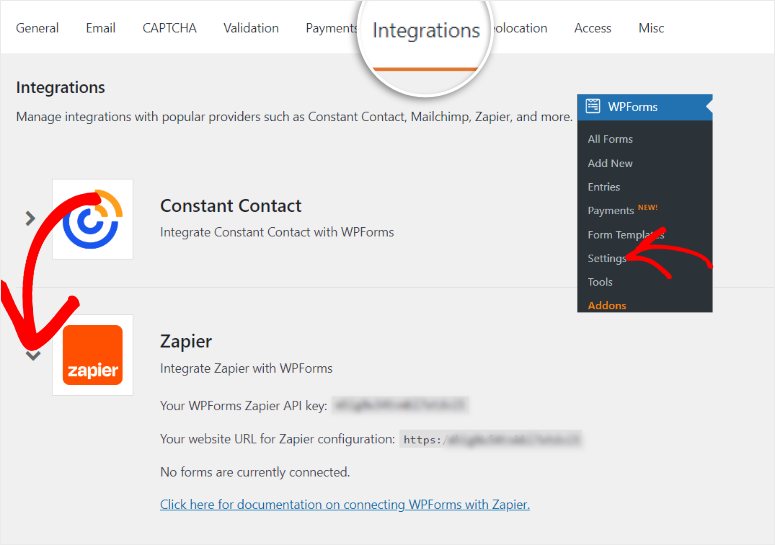
After this, move to the tab on your browser where you have opened your WordPress dashboard. Here, go to WPForms » Settings and navigate to the “Integrations” tab.
Once you locate the Zapier tab on this page, use the arrow to open the connection information. After this, copy the Zapier API and your Website URL, which you will use to integrate WPForms with Zapier.
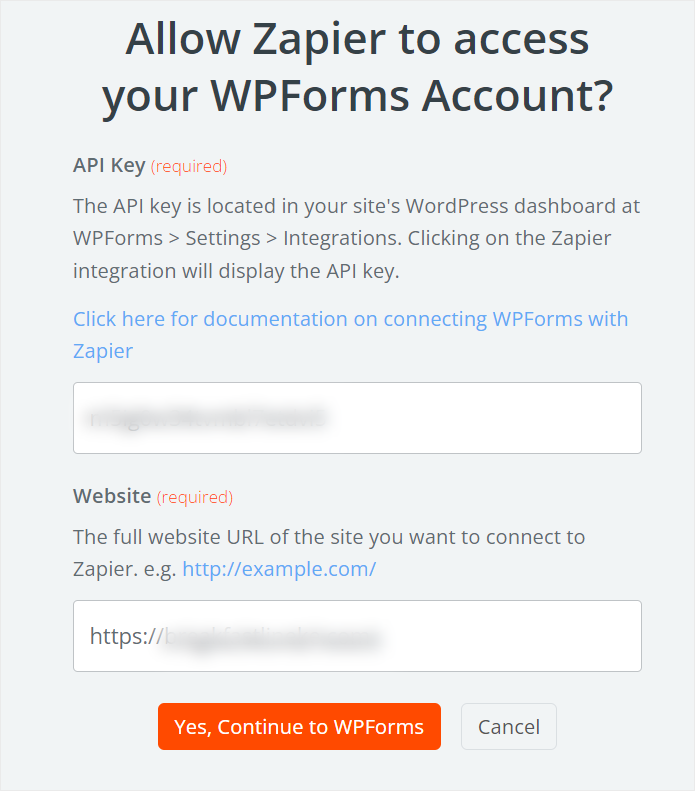
Then, move back to the Zapier connection window and paste this information in their relevant text boxes. Once done, simply hit “Yes, Continue to WPForms.”
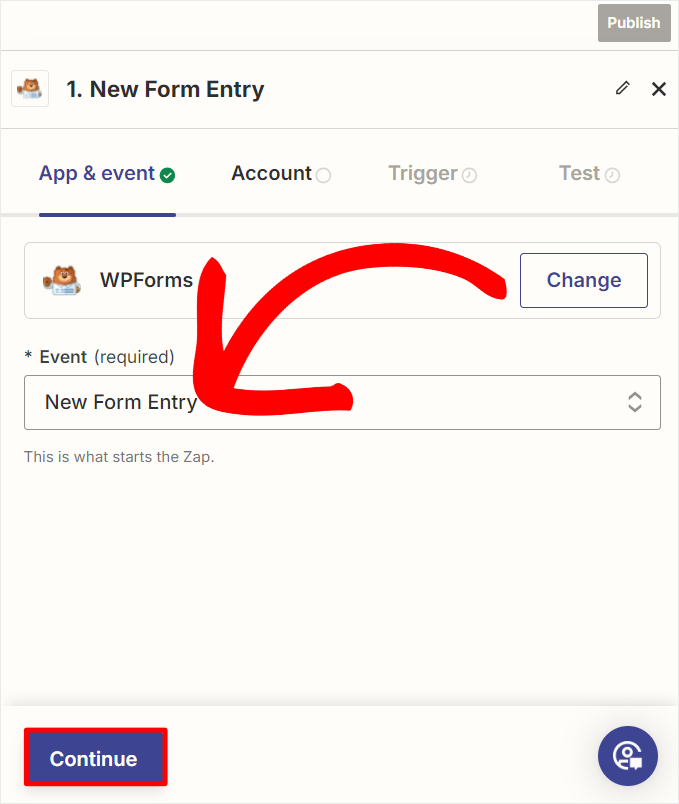
You will then be redirected back to the Zapier editor page, letting you know the connection was successful. Then, still, on this page, go to the Event dropdown menu and select “New Form Entry” from the list.
Once done, select “Continue” to go to the next page.
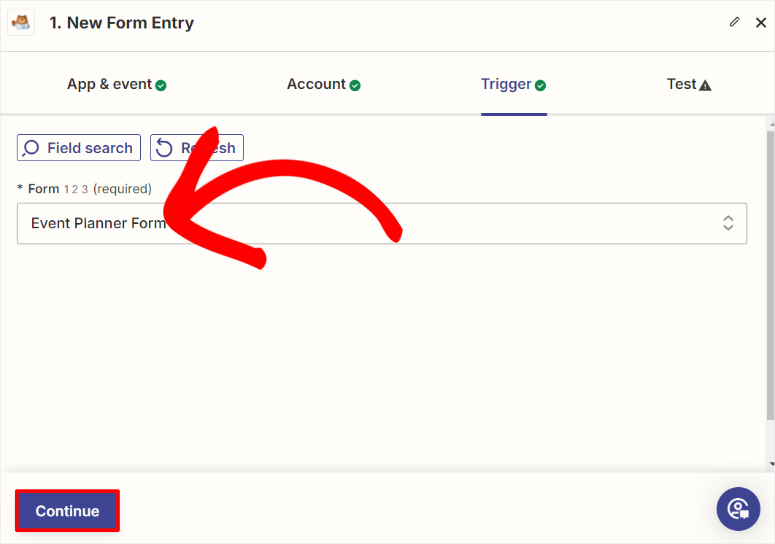
Once you are on the Trigger tab, go to the “Form” dropdown menu and select the form you just created using WPForms. For this tutorial, we will select “Event Planner Form” and then hit Continue to go to the next connection phase.
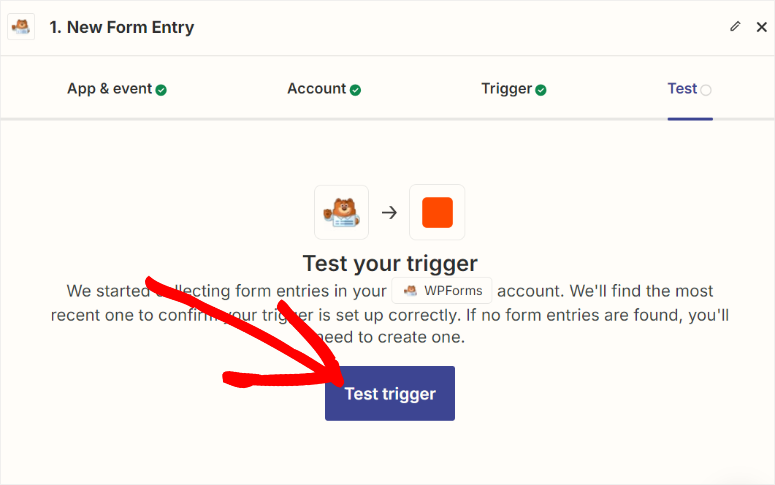
On the next page, select Test Trigger to see if the connection can successfully collect form data with Zapier.
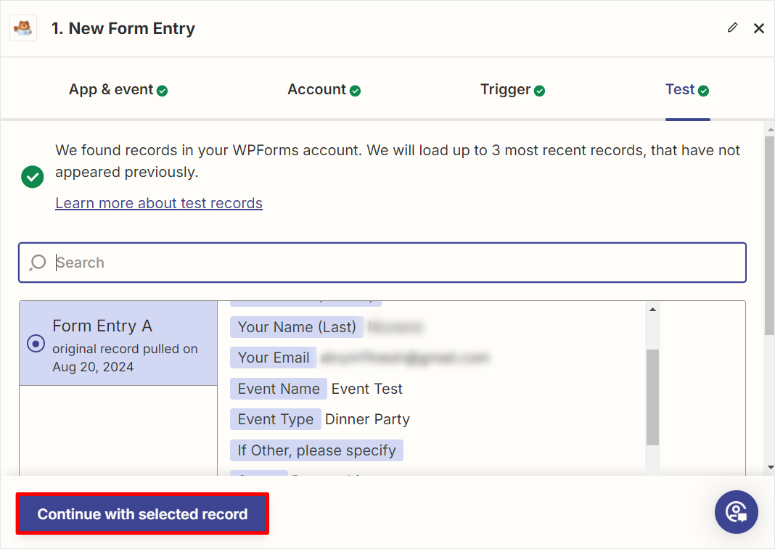
If the connection is successful, you should see how Zapier mapped out the different form fields on the next page. Finally, select Continue with Selected Records.
Well done! You can now connect WPForms with Zapier using a Zap. Next, let us connect WPForms with Google Calendar using this Zap.
After the steps above, Zapier will automatically take you to the next step of the flow called “Action.”
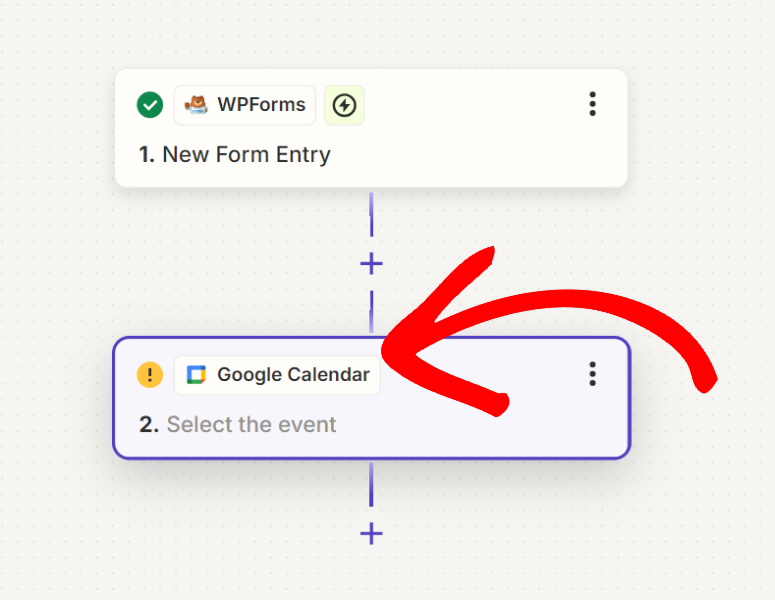
Then, on the Action screen, go to App Event and use the search bar to find Google Calendar.
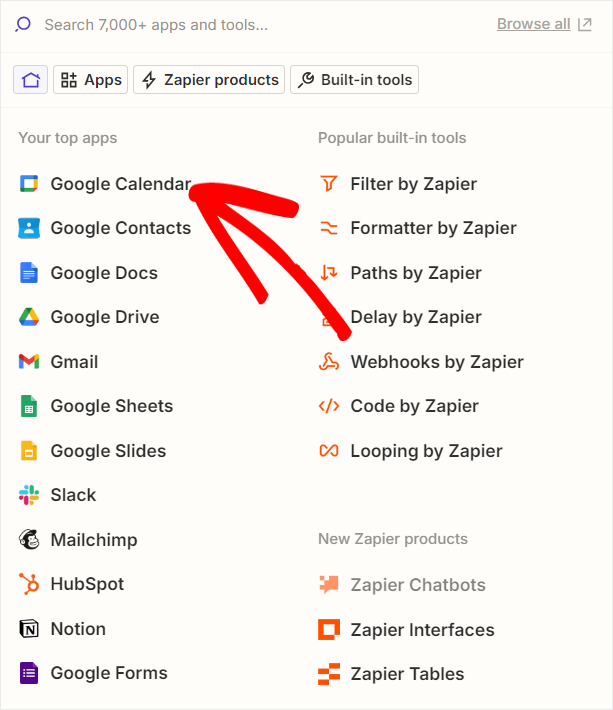
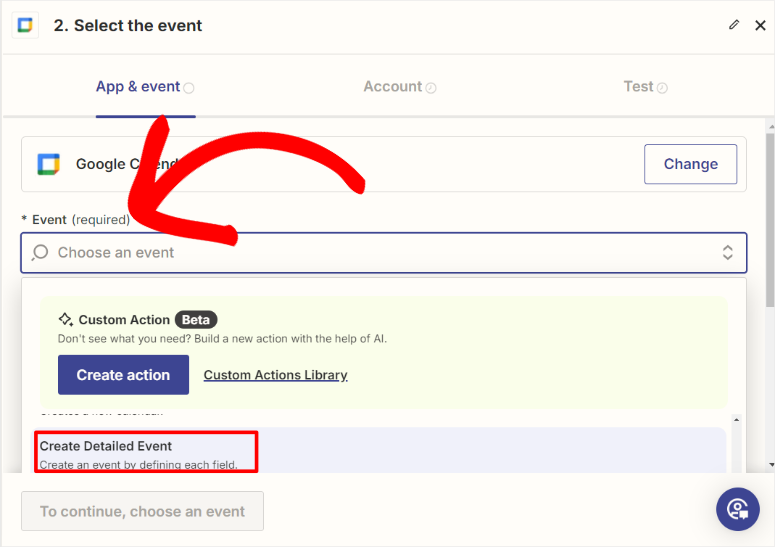
Once done, go to the Event dropdown and select “Create Detailed Event” to ensure the Google Calendar event displays all the information.
On the next page, hit Sign In to open the Google Sign-in page. Here, select the Google Account you want to use to track your appointments and events and hit “Next.”
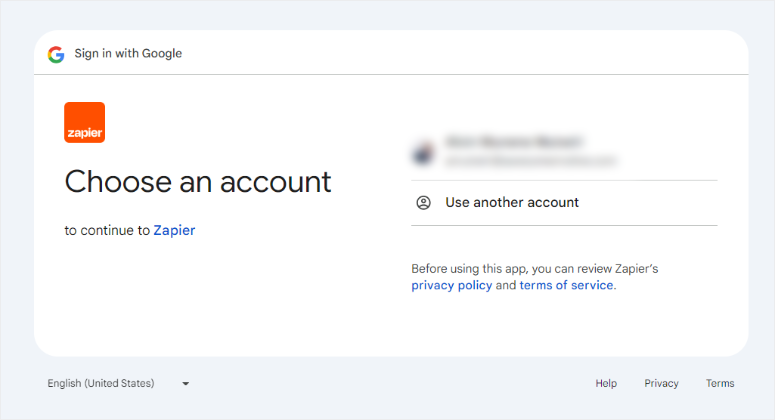
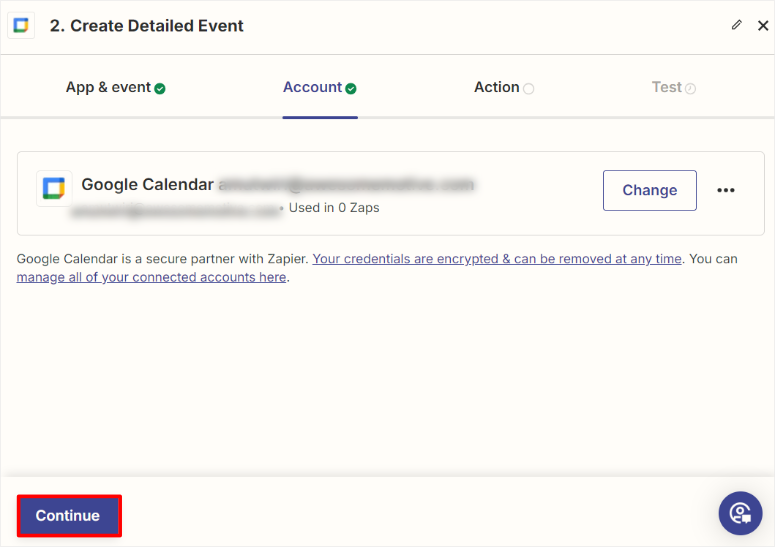
After this, grant Zapier permissions by selecting “Allow.” If the connection is successful, you will be redirected back to the Zapier builder page, where you will choose Continue.
On the next screen, you will carry out form mapping between WPForms and Google Calendar. Doing so ensures that the fields filled out by the users on your form are displayed as part of the event’s details.
First, go to the Calendar dropdown and select the calendar you want the events added to. After this, use the dropdown menus under Description, Location, Start Date & Time, End Date & Time to map them to their corresponding WPForms fields.
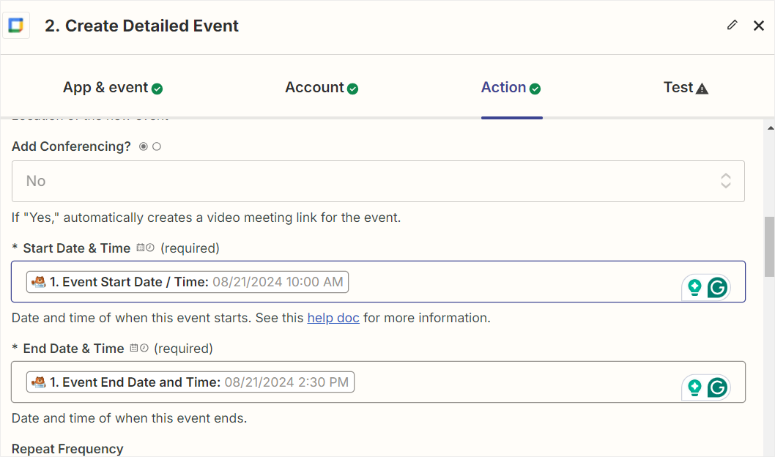
Using the same process, you can then map out any other fields relevant to your particular form.
Once you are happy with the form mapping, hit Continue to go to the next page.
Here, you will see how each WPForms field is mapped on Google Calendar. On this page, select Test Step to see if there are any errors.
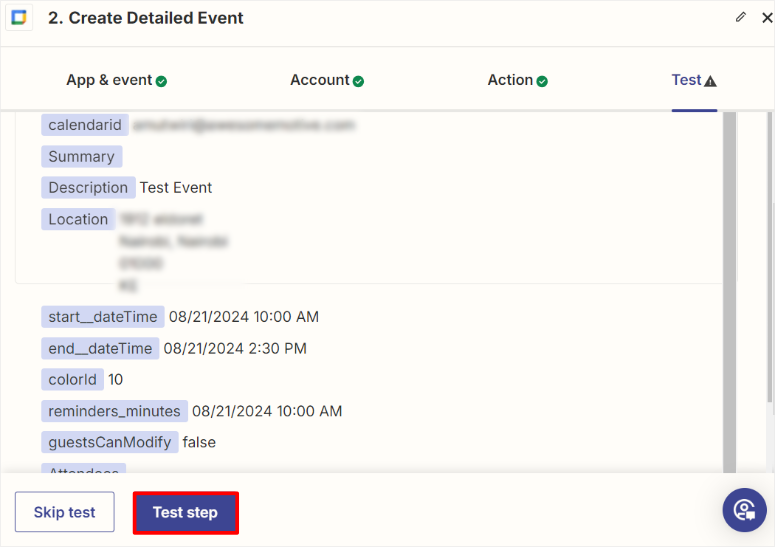
Finally, select Publish, and that’s it! You have easily connected WPForms and Google Calendar through Zapier.
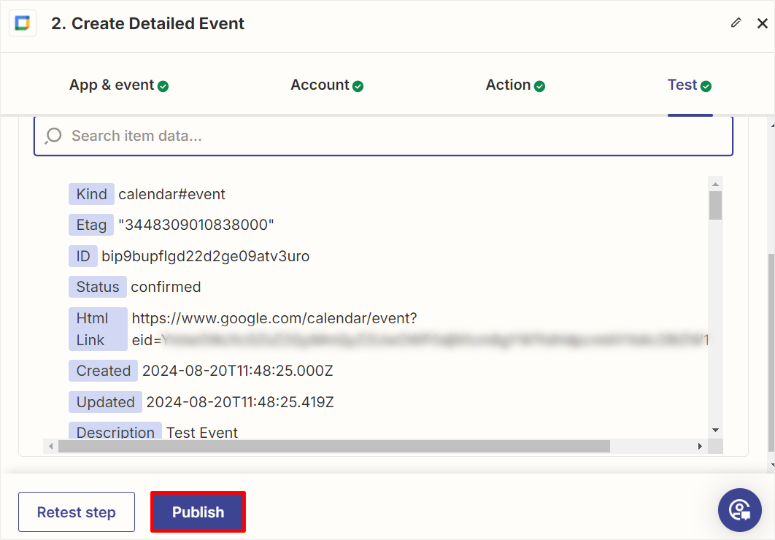
You can now receive all the events and appointments made through your WPForms events form automatically in your Google Calendar.

Now, when you select the event on Google Calendar, it expands, displaying all the information provided by the user who created it.
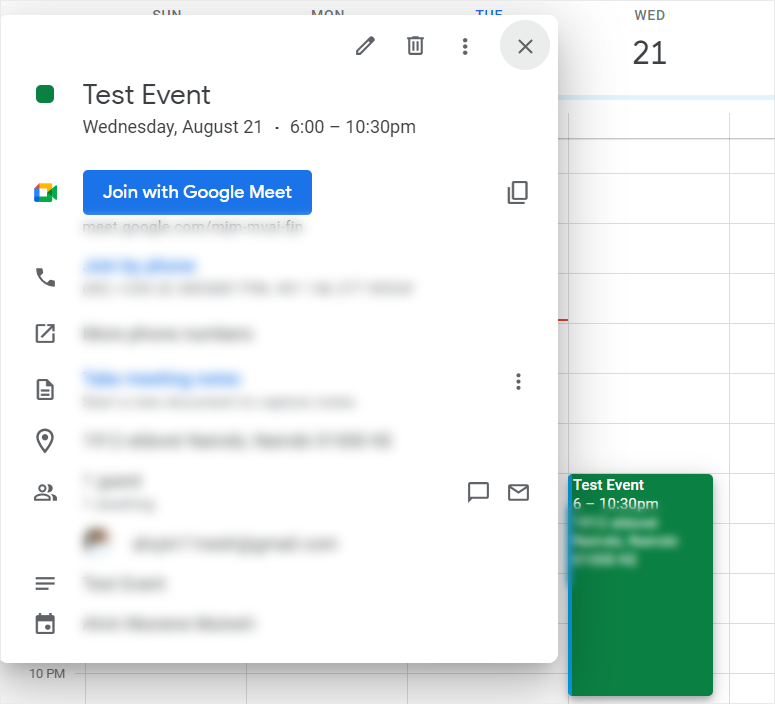
Congratulations! You now do not need to add any events or appointments yourself. All you need to do is set up an appointment form and let your users book themselves. If you have any more questions, check out the FAQs below.
FAQs: How to Add Appointments to Google Calendar From WPForms
Can I add a booking form in WordPress?
Yes, you can easily add a booking form in WordPress using WPForms. WPForms is a beginner-friendly drag-and-drop form builder that offers pre-made templates like the Appointment Booking Form. You can customize any form template to your liking. Then, embed it on any website page, allowing users to schedule appointments directly through your site. WPForms also supports features like payment integration, conditional logic, and email notifications to streamline the booking process.
Does a user need to log in to make an appointment?
No, users do not need to log in to make an appointment using most WordPress booking forms. For example, WPForms allows users to book appointments by simply filling out the form. But, if you want to ensure users provide all the relevant information before submitting the form, WPForms allows you to make specific form fields compulsory. You can also use it to create login and registration pages using the drag and drop builder.
Can I use Zapier with WPForms Lite?
No, Zapier cannot be used with WPForms Lite. To connect WPForms to other apps like Google Calendar via Zapier, you need the Pro version of WPForms or higher. But the good news is with WPForms Lite, you can create basic forms with the drag and drop builder. You can create forms like contact forms, suggestion forms, and newsletter sign-up forms.
Can I connect Google Calendar to WordPress without Zapier?
Yes, you can connect Google Calendar to WordPress without Zapier using the Sugar Calendar plugin. Sugar Calendar integrates directly with Google Calendar and allows you to sync events and appointments between your WordPress site and your calendar. This plugin is easy to set up and offers real-time syncing for seamless event management.
We hope you enjoyed learning how to sync your Google Calendar to WPForms using Zapier. Now if you want to track your forms better, check out this article on How to Set Up WordPress Form Tracking in Google Analytics.
On top of that, here are other articles you may be interested in reading.
- How to Let Users Submit Calendar Events in WordPress
- 10 Best User Login and Registration Plugins for WordPress
- 13 Best Booking and Appointment WordPress Plugins
The first tutorial teaches you how to let users submit calendar events to your WordPress website. The next post lists the 10 best user login and registration plugins. While the last article talks about the 13 best booking and appointment plugins for WordPress.

Comments Leave a Reply