Do you want to create a sense of excitement with a countdown timer on your site?
Whether you’re planning a product launch, promoting an event, or running a limited-time offer, a countdown timer is a powerful tool.
In this article, we’ll guide you through the process of adding a countdown timer to your WordPress website, step by step.
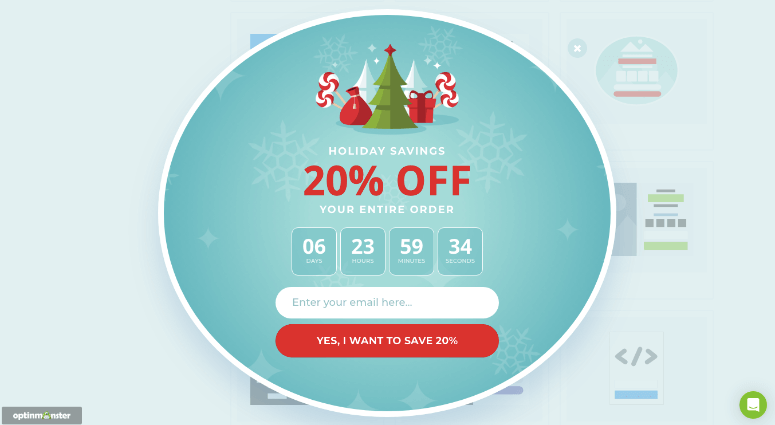
To give you an idea of the kind of campaigns we’ll help you create, here’s a cool welcome mat campaign with a limited-time discount offer. We created this with OptinMonster:
Before we get to the steps, let’s take a look at when you should use a timer on your site.
When to Use a Countdown Timer
There are many cases when you might want to add a countdown timer to your site. But it works best in the following instances.
- on a coming soon page before launching your website
- to let visitors know when the website will be available again if it’s down for maintenance.
- when hosting a webinar, event, or conference
- before introducing a new product or service
- upcoming and flash sale events
- reaching a milestone
- celebrating an upcoming event
That said, let’s dive into the tutorial.
Adding Countdown Timer to WordPress
The best way to add a countdown timer in WordPress is by using a Countdown Timer plugin.
We’ll show you how to use 2 of the most popular ones:
We chose these 2 plugins because their easy to use. We’ve used them for years on our own sites. There’s no coding involved in these countdown builders so they are perfect for beginners.
They are also compatible with all popular WordPress themes, and they are built on best practices. That means they won’t slow down your site which is a boost for SEO.
You can use both plugins on your blog, small business website, and even online stores.
Method 1: Adding a Countdown Timer With OptinMonster
This method is helpful if you want to display your countdown timer in the form of a widget on your website. With OptinMonster, adding a countdown timer widget is super easy.

The best thing about using OptinMonster for adding a countdown timer is that it’s easy to set up and doesn’t require coding or even shortcodes.
It’s one of the most powerful lead generation apps that helps you achieve the conversion goals of your website quickly and easily.
With this app, you can create some of the most advanced popup campaigns and display them accurately to your targeted audience.
OptinMonster works seamlessly with WordPress and WooCommerce. It also works on other eCommerce platforms like BigCommerce, Shopify, and even HTML sites.
Read our review on OptinMonster and learn more about it.
Step 1: Connecting the OptinMonster App With the Plugin
To get started, create your account with OptinMonster and then install and activate the OptinMonster plugin on your website.
This plugin acts as a connector between your WordPress site and the app. Go ahead and install the free OptinMonster plugin on your site.
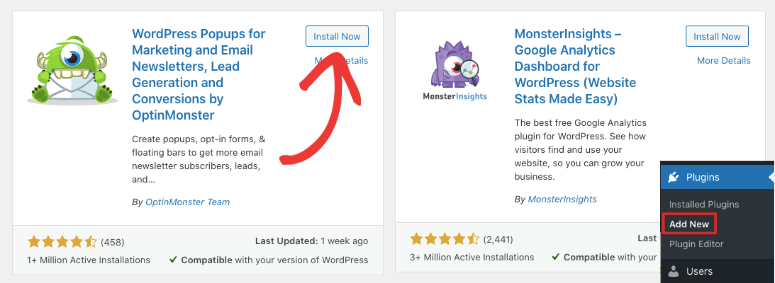
Once activated, you’ll see an option to connect to an existing account.

Make sure you’re signed into your OptinMonster account in another tab in the same browser window. This is because OptinMonster will auto-detect your account and sync it to your website.
You’ll now be redirected to a new window where you’ll see an option to Connect with WordPress.
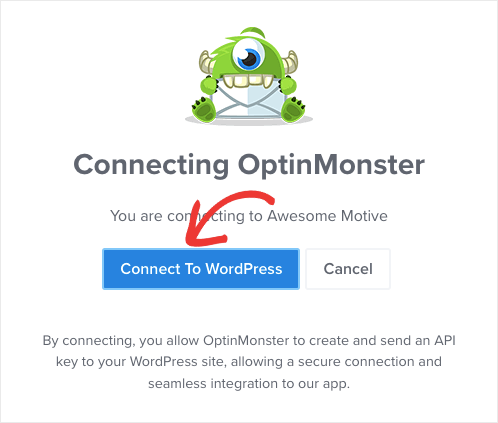
Click on this option and your app will automatically connect itself with your WordPress dashboard.
Step 2: Creating Your Countdown Timer With OptinMonster
It’s now time for you to start creating your countdown timer widget. You can create a new campaign right inside your WordPress dashboard. You can also get started inside your OptinMonster account under the Campaigns tab.
All you have to do here is click on Create new campaign button.
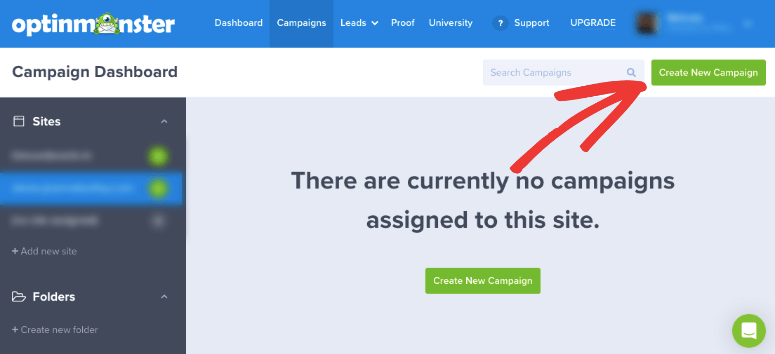
This will open up a new page where you can choose from 3 options:
- Playbooks: Premade and preconfigured campaigns that are designed based on successful campaigns of other brands
- Templates: Customizable designs
- Canvas: A blank template to start from scratch

We’ll choose a template for now. Next, you can choose your campaign type and then pick a template of your choice. Let’s select the Floating Bar campaign here. You can choose any campaign you want, the steps will remain the same.
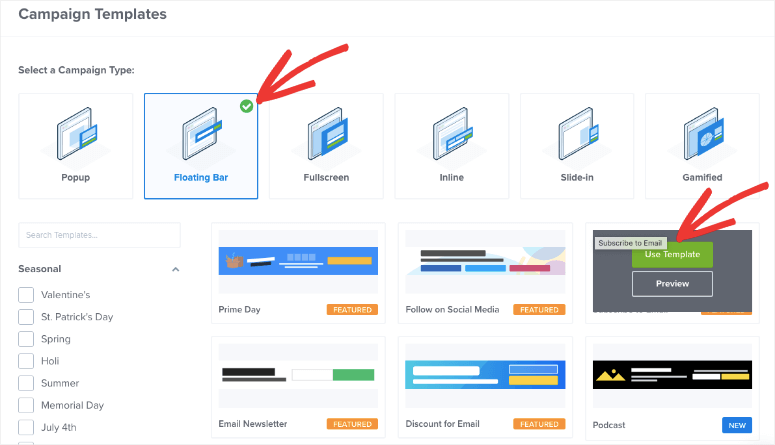
Now there are quite a few templates that come with the countdown timer already added in. You can also pick any template and then add a countdown timer to it.
In the next step, you’ll be asked to name your campaign. You can also choose the website where you want to display this countdown timer.
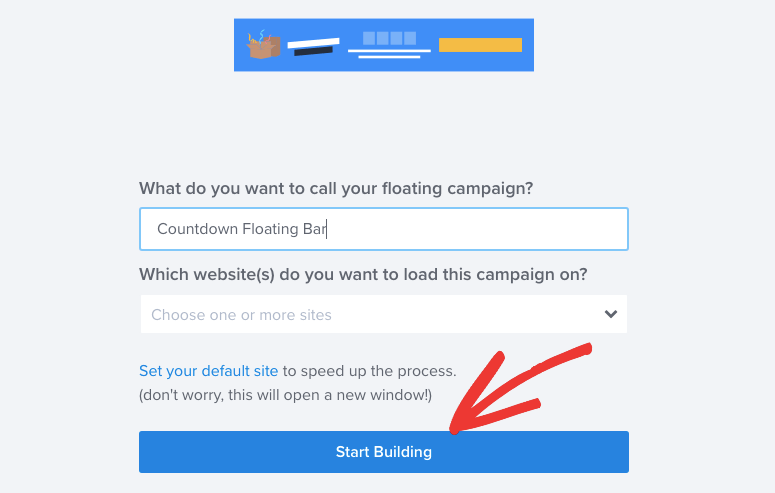
Once done, click on the Start Building tab. This will launch the drag and drop builder where you can design your campaign.
You’ll see a preview of your campaign along with a left taskbar with new blocks that you can add.
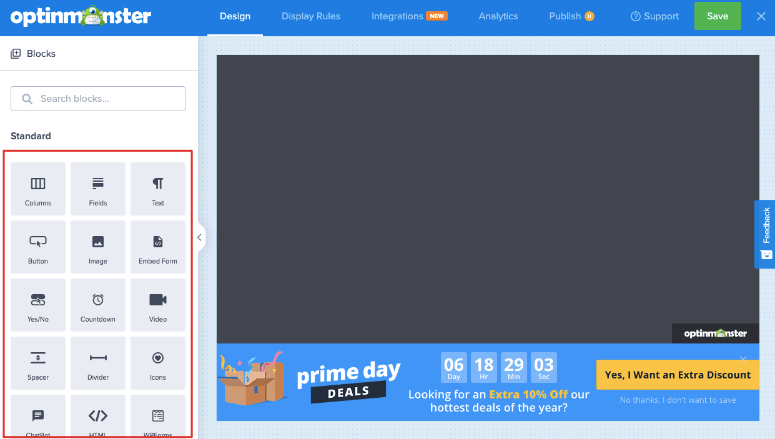
If your template doesn’t have the countdown timer added, simply select the Countdown timer block and drag it where you want in your design.
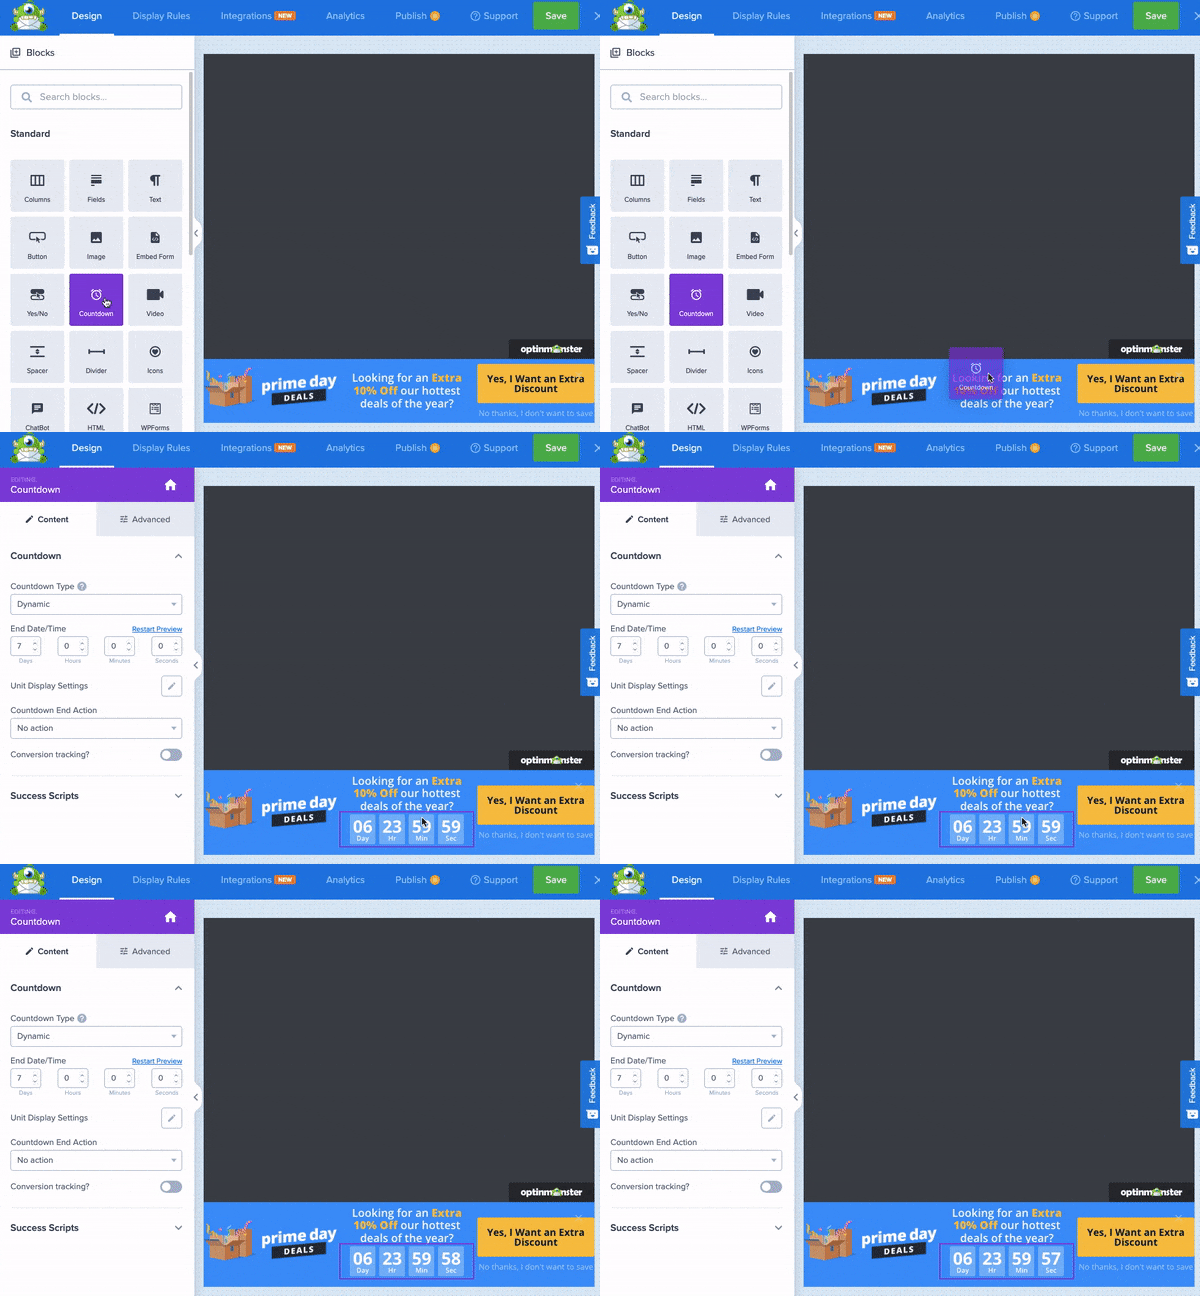
Now you can click on any element and start customizing it including your texts, fonts, color, etc. You can also change the position of the floating bar to the top.
To edit the countdown, simply click on the timer on your design panel and you’ll see several editable options in your editing panel on the left.
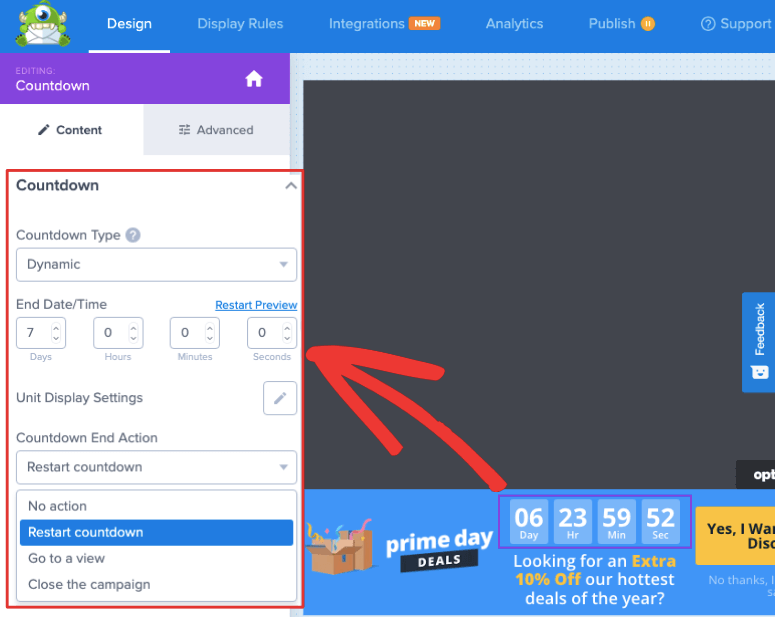
Here you can work on how you want your countdown timer to appear. You can select the time when you want the countdown to start and end.
You can choose 2 types of countdowns:
- Static timer to run for a specific time period.
- Dynamic counter to run your campaign for a set number of days, hours, and so on.
Want to make your campaign evergreen? You can choose to restart the countdown when the timer expires.
To make it easier for your users to understand the beginning and end of your countdown globally you can add the visitor’s local time too. You can also add the unit display type like days, hours, minutes, seconds, etc.
If you’re not happy with a certain element, just use the delete option to remove it.
Step 3: Add Targeting Rules and Email Integrations
OptinMonster lets you control when and where the campaign appears. Under the Display Rules tab, you can select what rules you want to add.
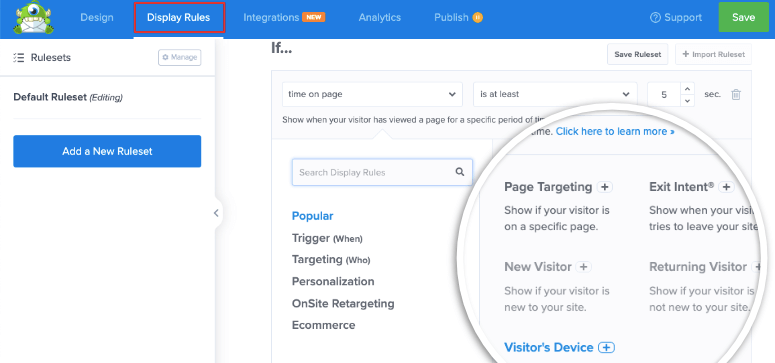
Some popular rules include on exit, on scroll, on a specific page, new visitor, visitor’s device, and more.
Want to display the counter in a specific location? OptinMonster lets you target a physical location such as a country, city, or area.
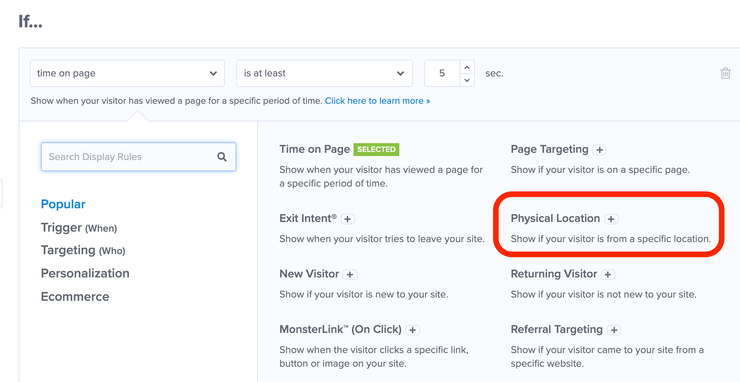
With so many options, you can run localized sales or event campaigns. You can also choose to display it only to an audience coming in from a referral source.
Next, if you want to sync your campaign to an email service provider, you can use the Integration tab. All you have to do is add a new integration, choose your provider, and add the necessary account details
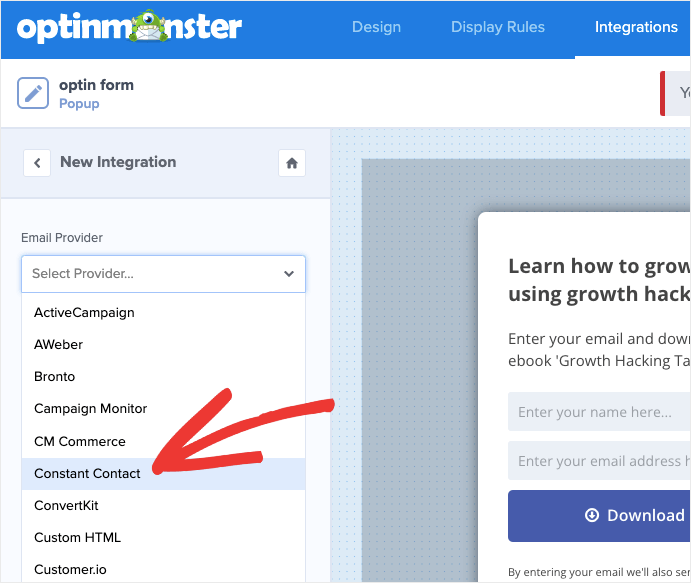
With that, you’re now ready to publish your timed campaign on your WordPress site.
Step 4: Publishing Your Countdown Timer
Once done with all the settings click on the Save button.
Next, go to the Publish tab. Here you can preview your campaign and change the status to Publish to make the campaign go live.
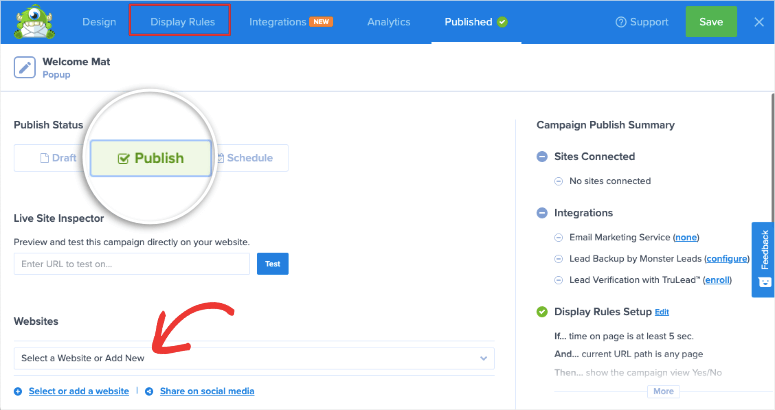
Now since you’re using the WordPress plugin, go to your WordPress dashboard. Head to OptinMonster » Campaigns tab and make sure your campaign is set to Publish here too.
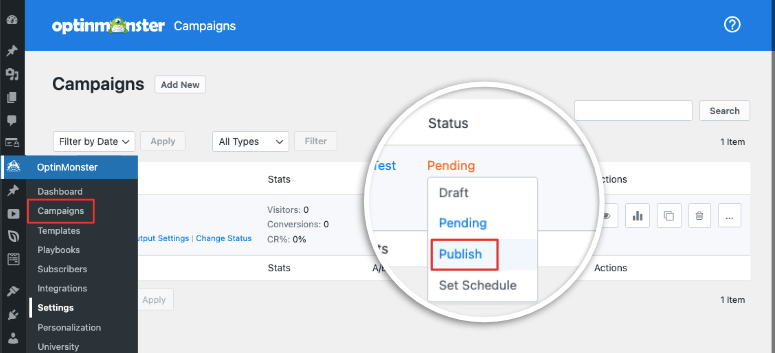
And that’s it. Your campaign should be live now on your WordPress website. You can now visit your site and see the countdown timer in action.
Next, we’ll show you how to add a countdown timer to your pages and posts in WordPress.
Method 2: Adding a Countdown Timer With SeedProd
SeedProd lets you add a countdown timer anywhere you want on your site including landing pages and posts.
However, this method is useful if you’re launching a new site or your already established site is under maintenance and you want to let your visitors know that it will be live soon.
SeedProd is the best website and landing page builder for WordPress that comes with easy coming soon and maintenance mode functionality. The plugin comes with a free version and pro plan.

It lets you add several elements to your landing page, including a countdown timer.
Let’s learn how to add a countdown timer with SeedProd in a step-by-step manner.
Step 1: Installing SeedProd
The first step is to install the SeedProd plugin on your WordPress site.
Once the plugin is installed and activated, you’ll have to verify your license key.
Your key is available in your SeedProd account created at the time of purchasing the product.
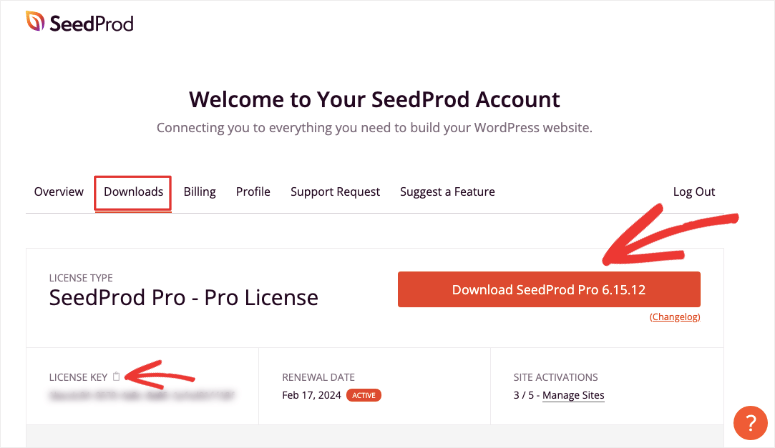
Paste the key in the blank field and click on the Verify Key box to validate it.
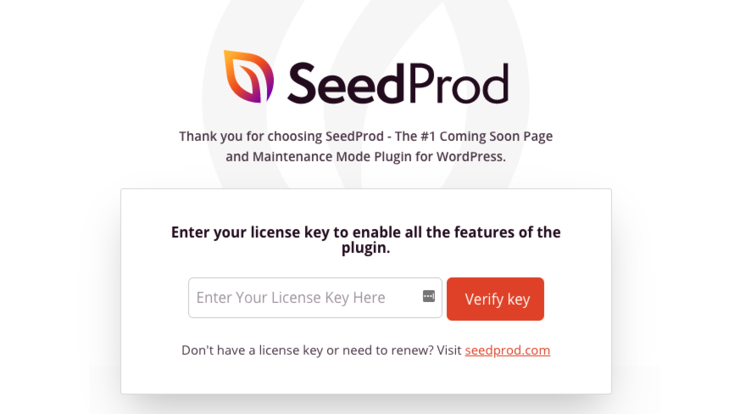
Once your license key is validated, scroll further down the page and click on the Create Your First Page button.
This will take you to the SeedProd dashboard. Here you can choose which type of page you want to create a countdown timer on. There are 4 different options:
- Coming soon mode: Create a coming soon page to build excitement for your website launch.
- Maintenance mode: Put your website into maintenance mode while you work on it behind the scenes.
- Login page: Create a custom login page for your website.
- 404 page: Replace the default 404 page with a custom 404 page.
Below this, you can scroll further down the screen to create a regular landing page.
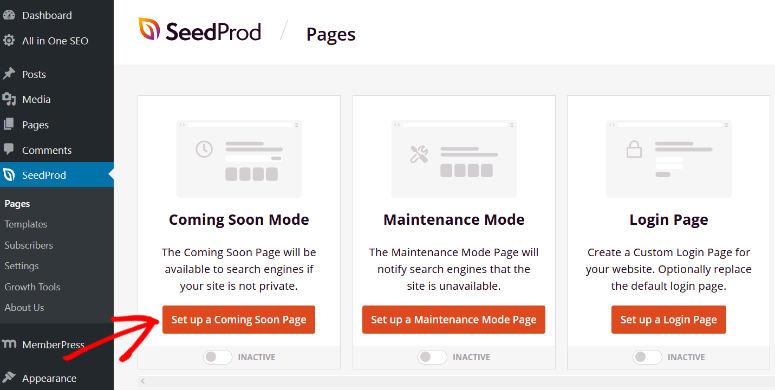
For this tutorial, we’ll create a coming soon page with a countdown timer. To get started, click on the Set up a Coming Soon Page button.
Step 2: Creating Your Countdown Timer
First, you need to choose a coming soon page template. SeedProd offers over 200+ professionally-designed templates to choose from, so go ahead and pick the template you like best.

When you’re done, you’ll be directed to the page builder where you can start creating your countdown timer.
Once you’re on the page builder in SeedProd, you’ll see all the Block options for customizing your page on your left and a live preview of your page on your right.
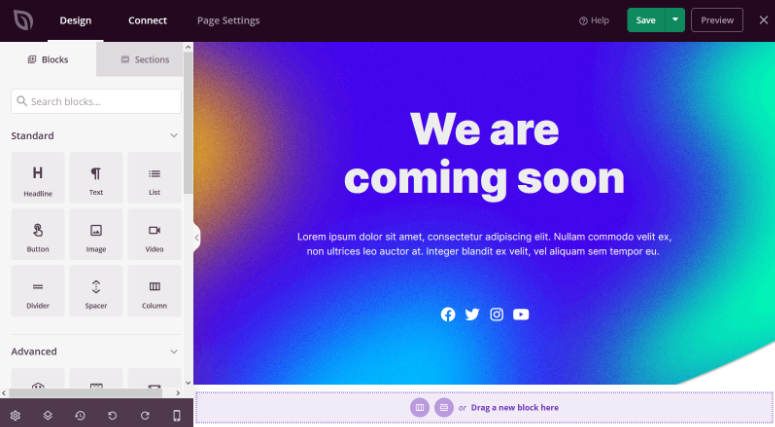
To add a countdown timer, go to the Blocks on the right, and under the Advanced section, drag the countdown timer and drop it onto your page.
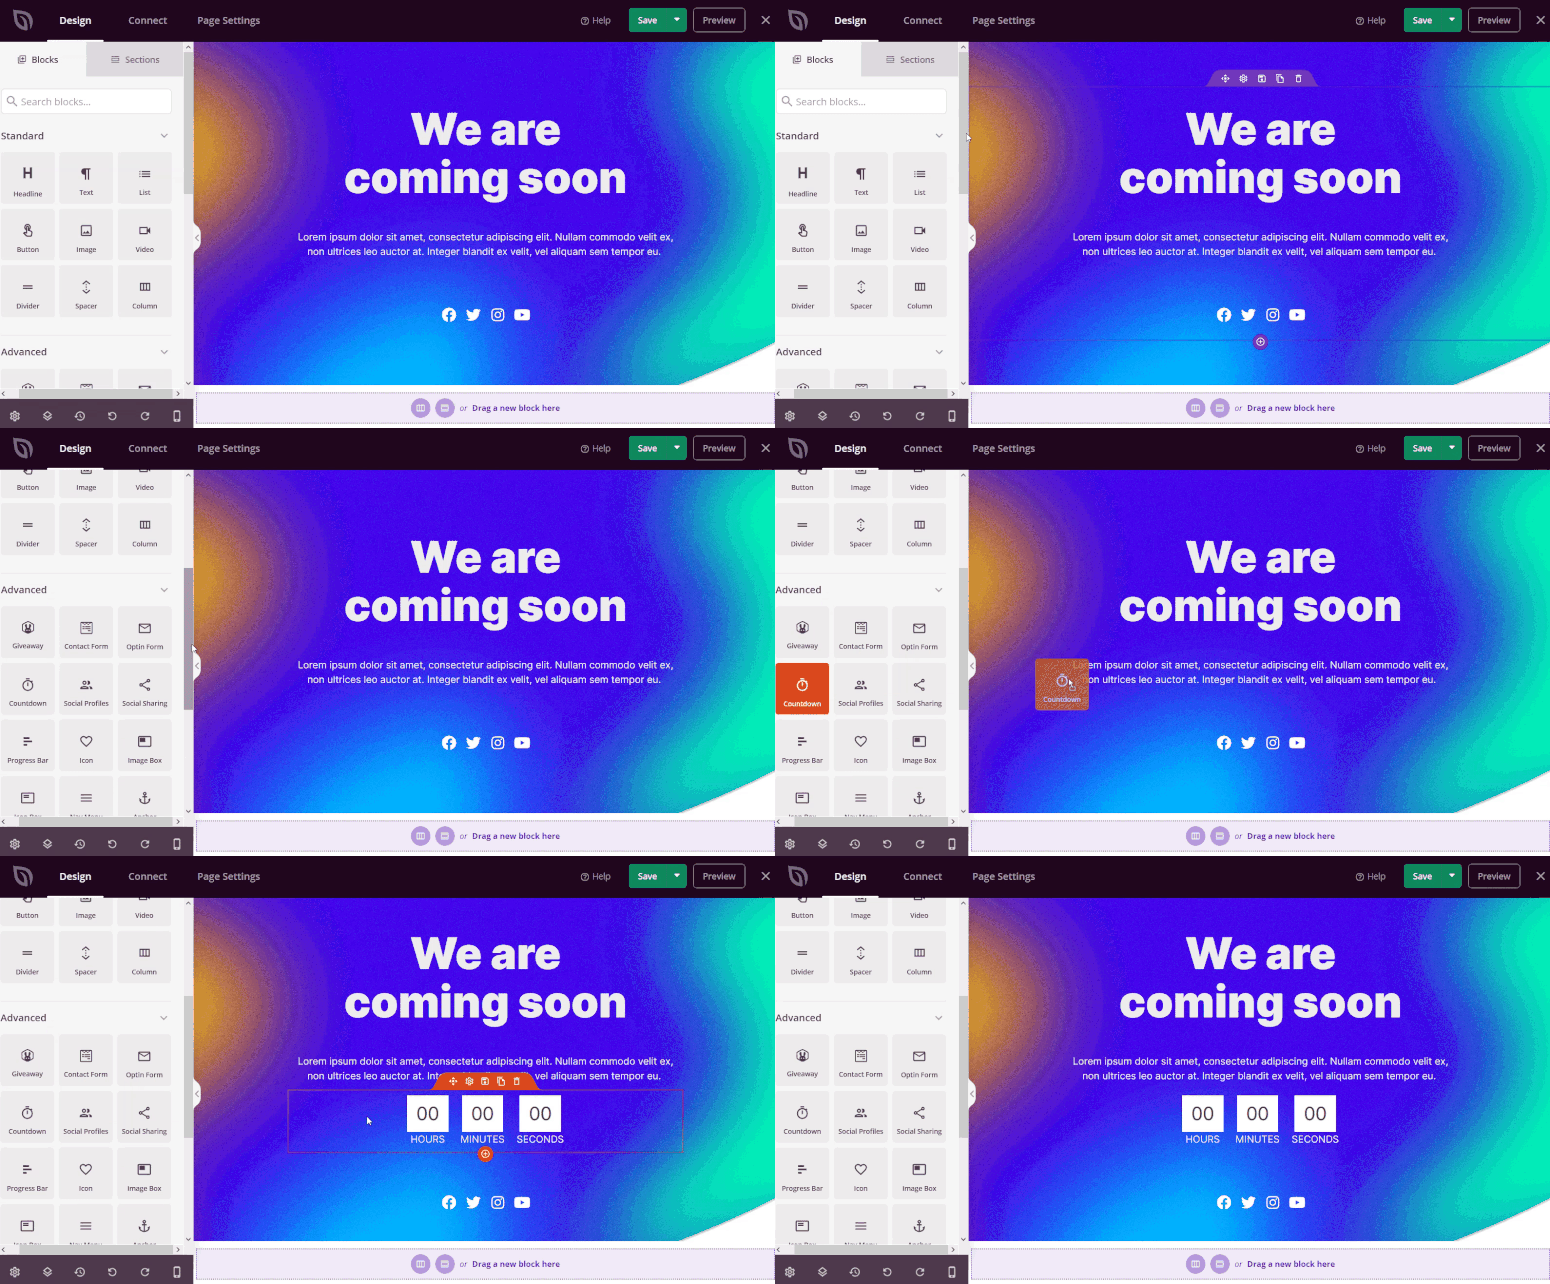
When you click on the countdown block in your design, you’ll get customization options on the left. You can then select the countdown timezone, select an end date and time, choose the style of your countdown, and more.
Based on your end date, the timer will automatically disappear from your site on the specified date.
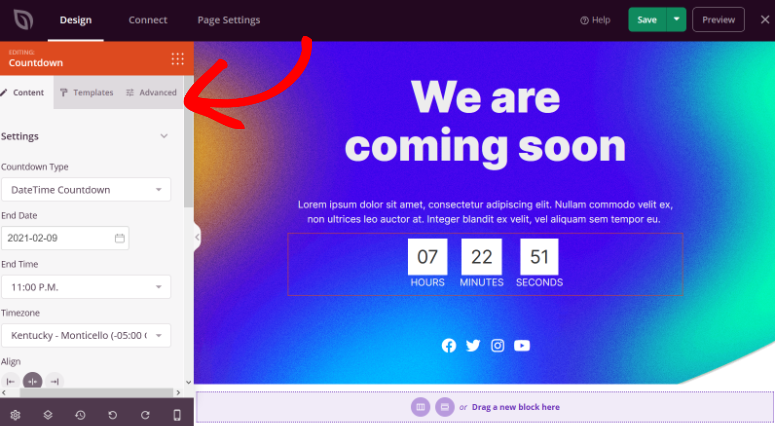
If you want, you can add more content to your page using SeedProd’s ready-made landing page blocks. You can add contact forms, social profiles, video, email optin forms, progress bars, and much more.
To customize your page even more, you can hit the Global Settings button in the bottom left corner of the screen.
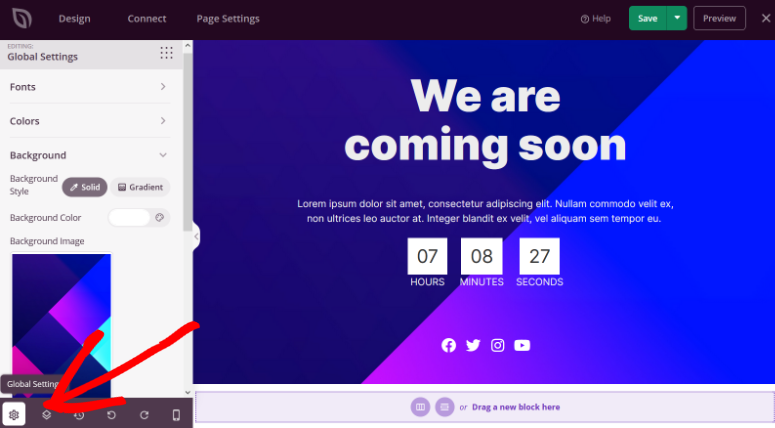
Here you can change the background image, choose your page colors, select a new font, and so on.
Once you’re happy with how your page and countdown timer looks, hit the Save button.
Step 3: Publishing Your Countdown Timer
Now that the coming soon page is ready with the countdown timer, it’s time for you to publish it on your website. Click the dropdown arrow beside the Save button and click the Publish button.
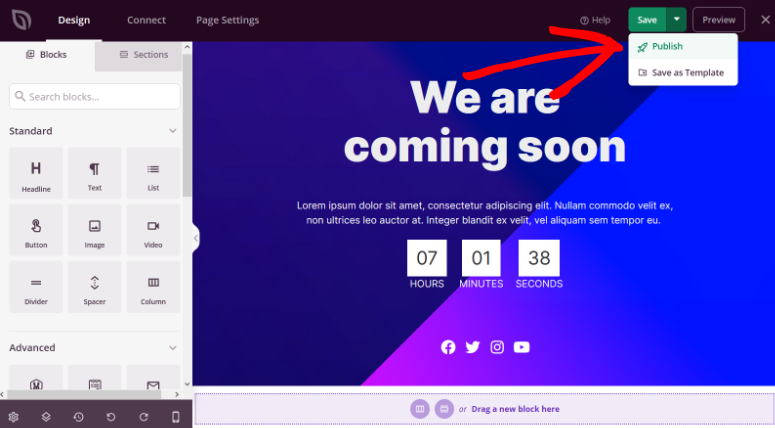
You’ll then see a success message that your page is published and you can click the See Live Page button to view how it looks.

Here’s how your page will appear to your visitors:
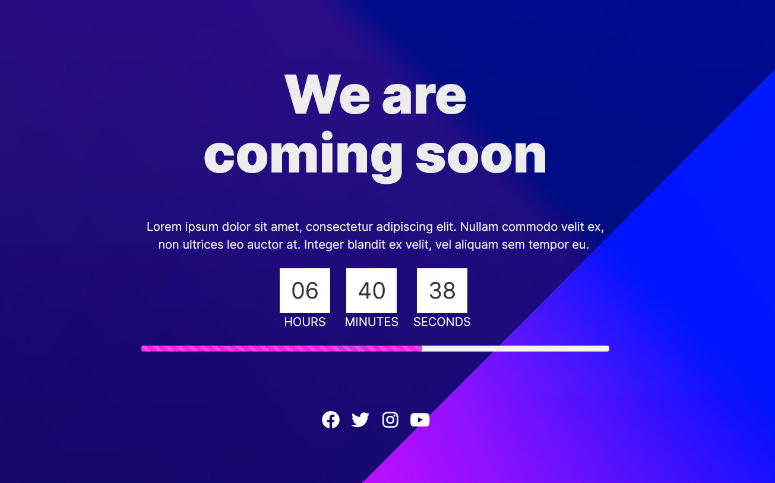
Lastly, activate the page by going to SeedProd » Pages from your WordPress admin area. Under the Coming Soon Mode section, toggle the button from Inactive to Active.
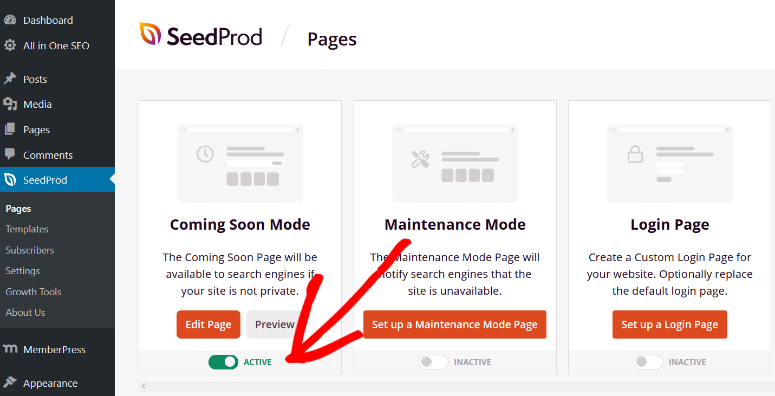
Now when users visit your website, they’ll see the coming soon page with the countdown timer page you just created.
If you want to turn off coming soon mode, use the same button here to deactivate it.
That’s it! Now that you know how to use SeedProd, you can add countdown timers to any landing page as well.
We must also mention that Thrive Architect is another great option to add countdown timers to any page or post. You get tons of template timers to choose from:
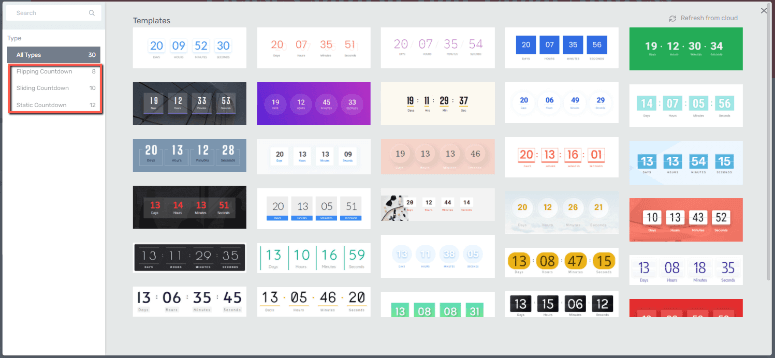
It lets you add animation effects and configure visibility settings. You can change background colors, style, border, and more.
See our complete Thrive Architect Review for more.
Next, we answer common questions our users have asked us.
FAQs: WordPress Countdown Timers
How do I add a countdown timer to WordPress?
You can easily add a countdown timer to your WordPress site using a plugin like SeedProd, OptinMonster, or Thrive. These plugins are perfect for beginners as there’s no coding involved.
What is the best countdown timer plugin for WordPress?
The best countdown timer plugin for WordPress may vary depending on your specific needs and preferences. However, popular options that offer extensive features and positive user reviews are SeedProd, OptinMonster, or Thrive. See our list for more: 7 Best WordPress Countdown Timer Plugins.
How to set an evergreen countdown timer?
Most plugins like OptinMonster and SeedProd let you set dynamic evergreen countdown timers. These are unlimited timers or recurring timers that restart when the timer reaches its expiry.
Why use a sales countdown timer?
Countdown timers add a sense of urgency and stir up the feeling of FOMO (fear of missing out). Customers are more likely to buy now while they get a good discount or deal that they know is limited otherwise they’ll miss out.
Can I add countdown timers to product pages?
Yes, you can add countdown timers to any product page you like. We recommend using a floating bar so that it doesn’t disturb the user’s shopping experience but at the same time can grab their attention to your offer.
Does Gutenberg Editor have a countdown timer?
At the time of writing this, no, there is no Gutenberg block to add a countdown timer. You can use a page builder such as SeedProd, Thrive, or Elementor to enhance the block editor’s capabilities.
Are there free countdown timer plugins available for WordPress?
Yes, there are free plugins available for WordPress to add a simple countdown timer. The WordPress plugin directory offers a wide range of options that you can explore.
Can I customize the appearance of the countdown timer on my WordPress website?
Yes, most countdown timer plugins for WordPress allow you to customize the appearance of the timer. You can typically adjust settings such as colors, fonts, sizes, styles, and even add custom CSS to match your website’s design and branding.
Can I set multiple countdown timers on different pages of my WordPress website?
Yes, you can set multiple countdown timers on different pages of your WordPress website with the countdown timer plugins used in this tutorial. Each plugin may have its own method for creating and managing multiple timers, so consult the plugin’s documentation or settings to configure multiple timers as needed.
Can I display a countdown timer only for a specific physical location?
Yes, OptinMonster is the best plugin for that. You can easily set display rules and select the location you wish to target.
Can I display a countdown timer only for a specific physical location?
Countdown timers themselves do not have a direct impact on SEO (Search Engine Optimization). Search engines like Google primarily focus on factors such as website content, relevance, user experience, and overall site performance when determining search rankings.
We hope this guide helped you create a countdown timer on your site. You might also want to check out how to add social proof to your WordPress site to gain users’ trust and boost your conversion goals.

Comments Leave a Reply