Want to know how to auto-apply discounts in WooCommerce using coupon URLs?
The auto-apply discounts using coupon URL feature is a great option for those who are organizing a giveaway or a special offer like free products, etc on their website. With this function enabled, your users can skip all the lengthy processes of adding the product to the cart and then applying the code manually at the time of checkout.
Instead, now they can just click on the coupon URL and land directly into the cart with the product added and the discount automatically applied to the product price. This is a great option if you want to promote a product or send a special offer to your users through email marketing with the coupon link or any other marketing strategies.
This makes it convenient for your customers because they don’t have to remember the code.
In today’s tutorial, we’ll show you how to auto-apply discount coupons in WooCommerce using coupon URLs.
When and Why Use the Coupon URLs on Your Site
Using a coupon URL to avail discounts on your website can have great advantages for your business. This feature is especially helpful for websites that promote products via various marketing strategies.
With this option enabled, your users will never have to memorize the coupon and enter it manually. Many users may even abandon the cart just because if they couldn’t find the field to paste the discount code.
Without a doubt, this feature makes it easy to boost sales with coupons and reduce shopping cart abandonment.
Let’s have a look at how to enable auto-apply discounts on WooCommerce using a coupon URL.
Step 1: Installing Advanced Coupons in WordPress
The first step is to install and activate the Advanced Coupons plugin on your site.
This plugin is a wonderful resource for advanced eCommerce sites that want to extend the default coupon feature that comes with WooCommerce.
With this plugin, you can quickly create your coupon code, enable the auto-apply feature, clone them, notify your customers about the deals and do a lot more. It also lets you generate a coupon URL once you have created your coupon code.
Once the plugin has been activated and installed, it’s time to create your coupon.
Step 2: Creating Auto-Applying Coupon With Advanced Coupons
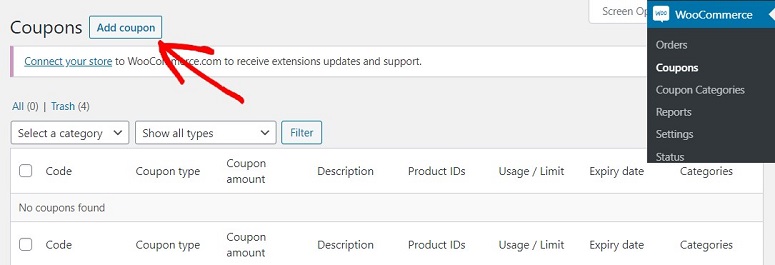
After the Advanced Coupons plugin is activated, you can start creating your coupon using it. For that, go to your WordPress dashboard and click on WooCommerce » Coupons » Add Coupon.
You’ll now be directed to a new screen where you can create your coupon code. On the first field of this page add a name to your coupon. Your customers will be using this code to get the discount. Below that field add a description to your coupon.
You can add the details of your coupon here like terms and conditions, minimum threshold amount to avail the coupon, etc. This makes it easier for your users to understand how to redeem the coupon.
To enable the auto-apply coupon using the coupon URL, we’ll have to create the coupons for a specific product. For the sake of this tutorial, let’s create it for shoes. Once the coupon is named and described scroll down your page and go to the Coupon Data section for the general settings.
Step 3: Select Coupon Amount
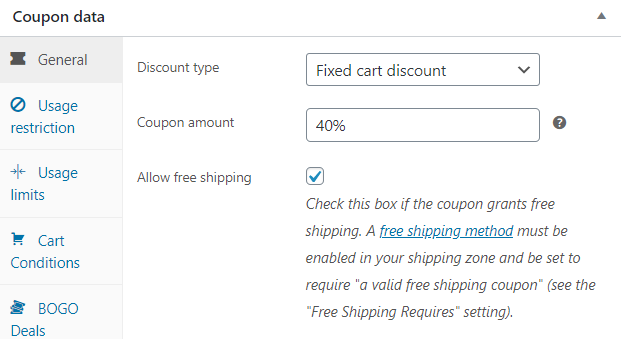
Under the Coupon Data section, you’ll see several tabs. Click on the General tab. Here you can select the discount type. To enable the code on a specific product, you need to select the Fixed Cart Discount option from the drop-down arrow.
Step 4: Select Products to Enable Auto Applying a Coupon
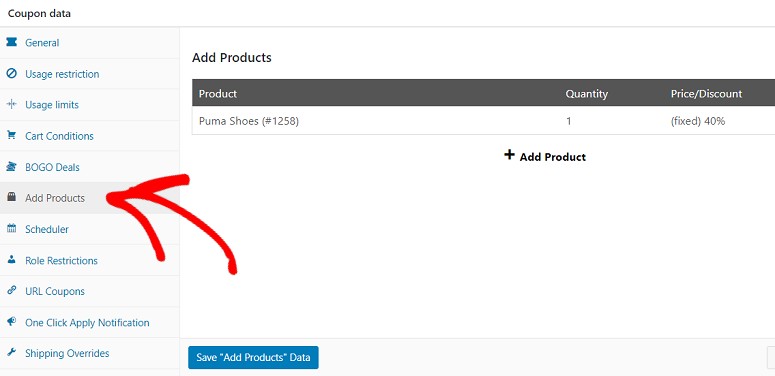
To enable coupon URL feature for certain products, go to the Add Product tab and add products using the + Add Product button.
You can then use the given field to type the name of the product you want to add. It will display all the related products from your store in the drop-down. Select the product that you want to list.
Now select the discount category. This is the same as the Discount type that we’ve added earlier. Since we selected the Fixed Cart Discount option earlier, select the same option for this as well.
Now your coupon is ready to be published. So go ahead and do it using the Publish button on your right-hand side.
Step 5: Using Your Coupon URL
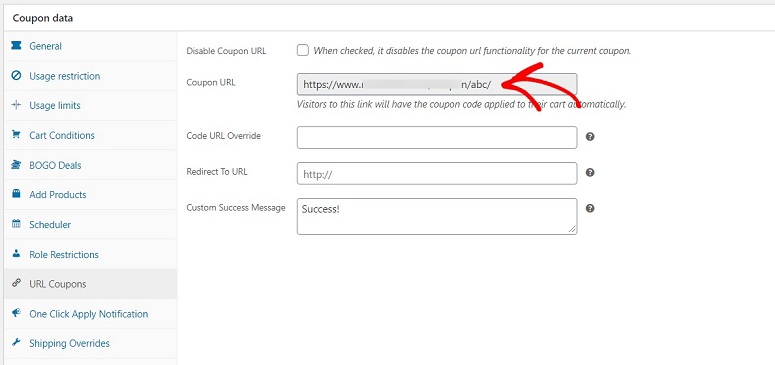
Once your coupon is published, the Advanced Coupons plugin will automatically generate a URL for your coupon. When your users click on this URL they’ll be redirected to the cart directly with the product added and the coupon code applied to the product.
You’ll find this URL under the URL Coupons tab in the Coupon Data section.
You can copy this URL and send it to your customers via your marketing emails, or hide it with a clickable button and place it anywhere on your website.
That’s it. Your coupon URL has been successfully created. That’s easy, right? We hope you found this post helpful. If you did, you might also want to learn about creating a powerful email newsletter using which you can send your URL coupon to your customers.
You can also check our step-by-step guide on how to set up dynamic pricing in WooCommerce to promote your products.


Comments Leave a Reply