
Are you looking to connect Salesforce to WordPress forms?
SalesForce is a powerful CRM that can help build and maintain customer relations. It does this by automating sales & marketing and improving customer care through its cloud-based applications.
As a result, integrating Salesforce with your WordPress forms automates lead capture and syncs data in real time. This can streamline your marketing and sales processes, allowing you to scale.
In this article, we will look at the best way to connect Salesforce to WordPress forms. We will walk you through the process step-by-step and show you the simplest way to do this WordPress Salesforce integration.
Why Integrate Salesforce with WordPress?
Salesforce is a leading customer relationship management (CRM) tool on the market. It manages your company’s relationships and interactions with leads.
It can store and organize user information, allowing you to streamline customer communication and provide personalized support. This will help you better understand your users.
By doing so, Salesforce can also help you retain more customers, reducing your acquisition costs.
Here are other reasons to integrate Salesforce with WordPress.
- Tactical Lead Nurturing: Salesforce’s lead scoring and tracking features help you easily prioritize and manage leads effectively, directing your efforts to the right leads.
- Marketing Automation: SalesForce can help you create targeted and personalized marketing campaigns. It can help you automate customer journeys by setting up triggers that guide customers through customized marketing campaigns based on their interactions with your brand.
- Data Management: Salesforce is one of the best CRMs for effectively storing customer data. Connecting it to WordPress ensures consistent and accurate customer information across both platforms.
- Analytics and Reporting: Salesforce can combine data from both platforms to generate better reports and analytics. This can help you gain insights into customer behavior, sales performance, and marketing effectiveness.
As you can see, Salesforce WordPress integration is great at streamlining customer management. But, at the same time, the connection between Salesforce and WordPress forms takes it a step further, offering additional advantages such as:
- Automates Lead Capture: This can help you automatically capture Salesforce leads generated through your WordPress website. As a result, every form submission can quickly be recorded in your Salesforce CRM, eliminating the need for manual data entry.
- Real-Time Data Sync: Real-time data updates allow customer information to always stay updated. This can help you interact with your customers more, as you will better understand their needs.
- Streamlined Sales Processes: With this integration, your sales teams can access and act on new leads as soon as they come in. They can reach out to the new lead while your company is still fresh in their mind, improving the chances of conversion.
- Enhanced Customer Relationship Management: The WordPress forms Salesforce connection makes it easy to centralize customer data. This ensures you can view interactions and engagements at one point. So, regardless of which team member starts handling the lead, if anyone else needs to step in, they can use all the information at their disposal to create personalized and informed responses.
Now that you understand the advantages of connecting Salesforce to WordPress and the merits of integrating WordPress forms into Salesforce, let us show you how to do it.
How to Create a WordPress Forms Salesforce Integration
Even though connecting WordPress forms and Salesforce has many advanced features and advantages, it is easy to integrate the two. But, it is also important to add that the simplicity of the process depends on the tools you select.
For example, some people may choose to connect WordPress and Salesforce with Zapier, but this can be confusing for beginners.
That is why we use WPForms for our WordPress Salesforce form integration!
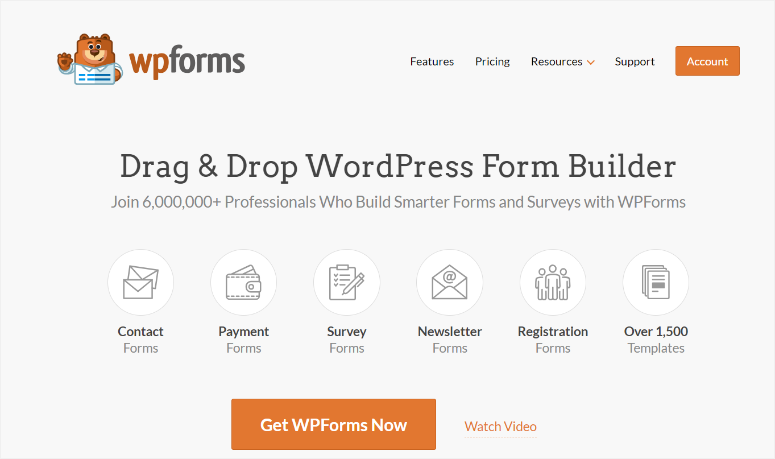
WPForms is the best WordPress custom form builder plugin. It comes with over +1500 form templates that you can further customize with a drag and drop builder. You can create anything from Contact Us forms to survey forms, newsletter forms, and registration forms without coding experience.
Plus, forms built by WPForms are super easy to add to your WordPress site, making this plugin great for beginners and small businesses.
But most importantly, it is super easy to connect Salesforce to WPForms in WordPress.
With that said, let us see how to connect Salesforce to WordPress forms using WPForms.
Step 1: Install and activate WPForms
The first thing you need to do is install the WPForms plugin on your WordPress dashboard. WPForms offers several plans, each with different features and addons.
So, to allow for the Salesforce WPForms integration, select the Elite Plan.
The Elite Plan is great because , other than allowing you to connect WordPress forms to Salesforce, it also allows you to use WPForms on unlimited websites and gives you access to all addons and features.
For more details on this package and others, check out the feature breakdown for each plan on the WPForms Pricing page.
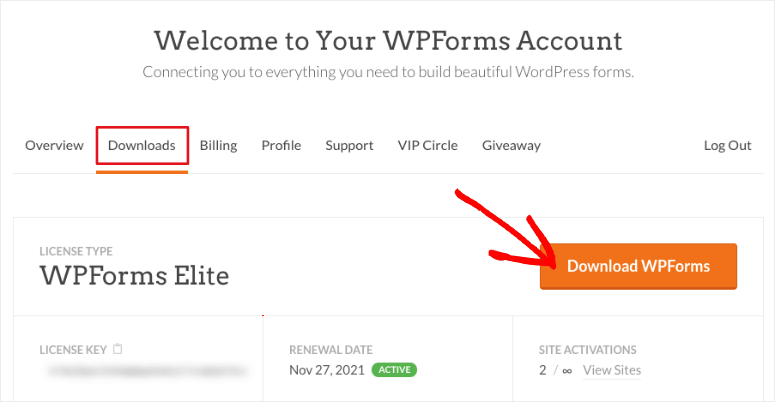
Once you purchase the Elite plan, log in to your WPForms dashboard and navigate to Downloads.
Here, download the plugin’s ZIP file to your PC. Then, still, on this page, copy the License Key so that you can use it to activate the Elite plan in WordPress.
Next, go to your WordPress dashboard and proceed to Plugins » Add New Plugin.
On the next page, select “Upload Plugin,” which will open the plugin upload area. Here, drag and drop the ZIP file you copied earlier and hit “Install.”
Once WPForms Elite installs, select “Activate.” This will result in a new menu option appearing in your WordPress dashboard called “WPForms.
Remember, this is the same process you will use to install any plugin. So, if you have any problems, check out this article on how to install WordPress plugins here.
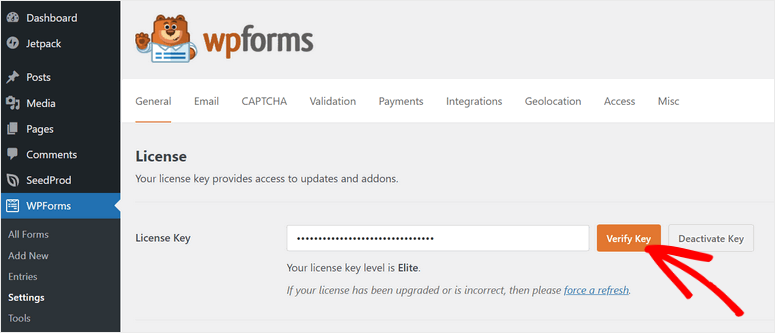
Now, still, in your WordPress dashboard, go to WPForms » Settings to configure and set up this WordPress Salesforce forms plugin.
Next, find the License Key text bar in the General tab and paste the code you copied earlier from your WPForms dashboard.
Finally, hit “Verify.”
And just like that, you have fully installed and activated WPForms.
But, to connect your custom forms to Salesforce, you need to install the WPForms addon Salesforce.
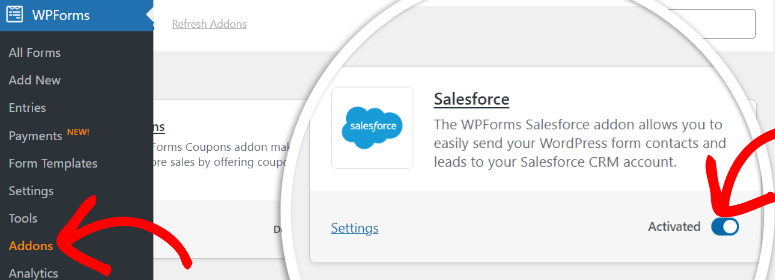
To do this, go to WPForms » Addons in your WordPress dashboard.
Then, on the addons page, use the search bar to find the “Salesforce” addon or scroll through the tools until you locate it.
Once you find it, hit Install Addon. Then, use the toggle button to activate the addon.
WPForms uses addons instead of adding all its features in its base WordPress plugin. This ensures you only install what you need, keeping both the plugin and site lightweight and ensuring the best website performance.
With that, the WPForms plugin and its SalesForce addon are ready to be used.
Next, we will now connect Salesforce to WPForms.
To do this, head to WPForms » Settings in your WordPress dashboard and go to the “Integrations” tab.
Here, you will find a list of different integrations you can make with WPForms, such as Salesforce, Constant Contact, ActiveCampaign, Authorize.Net, AWeber, Brevo, and more.
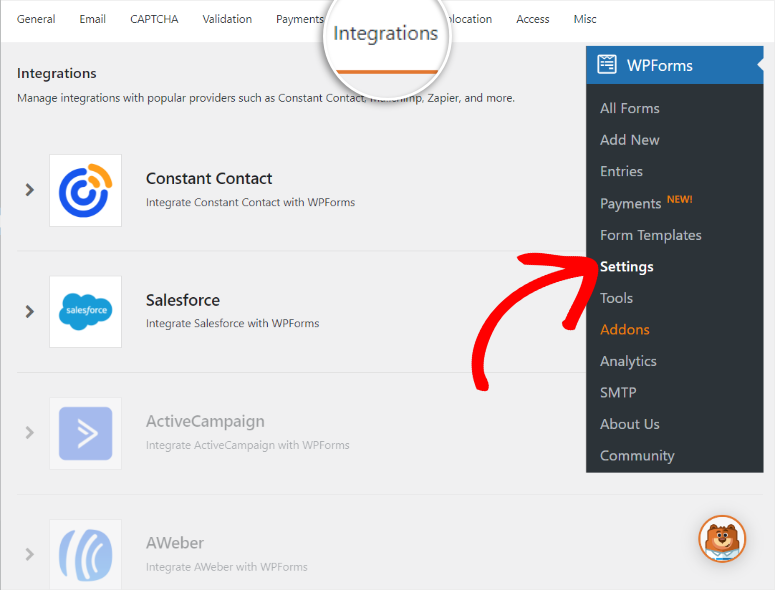
Next, hit Salesforce on this page to open and select the “Add New Account” button.

After this, text boxes for the Consumer Key and Consumer Secret should appear. Below this, you will also find the Callback URL. Copy this URL as you will use it in the next step to connect WPForms to Salesforce.
We recommend you open Salesforce in another tab so that both pages are open at the same time.

Step 2:Verify Your Salesforce Plan
First, you will need to make sure your SalesForce plan allows you to create form connections using API access.
Since this CRM offers many packages, below are the Salesforce plans that give you access to API form integration.
- Essentials
- Professional
- Enterprise
- Unlimited
The easiest way to determine your Salesforce edition (plan) is to log into your account and look at the browser tab for more information while in Lightning Experience mode. This should show you what edition you use without taking extra steps.

If you do not see this information in the browser tab, select your profile icon and Switch to Salesforce Classic.

Then, at the top of the next page, select “Setup.”
Follow this by going to the Administer menu on the left of the next screen. In the Administer dropdown options, find “Company Profile” and select the small arrow next to it.
This will open a dropdown list with additional options. Here, select Company Information, so that Salesforce can display all your organization’s details.

Next, look for “Organization Edition” so that you can view what Salesforce plan you are currently using.
Now that you’re using an edition with API access, it’s time to move forward and begin the integration.
Step 3: Set Up Your Salesforce WordPress Integration
For this step, you need to set up a Salesforce app so that WPForms can connect to your site.
So, go to your Salesforce account and ensure you’re on Salesforce Classic mode using the process demonstrated in step 2.
Then, select “Setup” in the Navigation menu after this.

Next, scroll down the left-side menu of the Setup page and locate the menu option “Build.” Once you are in this section, go to Create » Apps.

After this, scroll down the new screen to the “Connected Apps” section and hit “New.”

You’ll be redirected to a new screen where you have to fill out information about your new app.
First, fill out the mandatory fields highlighted with a red stripe. For starters, where it says “Connected App Name,” choose an easy-to-remember name.
After this, the “API Name” will automatically be generated from the app name you create.
Make sure you don’t edit the API Name further after this, just leave it as it is. Then, in the “Contact Email” field, type in your email.

Remember, you do not need to enter the logo image, icon, info URL, or description when you are simply connecting a new app. You only need to fill out this information if you publish an app.
When this is complete, move to the next section on this page, and check the box “Enable OAuth Settings” to open the OAuth settings, which you can then customize.
Next, paste the CallBack URL you copied from your WPForms settings in your WordPress dashboard.
Then, scroll down to “Selected OAuth Scopes,” where you will select the permissions to give to your app.
You will add 2 permissions from the Available OAuth Scopes list on the left of your screen.
- Manage user data via APIs (api)
- Perform requests at any time (refresh_token, offline_access)
To move them, Hold down the CTRL key (in Windows) or the Control key (in MacBook), then left-click your mouse to select and highlight the permissions.
While they are highlighted, hit the Add button. These commands should automatically move to the “Selected OAuth Scopes” list on the right.
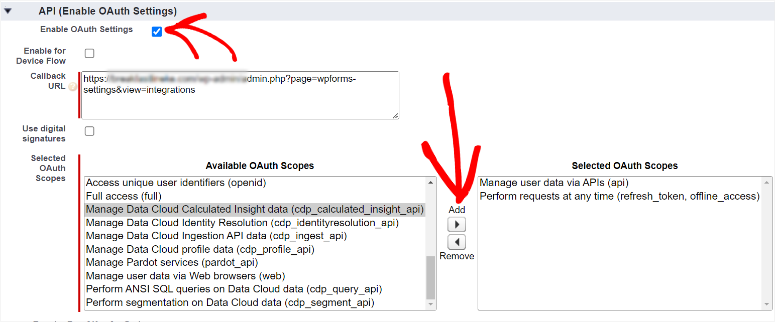
Finally, hit Save at the bottom.
Then, Salesforce will ask you to wait 10 minutes for the changes to take effect. Once you wait for the time period to elapse, hit Continue, and you will be redirected to your “API information” page.

But for added security, Salesforce will first log you out and send you a confirmation email before you can access the “API information” page. So, copy the code from the email confirmation and paste it on the confirmation page, then hit “Verify.”

Then, on the app management page, scroll to the API (Enable OAuth Settings) and select the “Manage customer Details” button.
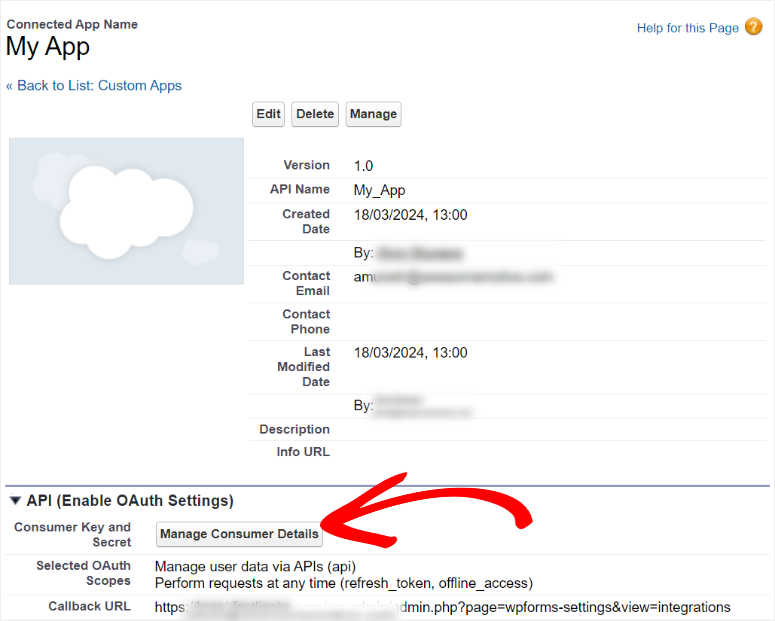
You will be redirected to the “Consumer Details” page where you can access the Consumer Key and Consumer Secret.
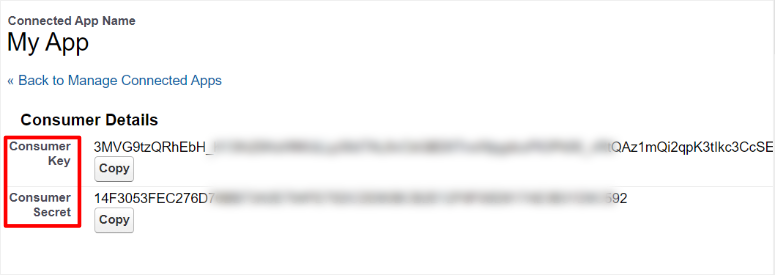
Next, copy these codes and paste them on the WPForms Integration page under Salesforce which you left open in another tab earlier.
Finally, select “Connect to SalesForce.”
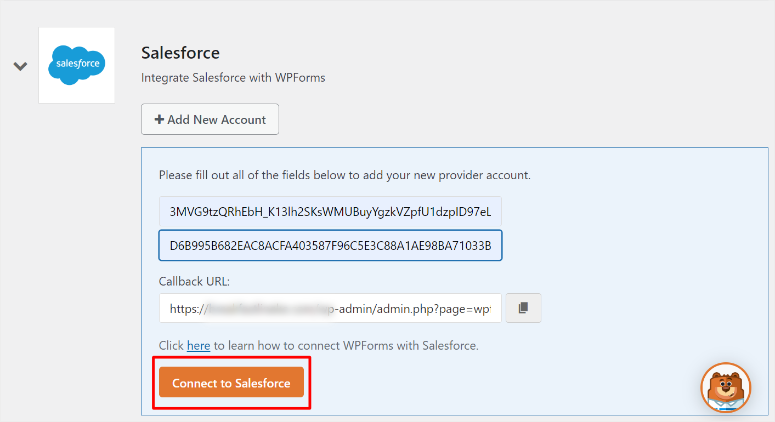
Then, you will be asked to log in to Salesforce by inputting your username and password.
On the next popup, give WPForms permission to access the identity of URL Service, Manage User Data via APIs, and perform requests at any time.

Once this is complete, you will be redirected back to your WordPress WPForms Integration page. Here, a message will display letting you know you have successfully integrated Salesforce with WPForms.

Step 6: Create Your Salesforce WordPress Form
With WPForms, you can create and connect any type of form you want to Salesforce. This ensures you do not bloat your site with many form plugins since WPForms can do it all.
To add to this, you can also create them with different form objectives, including:
- Campaigns
- Contacts
- Leads
- Products
- Cases
- Accounts
For this example, we’ll create a lead magnet from our contact form.
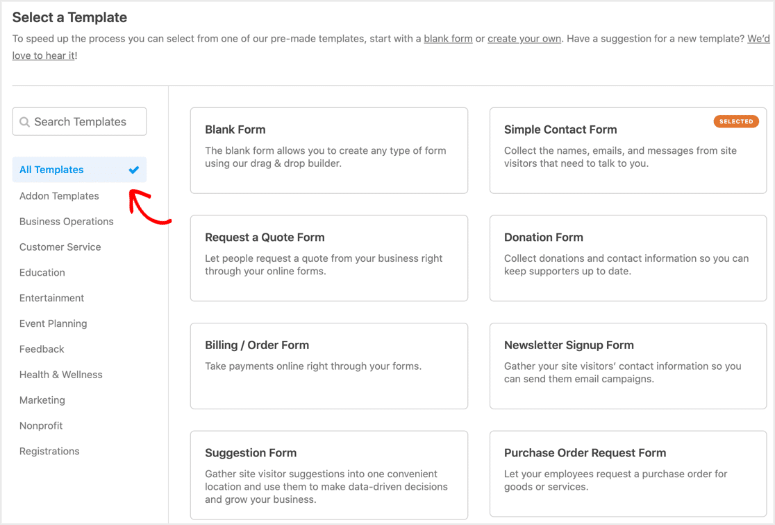
But first, you will need to create a contact form by going to WPForms » Add New, and you will be redirected to the Template page.
Here, search for the contact form template or scroll through the page until you locate it. But you can also use the category filters on the left of this page to make it easy to find the form template you want.
These categories include Business Operations, Calculator, Education, Entertainment and more.
If you don’t see a template you want to use, you can also decide to start building your custom contact form from the blank canvas.
But, for this example, we will use the “Simple Contact Form.” All you have to do is hover over the template, and then select “Use Template.”
If you aren’t familiar with creating custom contact forms, check out this post on creating forms in WordPress for an in-depth step-by-step tutorial.
Now, once you decide on the template, you will be redirected to the WPForms drag and drop form builder. Its form builder page has well-arranged fields on the left, which you can move to the preview window on the right.
The WPForms form builder is so reliable because you can drag and drop the fields anywhere you want on the preview window. To add to that, they will appear exactly where you placed them on the live form.
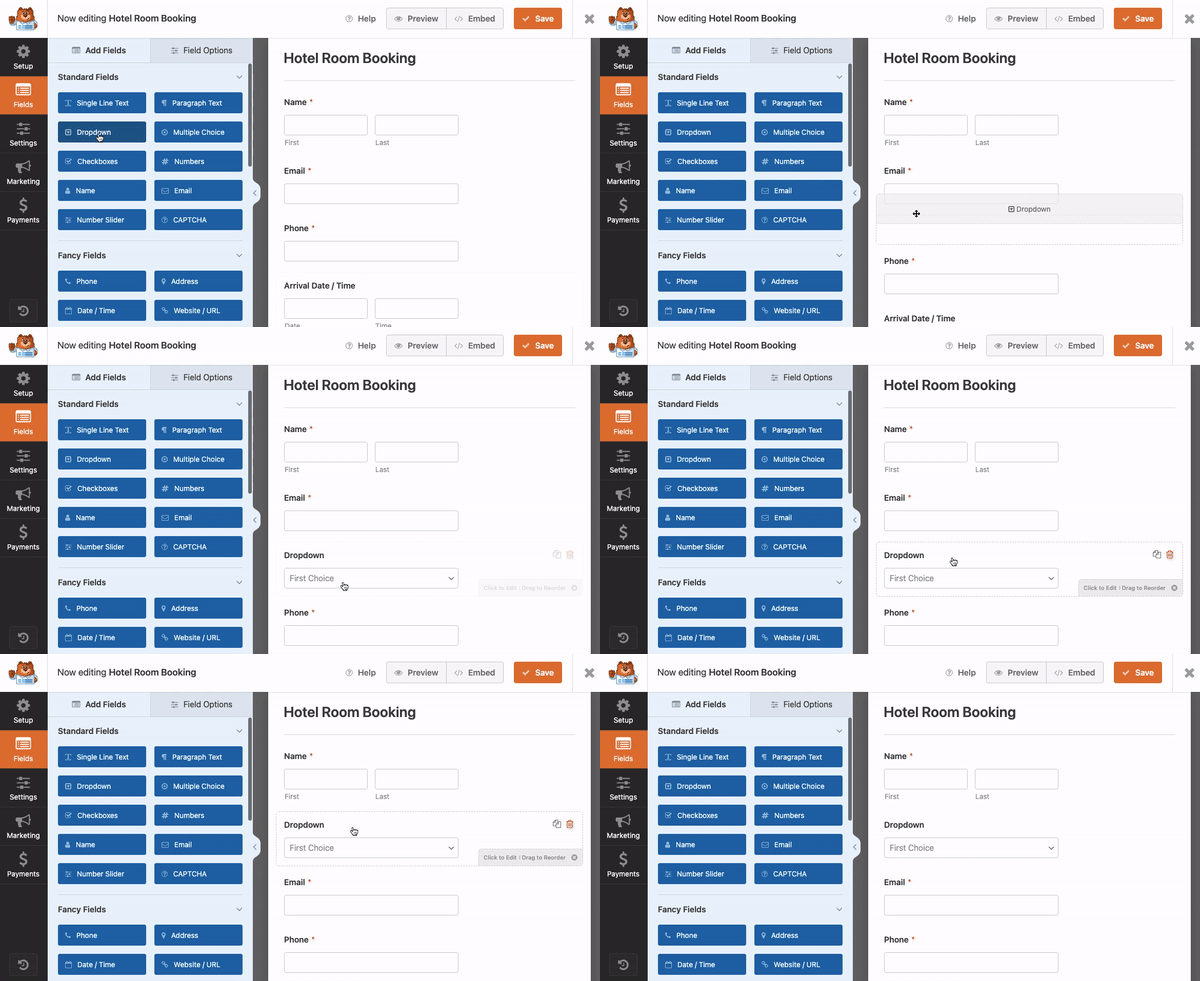
Just a quick tip: it is important to add all the relevant fields to your contact form. But at the same time, make sure it is not long, as this often leads to form abandonment.
But the good news is that WPForms has some amazing tools to help reduce form abandonment.
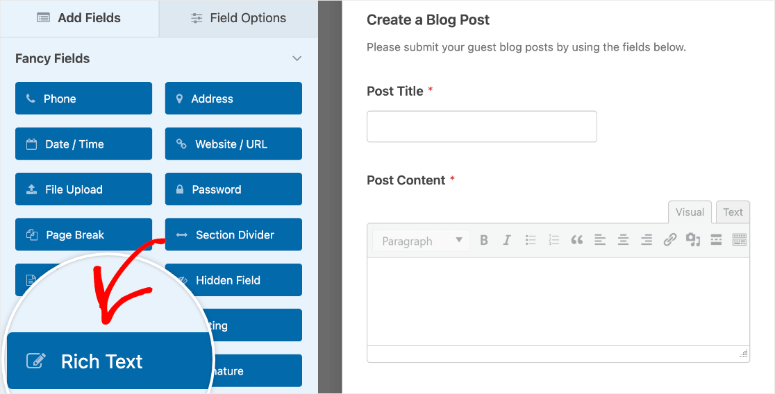
For example, you can add a Rich Text field, which allows your users to add links, images, and styling when filling out the form. This can help keep your users engaged, improving the chances that they will complete the form. At the same time, it can help provide better form data, helping you understand your users better.
You can also use Smart Conditional Logic with WPForms.
This feature changes how the form behaves based on the user’s response. In other words, the user will see a different field based on the input they provide.
As a result, you can keep the user more engaged and get better feedback. This also reduces the chances of the user dropping off somewhere while completing the form.
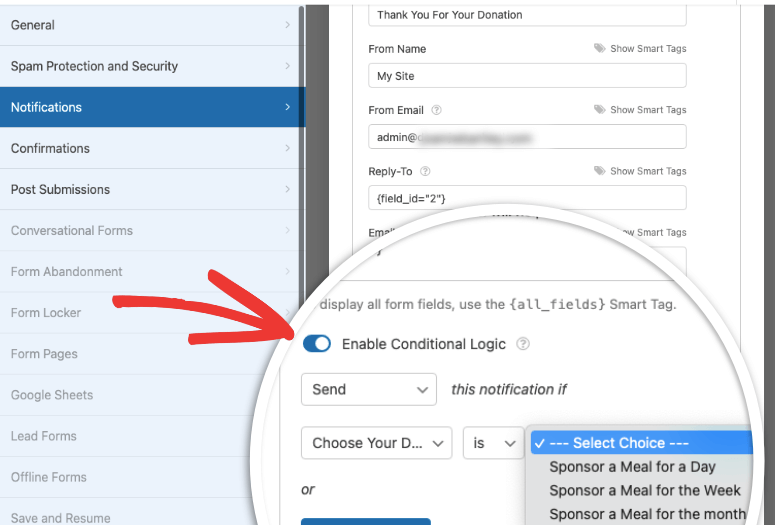
That’s it! You can now create a custom contact form with both Rich Text and Conditional Logic.
Once you are satisfied with the form you have created, select Marketing from the far left menu on your form-building page. You will find this menu option below Fields and Settings.
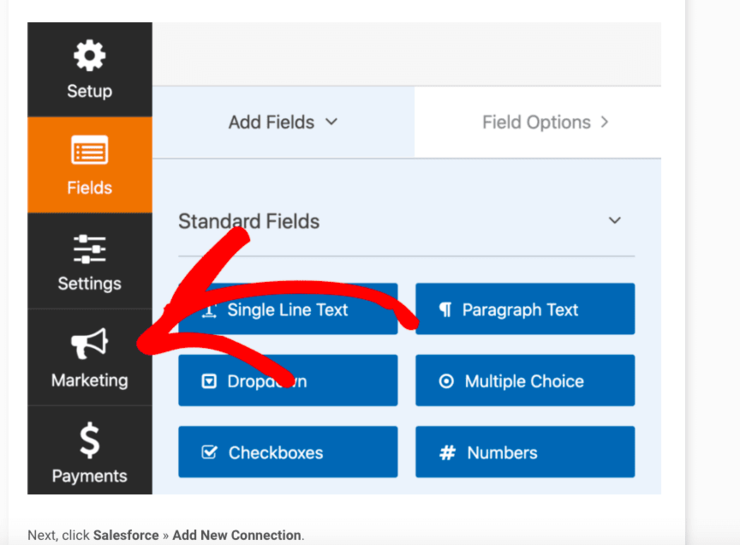
Here, you will see a long list of apps and tools you can integrate with WPForms.
So from the options provided, select Salesforce » Add New Connection.

Then, in the popup that appears next, give your connection a nickname that’s easy to remember later.

Follow this by selecting your Salesforce Account and Salesforce Object from the dropdown menus.

This will lead to new dropdown options based on the Salesforce Objective you have selected.
It’s important to remember that the “Custom Field Name” is the name of the field in your Salesforce account. On the other hand, the “Form Field Value” is the name of the field in the form in WPForms.
With that in mind, you need to select the correct “Form Field Value” to ensure data is sent from your WordPress form to Salesforce lands in the proper categories.
To add to that, you can also add new Salesforce fields to the form by using the Plus(+) or remove fields using the Minus(-) icons.

Hit Save once you have connected the relevant fields between Salesforce and WPForms.
Step 7: Publish Your Salesforce WordPress Integration
Now for the most exciting part: publishing the integration onto your WordPress website.
Though it sounds complicated, WPForms ensures it takes just minutes.
To make it more convenient, WPForms allows you to publish your form in 3 simple ways so you can select one that is most convenient for you.
For the first form publishing method, you only need to select “Embed” at the top of the form builder page.

A popup window will appear next, asking if you want to add the form to an existing page or create a new one.
For this first demonstration, select Create New Page.

After this, type in a name for your page and hit the Let’s Go button. Doing so means WPForms has created a WordPress webpage embedded with your form.

This form page will have all the fields exactly where you placed them using the drag and drop builder.
Now, all that’s left to do is hit Publish.

Now, let’s see how to add a form to an existing page.
This method is great for eCommerce stores that already have pages created. It will ensure that your pages are not duplicated, which can affect your SEO.
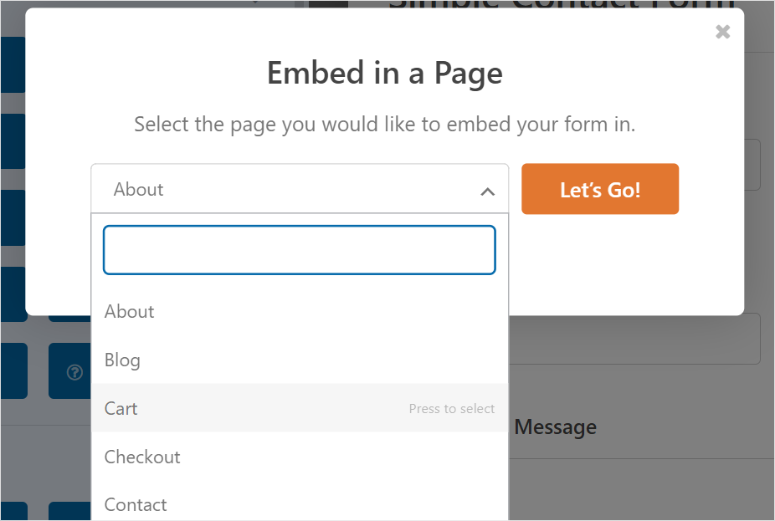
So first, on the form building page, select “Embed,” as you did before. Then, hit Select an Existing Page from the popup window that will appear next.
Then, from the dropdown menu, choose the page you want to add to the contact form and hit Let’s Go.
This will redirect you to the block editor of the page you select.
First, find the “WPForms block,” by searching for it on the bar provided. Then, drag and drop it in the area on the page where you want the form to appear.
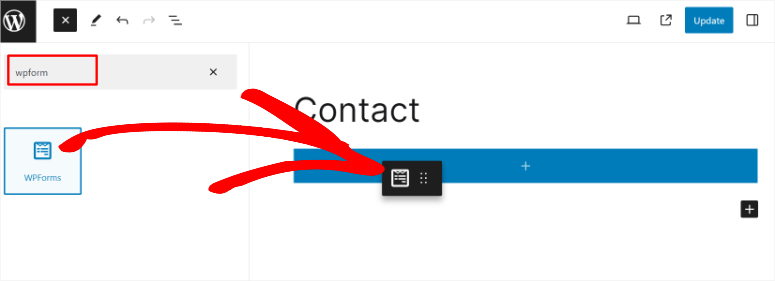
Next, on the WPForms block, select the dropdown menu to see a list of all the forms you have built with this plugin. Then, select the form you want, and it should automatically appear.
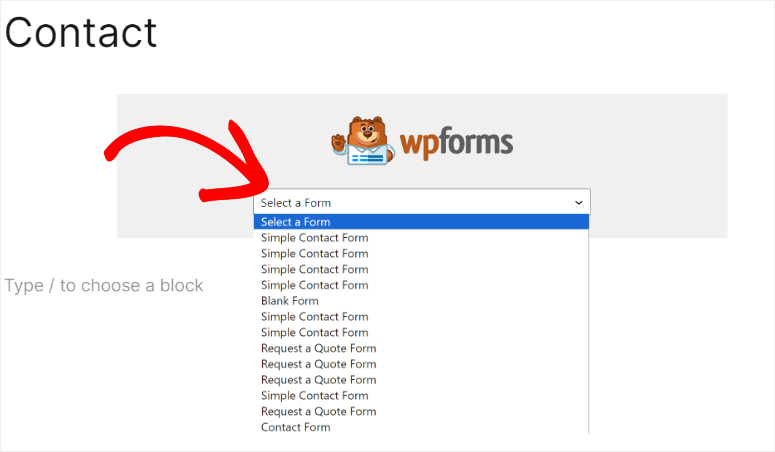
But, WPForms also allows you to add a form through shortcode.
This method is great if you want to add multiple forms to the same page or to a widget or footer of the page.
To get started, go to WPForms » All Forms in your WordPress dashboard. Here, you will find a list of all the forms you have built with WPForms.
Next, locate the form you want to add to a page and copy its shortcode.
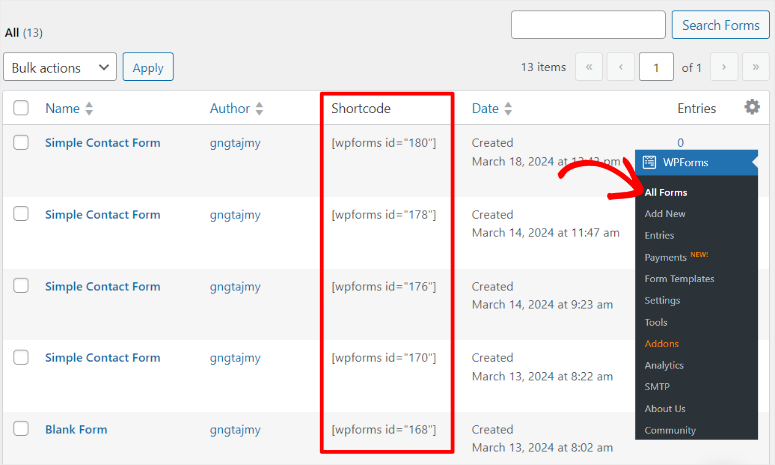
After this, go to Pages » All Pages to open all your existing pages. Then, locate the page you want to add the form to and Hit “Edit.” This will open the page’s block editor so that you can add your form.
On the page’s block editor, first, use the search bar to locate the shortcode block. Next, drag and drop the shortcode block to the location of the page you want your form.
After this past the form’s shortcode you copied earlier to the shortcode block and select ‘Update.”
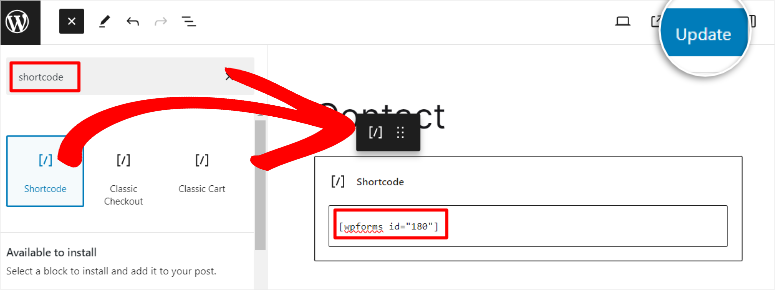
After hitting Update, go to the live page, and you should see your form as you designed it using WPForms.
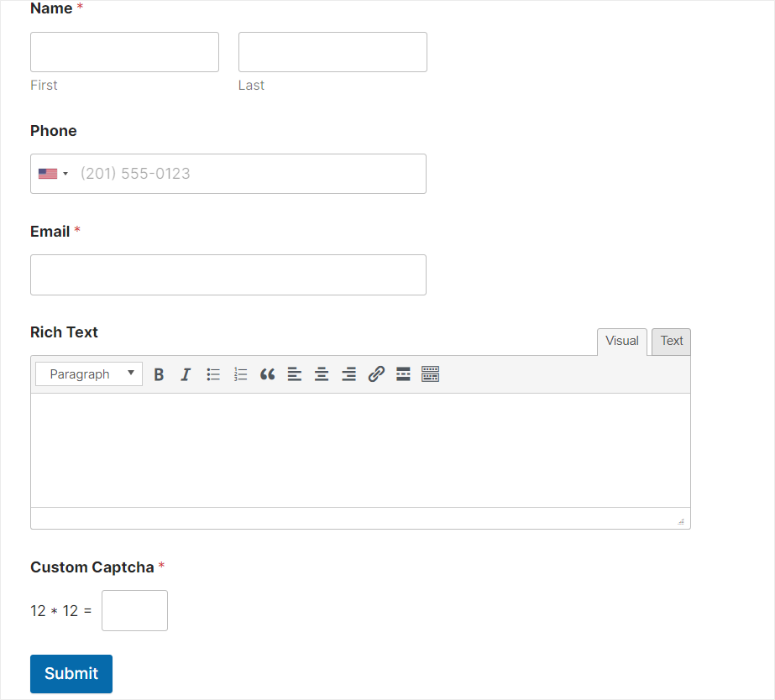
Congratulations! You can now connect Salesforce to your WordPress forms.
We hope you found this step-by-step tutorial helpful and easy to follow. If you have any more questions, check out the FAQs below.
FAQs: How to Connect Salesforce to Your WordPress Forms
Is Salesforce free?
No, Salesforce is not free, but it does offer a 30-day free trial you can use to test out the CRM. The best part about this is that it does not require you to enter your credit card or payment details. You just need to create an account, and you are free to use all the features of Salesforce according to the plan you selected.
Is WPForms free?
Yes, WPForms offers a forever free version of the plugin. WPForms Lite is great at creating and publishing basic forms. But if you want to integrate WPForms with Salesforce, you must select the Elite plan.
Can I use my WordPress forms for marketing?
Absolutely! Even though WPForms is the best form builder, you can integrate it with Bravo, Constant Contact, Salesforce, Uncanny Automator, and so much more. These connections can help you collect and nurture leads organically, which can help your email marketing efforts.
Can I create conditional logic forms in Salesforce?
Indeed, you can create forms with conditional logic using Salesforce’s Visual Workflow or Process Builder. These tools allow you to set up criteria-based actions, triggering specific actions based on specified conditions. But, this process can be a little confusing for a beginner. The best way to create custom forms with conditional logic is by using WPForms because all you will need to do is use checkboxes and dropdown menus.
Is there a Constant Contact Salesforce integration?
Yes, Constant Contact can integrate with Salesforce. This allows you to auto-sync contacts and leads from Salesforce to Constant Contact. You can connect your Salesforce account by going to Tools > Apps & Integrations in your Constant Contact account. Then, find Salesforce from the list of apps and connect it. Once set up, you can utilize targeted messaging, create customized contact segments, and send automated communications like welcome emails and thank you series.
If you enjoyed this post, check out our article on the best WordPress CRM plugins for small businesses. It will help you decide on customer relationship management software that is perfect for your business and its needs.
To add to that, here are other articles you may be interested in reading.
- 5 Best Form Builders With Conditional Logic
- How To Reduce Form Abandonment and Boost Conversion Rates
- How to Save Form Data in WordPress Database
The first article lists the best form builders with conditional logic. The next post teaches you how to reduce form abandonment and boost conversion rates. While the last link walks you through how to save form data in a WordPress database.

Comments Leave a Reply