
Do you want to get more leads and subscribers with a stunning lead capture page?
A lead capture page lets you collect the email addresses of your visitors using an optin form. You can use this page to offer lead magnets and promote products to boost engagement, sales, and revenue.
In this tutorial, we’ll show you how to easily create a lead capture page in WordPress.
Before we start, let’s learn what a lead capture page is.
What is a Lead Capture Page?
A lead capture page is a landing page designed especially for collecting contact information from visitors and potential customers.

To make your page successful, you need to offer the visitors something valuable so that they are willing to share their information. For this, you can offer rewards, discounts, or lead magnets like eBooks and helpful guides.

You can easily create a lead capture page in WordPress but if you’re serious about growing your leads, you’ll want to use a powerful page builder that gives you access to conversion rate optimization features.
So before we get started with the tutorial, you should know what to include in your page to maximize engagement and conversions.
This will help you pick the right page builder that lets you add these elements to your lead capture page.
What to Add to Your Lead Capture Page?
To create a successful lead capture page, you should consider adding these page elements.
- Eye-catching Headline: Your title needs to grab the attention of the visitor and clearly communicate what you’re offering. This will encourage visitors to stay on the page and read more.
- Compelling Copy: The content you add should clearly explain the offer and how visitors will benefit from them.
- Lead Capture Form: Add an optin form that includes the forms field for the information you need. Remember to collect only the information you need so the form will be short and easy to fill out.
- Call to Action (CTA) button: You should customize your CTA button color and text so that it stands out on your page. If you are offering an eBook, you can use “Claim my free eBook” instead of “Download free eBook”.
- Images: Use attractive images that are relevant to your offer. For example, you can add a cool headshot if you are promoting a webinar.
- Testimonials and Reviews: To build trust with your visitors you can add user reviews and testimonials on your page.
Now that you know what to add to a lead capture page, let’s learn how to create one.
Creating a Lead Capture Page in WordPress
Creating a lead capture page that actually converts is a challenge. However, the right lead capture tool will make it a piece of cake.
We recommend using SeedProd, the best WordPress landing page plugin in the market.

SeedProd lets you create any type of landing page without any coding knowledge. It offers a library of lead capture landing page templates so you don’t have to start from scratch.
Moreover, you can find over 80 content blocks that you can use to create professional-looking and dynamic landing pages. Its drag and drop page builder allows you to easily add page elements and customize your lead page.
SeedProd really stands out because it has powerful features like testimonials, countdowns, and CTA buttons that help you increase conversions.
Not to forget, SeedProd has built-in integration with email marketing services like Constant Contact, AWeber, Active Campaign, Mailchimp, and more. So, you don’t need to manually import your lead information into your email list.
SeedProd offers many features that make it the best choice for creating landing pages. The highlights are:
- 200 pre-built landing page templates
- User-friendly page builder
- Integrates with All in One SEO and Google Analytics for search engine optimization
- Built-in Coming Soon Page, 404 pages, and maintenance mode
- Spam protection with Google reCAPTCHA to get authentic leads
Plus, SeedProd is fully responsive which means your lead capture page will look good on all screen sizes. It’s also lightweight and developed with the best practices so your page will load at lightning-fast speeds.
Now, we’ll show you how to create a lead capture page in WordPress with SeedProd.
Step 1: Install and Activate SeedProd Plugin
The first thing you’ll want to do is sign up for your SeedProd account.
This will give you access to the SeedProd dashboard where you’ll get a plugin file to download along with a license key.
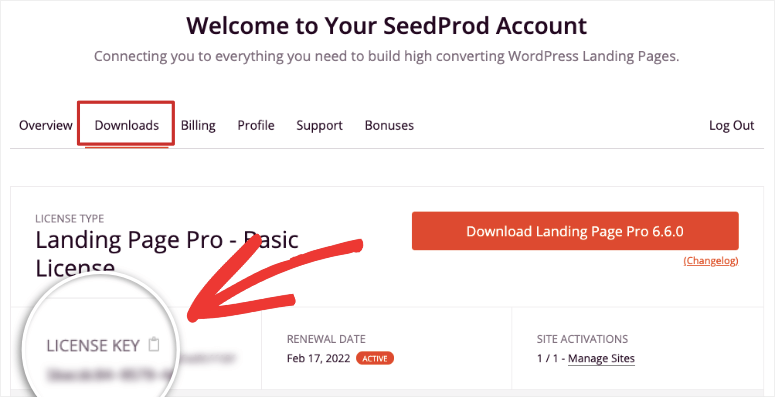
You’ll need to install and activate the SeedProd plugin on your WordPress website. For more details on this, see our tutorial on how to install a WordPress plugin.
Once you activate the plugin, you need to enter the license key from your SeedProd account.
For this, you can open the SeedProd » Settings tab in your WordPress admin dashboard and enter the license key.

Click on the Verify Key button and you’ll see a success message.
Now, you can start creating a lead capture page for your site.
Step 2: Create a New Lead Capture Page
To create a new lead capture page, go to the SeedProd tab in your admin dashboard.
You’ll see 4 options to set up Coming Soon Mode, Maintenance Mode, Login Page, and 404 Page. So you can easily create an under construction page to notify visitors and build your email list even before your site is up and running.
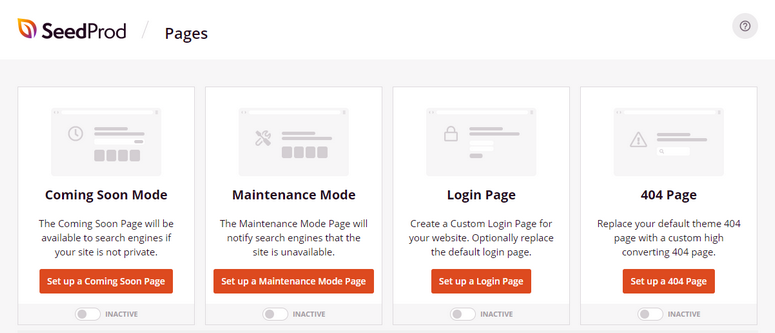
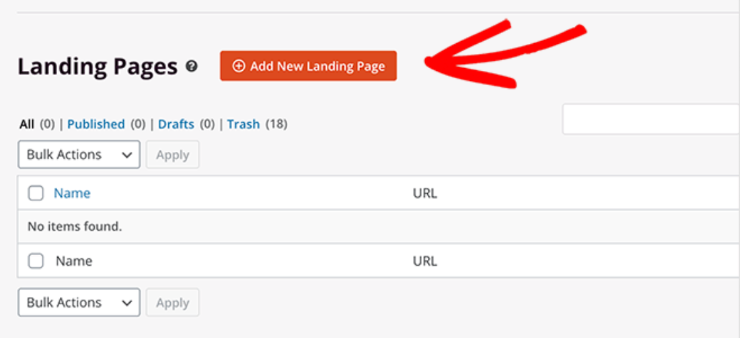
If you scroll down, you can see the section for Landing Pages. Click on the Add New Landing Page button next to that.
This will open up the template library that houses 100+ landing page templates. For easy browsing, you can use the filters at the top of the library. SeedProd offers the following filters:
- Coming Soon
- Maintenance Mode
- 404 Page
- Sales
- Webinar
- Lead Squeeze
- Thank You
- Login
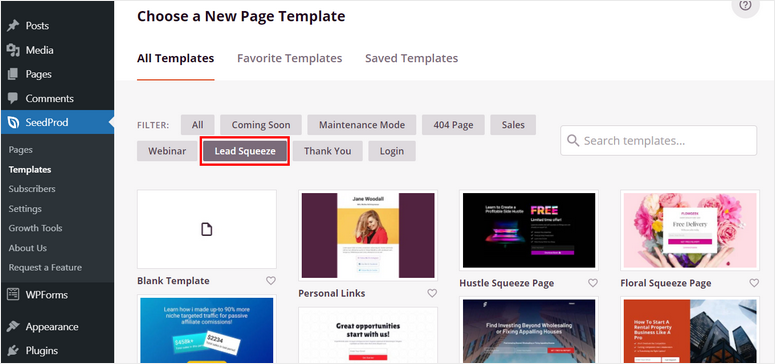
As you want to create a lead capture page, click on the Lead Squeeze filter. Now, you’ll see all the lead capture page templates in one place.
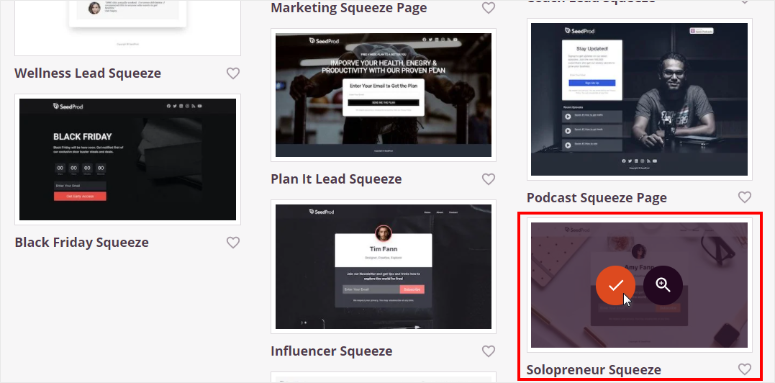
To preview a template, hover over it and use the zoom icon to see a demo page. Then you can click on the checkmark icon to select your template.
After you select a template, you’ll see a popup where you need to enter a name and URL for your page.
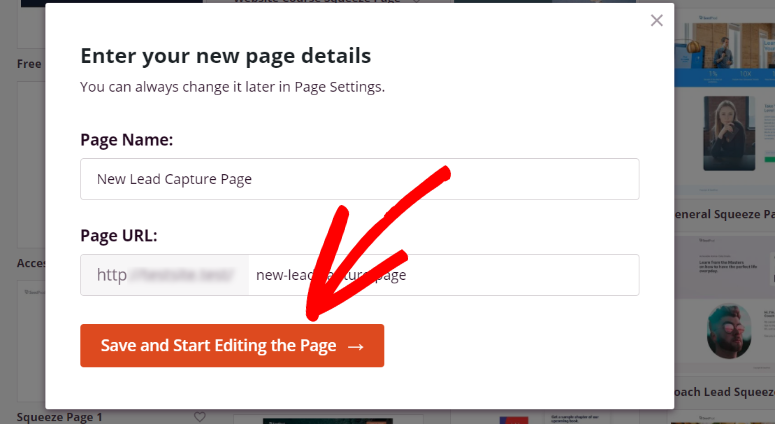
Click on Save and Start Editing the Page to launch the SeedProd drag-and-drop page builder.
Then, you can edit this template and customize it to look the way you want.
Step 3: Customize Your Lead Capture Page
SeedProd offers a visual page builder with the content blocks on the left side and the page preview on the right side.
The content blocks are divided into Standard, Advanced, and Woocommerce sections. The standard blocks let you add headlines, text, lists, CTA buttons, images, and more.
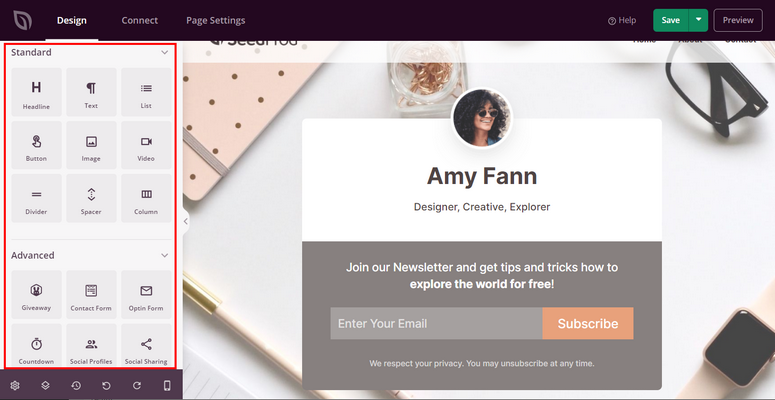
Whereas the advanced blocks include conversion-optimization elements that you can add to your lead capture page. These include:
- Giveaways
- Optin form
- Countdown
- Animated headline
- Star rating
- Testimonials
- Social sharing
Additionally, SeedProd offers WooCommerce content blocks like Add To Cart, Checkout, Cart, and more. This means you can sell products right from your landing page with an easy checkout option.
To add new content blocks, all you need to do is drag the required field from the left menu to the page preview on the right.

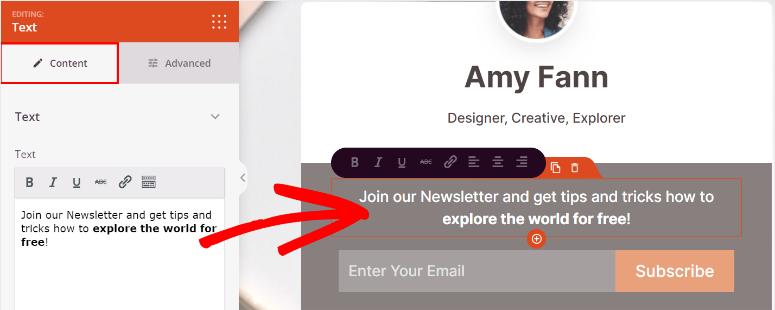
When you click on a content block, it opens the block settings where you can change the text, font, alignment, and more.
If you want to add universal customizations to the whole page, navigate to the Global Settings icon at the bottom-left of the page.
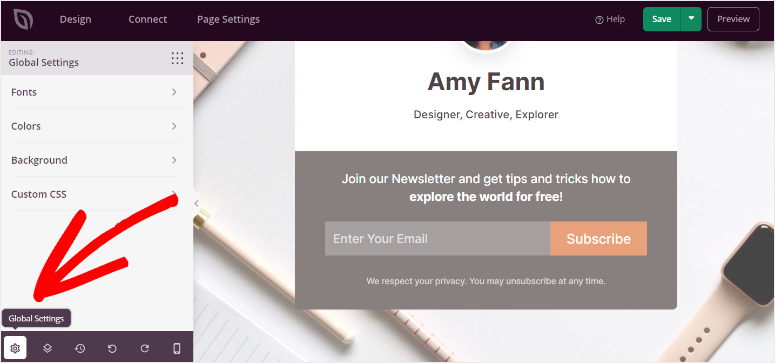
Here, you’ll see settings for fonts, colors, background, and custom CSS.
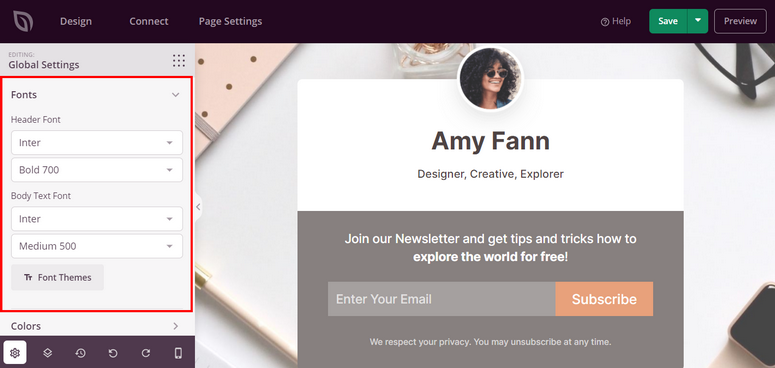
First, the Fonts settings allow you to change the font and styling options for the header and body of the page. You can add your brand fonts and ensure your font family and size is consistent throughout the page.
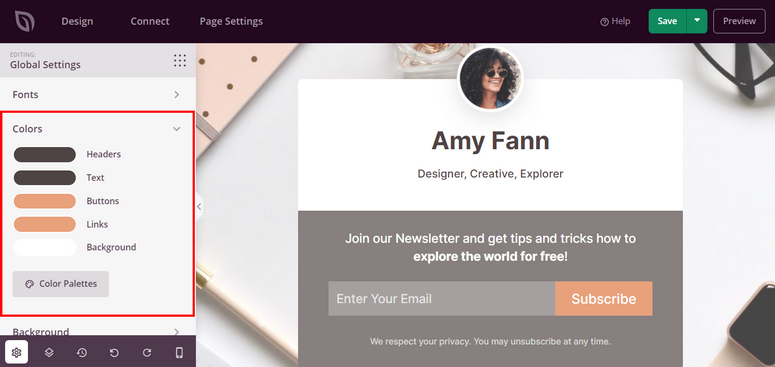
Next, you can choose the colors for headers, text, buttons, links, and background in the Colors settings. There are premade color palettes to change the color theme of your lead capture page.
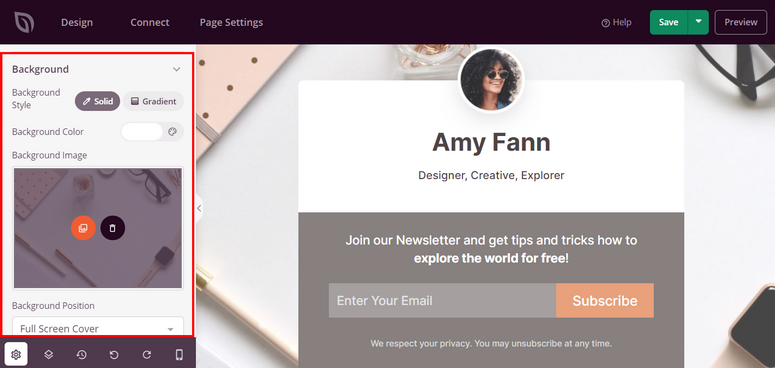
In the Background Settings, you add your own image or color for the page background and even customize the style and position.
Now your lead capture page is ready. We recommend saving your progress using the Save button at the top.
Now, we’ll show you how to connect your lead capture page to your email list.
Step 4: Connect Your Email Marketing Service
By connecting your lead capture page to your email account, all new leads will automatically be added to your contact list.
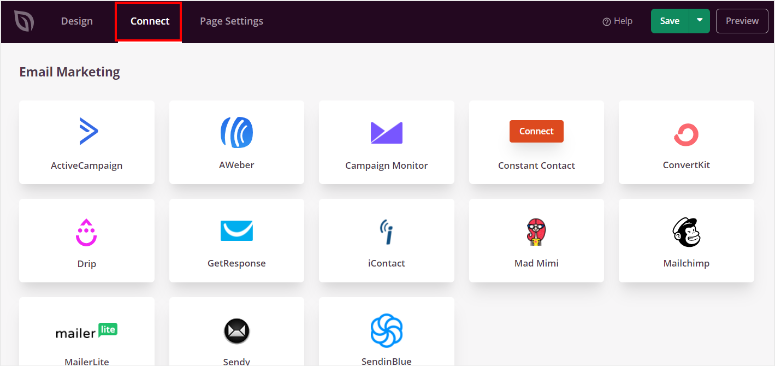
SeedProd allows you to connect with all the popular email marketing services like Constant Contact, AWeber, Convert, and more.
Added to that, you can select lists and segment your leads according to what they signed up for. So you can make sure your contacts are added to the right list based on what they are interested in whether its a newsletter, webinar, event, or a lead magnet you promised.
To connect your email account, open the Connect tab on the page builder and choose your email service.
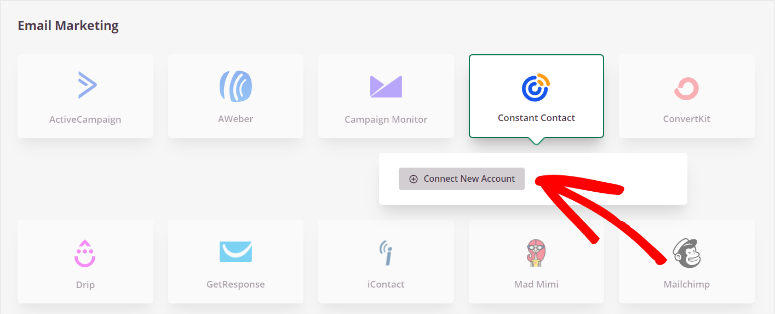
Then click on the Connect New Account button and follow the onscreen instructions and connect to your email account. Most providers require an API key to make a secure connection. You can find this key inside your email account.
With that, all new leads will be automatically added to your email list. You can set up autoresponder emails with your service provider to start engaging with subscribers as soon as they sign up.
Before you publish the lead capture page, you’ll want to make sure your page settings are set to your preferences.
Step 5: Configure Page Settings
To configure your page settings, open the Page Settings tab on the form builder. Here, you can see options for page settings.
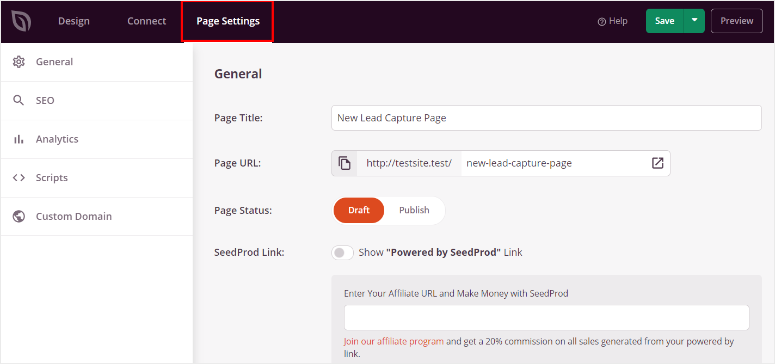
- General Settings: Change options such as page title, page URL, and page status. You can also choose if you want to show the “Powered by SeedProd” link.
- SEO: Connect your page to SEO (Search Engine Optimization) plugins such as the All in One SEO. It lets you optimize your page so it ranks well on the search engine results pages (SERPs).
- Analytics: Integrate with Google Analytics or MonsterInsights to track the performance of your lead capture page.
- Scripts: Add custom code to get more control over the style and settings of the page. We recommend leaving this field empty if you are not a web developer.
You’re almost done! All you need to do now is publish your page.
Step 6: Publish Your Lead Capture Page
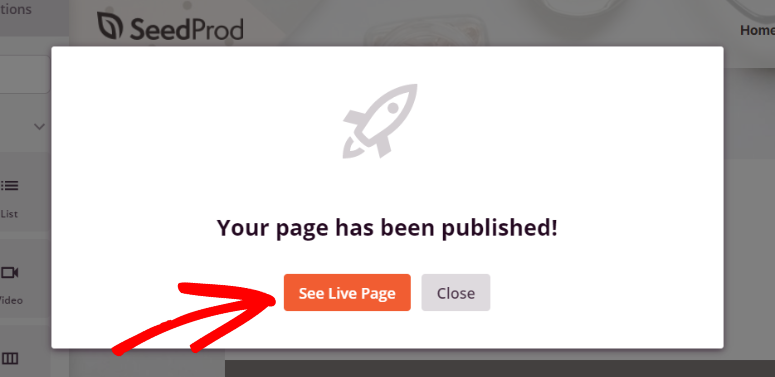
To publish your lead capture page on your site, click on the dropdown option on the Save button. Choose the Publish option and your page will go live.
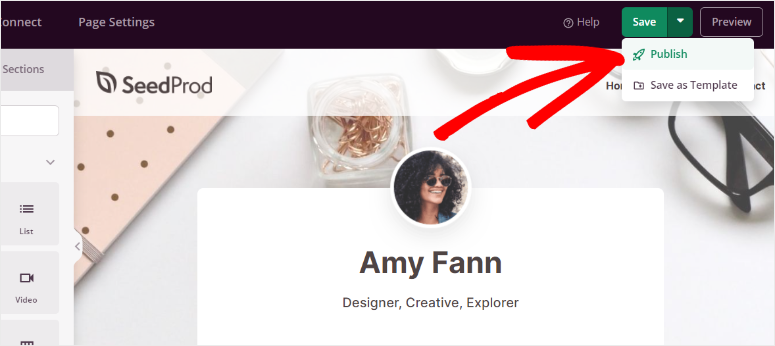
After that, you can see a popup to confirm your page has been published. You can click on the See Live Page button there to see how your lead capture page looks.
And with that, you are all set to grow your subscriber list and improve conversions with your lead capture form.
We hope this tutorial helped you learn how to create a lead capture page in WordPress.
Now that you know how easy it is to use the SeedProd builder, why not try your hand at creating a stunning splash page for your site?
There are a ton of pages you can create with SeedProd to promote products, flash sales, webinars, and more! You can also use SeedProd to hide your site with coming soon or maintenance mode pages while you work behind the scenes.
If you’re looking for more ways to grow your leads and subscribers, another great tool for you is OptinMonster. It lets you build beautiful popups, floating bars, welcome mats, inline forms, and more.

This banner plugin is designed to optimize conversions with powerful targeting rules and campaign triggers to ask visitors to sign up at the right place and time.
Read our OptinMonster Review to learn more about this tool.
For your next steps, you’ll want to check out these resources to improve your lead generation and email marketing efforts:
- Best WordPress Lead Magnet Plugins (Compared)
- How to Grow Your Email List With Social Proof Notifications
- Best Email Automation Tools to Improve Your Email Marketing
These posts will give you more ways to capture leads and boost conversions. The last one will help you automate email tasks so that you get more time to focus on growing your website.

Comments Leave a Reply