Do you want to create an optin form that will actually get visitors to sign up?
An optin form can help get more email and SMS subscribers so that you can connect with your audience even after they leave your site.
In this guide, we’ll show you how to easily create an optin form on your WordPress site. And not just that, we’ll make it look stunning and add targeting options so that you can maximize the number of subscribers you get.
Before we get to the tutorial, let’s be clear on what an optin form is and what it can do for you.
What is an Optin Form?
An optin form is a user subscription and email marketing form. It’s a really powerful tool to grow your audience, build relationships with subscribers, and create a lasting impression of your brand.
You can display the form on your site in pages, posts, footers, and sidebars.
But if you really want to grow your subscriber list, then you have to make it worth their while. You can do this by offering a lead magnet such as a free eBook or guide. Then, you’ll want to make the form appear at the right time and place when the user is most likely to subscribe.
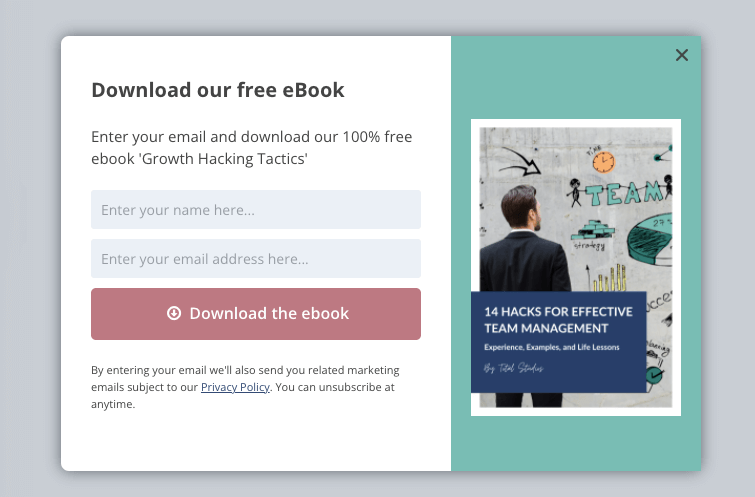
Once the user subscribes, you can spark a long-term relationship with them via email to keep them engaged in your brand. This will keep them coming back to your site for more products, blogs, news, and so on.
We’ll walk you through 2 different methods to create an optin form on your website.
Method #1 – Using OptinMonster:
OptinMonster is a powerful list building tool that lets you create stunning, conversion-optimized forms that you can display on any website platform including WordPress, Shopify, Joomla, and even HTML sites.
It’s best suited for those who want powerful targeting rules, different types of campaigns, readymade templates, and advanced integrations.
Method #2 – Using WPForms:
Looking for a free WordPress optin form plugin? Choose WPForms if you want a WordPress plugin to create a simple optin form to add in posts, pages, and widget-ready areas like the sidebar or footer.
Ready? Let’s get started!
Method 1: Create an Optin Form in WordPress using OptinMonster
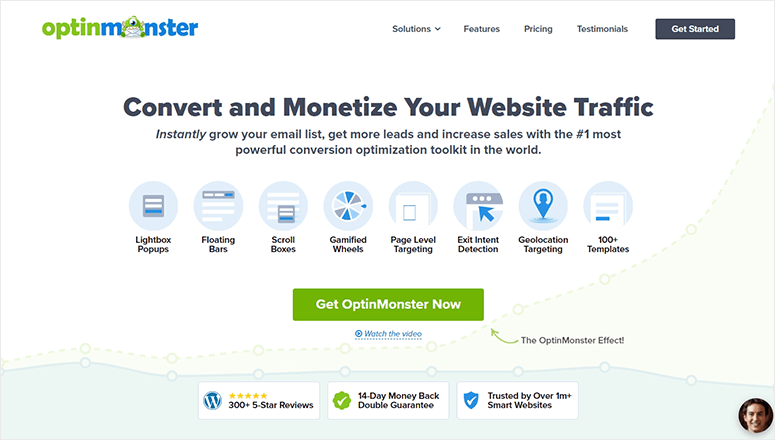
OptinMonster is hands down the best WordPress lead generation plugin. It lets you create all sorts of high-converting campaigns for your website including popups, floating bars, fullscreen mats, inline forms, slide-ins, and coupon wheels.
This gives you plenty of ways to get users to subscribe to your promotional and marketing emails. But you don’t want to bombard the user with too many campaigns and that’s where OptinMonster’s targeting rules come in.
You can display your optin form based on whether the user is coming to your site for the first time or is a returning customer. You can also target them based on
- Page
- User’s location
- Device
- Exit-Intent
- Scroll depth
- Referral source
- Date and time
You can add these rules to your optin form with just a click of a button. There’s no coding involved. You can even make sure that people who have already subscribed never see the optin form again.
Pretty neat, huh?
And there’s more you can do with the form. For instance, you can sync it to your email marketing service like Constant Contact, ActiveCampaign, or Mailchimp. Then when a person signs up for your newsletter, you can have their details automatically added to your email account. You can also add them to any automated funnels or email series you have set up to welcome new subscribers.
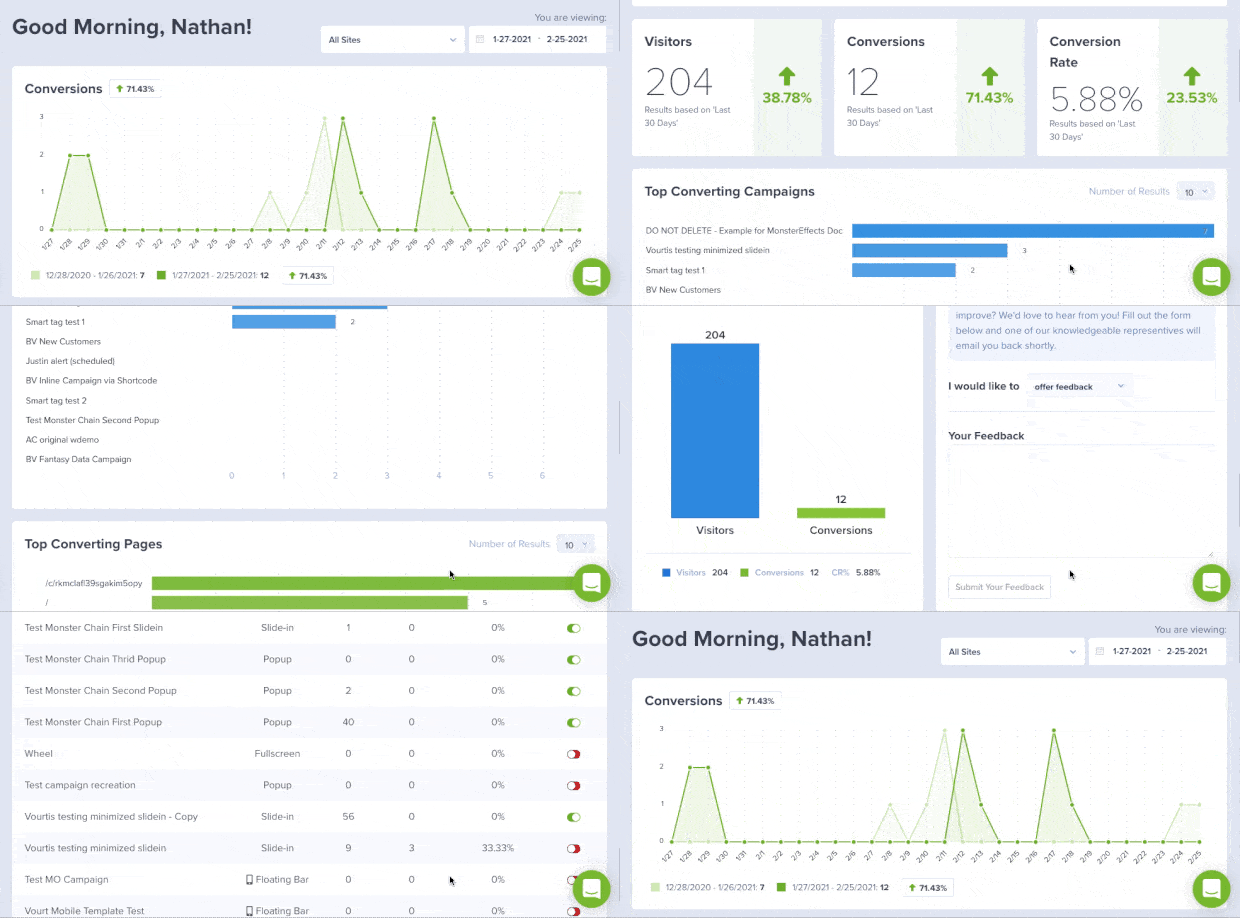
The best part is you can actually see whether your campaigns are working or not. OptinMonster comes with built-in analytics that includes visitors, conversion rate, A/B testing, and more. Plus, you can connect it to Google Analytics for more detailed insights.
One more thing you might find useful is that OptinMonster has the option of gated content. This allows your readers to view a snippet of your article and prompts them to subscribe in order to get full access. If you’re interested in content upgrades, then head over to this guide: How to Use a Content Locker in WordPress (Step by Step).
Now, as you can see, OptinMonster has so many features, it would take too long to talk about them all. So we’ve covered it for you in our detailed review: OptinMonster Review: Is It the Best Optin & Conversion Tool?
Now that you know why we’ve picked OptinMonster as the best WordPress optin form plugin, let’s get straight to the tutorial.
Step 1: Install OptinMonster
To get started with OptinMonster, you’ll need to sign up for an account. They have plans to fit every budget starting at $9 per month. So you can choose one according to what you need at the moment and upgrade later as your site grows. Plus, there’s a 14-day risk-free money back guarantee.
Next, you’ll want to connect your account to your WordPress site. To do this, inside your wp-admin panel, head over to Plugins » Add New page. Here, search for OptinMonster and install and activate the plugin.
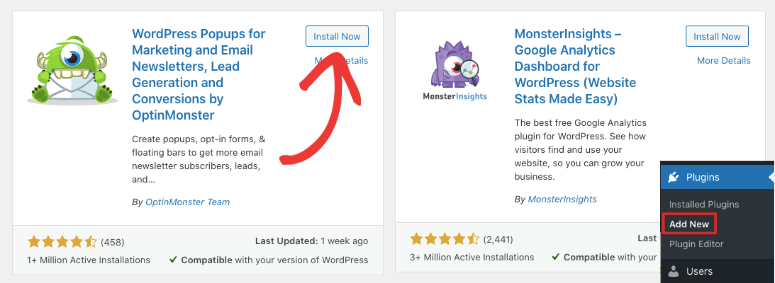
This is a free connector plugin that lets you link your site to your OptinMonster account. Once activated, you can create and manage all your campaigns right inside your dashboard.
If you have your OptinMonster account opened in another tab, it will automatically detect the account and sync it. You can also follow the setup wizard to connect the two.
Now you can create your first optin form to grow your subscriber list.
Step 2: Create a New Campaign
OptinMonster comes with lots of templates that make it so easy to create an optin popup form to match your theme.
Simply click on OptinMonster in your WordPress menu. This will open up the dashboard where you can see options to create new campaigns. We’ll show you how to create a popup but you can also choose any other campaign and the steps below will remain pretty much the same.
Click on the Create New link under the Popup and this will launch the template library.
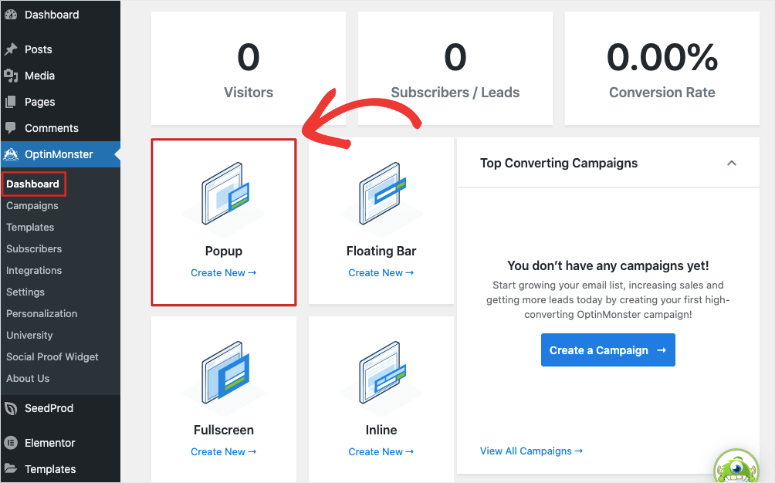
You can browser templates by hovering over them to get a Preview option.
You’ll find designs for events, webinars, signups, discounts, special holidays, and so much more. When you’ve found the one you like, hover over it and click on the Use Template button. We’ll use the Magnet template.
This template lets you add a lead magnet to your optin form. That’s the best way to get visitors to sign up. You can create freebies like downloadable eBooks, checklists, cheat sheet, PDF guides, and more. Then you can let visitors download your lead magnet in exchange for signing up for your newsletter.
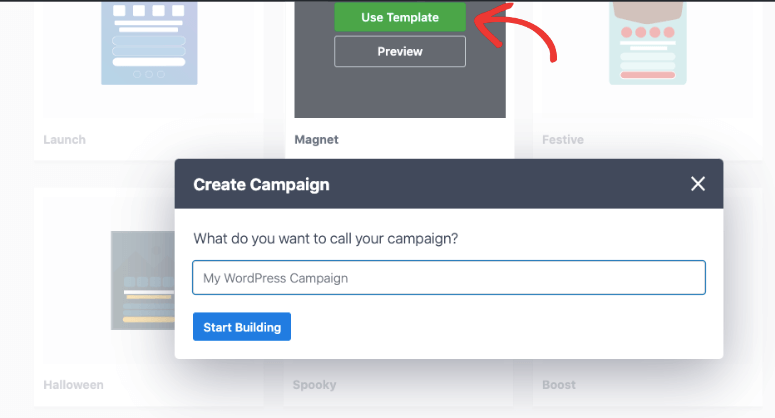
Next, you’ll see a popup where you can name your campaign for internal use. Then you can click on the Start Building button and it will open the campaign builder.
Step 3: Customize the Optin Form
OptinMonster comes with a drag and drop builder so it’s easy for anyone to use. You’ll see a live preview of your campaign along with an editing taskbar on the left.
This is a visual editor so that means you can just click on any field in the template to edit it. So for instance, if you want to change the text, you can click on it and simply type in the text you want.
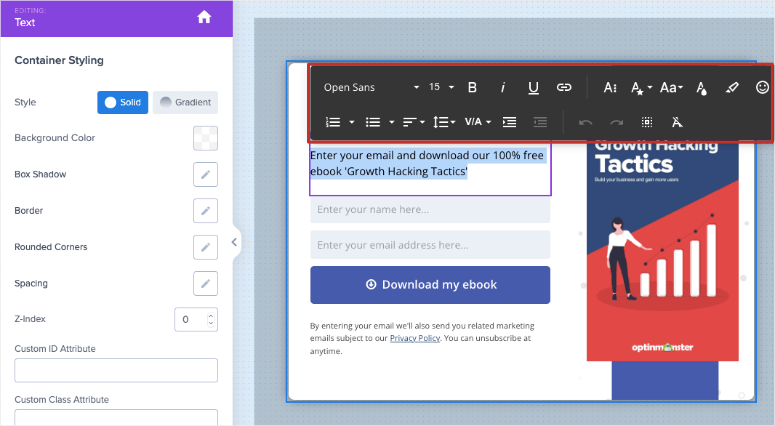
When you select the text, you’ll also see a text editor that lets you change the font, font size, and formatting.
Next, the template has an image for a free ebook. You can replace the image by selecting it. This will open up an image editor on the left. You can upload an image from your computer or access the Unsplash library for free stock photos. You can set the alignment, width, border, and more here.
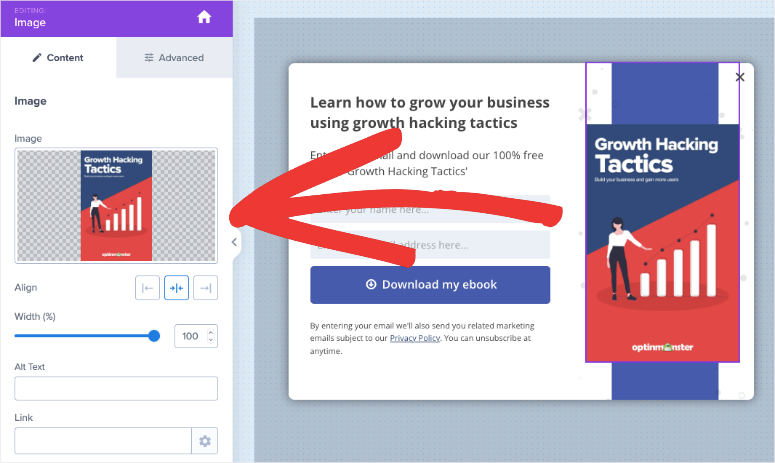
In the same way, you can select the CTA button and change the text to your own call to action. In the left menu, under the Advanced menu, you can change the button color, size, hover style, and more.
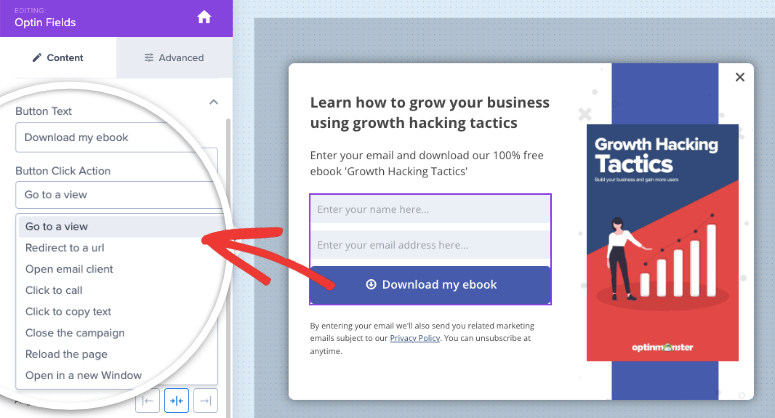
Under the Content tab, you can also change what action takes place when a user clicks on this button.
By default, OptinMonster displays a Success View. You can customize this view under the Success tab at the bottom.
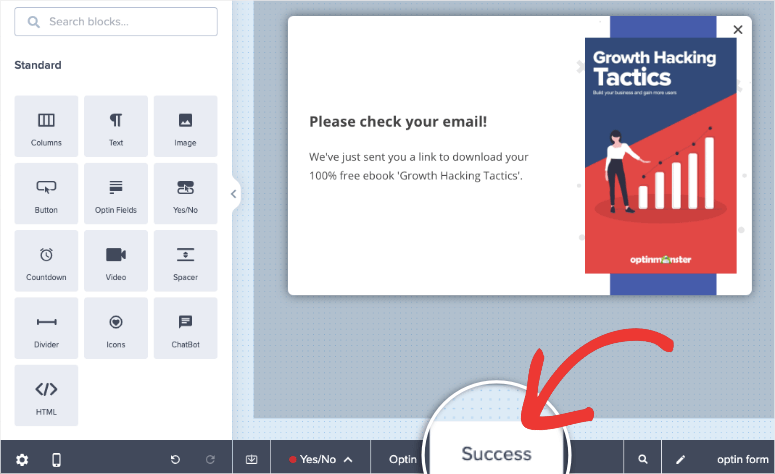
Feel free to explore more of OptinMonster’s settings, functionality, and customization options here. For instance, in the same menu at the bottom, you’ll see a Yes/No option.
This lets you create double opt-in forms.
Don’t forget to hit the Save button to store your changes. Next, we’ll show you how to set up targeting rules.
Step 4: Add Display Rules
We were telling you the whole truth and nothing but the truth when we said OptinMonster lets you add targeting rules with the click of a button. There’s absolutely no coding needed.
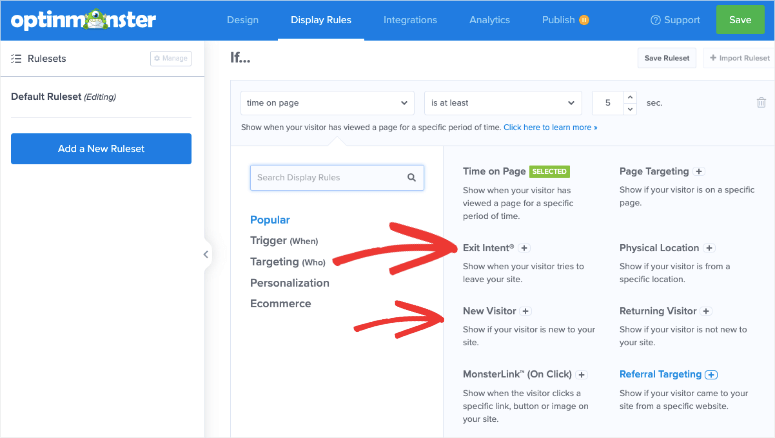
You’ll find the targeting options under the Display Rules tab in the top menu. Here, you’ll see that by default, your campaign appears to a user who spends at least 5 seconds on any page of your site, including the homepage.
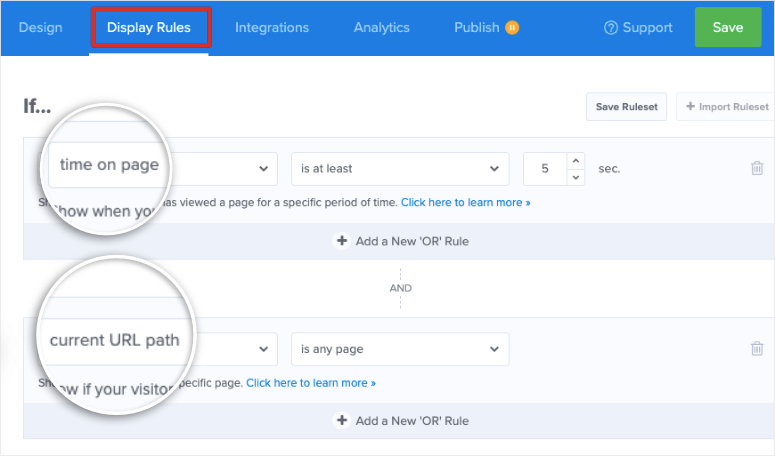
You can edit these rules to add your own. Simply click on ‘Time on page’ and you’ll see a list of rules that you can use. The rules are categorized by Popular, Trigger, Targeting, Personalization, and eCommerce. This makes it easier to explore and find what you’re looking for.
For this campaign, let’s display the form only to new visitors who are exiting the site. These website visitors usually leave and never come back to your website ever again. But you can try to catch them on their way out by displaying an Exit Intent popup.

There are plenty of case studies on the OptinMonster website that prove this method. Check out how Fastrack was able to recover 53% of abandoning visitors and increase sales using Exit Intent.
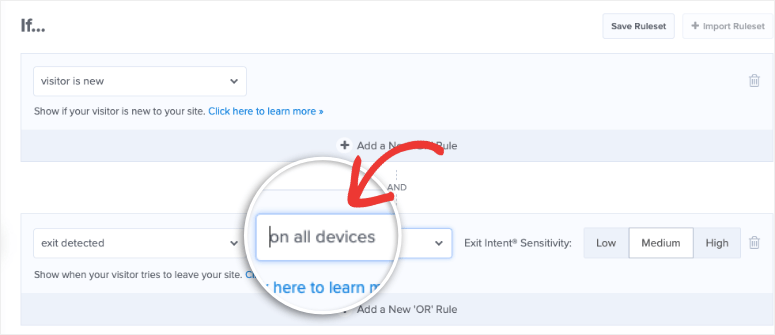
To add these rules, simply select New Visitor. Then edit the second rule in the same way, and select Exit Intent. That’s it. It’s that easy.
If you want to display the optin popup only on desktop, there’s an option to edit ‘on all devices’. This will let you control what campaigns appear on mobile devices according to your site’s design.
Now your popup is ready. Before we launch it on your site, we’ll show you how to link it to your email marketing service.
Step 5: Connect to Email Marketing
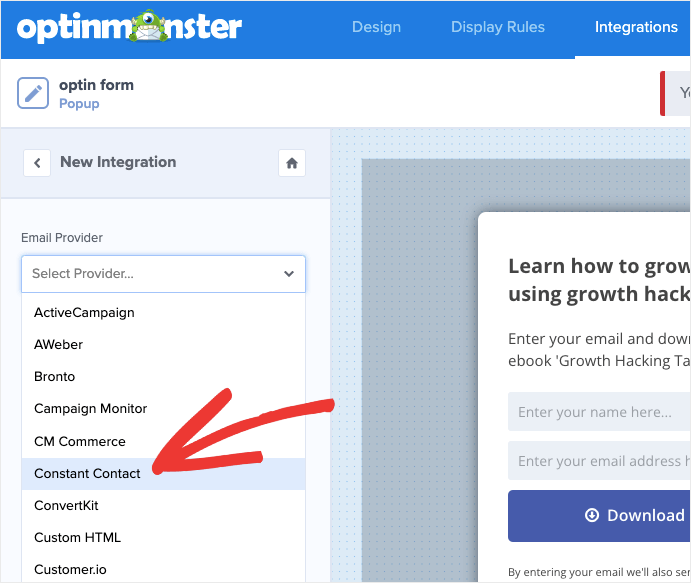
OptinMonster lets you connect to a long list of email providers that include Constant Contact, Drip, Aweber, ConvertKit, ActiveCampaign, Campaign Monitor, Mailchimp, Klaviyo, Sendinblue, and many more.
Under the Integrations tab, you can Add New Integration.
All you have to do is select your provider from the dropdown menu and follow the onscreen instructions here. For Constant Contact, you’ll first need to log into your email account and register OptinMonster there.
With other email providers like Mailchimp for example, you’ll need to add your API key.
You’ll find the API key inside your email provider account, usually under the admin or settings section.
Once you make the connection here, you’ll be able to tag and categorize your email subscribers according to which campaign they sign up for. This way, you can keep your email lists clean and organized. It also ensures that your new subscribers receive the right automated email campaigns you may have set up.
Now you’re ready to publish your first email optin form.
Step 6: Publish the Optin Form
Publishing your campaign is so easy. You simply have to go to the Publish tab in the top menu.
You can preview your form to see how it appears on your website. Then simply change the Publish Status from ‘Draft’ to ‘Publish’.
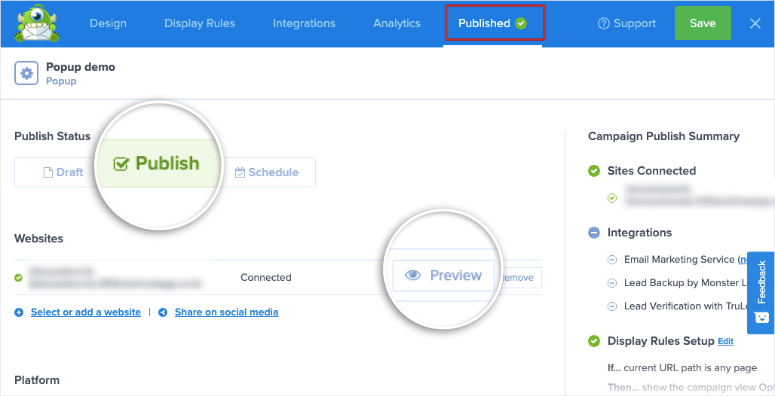
That’s it. If you’re using any other platform than WordPress, then you’ll find instructions on how to publish your campaigns here.
And one more thing, in WordPress, you’ll want to head over to your admin panel, and open OptinMonster » Campaigns tab. Here, you’ll see a list of the campaigns you create along with a Status column. Make sure the status is set to Published here.
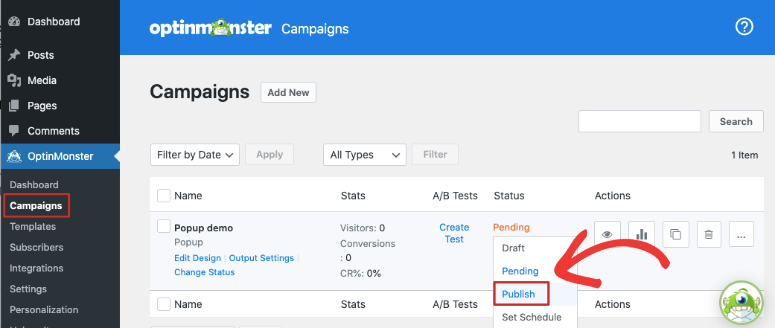
With that, you’ve successfully created and published your very first optin campaign with OptinMonster.
OptinMonster has a lot to offer like built-in analytics and split testing. You can explore these options as you learn how to use the tool.Up next, we’ll show you how to create a simpler version of your optin form that you can display in posts, pages, and sidebars.
Method 2: Create an Optin Form in WordPress using WPForms
WPForms is the #1 form builder for WordPress. You can use it to create optin, sign up, subscription, and registration forms. And it doesn’t end there. You can go on to build forms for just about any purpose like appointment bookings, job applications, event registrations, surveys and polls, and so much more.
WPForms has a smart visual form builder that’s beginner-friendly. You’ll get to customize your form using a live preview of the form. There are templates and a drag-and-drop builder to make things a whole lot easier.
Added to that, you can also use conditional logic to ask follow-up questions based on a user’s response. This lets you automate how you segment your subscribers into different lists based on their interests on your site.
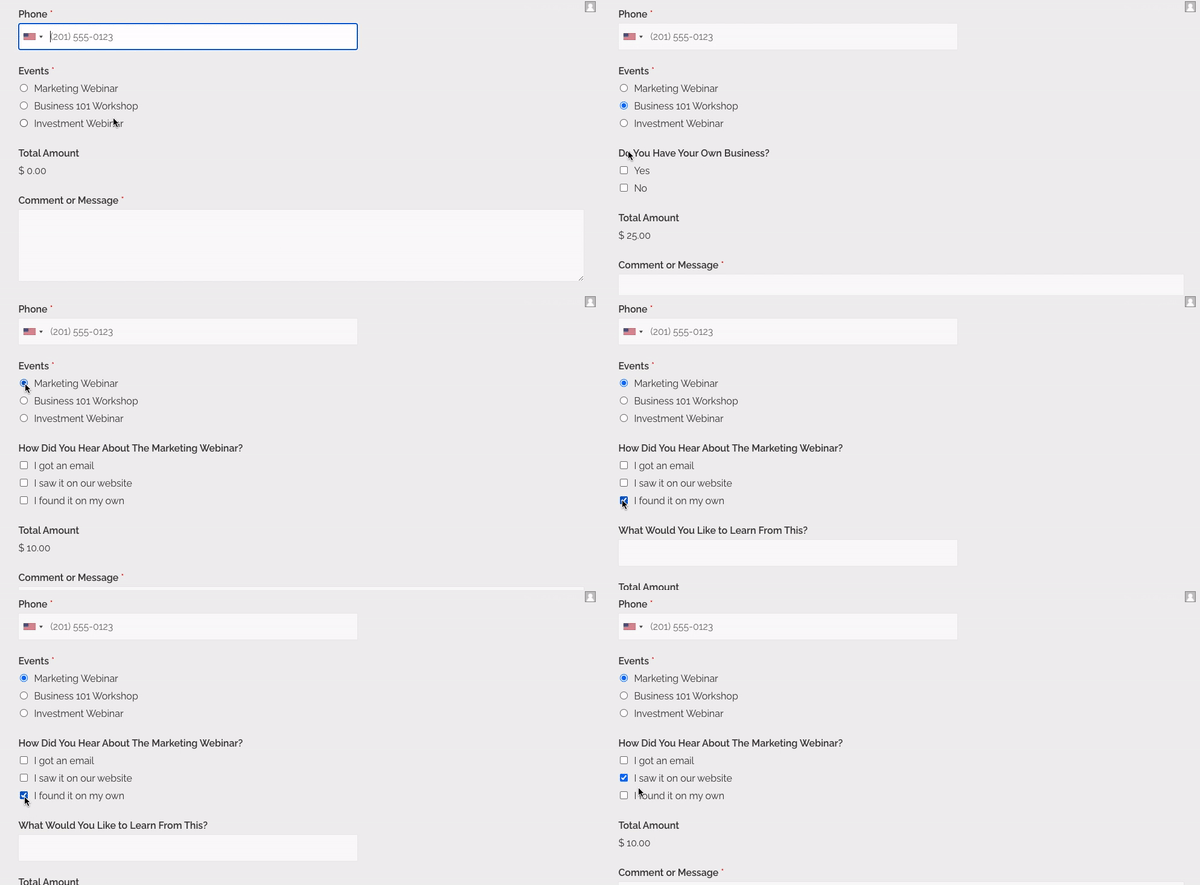
To top it off, you can connect your form to email marketing providers and payment gateways. So you can use your optin form to collect payments as well if you’re offering a premium subscription or membership.
WPForms has a free version that comes with enough features to build an optin form. So if you’re on a no-budget adventure here, then WPForms Lite is the best option. You can also buy a premium plan that starts as low as $39.50 per year. This will give you access to addons, advanced integrations with email and payment gateways, and more form field options.
Other highlights of WPForms include:
- Built-in spam and captcha protection
- Automated email replies
- Easy form entry management
- Free version available
- Reliable support team
There are many things that make WPForms our #1 choice. Read more about it: WPForms Review: Is It Worth the Hype?
Now, on to the tutorial!
Step 1: Install the WPForms plugin
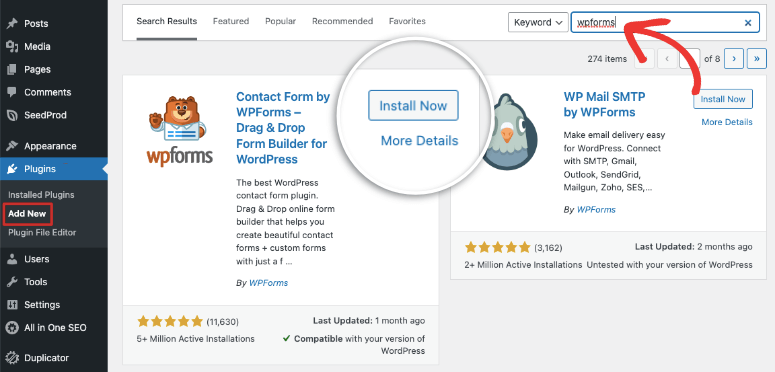
In your WordPress dashboard, go to Plugins » Add New page. Here, search for WPForms and install and activate the plugin.
If you’ve bought a pro plan, then you’ll find your download file and license key from the WPForms dashboard.
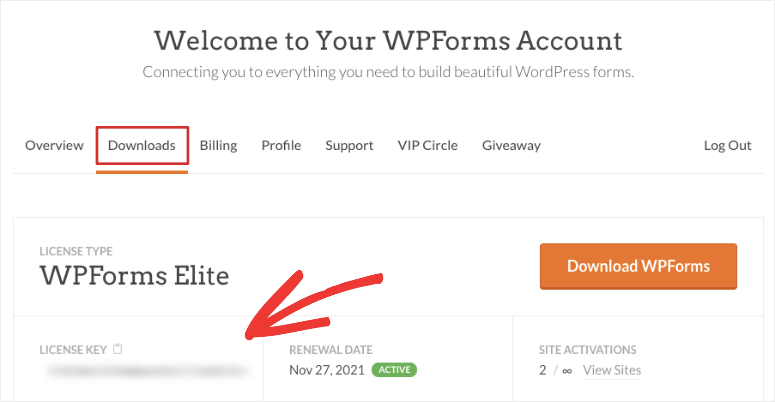
You need to install the WPForms plugin on your WordPress site. For more details on this, follow our easy guide on how to install a WordPress plugin.
After you install the plugin, open the WPForms » Settings page and enter your license key here.
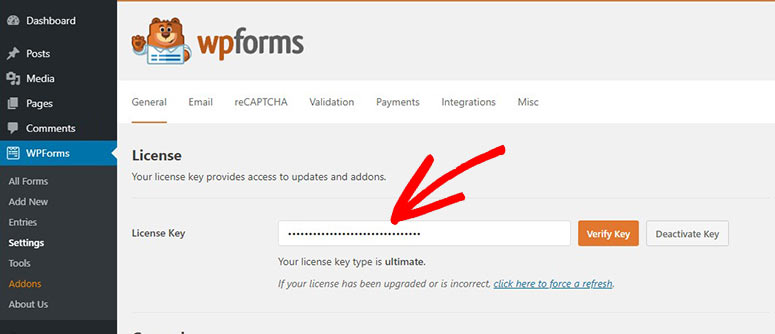
Then, click on the Verify Key button to see the success message. If you’re using the lite version, you can skip this part.
Now, you can start creating your WordPress contact form.
Step 2: Create a New Contact Form
To create a new form, go to WPForms » Add New tab on the left menu of your WordPress dashboard.
Then, you’ll see the template library with a list of categories on the list. This helps you find the form template you need. For this tutorial, let’s add a name for the form and then select the Newsletter Signup form.
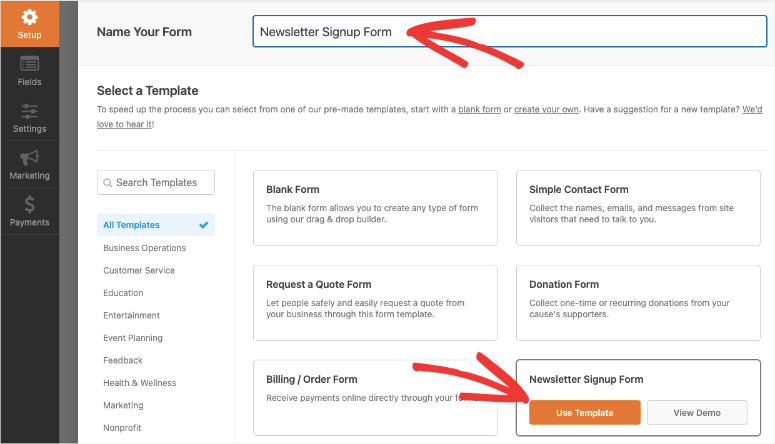
Click on the Use Template button to launch the form builder. Inside, you’ll see that the name and email fields are already added to the form.
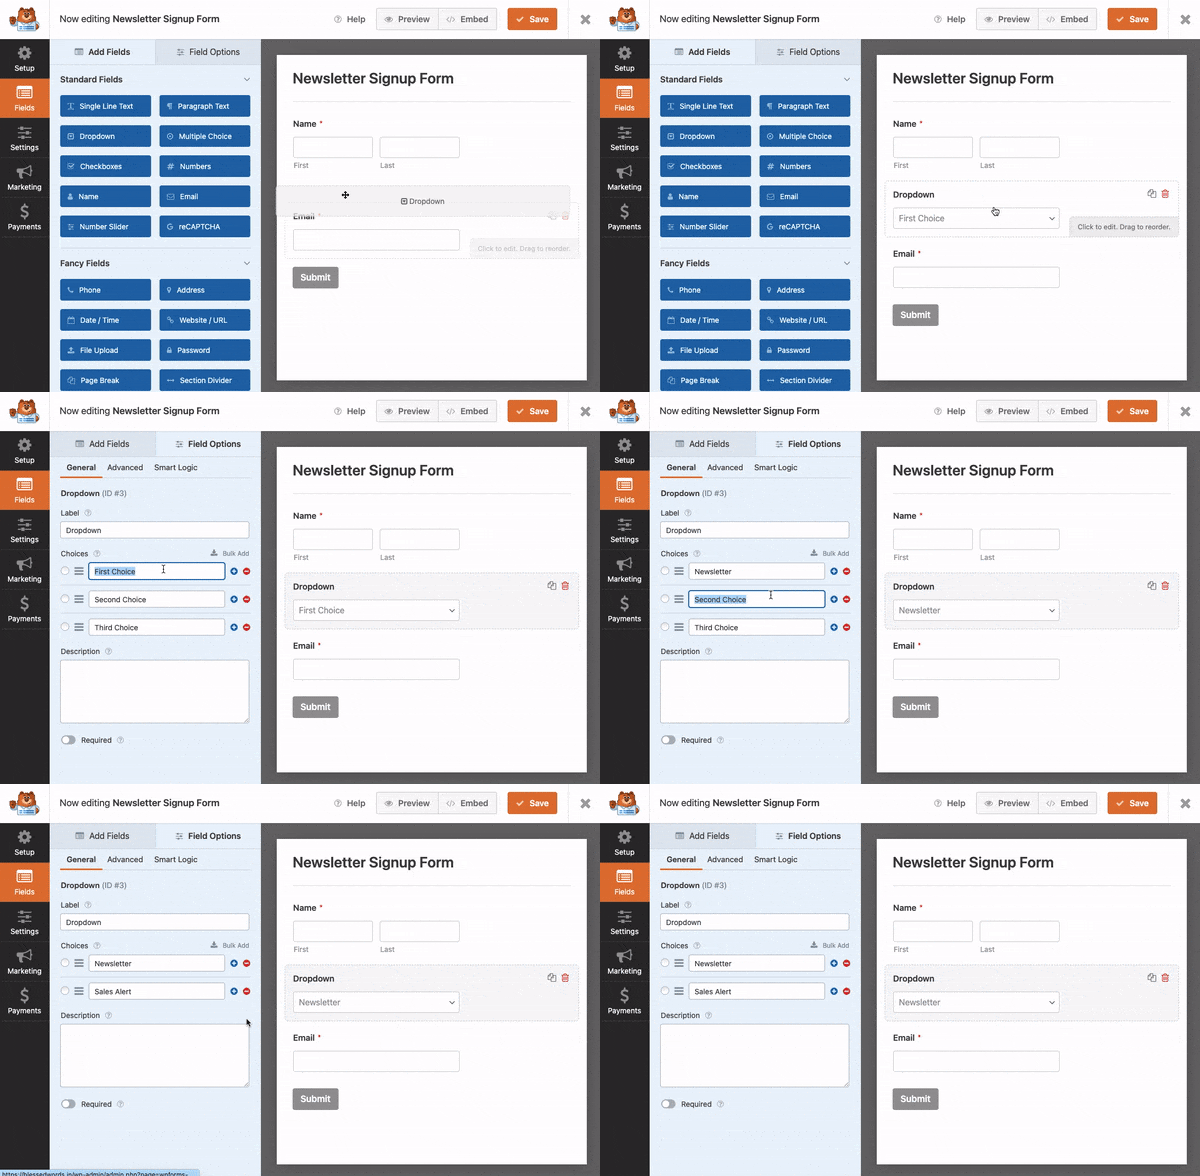
If you’d like to add more fields, you can drag and drop them from the left menu into the form preview on the right.
WPForms lets you add:
- Dropdown menus
- Multiple choice
- Checkboxes
- Numbers
- Number Sliders
It also comes with a Captcha field and this is all available on the free plan. If you want to capture more details such as the user’s phone number, address, website URL, or add payment fields, then you’ll need to sign up for the premium version.
When you select any form field in the preview, you’ll see options to change the label, description, and format. You can even mark the field as a required one. That way, if the user hasn’t filled out their name or email, then they won’t be able to submit the form.
Next, if you’d like to change the title and description of your form, simply click on the title. This will open the General Settings tab.
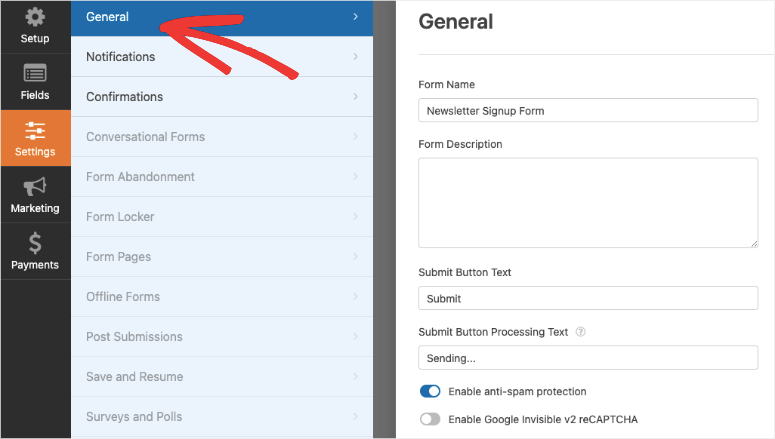
Here, you can customize the title and description to add more detail for the user to know what they’re signing up for. You could also add a line here to let them know that this will grant you permission to send them marketing and promotional emails from time to time.
Now, that’s all that’s needed here. Make sure to save your changes.
Step 3: Customize the Notification and Confirmation
When a user submits the form, you can send them an automated email reply. You can also send yourself or your team an email alert about the new subscriber.
Under the Settings » Notifications tab, you’ll see a default notification already set up. This sends a copy of the form entry to the admin email.
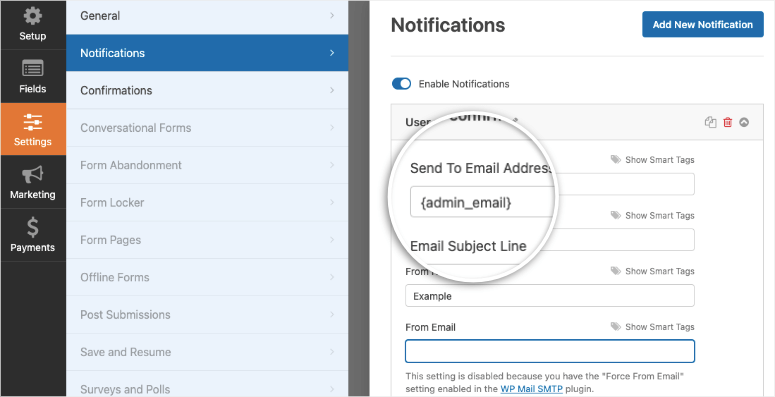
You can change the email or add multiple email addresses separated by commas. You can also edit the confirmation email message.
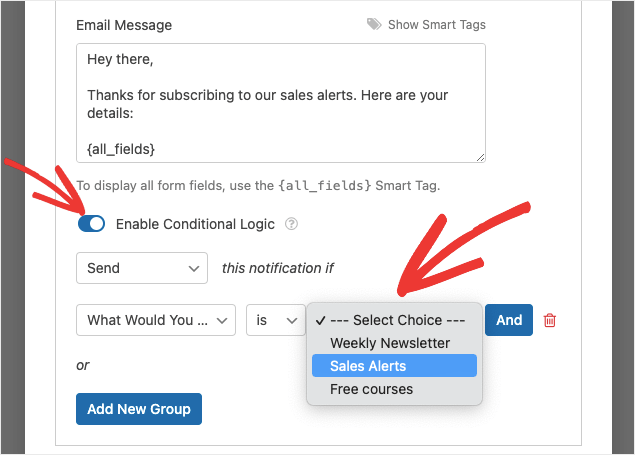
Now in case you’ve added a drop-down or multiple choice in your form, you can add smart conditional logic here. So for instance, if the person signed up for email alerts on upcoming sales, you can ensure this email alert goes to only your sales team.
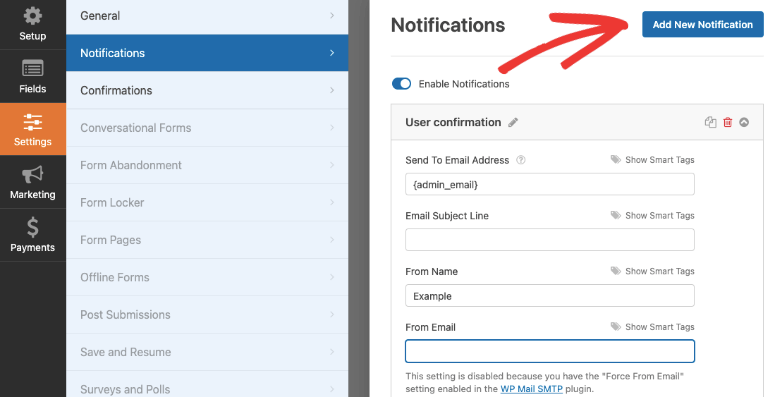
To send an automated email response to the user, simply Add New Notification at the top. Then in the ‘Sent to Email Address’ field, you’ll want to use a smart tag here.
Click on the ‘Show Smart Tags’ option and select Email. This will autodetect the email address the user has entered in the form.
Then you can customize the email subject line, from name, from email, and the email message. You can use this to thank the user for subscribing and to welcome them to your brand. You could also include notes on what they can expect next from you. For example, you can let them know that you’ll be sending an email newsletter every week with helpful tips on blogging.
That’s it. Make sure you save your changes before moving on to the next step.
Now you’ve set up email notifications, next we can look at confirmation messages that will appear on your website itself.
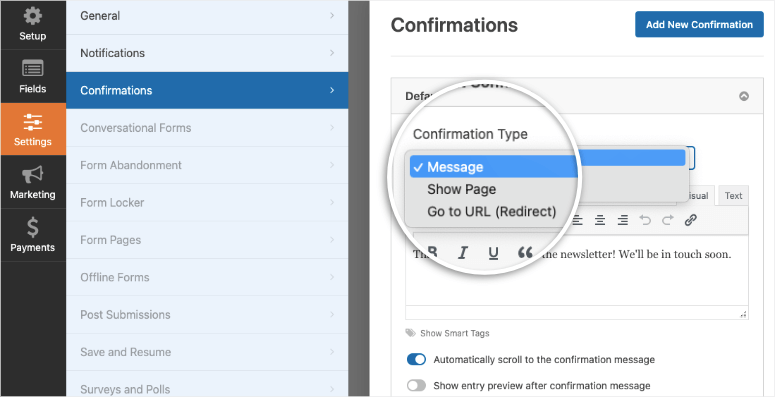
So as soon as the user submits the form, WPForms lets you:
- Display a message: You could thank them or confirm their subscription.
- Show page: You could display any page on your website such as your blog.
- Redirect to URL: This lets you take them to a third-party webpage that’s not a part of your website.
You’ll find these options under the Settings » Confirmations tab. It’s super easy to add these options so we won’t go into detail here.
For more detailed steps, see our guide: How to Set Up the Right Form Notifications & Confirmations.
Up next, we’ll show you how to integrate the optin form with your email service.
Step 4: Connect to Email
Under the Marketing tab, you’ll see the integration options available. Simply select your favorite provider and you’ll see an option to install and active the marketing addon for that provider.
Once it’s activated, you can select and click on the Add New Connection button. Then you can follow the onscreen instructions to connect to your account. In most cases, you’ll need to enter an authorization code or an API key that’s given to you by the email provider.
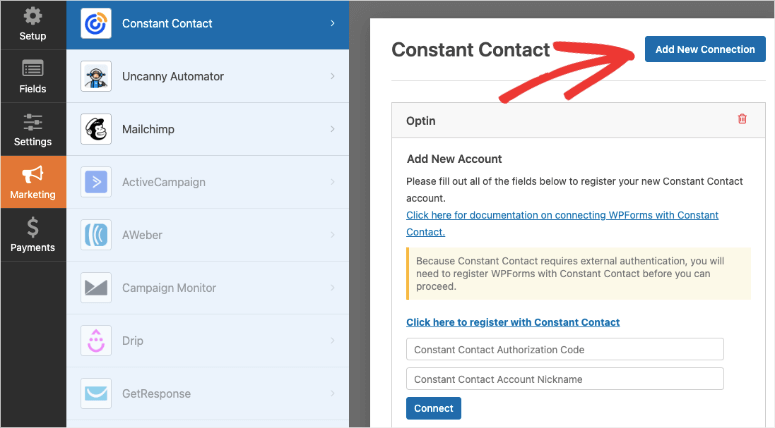
You can also connect to content marketing and automation platforms like HubSpot, Zapier, and Uncanny Automator.
Now your form is ready to go live.
Step 5: Publish the Optin Form
WPForms makes it incredibly easy to add the form to any page, post, or widget-ready area of your site.
Simply open a page or post in the block editor. Add a new block and search for WPForms. When you add this block, you’ll see a WPForms mascot along with a dropdown menu that lets you select the optin form you just created.
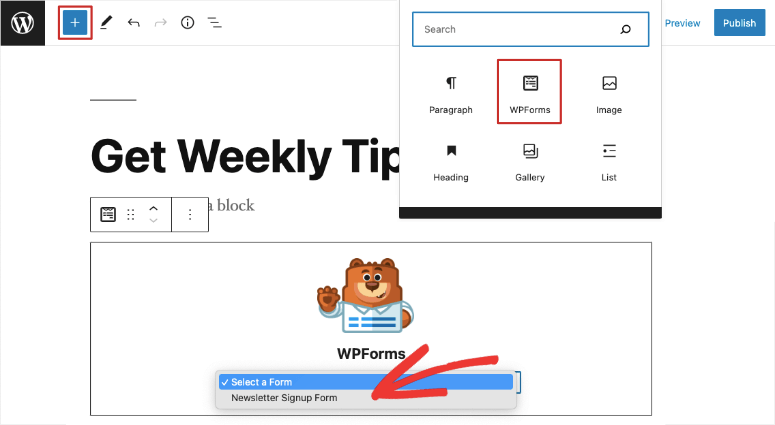
This widget is available in all popular WordPress builders like SeedProd and Elementor. In case you’re still using Classic Editor, you’ll see a button that lets you choose and embed the form.
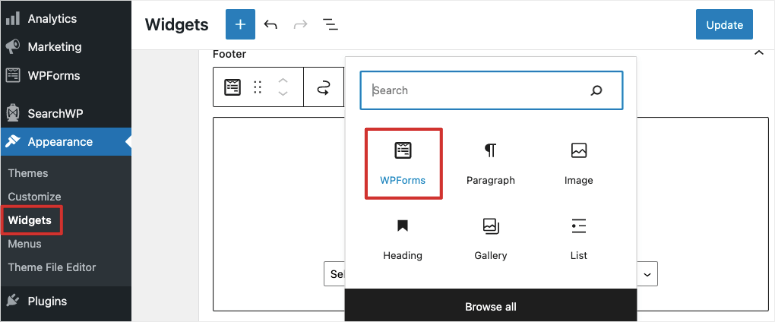
If you want to display the form inside a footer, header, or sidebar, head over to the Appearance » Widgets tab. Here, you’ll be able to add the WPForms block to your footer or sidebar using the same widget.
And there you have it. You’ve learned how to add both a stunning and simple optin form to your website.
Both tools give you insights and analytics inside their dashboard so you can see how many people are responding to your form.
If you’d like to build a dedicated opt-in page, then check out SeedProd. It’s the best landing page builder and comes with premade customizable templates to create the page you want.
It’s easy to create SEO-friendly pages complete with social media icons, headline animations, testimonials, and more. No coding needed although there is an option for developers to use custom CSS is they need.
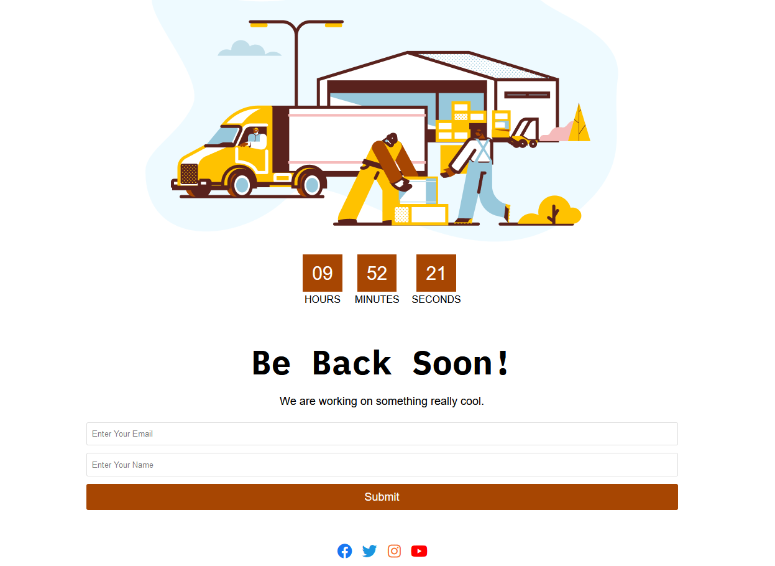
You can even display this page when your website is under construction or maintenance. That way, people can sign up for alerts or newsletters even when your site is down.
And a word of caution, if you’re using your WordPress website to send emails, you’ll want to test them to make sure they’re reaching your subscribers. Many times, WordPress emails fail because they’re based on a PHP system that isn’t always configured correctly with your web host.
This can be easily resolved with the WP Mail SMTP plugin. It’s a free plugin that’s easy to use. It will make sure your emails are being delivered and you can send test emails to be sure.
We hope you found this guide on creating an optin form helpful. Next, we answer some of the most frequently asked questions about WordPress optin forms.
FAQS: WordPress Optin Forms
Which is the best WordPress optin plugin to build a WordPress form?
The best free optin form plugin for WordPress is WPForms. If you want more targeting options, then OptinMonster is the best but it is a premium WordPress plugin.
Are there other WordPress optin form plugins?
Yes, there are plugins like Bloom (from Elegant Themes),Thrive Leads, and Ninja Forms. See our full list: 18 Best Form Plugins for WordPress (Most Are Free!)
Which is the best email service provider to link to optin form?
We recommend Constant Contact as the #1 email service provider for promotional, marketing, and transactional emails. They give you the right setup and features you need, and they have reasonable pricing plans. Other email services include Aweber, GetResponse, MailerLite, and MailChimp. See our full list: 8 Best Email Marketing Services for Small Business.
How do I add an Opt Box in WordPress?
Using OptinMonster, you can create an inline campaign. Then you can use a shortcode to embed the opt box in any page or post. See how: How to Create an Inline Form in 10 Minutes.
How to create a notification bar in WordPress?
You can use OptinMonster to create stunning notification bars. You can make them appear on the top or bottom of your site. It also lets you control who sees it, as well as when and where it appears. Follow this easy tutorial: How to Create a “Sticky” Floating Bar in WordPress.
Are there different types of opt-in forms?
Yes. There are different types of opt-in campaigns you can create. For instance, with WPForms, you can create simple subscription forms. Users can sign up for your newsletter if they want to. With OptinMonster, you can create all sorts of campaigns, like lightbox popups, floating bars, inline forms, and full-screen fillers. You can even create coupon wheels on Woocommerce sites. Every campaign helps you target your users differently.
Up next, you’ll find these posts helpful:
- 11+ Powerful WordPress Lead Generation Plugins Compared
- How to Grow Your Email List With Social Proof Notifications
- 7 Best Email Automation Tools to Improve Your Email Marketing
These posts will help you power up your email marketing and grow your subscriber list fast.

Is there an optin you can use with a free version of WordPress? It should be something that operates without having to download a plug-in.
Because the free version of WordPress won’t allow to download any plu-gins…
This article is written specifically for WordPress.org users. Free users of WordPress.com aren’t allowed to install a plugin on their site. You can check out our guide on WordPress.com vs. WordPress.org and how to migrate WordPress.com to WordPress.org.
Really very nice explanation. Screen shots were not shown for WPForms set up procedure.However,easy to follow.
Optin monster, WP Forms and Constant Contact are free or paid Tools?
Constant Contact and OptinMonster are paid tools. WPForms also has a free version on WordPress.org