Want to create and customize password protected page without touching a line of code?
By using password-protected pages, you can hide your content from visitors when it is under construction or when you want to give access to certain members only.
You can change elements like messages, images, and more on your password protected page and make it more engaging. However, customizing these pages on your own is very difficult without a developer. Or is it?
In this post, we’ll show you how to create and edit a Password Protected Page in WordPress on your own – without writing a single line of code.
Before that, we’ll cover why you need to customize your password protected pages.
Why Customize a Password Protected Page?
WordPress offers a simple way to password protect your pages and posts. With its default password protected feature, you can protect content on any page or post with a simple password.
But, the frontend view of this page is pretty plain. It only includes a simple text box for entering the password and a submit button.
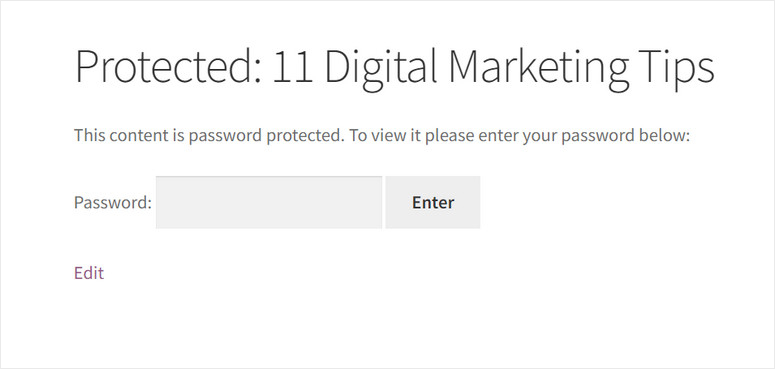
That’s not a good look for your website especially if you want to grant access to clients, members, or even your own team.
By customizing your password-protected pages, you can make them more appealing for users. You can even add your brand logo and social media profiles to grow your online presence.
And besides, adding useful content to your password protected page will also improve user experience and SEO. You can also embed a contact form so that users can contact you if they face any accessibility issues.
That being said, let’s learn how to edit your password protected page and add these page elements effortlessly.
How to Create a Password Protected Page in WordPress
For those who don’t want to hire a developer to create password-protected WordPress pages, we have the perfect solution.
With the help of a user-friendly WordPress plugin, you can easily make your password-protected page in a few steps.
The plugin we are going to use is SeedProd.
SeedProd is packed with powerful features that allow you to create any type of landing page in a few minutes. It’s lightweight so your website will perform at its best. This makes SeedProd our #1 choice of landing page builders in WordPress.
With SeedProd, you can create password-protected pages and customize them without any coding. It lets you set up coming soon, maintenance mode, and other landing pages with the access control option. This means you get to choose can view this page and block others from accessing it.
You can even lock your entire website and prevent users from seeing it.
SeedProd’s drag-and-drop form builder allows you to add useful content blocks such as headlines, text, CTA buttons, optin forms, contact forms, and more. You can also edit the design and layout of your pages without any coding.
Plus, it offers a template library with 100+ landing page templates along with under-construction, pre-launch, and 404-page templates.
Here are some of the highlights of SeedProd:
- Fully responsive so your password-protected page works well on all screen sizes
- Advanced permission controls
- 100+ pre-designed templates
- Google reCAPTCHA option protects your page from spam and malicious attacks
- 80 content blocks to personalize your landing pages
- Integration with email marketing services like Constant Contact, Aweber, ConvertKit, and more
With that, you can see that SeedProd is the perfect plugin to create password-protected pages. Here’s a quick preview of what you can create with SeedProd:
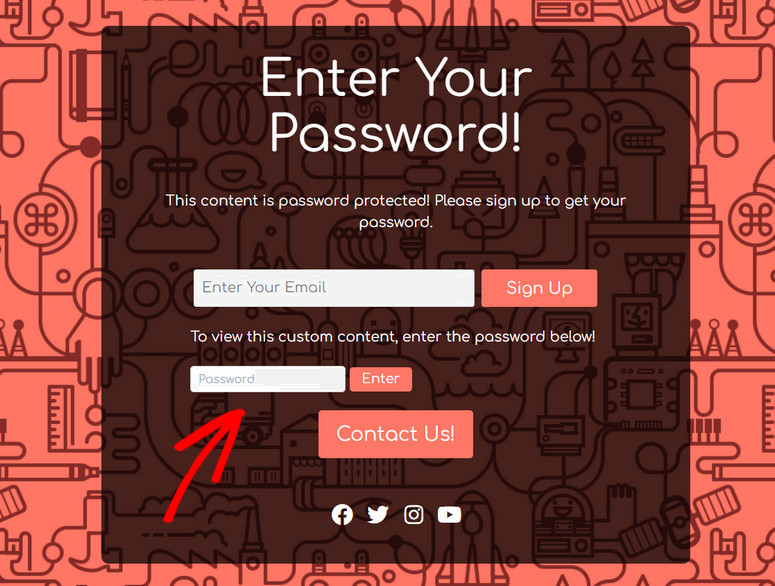
Now, we’ll show you how to create and customize this type of password-protected page with SeedProd below.
Step 1: Install and Activate SeedProd
First, you need to sign up for a SeedProd account. They offer different pricing plans for all types of businesses so you can choose one that is suitable for you.
After you sign up, you’ll get access to your SeedProd dashboard. Go to the Downloads tab to find your plugin file along with the license key.
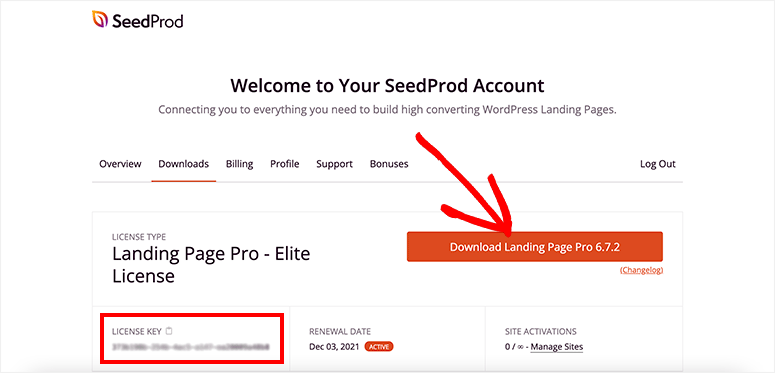
All you need to do is install the SeedProd plugin on your WordPress site. If you need help with this, you can check out our tutorial on how to install a WordPress plugin.
Once you install and activate the plugin, navigate to the SeedProd » Settings tab and enter your license key.

Then click on the Verify Key button to see the ‘verification successful’ message.
Now, you can create a password protected page and customize it in a few clicks.
Step 2: Create a Landing Page
SeedProd lets you create all sorts of landing pages for your site including sales, optin, coming soon, and maintenance pages. Then you can add permissions to restrict access to a certain page, post, or your whole website with a password.
From your WordPress menu, head over to the SeedProd » Pages and you’ll see the options to set up a coming soon page, maintenance page, 404 page, and login page.
We’ll select Coming Soon Mode here because it lets you lock your entire website with a password-protected page. Feel free to explore the other options here because the steps below will remain the same.
To get started, click on the Set up a Coming Soon Page button to customize a password protected page for your site.
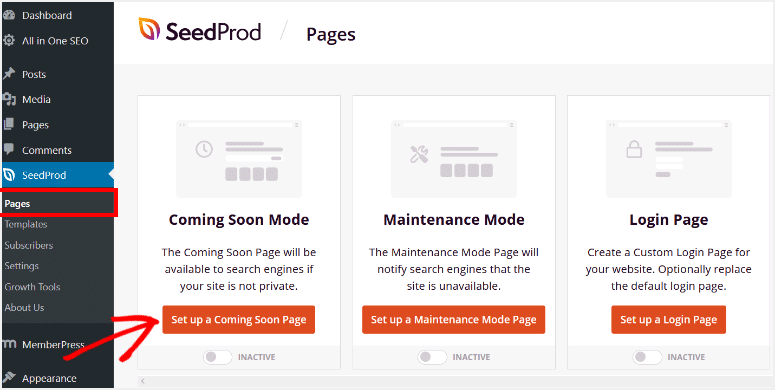
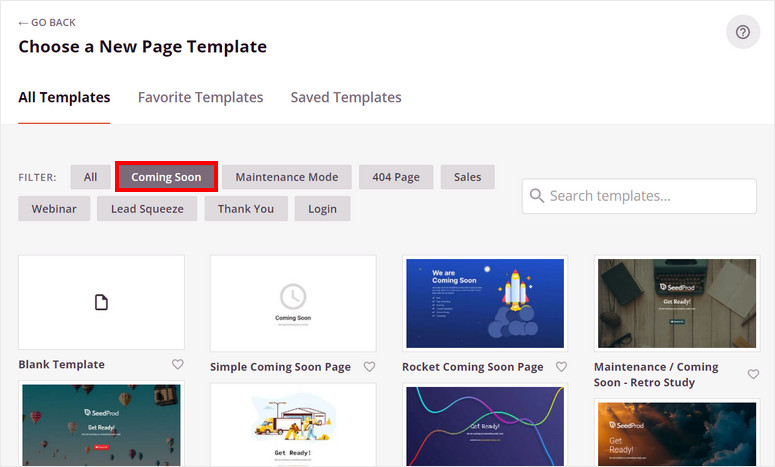
In the next window, you’ll need to choose a template for your coming soon password protected page.
SeedProd offers many beautifully designed templates to help you get started. You can use the filters or the search buttons to find the template that fits your requirements.
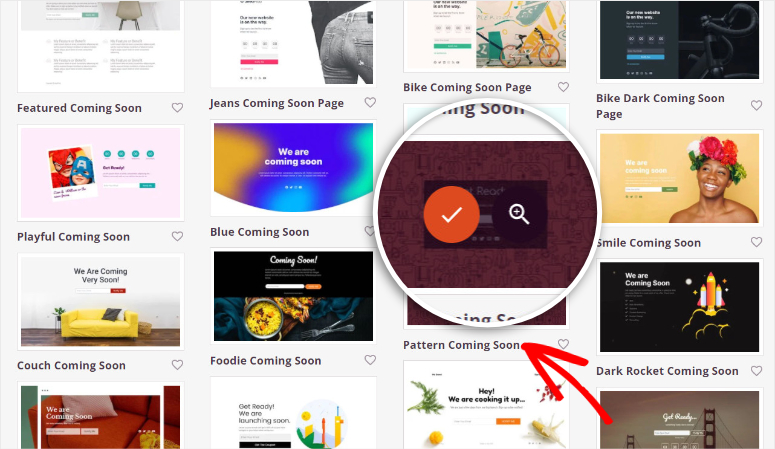
For this example, we are using the Pattern Coming Soon template.
To preview a template, you need to hover over it and click on the magnifying glass icon. Click on the tick icon if you want to use that template for your password protected page.
Now, we’ll show you how to customize your password protected coming soon template.
Step 3: Customize your Password Protected Page
After you choose a template of your choice, SeedProd’s drag and drop page builder launches automatically. Here, you can see all the content blocks on the left side and page preview on the right side of the page.
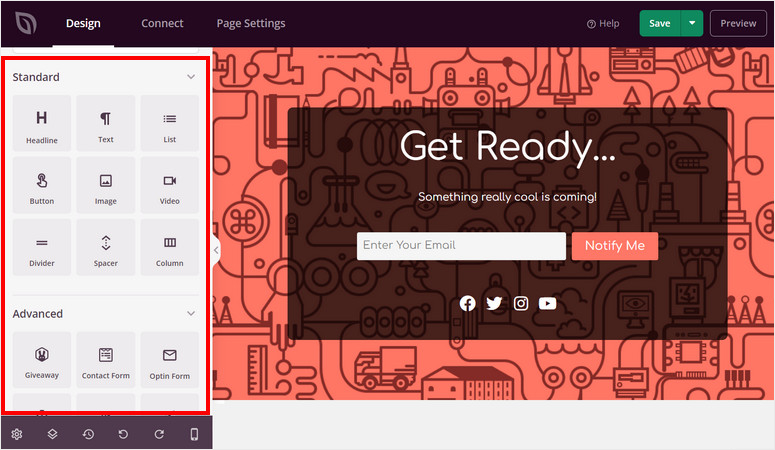
You’ll find all the necessary page elements to personalize your content such as headline, text, image, list, button, and more.
Additionally, SeedProd lets you insert high converting elements such as:
- Giveaway
- Optin Form
- Testimonials
- Star Rating
- Social Profiles
- Countdown
- and many more
The template already includes page elements like headline, content text, and optin form. You can edit or remove any block according to your preference.
To add a new content block simply drag and drop it on the live preview on the right side of the page builder. We are adding a Contact Us button on our password protected page.

To edit the block content and settings, simply click on the button and you’ll get options to edit the label, add links, and change button style.
Like this, you can easily customize any page element and add your own content as you like.
As we are creating a password protected page, we’re going to add customized messages to guide your website users.
If you want, you can add additional page elements such as social profiles and contact forms to make your password protected page more engaging.
Now, we’re going to add the password form to restrict access to your website content with a secret password.
Step 4: Add Password Protection
SeedProd offers a simple shortcode that you can add to make your content password protected: [seed_bypass_form].
This shortcode adds a password submission form on the front end of your page. You can insert this code using the Custom HTML block from the advanced blocks section.
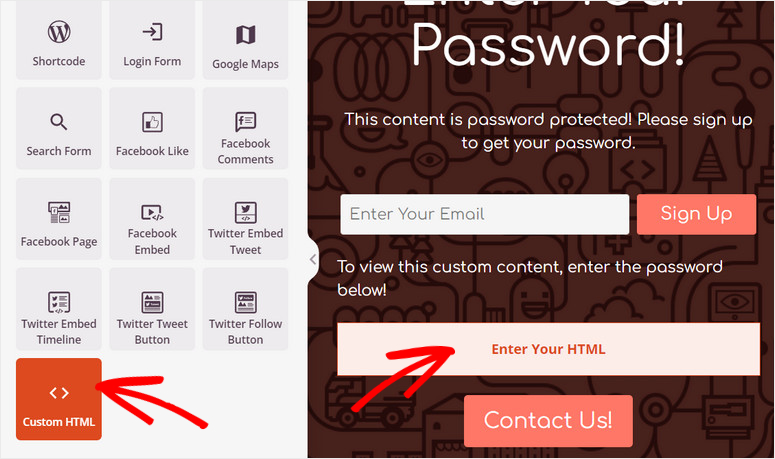
Just like other content blocks, you need to click on the HTML block on the page preview to insert the shortcode.
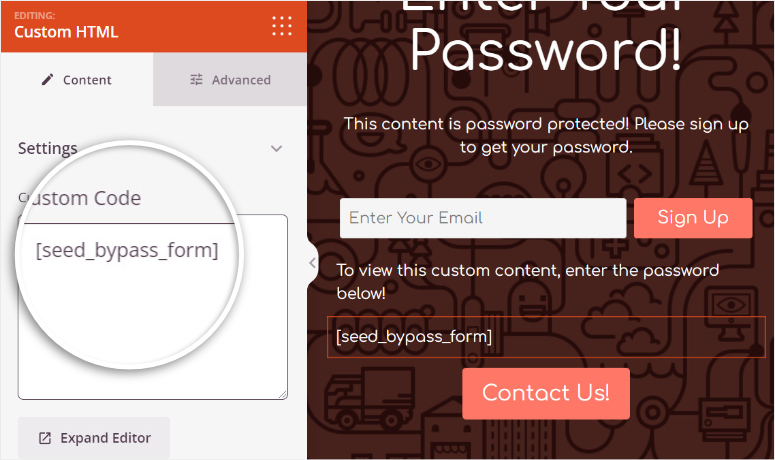
Once you’re done customizing, don’t forget to hit the Save button on the top-right of the page builder.
Step 5: Set Up Access Controls
In order to make the password element work smoothly on the front end, you need to set up the password as well. For this, you can click on the Page Settings » Access Control tab on the page builder.
Here, you’ll see options advanced options to control user permissions and access.
First, by default, SeedProd excludes specific URLs from your site such as login, admin, dashboard, and account. This ensures that you as the site owner never gets locked out of your own site. You can choose to turn it off but we recommend leaving this option as is.
Next, you can choose to use cookies to identify users instead of creating new WordPress users each time. For now, you don’t need this option.
The next field Bypass URL is the one we need to use to set up a password for the form you created in the previous step.
In the field space, you need to enter a secret key. This will act as your password that users can enter to get access to the restricted content.
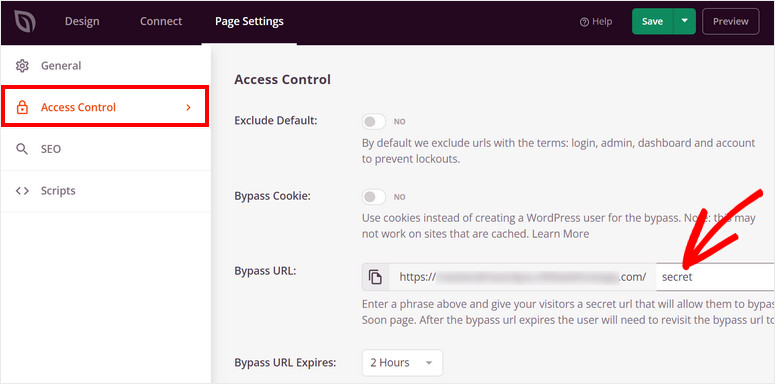
If you want to make it easier for clients or your team, you can also provide them with the whole Bypass URL. This will allow them to go directly to your site without visiting the coming soon page and entering a password.
Also, you can set the time limit for the users to access your protected content. After the time limit expires, the users will need to enter the password again.
Next, SeedProd lets you give access to the password protected page by the user’s IP address or roles.
By default, your password protected page is displayed on your entire website. You can change this and display the page to selected pages as you want.
For this, you’ll need to scroll down to Include/Exclude URLs settings and choose the Include URLs option. Then you can add the URLs to the page or post that you want to restrict with the password.
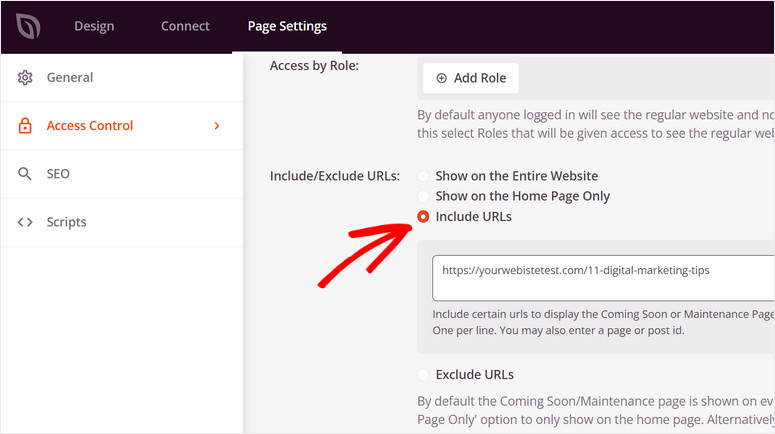
After you finish setting up the access controls, click on the Save button so you don’t lose progress.
Step 6: Connect Email Marketing Provider
There is one more thing you need to do before you publish your password-protected page on your site.
If you add an opt-in or sign-up form on your page, you can connect with your favorite email marketing service and send automated emails to your users.
SeedProd offers integration with all the popular email marketing providers such as Constant Contact, AWeber, ConvertKit, Drip, and more.
For this, navigate to the Connect tab on the page builder and select your email marketing provider.
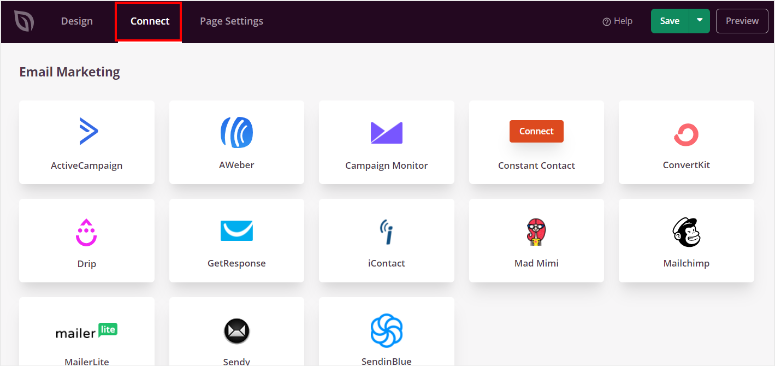
To connect your email service account, click on the Connect New Account button and follow the instructions on the screen.
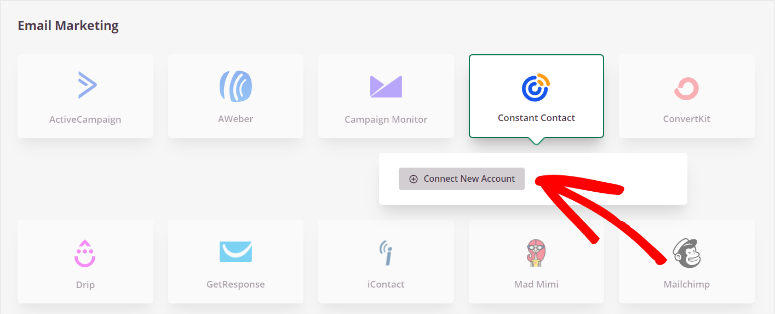
Most of these services require you to enter an API key to make the connection. You can get your key from your email account.
Now, you can make users sign up for your email list and send autoresponder emails with the password. With this, get access to your protected content after signing up.
Make sure you save your settings at the end.
Step 7: Publish Your Password Protected Page
All you need to do now is publish your password-protected page and activate the coming soon mode on your website.
On the top right corner of the page builder, you’ll see the dropdown menu next to the Save button. Simply click on the Publish button to display the page on your site.

Once you do that, you’ll see a popup window that notifies that your page is successfully published.
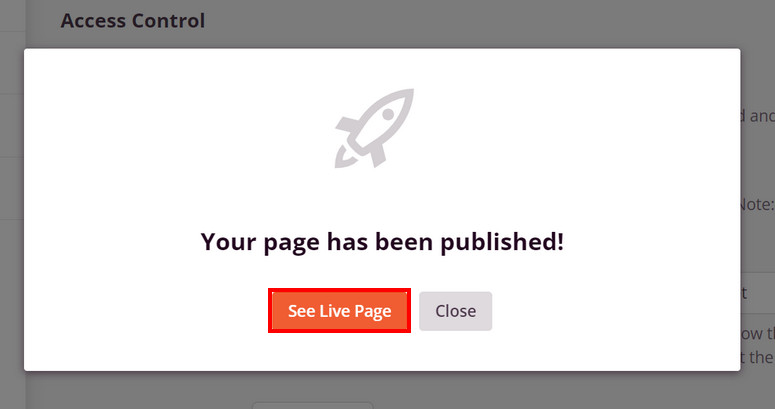
Then navigate back to your admin panel and click on the SeedProd tab.
Now, you just need to activate Coming Soon Mode. On the SeedProd tab on your admin panel, you can enable the coming soon page with one click.
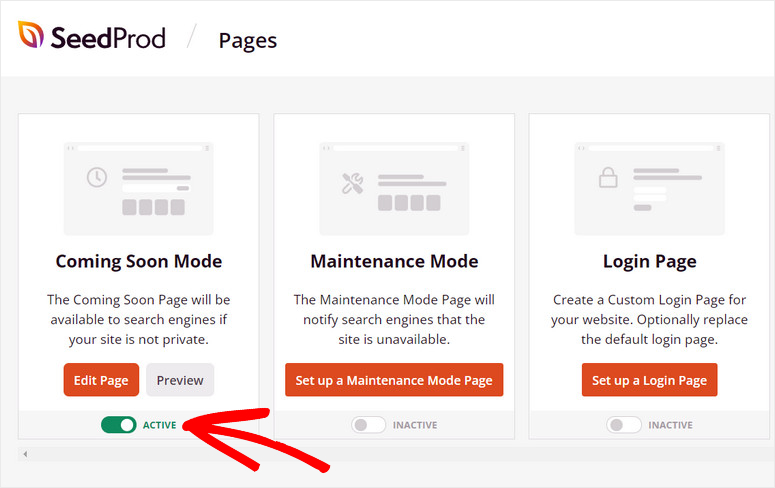
With that, you’ve successfully created and customized your password-protected page without coding or help from a developer. You can preview the page to see how it looks on the front end.
With SeedProd, you can create any type of page for your site in a few clicks. It is very easy to use so even beginners can customize their password-protected pages or any other landing page with ease.
SeedProd is a landing page builder that offers tons of powerful features that help you generate more leads. You can create a stunning lead squeeze page to grab the visitors’ attention and make them sign up.
If you’re looking to lock premium blog content to get users to subscribe, then you’ll want to give OptinMonster a try. It is the best lead generation plugin for WordPress that lets you create attractive marketing campaigns like popups, banners, welcome mats, and many more.
With this tool, you can give viewers a sneak peek of your content and add an inline form that lets them sign up for an account to access your content.

OptinMonster also comes with powerful targeting and retargeting rules to display offers based on location, device, user interests, and more. This makes sure that all your campaigns are displayed to the right people at the right time in their customer journey.
That’s all for today! We hope this tutorial helped you learn how to edit a password-protected page without any trouble.
If you want to learn more about protecting your site and content, you can check these posts:
- How to Include Password Protected Posts in Search Results
- How to Protect Your WordPress Site From Duplicate Content
- Best WordPress Firewall Plugins for Security & Protection
These posts help you protect your website from duplicate content and include your password-protected post in the search results. The last one will help you prevent any malicious attacks and spam on your WordPress site.

Thank You It Helps me a Lot ☺️