
Do you want to create coupons with WooCommerce to boost sales?
Offering a discount coupon to your customers is a great way to attract more sales and revenue. Customers are constantly looking for the best possible price from the moment they start searching for a product until they make the final checkout.
In this tutorial, we’ll show you how to create WooCommerce coupons for your products in minutes by using a plugin and without a plugin.
We’ll also show you which method is the best for you. So let’s begin.
Method 1: Add a Coupon to WooCommerce With a Plugin
Let’s first check out how to add coupons to WooCommerce with a plugin. We’ll use the Advanced Coupons plugin to show you how to do it.
Step 1: Install the Advanced Coupons Plugin
We’ll get started by installing and activating the Advanced Coupons plugin on your WordPress website. Once done, go to WooCommerce » Coupons » Add Coupon.
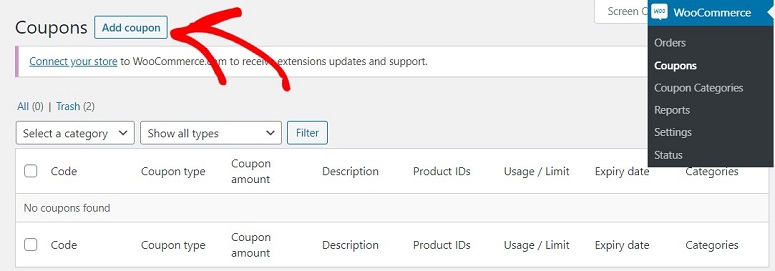
You’ll now be on a new screen where you can create your coupon. In the first field, you can add your coupon code. Just below that, you have a field to add the description of your coupon. This can be anything that describes your discount.
For example, you can add your discount conditions, limitations, etc in this field. This makes it easier for your customers to understand if there are any redeeming rules.

Step 2: Scheduling Your Coupon
Once the coupon code is created with Advanced Coupons, it’s time to schedule it. For that, go to the Coupon Data section just below where you have created your coupon code. Here you’ll see several options.
- General
- Usage Restriction
- Usage Limits
- Cart Conditions
- BOGO Deals
- Add Products
- Scheduler
- Role Restrictions
- URL Coupons
- One Click Apply Notification
- Shipping Overrides
Click on Scheduler.
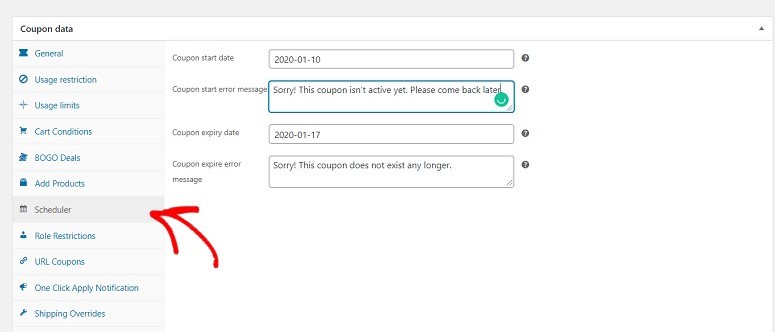
Here you’ll have a field to add a start date. In this field, you can add the date when you want the coupon to start working. Just below that field, you’ll find an option to write your Coupon start error message.
You can also find fields for adding Coupon expiry date and Coupon expiry error message.
Step 3: Publishing Your Coupon
Now on the right side of your screen, just below the Publish button, you’ll see three options. The first one is to add a category to your coupon. By adding a category you can keep your coupons organized. You can add a parent category and a sub-category too.
The second option is to enable the auto-apply feature. By enabling this option you can ensure that the coupon gets automatically applied to the user’s cart if they are purchasing a product in which it is valid. If you don’t want to use this feature just keep the box unchecked.
The last option is to clone the coupon. This option lets you create an exact copy of the same coupon with just a single click. Of course, you can edit the fields if you want later. This option helps save a lot of time and streamline the coupon scheduling process.
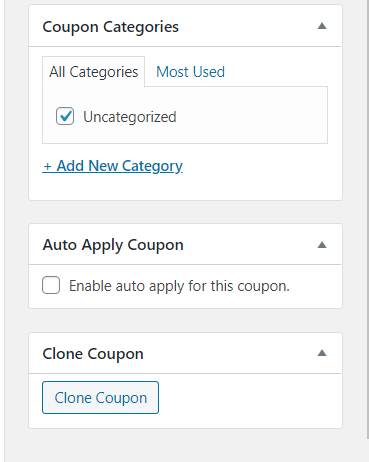
Once that’s done, hit the Publish button just on top of these options. Your coupon should be scheduled right away. On the start date, it’ll automatically go live and will expire itself on the end date.
Method 2: Scheduling a Coupon in WooCommerce Without a Plugin
By default, WooCommerce comes with Coupons option that allows you to set it up without the help of any third-party plugins. Here’s how you can do it.
Step 1: Create a Coupon in WooCommerce
Since you’re willing to schedule a coupon on your WooCommerce site, we’re assuming that you already have the WooCommerce plugin installed in your online store. So log into your WordPress dashboard and go to WooCommerce » Coupons.
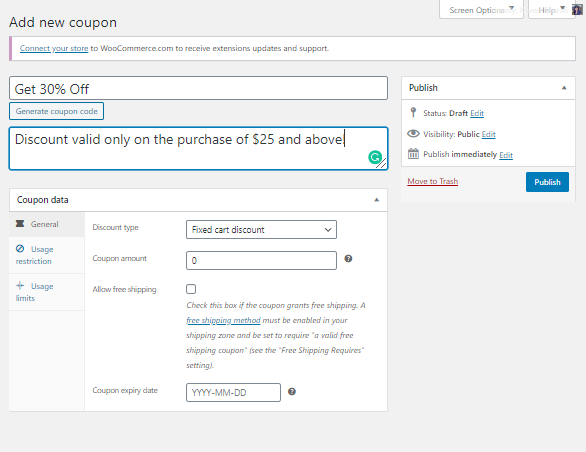
You’ll now see the following on your screen. Click on the Create your first coupon button.
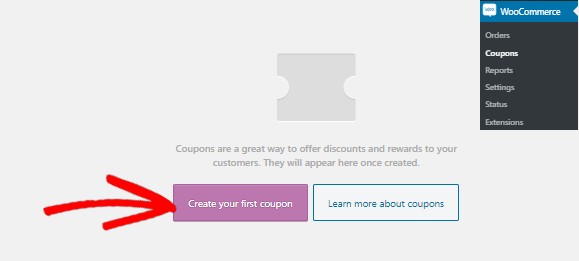
You’ll see several options on your screen. Start by adding a name or code to your coupon. Below that, you’ll see a field where you can add a description to your code.
In the next step, you’ll have to schedule your coupon. For that, you need to edit its timing.
Step 2: Edit Publish Date of Your WooCommerce Coupon
In this step go to the right of your screen. Here you’ll see the Publish option. Click on the Edit link just above the Publish button.
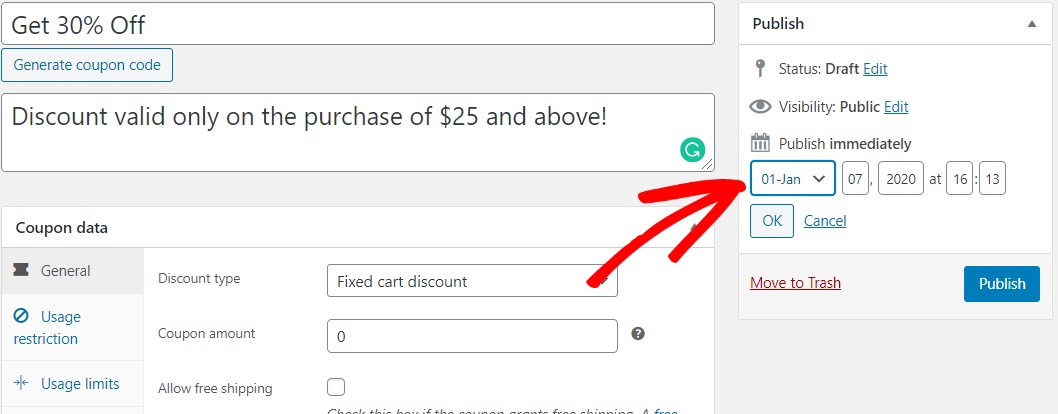
You can now add the exact date and time when you want the coupon to go live. Once done, hit the Publish button. Your button will now change to Schedule. And that’s it. The coupon will automatically go live at the specified time.
Step 3: Selecting an Expiry Date for Your WooCommerce Coupon
With WooCommerce, you can choose a date for your coupon link to expire automatically. To enable this option, scroll down the screen and you’ll see a coupon data panel with three tabs:
Select the General tab. Here you’ll see an option called Coupon Expiry Date.

Click on this field. You’ll see a calendar popup on your screen. In this calendar, you can select the date when you want your coupon to expire.
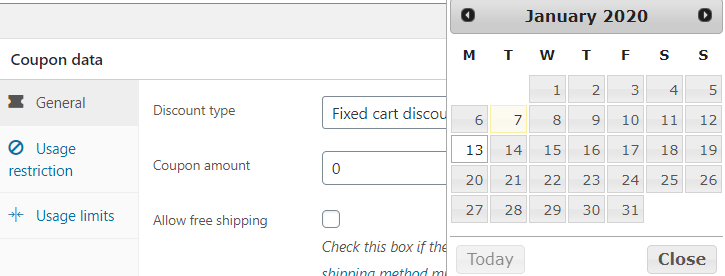
Once done hit the Update button on the right side of your screen. Your coupon is all set to go live on the set date and time and will expire automatically as well. That’s how easy it is to schedule a coupon in WooCommerce.
Which Option is the Best to Schedule Coupons in WooCommerce
You must be wondering why to install a plugin when you can schedule your coupon with the default option offered by WooCommerce. However, we would always recommend you to opt for the plugin rather than going for the default option.
The default option comes with a limited feature set as compared to the Advanced Coupons plugin. For example, the default option doesn’t let you clone the coupon or enable the auto-apply feature. The auto-apply feature is a great option if you’re giving away free gifts. Apart from that Advanced Coupons also offers several other options under the Coupon Data section.
If you’re using the default WooCommerce option you have only 3 options under your Coupon Data section.
- General
- Usage Restriction
- Usage Limits
But with the plugin, you have a lot more options than just these. You can use them to notify your users about an available coupon, let them know if their cart has met the conditions for the coupon to be applied, and so on.
The free option is good for those who have just started off and doesn’t need much customization. But if you’re an advanced WooCommerce user, it’s always better to opt for the plugin. Alongside coupons, a CRM tool is pretty helpful in managing great relationships with your customers.
Next, you may be interested in our round-ups of the best plugins to drive sales and revenue:
- Best ‘Out of Stock’ Plugins for WooCommerce Stores
- 7 Best WooCommerce Upsell & Cross-Sell Plugins
- 5 Best Live Sales Notifications Tools to Boost Revenue
We hope you enjoyed this guide. If so, you might also want to know how to further monetize your website.

Comments Leave a Reply