Do you want to create a WordPress membership site? Used by over 30% of the websites online, WordPress is a highly-flexible and easy-to-use platform where you can create a membership site all by yourself without touching any code.
In this article, we’ll show you how to build a membership site in WordPress (step-by-step).
What Is a Membership Website?
A membership site is a type of business website with some locked content that only registered members can access. It allows you to hide premium content behind a paywall, so not everyone can access the content – only those who have keys. Here, ‘membership’ serves as the key to your paywall. You can either charge people for subscribing to a membership plan or require them to register an account for free.
Here are some benefits of creating a membership site:
- You can earn recurring income by selling memberships.
- You can establish yourself as an authority by providing great content behind a paywall.
- You can create a highly-engaging email lists and use them for your email marketing campaigns.
A full-fledged membership site allows you to create different levels of memberships. Then, you can allow access to your content based on the membership level of the subscribers.
Another benefit is that you can sell your products for a one-off fee or sell it via recurring subscriptions.
Requirements for Building a WordPress Membership Site
To build a WordPress membership site, you’ll need the following things:
- A domain name: It’s the web address of your website such as IsItWP.com or Google.com. You can head on to our domain name generator to pick a good name for your membership website.
- A web hosting account: This is where your site files are stored. There are numerous hosting services that can help you kick off in no time.
- A membership plugin: It will convert your normal website into a membership site.
- SSL Certificate: It enables a secure connection on your site for accepting online payments.
Now, we’ll show you how to build a fully-functional membership site in WordPress.
Step 1: Set Up Your Membership Site With WordPress
First, you’ll need to make sure that you’re using the correct version of WordPress. WordPress.com and WordPress.org are the 2 WordPress flavors available. However, we recommend using WordPress.org as it offers great flexibility for creating a membership site.
Since WordPress.org is a self-hosted platform, you’ll need to purchase a hosting server and a domain name before you begin. You’ll also need to buy an SSL certificate for making secure transactions on your site.
Typically, a domain name costs around $14.95 per year, web hosting around $7.99 per month, and an SSL certificate around $49.99 per year.
When you’re starting out, the total price of building a website can seem quite high.
But we have sorted this out.
We’ve made a deal with Bluehost and now they offer a free domain, free SSL certificate, and a substantial discount on web hosting to our users.
You can now get all of the above for just $2.75 per month. Much better!
Click Here to Claim This Exclusive Bluehost Offer »
Bluehost is a recommended by the official WordPress.org website and top WordPress blogs including WPBeginner. It’s been one of the most popular WordPress hosting providers since its launch in 2005.
After signing up for web hosting, you’ll need to install WordPress on your site. Here’s our detailed beginner’s guide on setting up a site in WordPress for more information.
Step 2: Choose a WordPress Membership Plugin
A WordPress membership plugin helps you to transform your regular WordPress website into a membership site. Therefore, it is very important to choose the right plugin for your specific needs.
With such a large number of WordPress membership plugins on the market, it’s often difficult to pick one. So, for your convenience, we’ve reviewed the best membership plugins to help you choose the perfect plugin for your membership site.
After our in-depth comparison of the best WordPress membership plugins, we’ve chosen MemberPress for this tutorial. It’s the most popular membership plugin out there.
MemberPress comes with plenty of features and functionalities that allow you to:
- Create multiple types of memberships.
- Restrict access to content based on membership levels.
- Set up one-time or recurring payments.
- Generate coupons for promotions and giveaways to attract new members.
- And much more.
MemberPress also offers powerful LMS features so you can create, manage, and sell online courses.
Read our complete MemberPress review for more details.
Other great options include Wishlist Member and MemberMouse.
If you plan on setting up a membership site to sell online courses, then you could check out LearnDash and Thrive Apprentice.
Step 3: Set Up Your Membership Plugin
Now, let’s start setting up the MemberPress plugin on your WordPress site.
The first thing you’ll need to do is install and activate the MemberPress plugin. For more details, read our step by step guide on installing a WordPress plugin.
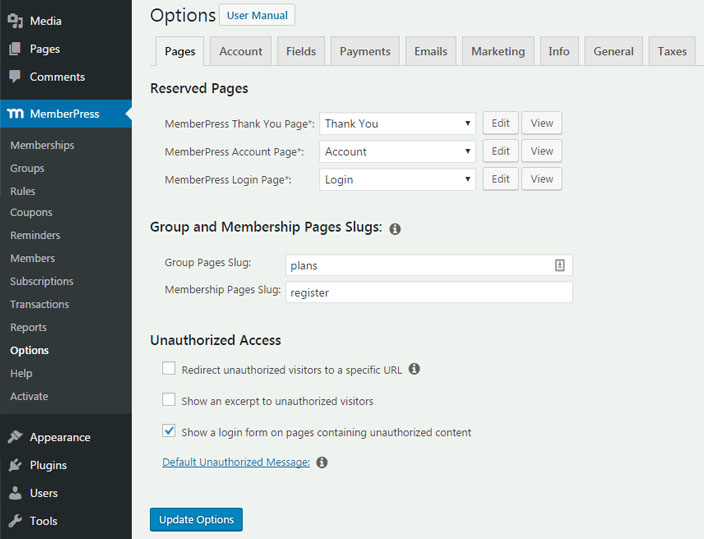
Once you’ve activated the plugin, it’ll show you a notification bar directing you to go to the options page.
When you click on the options page link, it’ll take you to the MemberPress options page.
You can configure all the plugin settings from here.
Step 4: Add a Payment Method
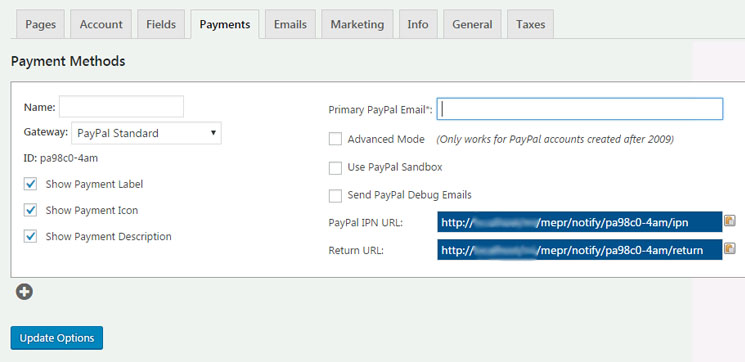
Next, you’ll need to set up payment gateways for your membership site. To configure payment settings, you’ll need to open the Payments tab in the Options page.
You can add and configure one or multiple payment methods from this section. Furthermore, you can choose whether to show payment labels, icons, or descriptions.
MemberPress supports PayPal (Standard, Express, and Pro), Authorize.net, and Stripe for accepting payments.
Step 5: Create Membership Levels
The next step is creating membership levels that your users can purchase. Using MemberPress, you can create multiple membership levels each with a different pricing plan, features, and access. You can even create a free membership plan and use it for collecting emails.
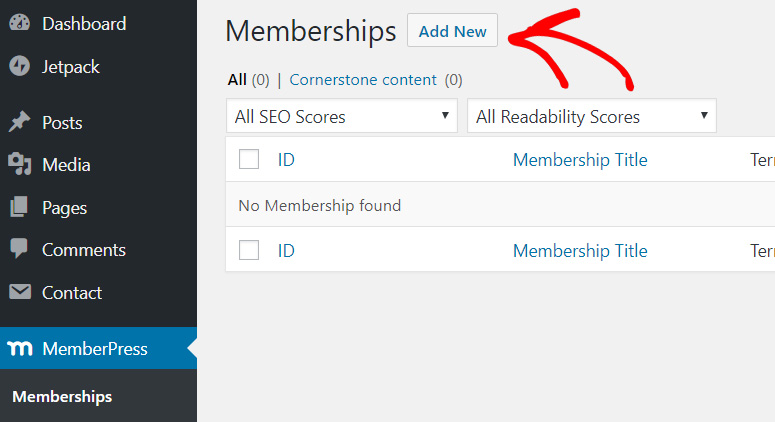
To create a membership level, you’ll need to visit MemberPress » Memberships in your WordPress admin area. Then, click the Add New button at the top.
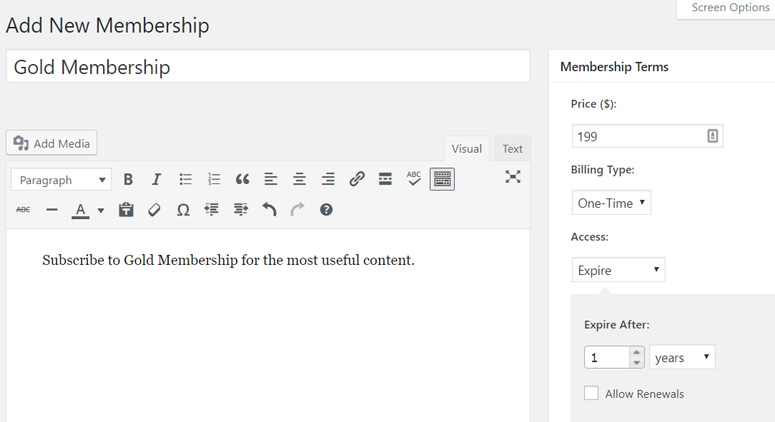
Then, you’ll see a page for creating a membership like the one shown in the screenshot below.
Enter a title for your membership plan, and then provide your membership plan details in the content editor.
Then, on the right side of the page, you’ll see a Membership Terms section. Set a price, billing type, access duration, and renewal option.
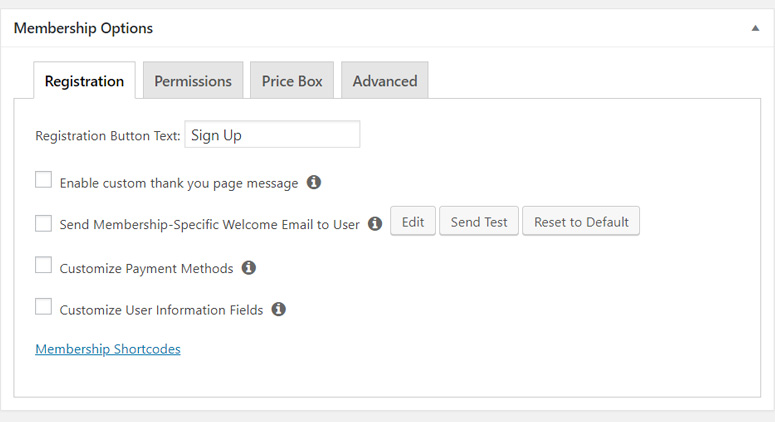
Then, you’ll need to scroll down to the Membership Options section below your content editor. This is where you can customize permissions and membership options for this particular membership level.
After you finish setting up the options, click the Publish button.
Now, you can create as many memberships as you want via repeating the same process.
Step 6: Set Up Access Rules for Your Membership Plans
The next step is to specify which content is to be accessible for different membership plans on your site. You can easily set up access rules using Rules.
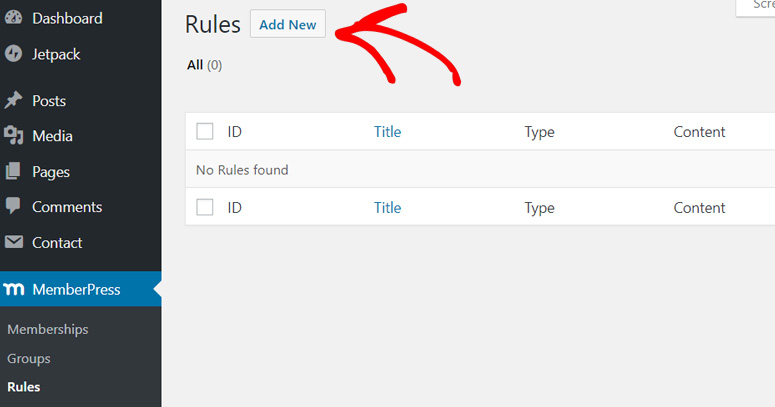
In order to set up rules, you’ll need to go to MemberPress » Rules and click the Add New button.
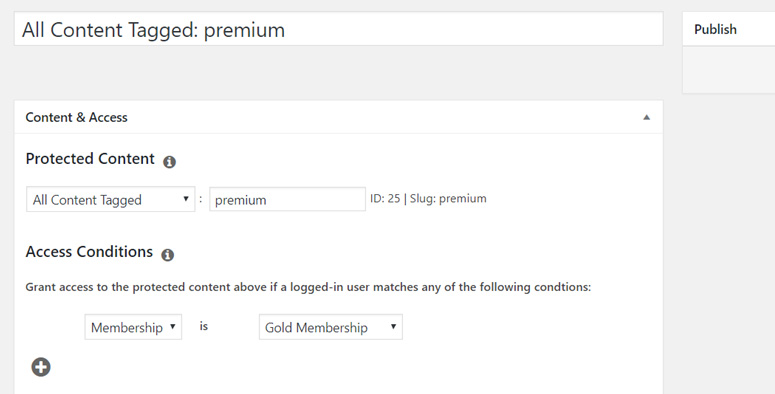
Now, you can add a new rule and associate your content with a specific membership plan.
For example, you can select all content with a particular tag available only to the gold subscription plan.
Now, all the content tagged premium will be accessible only to your members who purchase the gold membership plan.
Moreover, you can set up more specific rules and restrict a single post, page, or a specific URL.
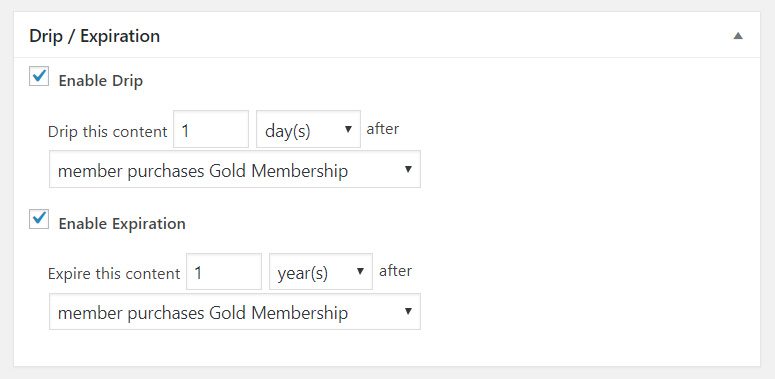
As you scroll down, you’ll find content drip and expiration features. Content drip allows you to gradually release content to users instead of giving it all at once. The expiration feature makes your content unavailable after a certain period of time.
For an example, you can refer to the image below.
Once you set up everything on this page, click the Save Rule button.
Then, create as many rules as you need by repeating the same process.
Step 7: Creating Members Only Content
Now, you’ve added members only (paid) content which only the specified members can access.
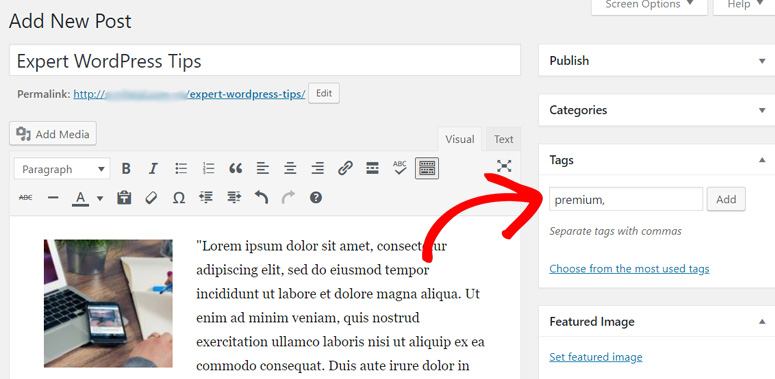
In the above example, we created a rule that restricted all content tagged as premium. Now, we need to create premium content and add a premium tag to it.
You can simply add a new post or page and add a premium tag or edit your existing posts and add this tag.
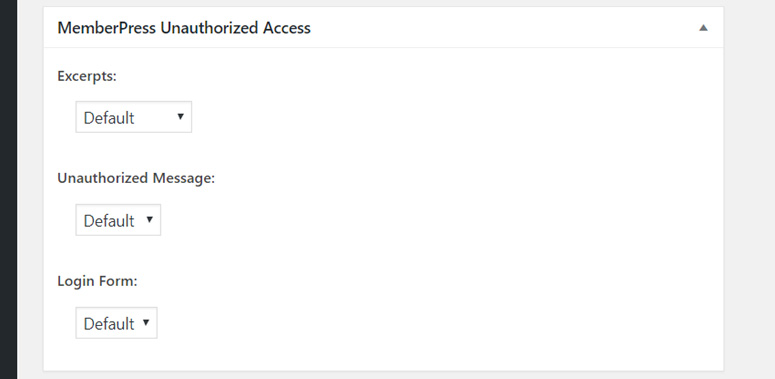
Then, scroll down the page to MemberPress Unauthorized Access section. There, you set what non-members will see when they reach this content.
You can use the default options or add custom options there.
Once you are done with setting up everything on this page, click the Publish button.
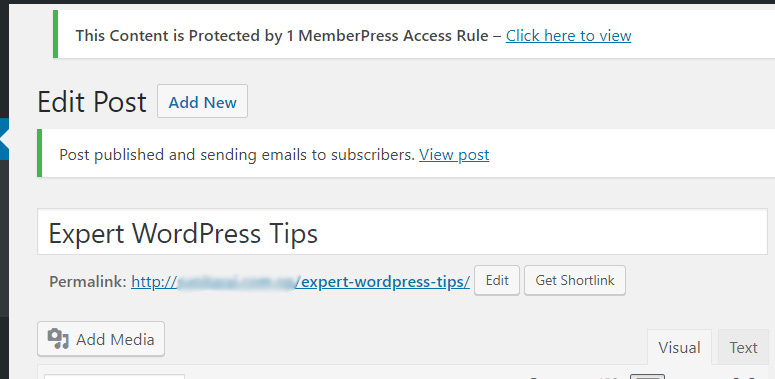
As you publish the content, you’ll see a notification box appear at the top of the page. See the screenshot below.
You can also create online courses with the built-in MemberPress Courses addon. The visual course builder is built on top of the WordPress block editor, so creating your course curriculum is easy.
Check out this post to learn how to create online courses with MemberPress.
Step 8: Create a Pricing Page
Next, you’ll need to create a pricing page where users can sign up for your membership plans.
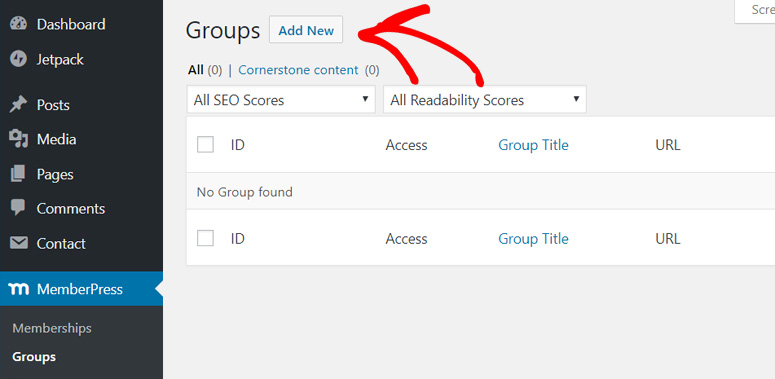
To start with, go to MemberPress » Groups and click the Add New button.
First, enter a title for your group plan page. This will serve as a pricing page so you can give it a name like Pricing Plans.
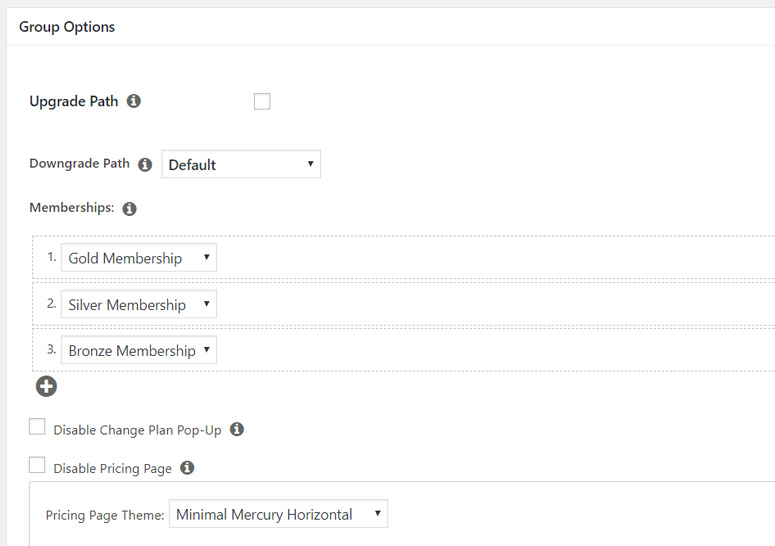
Then, scroll down to the Group Options meta box and add the memberships you want to display.
MemberPress comes with some pre-made pricing page templates. You can choose one of them for your pricing page if you don’t feel like building one from scratch.
Then, go ahead and click the Publish button.
Step 9: Redirect Users to Pricing Page
Now, you’ll have to redirect your unauthorized users to the pricing page.
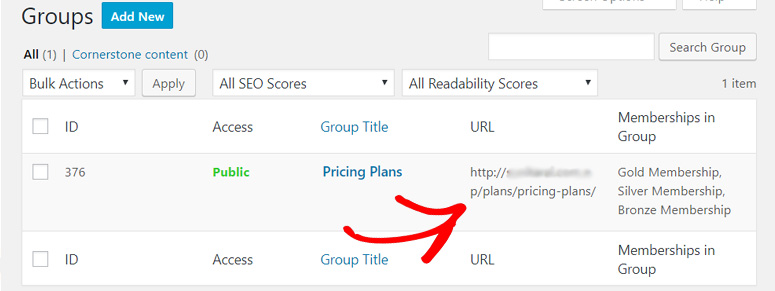
To do that, go to MemberPress » Groups and copy the URL next to the group you created in the previous step.
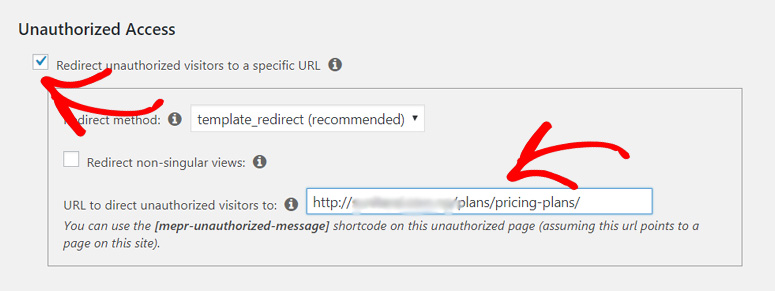
Then, navigate to MemberPress » Options and scroll down to the Unauthorized Access section.
There, you’ll need to check the box next to Redirect unauthorized visitors to a specific URL and then paste the group URL you copied earlier.
Then click Update Options to save the settings.
Now unauthorized users will be redirected to your pricing page when they try to access your premium content.
Step 10: Add Sign Up and User Login Forms
Now that you’ve set up everything, you’ll need to show sign up forms around your website.
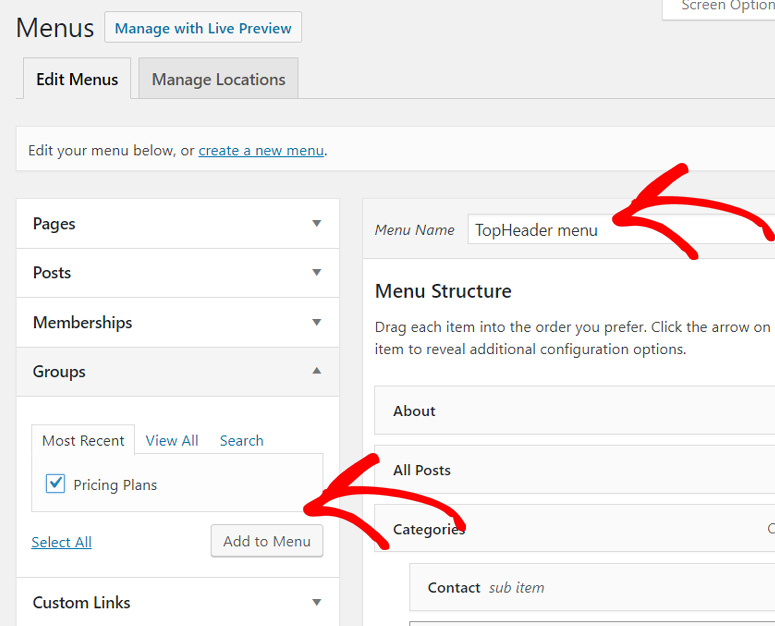
First, you’ll need to add the pricing page link to the navigation menu, so that new users can sign up.
To do that, visit the Appearance » Menus section in your WordPress dashboard.
Then in the left-hand column, click the Groups tab to expand it. Next, check your pricing page and click the Add to Menu button.
Make sure that the correct menu is selected first.
After that, the pricing plan page will appear in the right column. You can rearrange its position using the drag and drop interface. Then, click the Save Menu button.
Now, can find your pricing page on your website menu.
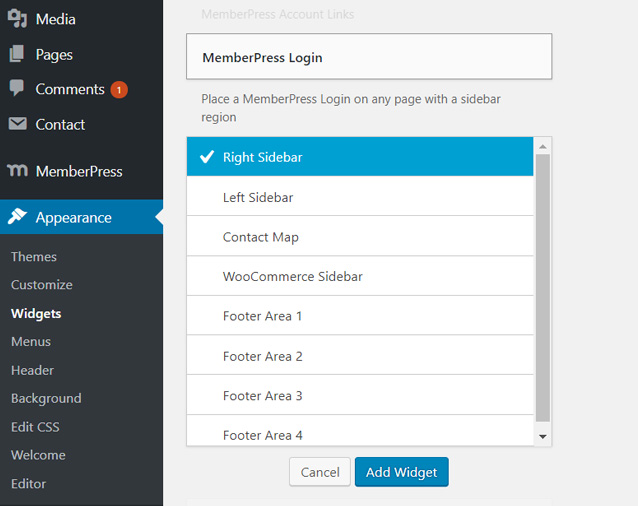
Next, you’ll need to create login forms for your subscribed members.
Go to Appearance » Widgets and add a MemberPress Login widget to your sidebar.
Then, click the Save button.
Now, a user login form will appear in your sidebar.
That’s it! You’re now ready to run a fully-functional membership site.
Scaling Growth of Your Membership Website Higher
Now that you’ve successfully created a membership site, you’ll need to plan for your website’s growth.
Here are some WordPress plugins to help you grow your membership site faster:
- MonsterInsights: Makes it easy to set up Google Analytics tracking on your site without touching a single line of code.
- WPForms: Add a contact form to your site or create custom registration forms. Also, take advantage of features like the form locker, which lets you restrict the number of registrations.
- OptinMonster: Helps you to grow your email list super fast and boost your email marketing.
- TrustPulse: Display social proof notifications on your membership site to improve conversions.
- Uncanny Automator: Put your membership site on autopilot by connecting plugins together and performing tasks automatically.
We hope this guide helped you build a membership site in WordPress. Next, you can see our easy guide on how to create a video membership site in WordPress.
You may also want to check out 25 must have WordPress plugins for business websites.



I have an established site, already with Woocommerce and this was great for easy to follow and understand to incorporate the Membership. Thank you
Julie
Thank you Julie for stopping by 🙂
Glad you liked the article.