
Do you want to create a dynamic landing page on WordPress?
A dynamic landing page is a key to engaging more users to your website. It shows information based on multiple factors, including user behavior, location, time zone, and more.
Dynamic landing pages help boost conversions with personalized messages and relevant information. And they’re easy to create with the right WordPress plugin.
In this article, we’ll show you how to create a dynamic landing page in WordPress and add it to your website.
Importance of a Dynamic Landing Page?
A simple landing page is like any other web page with content, graphics, and an email subscription form.
But, unlike a simple landing page, a dynamic landing page displays personalized content to users. This not only helps attract new visitors but keeps them engaged by offering them a better user experience. The chances of converting them into subscribers or customers also become much higher.
Here are other reasons to use WordPress dynamic landing pages.
- Enhanced Relevance: The dynamic page elements help keep the page relevant to each visitor’s journey. They can show different content based on the referral source or ad campaign, ensuring users find information that aligns with their original intent. This can also build trust and improve brand perception.
- Higher Engagement Levels: Dynamic landing pages automatically change elements like headlines, images, and product recommendations. This keeps users engaged by presenting content that feels fresh and unique to them. As a result, it encourages longer visits and interactions.
- Better Data Collection and Insights: Dynamic landing pages can be thought of as large-scale A/B testing. They allow you to test and track different versions of the page to see which elements perform best. You can also analyze user behavior in response to changes, making it easier to refine and optimize the landing page over time.
- Better Marketing Campaigns Flexibility: They make creating specific and targeted marketing campaigns easier. Instead of building separate pages for each audience, you can use a single landing page that adjusts to meet the goals of different campaigns, saving time and resources. This is especially helpful while running paid-per-click (PPC) campaigns.
- SEO and Retargeting Advantages: Some dynamic elements, like content based on search keywords or geolocation, can improve SEO by making the page more relevant to search queries. To add to this, you can retarget users with tailored content based on their previous interactions, increasing the likelihood of conversion.
Now, since dynamic pages involve customizing different sections of the page to fit the user, it can be difficult to implement. But at IsItWP, one of our main aims is to give you easy solutions that you can do yourself without hiring a professional WordPress developer.
That is why we recommend SeedProd for building dynamic pages.
SeedProd is the best drag and drop theme and site builder for WordPress. It comes with 300+ beautiful templates that match all kinds of websites and purposes. As a conversion-focused landing page builder, it can help you design:
- Coming soon/maintenance mode page
- App landing page
- Sales/optin pages
- Thank you page
- Webinar/podcast pages
- …and more!
You can also create a page from scratch using smart built-in sections and blocks in the SeedProd theme builder. This allows you to simply drag and drop a header, call-to-action, testimonial, FAQs, and more into your page design.
SeedProd also integrates with third-party email marketing services, including Constant Contact, Mailchimp, ActiveCampaign, ConvertKit, and more. This helps with collecting emails from users who visit your dynamic landing page.
SeedProd gives you full control of your page settings. There’s even an option to add custom CSS if you need to.
For more on why we’ve selected SeedProd, you’ll want to see our complete SeedProd Review.
Now, as mentioned, SeedProd is a conversion-focused landing page builder. One way it can help you improve your conversions is by creating highly engaging dynamic landing pages without touching a line of code.
Now, let’s show you step-by-step how to create a dynamic landing page in WordPress with SeedProd.
Step 1: Install and Activate the SeedProd Plugin
The first thing you need to do is to install and activate the SeedProd plugin. There’s a free version available in the WordPress repository. SeedProd Lite is perfect if you want to create simple landing pages and coming soon pages or enable maintenance mode.
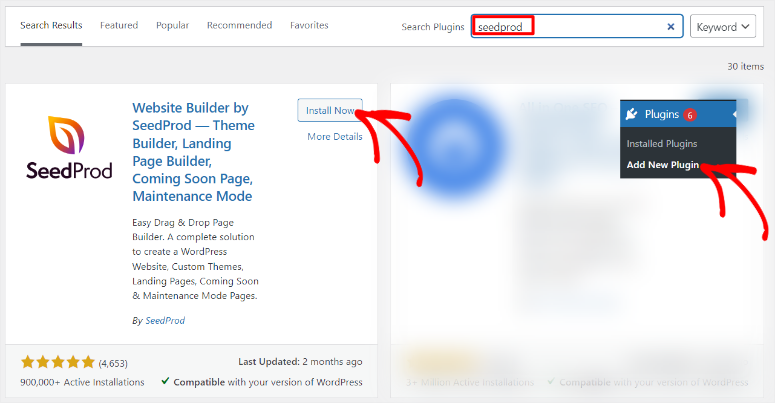
But to create dynamic pages, you need the SeedProd Pro Plan and above.
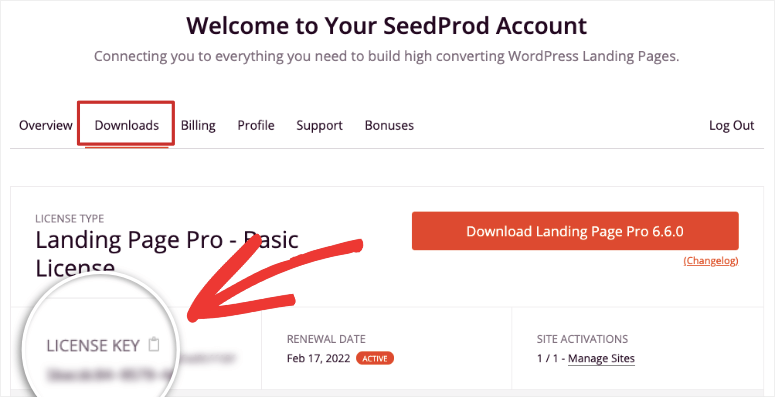
To get a SeedProd package, head to the plugin’s official website and purchase a plan. After this, log into your SeedProd account and navigate to “Downloads.” Here, download the plugin’s ZIP file to your PC. While here, copy the License Key, which you will need to activate the pro plan.
Next, go to your WordPress dashboard and navigate to All Plugins » Add New Plugin. Here, upload the SeedProd ZIP file, then Install and Activate it. Once this is done, you should see a new menu option labeled “SeedProd,” indicating that the installation was a success.
Now go to SeedProd » Settings, where you will see the “License Key” text bar. Paste the code you copied earlier and hit Verify Key.

And just like that, you are ready to create your first dynamic landing page.
Step 2: Add a New Landing Page in WordPress
After the verification, go to SeedProd » Landing Pages in your WordPress dashboard. The first thing you will notice is four built-in pages you can start with:
- Coming Soon
- Maintenance Mode
- Login Page
- 404 Error Page
These options help you quickly set up 1 click pages for your website. But to create a dynamic landing page, you need to select Add New Landing Page just below the four options.
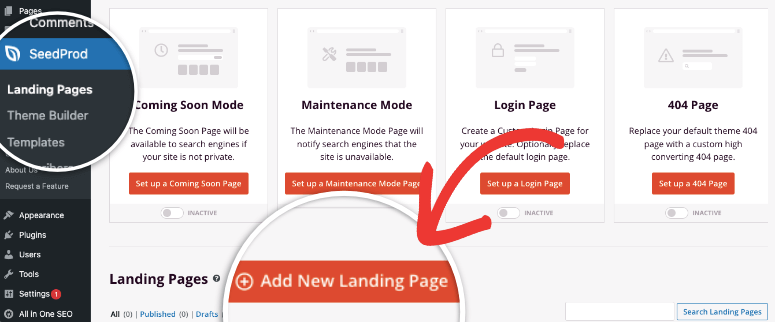
Next, you’ll see the complete SeedProd template library. As mentioned, SeedProd comes with over 300 templates, which can be overwhelming. So, to help you with this, you can use the filter and search function to narrow down your options.
Plus, each template comes with an image to help you visualize it better. You can also select the magnifying glass option when you hover over a template to view it better on a new tab.
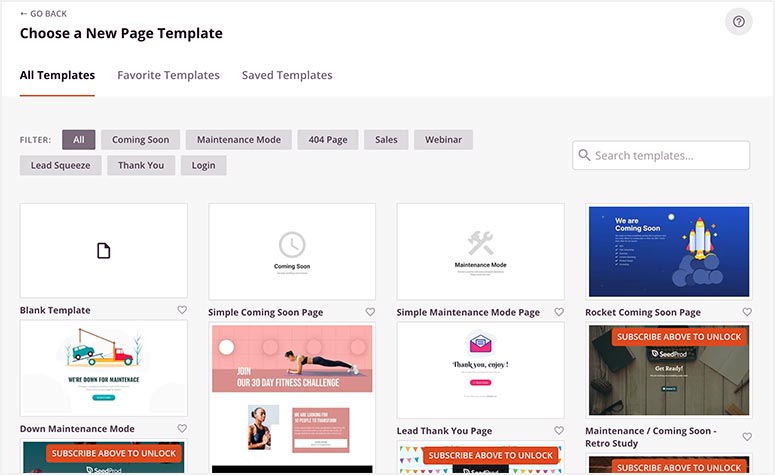
Once you find a template you want to use, hover over it and select the tick icon. For this tutorial, we will use the Automotive Sales page.
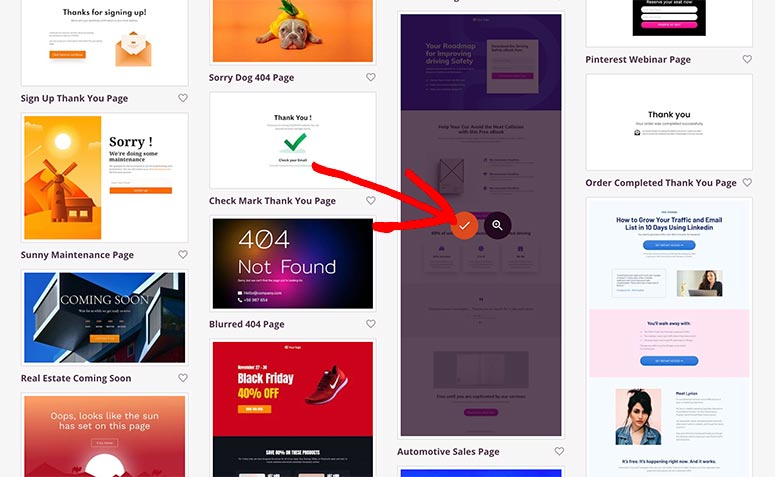
Next, a popup will open where you enter the page details, including the page name and URL.
After this, select the Save and Start Editing the Page button to continue to the drag and drop landing page builder.
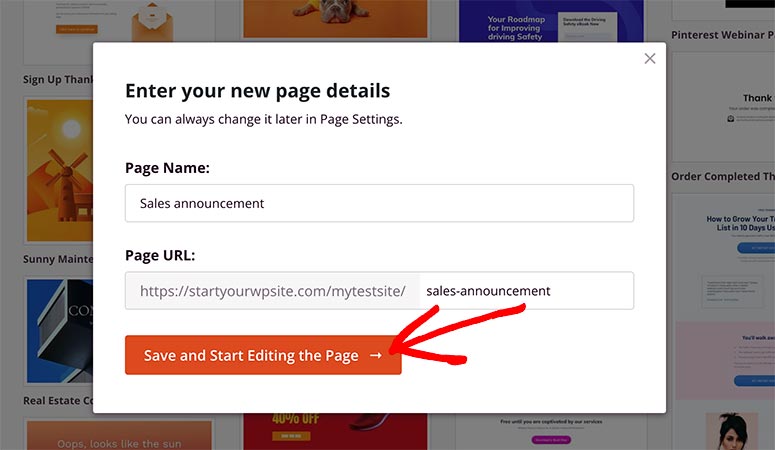
Remember, due to SeedProd’s flexibility, you can change this information later, so feel free to add any name and URL here.
Step 3: Customize and Edit Your Landing Page
On the next screen, the SeedProd builder will open with the template you chose already in place. One reason we encourage you to use this landing page builder is how easy it is to use.
First, you will see the “Blocks” and “Sections” areas on the left and the template preview window on the right side of the screen. You can drag and drop any block to the preview window and place it anywhere you want on the page.
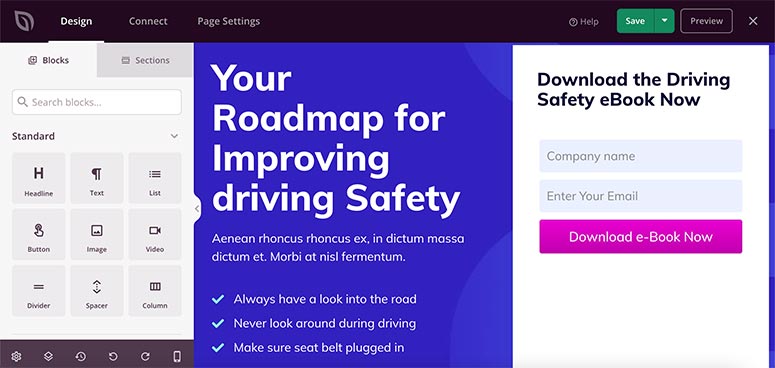
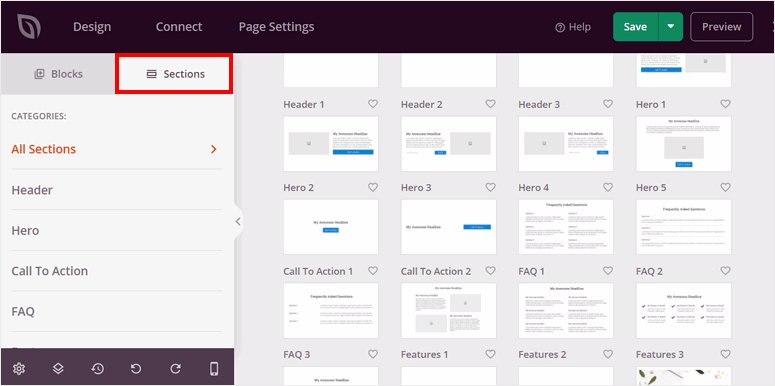
Sections are premade combinations of blocks that you can also drag and drop anywhere you want on the page. With this, you can add sections like Headers, FAQs, Calls to Action, and many more. They are a great way to ensure consistency across your page without building the site sections from scratch.
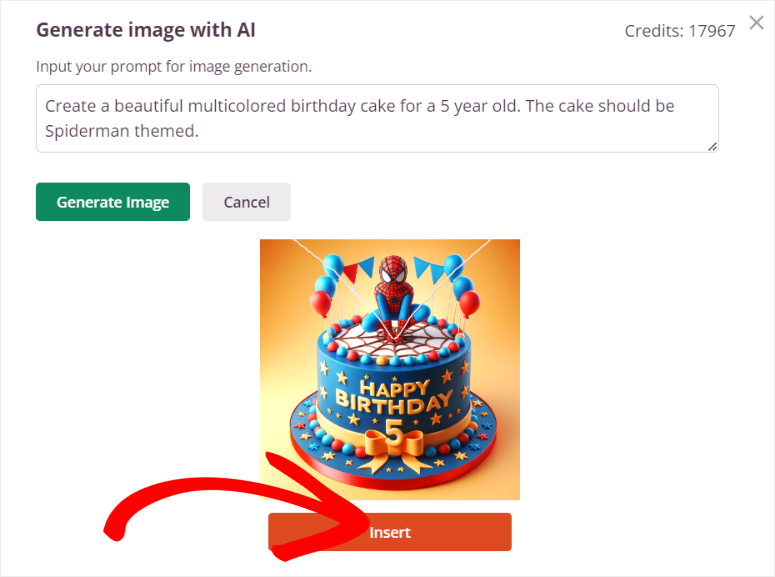
SeedProd makes page creation even easier by allowing you to add AI images and AI content through its visual builder. You can use it to generate content and images and replace the placeholders, ensuring you maintain the overall design of the template.
But, as you will soon discover, SeedProd templates are designed to be ready to go, so you’ll only need to make minimal changes to match your brand.
But, you can make your page more eCommerce-ready by integrating it with WooCommerce and Easy Digital Downloads and adding blocks like:
- Products Grid
- Recent Products
- Best Selling/Featured Products
- Add to cart
- Cart
- Checkout
- …and more!
Now, apart from adding new blocks and sections, you can customize the content and elements of the template.
Selecting any text or image area on the landing page allows you to make direct changes using the inline editor. You’ll also get more editing and advanced options on the left panel. This lets you upload new images, change background color, add borders, and more.
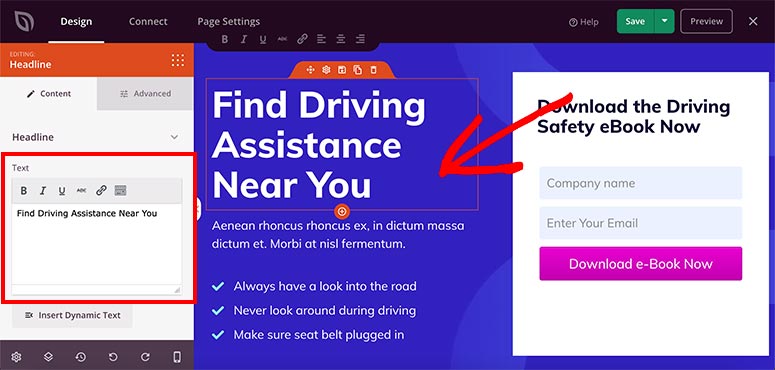
Once you’re satisfied with the editing and customization, select Save at the top right corner of your screen.
At this point, your landing page is ready. But we need to turn it into a dynamic page.
Step 4: Add Dynamic Text to Your Landing Page
So far, you have created a simple landing page, but now we’ll show you how to add dynamic content to personalize the page for users.
In the page builder, click on the text you want to personalize. Then, from the left menu, select the Insert Dynamic Content button.
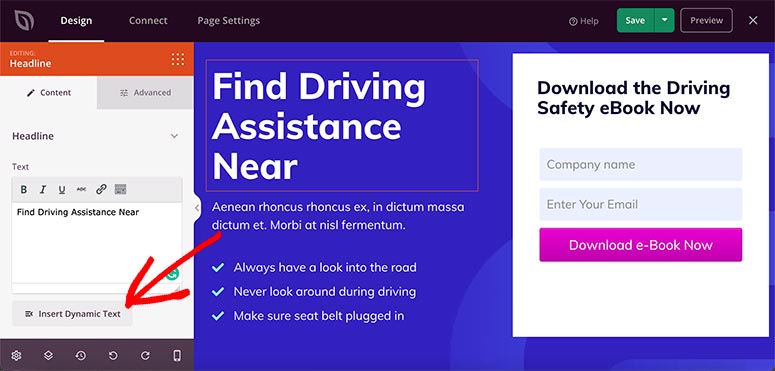
By default, SeedProd comes with two dynamic text options:
- Date/Time
- Query Parameter
1. DateTime
This is an excellent way to show a day or date in your text dynamically. It provides seven built-in options.
- Today
- Tomorrow
- Today Date
- Tomorrow Date
- Month
- Next Month
- Year
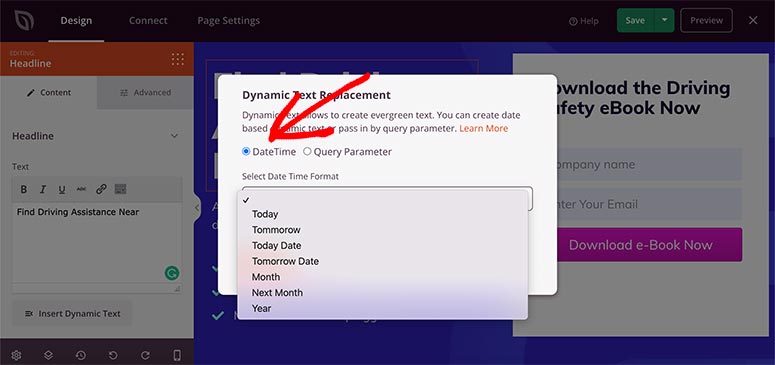
For example, if you write “50% Flat Sale Starts on [date]”, you can select a Tomorrow Date option from the dropdown, and it’ll add a shortcode to your text.
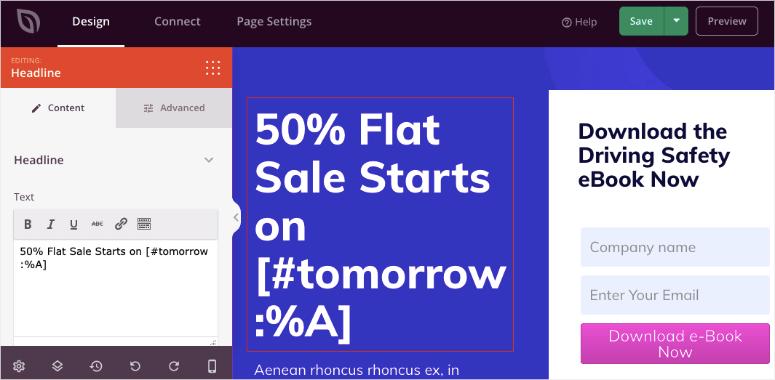
Now, the shortcode will automatically pick the date of this day and show it to users. This date will be updated daily on your website without you manually doing it. This means, users will have the impression that an offer is timed, creating a FOMO and a better conversion.
2. Query Parameter
Query parameters come in handy if you are running ads and want to pass in a keyword in the ad or personalize a page with someone’s name.
SeedProd lets you use dynamic text anywhere. The headline and text blocks have a button that will insert it into these blocks, but if you need it in some other block, just copy the dynamic text code and paste it where you need it.
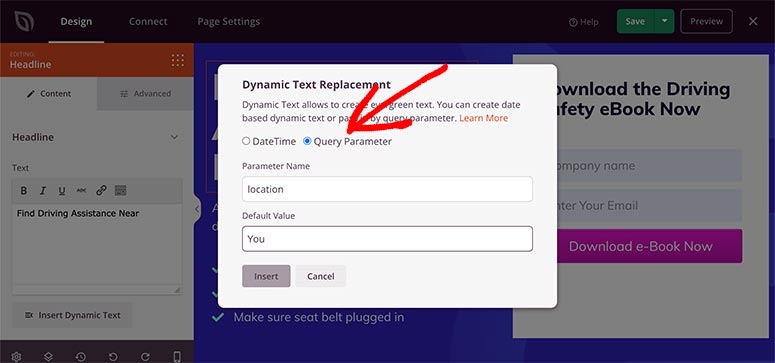
Query parameters are usually advanced customizations. However, it’s simple and easy to set up with the SeedProd dynamic text option.
You can display the name or location of users in the text depending on the query parameter passed in the URL.
For example, to personalize this page by location, simply write “Find Driving Assistance near” in the text block.
Then, choose the Insert Dynamic Text option and add ‘location‘ in the parameter name field. You also need to add a default value in case SeedProd is unable to detect the user’s location. For this example, we’ll add the word ‘you’ here.
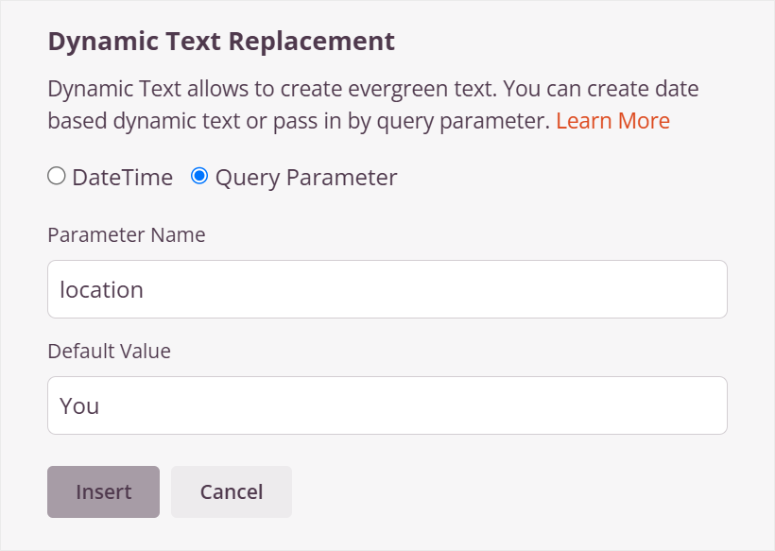
Now, when a user visits your website with a location parameter in their URL (http://example.com/?location=London), the text will appear as “Find Driving Assistance Near London”. If there is no parameter, SeedProd will display “Find Driving Assistance Near You”.

In the same way, you can display a person’s name as well by adding ‘name’ to the Parameter Name field.
Don’t forget to click the Save button before moving to the next step.
Step 5: Manage Settings for Your Landing Page
SeedProd gives you complete control of your landing page, and the best part is that you don’t need any coding skills to change the colors or background of your page.
Now even though we have created a dynamic landing page, we still need some consistency. To achieve this, you need to set up Global Settings.
Global settings allow you to define fonts, colors, and other design elements that will be applied uniformly across your landing page. This creates a cohesive look, reinforcing your brand identity. This can help you build trust and recognition among visitors.
On top of this, setting up global styles means you don’t have to adjust individual sections or elements manually. This speeds up the design process, allowing you to focus more on creating quality content and functionality.
With that said, you will find the “Global Settings” by selecting the gear wheel icon at the bottom of the page builder.
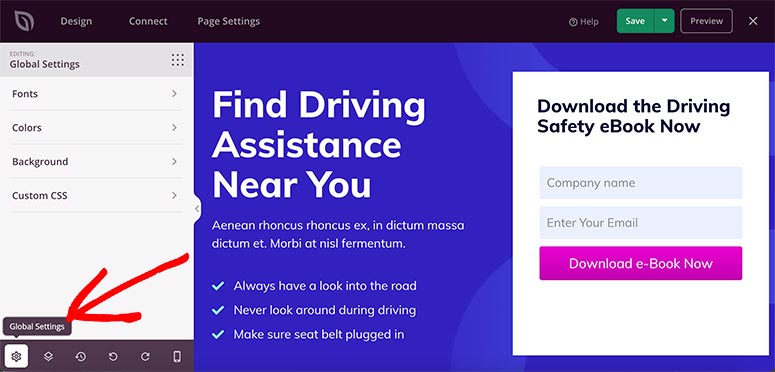
Inside the settings page, there are four options:
- Fonts – It includes font type, style, and size for each section of your landing page. You can also choose a built-in font theme to change the text-styling of your page.
- Colors – This setting allows you to change the color for your background, text, links, buttons, and more. It has multiple readymade color palettes to completely change the look of your landing page.
- Background – It lets you change the background of the page and add an image, video, or solid colors. You can also add a slideshow in the background.
- Custom CSS – If you’re a developer, you can add custom styling code to make changes to your page.
The best part about the page builder is that you can see the changes in real time on the right side of your screen.
Next, visit the Page Settings tab from the top navigation menu.
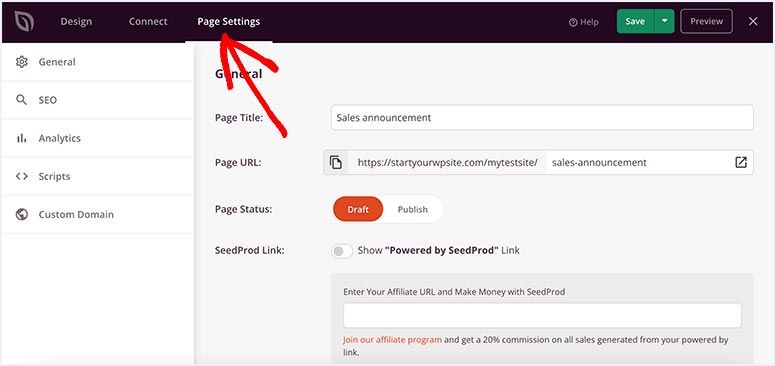
You’ll see the following options based on your SeedProd plan:
- General – This includes page title, page URL, page status, and other basic page settings.
- SEO – SeedProd integrates with popular SEO plugins like All in One SEO to help rank your dynamic landing page. It also lets you set up meta information to increase your organic traffic.
- Analytics – This setting requires you to install MonsterInsights plugin. Once installed, you can monitor statistics for your page, including user behavior and activity.
- Scripts – If you’re a developer, you can add custom scripts in your page’s header, body, and footer.
These settings are easy to edit even after publishing your page. For example, you can change the page status from ‘Publish’ to ‘Draft’ in the general settings to disable the dynamic landing page.
Step 6: Connect an Email Service to Your Dynamic Landing Page
Now that your landing page is ready with dynamic content, you can connect an email marketing service to build an email list. The email list will help you connect with your users in a more personalized way.
From the top navigation menu, open the Connect tab. It’ll display over a dozen popular email marketing services.
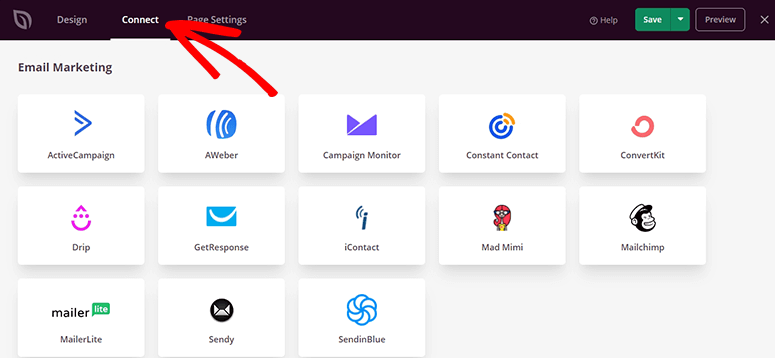
Choose your service provider and click on the Connect New Account button to configure it.
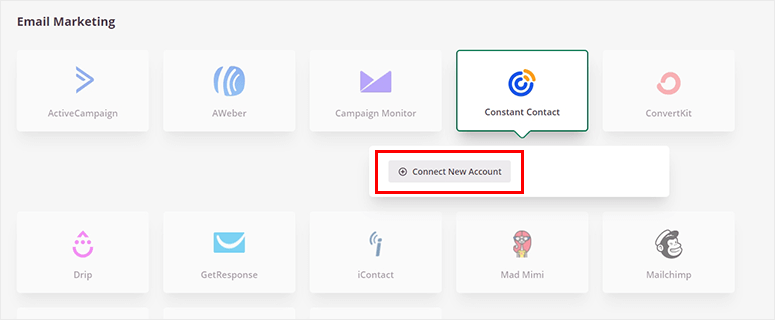
You’ll need to log in to your preferred email service and sync it with SeedProd. Once connected, click on the Save button to continue.
Step 7. Display Your Dynamic Landing Page in WordPress
Your dynamic page is now ready without writing code or hiring a developer. You can publish the page and display it to your users.
Next to the Save button, you’ll see a down arrow that displays a dropdown menu. Click on it and then click Publish.
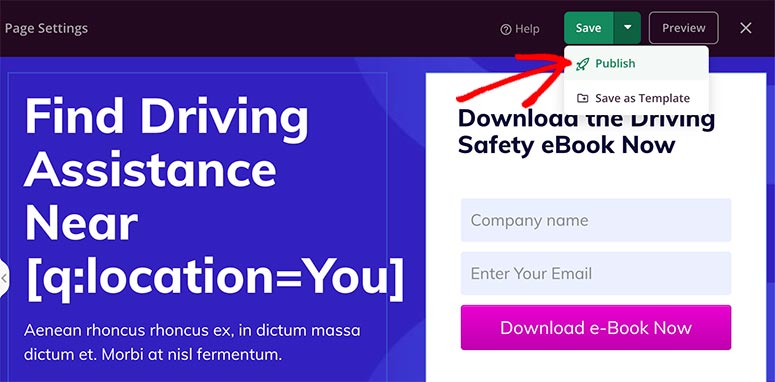
A popup will appear on your screen with a success message. You can click on the See Live Page button to visit your dynamic landing page.
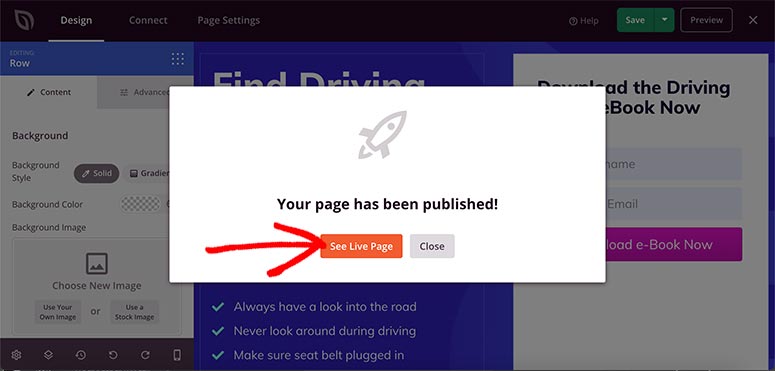
Take a good look at your landing page and ensure everything works according to your preferences.

If you want to make any changes to your dynamic landing page, you can always go back to customize it with the user-friendly SeedProd page builder.
Congratulations! You can now create a dynamic landing page on WordPress with SeedProd. If you have any more questions, check out our FAQs below.
FAQs: How to Create a Dynamic Landing Page in WordPress
Can I build a dynamic landing page without coding?
Yes, you can create a dynamic landing page without coding. The best tool to do this is SeedProd, a drag-and-drop WordPress page builder. SeedProd offers a drag and drop landing page builder with customizable templates and blocks. This makes adding personalized, dynamic elements like user names or location-based content easy. This way, you can build a high-conversion landing page tailored to your visitors without needing any technical skills.
How can I use a dynamic landing page?
A dynamic landing page can be used to enhance user engagement by displaying personalized content based on factors like location, user behavior, or time. For instance, with SeedProd, you could show targeted messages for different ad campaigns or keywords. This allows you to adjust content based on the visitor’s location or display time-limited offers. This approach helps capture attention and boost conversions by providing each visitor with a more relevant experience.
Difference between a squeeze landing page and a dynamic landing page?
A squeeze page is designed to capture basic information, like email addresses, through a single-focused call to action, usually targeting new leads. On the other hand, a dynamic landing page offers personalized content that adapts to each visitor’s data, such as their location or referral source. This creates a more engaging and tailored experience that can boost engagement and conversions. You can use SeedProd to create both these types of pages and test them yourself.
Can I use a dynamic landing page as a funnel page?
Yes, a dynamic landing page can be effectively used as a funnel page. A dynamic landing page guides visitors through different stages of the sales funnel by displaying personalized content based on user data. It adapts to user actions, keeping visitors engaged and more likely to move toward a final conversion, such as a purchase or signup, making it an ideal tool for lead nurturing.
That’s all we have for you today. We hope this article has helped you learn how to create a dynamic landing page in WordPress. Check out this article to see how to create a squeeze page.
On top of that, here are other articles you may be interested in reading.
- How to Create a Stunning Splash Page for Your WordPress Site
- Create a Custom Under Construction Page in WordPress
- How to Build a Sales Page in WordPress (Step by Step)
These articles will help you build different types of landing pages in WordPress so you can add dynamic content to your sales page and boost your revenue.


Comments Leave a Reply