Do you want to make your WordPress site available in multiple languages?
By making your website multilingual, you can attract and engage a much wider audience. Although creating a multilingual site is a developer-only job in most cases, it’s quite easy to do on your own with WordPress by using a WordPress translation plugin.
In this article, we’ll show you how to easily create a multilingual WordPress website using the most popular multilingual plugin, WPML.
Why Create a Multilingual WordPress Site Using WPML?
If your business serves a diverse group of people from different regions of the world who all speak their own language, then you’ll need to make your site multilingual. Similarly, educational institutes and international organizations with users from different countries need a multilingual website in order to succeed.
But how do you create one?
One option is to create multiple subdomains for your site and install one language for each of the subdomains. But this method is a huge hassle. Setting up and managing multiple subdomains takes a lot of time and resources. Plus, it can be costly if you need to hire a developer to carry out the job for you.
WordPress, combined with the WPML plugin, solves these issues and provides you with a hassle-free, simple solution for creating a multilingual site.
WPML allows you to install multiple languages in the same WordPress installation so you don’t need to create subdomains for each language. Not to mention, it’s so simple and quick that anyone can easily set up a multilingual site without touching any code.
It integrates with WooCommerce, BuddyPress, WPForms, and so much more.
That said, let’s see how you can create a WordPress multilingual site using WPML in a few quick steps.
Building a Multilingual WordPress Site with WPML
WPML is a translation plugin that helps you translate your WordPress website. But, first, you’ll need to create a website in one single language.
To create a website, you’ll need a domain name and hosting service. A domain name is your site’s online address, and hosting is the virtual space where your site files are stored.
A domain name usually costs around $14 per year and a hosting service costs around $7 per month. When you’re just starting out, these costs can add up and feel overly expensive.
So, to ease your financial pains, we’ve made a deal with Bluehost to provide our users an exclusive discount.
Now, you can get a free domain plus WordPress hosting for just $2.75 per month using our exclusive Bluehost coupon.
If you’re new to WordPress, read our beginner’s guide to creating a WordPress site easily.
Once you’ve created a WordPress site in your chosen language, you can then add different language translations to your site.
Step 1: Install WPML and Set Up Multilingual Options
The first thing you’ll need to do is to install and activate the WPML plugin on your WordPress site.
Once it’s successfully activated, you’ll see a notification box at the top of your WordPress dashboard with a Configure WPML button. Simply click the button to start your configuration.
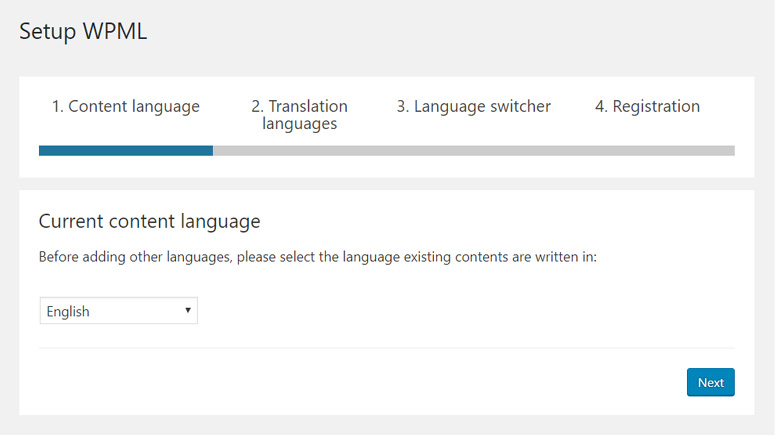
Then, you’ll be able to see the WPML setup wizard.
In the first step, WPML will automatically detect your WordPress site’s primary language. You can change it if you want or if it detected it incorrectly.
Click on the Next button to continue.
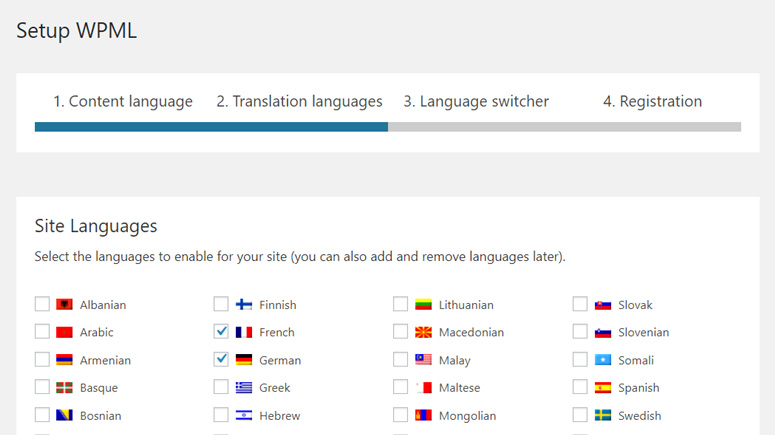
Next, it’ll ask you to select the languages you want to enable for your site. Simply select the languages and click the Next button.
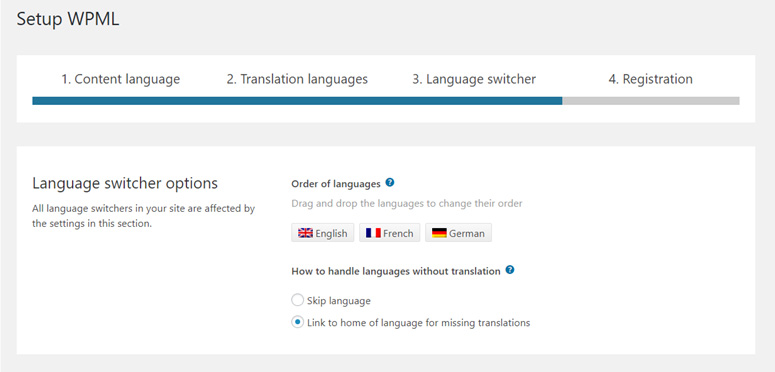
Now, you’ll see language switcher options in the third step of WPML setup process. The language switcher will allow your users to choose to view your site’s content in their preferred language. It usually appears in the form of a drop-down list or a collection of flags on your site.
From there, you can simply arrange the order of languages by dragging and dropping.
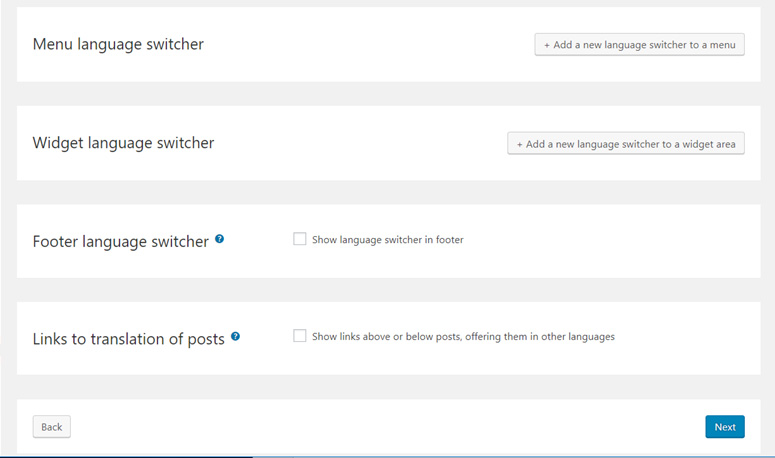
Underneath that, it’ll show you options for adding a language switcher on your site. You can add the language switcher to your navigation menu, widget area, or footer area. You also add links to the translation of posts before or after each piece of content.
To add a language switcher to your navigation menu, click the Add a new language switcher to a menu button in the Menu language switcher section.
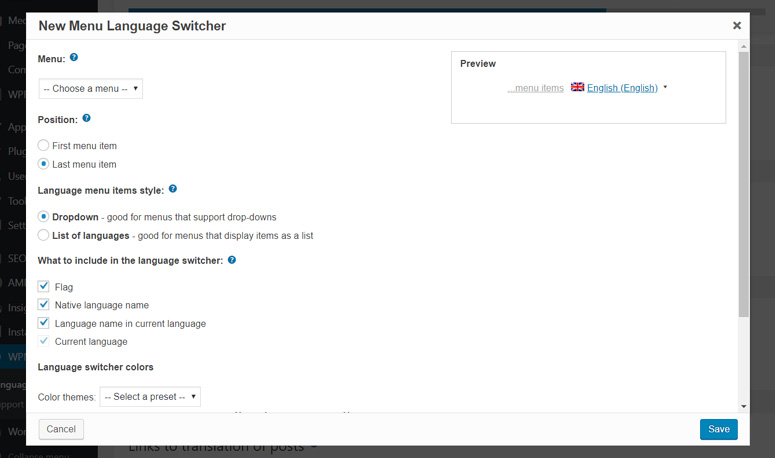
Then, New Menu Language Switcher options will appear in a popup box.
You can select a menu on your site to show the language switcher. Then, you can set the position of the language switcher in the menu; show it as the first menu item or the last menu item.
Then, you can choose how you want to show the language switcher menu item. You can either show it as a dropdown or the list of languages.
Next, you can choose what to include in the language switcher menu item. You can select what to show by simply checking the boxes.
Finally, you can set the language switcher colors.
As you configure all the options, you’ll be able to see the changes on the preview box on the right-hand side.
Once you’re satisfied, click the Save button.
Similarly, you can add a language switcher to other locations as well. However, if you want to add the language switcher only to the navigation menu, you can simply click Next button.
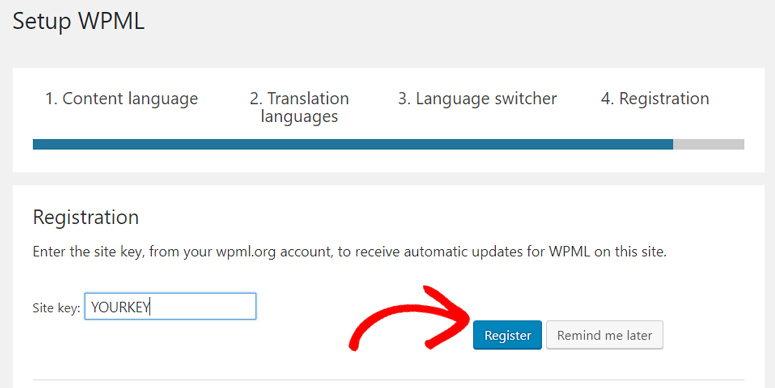
Now you’re on the final step of WPML setup process. You’ll need to enter your site key in this step.
You can get the site key from your WPML account. Simply copy the key and paste it in the box and click the Register button.
That’s it! You’ve successfully completed WPML configuration on your WordPress site.
Step 2: Adding Multilingual Content in WordPress Posts and Pages
Now that you’ve set up WPML on your WordPress site, you’re ready to add multilingual content on your site.
WPML allows you to easily translate your WordPress posts, pages, tags, categories, and themes into any language you like.
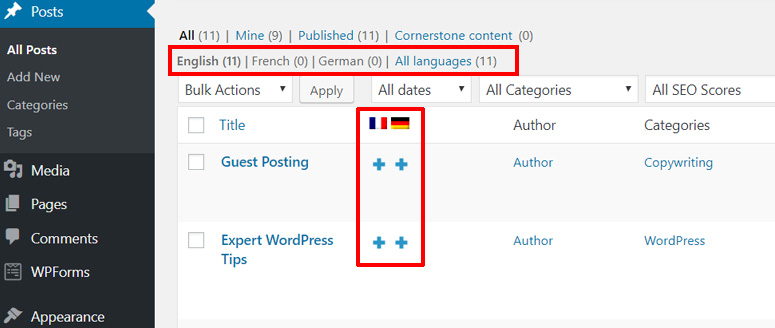
To create a translation for your existing WordPress posts, go to Posts » All Posts. There you’ll see your total posts, and also the number of your posts per language.
WordPress automatically detects your site’s primary language and shows you add buttons for each selected language next to your posts. You’ll need to click on the add button under a language to translate a post.
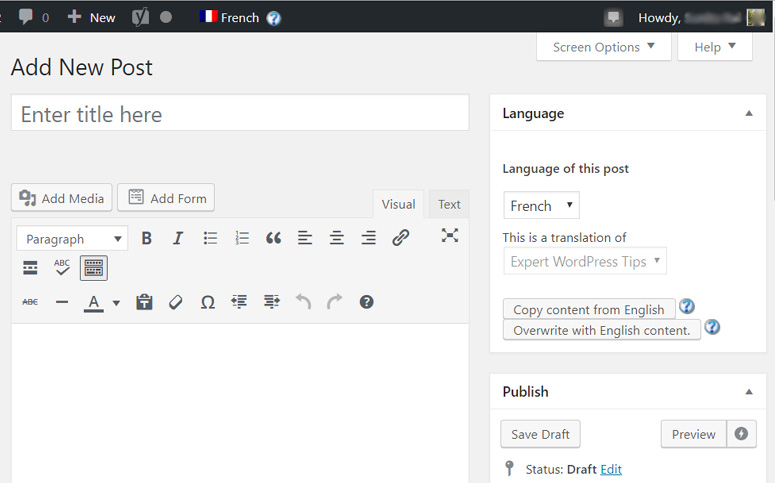
For this tutorial, we’ve clicked the Add button below the French language.
Now, you’ll see the language name / flag on the top of the editor. And, you’ll also see the Language meta box added on the right-hand side of your post editor.
You can add the translated content in the post area and publish the post. If you don’t have language proficiency in that language, you can add new users and authors to your site for translating your content.
Also, you can use the WPML Translation Management Module and manage translators on your site.
Step 3: Adding Translations for Categories and Tags
WPML allows you to translate your WordPress categories, tags, or any other custom taxonomies easily into any language you want.
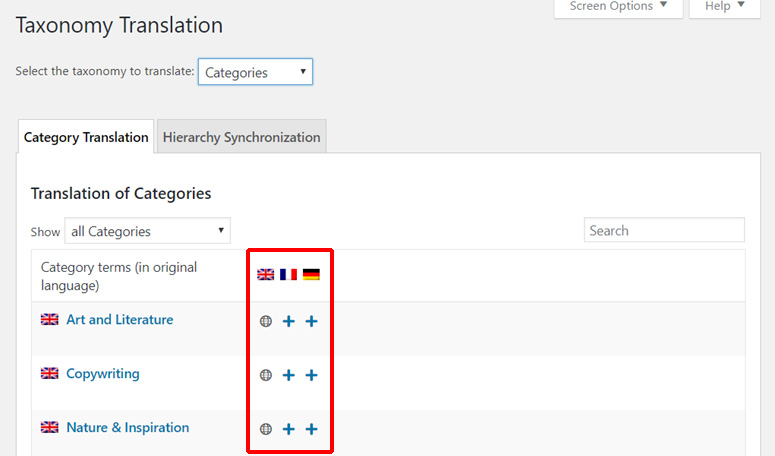
In order to translate them, you’ll need to go to WPML » Taxonomy Translation from your WordPress dashboard.
Then, you’ll need to select the taxonomy you want to translate in the next step.
For this tutorial, we’ve selected Categories. Now it loads all your site categories. There you’ll see Add buttons next to your taxonomy terms.
Simply click the Add button under a language / flag to translate your taxonomy.
Step 4: Adding Translations for Navigation Menus
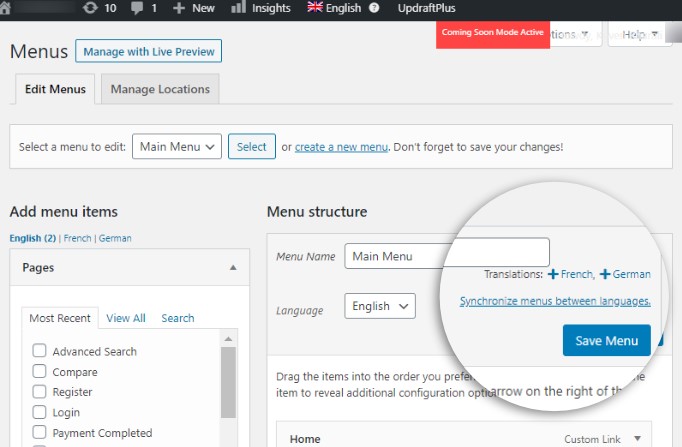
For translating your WordPress navigation menus, visit Appearance » Menus from your WordPress dashboard. Then, you’ll need to select the menu you want to translate.
Now, you’ll see Add translation buttons for your WordPress menu. Simply click the button to translate the menu.
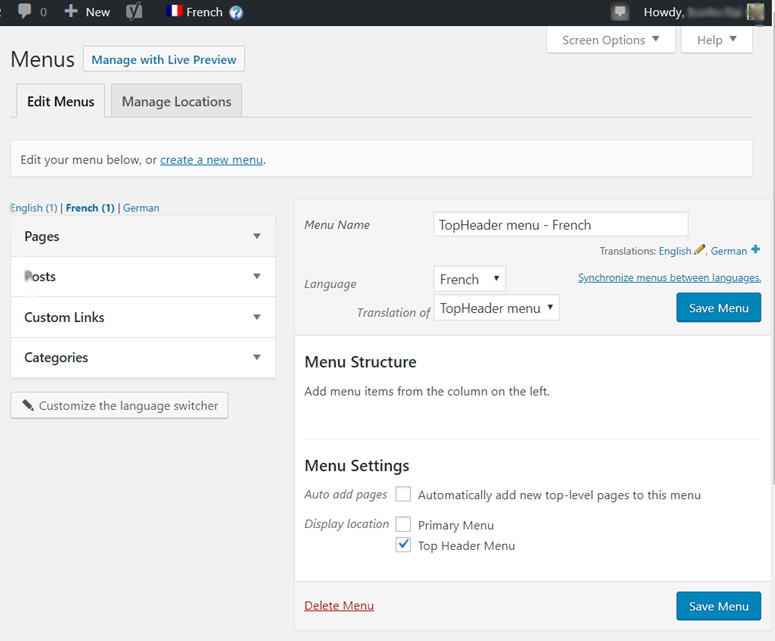
After creating a translation of the menu, you’ll need to add the same menu items as in your primary language menu.
If you have posts, pages, and categories as your menu items, then you’ll first need to translate them as shown in step 2. After that, you can add them from the tabs on the left in the Edit Menu panel.
Once you add and manage all the menu items, click the Save Menu button.
Step 5: Translating Themes, Plugins, and Other Text
WPML allows you to translate your WordPress plugins and theme as well.
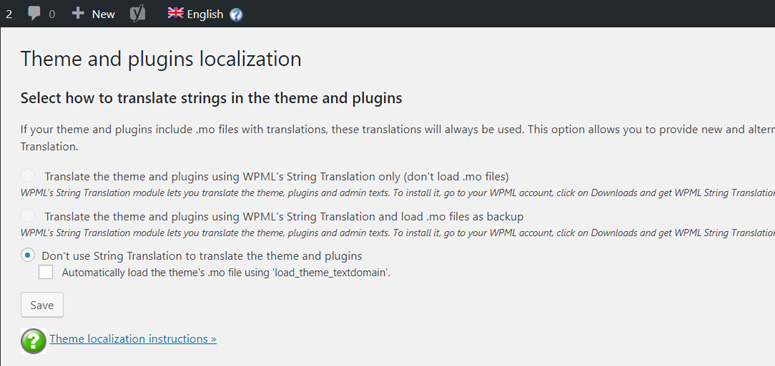
To translate them, you’ll need to go to WPML » Themes and plugins localization from your WordPress dashboard.
By default, you’ll see Don’t use String Translation to translate the theme and plugins checked and a checkbox below that. You can check the box if there are any translation files available for your theme. However, this works only with official WordPress.org themes.
So WPML comes with a WPML String Translation Module to let you properly translate your theme and plugins. You can translate custom fields, widgets, and other text on your site using this module.
Also, check out this TranslatePress review. TranslatePress is an alternative to WPML.
We hope this guide helped you to learn how to create a WordPress multilingual site easily with WPML.
Most WordPress plugins and website builders are WPML compatible so you shouldn’t have any issues if you try to translate your site no matter the theme or plugins on your site.
Next, you may also want to check our guide on 25 legit ways to make money online. Once you know how to create a multilingual website, you can reach out to a larger user base. And that’s the best time to use these ways to monetize your blog for some extra income.




Can a page be written with 2 different languages, one LTR language, e.g., English, the other language is RTL, e.g., Arabic.