
Want to increase your business with social proof?
Showing potential buyers your business is well-liked by your customers is a powerful way of making a great first impression. You could do this by showcasing recent activity, displaying testimonials & ratings, and social media engagement on your site.
More than anything, social proof conveys that your business has made your customers happy. First impressions last the longest and social proof is one of the best ways to make a good first impression.
In this guide, we’ll show you the best way to add social proof to your WordPress site. But first, let’s be clear on what social proof is and why it’s important.
What is Social Proof?
Social proof is based on the concept that customers are more likely to take a specific action if they see others doing the same thing. It creates an instinctive feeling to trust in a brand after seeing other people vouch for it.
The most trusted example of social proof is online reviews. Before looking at the features, warranty, or even the product description – shoppers will often look at the reviews first. For more on this, follow our tutorial to get more online reviews for your business.
In recent years, influencer marketing has become one of the most powerful channels of social proof. One shoutout from an influencer can turn a company into a trendsetter overnight. But influencer marketing can be really expensive for just that one shoutout. Plus, you don’t have much control over those campaigns.
The best way to go about adding social proof to your website is by showcasing recent activity on your site. Let’s break that down.
When customers enter a brick-and-mortar store, they can see how many other people are in the store and what they’re buying. But on a website, customers are invisible to each other.
When new visitors come to your site, they may be left wondering if you’re brand is legit or whether they’ll get the products they order. You need to show them that you’re a professional business that they can trust.
This is where a tool like TrustPulse comes in. We discuss this in detail next.
How TrustPulse Improves Your Website’s Social Proof
TrustPulse is the #1 social proof app for your WordPress website. It tracks recent activity on your site such as the latest purchase and showcases it in small non-intrusive popups on your site.
So potential customers can see that other users on the site are buying your product and this will give them that nudge to trust your business and make their purchase.
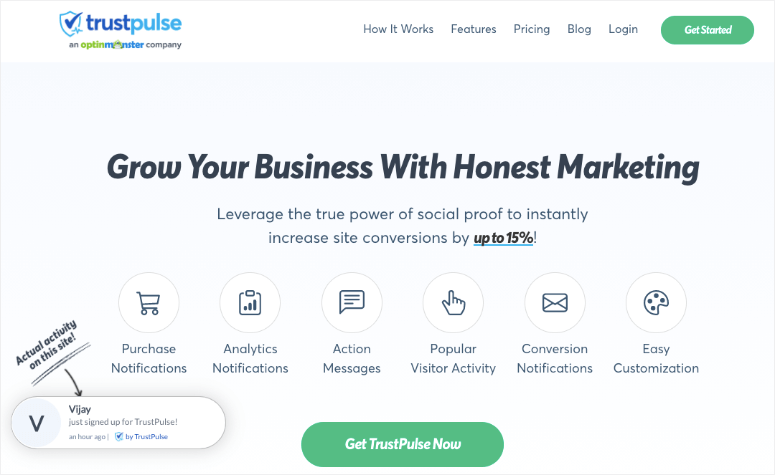
TrustPulse works on the concept of FOMO (fear of missing out). This means when visitors see others are buying your product, signing up for your newsletter, or taking a quiz, for instance, they’ll instantly feel like they’re missing out on what others are enjoying.
They’ll then want to get in on the action by participating in the same activity.
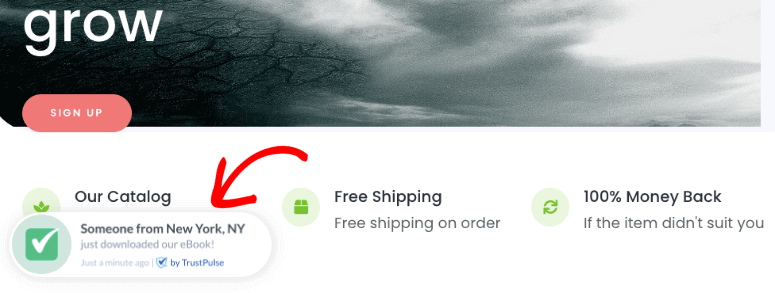
In fact, studies have shown the fear of missing out (FOMO) is a more powerful driver of sales. Added to that, TrustPulse has a proven track record of increasing conversions by up to 15%.
When you sign up for TrustPulse, here’s what you’ll get:
- Easy-to-use dashboard
- Recent activity as well as static messages
- Complete control over your campaigns
- Smart targeting features
- Plenty of customization options
- Real-time tracking and actionable analytics
TrustPulse also seamlessly integrates with any platform, including WordPress, Shopify, Magento, and Tumblr.
We’ve covered everything you need to know about this FOMO plugin in our full TrustPulse Review.
Now that you know what TrustPulse is and how it can help you, we’ll show you how to add social proof to your site right away.
How to Add Social Proof Notifications to Your Website
In this tutorial, we’ll show you how to set up TrustPulse in WordPress. Then, we’ll show you the different ways you can use this tool to showcase recent activity to boost your conversions.
Step 1: Install TrustPulse for Social Proof in WordPress
To get started, you can install TrustPulse with just a few clicks from your WordPress dashboard. Select Plugins » Add New from your WordPress admin menu.
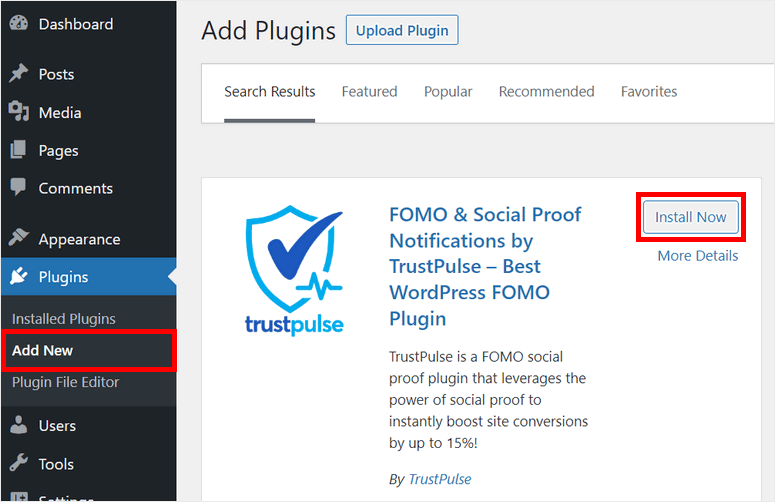
Then type in “TrustPulse” in the search field to locate the plugin. Once it appears, click on Install Now, then Activate for the plugin to begin working on your site.
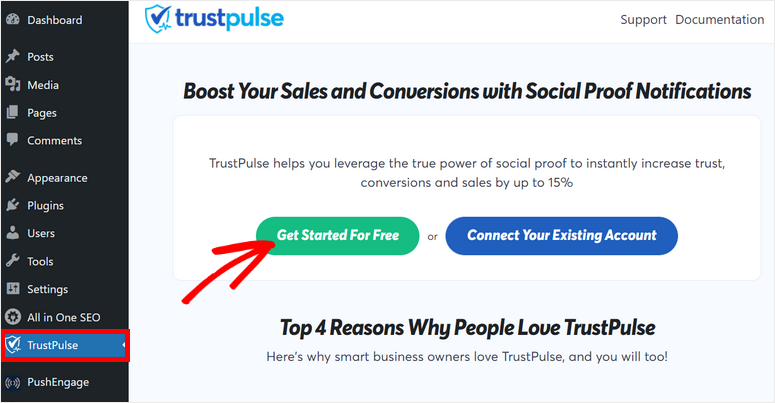
Next, you’ll want to create an account with TrustPulse. From the WordPress dashboard menu, click on TrustPulse » Get Started For Free option.
TrustPulse is a premium WordPress plugin so it will prompt you to sign up for a plan. Plans start as low as $5 per month. Plus, there’s a 14-day trial so if you feel TrustPulse isn’t for you, you can cancel your account anytime within this period.
Once you enter your account information, you’ll be logged in to your TrustPulse account where you’ll see the Welcome message.
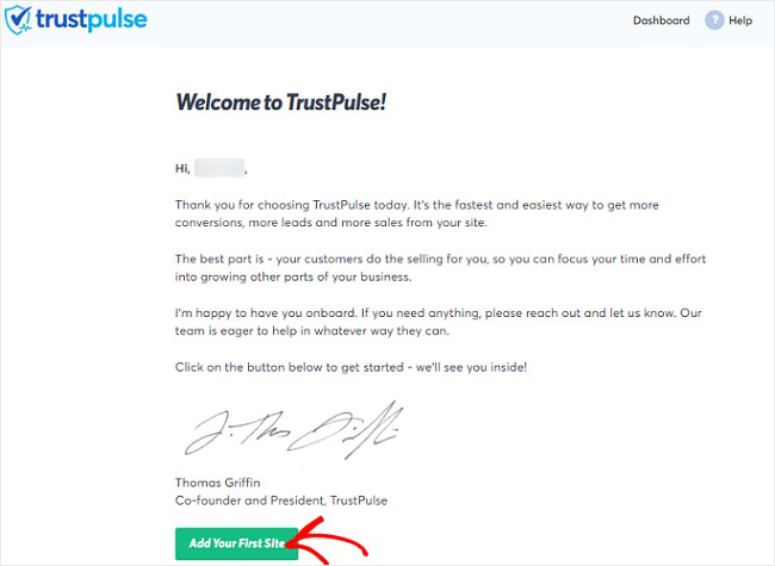
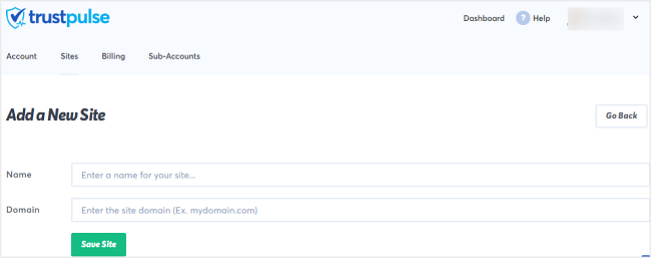
Click on the Add Your First Site button. On the next page, you can add your website name and domain and save your settings.
At this point, the next step is to create your first campaign.
Step 2: Creating Your First Social Proof Campaign
On your TrustPulse dashboard in WordPress, you’ll see a green Create Campaign button.
This will take you to the TrustPulse campaign builder where you’ll start at the Campaign Type tab. Here you can add a name for your campaign and select your site.
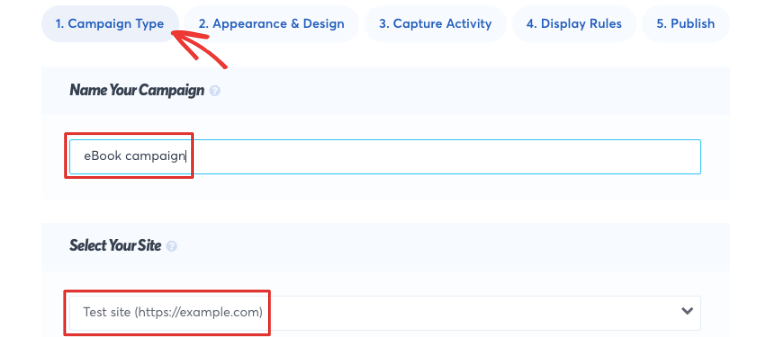
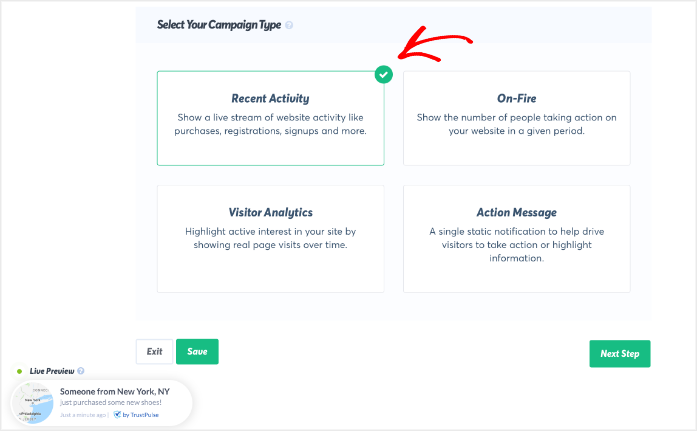
Below this, you’ll have 4 options when choosing your campaign type:
- Recent Activity shows live actions people took on your site like purchases or signups
- On-Fire will display large group actions on your website in a given period of time
- Visitor Analytics demonstrates the number of page visits to your site
- Action Message displays a single notification to push visitors to take a specific action

Depending on your goals, you may choose On-Fire if you expect a lot of conversions around the same time. It will display stats such as: “100 people purchased in the last 7 days.” On-Fire is great for increasing the buzz if you’re running a flash sale.
On the other hand, Recent Activity shows the activity of people that are signing up for your email list or making purchases in real time. If you don’t have products to sell or an email list, you can showcase all kinds of activity like ebook downloads, blog post views, and even when someone leaves a review.

Recent Activity is super effective for inspiring FOMO in new users on your site. So let’s select this option.
Now click the Next Step button at the bottom of the page to customize your campaign.
Step 3: Customizing Your Social Proof Campaign
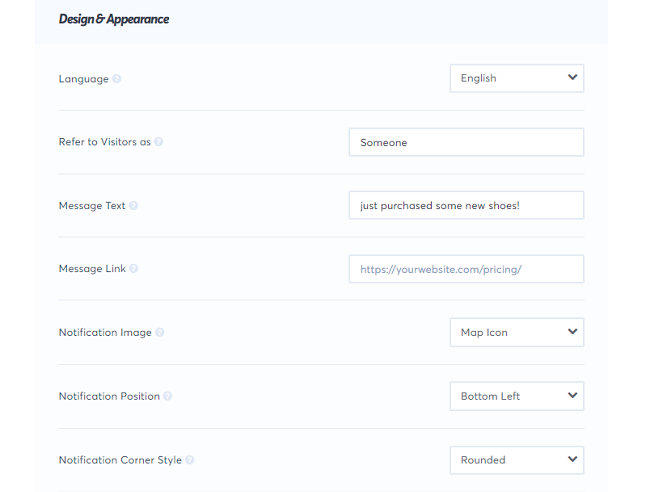
Now, you should be in the ‘Design & Appearance’ tab where you can add the name of your visitor and message text.
TrustPulse will autodetect the visitor’s name from their purchase information. In case it is unable to detect the name, it will default to the title you put in the ‘Refer to Visitors as’ field.
Next, you can also make the popups clickable by adding a message link. This lets you take visitors directly to your opt-in form or product page.
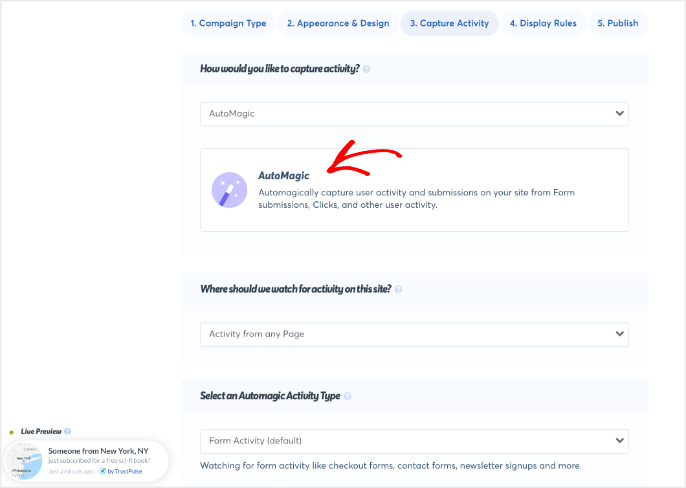
You can also see the live preview of your campaign on the bottom left corner of your screen. Click on the Next Step button to continue. You’ll see a new page where you’ll choose how to capture website activity. There are 3 options:
- AutoMagic
- Zapier
- WooCommerce Orders
When you select AutoMagic, TrustPulse will automatically track user activity and submissions on your site. You won’t have to do anything more.
At this stage, you’ll configure how you want AutoMagic to work. Click on the drop-down arrow and select which of the form activities you want it to capture. You also have the option to add your pages manually by typing in the URL.
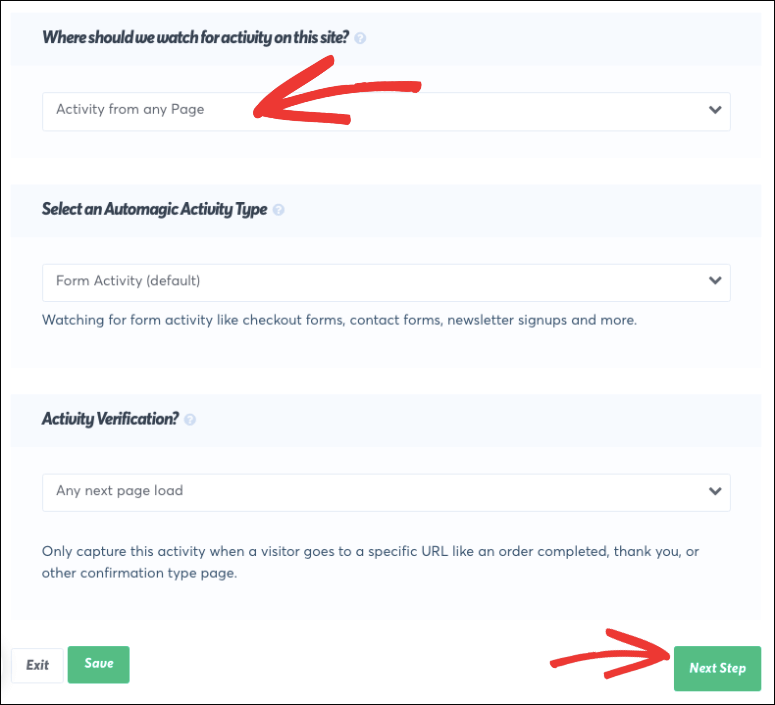
After clicking the Next Step button, you’ll be led to the Display Rules settings. Here you may configure where you want your successful submissions to be sent. You’ll also have the option to choose how often notifications appear on your website for new sign-ups.
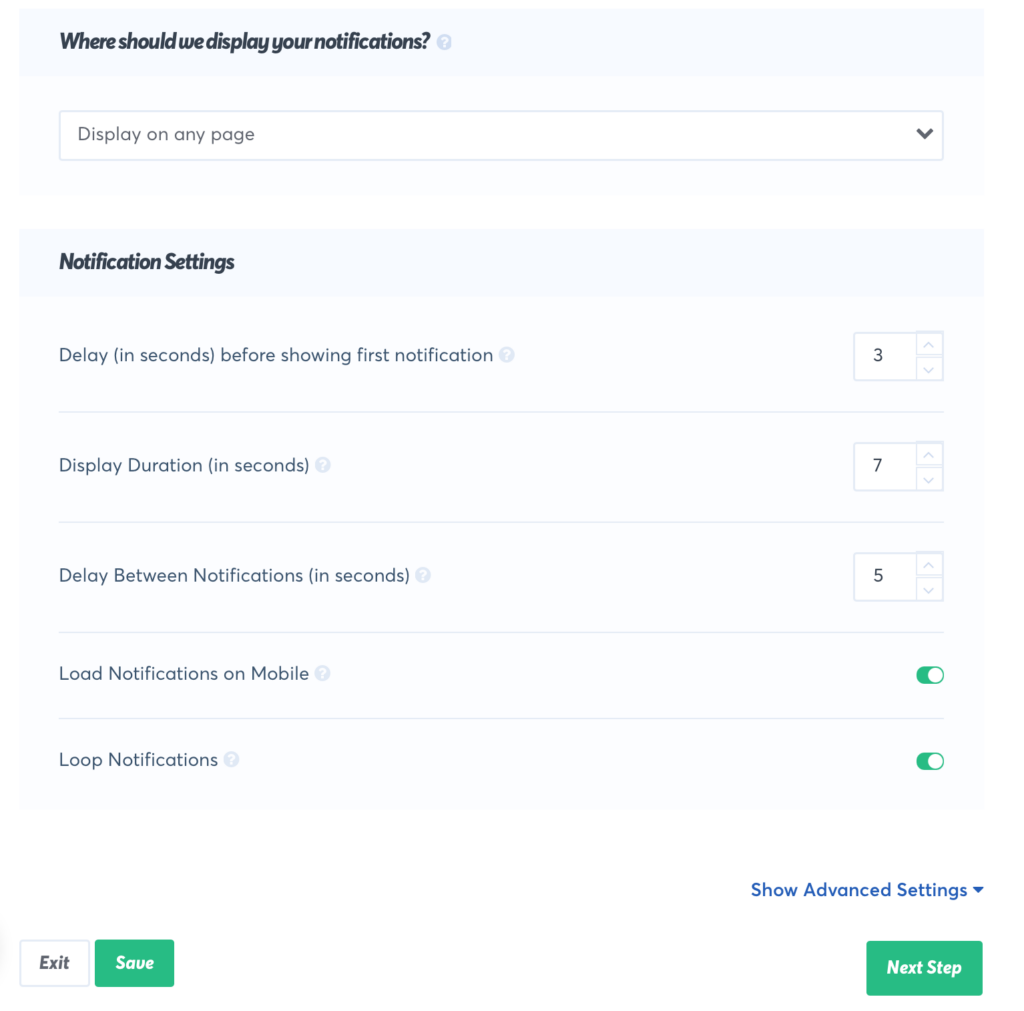
You can choose the duration of each popup notification and also add a delay between popups. In case you want more options, you can open the advanced settings tab.
When you’ve finished adjusting the Display Settings, the Next Step button will take you to the final screen.
Step 3: Publish Your Social Proof Campaign
Now that you’re done creating your campaign, it’s time to publish it. Publishing your campaign is easy — first, you’ll see a preview of how your campaign will look, then just click on the Launch your TrustPulse campaign button and your campaign will go live right away.
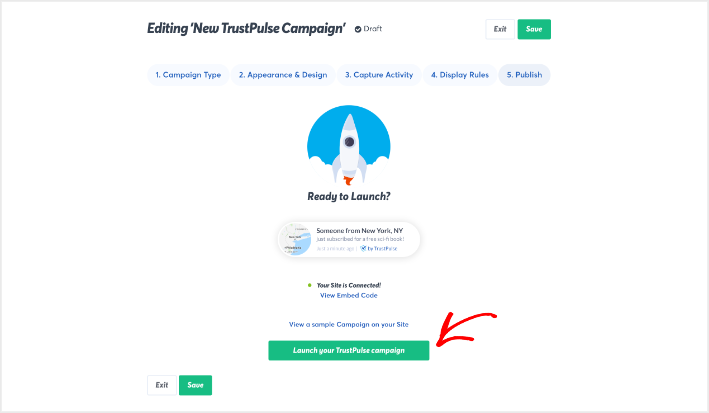
Now you’ll see the success message from TrustPulse that your campaign is live!
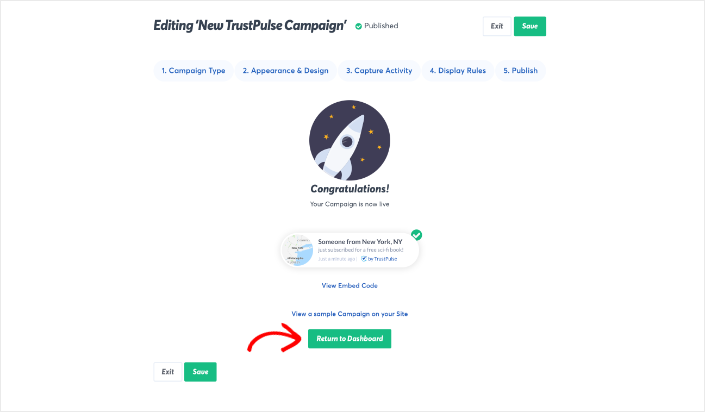
Users will now start seeing social proof popup notifications on your site that showcase what other live visitors are doing on your site.
Click on Return to Dashboard option to go back to the TrustPulse dashboard. Once your campaign has had enough time to get views and clicks, you can see your campaign stats here.

This will show you the number of viewers, clicks, and notifications for the campaign that you just created.
That’s it! Now you’re ready to use TrustPulse to set up more campaigns. With TrustPulse, you can showcase recent sales notifications as well as static messages to promote newly launched products, ebooks, flash sales, and so much more.

We hope you found this article helpful on adding social proof to increase business on your WordPress site. If you’re looking for more tools like this, see our list: 8 Best Social Proof Plugins for WordPress (Compared)
Want more ways to boost business? Here are our top suggestions:
- Use a countdown timer to build urgency for users to buy or subscribe now. You can do this with SeedProd – the best WordPress website & landing page builder. It comes with plenty of templates and WooCommerce store integration.
- Add social share buttons to your site to gain momentum on social media. SeedProd will help you here as well.
- Collect email subscribers using optin forms and lead magnets. OptinMonster – the best lead generation & popup plugin can help you do this. With this tool, you can also create notification bars, welcome mats, slide-ins, and so much more. It integrates seamlessly with all popular email marketing services and has audience targeting functionality too.
- Make sure potential customers can connect with your by displaying a contact form or a call now button.
- Get more positive reviews for your site to show users your business can be trusted.
- Track performance with a Google Analytics plugin like MonsterInsights that makes it easy to understand what all the stats and data means.
With that you’re all set to grow your business using WordPress and it’s many tools. You may also want to see our other resources:
- How to Create Stunning WordPress Optin Forms (Step by Step)
- How to Add Push Notifications to WordPress to Drive Traffic
- How to Grow Your Email List With Social Proof Notifications
These tutorials will help you boost the confidence of website visitors in your brand, and improve engagement and conversions.


Thank you so much for sharing this information and other helpful articles in a way anyone can understand. You are awesome!
Well explained and very organized content. Thank you for this information.