Do you want to install an SSL certificate on your WordPress site? Installing an SSL certificate tells your visitors that they’re on a secure connection. With it, you can foster trust in your website among your visitors.
In this guide, we’ll show you how to add SSL and HTTPs on your site.
Here’s a table of contents so you can easily navigate the post:
- What Is SSL and HTTPS?
- Why Do You Need SSL and HTTPS?
- Using SSL on Your WordPress Site
- Developer’s Guide: How to Add SSL and HTTPS
- FAQs
What Is SSL and HTTPS?
SSL (Secure Sockets Layer) is an industry standard security measure that creates an encrypted link between your visitors’ browsers and your website.
Using SSL and HTTPS ensures that all data transmitted between your visitor and you remains encrypted. In simple terms, SSL enables a secure connection between you and your visitor to ensure that only authorized people can access the information submitted on your website.
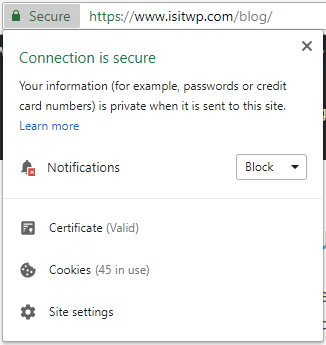
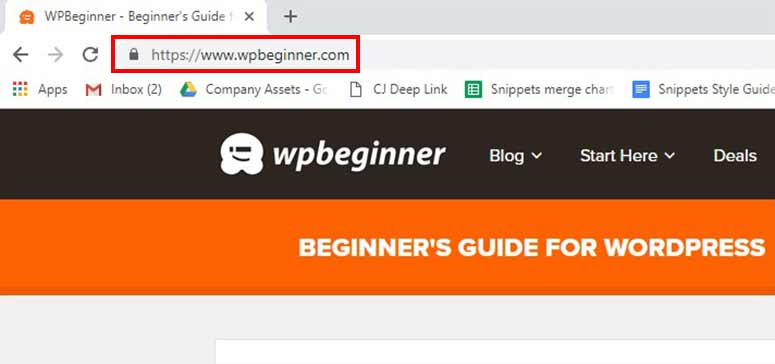
When you install an SSL certificate on your site, your website URL will be prefixed with HTTPs , instead of HTTP.

In addition, a small green padlock icon is also shown, signalling to your visitors that they’re on a secure connection.
Why Do You Need SSL and HTTPS?
Many website owners incorrectly assume that SSL is only for websites that accept online payments. The reality is: EVERY website needs an SSL certificate.
Below are a few benefits of using SSL and HTTPS on your site:
1. Website Performance
It’s been reported that websites delivered over HTTP/2 perform 50-70 percent better than sites over HTTP/1.1.
In order to boost performance and take advantage of HTTP/2, your website needs to run over HTTPS because of browser support.
2. SEO Ranking
Google uses SSL as a ranking signal in their search results. That means, by installing SSL on your site, and ensuring SEO best practices chances are better for you to hold a higher position in search results than your competitors who didn’t install SSL.
3. Trust and Security
The visual cues shown on your visitor’s browser as a part of your SSL certificate may seem small. However, many of your visitors are looking for these trust-earning signals before they share private information with you on your website.
In fact, studies show that 77% of your website visitors are concerned about their data being intercepted or misused online. And 90% of your visitors are more likely to trust a website if it displays security indicators.
Adding SSL is the best way to foster trust in your website and encourage your customers to share sensitive information with you without having to worry about a security breach. You can read more about how you can keep your website secure from our ultimate guide to WordPress security.
Using SSL on Your WordPress Site
In order to install SSL on your site, you need to first get an SSL certificate. There are different ways to do this:
1. Get Free SSL with web host
An SSL certificate typically costs around $49.99, but, if you use Bluehost as the hosting provider, then you’ll get a free SSL certificate, plus a free domain name, along with your web hosting purchase. Altogether, the purchase will cost only $2.75 per month.
Click Here to Claim This Exclusive Bluehost Offer »
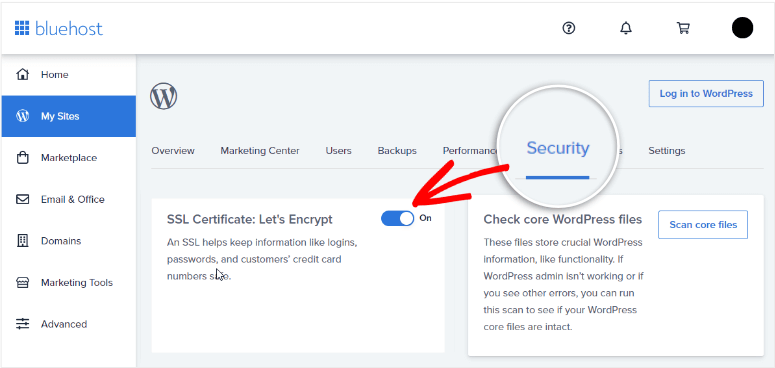
In your Bluehost dashboard, go to the My Sites » Security section.
Then just turn on the toggle switch to enable SSL on your site. That’s it. If you face any trouble with installation, you can contact your web host customer care and they’ll help you with it.
Easy right? So for beginners, we recommend using a hosting company that offers free SSL certificates because they’ll also install it on your website; which means you don’t need to worry about anything.
Here’s a list of all the best WordPress hosting providers on the market that provide a free SSL certificate:
If you’re already a customer of any of the above hosting companies, then you can ask their customer support team to enable an SSL certificate on your website for free.
2. Install an SSL certificate from a Third-party Vendor
If your web host doesn’t offer SSL or want to use third party options, you can get an SSL certificate from sources like:
- Lets Encrypt – Free and budget-friendly certificates
- SSL.com – Ample protection starting at $36.75 per year
- DigiCert – High security certificates at a wide range of prices
Once you buy or download your own certificate, you’ll need to upload it to your site using cPanel.
We’ll show you how to do this with Bluehost, but the steps remain the same for most hosts.
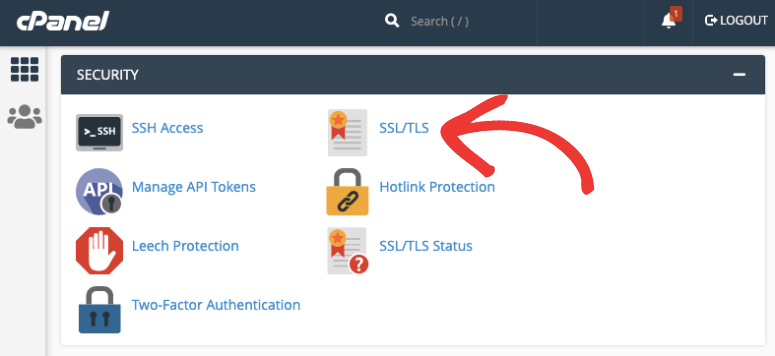
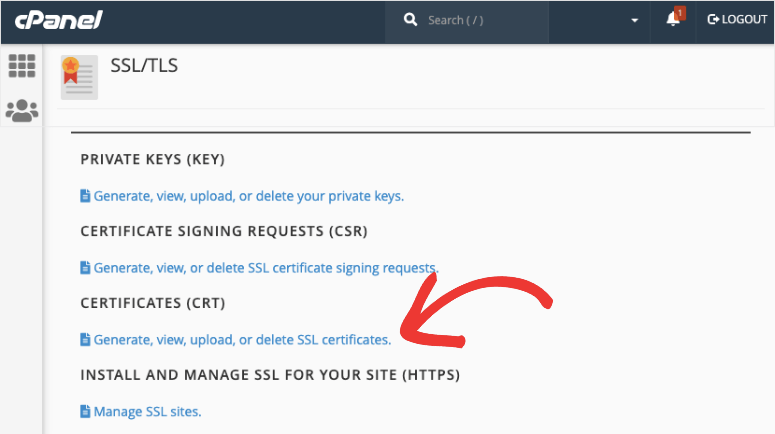
Inside your hosting account, open cPanel and navigate to SSL/TLS section.
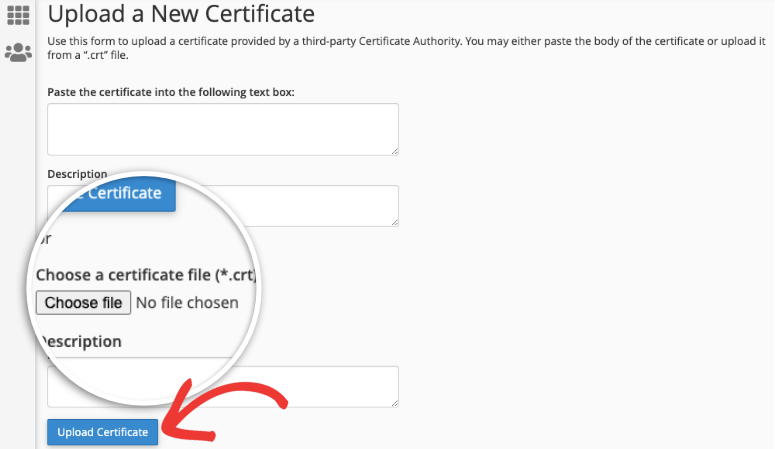
Click on Generate, view, upload, or delete SSL certificates. This will take you to a new page where you can upload the certificate.
You’ll see an option to choose file from your computer. Select the SSL certificate you’ve downloaded from your provider.
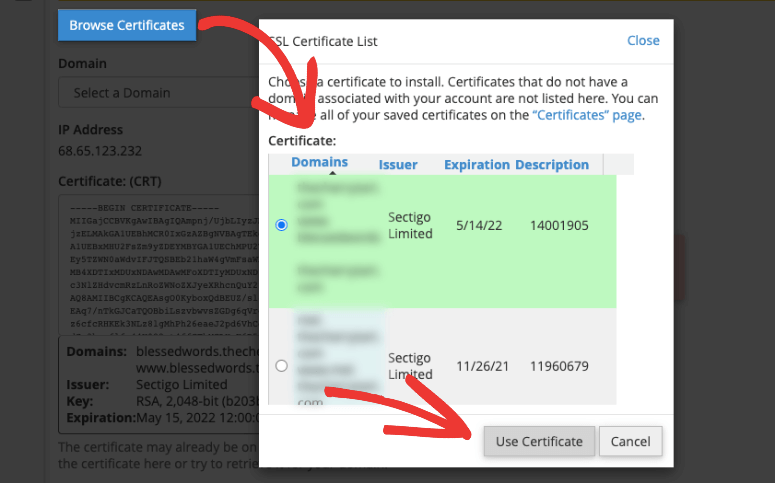
Now head back to the SSL/TLS page and open Manage SSL Sites.
Here, click on Browse Certificates and you’ll see all the installed certificates here.
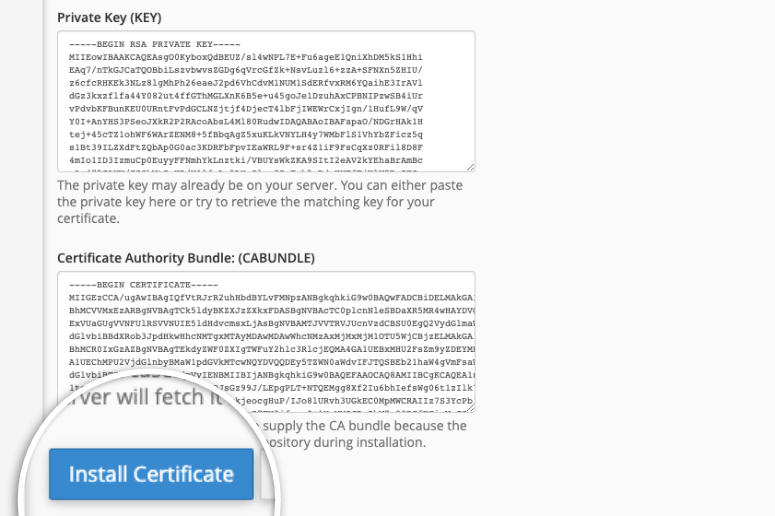
Select the one you just uploaded and hit the ‘Use Certificate’ button. This will autofill the given fields with the information from the certificate. At the bottom of this page, click the Install Certificate button and you’re done.
You’ll see a message that your certificate has been successfully installed.
3. Install an SSL certificate with a Plugin
Another simple option to install SSL is by using the Really Simple SSL plugin. It’s free to use but if you want auto-installation and high-end certificates, then you can sign up for the pro version. You can use our Really Simple SSL coupon code to get 15% off.
The first thing you’ll need to do is install and activate the plugin on your site. Never installed a WordPress plugin before? No worries, see our guide on How to Install a WordPress Plugin.
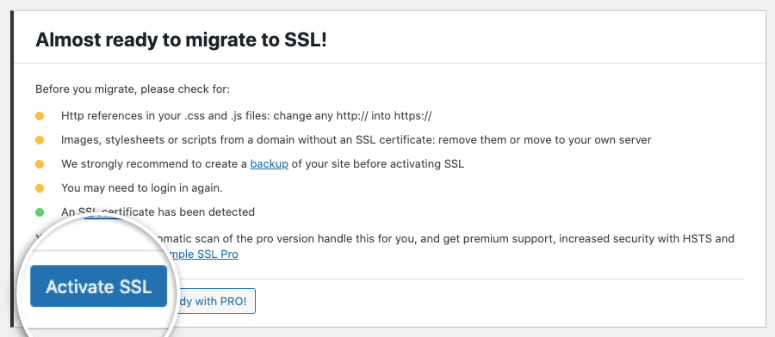
Once done, visit the Really Simple SSL page and you’ll see an option to Activate SSL.
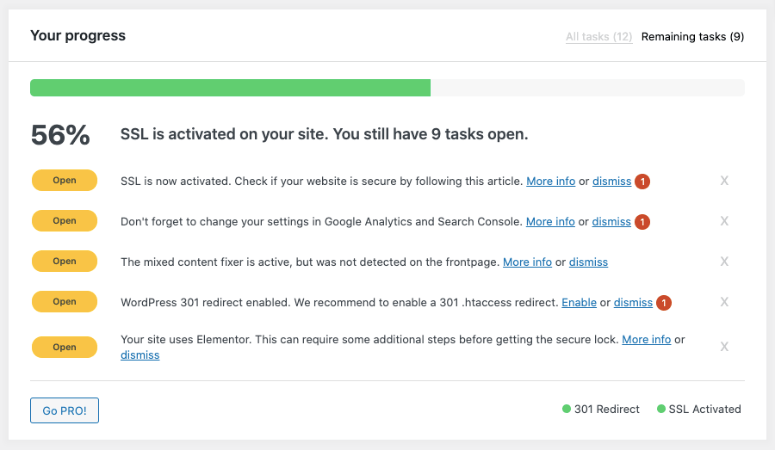
After it’s activated, the plugin will give you a list of tasks you need to carry out to make sure the certificate works correctly.
You can follow these onscreen instructions to fix errors and migrate your site from HTTP to HTTPs.
See our Really Simple SSL Review for more.
Developer’s Guide: How to Set Up WordPress to Use SSL and HTTPS
If you’re using a new site, then you’ll need to update http with https in your site URL. To do this, go to Settings » General and update your WordPress Address and Site Address fields.
If you’re adding SSL to your existing website, then you need to redirect all HTTP request to HTTPS. All you have to do is add the following code into your .htaccess file, which you can find in your root directory.
<IfModule mod_rewrite.c>
RewriteEngine On
RewriteCond %{SERVER_PORT} 80
RewriteRule ^(.*)$ https://www.yoursite.com/$1 [R,L]
</IfModule>
Make sure to replace example.com with your website URL.
If you’re on an Nginx server, you’ll need to add the following code instead:
server {
listen 80;
server_name yoursite.com www.yoursite.com;
return 301 https://yoursite.com$request_uri;
}
If you also want to implement SSL and HTTPS on your WordPress admin area or login pages, then you need to configure SSL in the wp-config.php file. Simply add the following code above the “That’s all, stop editing!” line in your wp-config.php file:
define('FORCE_SSL_ADMIN', true);
How to Set Up SSL and HTTPS on Specific Pages
If, for some reason, you only want to use SSL on specific pages of your site, then you’ll need to install the plugin WordPress HTTPS (SSL).
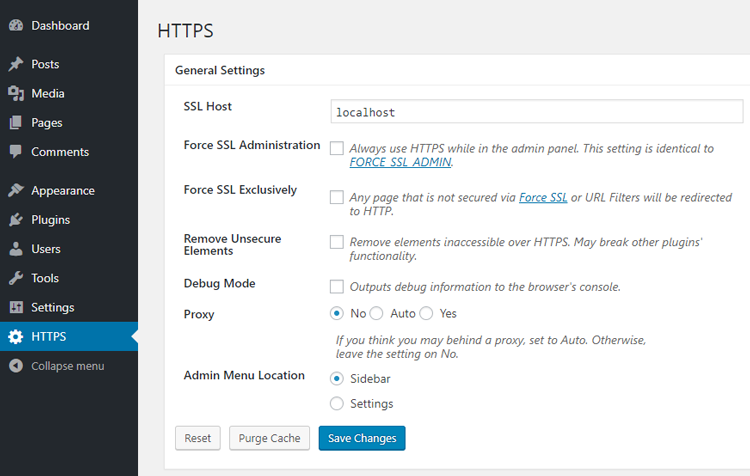
After installing the plugin, you can find the HTTPS menu in your WordPress admin dashboard.
In the SSL host field, you’ll need to specify your domain name.
However, if you’re using a shared SSL certificate, then you’ll need to enter the host information instead of your domain name.
If you’re using a non-traditional SSL host with a different port, then you can specify the port info in the Port field.
If the Force SSL Administration box is checked, then the plugin forces WordPress to use HTTPS on all admin area pages.
The next option is Force SSL Exclusively. Checking this box will only use SSL on pages where you have checked the Force SSL option. All other traffic will go to the normal HTTP url.
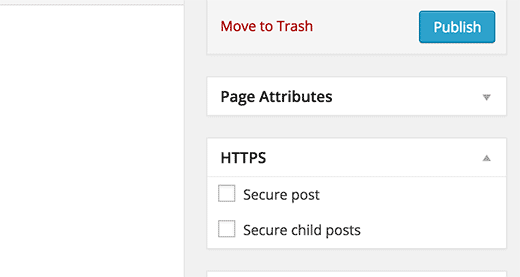
This is a great choice if you want to use SSL on specific pages like shopping cart, checkout, account pages, etc. Once this option is enabled in your plugin settings, you can go to specific pages where you want to use HTTPS.
Then, select the checkbox next to the Secure post option.
That’s it!
We hope this article helped you add SSL and HTTPS onto your WordPress website. Up next, we’ll answer some of the most common questions we get asked on SSL.
FAQs on SSL and HTTPS
1. What kind of data does SSL protect?
When you visit a website URL, it sends information to the server and displays the web page in your browser. The information that you send to the server can be anything from a website URL, username/password, credit card details, personal information, email address, etc. This data is private and it needs to be handled sensitively.
2. What happens to my website without SSL?
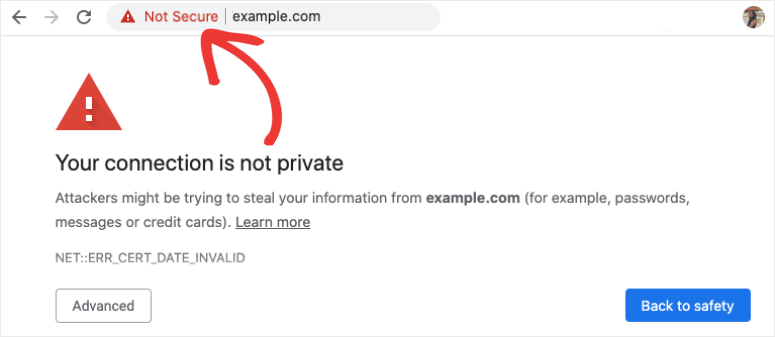
If you’ve not implemented an SSL certificate, when visitors come to your site, they’ll see a warning like this:
The error message “Your connection is not private” or something similar appears because the browser such as Google or Firefox has marked your site as insecure or unreliable.
Without SSL, your website can be attacked or hijacked which means you can lose your important information. Hijackers use this information to blackmail users. It’s mandatory to keep your website protected under the HTTPS protocol by adding an SSL certificate.
3. Who can issue an SSL certificate?
An SSL certificate can only be issued by a certified authority who’s recognized to provide SSL certificates for websites like SSL companies.
4. Are there any changes I can see on my site when I install SSL?
When the SSL certificate is added to your site, you’ll see a padlock and HTTPS with your website’s URL.
If the SSL certificate is not added successfully, you’ll still see the old HTTP protocol, which is insecure. Popular web browsers, like Google Chrome, have abandoned the sites that still hold HTTP protocol. If you try to access a site without an SSL certificate, you may see an error on your Google Chrome browser.
4. Can I run my website without SSL?
Though an SSL certificate is mandatory for all websites, you should know that if your website handles online payments, user logins/registrations, memberships, etc., then it’s a MUST for you. Otherwise, your data as well as the data of your site users will be at serious risk.
Sometimes, the third-party services that manage payments will also inform you to install SSL/HTTPs on your website to avoid getting hacked. This happens when your website is receiving payments using an online service like PayPal or Stripe.
5. What are the main benefits of having an SSL certificate?
Here’s why you need an SSL certificate:
- It validates your online identity and assures your users that your website is worthy to invest time into.
- Your users can make payments without any security concerns.
- Google supports websites that have SSL/HTTPs protocol activated. Sites with SSL/HTTPs will also have better search rankings than sites with the old HTTP protocol.
6. What is the Cost of an SSL Certificate?
There are many SSL certificate providers on the market. All these providers are authorized and may offer different prices. The price ranges between $49-$199 / year depending on the services offered by the SSL company.
Some of the popular SSL certificate providers also offer addons and services like installation of the SSL certificate on your website. These services come with additional costs for the user.
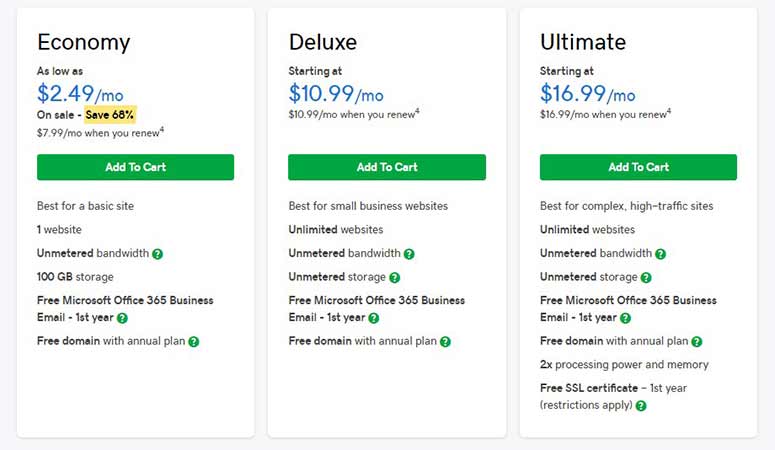
For instance, an SSL certificate from GoDaddy start from $2.49 / month which is the best deal for a single site. They also help install the SSL certificate on your domain.
How to fix mixed content issues caused by SSL?
When you migrate from HTTP to HTTPs, there are chances that a few pages, especially old ones remain on HTTP URLs.
You can fix these problems using the Really Simple SSL plugin or the SSL Insecure Content Fixer plugin.
These plugins will take you through the necessary steps to resolve any issues. Then the warning ‘This site is not secure’ will be removed from your site. You’ll see the padlock and ‘https://’ in your address bar.
For more details on this, we recommend following this guide from WPBeginner to Fix Mixed Content Error in WordPress.
That’s all we have for you today. You might also want to see our other guides:
- How to Harden Your WordPress Site to Keep Hackers Out
- 9 Best WordPress Security Plugins Compared
- How to Easily Back Up Your WordPress Site (Step by Step)
These guides will help you improve the security of your website.


Comments Leave a Reply