User submitted calendar events are one of the best ways to build and grow a community.
They create a sense of ownership and participation for your users. This can help them feel included in your mission. On the other hand, users who submit calendar events to your WordPress website can help you promote local events that you are not associated with.
As a result, the feeling of togetherness goes both ways, as this helps your users feel like you are part of the community as well. To top it off, since the events are saved in a calendar, it is easier to manage and everyone to remember about it.
In this article, we will show you how to let users submit calendar events in WordPress. We will walk you through step by step so that you do not need any expert help to set up this WordPress feature.
The Importance of Letting Users Submit Calendar Events
Now, letting users create their own events can help you build different types of communities.
You can grow your community through social events such as meetups, festivals, fairs, and volunteer opportunities. You can let your users set up educational and informative events like workshops, seminars, lectures, and more. Your users can set up networking events such as conferences, network meetings, and more.
On top of this, your users can showcase their charity events on your site that could help you be part of the solution for local pain points of the community.
The best part is that you literally do not need to do much, as your users will set up the events themselves. Your role is to provide the platforms!
Here are other reasons to let users submit calendar events.
- Variety: Ensures a diverse range of events, catering to different interests and needs within your community.
- Local Knowledge: Users often have better insights into local or niche events that may not be in your radar.
- Up-to-date Information: Users can provide real-time updates and corrections, ensuring the calendar is current and accurate.
- Delegation: Distributes the workload of maintaining the calendar among a larger group, reducing the burden on you or your team.
- Scalability: Makes it easier to manage a large volume of events, especially in dynamic or fast-growing communities.
- Networking Opportunities: You and your users can discover new things and connect through events.
- Visibility: Provides a platform for promoting personal or community events, increasing your reach and attendance.
- Feedback: Users can provide you feedback on events, leading to improvements and better future planning.
- Insights: Collecting data on user-submitted events can offer valuable insights into community interests and trends.
- Creative Input: Users can introduce innovative ideas and new types of events that you may not have considered.
Now that you have a better understanding of the importance of setting up community-led events let us see how you can add them to your WordPress site.
Here is a quick look at the steps to take. You can select the links below to skip to the section you want to read.
- Step 1: Install The Events Calendar Plugin
- Step 2: Install WPForms and Its Addon
- Step 3: Creating a User-Submitted Events Form
- Step 4: Connect Event Form to Event Calendar
- Step 5: Set Up Confirmation & Notification messages
- Step 6: Publishing the User-Submitted Events Form
Step 1: Install The Events Calendar Plugin
The Events Calendar is one of the best WordPress events calendar plugins. It allows your users to create events from the front end, meaning you do not need to grant them admin or editor access to your WordPress dashboard.
The Events Calendar also allows you to publish the user events immediately or first pass them through an approval process. To add to this, you have more control over the events displayed on your WordPress website.
The best part is you do not need any coding experience to use this events plugin.
Check out the latest The Events Calendar review here.
So how do you set up The Events Calendar?
You can access The Events Calendar pro version by going to the official site and buying a plan. This premium plugin will help you with event management, recurring events, and more right in your WordPress dashboard.
But for this tutorial we will use the free version of the plugin. It allows us to set up user submitted calendar events without incurring additional costs.
First, head to Plugins » Add New Plugin in WordPress to access your plugin repository. On this page, use the search bar to find The Events Calendar. Then, install and activate it as you would any other plugin.
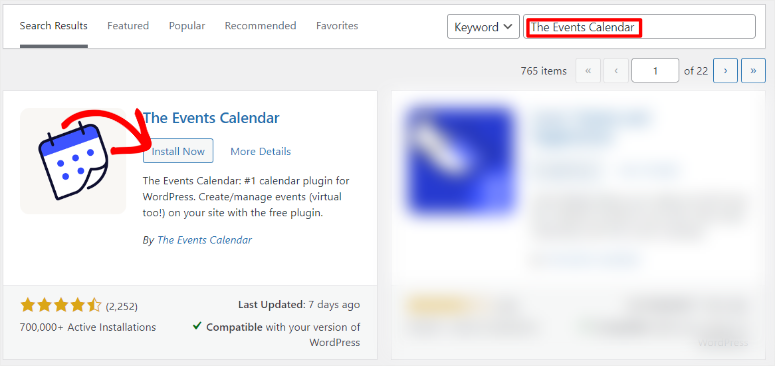
If you experience any issues, here is an article on how to install a plugin.
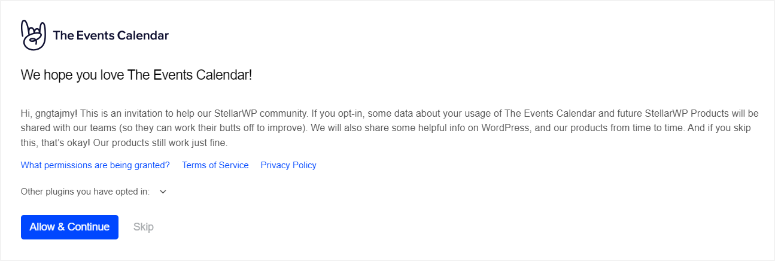
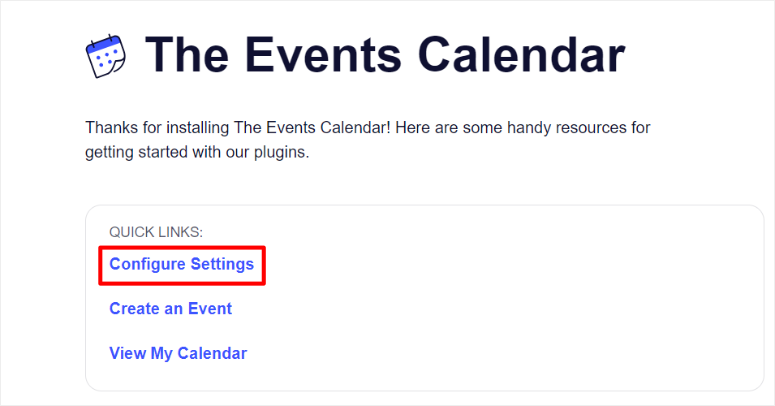
After you activate the plugin, you will be redirected to Events » Settings. Here, you can either accept to be part of the plugin’s community when you select “Allow & Continue.” Or you can simply select “Skip” if you do not want to receive community updates.
On the next page, select Configure Settings to take you to “Event Settings,” where you can personalize your user events settings.
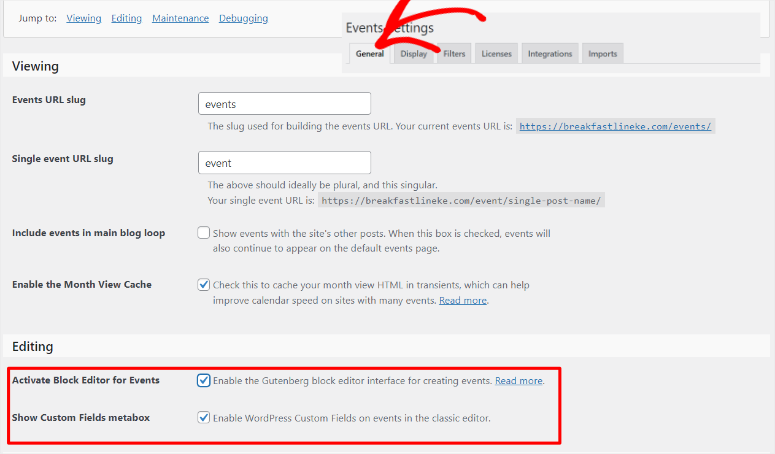
On the next page, go to the “General” tab.
Then, in the Viewing section of the page, you can customize the Events URL Slug and Single Event URL Slug to whatever you want. But we suggest you leave it as “Events’ and “Event” to avoid any confusion.
After this, move to the Editing section of the page and use the checkbox to enable “Activate Block Editor for Events,” so that you can customize the user event forms with Gutenberg blocks.
In this section, make sure that “Show Custom Fields metabox” is also enabled to ensure you can map out fields from form templates from form builders.
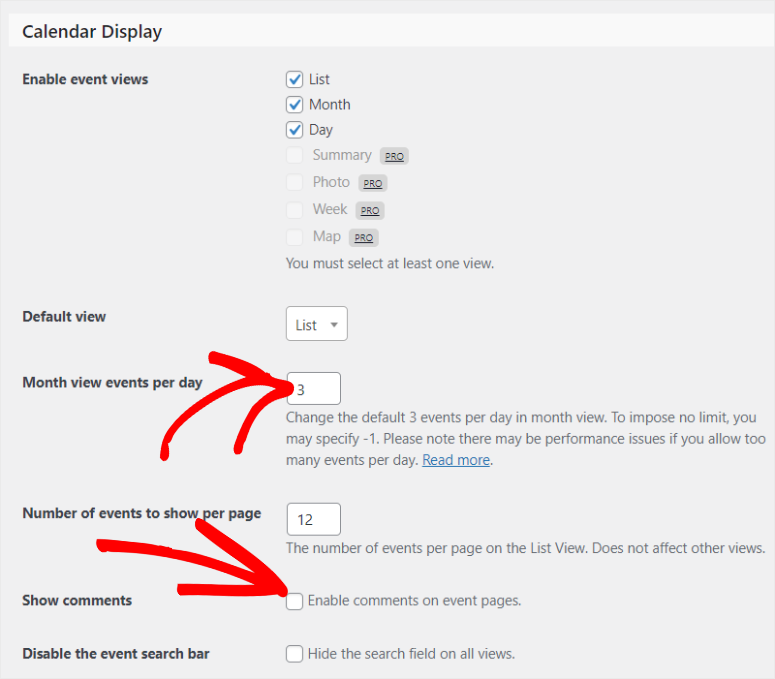
Let us move to the “Display” tab to see how to set up the user events page appearance on your site.
By default, the “Month view events per day” is set at 3 to ensure you keep the calendar clean and easy to read. You can change this number to fit your website and needs.
But, if you want to display all events without a limit, you can set the value to -1. This means that all events scheduled for a day will be shown, regardless of how many there are.
Next, type in the number of events you want to display on your events page in “Number of events to show per page.”
After this, activate “Show Comments” to ensure you get user-generated content to support the legitimacy of the event and improve engagement and SEO.
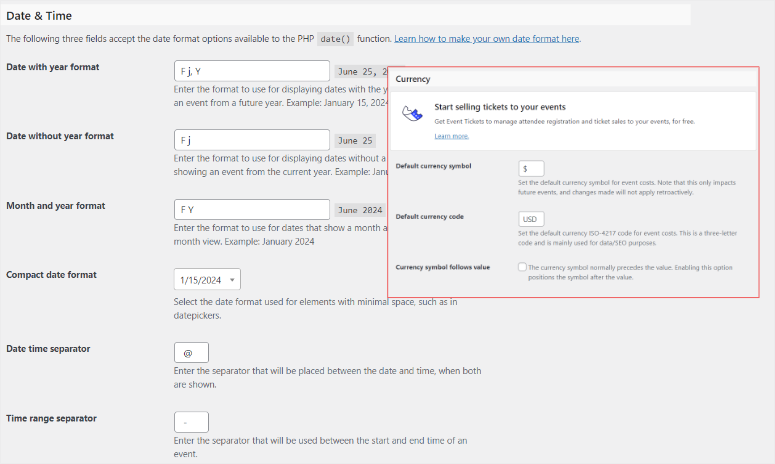
Then, move to the Date & Time section to set up the date and time format. Finally, use the Currency section to set up the default currency symbol and default currency code.
That’s it! You are ready to use The Calendar Events plugin to add user events to your site.
Step 2: Install WPForms and Its Addon
Now to allow users to submit calendar events, you need to build a form. And there is no better form builder than WPForms.
WPForms is the best forms plugin because it can help you create any form with an easy-to-use drag and drop builder. It comes with over 1800 templates that you can customize to fit your needs. You can then further edit any template you want using the drag and drop builder, making it great for beginners.
One of the reasons why WPForms is so powerful is its many integration features.
You can add payment gateways like Stripe and PayPal to receive payments directly on your forms. You can also integrate it with many popular marketing and subscription tools to improve lead generation and conversion.
Most importantly, you can connect it with other plugins like The Events Calendar to display a user events calendar.
Check out the latest WPForms review here.
So how do you set up WPForms?
First, go to WPForms’ official website to sign up for a premium plan. Sure, this form builder plugin comes with a free version. But to accept user-generated content from the front end, you need the WPForms Pro Plan or higher.
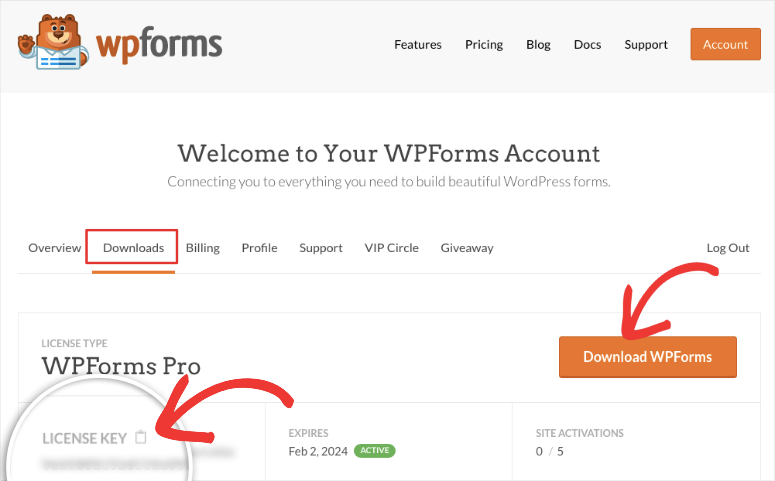
Once you purchase a plan, head to the Download tab in your WPForms dashboard and download the plugin’s Zip file. While you are on this page, also copy the License Key; you will need it later to activate the pro plan.
Then, head to your WordPress Dashboard and navigate to Plugins » Add New Plugin. Here, upload the WPForms’ ZIP file and activate it. After this, the WPForms menu option should appear in your WordPress dashboard.
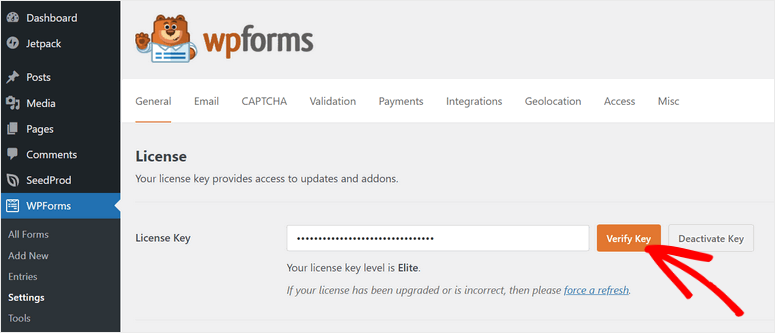
Now, go to WPForms » Settings and select the “General” tab. In the License Key bar, paste the activation key you copied earlier and hit “Verify Key.”
That’s it! You can now set up WPForms on your site.
But to accept user events, you will need the “Post Submissions” addon.
This plugin addon allows your users to send submissions like events, guest posts, and more from the front end.
They do not need to log into your backend to create the content, which can present security issues. Everything they need to create a calendar event is conveniently placed on your website’s front end.
To get started, head to WPForms » Addons.
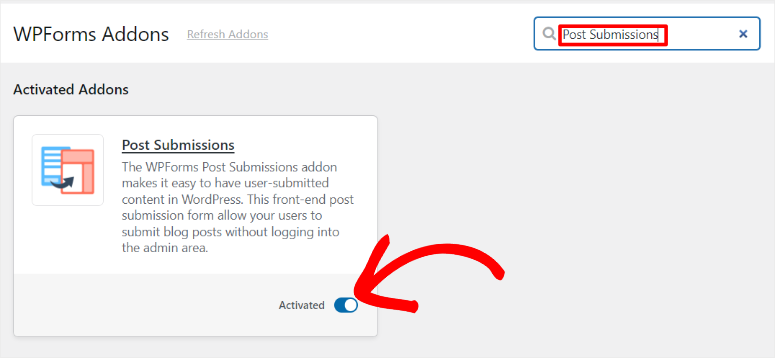
On this page, use the search bar to find the Post Submissions addon. Install and activate it as you would any other plugin addon, and you are set!
You can now use the Post Submissions addon with WPForms to accept user submitted events.
Step 3: Creating a User Submitted Events Form
With WPforms, the WPForm Post Submissions addon, and The Events Calendar plugin set up, it is time to create a user submitted events form.
To start, go to WPForms » Add New in your WordPress dashboard to open the WPForms form builder. You will see all the +1800 form templates displayed here.
To help you quickly find the form you want, WPForms has arranged the templates in categories on the left. You can also use the search bar to find the template you want.
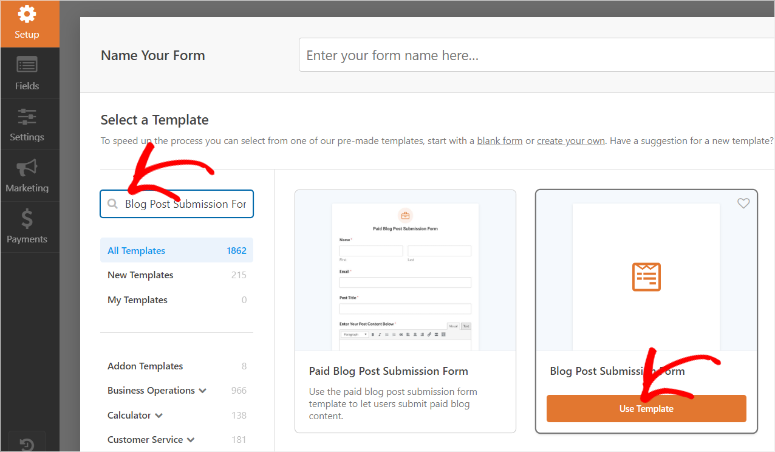
For this tutorial, we will use the search bar to find the “Blog Post Submission Form” template. Remember that this particular template is tied to the Post Submission addon. So you can only access this template after setting up the Post Submission addon.
Next, select “Use Template” to go to the drag and drop form builder.
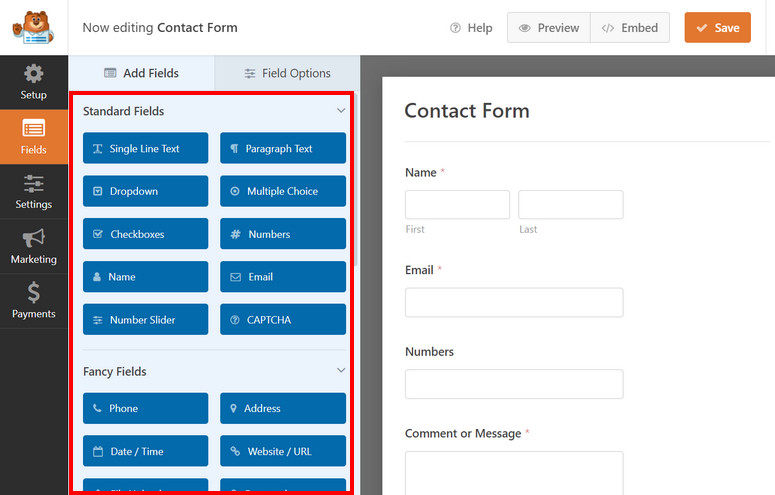
On this page, all the field options are placed on the left, while the preview window is on the right. The fields are grouped into Standard Fields, Fancy Fields, and Payment fields to further simplify the form-building process.
Remember that the template we selected, the Blog Post Submission Form, is designed for blog post submissions.
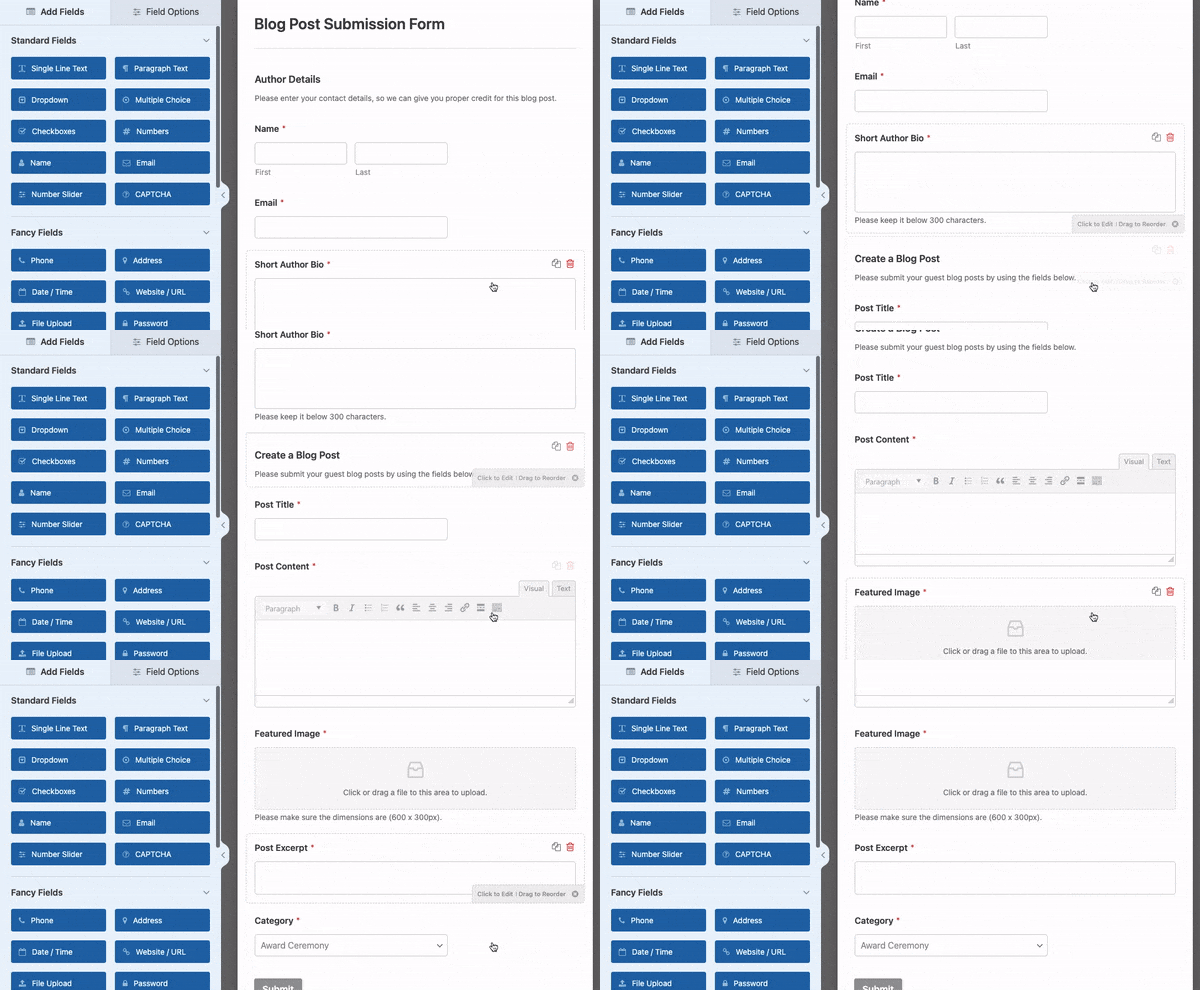
So our first mission is to customize it to fit event submissions.
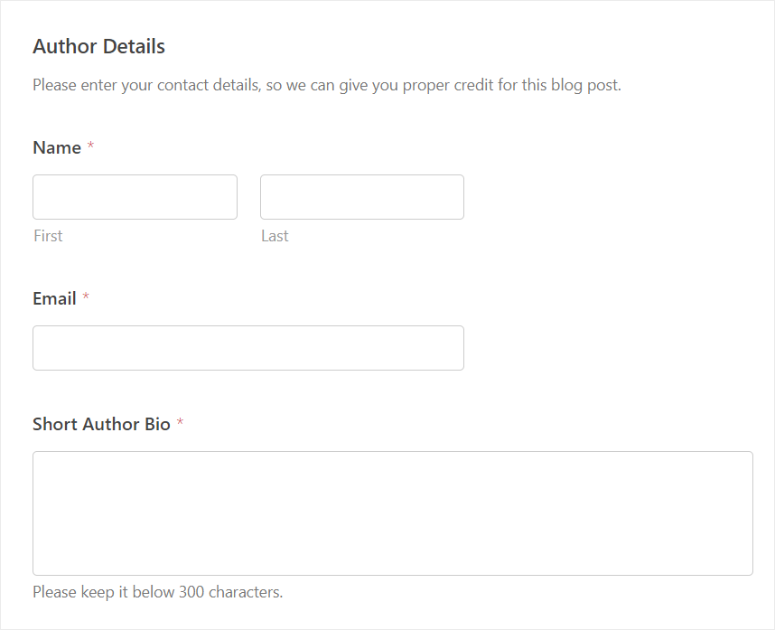
The first section of this template is Author Details. In this section, the author of the event provides user information such as name and email. This ensures that you have all the details of the event author in your database.
Below this is the Short Author Bio field. Here, the user can provide details about themselves and their connection with the event or organization.
Since the Author Bio section is important for the credibility of the event, we will leave it as it is.
Now, let’s move to the event body section.
Remember, you do not need to use the exact edits from this tutorial to design your custom post type; you can personalize this form to fit your specific needs.
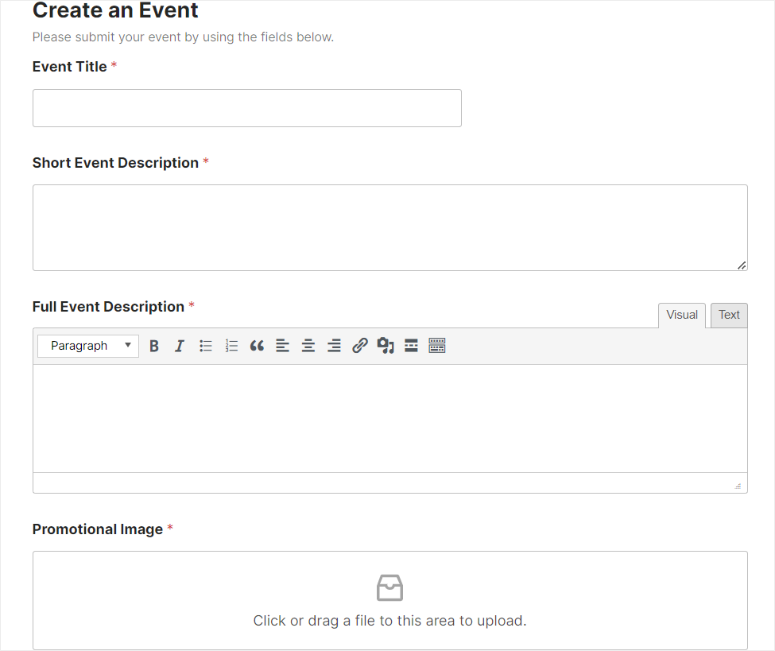
First, move to the “Create a Blog Post” field and select it to open Field Options.
Here, change the Label to something like “Create an Event” to match the form’s objective. Below this, edit the placeholder content in the Description box to something like “Please submit your events by using the fields below.”
Next, move to the Single Line Text field labeled Post Title and edit it to something like “Event Title.” After this, proceed to the Post Excerpt and edit it to “Short Event Description.”
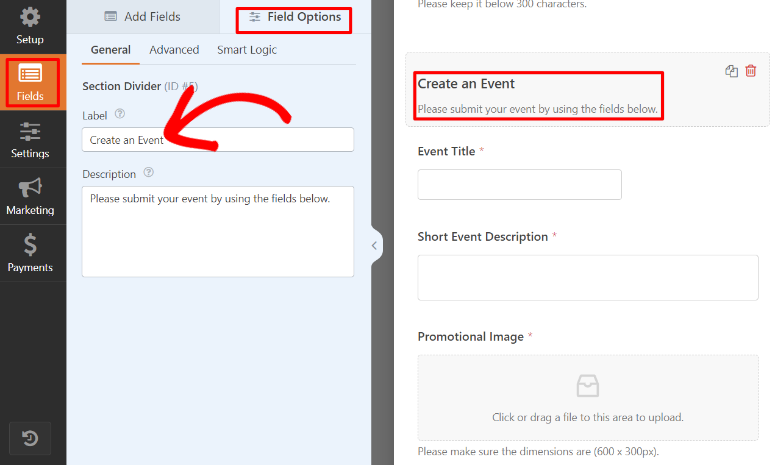
Once you are done, also edit “Featured Image” to Promotional Image,” ensuring the event has a featured image.
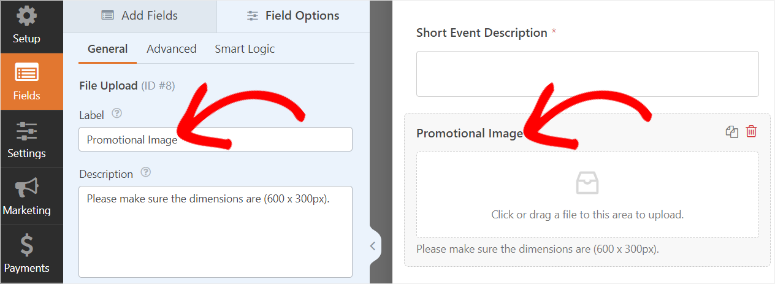
Now, as mentioned, we want to give the users the ability to create a beautiful event without accessing the backend.
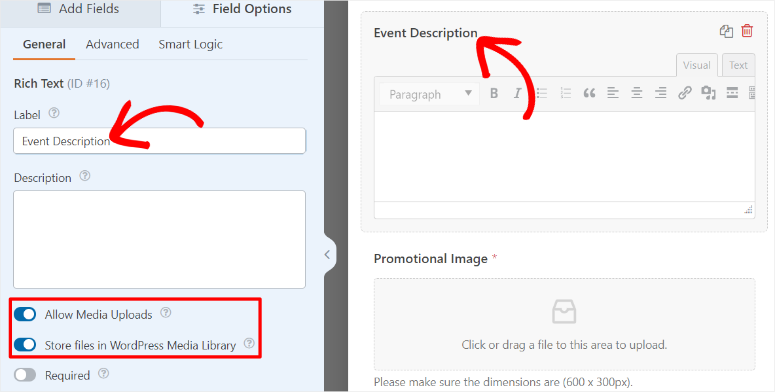
To do this, we will add a Rich Text field.
To do this, first delete the “Post Content” field on the form using the trash icon.

Then in the Fancy Fields section on the left, find the “Rich Text” field and move it to where “Post Content” was previously located.
Once done, edit the label of the field from “Rich Text” to something like “Event Description.”
Now, Rich Texts can help your users add bolding, italics, H tags, links, quotes, lists, links, media files, and more. This can help your users style their content to be more appealing to your audience and improve SEO right in the front end of your site.
Next, add a start and end date for the event.
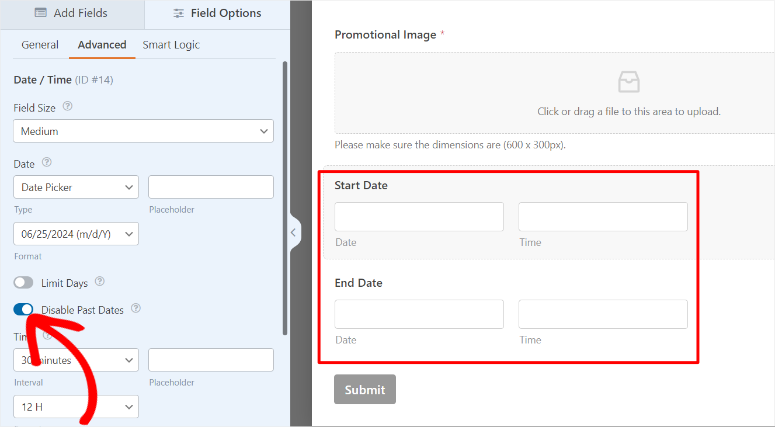
To do this, head to Fancy Fields once more and find the “Date/Time” field. Drag and drop 2 of these Date/Time fields to your form. Then, edit one of these fields to be the “Start Date” and the other to be the “End Date.”

Now, select one of the Date/Time fields in your preview window to open its “Field Options.”
Next, go to the Advanced tab and use the toggle button to enable “Disable Past Dates” to ensure your users only create events for future dates. When done, select the other Date/Time field and do the same.
Remember, each form needs users to fill out certain sections before submitting to ensure you or other users have all the information. And an event listing calendar form is no different.
With WPForms, you can make any field you want on the form compulsory.
All you have to do is enable the “Required” toggle button under “Field Options” any field. For example, you can set the Name, Email, Event Title, and Event Description as required for this event calendar form.
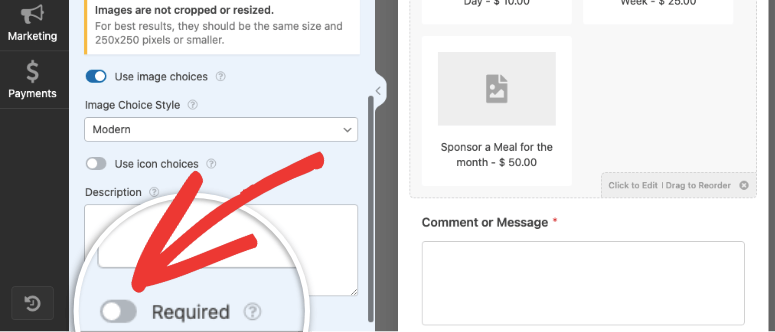
Your users will see a small red star next to compulsory fields to tell them that they have to fill it out before submission.
As a bonus, you can add additional fields like Phone, Website / URL, and Address to get more information about the user submitting the event. You can also add a CAPTCHA field or a Custom Captcha field to increase form security and ensure you only receive genuine events.
But you should remember not to add too many fields or unnecessary fields, keeping the form short and precise to reduce form abandonment.
Step 4: Connect Event Form to Event Calendar
As mentioned, WPForms works with other tools like The Events Calendar plugin seamlessly. To connect these two plugins we will carry out a simple process called Mapping.
Mapping refers to the process of connecting data between different parts of a form and other applications or services.
In this case, we will connect WPForms fields with The Events Calendar. This ensures that the data collected through the forms is accurately and efficiently transferred to the appropriate fields within The Events Calendar.
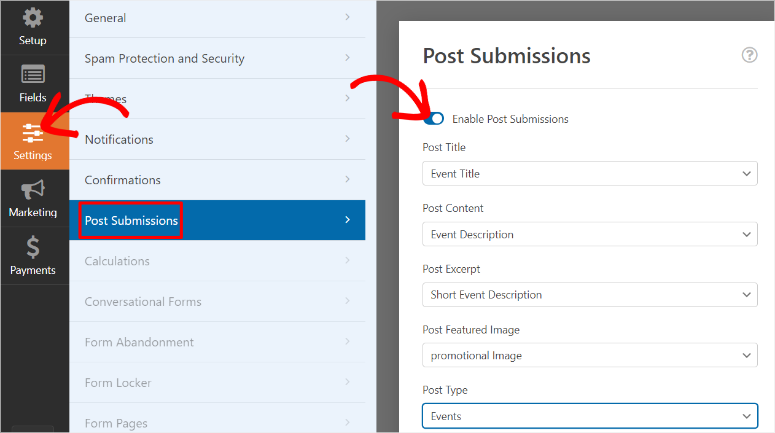
To get started, go to Settings » Post Submissions in your WPForms drag and drop builder. Next, enable “Enable Post Submissions” using the toggle button to expand the options.
Now with WPForms, mapping your forms is very simple as you will use dropdown options.
First, go to each dropdown option in the list and select the following.
- Post Title mapped to “Event Name”
- Post Content mapped to “Event Description”
- Post Excerpt mapped to “Short Event Description”
- Post Featured Image mapped to “Promotional Image”
- Post Type mapped to “Events”
After this, also use the dropdown menu under Post Status to select “Pending Review.” This way, you have the opportunity to review any event before it goes live.
Then under this, set the Post Author to “Current User.” This will ensure that the event is published under the name of the creator.

Now let’s map the time and date using the “Custom Post Meta.”
In this section, we will add a very simple code to tell The Events Calendar WordPress plugin the event duration.
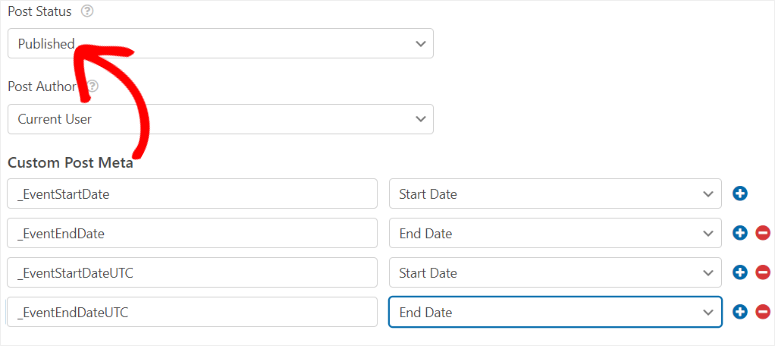
In the first text bar line, type in “_EventStartDate” then in the dropdown next to it, select Start Date. Next, hit the Plus(+) sign, and another text bar line will appear below. Here, type in “_EventEndDate” then in the dropdown next to it, select End Date.

But what if you want the event to go live without your approval?
To do this, first change the Post Status from “Pending Review” to “Published.” Then, head back to the Custom Post Meta area and add two more text bar lines.
In the next text bar line type in “_EventStartDateUTC” and select Start Date in the dropdown menu. After this, move to the last text bar line and type in “_EventEndDateUTC”
So to summarize, this is how the mapping looks like:
- _EventStartDate mapped to Start Time
- _EventEndDate mapped to End Time
- _EventStartDateUTC mapped to Start Time
- _EventEndDateUTC mapped to End Time
That’s It! You can now map out your WPForms with The Events Calendar.
Step 5: Set Up Confirmation & Notification messages
With your form and event calendar tool connection ready, it is time to customize the confirmation and notification messages. These messages help both you and event creators know the status of an event.
For example, they confirm to a user that their submission has been successfully received. This removes any uncertainty or confusion about whether the form was submitted correctly, preventing multiple submissions.
On the other hand, email notifications ensure you, the site admin, are quickly informed of new submissions, allowing you to take immediate action if needed.
As a result, you can easily automate tasks like assigning submissions to team members or triggering workflows. This can save you time and reduce manual effort.
First, go to the “Notifications” tab in your WPForms form editor.
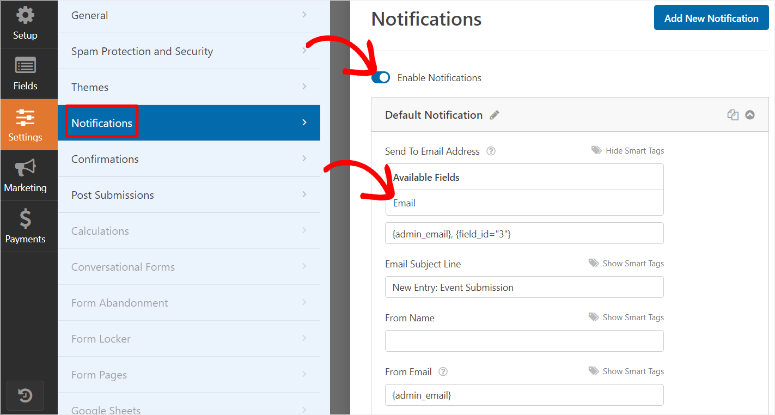
Here, Enable Notifications with the toggle button to open more options. Then in the “Send to Email Address” text bar, you will find the Smart Tag {admin_email}, which allows WPForms to send email alerts to your WordPress email address.
If you want to send the notification to one of your other email addresses, simply delete the Smart Tag and type the one you want.
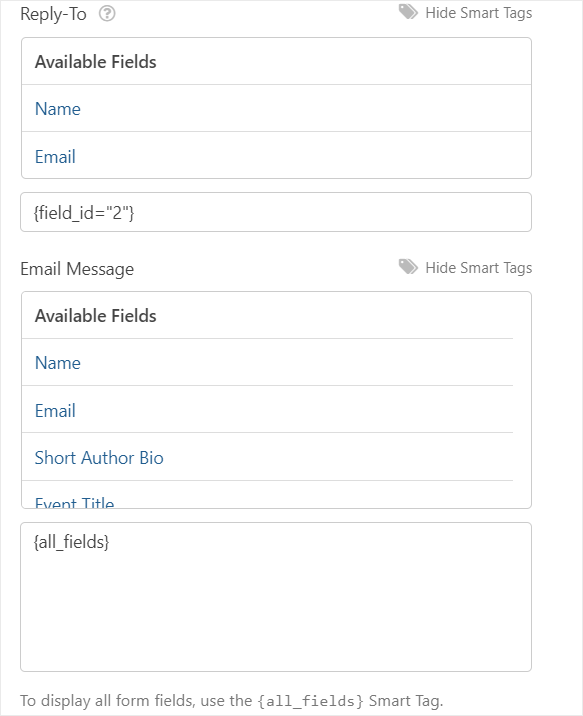
If you want your user to receive a copy of the email, select the Show Smart Tags button. From the Available Fields dropdown, select “Email.” This way, a copy of the email will be sent to the email address the user used to create their event form.
Next, move to the Email Subject Line text box and customize it to reflect event submissions. You can use something like “New Entry : Event Submission.”
In the From Name, type in your company name, your name or the team member’s name in charge of the process.
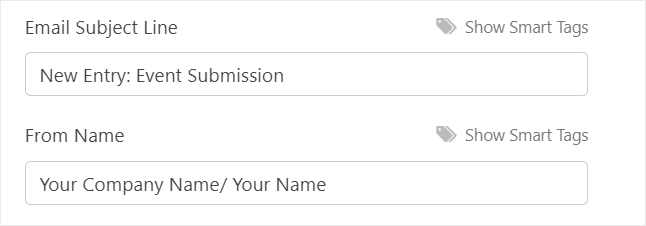
Then in the “From Email” text bar, leave the {admin_email} Smart Tag as is to avoid breaking the email setup.
Now, move to the Reply-To section to customize the message you want to send as part of the automated notification message. It can be a message to thank the user for the event submission, a quick marketing message, or further steps to take after form submission.
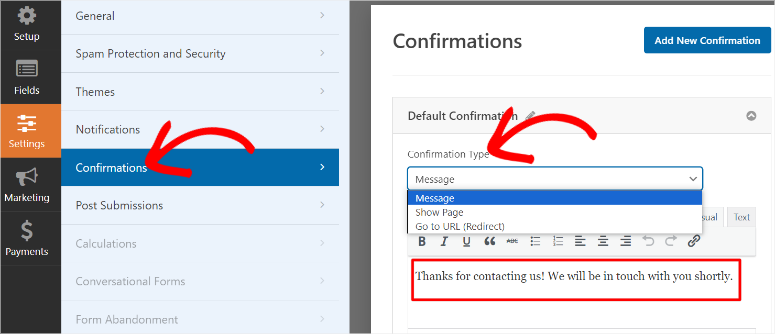
Now move to the “Confirmation” tab next.
In the Default Confirmation section, use the dropdown to select the “Confirmation Type” you want to use. Select between “Show Page,” Which allows you to redirect the user to another page on your site. You can also select “Go to URL (Redirect)” to send the user to an external URL away from your site.
But for this tutorial, we will select Message from the “Confirmation Type” dropdown to display a simple confirmation message. Next, type in the custom message to your users in the “Confirm Message” box.
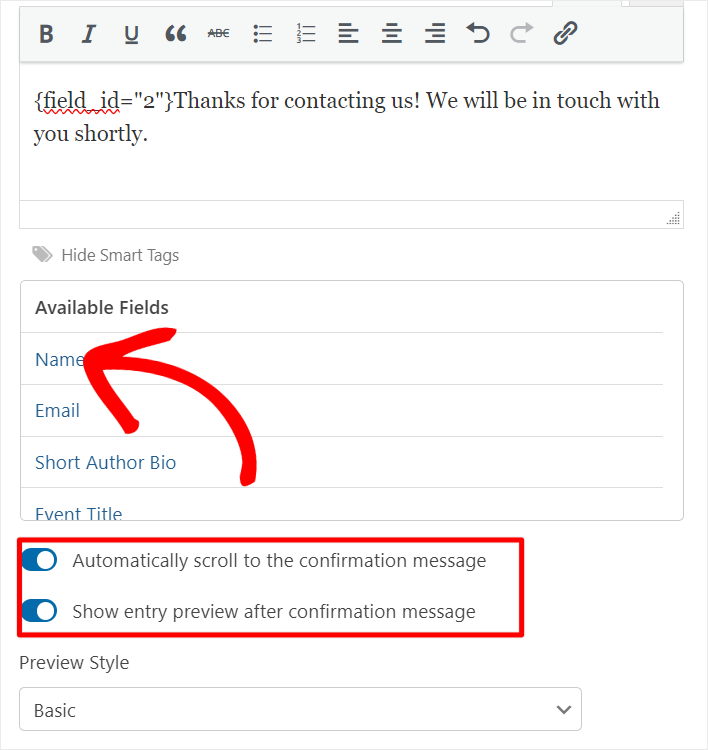
Then, below this, select “Show Smart Tags” and hit “Name” so that the message contains the user’s name.
Next, allow “Automatically Scroll to the Confirmation Message” using a toggle button. This will ensure your users do not need to reload the event page or go to a different WordPress page to see the confirmation message.
Once you do this, you can also use the toggle button to enable “Show Entry Preview After Confirmation Message.” This will display the filled out event form to the user so that they can see if they made any error during submission.
Finally, go to the Preview Stye and use the dropdown to select between Basic, Compact, Table, and Compact-Table.
Great! Your user submitted event form is ready to publish.
Step 6: Publishing the User-Submitted Events Form
Now that your form is ready, it is time to publish it on your site.
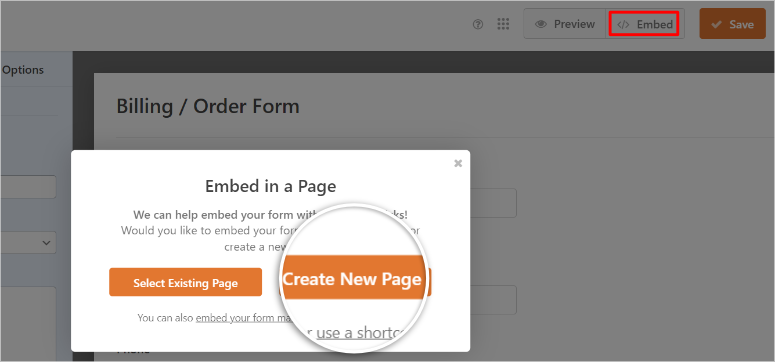
To do this, first “Save” your form. Then, select the Embed button at the top right corner of your WPForms drag and drop form builder page.
Then, in the popup window, select “Create New Page.”
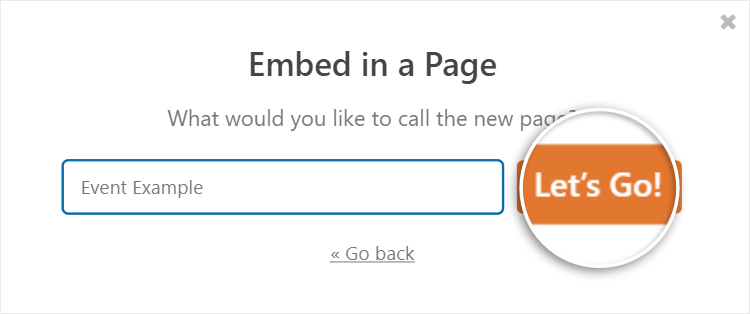
On the next popup, type in the page name you want for the event calendar page. Remember that this name serves as the page title and the page URL slug.
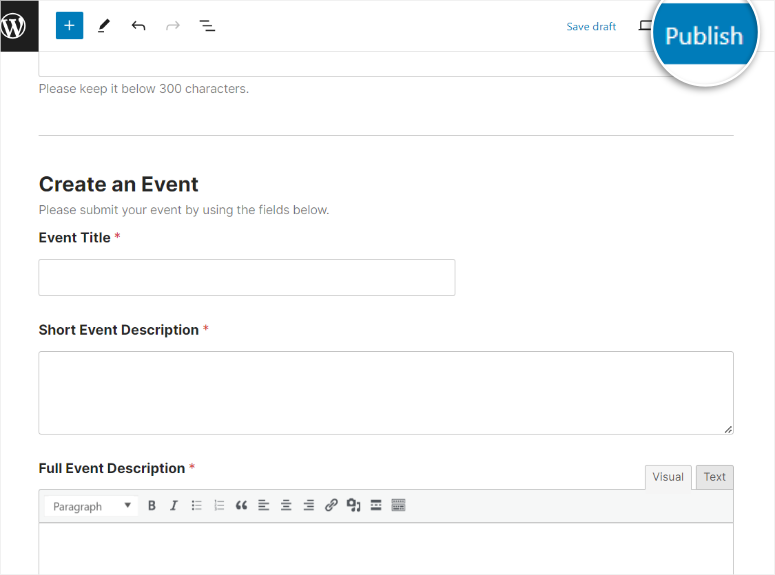
After this, WPForms will redirect you to the draft of the page you just created. You can check and see if it is missing anything or if you made any errors. When you are happy with your form, hit “Publish,” and your event calendar page should go live.
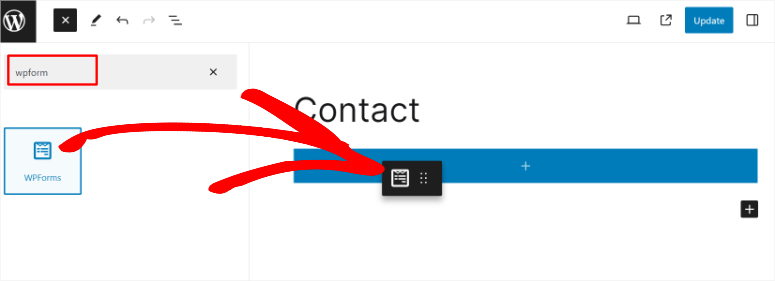
But you might also want to add the form to an existing page. The good news is that WPForms allows you to add forms using its Gutenberg Block using WordPress’ default block editor.
You can also use a shortcode to place the form virtually anywhere on your site, such as on a widget, a sidebar, and more.
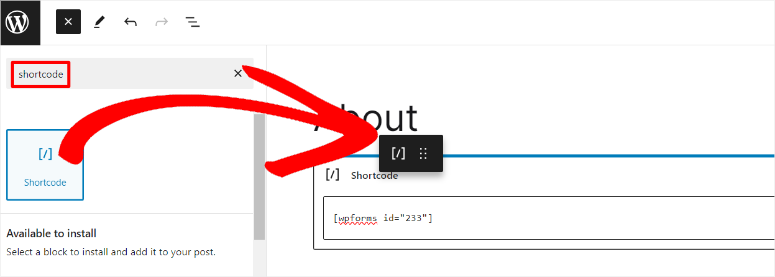
You can also use an Embed Wizard, Elementor Form Modules, Divi Embed, and SeedProd Module.
Now, after the event calendar page goes live, you can review submissions before they go live.
To do this, navigate to the Events menu option in your WordPress dashboard.
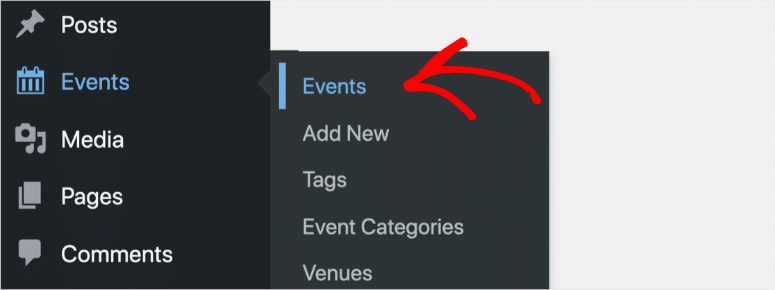
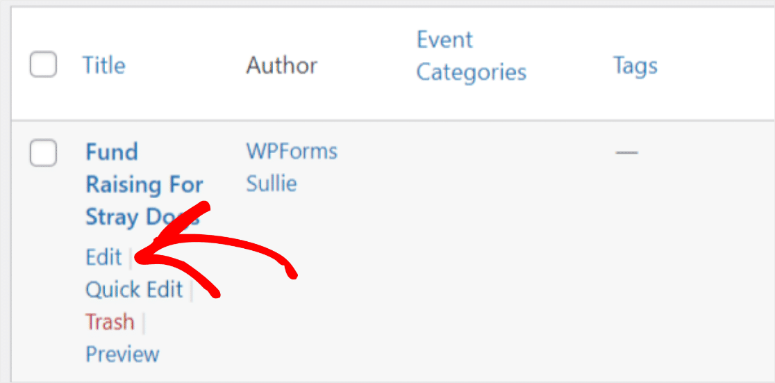
Remember that any events submitted through your calendar form will appear as Pending, indicating they need your approval before being displayed.
So, select the ‘Edit’ button underneath the event title. This will allow you to preview the submission details, including images, using the rich text field from WPForms.
Pay special attention to the Time & Date section to ensure the event is correctly mapped to your site’s timezone. Now, once you have reviewed all the event details and made any necessary edits, hit ‘Publish.’
The events page will then go live on your site and can be viewed by visiting the URL created by The Events Calendar, such as https://www.yoursite/events.
Below is an example of how the page would appear.
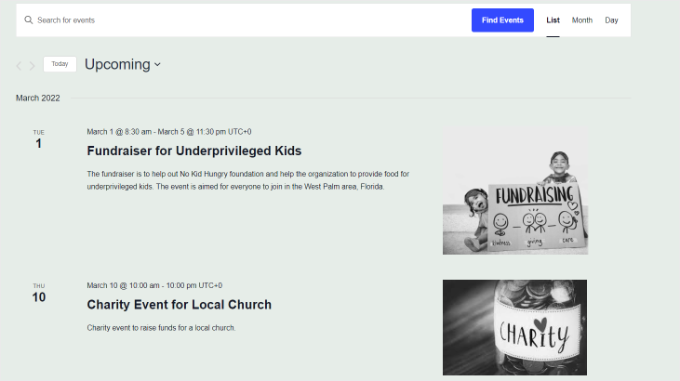
If you want to view the event on its page, then the URL will look something like this, https://www.yoursite/event/single-post-name.
Below is an example of how a new event form calendar would look like.
Congratulations! You can now let users submit calendar events in WordPress. If you have any more questions, check out our FAQs below.
FAQs: How to Let Users Submit Calendar Events in WordPress
Can I connect Google Calendar with my WordPress Calendar?
Yes, you can connect Google Calendar with your WordPress calendar using The Events Calendar Pro. It offers add-ons that enable synchronization with Google Calendar, Eventbrite, iCalendar, Meetup, and more. This integration allows you to manage and display events from Google Calendar directly on your WordPress site, ensuring all events are updated and accessible from one place.
How can I send a calendar event?
To send a calendar event, you can use The Events Calendar plugin with WPForms. First, create an event submission form using WPForms. Once the form is set up and mapped to The Events Calendar, users can submit events via the form. The Events Calendar will then help you with event management and displaying these events on your WordPress site.
Do I need to sign up to submit a Calendar Event?
No. With The Events Calendar, your users do not need to sign up to submit a calendar event. The WordPress plugin allows them to create events directly from the front end and do not need to be logged-in users in your WordPress dashboard. But, you can set submissions to be reviewed before publishing to maintain control over the content.
Which is the best free user-submitted events plugin?
The Events Calendar is the best free plugin for user-submitted events. It allows users to submit events directly from the front end of your site. For better functionality, you can use it with WPForms to create customizable event submission forms. WPForms’ drag-and-drop builder and Post Submissions addon make it easy to create and manage user-submitted event forms. This provides a user-friendly experience for both users and you.
That’s it! We hope you enjoyed reading about how to allow users to create events on your site. If you are looking for event plugin alternatives, check out this article on the 9 best WordPress events plugins compared.
On top of that, here are other articles you may be interested in reading.
- 21+ Best WordPress Themes for Events & Conferences
- How to Use Sugar Calendar to Manage Events & Schedules
- How to Create a Booking Form
The first article lists 21+ best event and conference themes for WordPress. The next post walks you through how to use Sugar Calendar, one of the best event plugins, to manage and schedule events. While the last article teaches you how to create a booking form.

I would like to create an event creation/registration site. It would allow event creators to post an event for a fee (so they “pay to post”) and to get a fee from those that register for the event.
So, event sponsor posts the event info and pays $???.00
event participants pay on the same site the sponsors attendee
fee
What plugins would I need?
Hey Ken,
Thank you for the question. To achieve this you will need a combination of plugins.
First you will need an event management plugin. I recommend The Event Calendar plugin.
Then, you will need form builder to allow creators to submit events from the front end.
On top of this, you will need a form builder that integrates with payment gateways.
For this, I recommend WPForms.
You can connect WPForms with Stripe or PayPal.
Finally, you need a way to sell and manage attendee registrations.
For this, I recommend Event Tickey Plus, by The Event Calendar.
That’s it.
Optionally, you can use a membership plugin like MemberPress to ensure event creators and attendees registration is streamlined. This also allows you to charge event creators to post their events on your site.
you can follow the steps below:
Step 1: Install and Configure The Events Calendar
Step 2: Set Up WPForms for Event Submissions
Step 3: Add Payment Integration Through WPForms
Step 4: Set Up Event Tickets Plus
Step 5: Create Membership Levels (Optional)
Step 6: Publish Your Event Submission Form
Hope this helps. Try it and please let me know if it works.