Do you want to build your WordPress website with AI?
Building a website can be time-consuming and requires experience, even if you use a simple drag and drop website builder. You need to design different sections, layouts, pages, and site elements. Apart from the site’s appearance, you must develop and customize the functionality for your audience.
AI WordPress site development allows you to create a complete website in minutes, which was nearly impossible in the past. As a result, you can have a professional and unique website without help from site builders or a developer at a fraction of the price.
At ItIsWP, we have been experimenting and testing different AI site building tools to see which are most efficient. We have tested stand-alone AI site-building tools, website builders with AI functionality, and hosting services that offer AI building features.
We have focused on ease of use, cost, customization, and integration to ensure we find the best AI site-building tools for you.
In this article, we will break down 3 easy ways to use AI to build your WordPress site. We will walk you through each method step by step to ensure you can comfortably do it yourself.
Advantages of Building Your WordPress Site with AI
The main reasons for the quick uptake of AI in so many industries are accuracy, speed, cost, and ease of use. And it is no different with site building with AI. Most AI site builders only need you to describe the site you want to build, and it will do the rest for you. Many take just a few minutes to populate your site with custom themes, pages, images, and content.
On top of this, AI site building is more affordable as you do not need to hire a developer or get an expensive site builder. This can reduce your maintenance and site building costs, allowing you to channel this money to other business areas.
Here are other reasons to use AI WordPress site building.
- Pre-designed templates and AI suggestions make setup quick and easy, even for beginners.
- They can analyze your preferences and provide personalized design suggestions tailored to your brand or niche.
- By analyzing visitor behavior, AI can optimize your site layout and navigation for better user engagement.
- AI integrates SEO best practices into your site structure, helping improve search engine rankings without requiring technical knowledge.
- AI tools can generate blog posts, product descriptions, and even entire landing pages, saving time and effort.
Now, even though creating your WordPress with AI comes with a lot of advantages, it can limit creativity. It can make your site generic, which can reduce user experience. That is why the methods we will show you today allow you to customize your site further after AI completes the building process.
With that said, we will use the following methods to create an AI site in WordPress.
Note: We will use the same prompt to ensure consistency while building AI websites using the methods mentioned above. This will ensure that you can quickly compare the quality of each AI website created.
To create this prompt, we told ChatGPT the type of site we wanted to build, and it created a detailed description for us. This way, we could create a fully AI site from start to finish.
Check out the ChatGPT prompt we used below:
Site Name: Test AI Sites
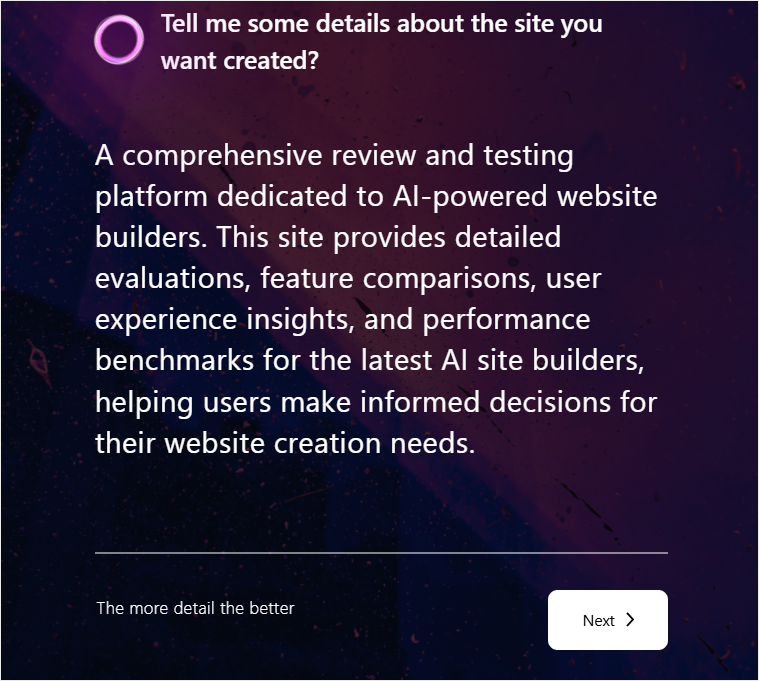
Site Description: A comprehensive review and testing platform dedicated to AI-powered website builders. This site provides detailed evaluations, feature comparisons, user experience insights, and performance benchmarks for the latest AI site builders, helping users make informed decisions for their website creation needs.
Use SeedProd to Build a Complete AI Website

SeedProd is the best easy-to-use landing page, site, and theme builder for WordPress.
It comes with over 300+ templates that you can quickly customize with the drag and drop builder to bring your vision to life. You get built-in coming soon, maintenance and 404 pages that you can set up with one click.
On top of this, you can also save custom page sections and use Smart Sections across your SeedProd properties to ensure consistency.
Check out the latest SeedProd review here.
But even though it is simple to build pages and even an entire site with SeedProd, they recently introduced AI features to make these processes more convenient.
Let us show you how.
Step 1: Install SeedProd
SeedProd offers a free version of the plugin that can help you create simple but detailed landing pages, maintenance pages, coming soon pages, and more.
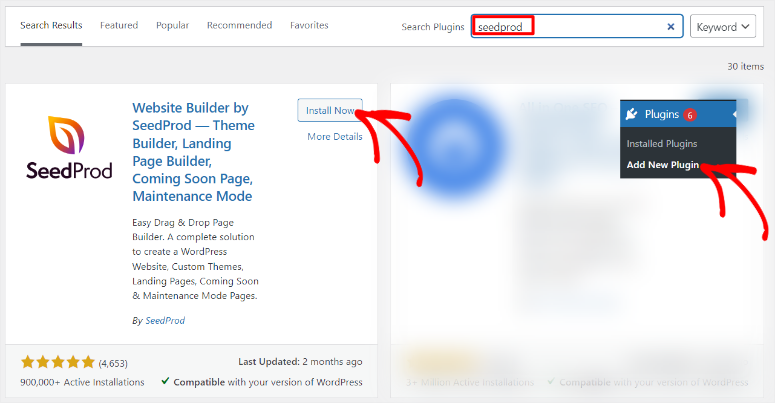
But to use the AI site building features, you need the pro version. This is because we will need to use the import/export feature which is only available in the pro version.
To get a pro plan, head to the official SeedProd website and purchase a plan.
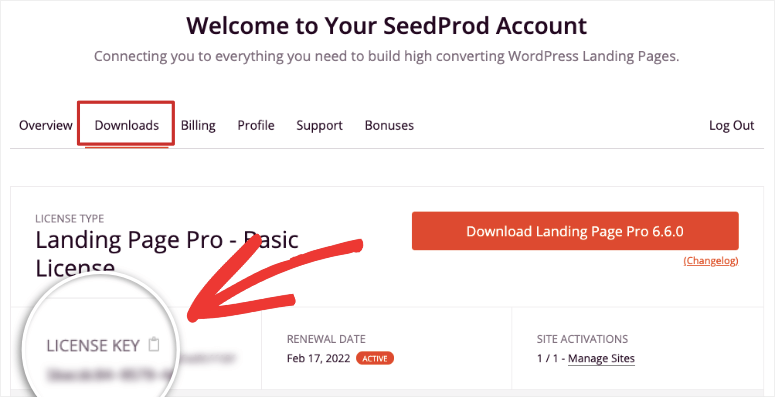
Then, log into your SeedProd account and navigate to Downloads. Here, save the plugin ZIP file to your computer. On this page, also copy the License Key; you will need it later to activate the pro version.
After this, go to your WordPress dashboard and navigate to Plugins » Add New Plugin » Upload Plugin. Then, Install and Activate SeedProd as you would any other plugin.
If you face any issues, check out this article on how to install plugins.
Once done, you should see a new menu option labeled ‘SeedProd,” indicating that the installation was successful.
Then, navigate to SeedProd » Settings and locate the “License Key” text bar. Paste the code you copied earlier and hit Verify Key.

That’s it. You have fully installed and activated the premium version of SeedProd.
Step 2: Create a SeedProd AI Account
Apart from your SeedProd subscription, you also need a free SeedProd AI account.
SeedProd allows you to create 2 websites for free using AI. So, even if you are not ready to commit to SeedProd, you can quickly create an account and test it out. But as mentioned, to transfer the theme files you create on your free SeedProd AI account you need the import-export feature, which is only available on the pro version.
So, go to AI.SeedProd.com to open a free account.
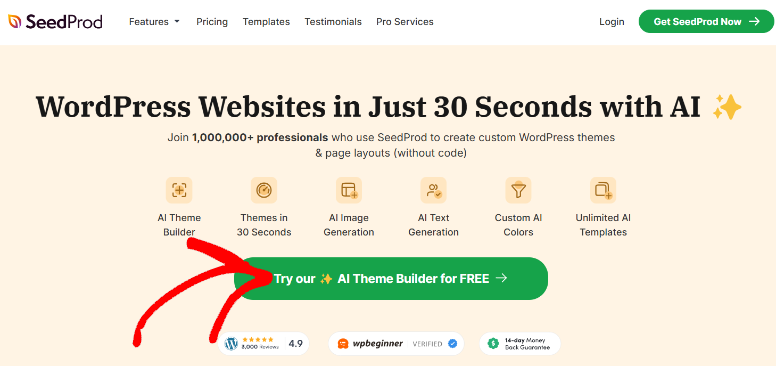
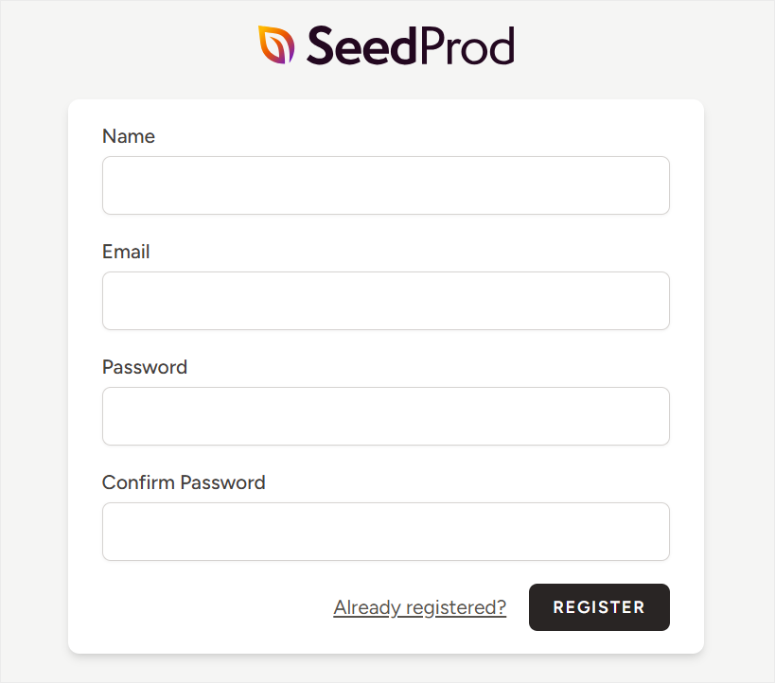
All you need to provide is your email and name to create the account. That’s it. You are ready to use the SeedProd AI for free.
Step 3: Create a Free Website with SeedProd AI
After this, log in to the dashboard and navigate to “Create Site with AI” to open the prompt box.

Then, in the popup window that will appear next, type your “Business Name” or “Site Name” in the bar provided.
Below this, add the “Site Description” to prompt the AI to create the website for you. After this, you can select colors, but we will leave the Choose My Colors checked to fully automate the process of creating a site with AI.
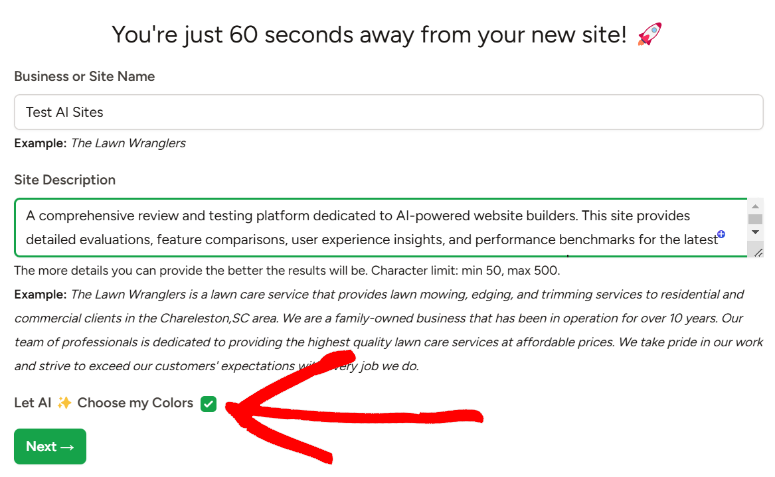
Remember, we will use the same prompt (described above) for each method to ensure consistency.
After this, hit ‘Next” to start the AI generation process.

SeedProd states that generating a WordPress AI site takes less than 60 seconds. This is true because it took 32 seconds to generate the site.
Next, hit the site link created to see the live website on a new tab.

We have to say we were pretty impressed with the results!
First, we noticed that SeedProd AI used a beautiful tech blue color as the website’s main color. This is on brand for us, as we intended to create a technology website. The site design was also minimalist, a popular design among tech websites.
Going deeper, we see it creates a header with Home, About, Contact, Blog, and Get Started Buttons.
Below this, SeedProd AI populated the website with a quick and direct site description, letting the users know exactly what the site is for.
Scrolling through the site, we see that each section is beautifully designed with eye-catching AI images and content. Then, at the bottom of the page, the footer contains links to all the AI generated pages, an optin form, and social media icons.

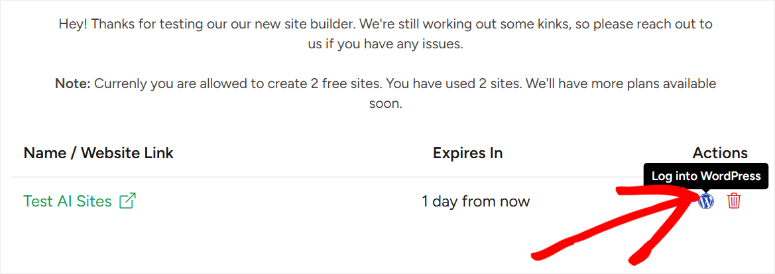
With the site ready, head back to your SeedProd AI dashboard and hit the WordPress icon next to your newly created site. This redirects you to the WordPress dashboard of the AI site you just created.
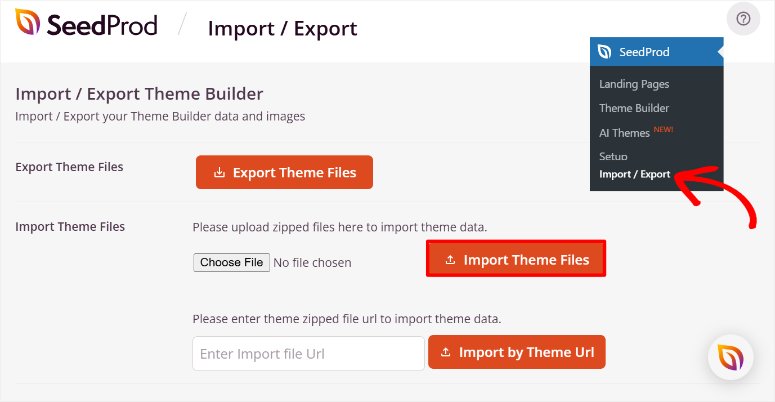
Here, navigate to SeedProd » Import / Export. Use the “Export Theme Files” button to save your site files to your PC.
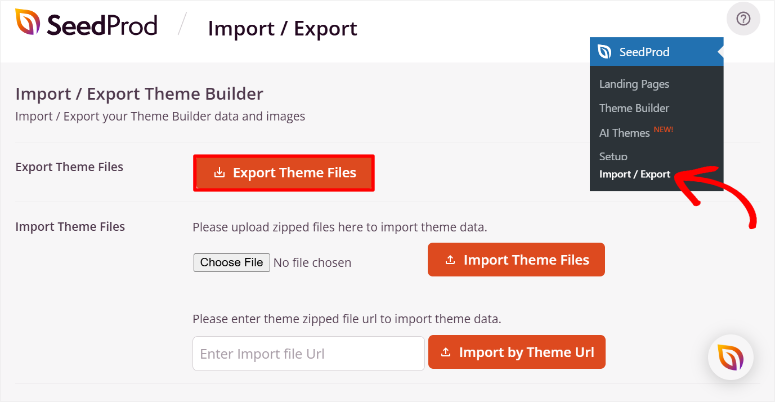
Next, head to your WordPress dashboard and, once again, navigate to SeedProd » Import / Export. This time, you will use the Import Theme Files button to upload the theme files you downloaded earlier.
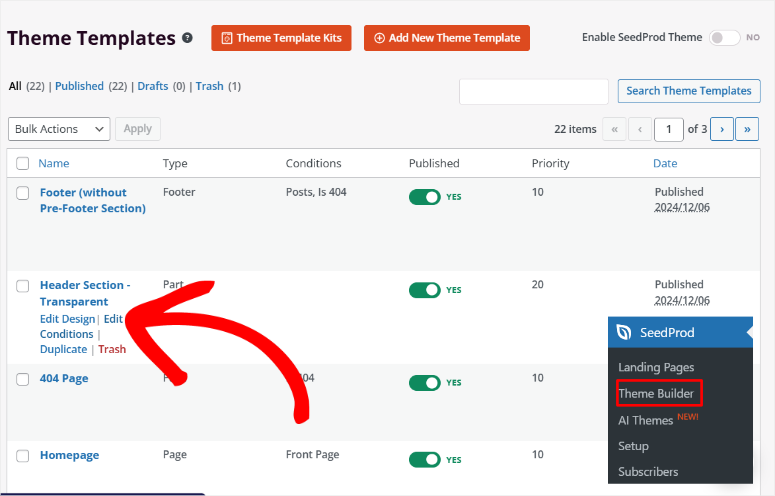
Now, head to SeedProd » Theme Builder in your WordPress dashboard.
On this page, you will see all the theme sections created by SeedProd AI already added. You will see the section Name, Type, Condition, Publish status, Priority, and Date. If SeedProd AI created a Theme section you do not want to appear on your site, use the Publish toggle button to switch it off.
However, if you want the section to appear only in certain situations, hover over the section name and select Edit Conditions.
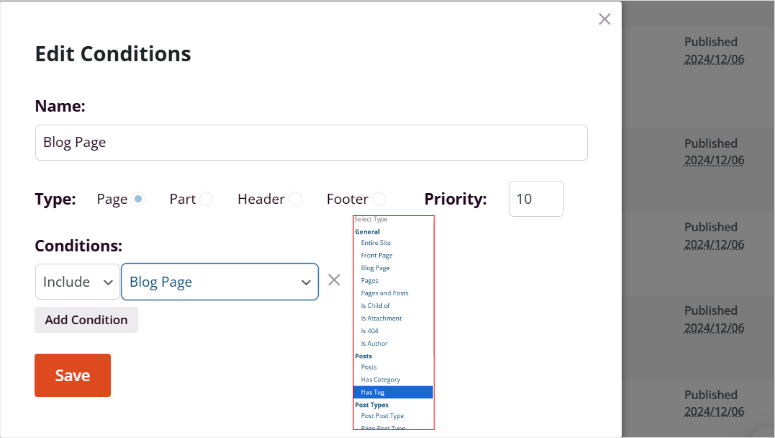
Then, in the “Edit Conditions” popup, you can change the section Name, Type, and Priority.
Once done, go to the Conditions section and use the dropdown menus to set up when the section should appear. In the first dropdown, select between Include, Exclude, and Custom. Then, on the next dropdown, select the location to apply the condition. You can choose from Posts, Post Type, Pages, Entire Site, and more.
After this, use the Enable SeedProd Theme toggle button at the top of the page to activate your new AI WordPress site.

Well done! You can now create an AI site with SeedProd. Next, let us see how to customize it.
Step 4: Customize SeedProd AI WordPress Website
As mentioned, Seedprod is the simplest, most advanced drag and drop page and theme builder. This means that you can use it without coding experience and create a beautiful website. Now that you have your AI wordPress website, you can customize it with both the visual builder and AI features to make it truly unique.
When you want to customize a WordPress site, there are 2 main routes you can take. First, you can customize the theme to make global changes. This is a great way to make site-wide changes, ensuring your site is consistent.
You can also customize specific pages that affect that particular page.
This approach is ideal for tailoring individual pages to meet unique design or content needs without changing the rest of the site. Both options give you flexibility to achieve the exact look and functionality you want.
Let us start by customizing the theme files with SeedProd.
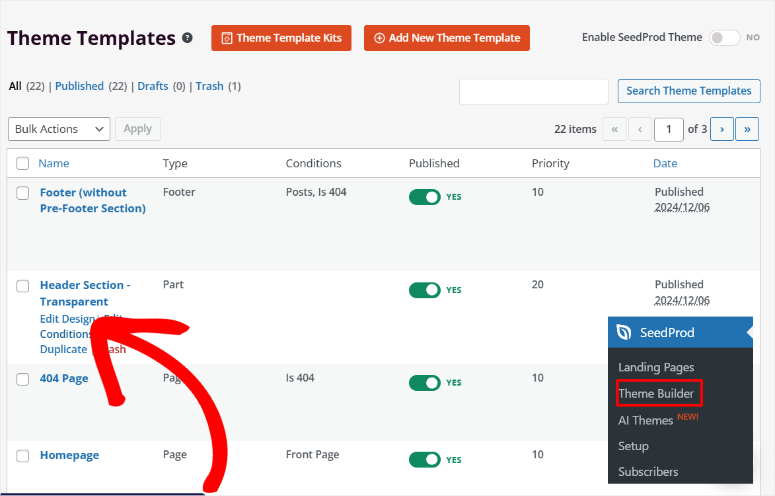
To do this, go to SeedProd » Theme Builder to access all the page sections. Then, hover over the theme section you want to personalize and select “Edit Design.” After this, you will be redirected to the drag and drop builder with only the section placed.
For this tutorial, we will customize the header section, so this is the only part of the theme that will appear in the visual builder.
Once on the visual theme builder page, you will first notice Blocks and Sections on the left and the preview window on the left. Depending on the theme section you are editing, you will see “Template Tags” under the Block section first.
For the Header Theme Section, these includes the Site Logo, Post, Featured Image, and more. Then, below this, you get Standard Blocks that include Headline, Text, list Button, and more. Below this, you will get Advanced, WooCommerce, Easy Digital Download, and Saved Blocks.
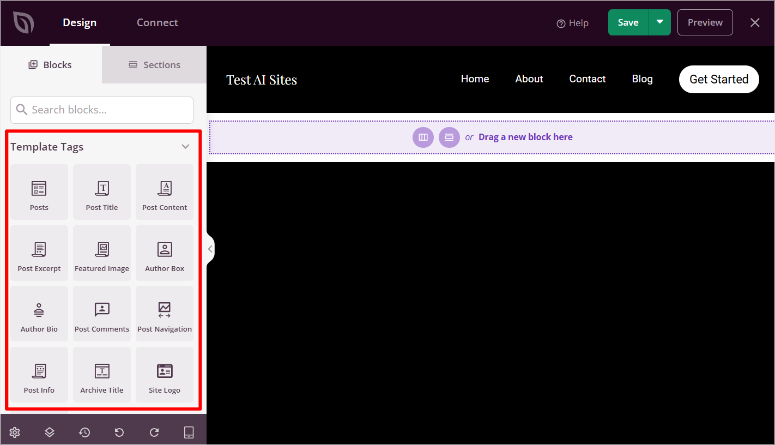
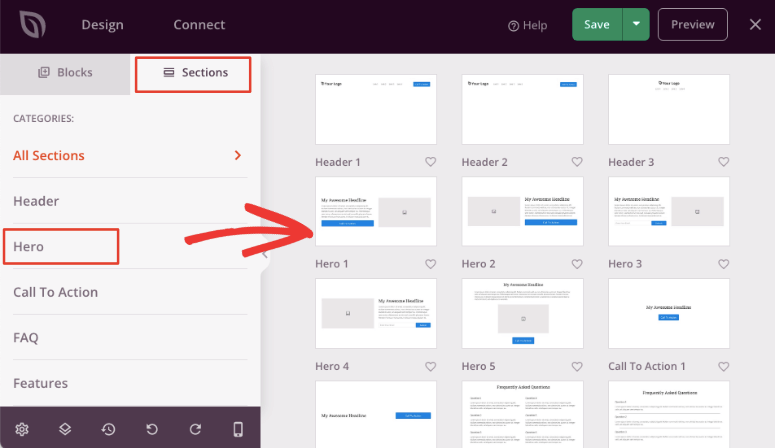
Next to “Blocks,” you will see Sections that are grouped blocks to make site building easier. You get Sections like Calls to Action, Headers, Footers, FAQs, and more.
The preview window displays the theme section as it would on the live site. To make changes, simply select what you want to change to open settings on the left.
To add Blocks or Template Tags, drag and drop them from the left to the preview window on the right.
You can edit and change the text and images manually or using AI. Let us show you how to customize your content and Images with AI below while we walk you through customizing a page with SeedProd.
Next, let us look at how to customize a page in SeedProd.
To do this, navigate to Pages » All Pages in your WordPress dashboard. Here, you will find all the AI pages built with SeedProd AI.
Then, hover over the page you want to customize and hit “Edit” to redirect you to the default WordPress page editor. For this tutorial, we will edit the Homepage.
Then, in the default WordPress builder, select the “Edit with SeedProd” button.
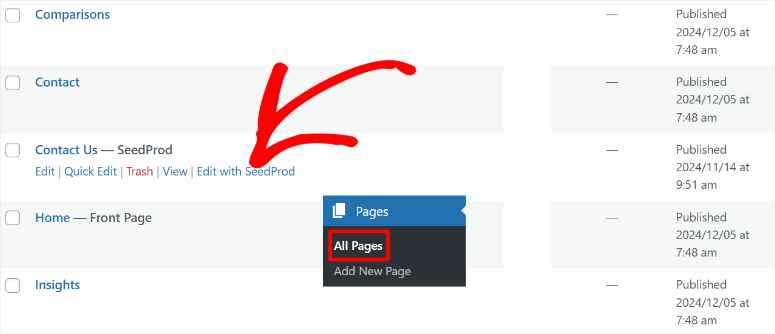
This will take you to the SeedProd drag and drop builder once again. But this time, all the home page content will be placed, allowing you to customize everything.
Let us first customize content and images with AI.
Select a content block in the preview page to open settings on the left. In the options, select “Edit With AI” to open a popup window.
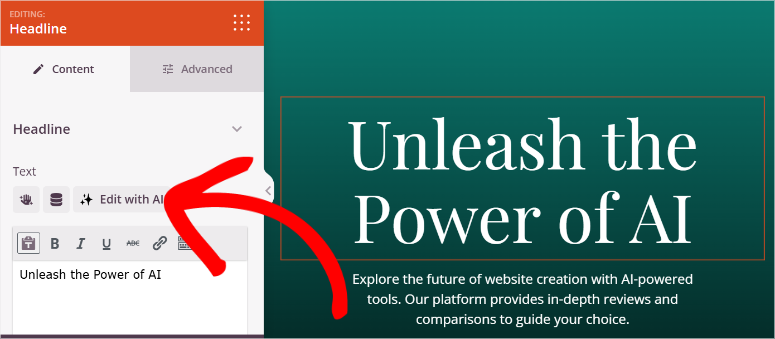
You can make the language simple, longer, or shorter using the AI prompt. On top of this, you can translate the content to more than 50 languages and choose one of the 20+ tones. You can do all this with just a click of a button.
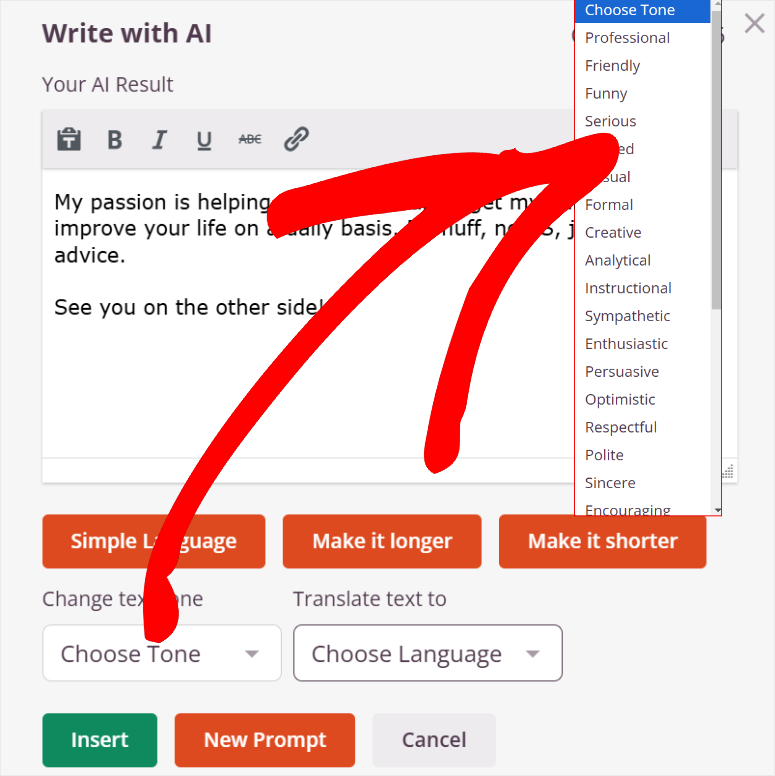
What if you want to change the content in the block entirely?
To do this, select New Prompt on the popup window. Then, in the next popup window, describe the text you want or use the suggested prompts displayed.
After this, you can also make the content longer, shorter, or simpler in the next popup window.
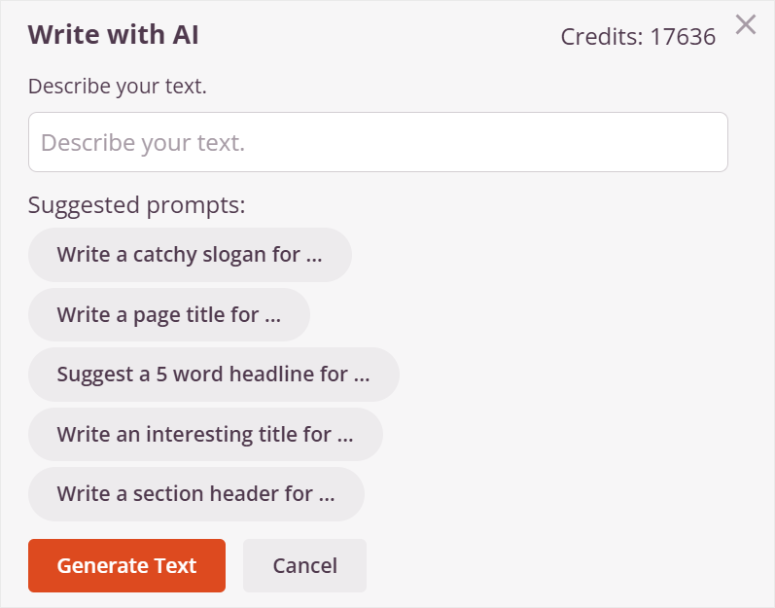
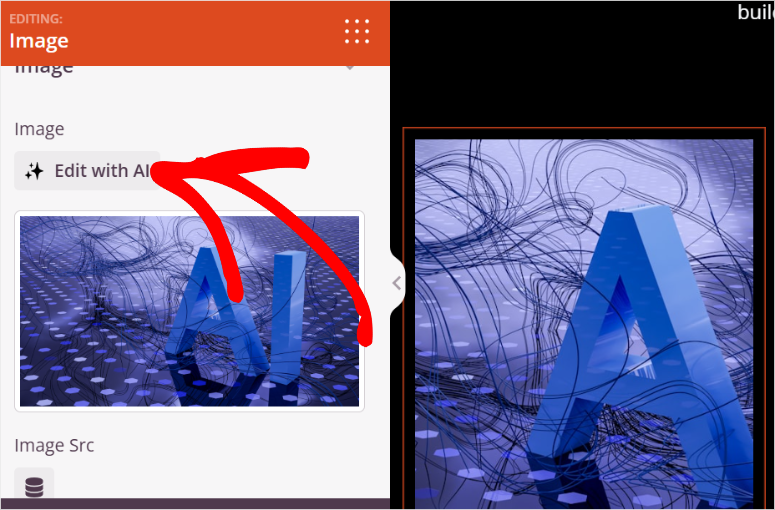
What about generating an AI image?
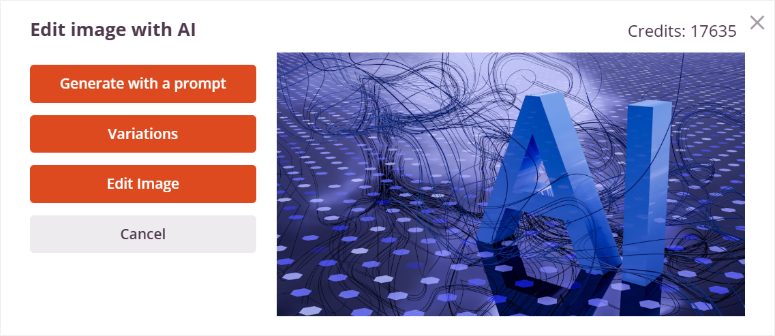
To do this, add an image block or select one of the AI image blocks pre-added during site building. Then, select Edit with AI in the settings to open a popup window.
Here, you can select Generate with a prompt, Variations, or Edit Image.
Check out this article to learn everything about adding AI images with SeedProd.
Once you are happy with the changes, hit Save at the top to make the changes live.
That’s it! You can now create a complete AI site with WordPress and customize the theme files and individual pages.
Use Divi to Build a Complete AI Site

Divi is an Elegant Themes product that allows you to build your website with a simple drag and drop builder. It makes building easy with over 370 full-site kits that you can customize further to suit your needs.
As a result, Divi can help you build any type of website without coding experience. But, now, they have integrated AI into their site building process, which offers a one-click website creation feature.
Check out the latest Divi review here.
You can then use the Divi drag and drop builder to customize your site. Let us show you how.
Step 1: Install Divi to WordPress
Now, you can either get the Divi Page Builder as a stand alone plugin, which only comes with the visual builder. This can help you design individual pages or an entire site with AI. But, we want to show you how to create an entire site with custom themes using AI.
So, we will use the Divi Theme & Page Builder plan for this tutorial.
To get started, head to Divi’s official website and purchase a plan. Then, head into your Divi dashboard and select Account » Product Downloads.
Here, download the theme ZIP file to your PC.
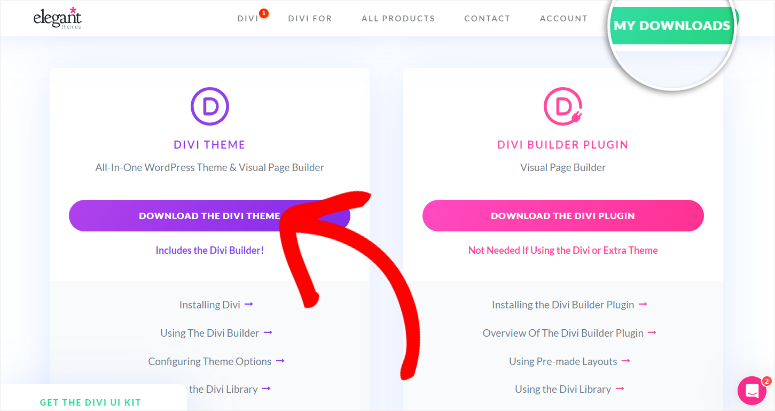
Then, go to your WordPress dashboard and navigate to Appearance » Upload Theme. Install and Activate Divi Theme & Page Builder, like you would any other.
Remember, if you purchase only the page builder, you will install it as a plugin.
After installation, Divi will ask you to log into your account to connect it to WordPress. This will also create a new Key in your Divi account.
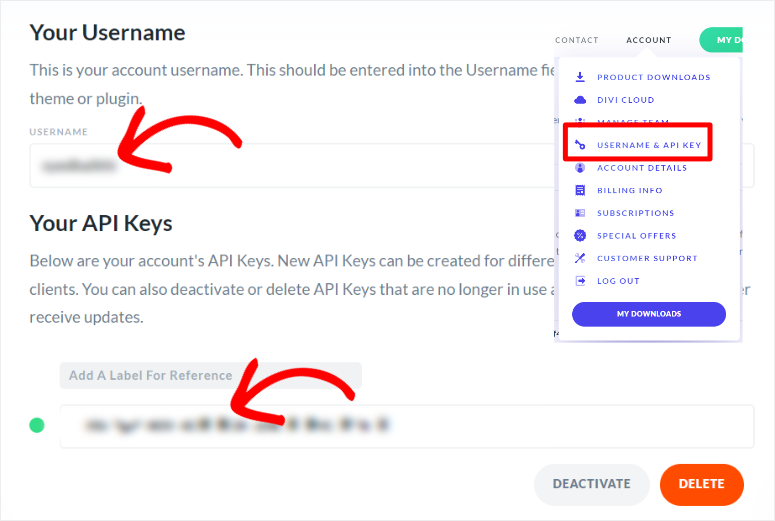
That’s it, you are ready to use Divi.
Step 2: Use AI to Build Your Site
Next, head to Divi » Dashboard and select Generate a New Site.

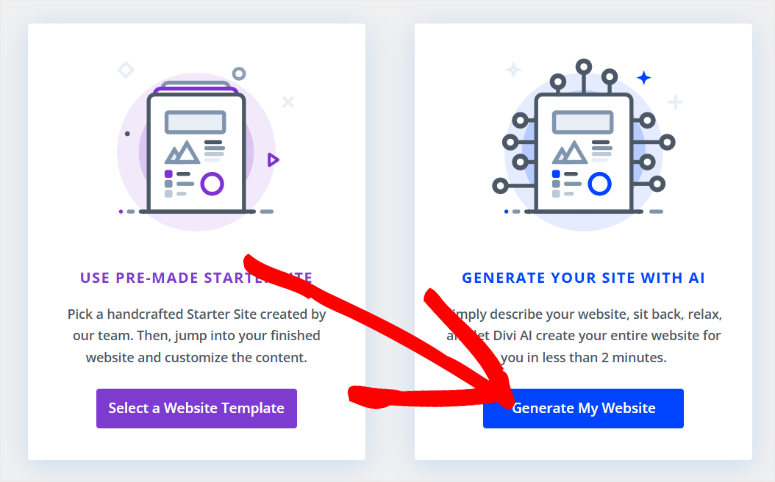
On the next page, you have the option to build a site with the Select a Website Template.” But for this tutorial, we will select “Generate My Website.”
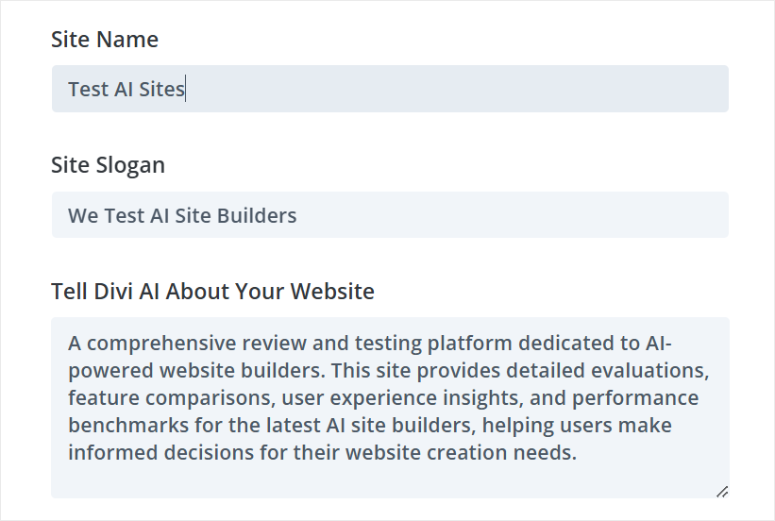
Then, in the next popup, enter the site name and site slogan and type the description of your site to Divi AI.
Tip: If you want a better description to import to Divi AI, we suggest you use ChatGPT. Tell ChatGPT about the site you want to build, and it will create a proper description.
After pasting your site description under “Tell Divi AI about your Website,” scroll to the eCommerce section. Here, check the Install and Configure WooCommerce” if you want to generate an AI eCommerce store.
Then move to Images and use the checkboxes to choose between Use Stock Images which will ensure your site is built faster with AI. If you plan to insert your own photos, check the box “Use placeholder images.”
But for our website, we will go with “Generate Images with AI.” Since generating AI images takes more processing power, this option takes more time to build the website for you.
But it will ensure that our website is fully built with AI, sticking to the main aim of this tutorial.
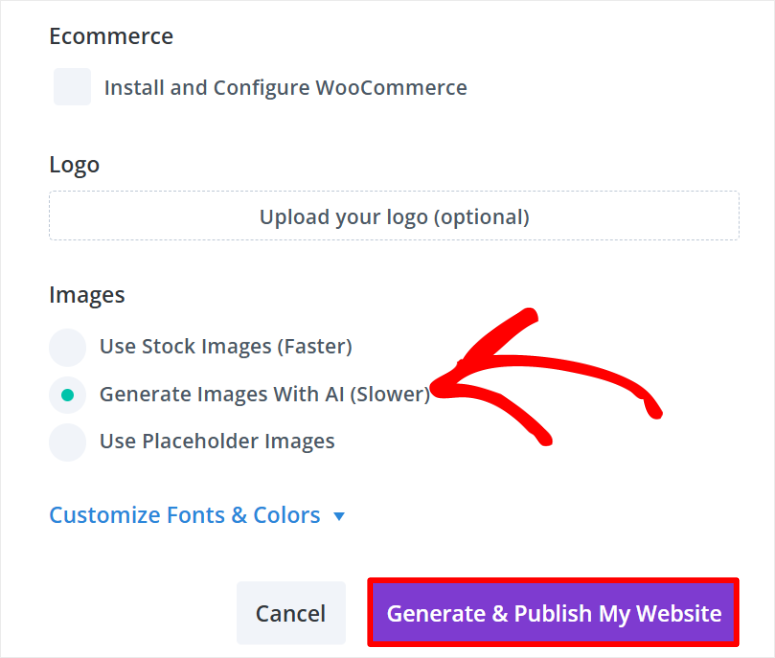
Finally, hit “Generate & Publish Website.”
Give Divi AI a few minutes to generate your site. Once complete, Divi will reload the page and give you the option to view your new AI created WordPress site.
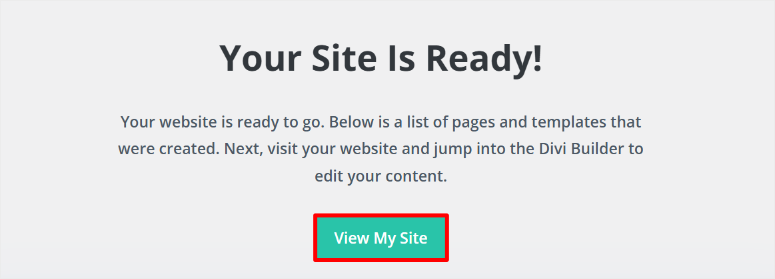
It is that simple.
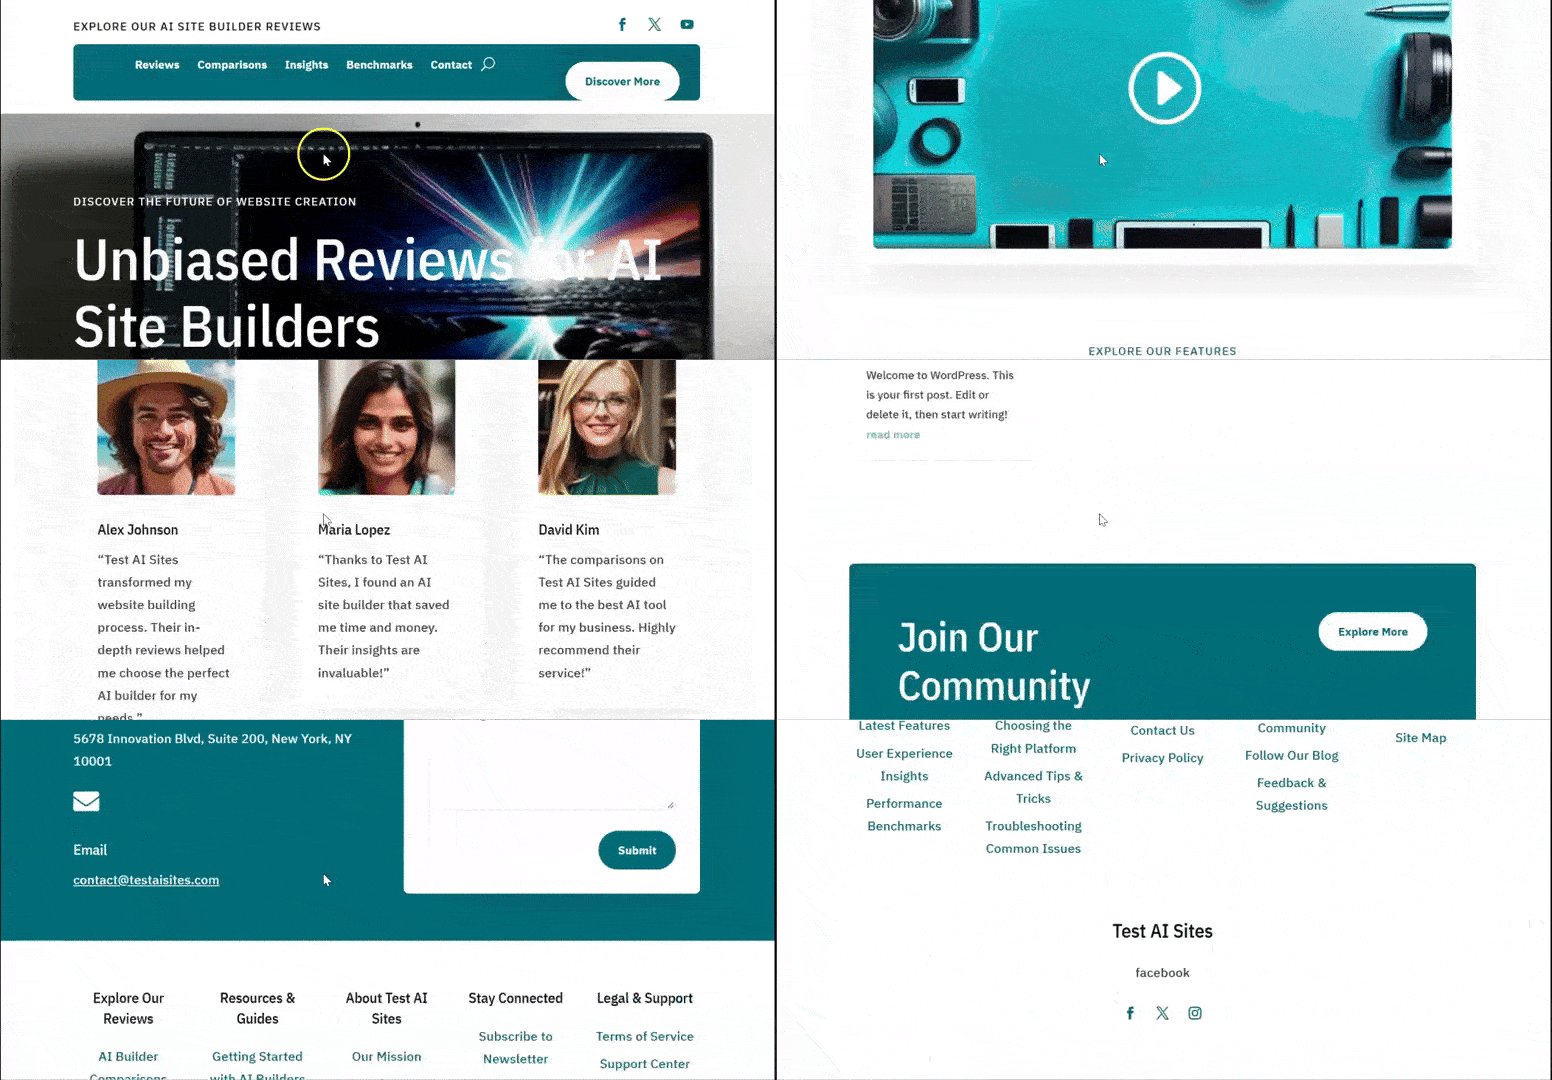
Every site will be different depending on the description you provided Divi AI. For example, Divi created several pages and page sections according to the description we gave for our AI site.
It automatically embeds a YouTube video, which takes some coding experience to do. On top of this, it created service, review, blog, and community forum pages.
Divi AI also designed page sections like a Contact Us form, footer notes, a Header, social media icons, and more.
Each link takes us to a well-populated page with page modules, content, and images already populated. For example, Divi Ai generated first-hand reviews, star ratings, quotes, an FAQ section, and more.
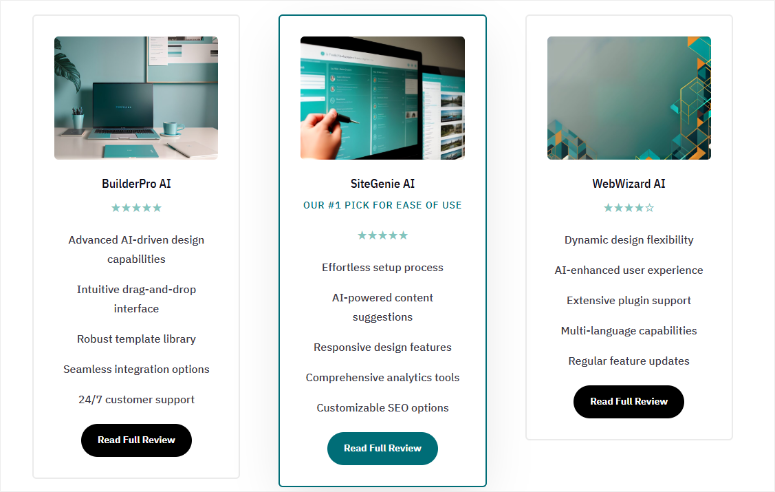
That’s it! You can now create an AI website with Divi. Now, you can customize the pages and theme to your liking.
Step 3: Customize AI WordPress Site
Just like SeedProd, Divi allows you to customize the theme files to add global and site-wide changes. Or simply customize the pages to add unique designs for individual pages. Let us walk you through both.
To customize your AI generated theme using this site builder, go to Divi » Theme Builder.
Here, you can use the Divi theme Builder to customize the site’s overall layout with a drag and drop interface. Each part of the theme is well arranged on this page, allowing you to quickly select what you want to change.
You can personalize the default Website Template, All category Pages, all Author Pages, 404 Page, All Posts, and Search Results. If any site section is missing in the theme, Divi allows you to create one by selecting Add New Template.
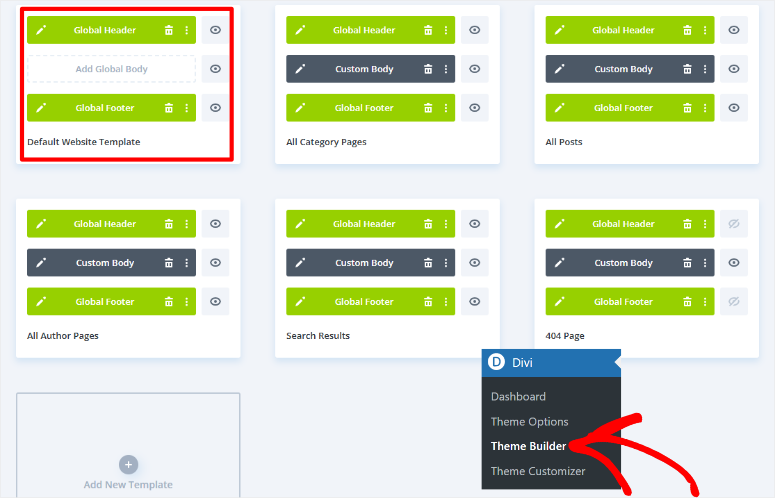
You will use the same process to customize any of these theme sections with Divi. But for our tutorial, we will customize the Global Header in the “Default Website Template.”
This allows the same header to appear across all pages on your AI site.
To do this, hover over the tab, which allows you to drag and drop the different sections to a new position. You can delete the theme section by selecting the trash can icon if you do not want it.
To customize the theme section, select the pencil icon to open the drag and drop builder.
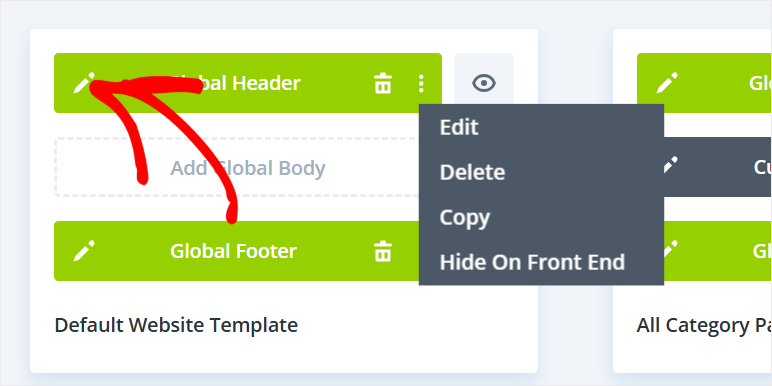
Since we are only customizing the global header, that is all that will appear in the visual builder, making it easier for you to edit.
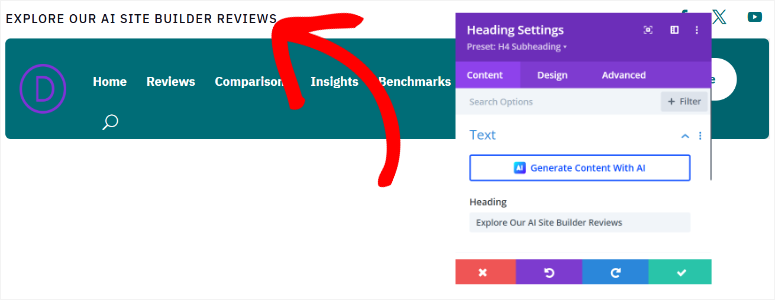
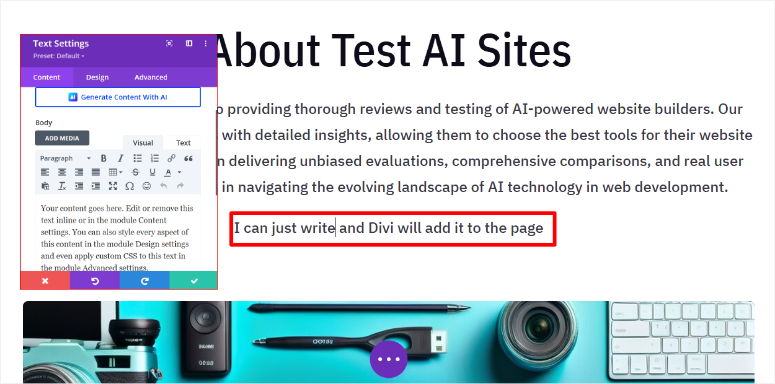
With Divi, you can edit the content on the page by selecting the text section and typing what you want. On top of this, you can use AI to customize any content you want.
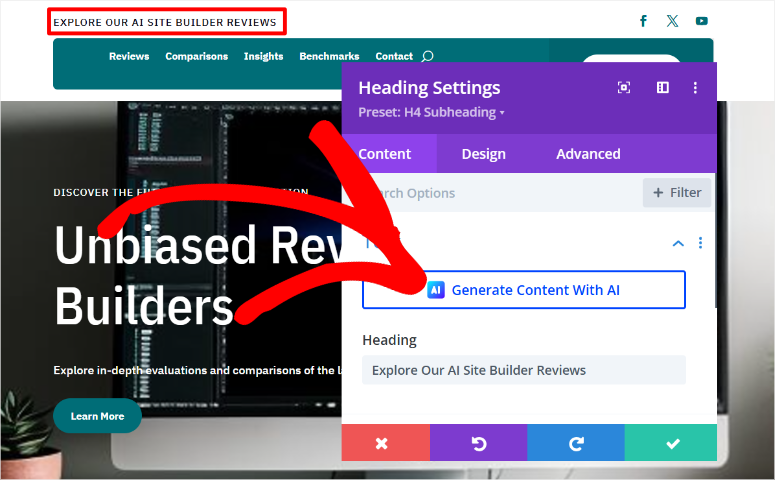
To customize a module on the theme section, select it to open a settings popup. Here, you can customize the text color, font style, font size, spacing, and more. You can also add links to the text or buttons in the section.
To add a new section, select the Plus (+) icon below the header section. You can add the section from your library or use AI to generate it.
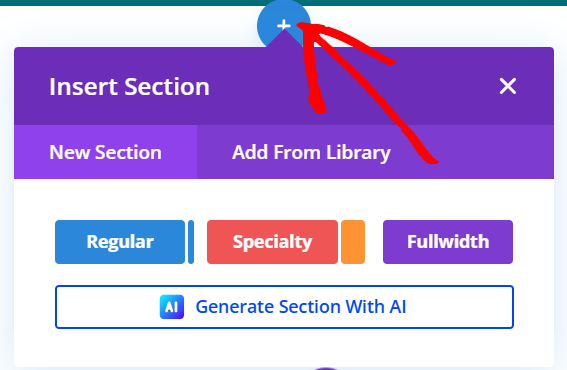
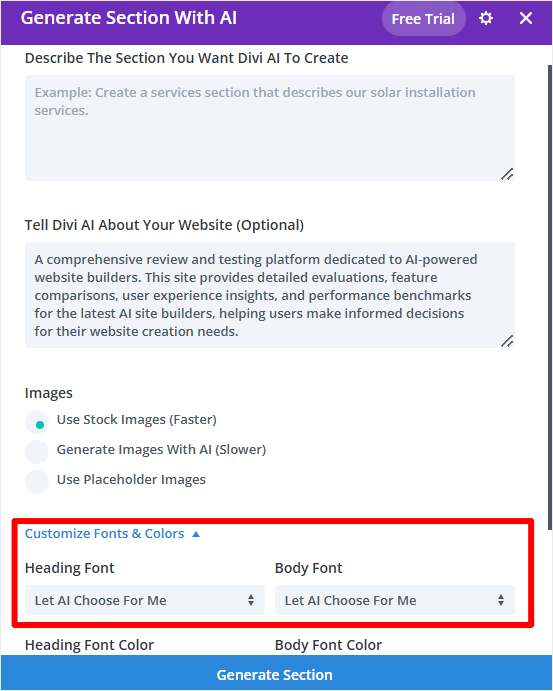
Again, you will provide a detailed description to Divi to generate the section you want. But since Divi has created an AI website for you already, it has started learning what you need.
So at this point, go to Customize Fonts & Colors and select “Let AI Choose for Me.”
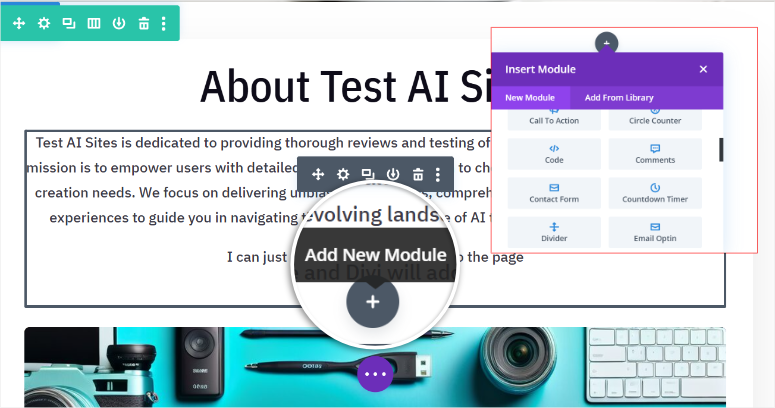
Once you create a new section, you can again use the Plus (+) icon to add modules to it. You can add modules like Call to Action, blog, Comments, Contact Form, countdown Timers and more.
Once you are happy with the theme changes, hit Save at the bottom of the page to apply it to your site.
Next, let us see how to customize a page with Divi.
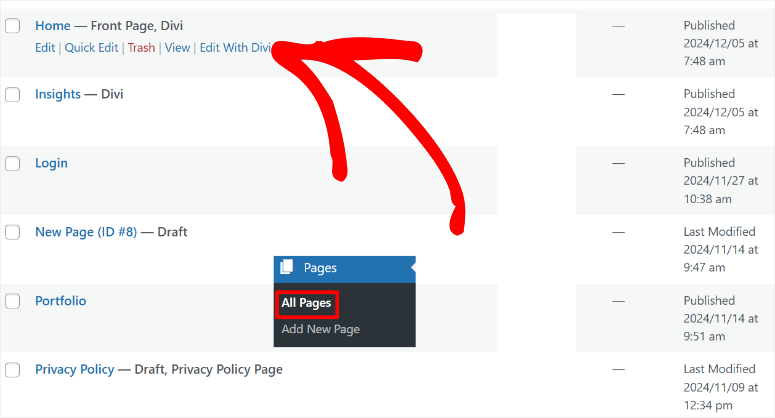
To do this, go to Pages » All Pages in your WordPress dashboard. Here, you will find a list of all the pages generated by Divi AI during the site building process.
Let us edit the homepage for this tutorial. To do this, go through the list of pages and find the one labeled Home – Front Page, Divi.
Then, hover it and select Edit with Divi to open the drag and drop page builder.
For consistency, you will use the same process to edit your pages as you did customizing the theme sections. So, you will use the plus (+) icon to add new modules. You can then edit them using the settings popup window when you select a module on the page.
Once again, you can add content manually or generate it with AI. On top of this, you can regenerate the AI images created during site building.
Check out this article on how to create AI images in WordPress to learn more.
When you are happy with your page changes, use the Save button at the bottom of the page to make them live.
That’s it. You can now create a complete WordPress with AI using Divi. You can also customize it by combining Divi AI features with its drag and drop builder.
Use Bluehost to Create a Complete AI Site

As you have noticed, the two methods above are premium ways of creating an AI website. But, if you do not want the additional cost, you can use your hosting company to build an AI site. This means you will only incur domain and hosting costs.
Check out the latest Bluehost review here.
For this tutorial, we will use Bluehost to create an AI site.
Bluehost is one of the best and most affordable WordPress hosting companies. To add to that, if you use our Bluehost coupon, you can get it at $1.99/ month.
The good news is other WordPress companies also offer AI site building features, and you can get amazing offers if you use our link. These hosting companies include Hostinger, GoDaddy, Squarespace, DreamHost, SiteGround, and more.
So, how do you use Bluehost to build a website with AI?
First, you need to purchase a hosting plan from Bluehost. If you do not have a domain, do not worry; you also get a free domain with the IsItWP coupon. Next, visit the Bluehost official website and find a plan that works for you.
After this, log in to your Bluehost account and go to Hosting » Add Site.
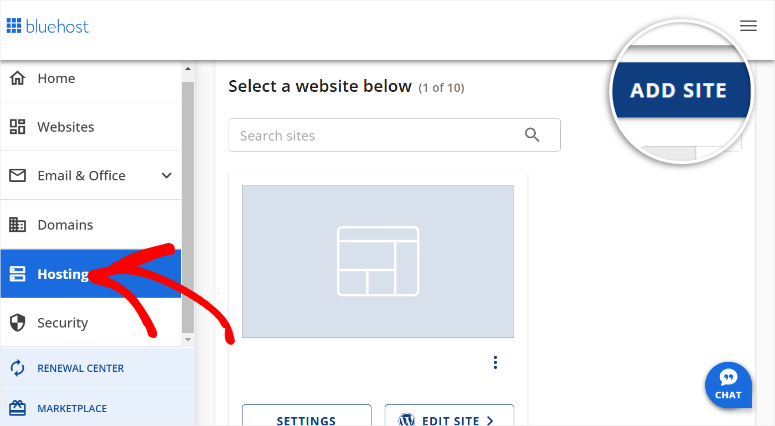
After this, add your domain and choose a site title for your website. Hit Continue to go to the next step.
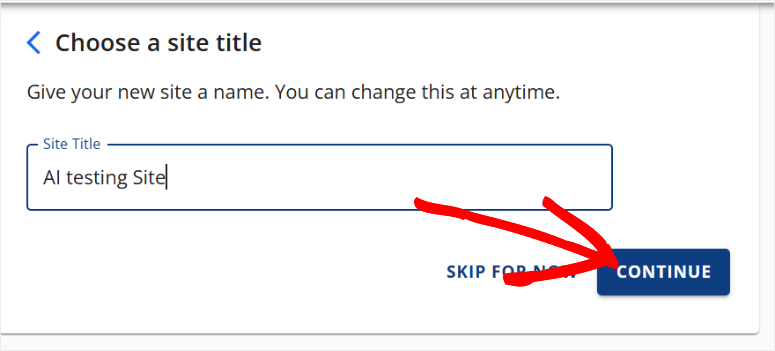
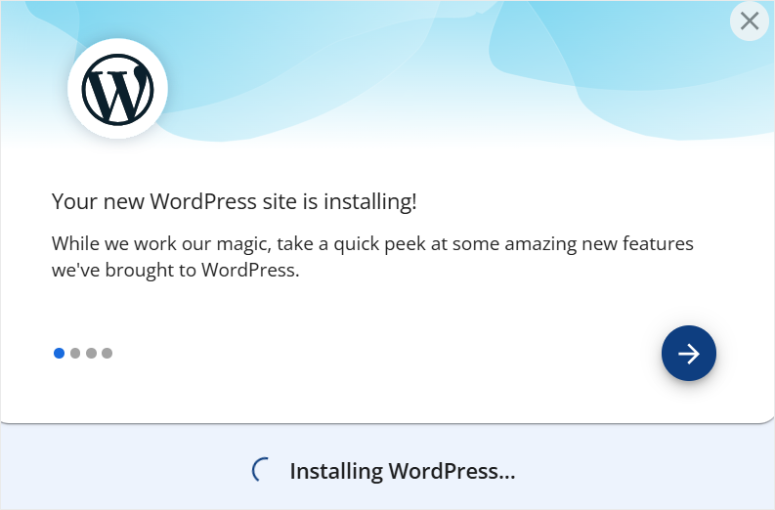
Next, enter your domain name and hit continue and let Bluehost install WordPress.
On the next screen, select AI Site Creator to start the website generation process.
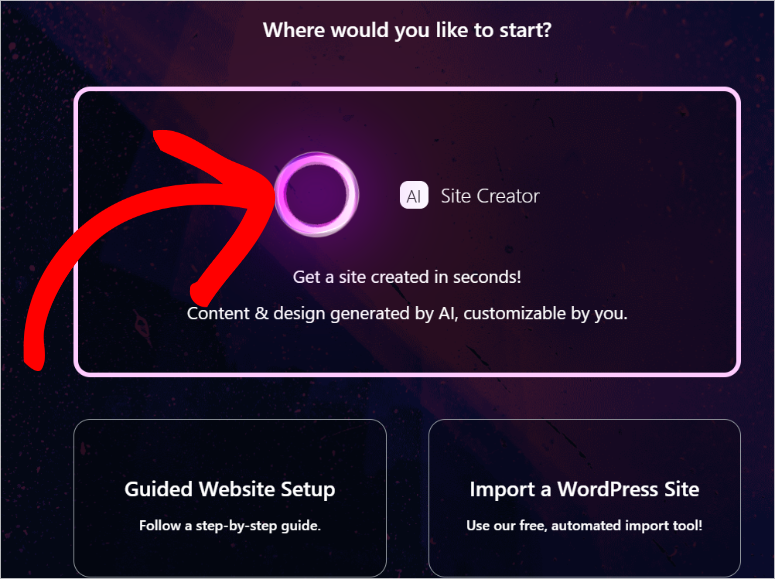
We will use the AI site description for this Bluehost tutorial once again.
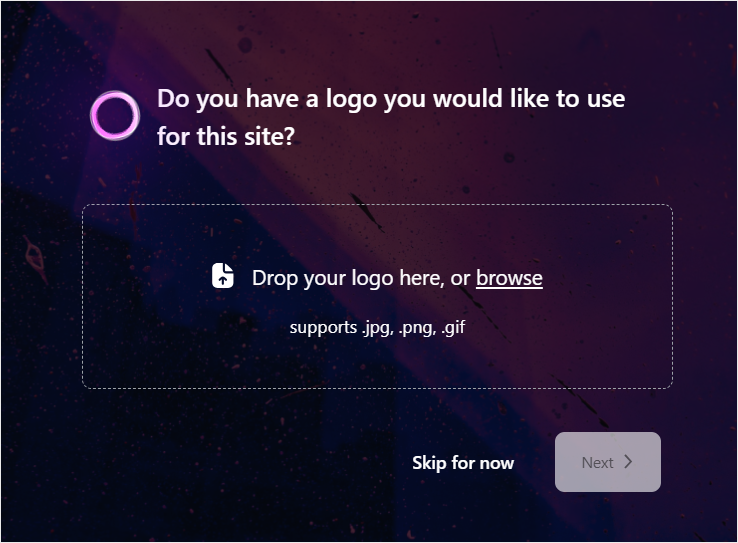
If you have a logo, upload it in the next page and select Next.
On the next page, describe the website you want to build on the text area. Once again, we will use the description we used above to ensure consistency. Once done, hit Next to start the AI site building process.
As your site is being generated with AI in the background, tell Bluehost your familiarity with WordPress using checkboxes. You can choose between Beginner, Intermediate, and Expert.
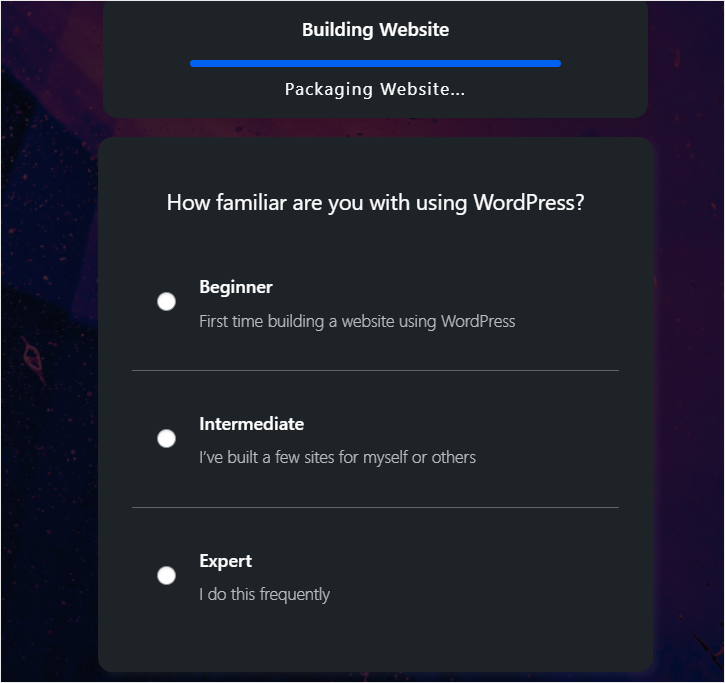
Now, Bluehost will generate 3 versions of the AI website using the description you gave it. If you do not like any of the options, select the Regenerate button under the version.
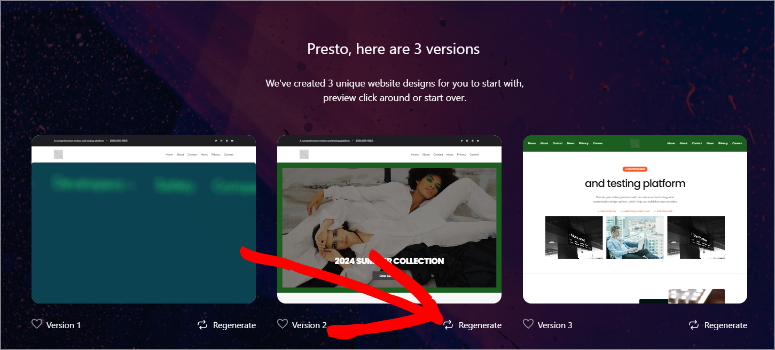
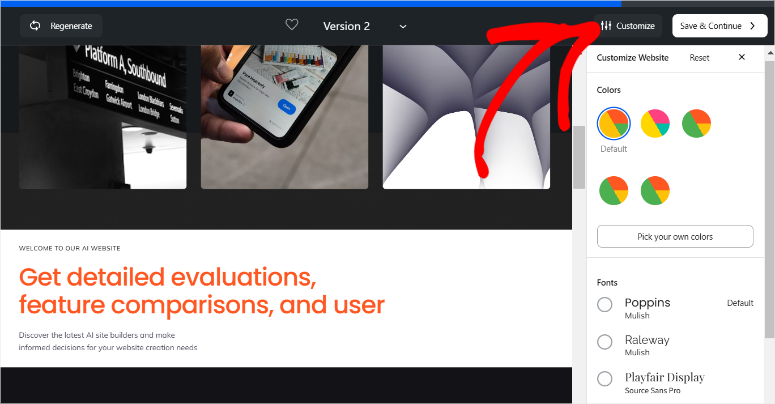
Then, in the preview window, see if the Bluehost AI added everything you wanted. You can also change the colors and font by selecting Customize at the top of the page.
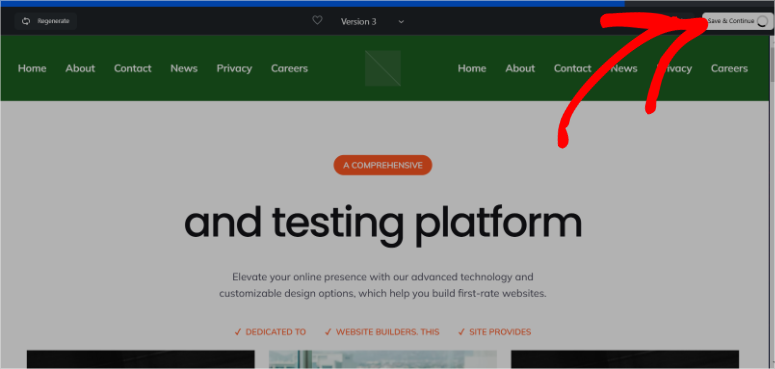
After selecting one option, hit Save & Continue to complete the site-building process.
The site Bluehost generated with AI was also quite nice. The header contained Home, About Us, Service, Contact Us, Demo, and Get Started. It generated AI content for the website. But unlike the other 2 options mentioned above, it used stock images instead of AI images.
It also included social media icons and links to site pages at the bottom.
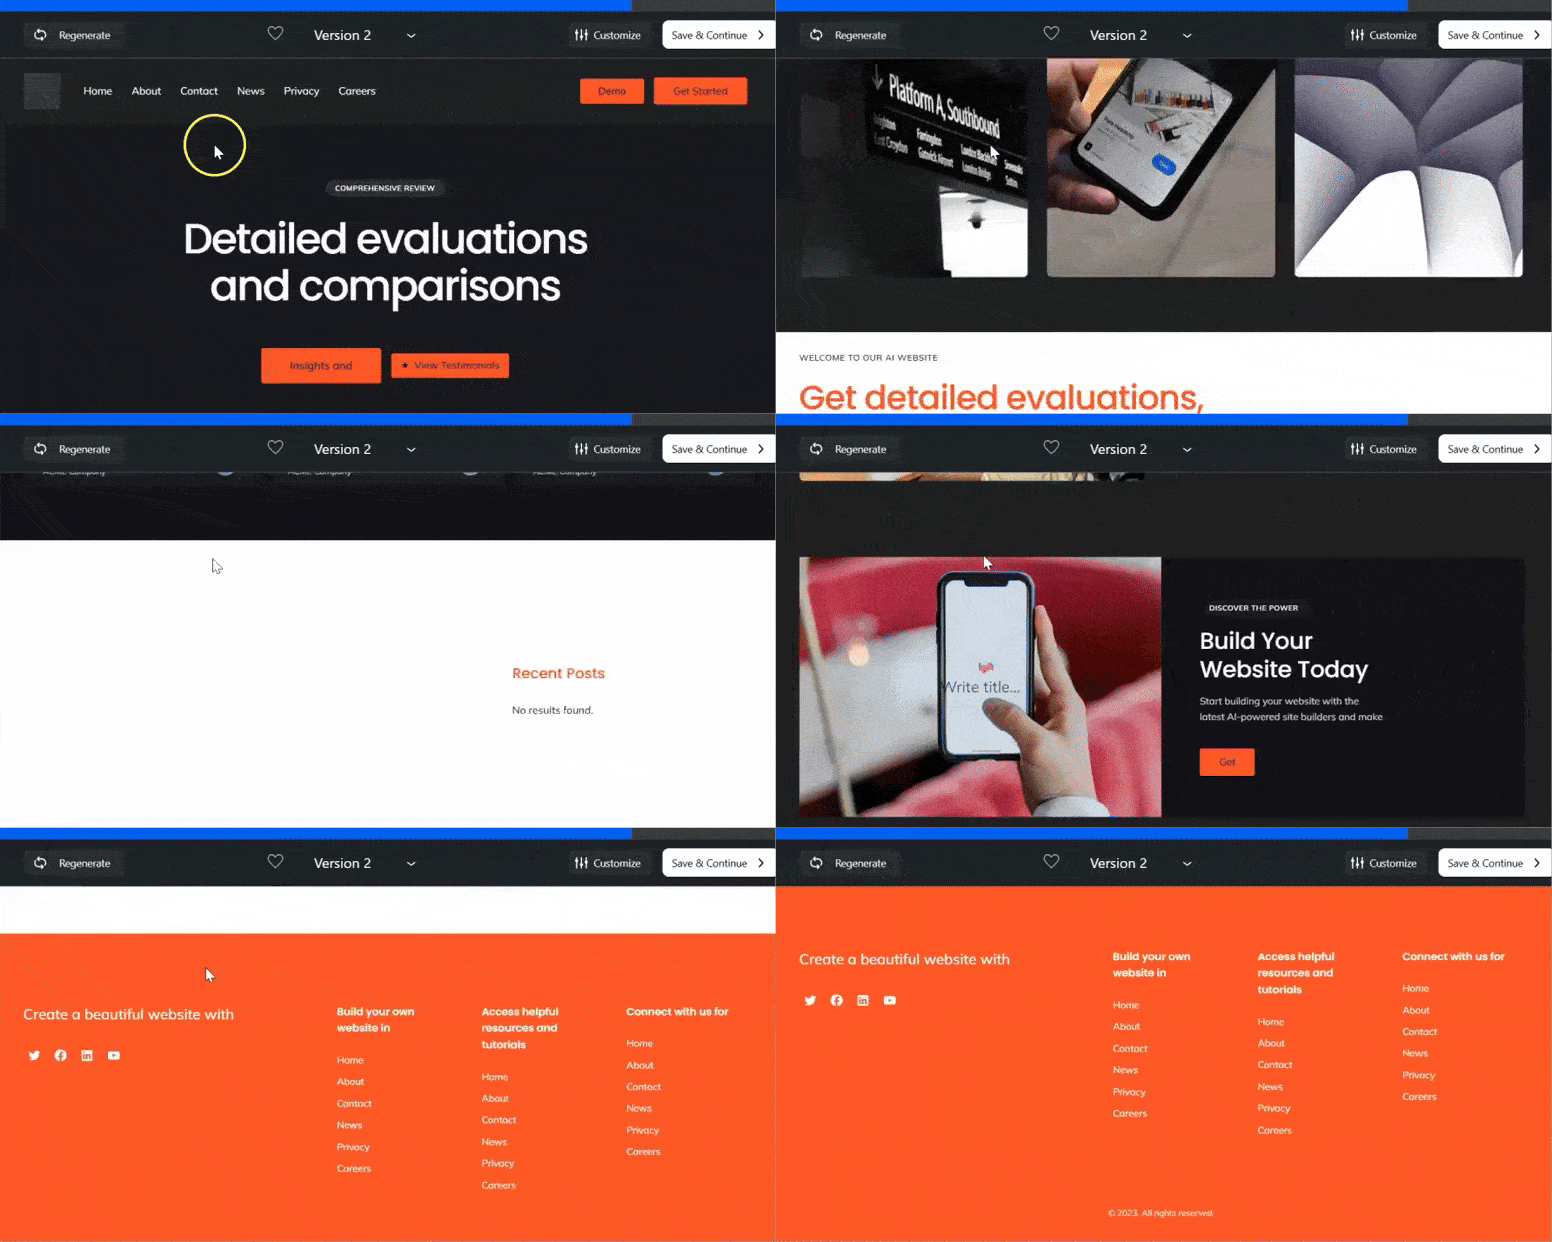
When you are happy with your Bluehost AI website, hit Save to continue to go to your new WordPress dashboard.
With Bluehost, when you install WordPress, it comes preloaded with important plugins like WPForms, OptinMonster, Jetpack, Yoast SEO, and more.
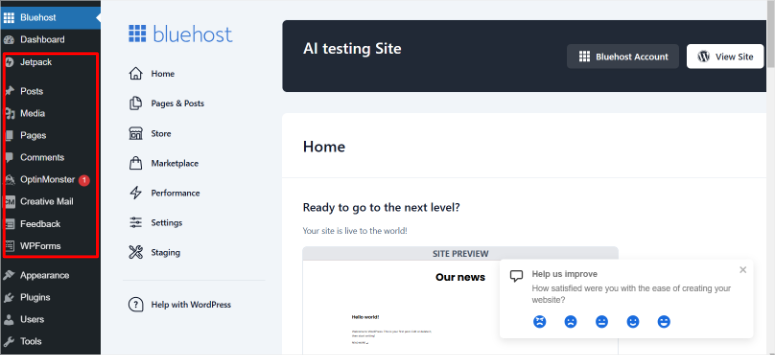
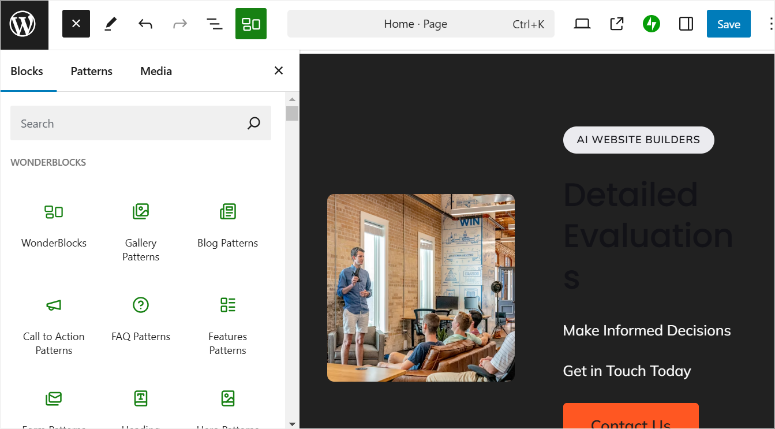
It also comes preloaded with Wonder Blocks, allowing you to customize the AI pages to suit your needs. But if you are more familiar with other page builders like SeedProd, Divi, Thrive Architect and more, you can also install them.
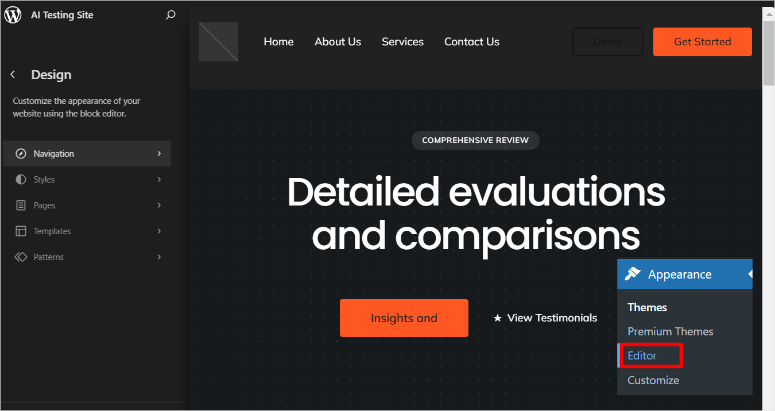
To edit the theme, go to Appearance » Editor, which will take you to the default WordPress theme editor. Here, you can change Navigation, Styles, Pages, Templates, Patterns, and more.
Congratulations! You can now build a complete AI site using any of these three methods. Select one that you find easy to make the process smoother. If you have any questions, check out the FAQs below.
FAQs: How to use AI to Create a WordPress Site
Can I build a complete website with AI?
Yes, you can build a complete website with AI-building tools like SeedProd, Divi or hosting platforms such as Bluehost and Hostinger. These solutions allow you to generate fully functional AI websites quickly by providing a site description and preferences. They simplify the process by automatically creating themes, pages, images, and content while offering tools to customize your website further.
How quick is AI website building?
AI website building can be incredibly fast. For instance, with SeedProd, you can generate a complete WordPress site in under 60 seconds by entering a simple prompt. This efficiency allows you to create a fully functional website almost instantly, saving significant time compared to traditional methods.
What is the best AI site for creating a website?
SeedProd is the best tool for creating an AI-powered WordPress website. It combines simplicity and power with its drag-and-drop builder. You can use over 300 customizable templates and advanced AI features that generate sites tailored to your preferences in seconds.
Can I customize a WordPress site built with AI?
Absolutely! Site builders like SeedProd and Divi allow you to customize your AI-generated WordPress site fully using intuitive drag and drop editors. You can modify themes, page layouts, and content blocks to ensure your website aligns perfectly with your brand and specific requirements.
We hope you enjoyed learning about how to build a website with AI. Check out this article on the Best WordPress AI Plugins to Make Your Work Easier to see how else AI can help you.
On top of that, here are other articles you may be interested in reading.
- 9 Best WordPress Import Export Plugins
- How to Create a Dynamic Landing Page in WordPress
- How to Easily Create a Custom WordPress Theme Without Any Code
The first article lists 9 of the best import-export plugins for WordPress. The next post walks you through how to create a dynamic landing page. While the last article shows you how to create a custom WordPress theme.

Comments Leave a Reply