Do you want to know how to quickly restore website data?
Technical errors, hacks, and outages can strike at any time, resulting in the loss of some or all of your site’s data. There’s nothing worse than frantically struggling to recover what you’d spent hours building in the first place.
But luckily, there’s an easy way to prevent this from happening!
The best way to deal with these situations is to back up your website regularly and stay prepared. Then, if you lose your site data for any reason, you can easily restore your backup and restart the business where you left it.
In this tutorial, we’ll teach you how to restore WordPress data from a backup. To do so, we’ll cover 4 different methods:
- How to Restore a WordPress Site Using a Plugin
- How to Restore a WordPress Site via cPanel
- How to Restore a WordPress Site via SFTP
- How to Restore a WordPress Site from Your Dashboard
- What To Do If I Don’t Have a Backup?
But before that, let’s have a quick look at different reasons why you might need to restore a backup version of your WordPress site.
When to Restore WordPress from a Backup
There are several situations when backup files can come in handy. If you have a backup ready, it’s easy to restore your lost data when you find yourself in one of the following situations:
- Server Outages: No web hosting company in the world can offer 100% uptime and reliability. Sometimes, when the server goes down, web hosting companies may fail to retrieve your data. But if you have a backup, you can easily restore what was lost and have the most recent version of your site.
- Hacked Sites: WordPress is the most popular content management system for publishing content, making it an attractive target for hackers and spammers. If your site gets attacked, you could lose data. You’ll need to get the malware, backdoors, and viruses removed from your site and then restore a backup copy to make sure all your data is intact. See our detailed guide on WordPress website security.
- Human Error: Sometimes, you may end up deleting important files from your site by mistake. This actually happens more often than you’d think. Website backups can be a lifesaver if you’ve accidentally removed important data from your site. You can restore your site first and continue with troubleshooting so that your users are not disrupted.
These are just a few examples of when you’d want to have a backup ready to restore lost files. There can be many other reasons.
But whatever the situation may be, restoring your website data is possible only if you have a backup version of it. Whether you run a website with tons of traffic or get just a few visitors per month, it’s important that you invest in a good backup plugin and run timely backups to protect your data.
Now, you don’t have to manually copy your files every time you want to create a backup. There are plenty of plugins that you need to simply install and it will automatically take regular backups for you.
Our #1 pick is the Duplicator plugin. It’s easy to use and gives you plenty of options to store a backup and restore your site when you need it.
For more backup plugin options, see our list: 12 Best WordPress Backup Plugins Compared.
With that in mind, let’s check out how to restore WordPress from a backup.
Method 1: How to Restore a WordPress Site With a Plugin
We’re starting with the best and easiest method first.
But before we begin, you need to know that this will work only if you’ve already installed a backup plugin on your site.
Again, you have many options for a WordPress backup plugin, but we highly recommend you try Duplicator.
Duplicator is a powerful backup plugin that will create a complete backup of your site and store your data in the cloud. At any time you need, you can restore all your WordPress files and WordPress databases within minutes using recovery points!
It works on small and large websites and even supports multisite networks. You can also store your backups offsite in cloud storage, such as Dropbox, Google Drive, Microsoft OneDrive, and Amazon S3.
If you’ve never installed a plugin before, don’t worry. Just read our helpful guide on how to install a WordPress plugin.
Once installed, you can run manual backups or set up an automated schedule. Head over to Duplicator Pro » Schedules to find these options:
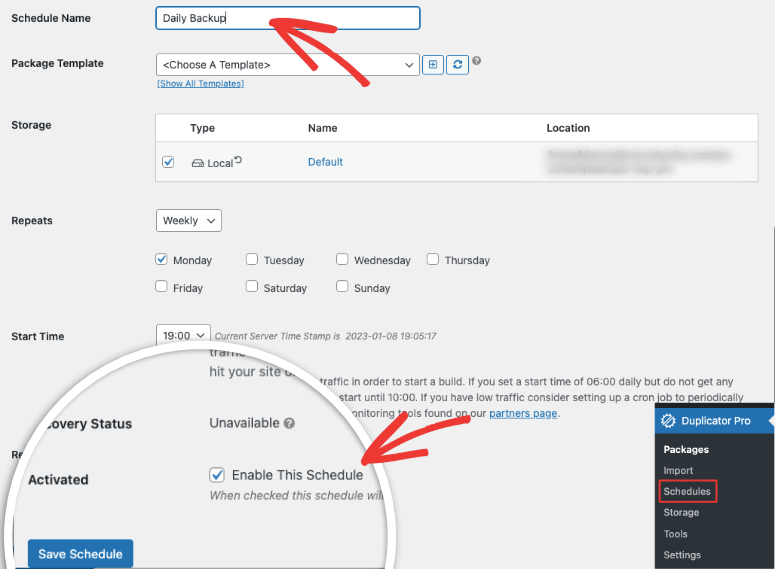
In case you’re using Duplicator Lite, then you’ll need to create a backup manually under the Packages tab.
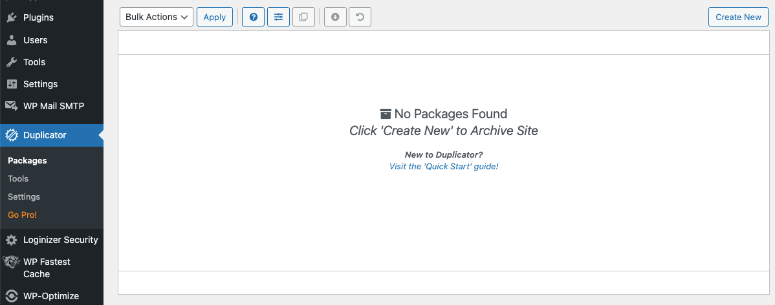
After you’ve created backups, you’ll see them listed under the same Packages tab.
Now, restoring your backup is really simple. Choose the Recovery Point icon from the taskbar menu above the list of backups available.

On the next page, you’ll see restore options. There’s a dropdown menu labeled ‘Step 1: Choose Recovery Point Archive’ from which you can choose which recovery point you want to restore.
Duplicator recommends that you copy a URL that they provide to you and store it in a safe place.
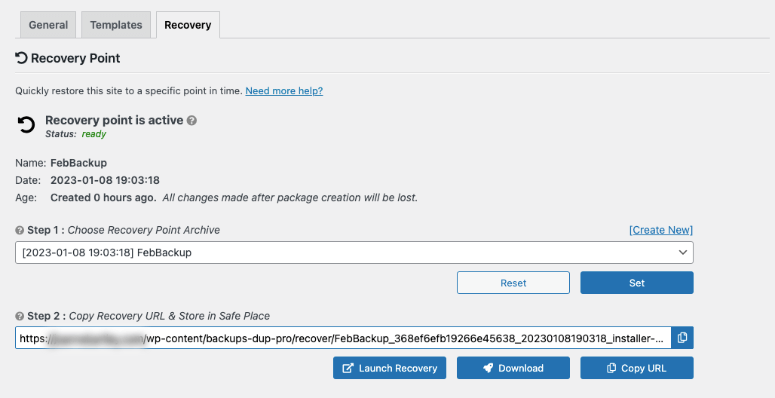
You can download the most recent backup copy of your site and restore it manually or use it to migrate your site. But Duplicator makes it really simple for you here. All you have to do is hit the Launch Recovery button.
A new page will open with the details of your recovery point along with a warning that this restore process cannot be undone.
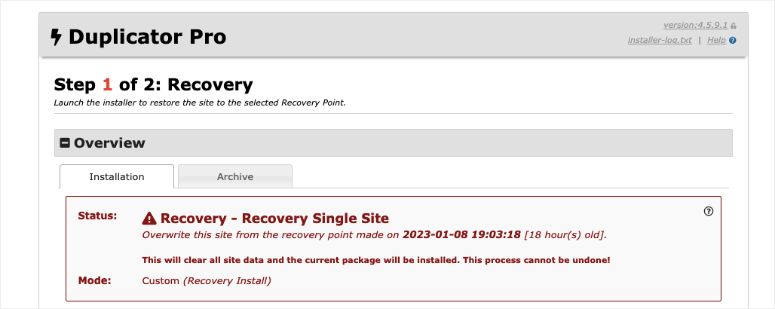
You can view the details of your site, which has been scanned by Duplicator, and check if any issues have been flagged.
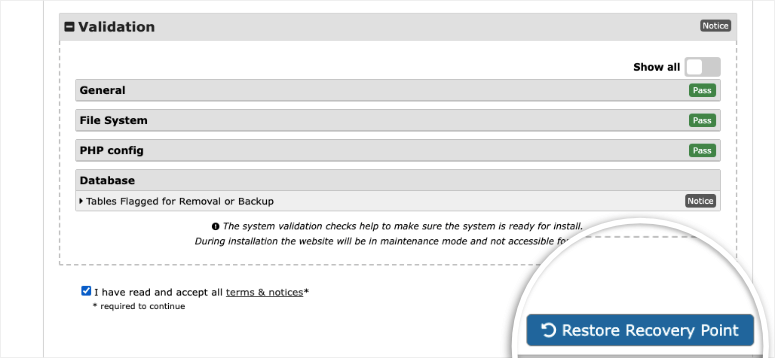
Then, simply agree to the terms of service and click on the Restore Recovery Point button.
Since restoring a backup means replacing all your current WordPress files with the backup files, Duplicator asks you to confirm once more if you’re sure.
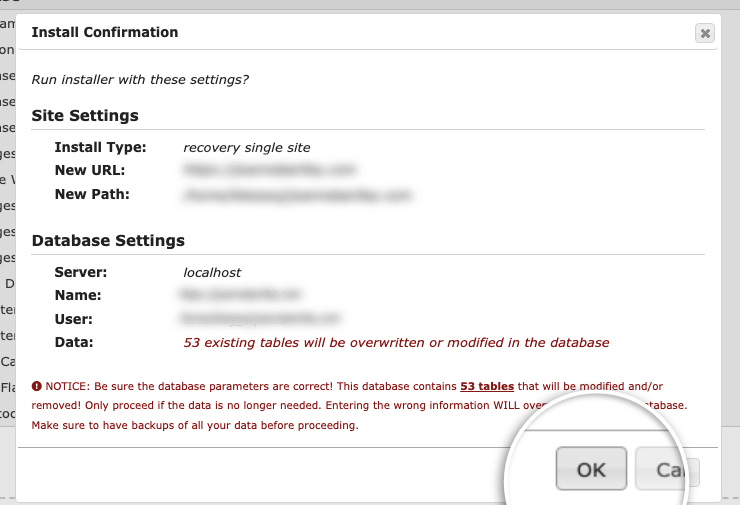
Click on the OK button to proceed.
And that’s it! Your backup has just been restored, and the crisis has been averted.
You’ll notice that on the final page which alerts you that the recovery process is done, you’ll see a checkbox to delete all installer files.
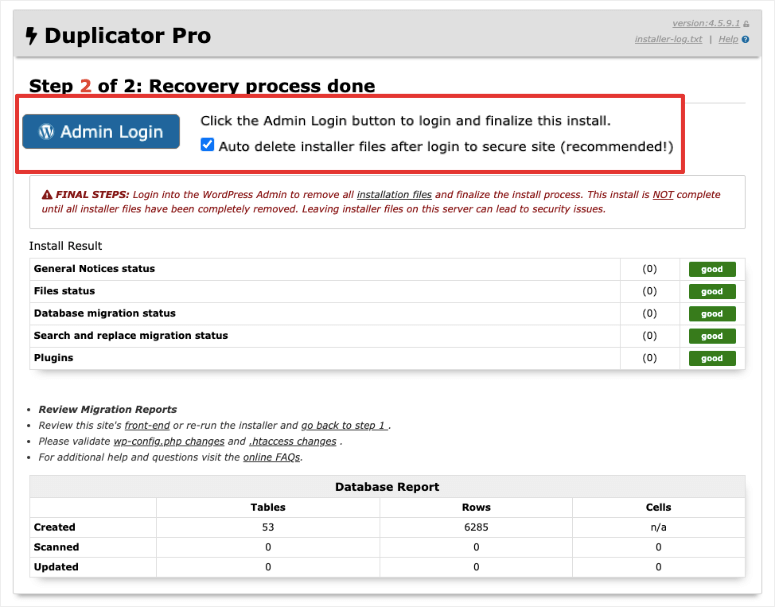
This is automatically selected, and we recommend leaving the default setting. It will delete all installer files to make sure your site doesn’t face any security issues.
You can log in to your WordPress admin page here and check that your live site is back to normal.
If you haven’t backed up your site yet, get started with Duplicator now »
Method 2: How to Restore a WordPress Site via cPanel
In this method, we’ll show you how to restore your backup from the cPanel (control panel) of your web hosting provider. But depending on your hosting company and your managed WordPress hosting plan, the process may vary slightly.
For the sake of this tutorial, we’ll show you how to do it from the cPanel of Bluehost hosting account. Keep in mind the steps will be similar for most hosts.
Bluehost is one of the most popular web hosting service providers that offers great performance, top-notch support, and excellent uptime. If you want to know more about Bluehost, read this detailed review.
To restore your backup, log into your hosting account and access cPanel. If you’re not sure where to find it, contact your support team. It’s usually under your hosting plan.
Inside cPanel, scroll down to the Files section. Here, you’ll see an option called Backup.
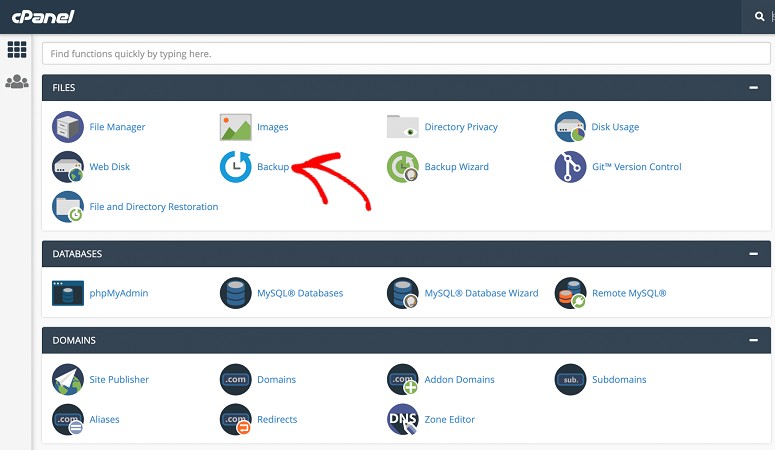
This will take you to a new screen where you’ll find backup options. Now, depending on your web host and chosen plan, you may see different options here.
Some web hosts automatically take backups for you, and you’ll find them here. With others, you need to manually request a full backup.
On the same page, you’ll see restore options. You can choose to restore a directory or a database.
To restore the database, there’s an option labeled Restore a MySQL database backup. Under this, click on Choose File.
You can now select your *.sql file backup/export and click on the Upload button.
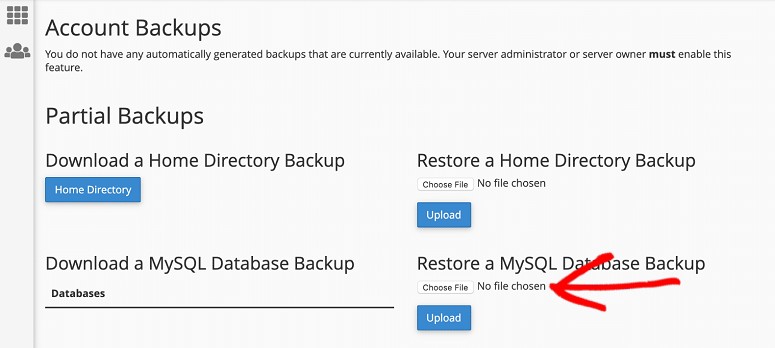
Your backup will now be uploaded, and you’ll have your lost database back.
To manage your databases, you need to access phpMyAdmin inside your cPanel account. You’ll be able to export and import databases here. But we don’t recommend this if you don’t know what you’re doing. It’s better to use a backup plugin that will handle this for you.
Method 3: How to Restore a WordPress Installation via SFTP
This method comes in handy if you fail to gain access to your WordPress dashboard for various reasons. To use this method, you’ll need to install and know how to use an FTP client like FileZilla.
You’ll also need your FTP details, including your hostname, FTP username, and password. If you don’t know what the details are, you’ll find it under FTP accounts inside your hosting cPanel. You can also ask your host’s customer support.
Now, go to WordPress.org and download the latest version of WordPress.
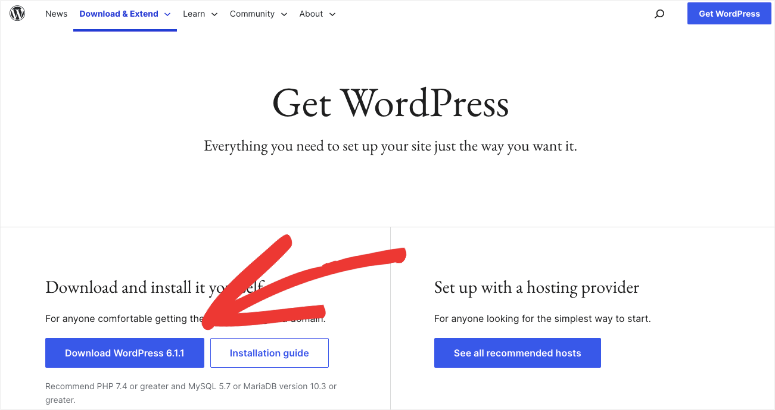
You’ll now have a zip file downloaded to your computer. We recommended storing this file in a separate folder that you can easily access and identify as you’ll need it later.
Extract all the website files from the zip file. Then inside the WordPress folder, delete the folder labeled wp-content.
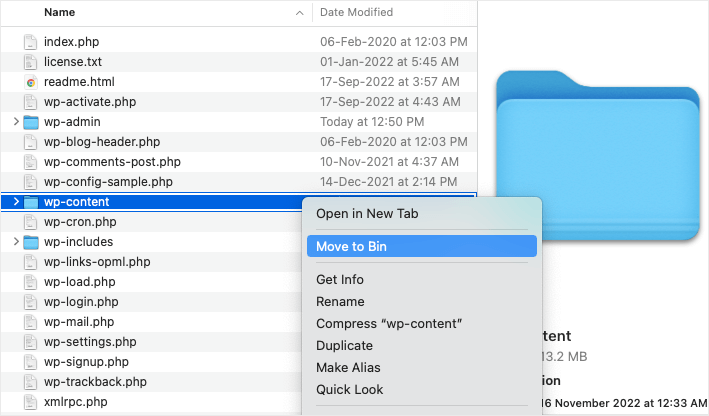
You can also delete the original zip file now since you won’t need it.
Now connect to your host using SFTP. You’ll need to open FileZilla, enter the correct hostname, username, and password and connect to your server.
Once a connection is made, you should see your WordPress installation folders including wp-content, wp-admin, and wp-includes appear on the right-hand side panel
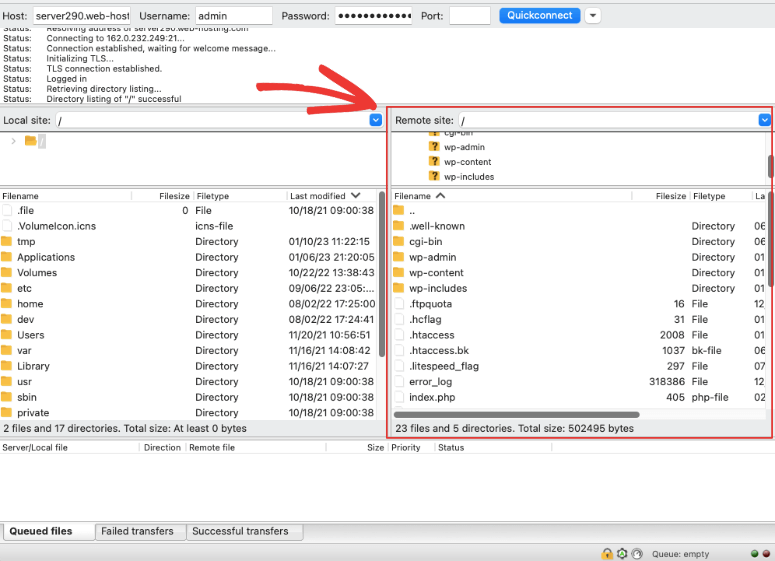
If you don’t see it, you’ll need to locate a folder called Public_html. This is where your WordPress install is usually located.
On the left panel is your local computer. Here you need to select the files you just extracted on your computer, then right-click and upload them to your server.
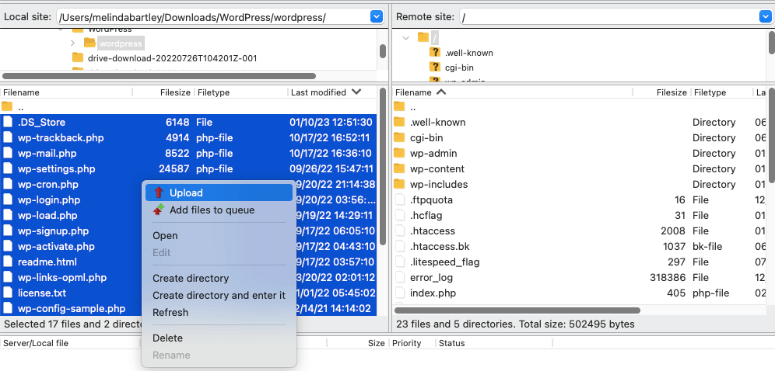
Then, you’ll see a message on your screen saying Target File Already Exists.
On the right side under Action, select Overwrite and click on the Ok button.
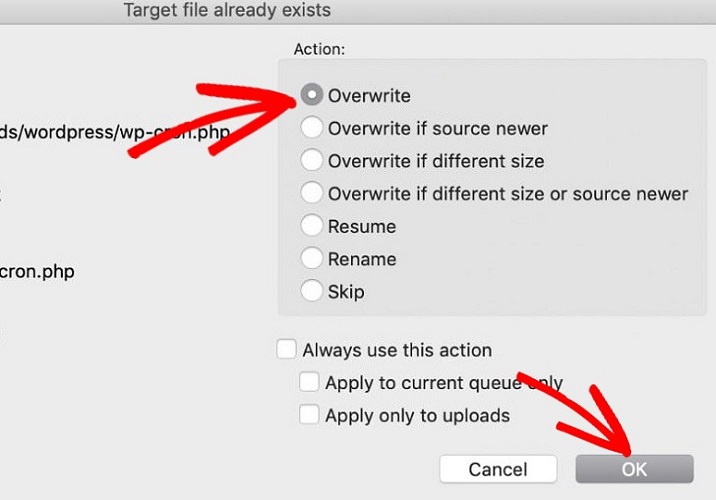
This process will overwrite all of the core WordPress files.
Since you deleted the wp-content folder in the new install, the original wp-content folder will remain intact. This contains all your media files, themes, plugins, uploads and so on. So overwriting the files won’t affect your WordPress themes or plugins.
Once the process is completed, your WordPress core files will be freshly installed.
In case you don’t have an FTP client, you can log into your cPanel and head over to File Manager.

Here you’ll see a folder called public_html that contains your website files.
You can replace the current files with your backup copy here.
Method 4: How to Restore WordPress Files from Your Dashboard
This method is the easiest way to restore your WordPress core files from a backup. And the best part is that you can do it right from your WordPress dashboard with just a single click.
So if you still have access to your WordPress dashboard, try this out. This will only replace your WordPress core files.
You can begin by logging into your WordPress dashboard. Now go to Updates. Here you’ll see an option called Re-install Now button. Click on it.
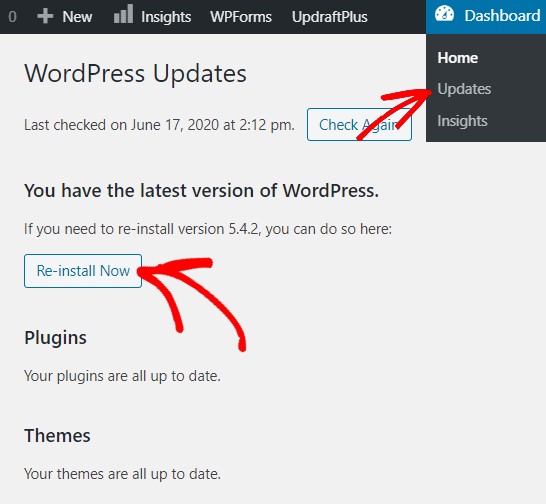
WordPress will take just a few seconds to reinstall its latest version for you. Once that’s done, you can have a fresh version installed. By doing this, you’re manually running the update process that WordPress performs from time-to-time.
BONUS: What To Do If I Don’t Have a Backup?
If you don’t have a website backup, you’re not alone. Most website owners don’t know that they need to backup their website. Some don’t think anything bad will happen to them.
No matter what the reason is, you may not have taken a backup of your website leaving you flustered that you can’t get your site back.
Now there is hope. This may or may not work for you and it all depends on whether your web host provides this option. It also depends on whether this was enabled when you installed WordPress.
Inside your hosting cPanel, go to Softaculous App Installer.

Here, you’ll see icons on the top menu. Choose the Backup & Restore icon like this:
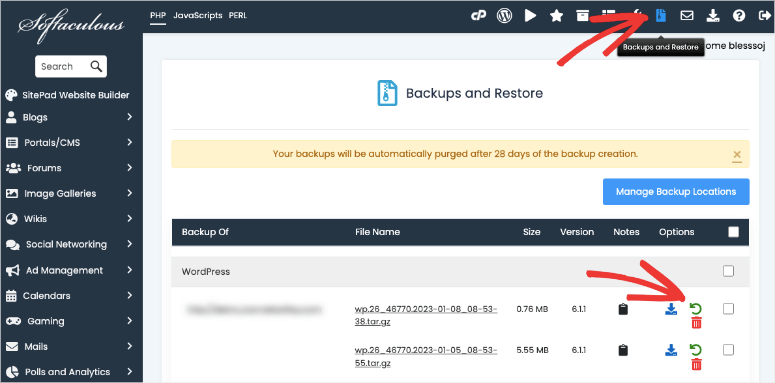
If you’re lucky, Softaculous may have been taking backups for you. You may get a full or partial backup that was taken while your site’s plugins and themes were updated.
You simply need to click on the restore button here.
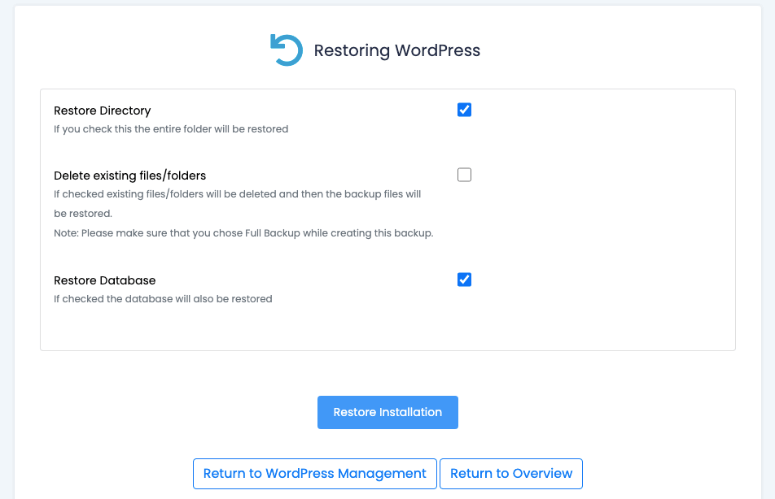
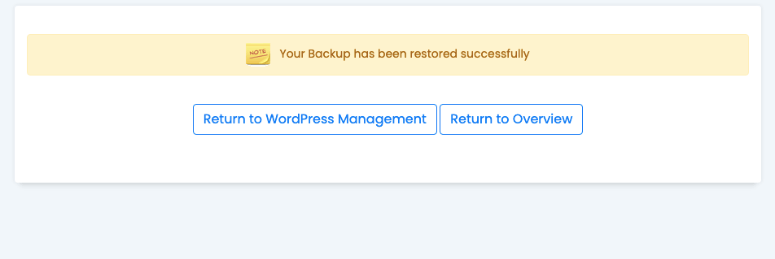
It takes a few seconds to minutes depending on the size of your site. Once your backup is restored, you’ll see a success message.
We can’t guarantee how much of your website is restored with this method. It’s best to create regular backups of your site using a backup plugin like Duplicator. You could also use UpdraftPlus, BackupBuddy, or BlogVault.
With easy one-click backup restore options, you’ll be able to get your site back to normal in seconds.
If you run an eCommerce site, you’ll want to set up real-time site backups so that every order and its details are saved.
We hope you found this guide helpful!
We should mention that one way people tend to lose important data from their WordPress site is by experimenting with new features. Site creators will add elements to their site’s code that can have a negative impact on their entire website.
If you want to know how to experiment safely with your website so you don’t lose any important data, you may want to check out the best staging plugins for WordPress.
Those will help you work on your website while reducing the risk of losing any data in the process. If you do lose some data, though, you now know how to recover it in just a few minutes!


Comments Leave a Reply