Do you want to set up an automated phone system for your online business?
An auto attendant phone system makes sure customer calls are answered instantly. It not only makes your small business look professional but it can also help you cut costs.
In this step-by-step tutorial, we’ll show you how to easily set up an auto-attendant phone system in WordPress.
Getting the Right Tools for an Automated Phone System
Many small business websites simply add a phone number or call button to their website and leave it at that. Customers can then get in touch if they need. But the problem with this is that you can get calls at all odd hours and if you’re on another call, a customer could be left waiting for a long time.
This will leave you and them frustrated. An auto attendant system, on the other hand, lets you take advantage of so many features that include automated call answers, call waiting, business hours, and so much more.
With standard phone services, setting up these features can be expensive, especially if you’re handling business volumes of calls.
By using an auto-attendant phone system, you can get all the features you need to provide an elevated customer experience on your site within your budget.
We recommend using Nextiva. It’s the best business phone service that lets you easily manage business calls with auto-receptionist features.

Nextiva is a VoIP(voice over internet protocol) phone service provider. This means it uses the internet to make and receive phone calls so it’s much cheaper.
You don’t need an expensive call center with support staff. You’ll get everything you need to appear professional even if it’s just 1 or 2 team members handling the support.
If you have a larger team, you can route callers to the right department using a menu system. This will reduce call queues and make call management much easier.
Here are just a few of the awesome benefits included in Nextiva:
- Toll-free number
- Auto attendant
- Call forwarding
- Call waiting
- Voicemail
- Call and video conferencing
- Call recording
- Mobile app
- and so much more.
If you already have a business phone number, you can port the number to Nextiva and continue to use the same number. They’ll even give you a temporary number with caller ID as you transition.
You’ll be able to manage your business communication from any device including your laptop, desk phone, and mobile phone.
This will help improve customer satisfaction tremendously. Nextiva even has a cloud-based telephony system built for remote teams. You can move your current PBX to the cloud or get a hosted VoIP system with superpowers.
Want to know more about Nextiva? you can read more about this service here: Nextiva Review: Is It the Best Business Phone Service?
If you’d like to explore more options, then check out RingCentral, Ooma, and Grasshopper.
That said, we’ll show you how to set up the auto attendant phone system on your website using Nextiva.
How to Set Up an Auto Attendant Phone System
To get started, sign up for a Nextiva account. You can choose a plan according to what features and functionality you need and the pricing tiers. The basic Essential plan is more than enough to get started with an automated phone system for small businesses, and you can scale as you grow.
You’ll get features like:
- Unlimited voice calling
- Toll-free numbers, unlimited Internet Fax
- Video meetings, up to 45 minutes and 250 participants
- Create notes on contacts and calls
- Team collaboration chat messaging
- Calendar and meeting scheduling
- Contact and calendar integrations, Google and Outlook
- Contact management, up to 500 shared contacts
You can also request a demo before you sign up so that you’re sure this service is right for you.
When you’re signing up, you’ll get an option to select a new business phone number or connect an existing number to your Nextiva account.
Once you’ve completed the setup, you can use this number to make and receive calls across multiple devices.
Now to set up the auto-attendant phone system on your website, head over to your Nextiva account. In the left taskbar, select the Communication » Phone System tab.
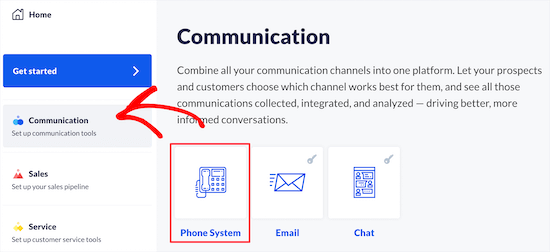
This will open up a new page where you’ll see more options for your phone system. Select the Call Flows tab here. This will let you set up an automated phone answering system for small businesses.
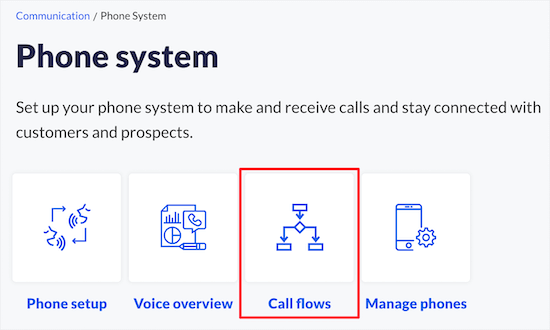
Next, you can choose the Create New Flow button to start setting up the auto attendant feature.
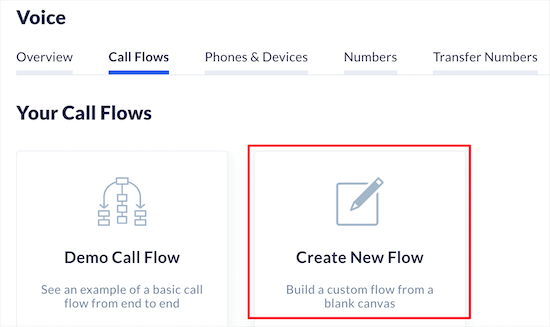
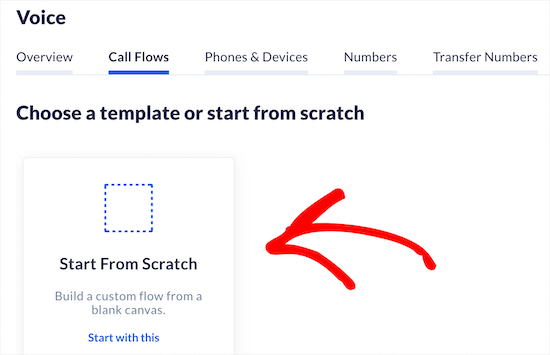
When you’re just getting started, you can Start From Scratch. Once you create call flows and save them as templates, you’ll see them here.
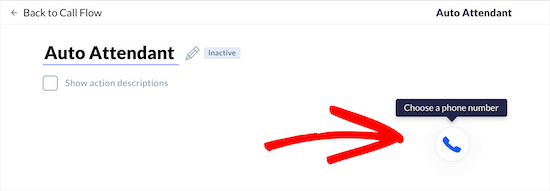
Nextiva lets you add a name for this call flow so that you can easily remember which one to select later. On the right-hand side, you’ll see a phone icon.
When you click on this icon, you’ll get an option to enter your business phone number. You can even add extensions and more numbers here if you’d like callers to connect directly with different departments or teams.
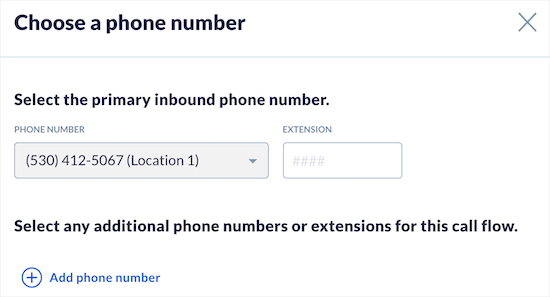
This call routing feature makes it easier for your team to know what the customer is calling about even before they answer the phone.
Now you can click ‘Save & Continue’ button. After this, you can set up actions that will take place once your call flow is activated.
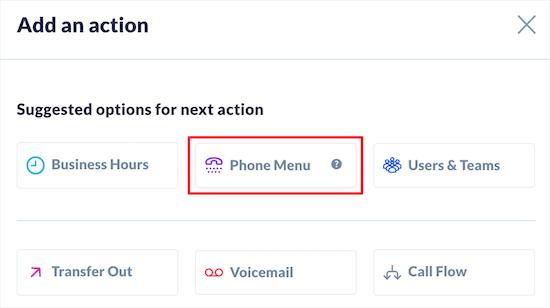
Select the ‘Add action’ button and you’ll see a new menu pop up.
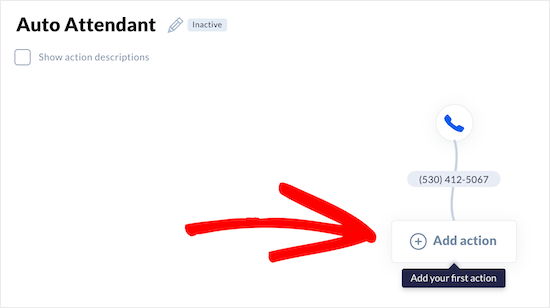
Here, choose ‘Phone Menu’ to record a greeting message for your callers. You can also add options for them to select specific problems they are facing so that they are directed to the correct department or team member.
Now by default, there is a pre-recorded greeting that you can use. If you’d like to personalize your message for the automated attendant, you can record or upload a custom greeting here.
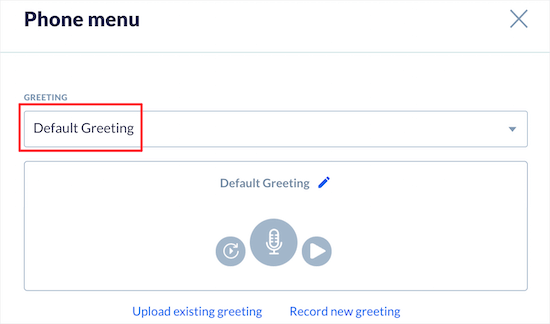
This message will become your virtual receptionist in the IVR (interactive voice response) call.
Next, you can customize your phone menu to make it suit your business or website. Under the Phone Menu, you’ll see a keypad. You can select the numbers you want to activate here.
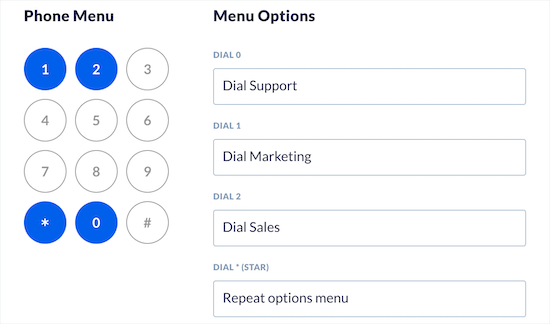
So for instance, you can ask the caller to press 1 for Support, 2 for Sales queries, and 9 to Connect to a representative.
All you have to do is click the number and then add the department or team details in the Menu Options section on the right.
Now you’re almost done setting up your business phone system. If you’d like to configure Advanced Options, you can set a timeout duration and a number to dial operator.
If you want to enable callers to dial an extension, there’s a checkbox here that you need to tick.

To move on to the next step, you need to click the ‘Save & Continue’ button.
Now you’ll be back on the main call flow screen. Here, you can assign team members and phone numbers/extensions to the menu options you just added. This will improve your call handling and allow staff to use attendant scripts for each extension.
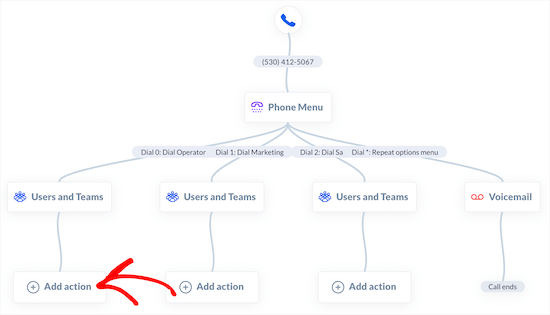
If you click on an ‘Add action’ button here from the submenus, you can select the ‘Users and Teams’ tab.
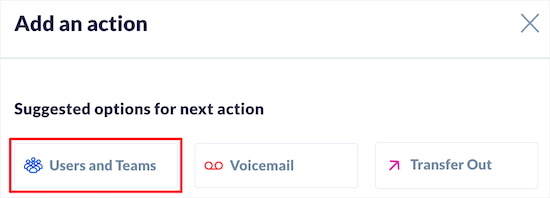
Here you can assign a team member to the action. You’ll see options to add a team name, whether you want to ring all connected members together or one at a time.
You can explore these options and configure the settings to suit your preferences.
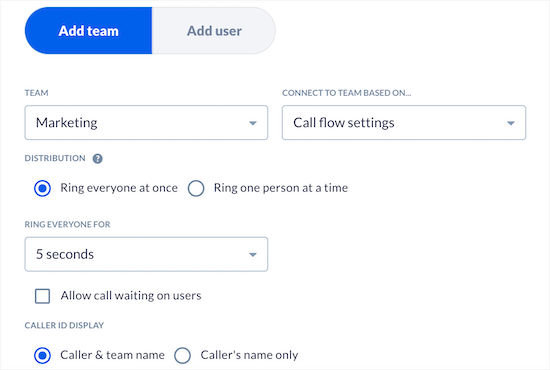
Click on Save & Continue and you’ll return to the main call flow screen. Follow the same steps to add actions to every menu option.
With that, you’ve set up an automated business phone answering system.
Now there may be times when you or your team members may not be able to answer any calls. So outside of business hours and on holidays, you can set up a Voicemail box. This allows callers to leave a message if no one answers the phone.
This feature is especially useful for businesses that don’t want to miss important communications from clients. So if you’re a wedding planner, event planner, or freelancer, for example, callers could leave messages detailing what they are looking for and requesting a quote.
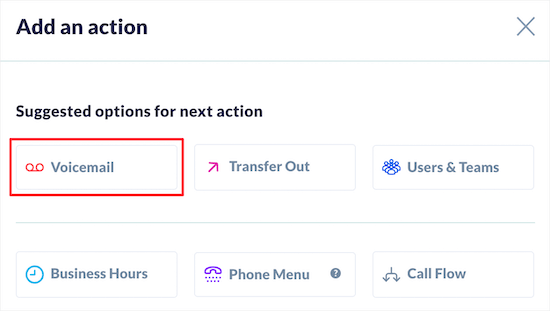
To add voicemail to your call flow, make sure you choose the ‘Add action’ button under the extension you just set up.

Now you can choose ‘Voicemail’ instead of ‘Users & Teams’.
On the next page, you can set up your voicemail box and message. Choose the team or person from the ‘Voicemail Destination’ drop down menu, and the right department from the ‘Team’ drop down.
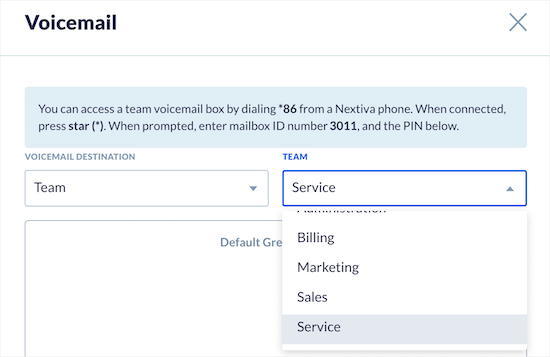
Again, click on the Save & Continue button. Follow the same steps for every extension you added. After you’re done, you’ll see that the call flow goes to different extensions, then voicemail, and the call ends.
Now your multi-level auto attendant call flow is ready. When you click the ‘Go Live’ button at the bottom of the screen the call flow will activate.
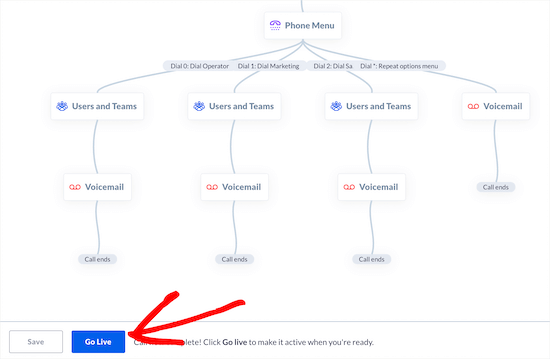
We recommend testing out your auto attendant phone system by placing several dummy incoming calls to test out the greeting message, extensions, and voicemail options.
With that, you’ve successfully set up an automated phone system for your website with auto attendant and a call flow.
Now you can make it easier for customers to call you by adding a phone icon to your website rather than displaying a number that they need to dial. When users click on the icon, the number will auto-dial for them.
How to Add a ‘Call Now’ Button to Your WordPress Site
There’s a simple WordPress plugin you can use to add a Call Now button to your website. This makes it easier for callers to dial your number especially if they’re on their mobile.
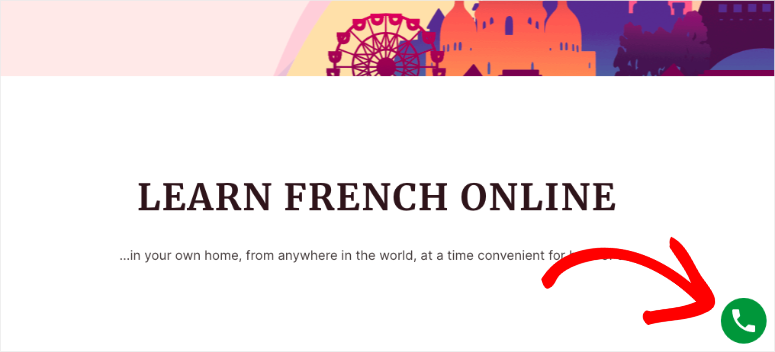
If you’re looking for a free auto attendant phone system, then this plugin can be a good alternative. It makes it easy for customers to connect with you by just clicking on the call button.
You can also use a Contact Form in WordPress. You can set it up for free and let interested users fill out a form with the date and time that they find convenient for you to give them a call.
Coming back to the tutorial, let’s set up the Call button on your site.
In WordPress, navigate to Plugins » Add New page. Now search for the WP Call Button plugin and install and activate it. For more steps on that, use this guide: How to Install a WordPress Plugin – 3 Methods (Step by Step)

Once activated, go to Settings » WP Call Button in the WordPress menu.
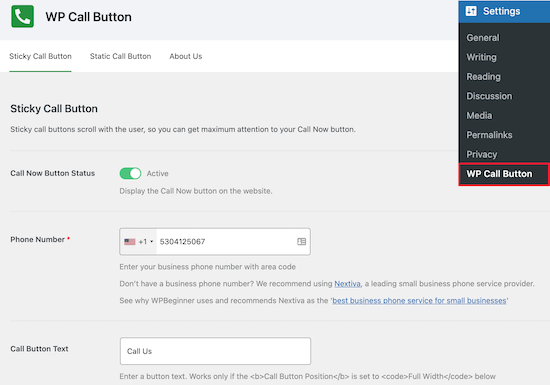
Here, you can activate the call button and add the VoIP phone number that you set up with Nextiva.
You’ll also see options to customize the appearance of your button and add a sticky call button that floats on the screen across your website.
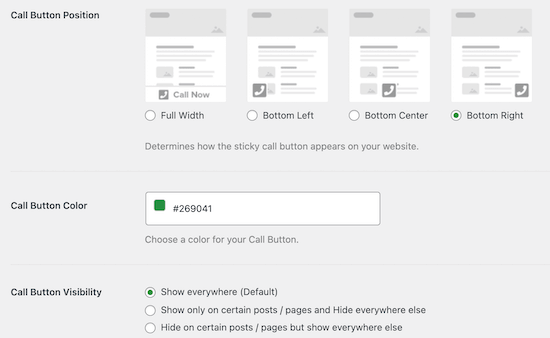
WP Call Button gives you control over your button. You get to choose where you want to show/hide the button on pages and posts.
If you want to display it at specific places, then you can use the Static Call Button option. This will give you a shortcode that you can embed on your WordPress site.
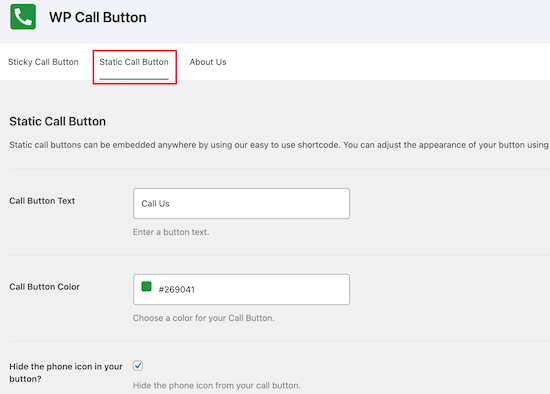
After setting up the plugin, make sure you hit the ‘Save Changes’ button.
You can also add a sticky button directly to your pages, posts, and widget areas by using the included block.
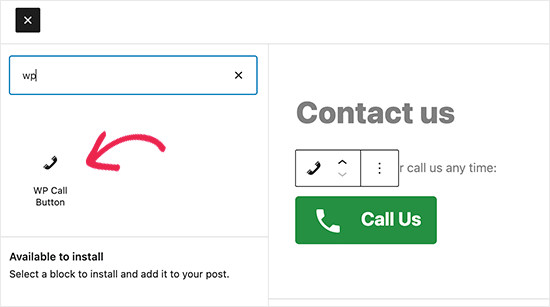
In the block settings, you’ll get options to customize the colors, size of the text, alignment, and show or hide the phone icon.
Once done, make sure to click ‘Update’ or ‘Publish’ to save your changes. See our step by step tutorial here: How to Easily Add a Call Now Button to WordPress (Step by Step).
That’s it! You’ve just improved your customer support and saved money too! We hope you found this guide on setting up added virtual phone automation helpful.
Up next, you may want to use a CRM to improve your automation: 10 Best CRM Software for Small Businesses Compared.
And you’ll want to see our guides:
- WordPress Live Chat: How to Set Up for FREE (Step by Step)
- 7 Best Online Collaboration Tools for Teams
- 11 Best Business VoIP Phone Services for Small Businesses
These posts are dedicated to optimizing your customer experience in easy and budget-friendly ways.

Comments Leave a Reply