
Do you want learn how to set up Google Optimize in WordPress? With Google Optimize, you can easily run tests on your website to find out what works best for your users and your business. It’s a free A/B testing tool by Google to allow you to test your website content and take action to optimize conversions.
In this article, we’ll show you how to set up Google Optimize in WordPress, and how to use your A/B test reports to grow your business.
What’s Google Optimize?
Google Optimize is a free A/B testing and personalization product by Google to help businesses deliver a more engaging user experience. It allows you to create experiments on your website content and test what works best for your audience. Hence you can improve your website and make it more useful and engaging to users.
Google Optimize is natively integrated with Google Analytics so you can use your Analytics data to create experiments quickly and easily. And, it’s really easy to implement that you’ll need to add just a piece of code to your Analytics code to get Optimize up and running. If you’re already a Google Analytics user, it takes less than 3 minutes to set up Google Optimize on your site.
On top of everything, it’s free and user-friendly that anyone can easily learn and implement.
That’s why it’s an ideal A/B testing solution for small and medium level businesses who cannot afford premium A/B testing solutions or hire an expert.
Creating a Google Optimize Account
Google Optimize is built right on top of Google Analytics hence you need to have Google Analytics installed on your website. If you need instructions, here’s our guide on how to easily set up Google Analytics in WordPress.
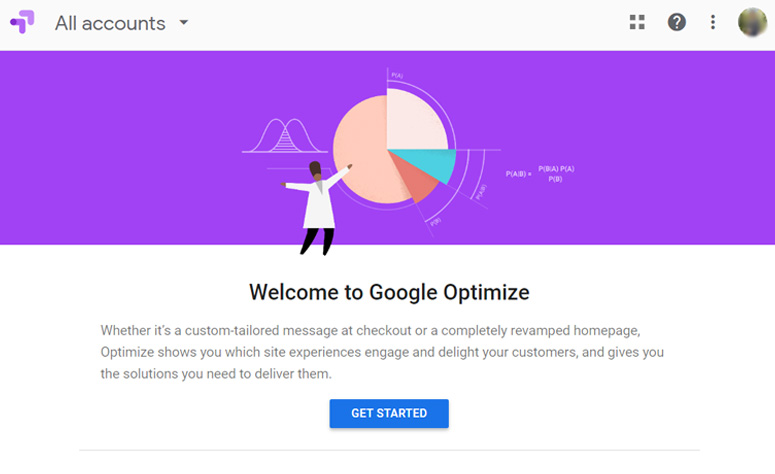
Now you can get started with Google Optimize by creating a new account. To do that, you’ll need to visit Google Optimize accounts page and click the Get started button.
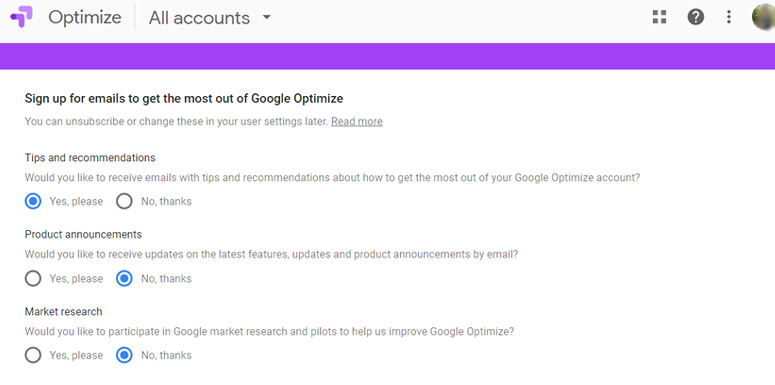
Next, you’ll need to choose email sign up options for tips, product announcements, and market research from Google Optimize. After making your choices, click the Next button.
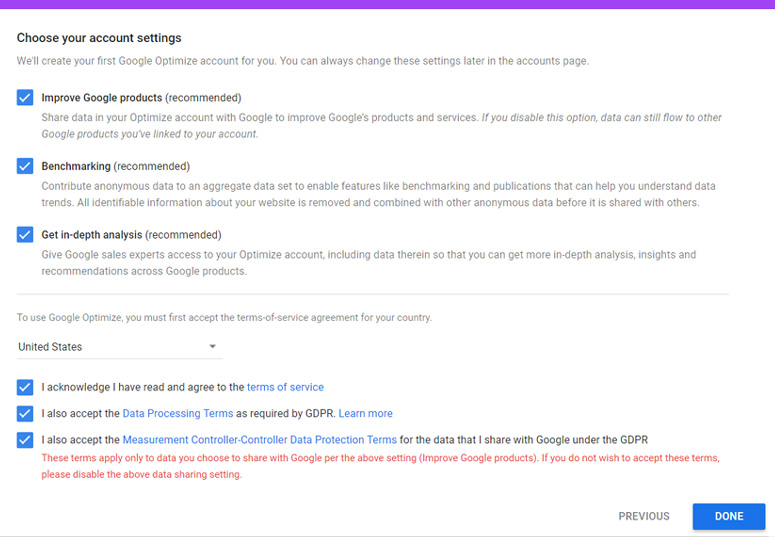
In the next step, you’ll need to check Google’s terms of service and GDPR policy options.
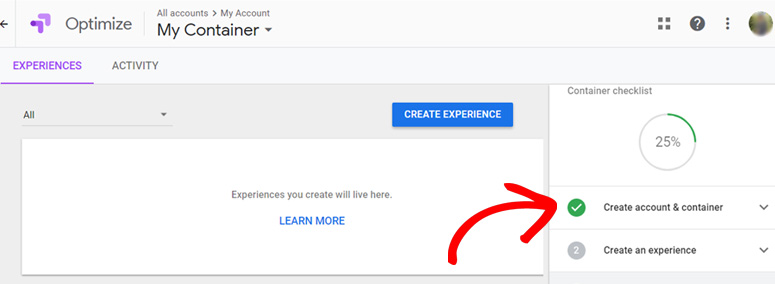
Now, you’ll see your Google Optimize account created along with Container. It’s automatically created by Google for you.
As you can see, there’s a green check on Create account & container option in the right-hand side panel.
An Account is the highest level of Optimize hierarchy which usually represents your company. A container lies within an account which represents your website.
Setting Up Google Optimize in WordPress
Now that you’ve created a Google Optimize account, you’re ready to set up Optimize on your WordPress website. To do that all you need to do is to link your Optimize account with your Analytics account.
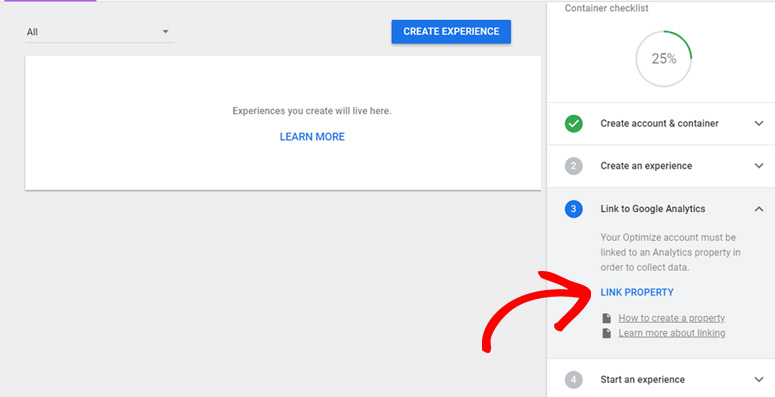
First, you need to go to Link to Google Analytics option in right hand side panel in the Google Optimize accounts page.
Then, click Link Property option.
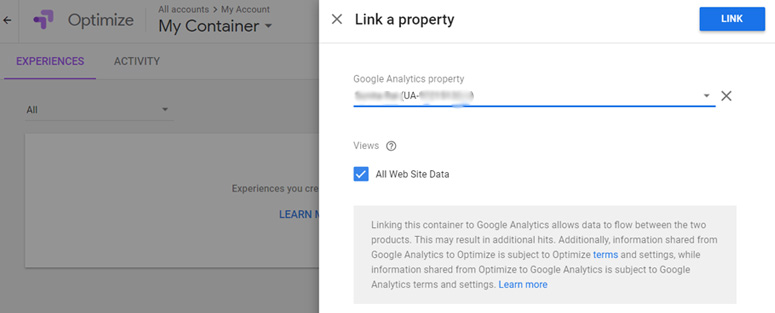
Now, you need to select the Google Analytics property that corresponds to your site and click the Link button.
After that, it’ll show you a popup asking to add the Optimize snippet to your site. The code snippet lets you run tests on your site. Click on Get Snippet button to get started.

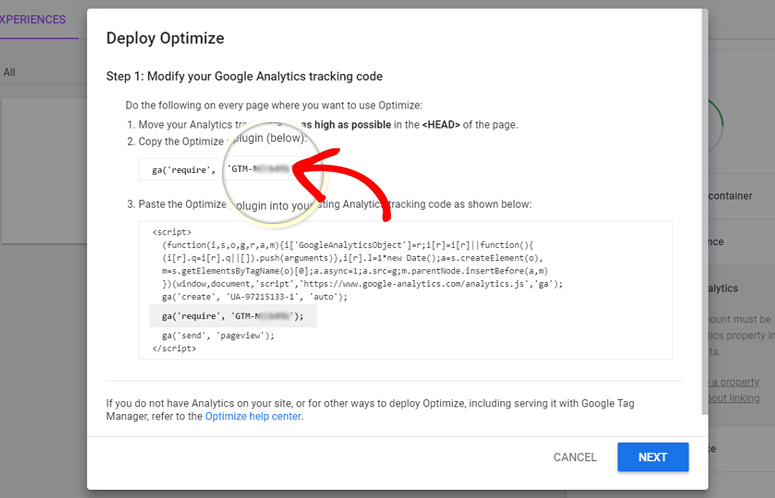
Now you’ll see another page with steps to deploy Optimize on your site.
However, the steps include editing your website header to add the code snippet which is risky as a tiny error can break down your entire site.
But you don’t need to worry anymore because MonsterInsights lets you add the code easily and safely with the Google Optimize addon.
All you need from the above step is your Container ID that’s provided in point 2. It’s the code starting with GTM- which looks like GTM-XXXXXXX. So, just copy that code and click Next button.
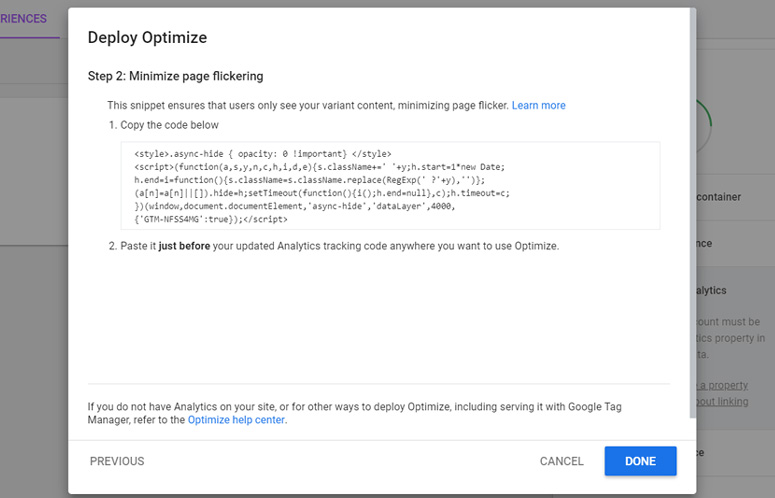
Then, it’ll show you options to Minimize page flickering.
You can simply click the Done button because this option is available in MonsterInsights Google Optimize addon with just a checkbox.
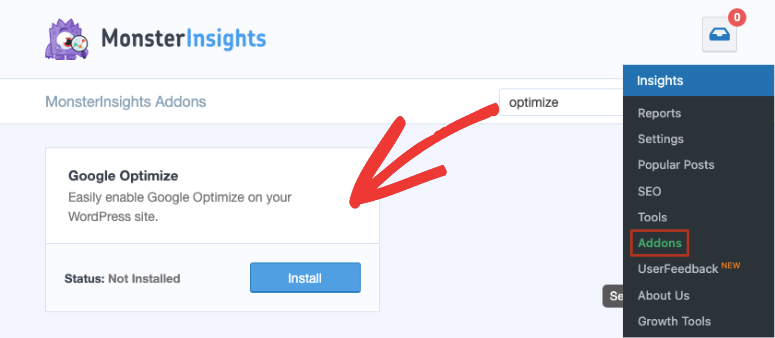
Now, you need to open your WordPress dashboard and install the Google Optimize addon by going to Insights » Addons.
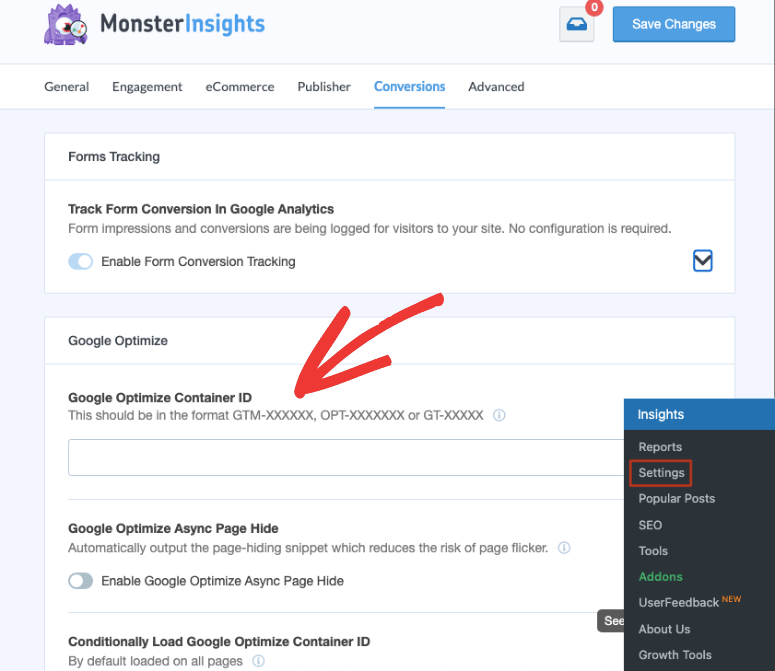
After the addon is activated, navigate to Insights » Settings » Conversions » Google Optimize. Then paste the Container ID that you copied earlier in the Google Optimize Container ID field.
Then, click the Enable Google Optimize Async Page Hide checkbox. It reduces the risk of page flickering (the original page appears briefly before loading the variation). You can leave the remaining field unchanged.
Then, click Save Changes.
That’s it! You’ve successfully installed Google Optimize on your WordPress site.
Creating Your First A/B Test with Google Optimize
Now that you’ve set up Google Optimize on your WordPress site, you’re ready to conduct A/B tests, multivariate, and redirect tests on your site. To show you an example, we’ll create a simple A/B test here. We’ll be testing whether changing the headline of our Subscription section on a landing page will impact our subscription rate.
Our original Original headline is: Subscribe for Interesting WordPress Tools!
And, the variant headline is: Subscribe to Get Google Optimize Addon Free!
To create the test, go to your Google Optimize account page and click Create Experience button.
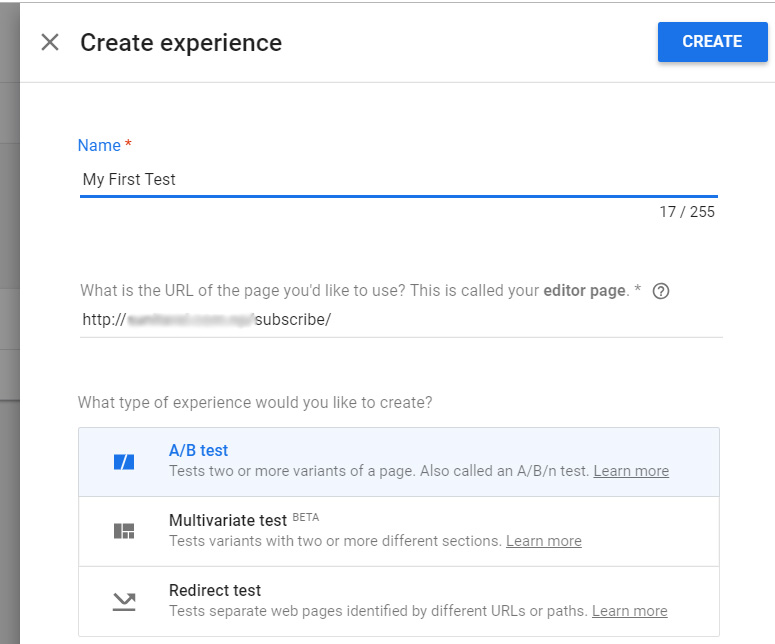
Then, a new window will open where you’ll need to name your first test and enter the URL of your landing page you want to conduct a test on.
There’s A/B test selected by default, so you can leave as it as. Then, click the Create button.
Creating a Test Variant
After that, you have to create a variant for the test. Google Optimize lets you easily create a test variant with the visual editor.
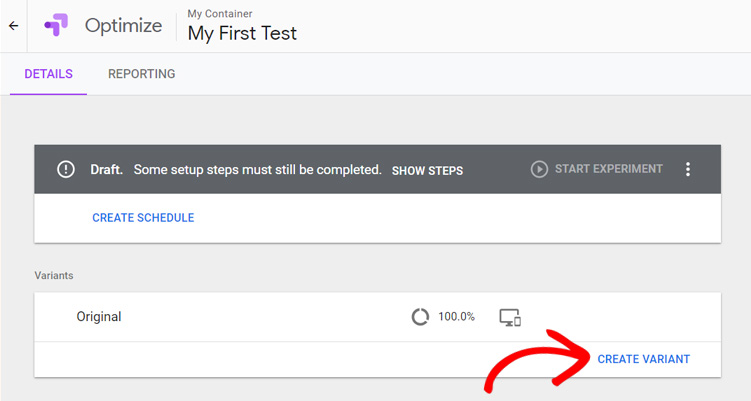
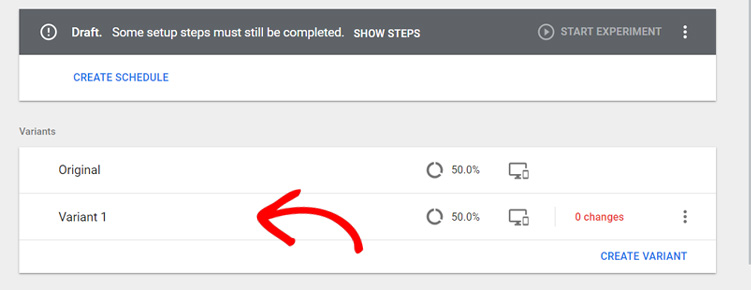
Now, on your Optimize window, you’ll see a page like the one below:
Simply click the Create Variant link. Then, a new popup will appear where you can name the variant.
After that click Done.
Now a new variant is added but there’re 0 changes. So, to make modifications, click the Variant row.
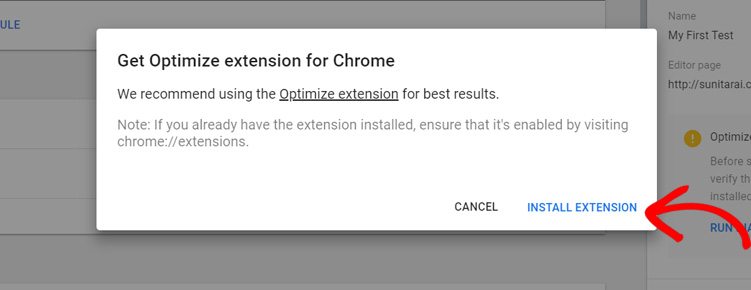
Upon clicking, you’ll see a popup asking you to install Optimize Extension.
The Optimize extension allows you to edit your variant with the visual editor. So, install the extension on your browser by clicking Install Extension link.
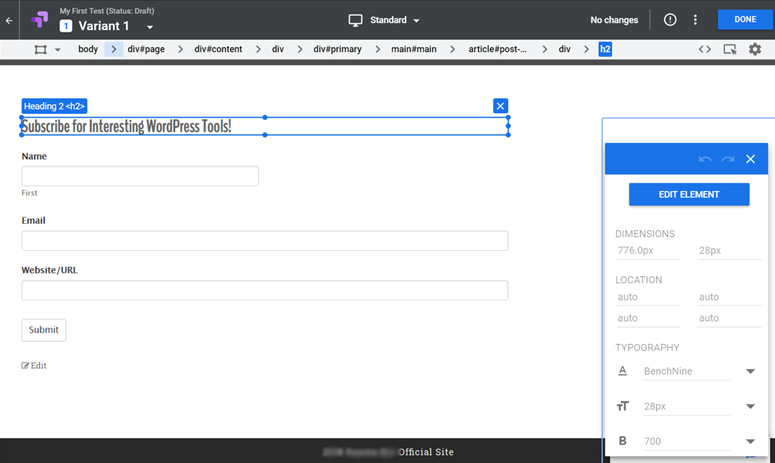
After it’s installed, click on the variant row again. Now, it’ll redirect you to your landing page where you can make changes using the visual editor. As we want to modify the headline for the subscription section, right click on it and then choose Edit text.
Once you change the headline, click the Done button and then Save button to return to your Optimize account.
Adding Objectives and Targeting
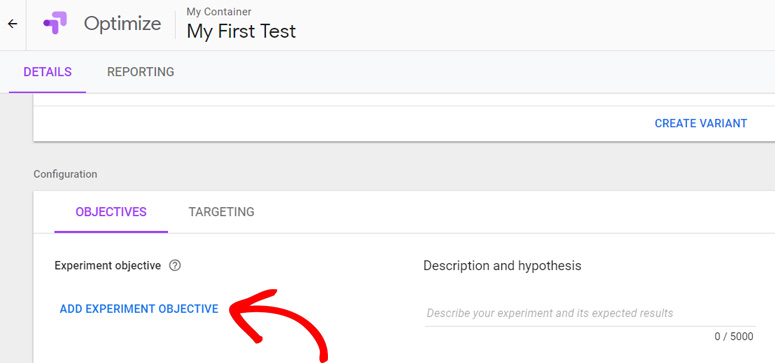
Next, you need to add an experiment objective on your test by connecting your Google Analytics goal. To do that, click on Add Experiment Objective button.
Then, choose a proper goal from your list of Google Analytics goals. If you don’t have a proper goal already set up, you can create a new Google Analytics goal.
Then, specify your test description and hypothesis. For example, we used: This experiment tests whether a change in subscription headline impacts the conversion rate.
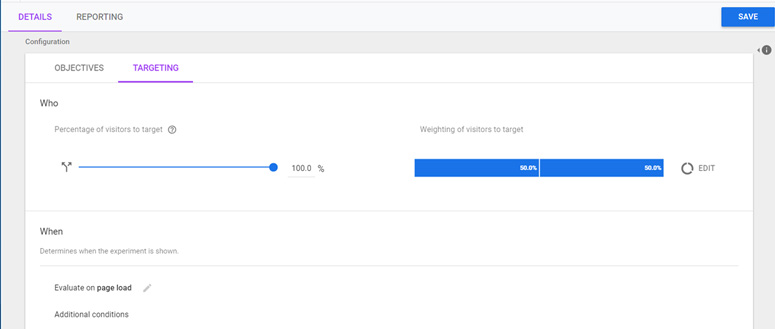
Next, you’ll need to specify targeting options. Click on Targeting tab to get started.
There, you can see 100% of visitors targeted by default. You can also set when the experiment is shown, like on page load or a custom event. Once you’re done setting up, click Strong button.
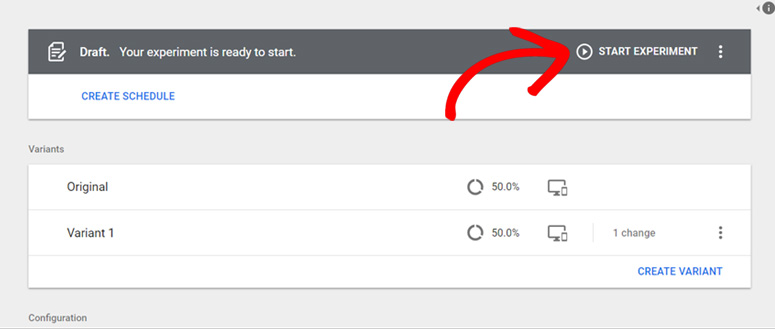
After that, you’re now ready to start an experiment. To do that, simply click the Start Experiment button at the top.
That’s it. You’ve created your first A/B test. In the same way, you can create more experiments with Google Optimize.
Now wait for at least 2 weeks to gather enough data and then you can review the reports. Google Optimize will show you the winner and helps you to optimize your site for more conversions.
We hope this article helped you learn how to set up Google Optimize in WordPress. You can also conduct website speed test to ensure your site loads in an optimal time.
If you liked this post, you might also love our tutorial on how to set up download tracking in Google Analytics.





Why I need buy pro version to use Google optimalize in this plugin ?
The MonsterInsights plugin makes it easy to connect your website to Google Analytics as well as Google Optimize. You can rest assured that the implementation is correct, without having to worry about skewing your data.