Are you looking to create a blog?
We know the thought of launching a blog can be scary, especially if you’re not a tech-savvy person. But, the good news is that starting a blog is way easier than you think, regardless of your skillset.
Blogging platforms like WordPress make it super simple for anyone to start a blog without knowing a single line of code. Once you’ve set up the blog, you can create content in a post editor that looks very similar to Microsoft Word. You can customize the design, look, and feel of your blog with an easy-to-use drag-and-drop interface.
In other words, starting a blog in 2024 is A LOT easier than starting one 10 years ago.
But why listen to us?
Unlike other wannabe experts and false prophets, we only preach what we practice.
We’ve built several large blogs in our career including this one. Having helped thousands of WordPress users get started with blogging, we know exactly what it takes to build a stunning blog from the ground up.
Whether you’re an absolute beginner or just in need of a refresher, in this guide, you’ll find everything you need to get your blog up and running.
We’ve broken down this guide into 12 different chapters:
- Chapter 1: Why Start a Blog?
- Chapter 2: Choosing a Blogging Platform
- Chapter 3: Creating a Blog – Technical Guide (Step by Step)
- Chapter 4: Configuring Your WordPress Blog Settings
- Chapter 5: Essential Plugins & Tutorials for Your WordPress Blog
- Chapter 6: Working with WordPress Editor to Create a Blog
- Chapter 7: Creating WordPress Pages
- Chapter 8: Writing Your First Blog Post
- Chapter 9: Promote Your Blog
- Chapter 10: WordPress SEO: Getting Started
- Chapter 11: Monetize Your Blog
- Chapter 12: Resources to Learn and Master WordPress
In this step-by-step guide, we’ll walk you through how to start a blog from the ground up in less than an hour.
If you’d rather cut straight to the chase and dive into the step-by-step technical tutorial, then go for it.
Chapter 1: Why Start a Blog?
Blogging has come a long way since its inception. Initially, it was used by individuals for sharing their personal thoughts and opinions. Now even businesses around the globe leverage blogs for expanding their reach and to generate new leads.
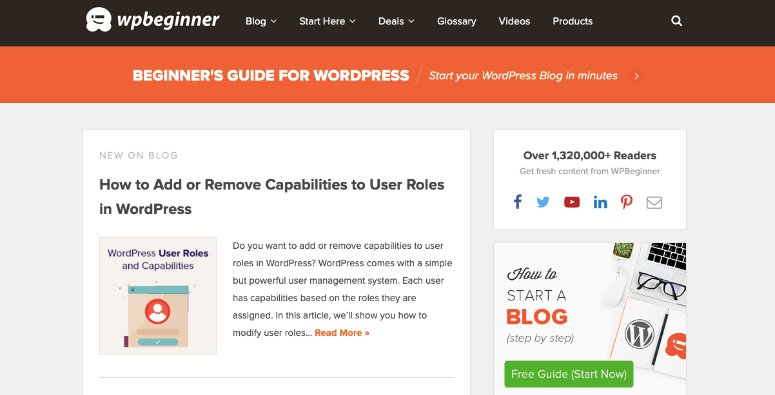
When it comes to blogging, having a purpose is critical, or you’ll lose the direction and inspiration as time passes. When you blog with a purpose, your readers will connect with it because that purpose shines through in your writing. Good examples of blogs with a purpose are our very own IsItWordPress blog and the WPBeginner blog:
Here are some of the reasons why people blog:
Journal/Personal Blogging
Some people blog to document everything they have going on, so they can keep track of their progress. It helps you connect with like-minded people in the community and build long-lasting relationships with them.
Make Money Blogging
A lot of people start a blog with a single goal: to make money online.
Your blog can be your semi-passive income source, meaning you can earn money even when you’re not actively updating it. Some of the ways you can monetize your blog are:
- Advertising: Sell ad space on your blog and generate a steady stream of income from it.
- Affiliate marketing: Join affiliate programs and refer products to your audience and generate revenue when they purchase using your referral links.
- Sell products: Create a product that you know your audience will love and sell it on your blog.
Establish Yourself as an Authority
In this crowded digital era, to be a successful blogger, you need to demonstrate your expertise and establish yourself as an authority. In order to do this, you’ll have to keep an eye on trends in your niche and consistently blog about them.
Be sure to offer tips and recommendations to your audience on a regular basis so they’ll realize your blog is a go-to resource when it comes to everything related to your niche.
1.1. Choose the Right Niche for Your Blog
When starting a blog, it’s imperative to realize that blogging isn’t always going to be rainbows and unicorns. Blogging is a marathon, not a sprint.
To run a blog on a long-term basis, you’ll need to be persistent. And to be persistent, you’ll need to consider a few different things when choosing a topic for your blog:
- Passion: For persistent blogging, you’ll need to choose a topic that you’re really passionate about. You can’t continuously write about a topic that doesn’t excite you.
- Traffic volume: Just because you love a topic doesn’t always mean it’s the best one for starting a blog. If no one else wants to read a blog on the topic you’re about to choose, then you’ll need to reconsider the topic before jumping in.
- Purpose: Consider the purpose of your blog when you decide on a topic. For instance, if you want to make a living from advertising, but the niche is too narrow with low traffic volume, then you might want to expand your niche or change your monetization strategy.
1.2. Unlearn Conventional Writing Lessons
Blogging is a bit different from conventional writing. If you’re an aspiring blogger, then you might have to unlearn a few things that you were taught in your English classes.
For example, when you’re blogging or writing for the web, it’s advised to craft short sentences and even shorter paragraphs, so readers can quickly consume your article. This is mainly because people have shorter attention spans on the web.
Another difference is that print editors often recommend writers write in the third person. However, bloggers are expected to write in a first-person voice. By writing in a first-person voice, you’re talking directly to your readers just like you would with your friends.
Aside from talking to your readers directly, you’ll also have to optimize your blog posts for search engines. This’ll help search engines discover and index your website, so you can attract more search engine traffic, also known as organic traffic, to your blog.
↑ Go back to Table of Contents
Chapter 2: Choosing a Blogging Platform
The blogging platform you choose can make or break your blog.
Not every blogging platform is created equal. It’s easy to get overwhelmed with all the different blogging platforms available. So, before you jump in, it’s worth taking a moment to examine a few different factors:
- Your blogging purpose: When choosing a platform, it’s essential for you to check if it aligns with your blogging goals.
- Usability: Obviously, you’ll need to choose a platform that’s easy to use. With an intuitive platform, you can easily get things done with a minimal learning curve.
- Monetization: Double-check if your blogging platform of choice allows you to monetize your blog with ads. For instance, some platforms, like free WordPress.com, don’t allow you to monetize your blog. That means such a platform isn’t a good fit for you if your goal is to make money blogging.
2.1. Best Blogging Platforms Showdown
Now that you know what factors you’ll need to consider, let’s take a look at some of the best blogging platforms in existence.
WordPress.org

Without a doubt, WordPress is the most popular blogging platform out there. Originally, WordPress was started as a blogging platform, but it’s now transformed into a full-fledged open source content management system (CMS).
With WordPress, you can build any kind of website you can imagine, such as an eCommerce store, forum, niche social network, etc.
We highly recommend you start with WordPress because it gives you full control over your blog. Also, check out our article on the best WordPress books including the books on creating a website or blog with WordPress.
Pricing: To build a blog site, you’ll need to purchase a domain name and web hosting account. A domain name costs around $14.99 per year and web hosting costs around $8.99 per month. We’ve worked out a deal with Bluehost for IsItWP users, so you only have to pay $2.95 per month.
That means you get 70% off on WordPress hosting and a free domain name.

Wix is a free website-building platform that also allows you to create a brand-new blog from the ground up. There are also premade website templates if you don’t want to start from scratch. To create a blog with Wix, you’ll need to integrate the Blog app into your Wix website. The free Wix plan lets you use 500 MB of storage and 1 GB of bandwidth.
Pricing: To remove Wix branding and enhance the built-in features, you can purchase a premium plan, starting at $8.50 per month.

WordPress.com is a free blogging platform managed by the same folks as WordPress.org. With WordPress.com, you can create a free blog, without purchasing a domain name. You can upgrade your subscription for enhanced features, such as a custom domain, monetization, additional storage, etc.
Make sure to check out the differences between WordPress.com and WordPress.org.
Pricing: You can start a basic blog for free. For $48 per year, you can connect a custom domain name and remove WordPress.com ads. To monetize your blog, you’ll have to get the Premium plan for $96 per year.

Blogger is a free blogging platform by Google. Blogger allows you to start a blog and monetize it with ads without having to spend a dime. While it comes with all the features you’ll need to run a blog, you can’t add enhanced functionalities like an eCommerce storefront.
Pricing: Blogger is a 100% free blogging platform.
2.2. Why Do We Recommend WordPress.org to Create a Blog?
We recommend using the self-hosted WordPress.org platform to everyone because it’s a truly superior blogging platform. We use it on all of our websites, including this one!

The main difference between self-hosted WordPress and other options is that it gives you full freedom and control over your site. You can customize the look and feel as needed. You can monetize your website however you like. You can even add an online store to your blog.
Last but not least, nobody can delete your blog just because you didn’t follow their terms of service. See this guide to see the full list of differences between WordPress.com vs WordPress.org.
Also, check out this article on moving a blog from blogger to WordPress.
Now that we’ve chosen the platform, let’s take a look at what do you need to start a WordPress blog.
↑ Go back to Table of Contents
« Previous: Chapter 1 – Why Start a Blog?
Chapter 3: Creating a Blog – Technical Guide (Step by Step)
Starting a blog isn’t rocket science. With the right set of tools, it’s easy to get your blog up and running.
No matter what kind of blog you’re looking to create, you’ll need to have a few things in hand, such as a domain name, a blogging platform, and web hosting.
After setting up the blog, you’ll need to customize its appearance, add essential functionalities, and more.
In this chapter, we’ll explain:
- How to choose a domain name
- How to set up a domain name and web hosting
- How to install WordPress on your host
- How to install a WordPress theme to customize blog’s appearance
- How to install a WordPress plugin to add functionalities
3.1. How to Choose a Domain Name
Registering a domain name is easy and cheap, but it’s important to choose the right domain name for your website that’s easy to type and remember.
Your domain name will also be your blog name and serves as your blog’s address on the internet, like Google.com or IsItWP.com. It’s what your customers type in their browsers to access your website. A domain name normally costs around $14.99 per year.
Let’s take a look at a few different approaches you can follow to choose a domain name for your blog.
Go for a Brandable Domain Name
Gone are the days when you can boost your blog’s search rankings with a keyword stuffed domain name. While including a keyword in your domain name can still have a positive impact, stuffing with keywords could negatively impact your SEO efforts.
When choosing a domain name, it’s advised to go for a brandable domain name, like ProBlogger.com or OptinMonster.com over keyword-stuffed ones, such as copywritingtweaks.com or killercopywriting.com.
Not only are they easier to remember, but it helps you get a positive SEO impact in the long run.
Choose the Right Domain Extension
.com domains are so popular that people are more likely to type in [yourblog].com on their browser to visit your site. In fact, if you choose a different extension, then you might want to do extra work to get people to remember it.
Of course, we always recommend choosing a .com domain name for your blog. However, if .com isn’t available, you can go for .net or .org.
Use a Domain Name Generator
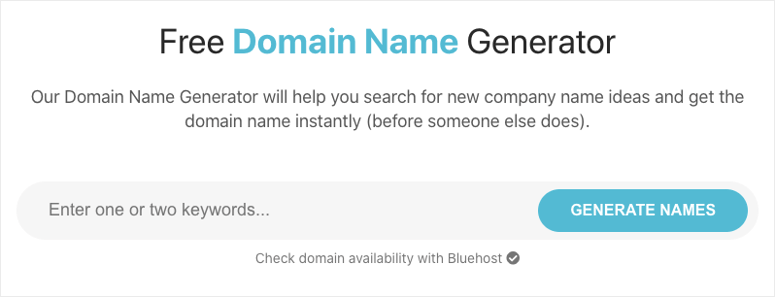
Choosing a perfect domain name for your blog can be intimidating because it’s highly likely that your first domain name of choice has already been taken. That means you’ll need to brainstorm your own domain name ideas and check for their availability one by one.
A domain name generator helps you save time by automatically generating tons of domain name ideas by simply entering one or two keywords.
You can choose IsItWP’s domain name generator to find the perfect domain name.
3.2. How to Set Up Domain Name and Web Hosting
Now that you’ve found a domain name, the next thing you’ll need to do is register it and set up web hosting.
If you’re new to the web space, below is the definition of a domain name and WordPress web hosting.
Domain name: Your domain name is your blog’s address on the internet, like Google.com or IsItWP.com. It’s what your customers type in their browsers to access your website. A domain name normally costs around $14.99 per year, but we’ll show you how to get one for free later in this article.
Web hosting: Your web hosting account is where your blog’s content and files are stored. Think of it as your website’s house. When a visitor tries to access your blog by typing your web address (domain name), they’ll be directed to the website files stored in your web hosting server. Web hosting typically costs $7.99 per month.
Also, check out these best blog hosting companies for reference.
When you’re first starting your blog, the combined cost of a domain name and hosting can seem like quite a lot.
That’s why we’ve worked out a deal with Bluehost to offer our users a free domain name, free SSL, and 70% off on WordPress hosting.
Click here to Claim this Exclusive Bluehost Offer »
Bluehost is one of the largest web hosting companies in the world. They’ve been involved in the WordPress community since 2005, and they’re an officially recommended hosting provider by WordPress.org.
Note: We believe in full transparency. If you purchase hosting using our referral link, then we will get a small commission at no additional cost to you. You’ll actually get a discount on hosting + a free domain + free SSL. We can get a commission from just about any hosting company, but we only recommend products that we truly believe will give value to our readers.
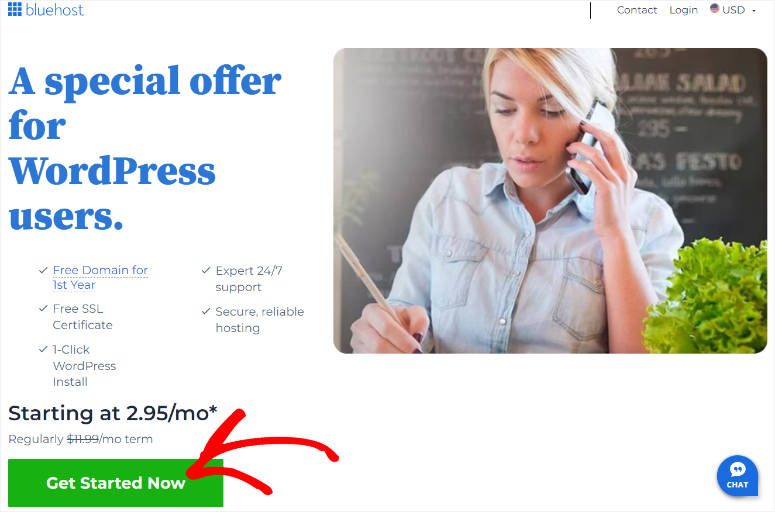
To start your WordPress blog, head over to Bluehost’s website and click the Get Started Now button.
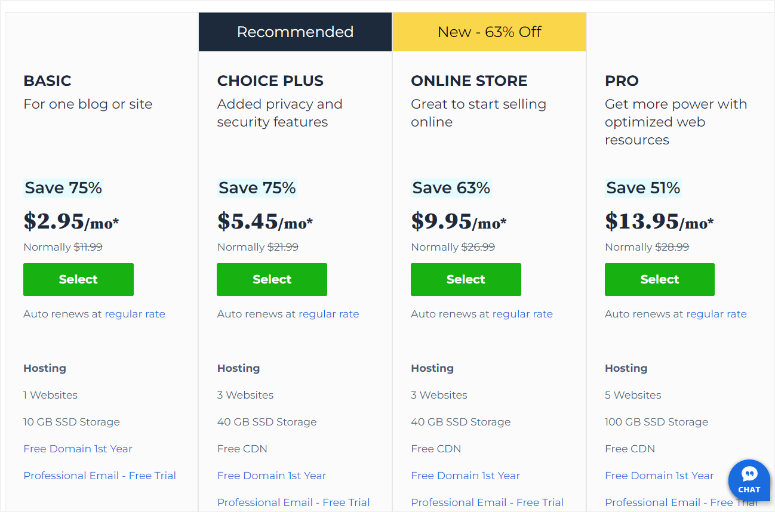
On the next page, you’ll be asked to choose a plan. Since you’re just getting started, you can choose the basic plan that also includes a free domain for the first year and free SSL certificate. You can always upgrade your account as your site grows.
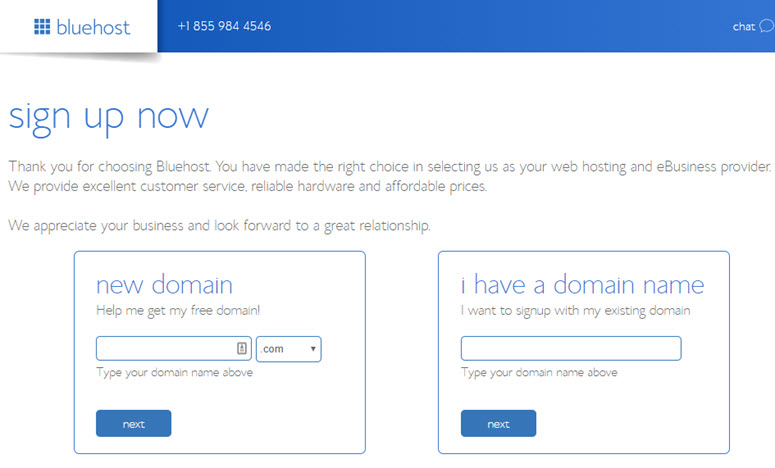
You can now either choose an existing domain you have or purchase a new domain for free. We recommend getting a new domain since it’s free.
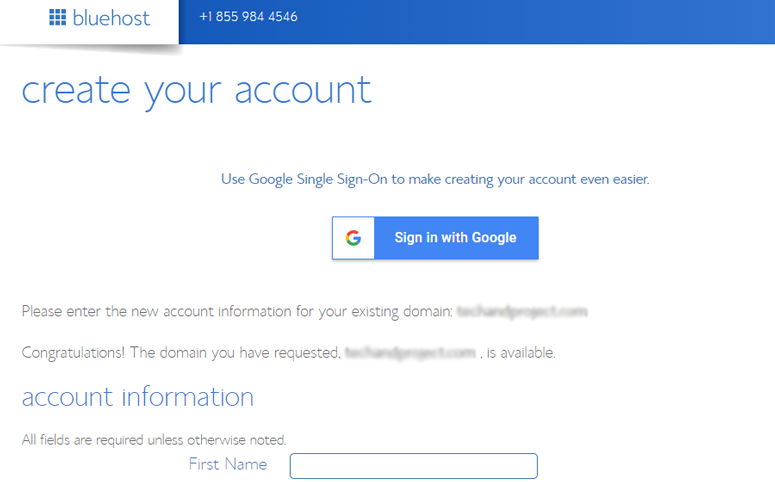
You’ll now be prompted to enter your account information. For easy registration, you can sign in with Google with just a couple of clicks.
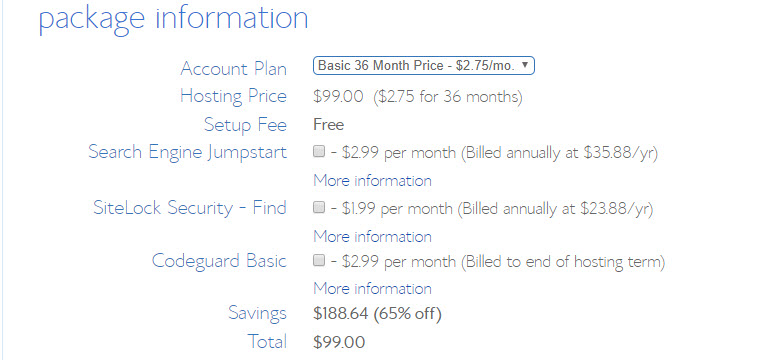
After entering your details, scroll down the page until you find the package information box. You can select the basic plan for 12 months, 24 months, or 36 months. You’ll also see that a few addons are preselected which increases the total price. You can uncheck these addons because you won’t be needing them right away. You can always add them later, if needed.
Note: Choosing the 36 months plan will get you the best value for your money!
Once you have configured your plan, scroll down the page further to enter your payment details. You’ll need to Agree to their Terms of Service and then, click Submit.
That’s it!
You’ve successfully subscribed to a hosting plan with the best web hosting company. You’ll be asked to create a password for your Bluehost account. After that, you’ll receive an email with details on how to log into your web hosting control panel (cPanel) where you can manage everything from hosting files to emails and support.
3.3. How to Install WordPress on Your Web Host
With Bluehost, you don’t have to go through a separate WordPress installation process because Bluehost now does it by default.
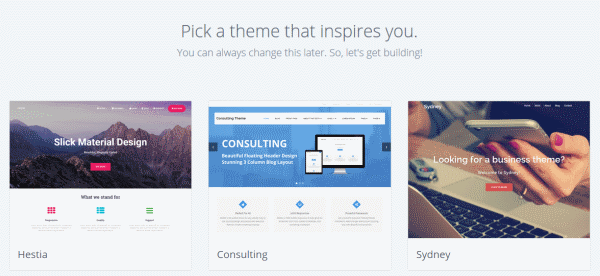
Inside your Bluehost account, all you have to do is choose your WordPress theme, then specify the name and tagline for your blog, and you’ll be ready to get started with WordPress.
After subscribing to your hosting plan, you’ll now be prompted to choose a WordPress theme. You can pick just about anything during this step because you can always change your theme later (we’ll show you how to do this in a later step of this tutorial). The most important part is to start building your blog, so go ahead and choose any theme that catches your eye just to get you rolling.
You’ll then be asked to choose the name and tagline for your blog.
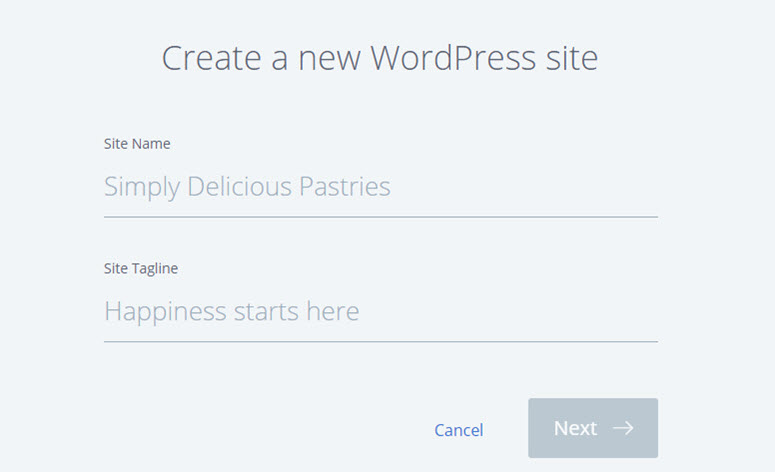
After specifying the details, click Next. Bluehost will now automatically install WordPress for you. Once it’s done, it’ll show you a screen like this:
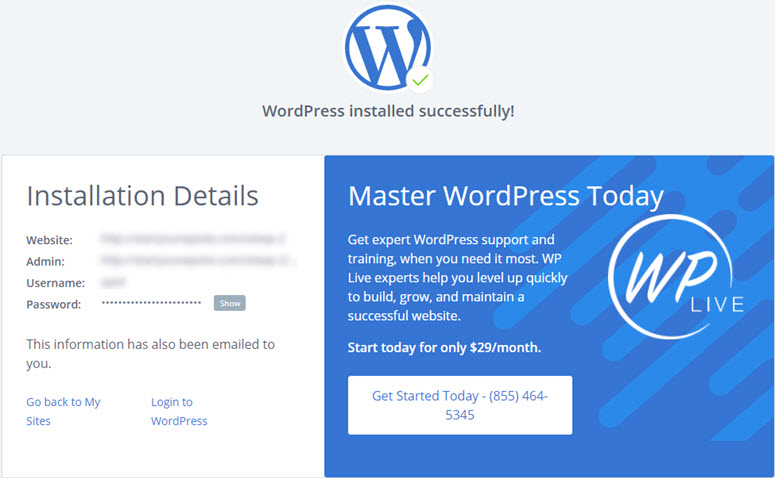
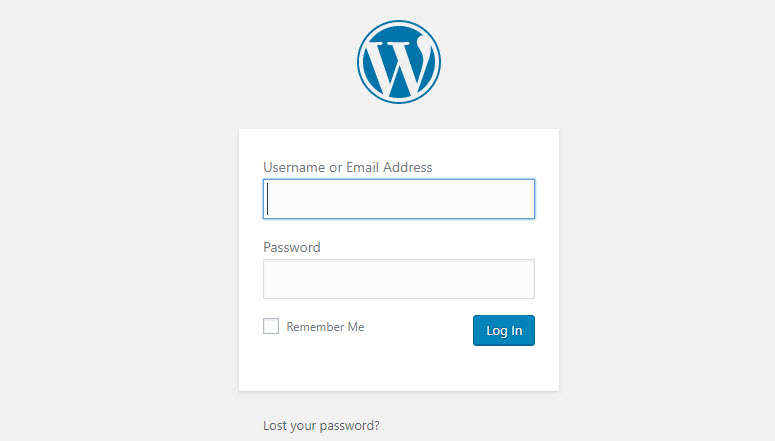
You can login to your site by appending wp-admin to your URL. Here’s what your WordPress login URL should look like:
http://example.com/wp-admin
You can now log into your WordPress site with the credentials sent to your email address.
3.4. How to Install a WordPress Theme
Now that you’ve logged into WordPress, changing the visual appearance of your blog is easy. All you have to do is find the right WordPress theme and install it on your WordPress blog.
The default WordPress theme is good, but if you want a different look and feel for your site, then you can find an alternative theme from the official theme directory and install it on your site.
But before you choose a random free theme for your blog, take a look at our list of top WordPress themes and decide which one would be the best choice.
If you choose a premium theme, then it has to be downloaded from the theme vendor’s site and uploaded to your WordPress.
If you decide to go with a free WordPress theme from the official theme repository, then you can search and install it directly from your WordPress dashboard without having to download it to your computer.
To install a free theme, navigate to Appearance » Themes in your WordPress dashboard. Then click the Add New Theme box.
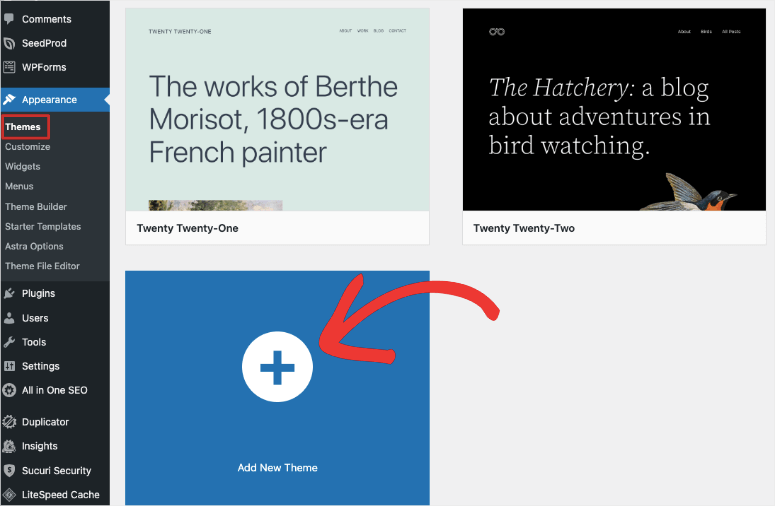
You will see some featured themes in your dashboard. Before installing a theme, you can preview it by clicking on the thumbnails displayed.
You can also filter themes based on layouts, features, and blog niches by clicking on the Feature Filter button.
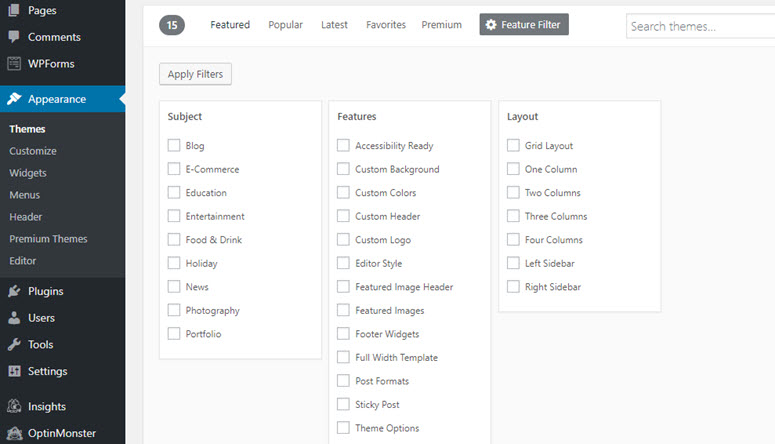
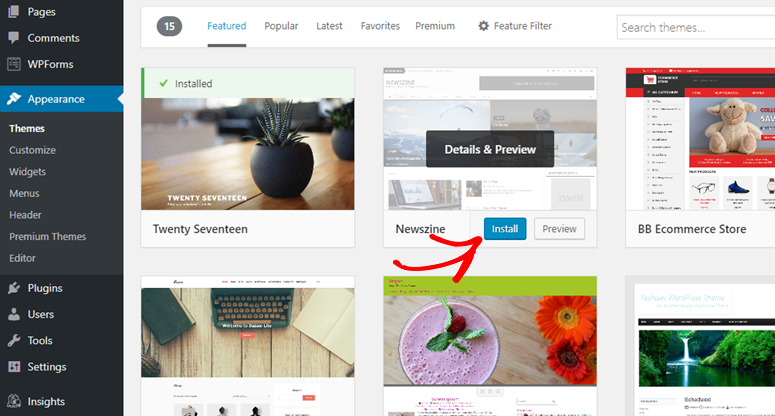
In the right-hand corner, type the theme name in the search bar. Once you’ve found the right theme, hover on its image and then click the Install button. Next, you need to click Activate to change your blog’s appearance.
3.5. How to Install a WordPress Plugin
Now that you’ve installed a WordPress theme, you probably want to know how to enhance your blog by adding features like a contact form, photo gallery, etc.
With WordPress, you can find thousands of free plugins (apps) that let you easily add additional features to your blog without having to touch a single line of HTML code. Just like WordPress themes, you can easily find and install free plugins from the WordPress plugin repository within your WordPress dashboard.
All you have to do is to visit the Plugins » Add New page and use the search box in the right-hand corner to find a plugin. Once you find the plugin you’re looking for, it’s a simple one-click install using the Install Now button and then click Activate.
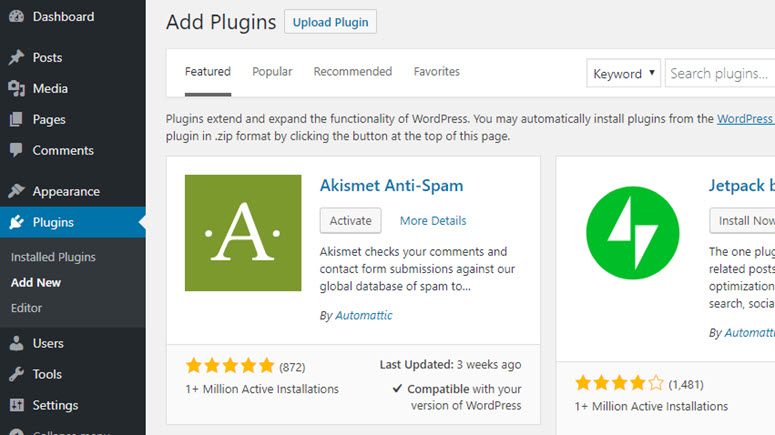
Plugins are extremely helpful especially for new bloggers because you can get all the features you need at the click of a button.
↑ Go back to Table of Contents
« Previous: Chapter 2 – Choosing a Blogging Platform
Chapter 4: Configuring Your WordPress Blog Settings
By now, you’ve had your basic blog setup.
You already know how to change a WordPress theme and install plugins. So far so good.
Before you jump in and start publishing articles on your blog, you’ll need to change some default blog settings and adjust them to your preferences. Let’s take a look…
4.1. Choose Your Permalink Structure
In WordPress, a permalink is the web address / URL of the content you publish on your site. It’s what people enter into their browser address bar to visit the web pages of your site.
The wrong permalink choice can hurt your search engine traffic and referral traffic, so it’s essential for you to choose the right one when setting up your site.
The default permalink structure known as Plain contains some random numbers in your URL, which tells nothing about your content, so pretty much any other choice is better. Pick the one that best suits your needs.
To choose the right permalink structure, go to Settings » Permalinks in your WordPress dashboard.
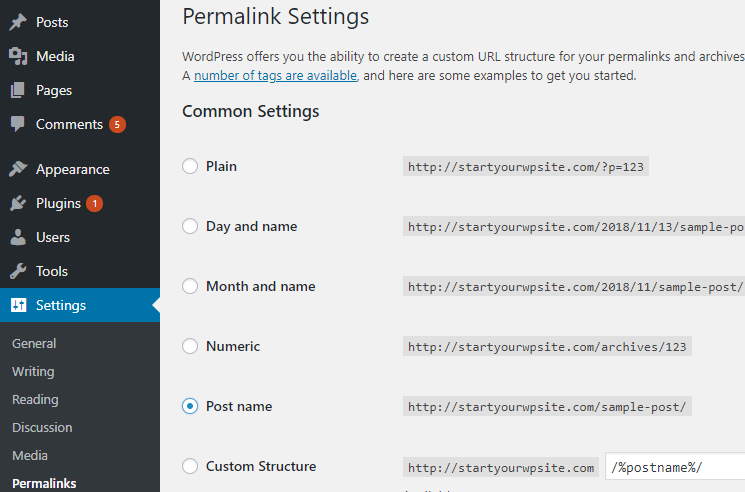
If you don’t have any preference, you can simply choose the Post name option from the list. Now when you publish a new blog post, it will follow this URL structure.
4.2. Choose Search Engine Visibility
WordPress comes with an option that allows you to easily discourage search engines from indexing your site with a single click. Not to mention, you should never check this option if you’re running a publicized website or blog.
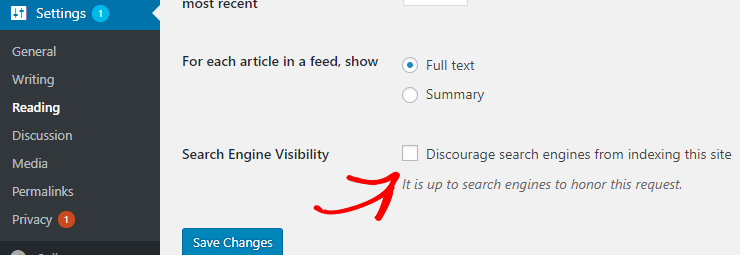
However, below are a few use-cases when you want to consider discouraging search engines from indexing your site.
- Private content: You may not want to index your private content behind a paywall like a membership site, which is created specifically for your members.
- Test / development / demo site: To avoid a duplicate content penalty for your production site, you might want to de-index your development site from search engines.
- Dynamic content: Similarly, you might want to discourage search engines from indexing your site if you create dynamic content that updates too frequently.
4.3. Configure WordPress Customizer
Want to instantly update your theme settings while previewing your site’s appearance?
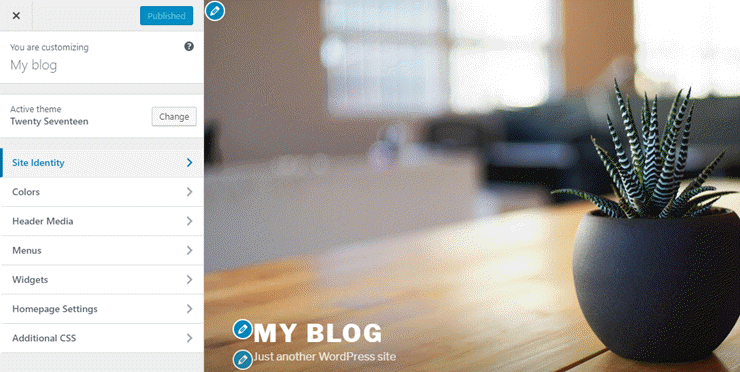
It’s now possible with WordPress Customizer. WordPress Customizer lets you preview what your site content would look like with a different theme, with different theme settings, and more.
For example, you can set your Site Title, Tagline, and Favicon easily.
To change the settings, all you have to do is navigate to Appearance » Customize.
4.4. Create a Navigation Menu
The navigation menu provides quick links to some of the most important pages of your site. In WordPress, the navigation menu is a theme feature that appears in the header of the page.
Its appearance and display are controlled by your WordPress theme. Once you have some important pages created, you can go ahead and set up a navigation menu.
To add, edit or manage your navigation menu, go to Appearance » Menus. Then, click create a new menu.
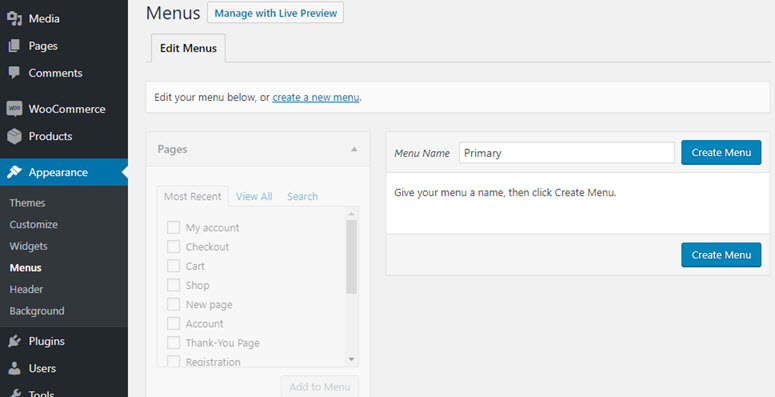
You’ll now be prompted to specify Menu Name.
As you can see in the screenshot, our theme supports 2 different menu locations: Top Menu and Social Links Menu. Keep in mind that menu locations and their names vary from theme to theme.
Next, select the pages that you want to add to the menu and then, click Add to Menu.
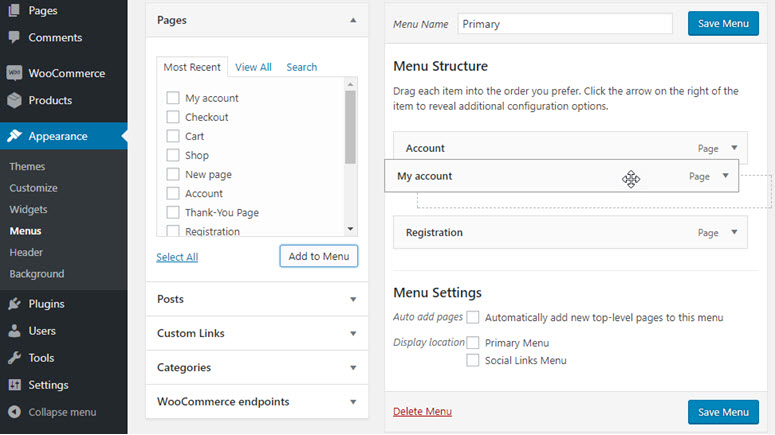
You can reposition the menu with drag and drop. You can then choose the menu location and click the Save Menu button.
4.5. Set Up Sidebar/Footer Widgets
WordPress widgets are simple movable elements that let you easily customize your website. You can use widgets to do a variety of things, such as displaying recent posts, popular comments, email signup box, etc.
You can add widgets to widget-ready areas of your website. Usually, this means your blog’s sidebar, but many themes support adding widgets to the footer as well as other sections on the homepage.
To add widgets to your widget-ready areas, such as the sidebar and footer, follow the below steps.
Navigate to Appearance »Widgets.
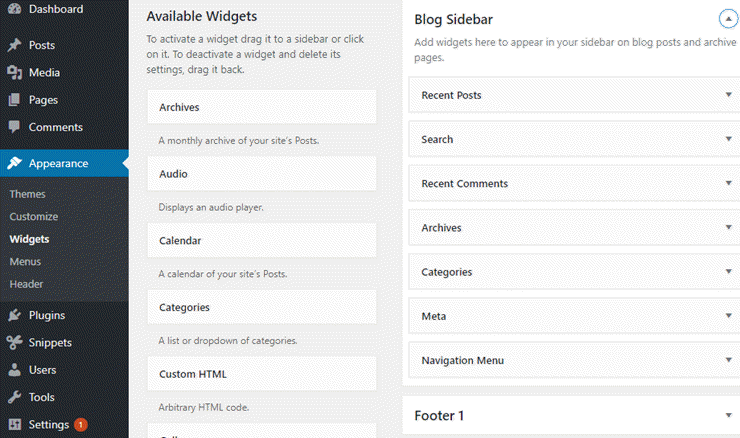
In the left-hand panel, you can find a list of available widgets. You can find a few different boxes on the right-hand side, which are widget-ready areas supported by your theme.
In our example, our widget supports 3 different widget-ready areas: sidebar, footer 1, and footer 2.
To add a widget, all you have to do is drag it to any widget-ready area.
4.6. Decide on Accepting Comments
Comments are the lifeblood of any blog or online publication. Blogs are not monologues. They’re built for having a 2-way conversation with your readers through comments.
With blog comments, you can encourage your readers to engage with you and other readers. But you always need to moderate your comments before it goes live. That way you can ensure only legitimate comments get published.
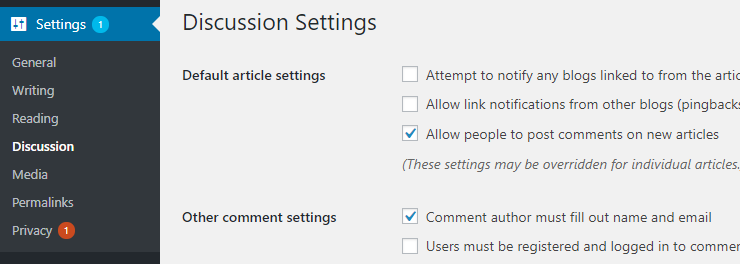
By default, WordPress allows users to comment on your blog. If you don’t want to accept comments, you can go to Settings » Discussion, and then uncheck the box next to Allow people to post comments on new articles.
4.7. Decide on Allowing Pingbacks/Trackbacks
Just like comments, by default, WordPress allows pingbacks and trackbacks. Pingbacks and trackbacks allow other blogs to notify you whenever they link to you.
Since most pingbacks and trackbacks are spam, it’s in your best interest to disable them on your site. To do this, you can uncheck the box, Allow link notifications from other blogs by going to Settings » Discussions.
4.8 Set Your Desired Time Zone
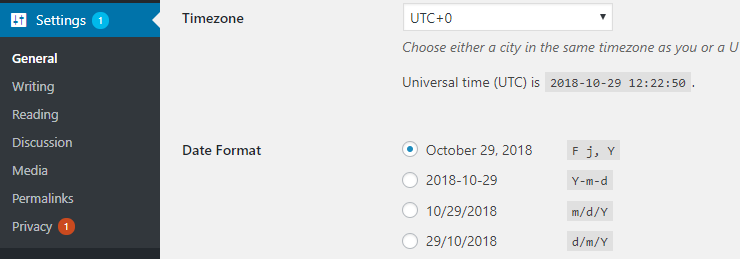
The default WordPress time zone is UTC +0. After installing WordPress on your site, you might want to change the time zone to your preference. This makes it easy for you to schedule your posts in advance.
To change the time zone, go to Settings » General and then, either choose a City or a UTC timezone offset.
↑ Go back to Table of Contents
« Previous: Chapter 3 – Creating a Blog – Technical Guide (Step by Step)
Chapter 5: Essential Plugins & Tutorials for Your WordPress Blog
Being an open-sourced platform, WordPress is home to over 50,000 plugins and themes contributed by WordPress users.
Having the right set of plugins in your toolbox is necessary to expand the core features of your WordPress blog, especially if you’re a blogging newbie.
Every blog is unique in terms of audience, content, web design, and features. However, there are some common plugins that almost every blog will have to install. Since it’s quite easy to get overwhelmed with all the different plugins available for WordPress that do almost the same thing, we’ve handpicked the best ones below.
We use these plugins on our own sites and recommend our users install them as well. For your convenience, along with the plugins’ names, we’ve also explained their use and provide links to the pro and free versions.
- Build contact forms with WPForms – Pro | Free
- Connect your site with Google Analytics using MonsterInsights – Pro | Free
- Improve your SEO with All in One SEO – Pro | Free
- Add an extra layer of security with Sucuri
- Make a regular backup with Duplicator – Pro | Free
- Get the best conversion-optimization tools – Thrive
- Improve WordPress performance with W3 Total Cache
- Prevent spam comments with Akismet – Pro | Free
- Grow your subscribers and sales with OptinMonster
These plugins take care of most of the hard work involved in running and maintaining your site.
Since a detailed explanation about ALL the plugins would be overwhelming, we’ll explain how to add just 3 of the most essential features to your blog using the plugins listed above.
- How to add a contact form with WPForms
- How to connect your blog to Google Analytics with MonsterInsights
- How to improve your SEO with Yoast SEO
5.1. How to Add a Contact Form With WPForms
Regardless of your blog’s topic, including a contact form on your blog is necessary. Adding a contact form to your blog makes it easy for your visitors to contact you.
WPForms is the best contact forms plugin for WordPress beginners. It lets you create a contact form with a drag and drop builder and allows you to publish it anywhere on your site with ease.
A few more benefits of using WPForms are:
- Create any type of online form hassle-free such as contact forms, donation forms, registration forms, signup forms, and more…
- All forms you create with WPForms will be 100% responsive meaning it works on mobile, tablets, and desktops.
- Seamlessly integrate your form with your favorite email marketing tools or third-party web apps.
- And more…
Read the complete WPForms review.
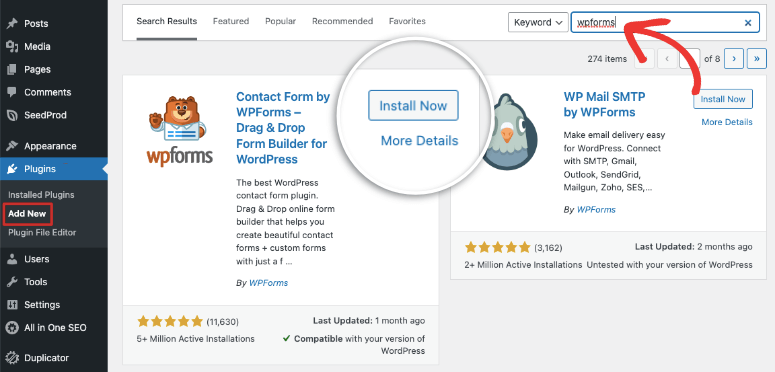
To create a form on your blog, first off, you’ll have to install WPForms by navigating to Plugins » Add New. Search for the WPForms plugin and, when it shows up, click Install Now, and then Activate.
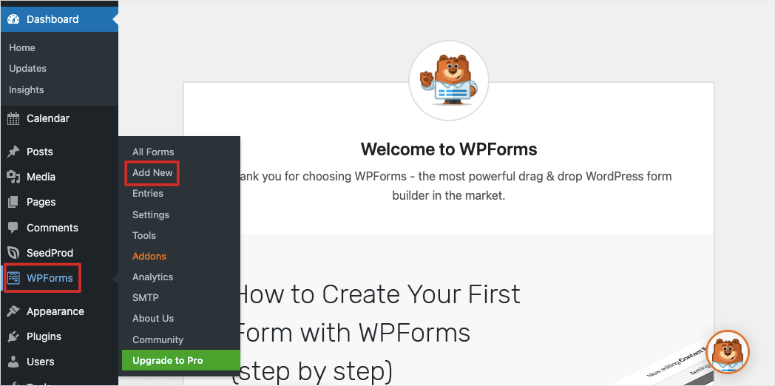
You’ll then be directed to the beautiful welcome page of WPForms. You can either click the Create Your First Form button or click WPForms » Add New to create your first form.
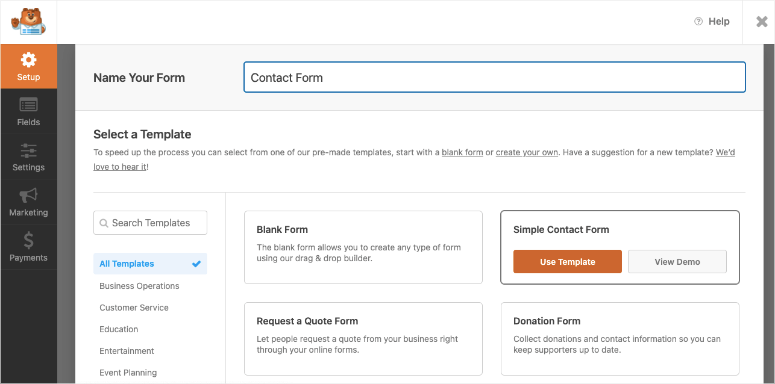
Next, you’ll be prompted to choose a template. You can select one of the premade templates or start with a blank form. If you want, you can give a custom name to your first contact form.
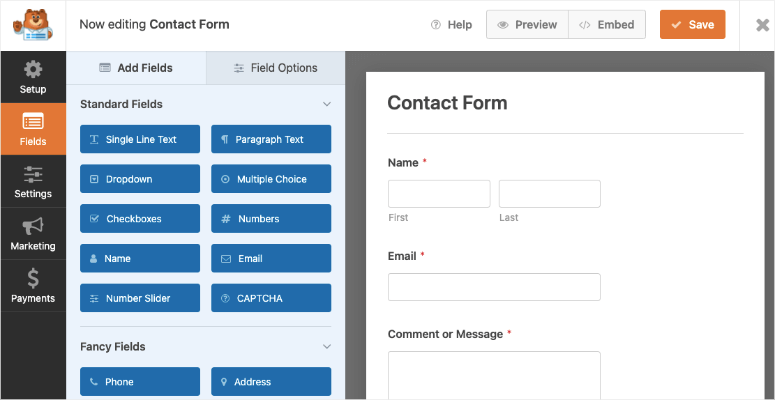
WPForms makes it easy to build a form and tweak it to your liking with drag and drop builder. Click on the appropriate form fields in the left panel to add them to your form. You can also easily re-arrange them and even remove any unnecessary fields with ease. After making the necessary changes, click Save.
Now you can add your form to any post or page, and even in your sidebar. When you’re editing a page for example, in the block editor, simply add a new block and select the WPForms block.
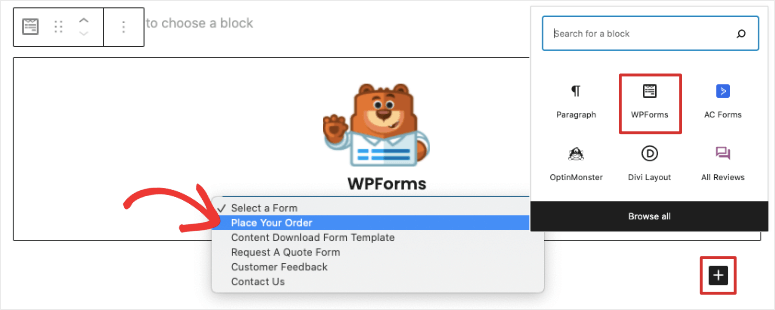
This will give you a drop-down menu in your editing area where you can select the form you want. You can preview the page to see how your form looks and hit the publish button.
That’s it! You’ve successfully published a contact form.
Want to create a contact form the easy way? Then, get started with WPForms today.
Want to start with the free version instead? Try WPForms Lite.
5.2. How to Connect Your Blog to Google Analytics With MonsterInsights
If you want to grow your blog traffic, then you need to understand how people are finding your blog and what they do once they’re on your blog.
The easiest way to track user interaction on your site is by using Google Analytics. Google Analytics is the best tracking solution for websites, and it’s free to use.
The MonsterInsights plugin makes it easy for you to set up Google Analytics on your WordPress blog. Plus, it allows you to make use of the full potential of Google Analytics tracking, like file downloads tracking, ads tracking, form submissions tracking, eCommerce transactions tracking, etc., without having to touch a single line of code.
Read the complete MonsterInsights review.
We have a full tutorial on how to set up Google Analytics as well as enable the new GA4 tracking. See our guide: How to Set Up Google Analytics 4 in WordPress.
Below we give you the basics steps you need to follow. Keep in mind you need to sign up for a Google Analytics account first.
To set up Google Analytics on your blog, head over to Plugins » Add New. Search for MonsterInsights and, when the plugin shows up, click Install Now and then, activate.
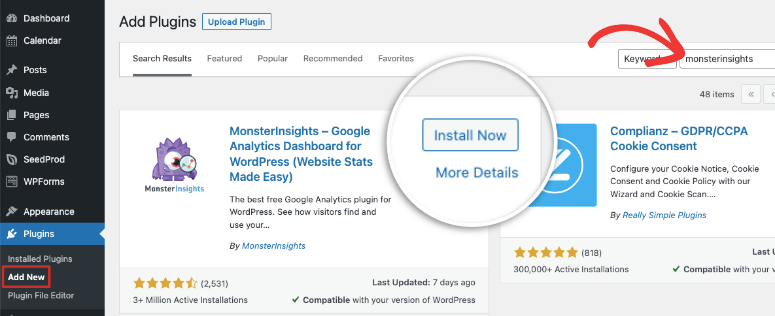
Now you can visit the MonsterInsights dashboard any time by clicking on Insights from the WordPress admin menu. When you activate the plugin, MonsterInsights will automatically launch the setup wizard on your screen. We recommend following this wizard because it will take you through the steps to easily connect your site to Google Analytics in under 3 minutes.
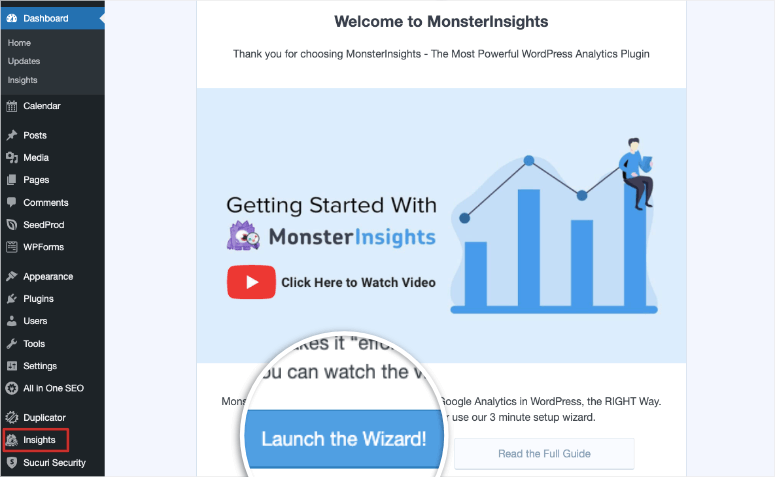
First, you’ll need to select the type of website you have. Then MonsterInsights gives you an option to enter your license key if you’ve purchased the pro version. If you’re using the free lite version, then you can simply go ahead and Connect MonsterInsights.
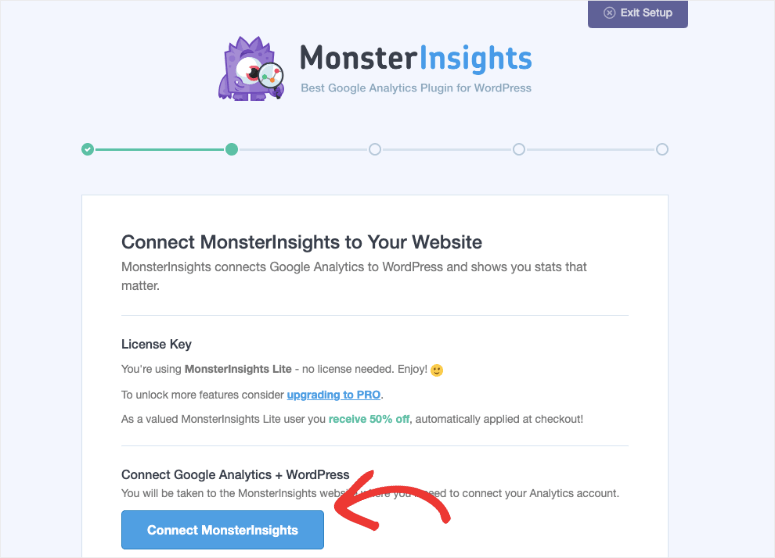
You’ll also need to select the Google Account you’ve used to create a Google Analytics account for your website. Then at the end, you need to click on Complete Connection.
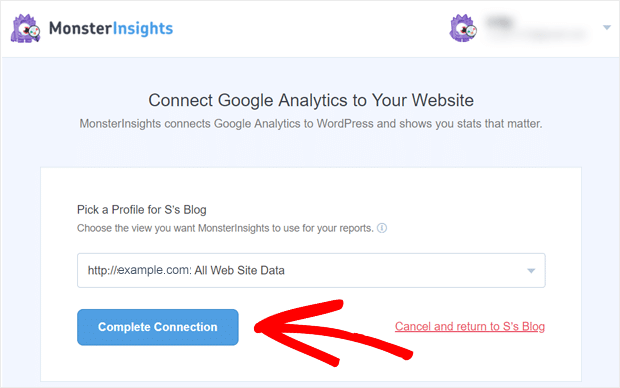
That’s it! You’ve successfully connected your blog to Google Analytics. MonsterINsights will start tracking your data and give you insightful reports right inside your WordPress dashboard.
Get started with MonsterInsights today to easily set up Google Analytics on your site.
Want to start with the free version instead? Try MonsterInsights Lite.
5.3. How to Improve Your SEO With All in One SEO
Want to attract a targeted audience to your blog? The best way to attract targeted visitors is to drive more search engine traffic, also known as organic traffic, by improving your website’s SEO.
According to OptinMonster, SEO is the practice of increasing your website traffic by getting your web pages to rank higher in search engine results. Visitors who arrive at your site via search engines are referred to as organic traffic.
SEO can get technical and complicated but thanks to free SEO plugins and WordPress SEO guides, it has gotten quite easy, even for beginners.
While you can find tons of different SEO plugins out there, we use and recommend All in One SEO. It’s the best SEO plugin on the market.
With All in One SEO, you can easily add meta tags and titles to your WordPress blog posts/pages. It also forces you to choose a focus keyword for your blog posts and pages to make sure you’re using the keyword appropriately on that page.
From your WordPress dashboard, go to Plugins » Add New. Search for All in One SEO in the search bar that you can find in the top right-hand corner. The All in One SEO plugin will appear on your page. Click Install and then Activate.
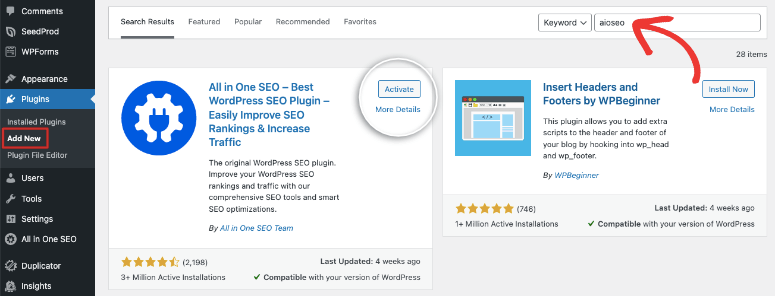
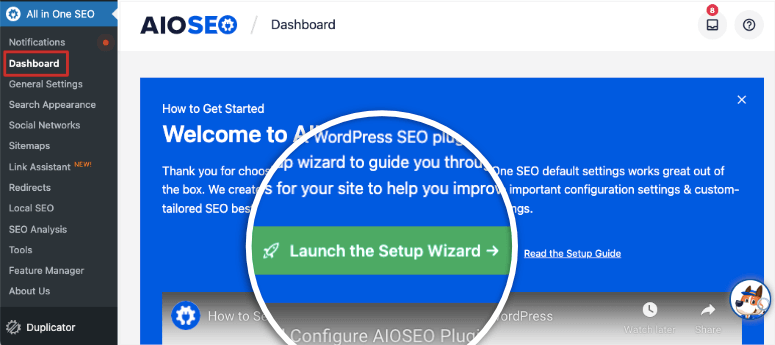
Setting up All in One SEO is easy using the setup wizard. Simply open the dashboard and click on Launch the Setup Wizard button.
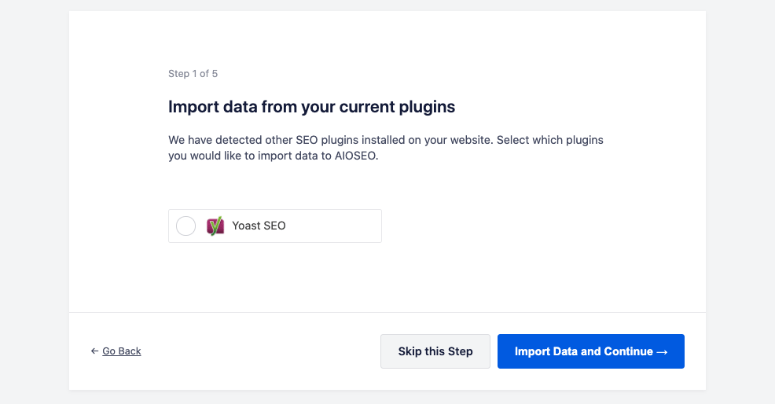
First, you have the option of importing your SEO settings in case you were using another plugin like Yoast SEO. You can either import your data or skip this step if you don’t have previous SEO settings.
In the next step, you can select a category for your website. This will help you rank on search engines for the relevant category. If you’re starting a blog, select the Blog category.
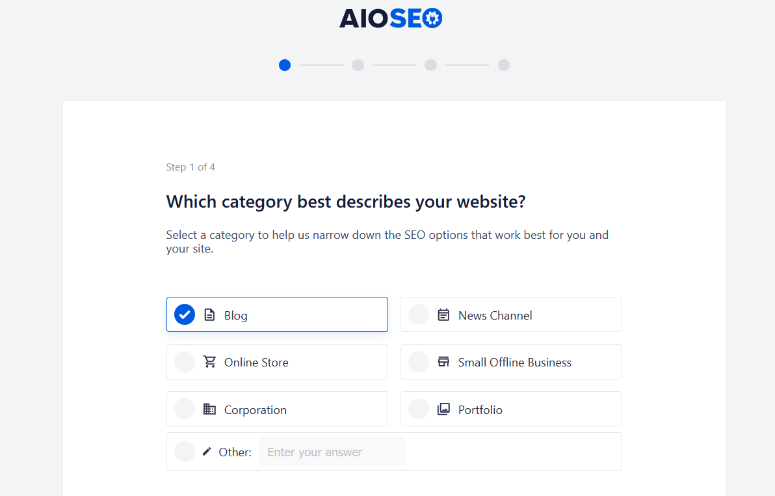
On this page, you can also set your home page title and meta description. Once you’re finished, click the Save & Continue button at the bottom of the page to move on to the next step.
On the next page, you can add additional information about your site. You can choose whether it represents a person or an organization. If you select Person, you can add your default social share image.
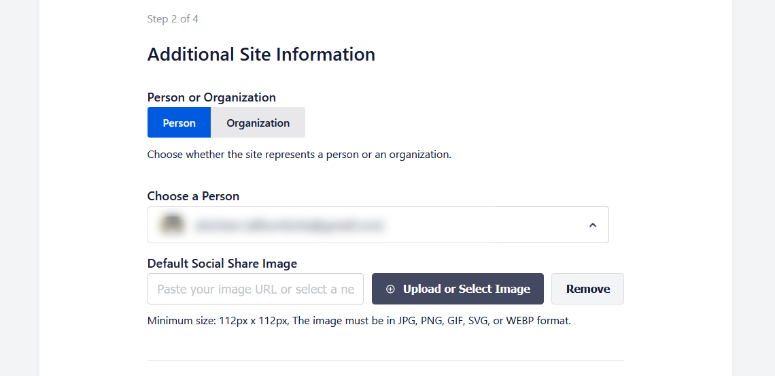
If you pick Organization, you can add your organization’s name, phone number, logo, and more.
Further down the same page, you can connect to social profiles on Facebook, Instagram, Twitter, and more.
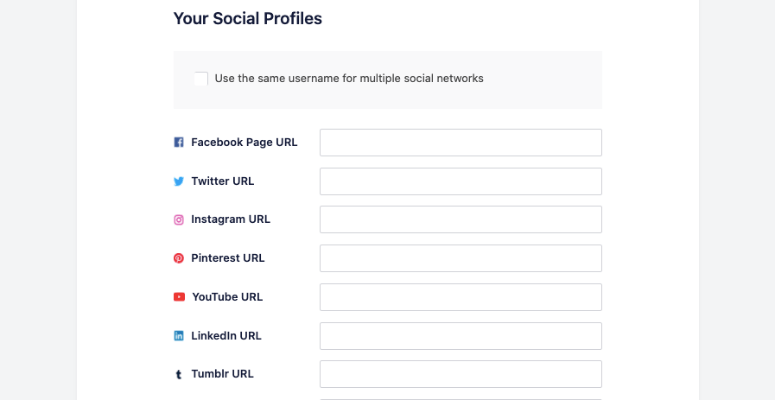
When you’re finished on this page, hit the Save & Continue button to go to the next step.
Now it’s time to pick the SEO features you want to enable on your site. On the next screen, e recommend enabling sitemaps, optimized search appearance, analytics, and image SEO on your site.
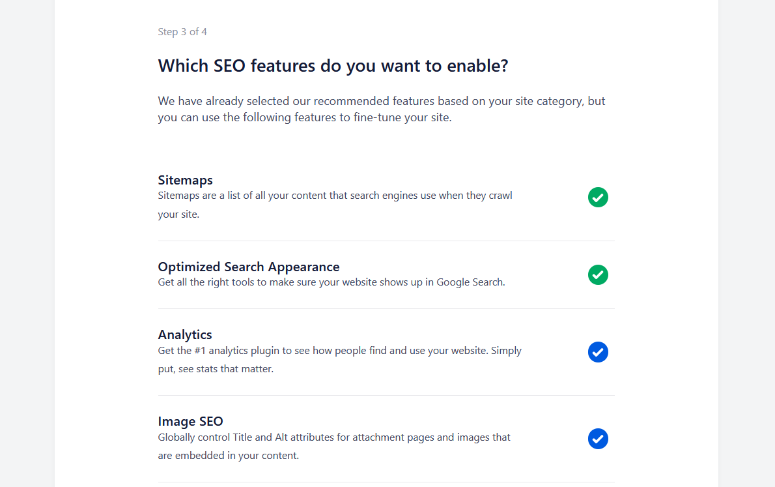
The best part of All in One Seo is that you can enable other features depending on the site you’re running.
After you’ve enabled the SEO features you want, click the Save & Continue button.
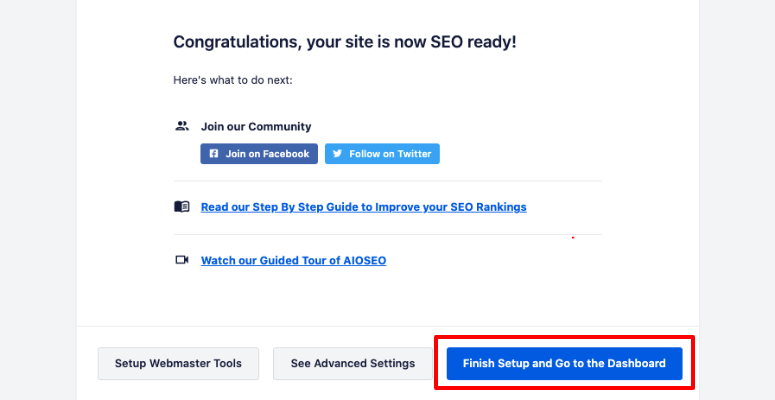
And that’s it! Your blog’s SEO is now set up and ready to go. Click on the Finish Setup & Go to the Dashboard button.
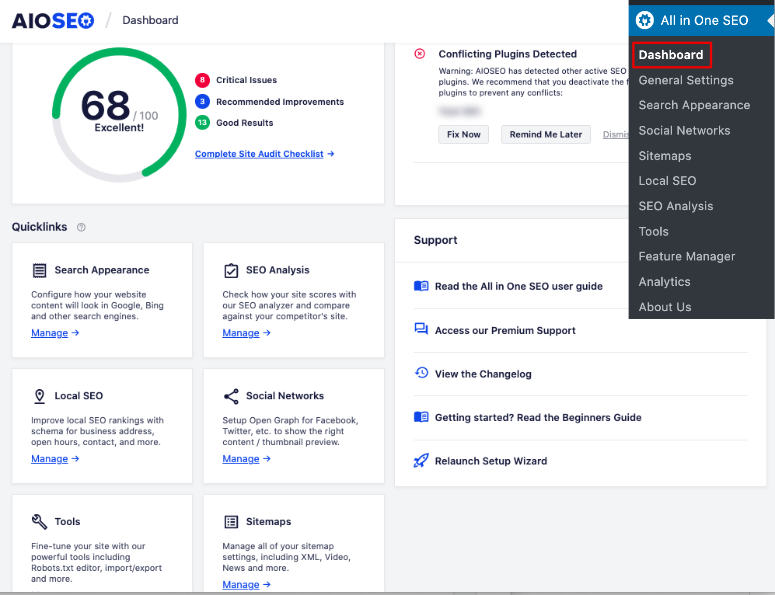
This will take you to the All in One SEO dashboard, where you can get an SEO score of your site along with errors and recommendations for improvement.
Before you publish new content, AIOSEO will give you suggestions to optimize your content so that it ranks high on search engines.
This plugin can turn an average blog into a great blog. Get started with All in One SEO today to improve your blog’s SEO.
Want to try it out for free instead? Check out the lite version of All in One SEO.
↑ Go back to Table of Contents
« Previous: Chapter 4 – Configuring Your Blog Settings
Chapter 6: Working with WordPress Editor to Create a Blog
WordPress boasts about being the best publishing platform in existence, in terms of popularity and flexibility. Of course, with a whopping 60% market share, WordPress beats the pants off all their competition.
However, the main downside is that the post and page editors aren’t as sleek as other blogging platforms. The legacy WordPress editor, which is now known as Classic Editor, has a word processor-style interface. It allows users to input text in either Text or Visual modes. Since it had been a part of WordPress for over a decade, existing users are accustomed to this interface.
However, editors of other publishing platforms, such as Medium or Ghost are way more intuitive than WordPress.
Related: How to Migrate From Medium to WordPress (No Downtime!)
To make adding rich content to WordPress easier and enjoyable, with the 5.0 release, WordPress is shipped with a brand new editor, known as Gutenberg.
In this chapter, let’s take a look at the differences between Gutenberg and Classic Editor.
6.1. Writing Content – Classic Editor vs. Gutenberg
By default, WordPress is shipped with Gutenberg editor, which lets you instantly preview your article right within the editor. Classic Editor, on the other hand, allows users to input text in either Text or Visual modes.
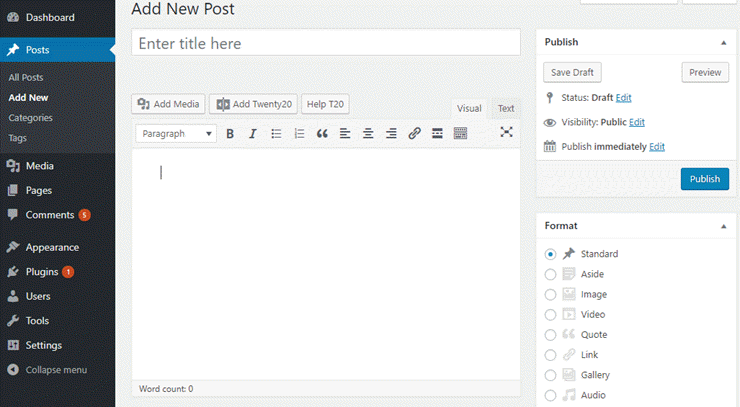
With Classic Editor, users can’t preview the finished page instantly while writing the content. Editing and moving different elements can also be a hassle. Users will have to switch back and forth between Text and Visual modes. They can also create spacing and sizing problems. This is where the Gutenberg editor comes in.
The Gutenberg editor lets you see what a finished page looks like while in the editor. That way you can adjust sizing and spacing in real time without having to switch to the preview panel. The entire editing experience has been rebuilt for media-rich content.
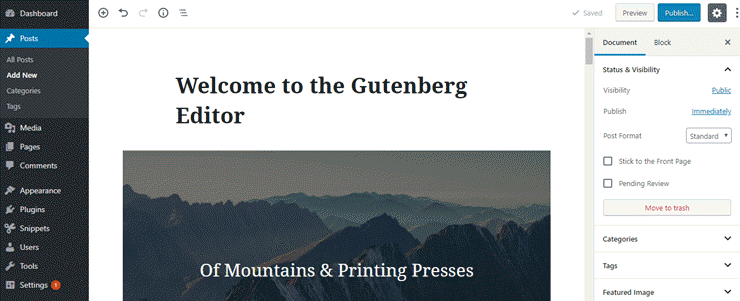
Gutenberg separates all the elements on your content into individual units called blocks. Unlike the Classic Editor, Blocks in Gutenberg help you easily customize the style and appearance of your multimedia content without the need of using custom code.
6.2. Deciding on Choosing a Page Builder
Without a doubt, Gutenberg is built to provide unmatched writing and editing experience on WordPress. Its goal is to make adding rich content to WordPress simpler and more enjoyable. However, it doesn’t mean to replace the page builder plugins for WordPress.
The built-in WordPress editors come with all the essential tools out of the box to create a basic page on your site. However, if you want to build an eye-catching page, then you might want to use a page builder on your site.
Not only does it help you create a custom layout for your web page, but you can also create a stunning page without changing your existing WordPress themes.
We recommend using SeedProd for building a custom page. SeedProd is packed with templates, smart sections, stock photos, and lots of customization options.
We also recommend Thrive Suite – It comes with premade themes, a theme builder, and conversion-optimization tools. You can also check out the best page builders for WordPress.
We hope now you have a basic idea about WordPress editors. In the next 2 chapters, we’ll explain how to create WordPress pages and posts.
↑ Go back to Table of Contents
« Previous: Chapter 5 – Essential WordPress Plugins & Tutorials
Chapter 7: Creating WordPress Pages
In WordPress, you can publish content either as a post or page. When you want to publish a regular blog article, you write a post and when you want to publish a standalone web page, like About or Contact pages, you write a page.
Another difference is that Posts allow you to organize the content using categories and tags, whereas pages allow you to apply custom templates and reorder them based on your needs.
7.1. Essential Pages You’ll Need
Homepage
Your homepage is probably the first page your visitors see on your blog. To warmly welcome your first-time visitors, you might want to customize your homepage. Just take a look at an example of IsItWP’s homepage for inspiration.
By default, WordPress sets your blog page as the homepage. However, you can create a page and choose it as your homepage. Before you dive in and create a homepage, below are a few things to consider.
- Built-in template: Check if your theme supports a homepage template. In that case, you can make use of it rather than creating a brand new homepage unless you want a different one.
- Full-width layout: If you want to set up a homepage on your own, you might want to choose a full-width / no-sidebar layout for the page. That way you can avoid sidebar elements from your homepage and easily create a highly customized page.
- Choose a page builder: You can find dozens of different page builders that help you create a stunning customized page on your own.
Once you have a page set up for the homepage, you can go to Settings » Reading.
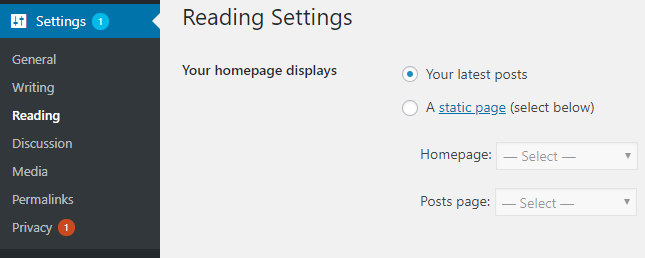
Then select “a static page” as your homepage and then choose your preferred homepage and posts page.
About Page
Creating an about page is a great way to build an emotional connection with your audience. On your about page, you can explain how you started, why and what values your blog stands for.
It’s essential for you to understand the motivations and fears of your audience before creating an about page. That way, you can create a compelling story of yourself that your audience can easily relate to. You’ll also need to figure out the right emotional ties to link your blog with your readers’ problems.
If you’re looking for inspiration, take a look at the about page of SyedBalkhi.com.

In the About page, Syed reveals the struggles he encountered throughout his journey as an entrepreneur. Since the blog’s targeted at aspiring entrepreneurs and marketers, readers can easily forge a connection with their daily lives.
Contact Page
Your contact page plays an important role in turning your website visitors into customers. If you want to encourage your audience to connect with you, then make sure to add a contact form to your contact page.
Compared to displaying an email address, having a contact form on your contact page makes it easier for your audience to connect with you. That way, your audience can get in touch with you without leaving your site.
You can use WPForms to build a contact form on your site, which is one of the best form builder plugins for WordPress. Follow our tutorial: How to Add a Contact Form to Your WordPress Website.
7.2. How to Create a Blog Page with Classic Editor
To use the Classic Editor, you need to install the Classic Editor plugin. Then head over to Pages » Add New and choose to edit with the Classic Editor.
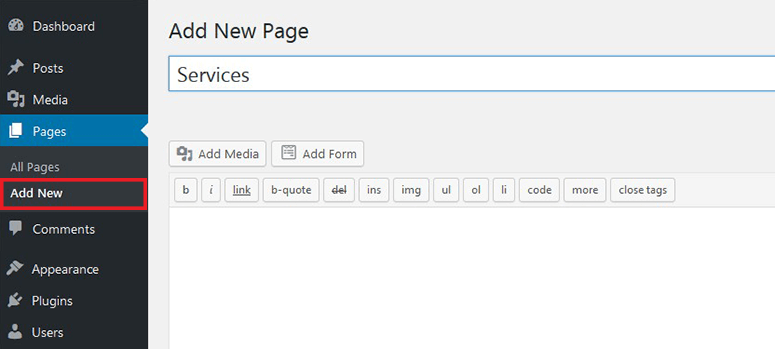
You can now specify a title for your new page and add some content in the text area.
The Page Attributes section allows you to choose a parent page. You can also nest pages based on your needs.
Some WordPress themes provide you with custom page templates. Choosing a template helps you easily add structural variations to your web pages.
After adding content, preview your page and then click Publish. You’ve successfully published a new page.
7.3. How to Create a Blog Page with Gutenberg
By default, WordPress uses the Gutenberg editor, also known as the block editor.
To create a page, head over to Pages » Add New. You’ll be prompted to add a title for the post. You can then start writing content, just like the Classic Editor.
Gutenberg allows you to easily add any content block you’d like such as text, images, galleries, hero images, buttons, etc. To add a block, all you have to do is click on the Inserter tool (+).
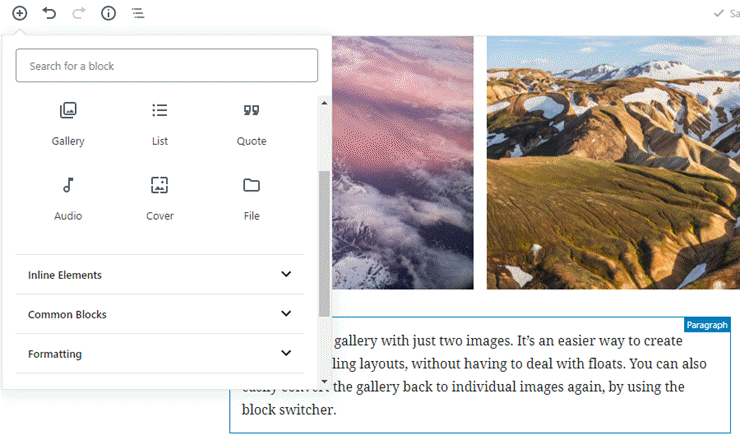
To find the Page Attributes section, click the gear button on the top right-hand corner and then, click on the Document tab. In-Page Attributes, you can choose a parent page and nest pages based on your needs.
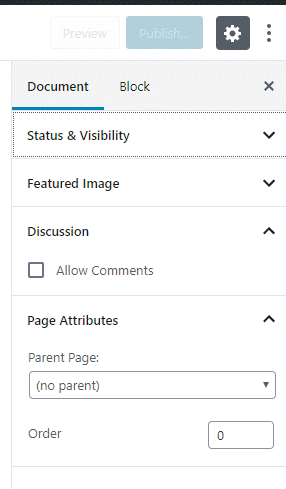
In the Document tab, you can change your page template to add structural variation to your pages.
To customize any Block, you can navigate to the Block tab and change the configurations of your selected Block.
↑ Go back to Table of Contents
« Previous: Chapter 6 – Working with WordPress Editor
Chapter 8: Writing Your First Blog Post
Now that you’ve created static WordPress pages and filled the sidebar and footer with the appropriate information, it’s time to start publishing your first blog post.
By this point, you might have already figured out the purpose and niche of your blog. If you don’t, you can go back to Chapter 1 to learn it.
8.1. How to Create a Post with Classic Editor
The first thing you’ll need to do is install and activate the Classic Editor plugin.
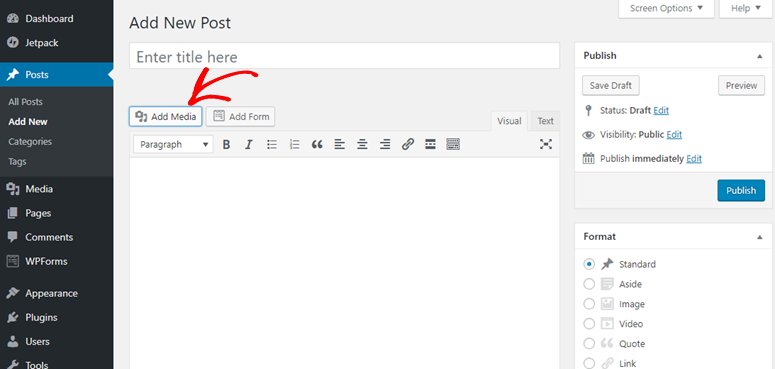
To create your first blog post, head over to your post editor by clicking Posts » Add New.
You will need to add a title to your post and start writing content in your post editor. To upload images to your blog, all you have to do is drag and drop your images into the text editor from your computer. Alternatively, you can use the Add Media button to upload your images and videos.
8.2. How to Create a Post with Gutenberg
To create a post, head over to Posts » Add New. You’ll be prompted to add a title for the post. You can then start writing content, just like the Classic Editor.
Gutenberg allows you to easily add any content block you’d like such as text, images, galleries, hero images, buttons, etc. To add a block, all you have to do is click on the Inserter tool (+).
8.3. Adding Categories and Tags
The content of your WordPress blog is organized by categories and tags.
Categories are basically a broad grouping of your blog posts. Think of it as general topics you cover or a table of contents for your blog. As they’re hierarchical, you can have as many subcategories for each one.
Tags are meant to describe specific details of your post. They can be used to micro-categorize your content and they’re not hierarchical.
Here’s how to add categories and tags with Classic Editor:
In your post editor screen, scroll down to the categories meta box on the right side. You can click Add New Category or simply choose from the existing categories.
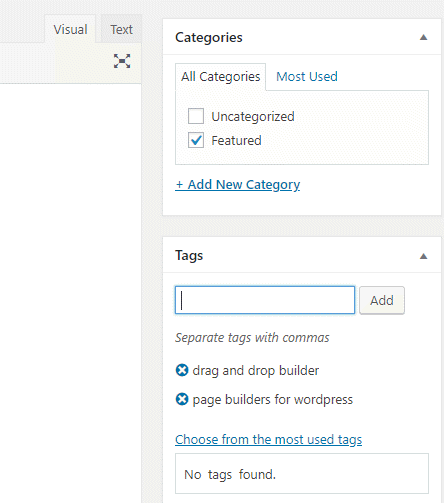
Similarly, using the Tags meta box, you can create new tags or choose from the existing tags.
With Gutenberg, to add a category and add tags to your blog post, you can click on the gear icon on the top right-hand corner of your editor. Within the Document tab, you can add categories and tags to your blog post. You can also change your featured image, excerpt, and even change the Status and Visibility options.
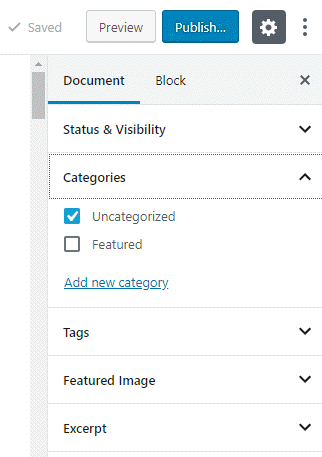
To customize any Block, you can navigate to the Block tab and change the configurations of your selected Block.
You can click on the 3 dots for changing the view of your editor. You can also switch to code editor if you’d like.
Finally, you can click the Publish button in the right-hand corner.
↑ Go back to Table of Contents
« Previous: Chapter 7 – Creating WordPress Pages
Chapter 9: Promote Your Blog
A blog without readers and engagement is a dead blog. There’s no value in maintaining a blog if no one wants to consume your content.
Just because you published some great content on your blog, doesn’t always mean that it could bring in loads of traffic. In fact, you’ll need to attract the right segment of readers who will love the type of content you publish. Otherwise, they won’t stick around, which won’t be profitable for you in the long run.
In this chapter, we’ll explain a few different ways to promote your blog.
- Create pillar content
- Email outreach
- Email marketing
- Social media
- Other ways
9.1. Create Pillar Content
Before you dive in and start promoting your blog, it’s essential for you to publish some pillar content on your site. In fact, no one wants to stick to a site that doesn’t provide value. That means, if you’re driving traffic to a blog that doesn’t have a solid foundation, like pillar content, then you’re losing some of your most valuable assets: time, money, and other resources.
Pillar content is the founding stone of your blog. Usually, it’s a series of blog posts that represent your best work, but it can also be infographics, videos, or any other type of content.
The main benefit of pillar content is that it brings in a rush of new visitors and backlinks. Since it provides some sort of value, your audience is more likely to stick to your blog and promote it. Best of all, it continues to attract more traffic – long after they’re initially posted.
Not sure what type of blog posts you should write?
Don’t worry! We’ll explain a few different types of blog posts that are proven to work.
- Tutorials and how-to guides: Explain how to do a tedious task step-by-step, in an easy-to-follow style. This particular guide that you’re reading right now is a perfect example of a tutorial.
- Listicles: List posts are always among the most-shared content on the internet because they’re easy to digest.
- Latest industry news: Keep an eye on the latest industry news and blog about it. You can even explain what each trend means to an average reader, and how they can embrace the changes in your industry.
- Controversial subjects: Talking about controversy can bring some readers to your blog but be cautious! Controversies can be highly emotional. Be aware of the language you use, and try not to be purposely malicious when expressing your thoughts.
Looking for more blog post ideas? Read 73 types of blog posts that are proven to work.
Bear in mind that blogging is a constant process. Just because you’ve created a series of posts, doesn’t mean that you’ve done with content. Remember, blogging is a marathon, not a sprint.
The success of your blog lies in how persistent you’re in terms of producing quality content. Now, you don’t have to produce one blog post every day. Have a publishing schedule and stick to it.
9.2. Email Outreach
Once you’ve laid a solid foundation for your blog by creating a series of pillar content, it’s time to step up and start promoting your blog.
Email outreach helps you promote your blog in a few different ways: You can drive traffic and backlinks, get press mentions, offer guest posts on popular blogs, and more.
Without a doubt, email outreach is the easiest way to develop a personal connection with influencers in your niche. Here’s how to do email outreach, the right way.
Step 1: Understand your purpose.
For example, you can start an outreach campaign to offer guest articles on popular blogs. Or if you want to build backlinks, you might want to pitch influencers and let them know you’ve produced valuable content on your blog that is worth linking to.
Step 2: Find email addresses based on your purpose.
If you’re looking to guest post, then create a list of email addresses of popular bloggers.
Step 3: Use an email finder tool like Hunter.io to create an outreach campaign. This lets you find emails of people you want to connect with it.
With the right strategies, email outreach can be very effective in building backlinks and driving traffic.
9.3. Email Marketing
Did you know that 95% of your first-time visitors will never return to your site? That means if you’re not building a connection with your first-time visitors and making them visit repeatedly, they’ll be gone forever.
Creating an email newsletter is the best way to build connections with your audience and encourage them to return to your site.
To create an email newsletter, you can choose an email marketing software like Constant Contact or MailChimp. You can occasionally send them useful emails to build a long-lasting relationship. Once in a while, you can promote your recent blog posts in your newsletter and encourage your subscribers in your email list to visit your site.
9.4. Social Media
Social media is one of the most reliable traffic sources for your blog. If you’re struggling to crack the code on driving social traffic to your blog, below are a few tips that might help.
Set Up the Basics
Create a profile for your blog on various social networking sites. You can showcase those profiles on your blog and encourage your users to connect with you. Great places to start include Instagram, Twitter, and Facebook. And if you want to build a community, Facebook groups are great for that.
Additionally, install a social sharing plugin like Shared Counts and make it easier for your users to share the content on social media. Smash Balloon is another great social media feeds plugin to showcase your social content on your blog.
Focus on One or Two Social Media Platforms
Focusing on every social network out there can spread yourself too thin. If you’re under a limited budget and resources, it’s in your best interest to focus only on one or two social platforms initially.
If you’re looking for inspiration on driving social media traffic, you can check out how to increase Facebook traffic by 332%.
Optimize Your Content
If you’ve ever shared a blog post on social media, you might have noticed that the social network automatically pulls out the image, title, and description of your content. This info gives a basic outline of the content you’re sharing, which entices other users to click on it.
If you can’t find a beautiful preview of your post while sharing it on social media, chances are your theme doesn’t support OG (Open Graph) tags. OG tags help social networks pull the right info from your link. If you’re having the same issue with the links you share, then you might want to check out how to fix Facebook incorrect thumbnail issue.
9.5. Other Ways to Promote Your Blog
Below are a couple more ways to promote your blog.
Blog commenting: Actively comment on popular blogs in your niche and get involved in the conversations. When users click on your name, they’ll be directed to your blog (provided that the blog you commented on allows backlinks from a commenter’s name).
Search engine optimization (SEO): SEO enables you to grow your website traffic by getting your blog posts to rank higher in search engines. With onsite and offsite SEO tactics, you can drive more targeted organic traffic to your site. You can find more on this in the next chapter.
↑ Go back to Table of Contents
« Previous: Chapter 8 – Writing Your First Blog Post
Chapter 10: WordPress SEO: Getting Started
Want to drive targeted traffic to your site from search engines? Search engine optimization (SEO) can be tricky due to the ever-changing search algorithms.
However, with the right strategy, you can grow your organic traffic despite the constant algorithm changes. By following the best SEO tactics, you’re allowing search engines to easily scan and index your website.
In this chapter, we’ll discuss the following:
- Keyword research
- On-page SEO
- Link building
10.1. Keyword Research
Keyword research is one of the most important aspects of SEO. Keyword research helps you understand what your audience is looking for on Google.
Ideally, you’ll need to find every possible combination of keywords that your potential audience uses on Google to find your content.

Below are a few keyword research tools that you may find helpful.
- Answer the Public: This tool helps you find what questions people online are asking about a specific topic.
- Google Search: Google Search helps you find a lot of related keywords for your blog. You can find the related keywords at the bottom of your search results page.
- SEMRush: SEMRush is a paid tool that helps you find a list of potential keywords for your blog. It helps you find out what works for your competition, what site visitors in your industry are searching for, and what keywords you should focus on.
Once you have a list of potential keywords, it’s time to create an editorial calendar to streamline your content creation process.
10.2. On-page SEO
In order to rank higher on Google and position your web pages on top of search results, you’ll need to optimize your web pages for search engines.
With WordPress, it’s easy to optimize your website for search engines. Here’s how to do it.
Install an SEO plugin
An SEO plugin helps you make your website search engine friendly. We recommend installing the All in One SEO plugin on your site. Upon installing the plugin, you can use the setup wizard to help you choose the best SEO settings for your site.
You can also choose a focus keyword when you’re publishing content.
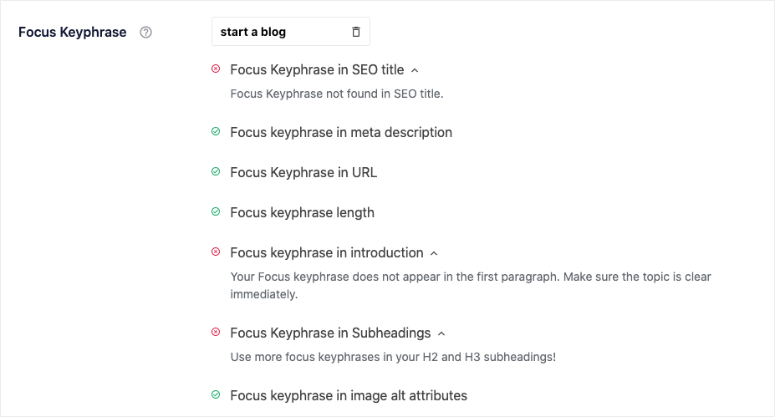
All in One SEO will score how well your content is optimized and give you actionable tips to improve.
Add Alt Tags for Images
Alt tags help describes what’s on the image. Google places a relatively high value on alt text to identify what is on the image and the blog topic of the surrounding text.
Internal Linking
Add 2-3 internal links to every single post.
Internal links allow users to navigate to other pages. It keeps your visitors longer on your site and more importantly, increases your link juice, which improves your SEO.
To make internal linking easier, you can use All in One SEO’s Link Assistant addon. The Link Assistant will automatically generate a link report for your site and provide relevant internal linking suggestions.
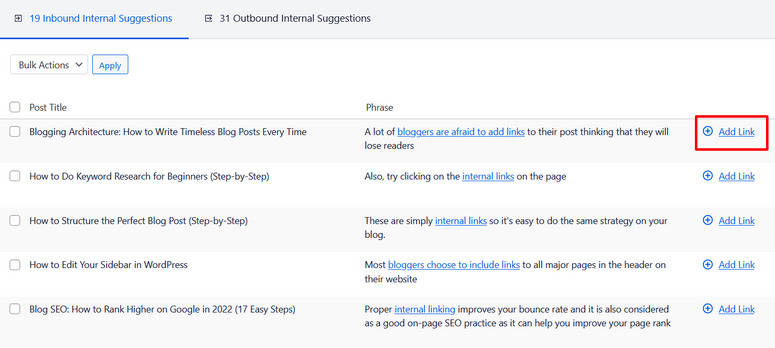
You can add the internal links to your content in 1 click without needing to edit individual posts manually.
10.3. Link Building
Link building is a major factor in how Google ranks web pages. You can improve the ranking of your blog by increasing the number of high-quality links that link to your pages.
There are lots of different ways to legitimately build backlinks to your site. Let’s take a look at a few of them below.
Create pillar content:
We’ve mentioned it already but we’re saying it again. Before you dive in and try to build backlinks, make sure you already have published a handful of content that is worth linking to. Some examples of pillar content are how-to guides, listicles, and case studies.
Create shareable infographics:
You can either hire a graphic designer or create it by yourself using an infographics creator tool such as Canva, Piktochart or Visme. After creating it, make it shareable by providing an embed code that your users can easily use.
Reach out to likely linkers:
Create a list of blogs that are likely to provide a link back to your blog. For instance, you can find blogs that publish weekly recaps about your niche and ask them to feature your article in their upcoming post.
Publish interviews:
Create a list of influencers and publish a one-question interview with them. Chances are they’ll likely add a link to the interview you’ve published.
Guest blogging:
Publish high-quality guest articles on reputed sites in your niche. While it’s an effective strategy to gain links, keep in mind that Google has cracked down on marketers who abuse this tactic with low-quality articles and links.
↑ Go back to Table of Contents
« Previous: Chapter 9 – Promote Your Blog
Chapter 11: Monetize Your Blog
Do you want to quit your 9 to 5 job? Wondering how to start a blog and make money? Then you’re not alone!
While blog monetization isn’t a quick rich scheme, with the right strategies, it’s totally possible to make a solid income. Read: 30 Ways to Make Money Online Blogging (On the Side).
In this chapter, we’ll be explaining 4 different methods to make money blogging.
- Advertising
- Affiliate marketing
- Freelancing
- Selling products
11.1. Advertising
Advertising is probably the easiest way to make money blogging.
You can start by displaying ads by Google AdSense, which is an advertising network by Google. The best thing is that it doesn’t require you to have a huge traffic volume to join the program.
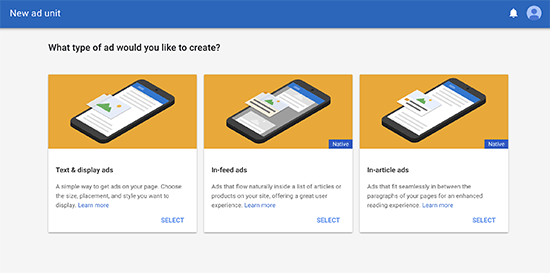
Alternatively, you can sell direct ads on your site. It’s effective for your blog if it attracts a significant traffic base. Since it doesn’t depend on any ad networks, you can keep the full ad revenue profits.
For monetizing your site with any kind of ads, we recommend using the AdSanity plugin. It simplifies ad management and helps you generate more ad revenue with minimal effort.
11.2. Affiliate Marketing
Affiliate marketing helps you generate revenue from your blog when someone purchases a product through your referrals. Basically, you choose a product you like, insert an affiliate link to that product and whenever someone purchases it by clicking your link, you can earn commissions.
If you think ads are annoying, affiliate marketing is the best way to earn solid revenue from your blog. You can even use it in conjunction with advertising and other monetization methods.
eCommerce giants like Amazon offer affiliate programs that you can join for free. If that’s not for you, you can check out companies in your niche. You’re sure to find smaller companies that offer great affiliate commissions.
We use and recommend ThirstyAffiliates for managing and cloaking affiliate links. If you want to set up your won affiliate program, then you can check out AffiliateWP.
11.3. Freelancing
Offering your skills and expertise on your blog as a freelancer is the best way to make a living you’re your blog. Not only will you be able to showcase your portfolio on the blog, but also you can attract the right segment of paying clients.
Make sure to create a hire me page on your blog and promote that page extensively.
11.4. Selling Products
If you’re looking to make a steady flow of passive income, then you might want to consider selling products from your blog. With the right strategies, it’s totally possible to make a full-time income from your blog by selling products.
Below are a couple of ideas:
Sell eBooks: Creating a product can be a tedious and intimidating task. If you already have published some great pillar content, you can easily repurpose them into an eBook and sell it to your audience. Follow our guide to easily start selling eBooks on your blog.
Integrate an eCommerce store: Integrate an eCommerce storefront into your existing blog with an eCommerce plugin such as WooCommerce. If you sell merchandize that mirrors the type of content they love on your blog, then you can piggyback your existing user base to sell your eCommerce products.
↑ Go back to Table of Contents
« Previous: Chapter 10 – WordPress SEO: Getting Started
Chapter 12: Resources to Learn and Master WordPress
The WordPress community is huge, so you can find tons of different resources on the web that will help you learn and master WordPress.
Some of the best and free WordPress resources you can find on the web are:
- IsItWP: At IsItWP, we regularly publish WordPress tutorials, WordPress theme and plugin roundups, reviews, WordPress deals, and a lot more.
- WPBeginner: WPBeginner is the largest free WordPress resource on the web for WordPress beginners. They regularly publish useful tutorials, videos, coupon codes for WordPress products, and a lot more.
- WPForms blog: If you want to read tutorials that help you grow your business using the WordPress platform, you need to follow the WPForms blog. You can also find tips and recommended practices to build any type of online WordPress form.
- MonsterInsights blog: The MonsterInsights blog is an excellent resource you can follow to get a handle on Google Analytics’ best practices and recommendations.
You can also sign up for a paid course on WP101. They have well-tailored courses with video tutorials that are easy for anyone to follow and learn WordPress fast.
For more resources, see our guide: Best Free Websites and Resources to Learn WordPress (Beginners & Developers).
Frequently Asked Questions (FAQs)
Having helped thousands of users start a blog, we’ve found that people ask the same sort of questions again and again. This is why we’ve compiled a list of frequently asked questions, so you can easily start blogging.
How does a blog differ from a website?
A blog is just a type of website that publishes articles in reverse chronological order. Blog articles are usually published using a blogging platform like WordPress, so anyone who can’t code can start a blog with ease. Once the blog is set up, you can easily start creating blog content in your post editor and publish it with the click of a button.
Read more: How to Build a Website.
Can I create a successful blog without WordPress?
Yes! There are dozens of blogging platforms such as Blogger, WordPress.com, and TypePad. But we always recommend you to start a blog on self-hosted WordPress because it gives you full freedom to build a blog site the way you want with no restrictions.
What’s the difference between WordPress.com and WordPress.org (self-hosted WordPress)?
WordPress.com is a free blogging platform that lets you kickstart a blog with ease, but it comes with a lot of restrictions such as limited theme availability and limited storage space. Plus, the free platform doesn’t allow you to monetize your WordPress website.
WordPress.org, also known as self-hosted WordPress, requires you to own a domain name and a hosting account to run a blog. With a self-hosted platform, you get full control over your blog, can monetize your blog the way you want, get unlimited theme and customization options, and enjoy unlimited storage space depending on your hosting provider.
See: WordPress.com vs. WordPress.org – Is One Really Better Than the Other?
How much does it cost to start a blog?
You can start a blog for free using free web hosting combined with WordPress. But we recommend, purchasing a hosting plan from a reliable web host like Bluehost for security reasons. You can get started for as low as $2.95 per month with Bluehost.
Added to that, with WordPress, you can find thousands of free themes and plugins for your blog. However, if you prefer premium themes and plugins, the running cost of your blog may go higher.
Most tools come with a 30-day money-back guarantee, so you can try them risk-free. Check out our pricing breakdown: How Much Does It REALLY Cost to Build a Website? (Expert Answer)
Can I start a blog anonymously?
If you want to publish a blog but remain anonymous, then you need to make sure to protect your domain with WHOIS privacy turned on. For anonymous blogs, people often use a pseudonym/nickname to write under. You can even create a unique email just for writing your blog.
What should I start a blog about?
While you can start your own blog on any topic, it’s advised to start a blog on a topic that you’re really passionate about. Or you can even start a personal blog, documenting your data-to-day life and reach out to like-minded people on the web. If your blog topics are helpful, people will automatically follow you.
Is there a recommended blog template to follow?
All WordPress themes are designed to make it easy for users to navigate and browse your site so that they have the best user experience (UX). By opting for a premade blog theme, your blog design will automatically follow recommended practices. You can make customizations as you like.
How do bloggers make money?
Bloggers get paid by placing ads, promoting affiliate products, and charging for access to premium content. Take a look at 30 Ways to Make Money Online Blogging (On the Side).
How much money can I make blogging?
Successful bloggers have built blogs that generate 7-figure incomes a year. Blogs like WPBeginner are wildly popular and successful. On average, a good blog today makes $25,000 a year which grows over time but it depends on how much time you dedicate to managing your blog.
Can I run a multi-author blog?
Yes. WordPress comes with 5 default user roles that will help you manage and control permissions for each author on your blog.
Can I add an eCommerce storefront to my blog?
Yes! Adding an eCommerce storefront allows you to easily start selling physical or digital products right from your blog. Just install a plugin like WooCommerce and integrate an eCommerce storefront into your blog so you can start selling your products.
How do I add a podcast to my WordPress blog?
There are lots of WordPress Podcast Plugins you can use to add a podcast to your blog. Follow our guide: How to Start a Podcast the Right Way (Step by Step).
How can I learn more about WordPress terminologies?
Refer to this WordPress Glossary Terms for Beginners whenever you’re puzzled by strange WordPress terms or abbreviations.
Can I start a blog in multiple languages?
With WordPress, you can easily start a multilingual blog with a multilingual plugin such as Polylang. You might also want to choose a WordPress theme that supports the multilingual plugin you want to use.
Can I switch from other blogging platforms to WordPress.org?
Yes. You can switch from just about any platform to WordPress including Squarespace, Medium, Tumblr, Blogger, and more. We have lots of in-depth yet easy tutorials you can follow. Here are a few of our most used guides:
- How to Migrate to WordPress From Any CMS or Site (Step-by-Step)
- How to Migrate From Medium to WordPress (No Downtime!)
- Guide to Moving a Blog From Blogger to WordPress (Resolved)
We hope this guide helped you start a WordPress blog. Have fun blogging!

As i have converted my SaaS site into blog. I was looking for some tips and webhosting. I created my SaaS using simple hosting, but now that traffic has started coming in, I am planning to move and was looking for alternatives. This article will surely help me make the right choice.
Hello Soliha,
Thank you very much for the feedback 🙂
This is a really informative article with lots of great ideas. Could you please tell me what software you use to run your incredibly fast website? I also want to create a simple website for my business, but I need help with the domain and hosting. Asphostportal reportedly has a good reputation. Are there any other choices available, and if so, what would you suggest?
Hey Anna, you can take a look at this web hosting guide.
I just finished reading your blog and I have to say, it was an absolute fulfilment. Your writing technique is engaging and illustrative, making me feel like I was right there with you on your exploit. The picture you included were also stunning and really added to the overall quest. good-luck
WordPress is help to increase our website traffic. This article actually great and more informative.
Wow thanks alot you guys just helped me to regain myself from where am lost
I have been looking for the best blogging tutorial for almost 2 months now but you guys own is the best among all I have created my blog according to your discription I don’t know if you might want to check it for me if I made any error somewhat please
OK great article. But which SEO plugin is BETTER
1) All In One SEO plugin ( AIOSEO)
or
2) Yoast SEO Plugin. ( YSEO)
The premium YSEO cost is $99/year and AINSEO varies from $99-$299/year
Consider you go for the $99/year plan for both, which is Better and why.
I have a site and am up with this question and need some expert advise. Thank you
Hey Barry, sorry for the late response.
All in One SEO is hands down the best SEO plugin for WordPress sites.
All in One SEO is built to be result-focused. Unlike other SEO plugins (Yoast and all), AIOSEO is super innovative and helps you get ahead of your business competitors.
It also helps you discover new growth opportunities and be futuristic in your marketing approach. So, we fully recommend All in One SEO over Yoast or any SEO plugin.
I hope that answers your question. If there’s anything else you want to know, please feel free to reach out.
Great guide and really interesting and useful especially for a beginner with wordpress like myself.
One aspect which I feel was not covered was dealing with nameservers etc.. and connecting your domain with your host with your blog.
thanks
Hey Stillsy, thanks for your kind words. We will revisit our blog on your suggestion. 🙂