Do you want to create your own jewelry store online?
You may have an idea to start a business or you may want to take your already-established jewelers brand online. Whichever stage you’re at, this guide will teach you how to showcase and sell your jewelry online.
Many users find it intimidating to do this because it seems really technical. So we’ve removed all the jargon and the fluff and narrowed it down to 5 simple steps you need to follow.
At the end of this guide, you’ll have your online jewelry store set up so that you can start selling right away.
Getting Started
You can sell your jewelry online by opening an account with Etsy, eBay, or even on social media platforms like Facebook and Instagram. But these options may work well only if you’re a small-time seller with handmade jewelry pieces, fashion jewelry, or antique jewelry.
If you want to establish your jewelry company online, first, people need to know that they can trust your business. The best way to present yourself the right way is to create a proper website with your logo, branding, and most importantly, you need to ensure security of customer data and payments.
There are many platforms that let you create a website where you can list products and sell them (This is otherwise called an eCommerce website). We’ve researched plenty of platforms and know which ones are the best:
- WordPress + WooCommerce : Most flexible and affordable platform that lets you customize and scale your business the way you want at a low cost.
- Shopify: Let’s you create an online store and takes care of the technical aspects like hosting and web security, but gives you limited control over your website.
- BigCommerce: Similar to Shopify but comes with a feature-rich online store builder without costly add-ons or transaction fees. The downside to this eCommerce platform is you’ll face limits on the number of annual sales you can make depending on the plan you choose.
- SquareSpace: Easy to use eCommerce site builder but can be expensive and doesn’t support third-party apps.
- Wix: Another popular platform that’s easy to use. It’s great for people who aren’t tech-savvy to create a simple online store. But we don’t recommend it for the jewelry industry. You’ll need much more flexibility and features than what Wix offers.
We recommend using WordPress and WooCommerce for 3 critical reasons:
- Control: You’ll get complete freedom to customize and grow your website the way you want. This is something that other almost all other platforms lack.
- Customization: There’s a huge treasure trove of 55,000+ plugins (tools and add-ons) and 10,000+ themes to choose from. You can even import demo websites and change the content to make it your own. With these options, you’ll have so much room to add more features and functionality to your site as and when you want.
- Cost: It’s affordable. You can get started for just a few dollars and then choose what you want to spend on as you expand your site and business model.
WooCommerce works perfectly for large and small businesses. While the other platforms take care of your site security, backups, and hosting, they charge you a lot for it and since they manage so many things for you, they have to block you from modifying essential parts of your site. So as you grow, which is the goal of every website owner, you’ll realize you’re stuck in a box with very few options.
Not convinced? We’ll give you more insights from real-life experiences next. If you’re ready to set up your own website, skip ahead to the tutorial.
Why Choose WordPress + Woocommerce
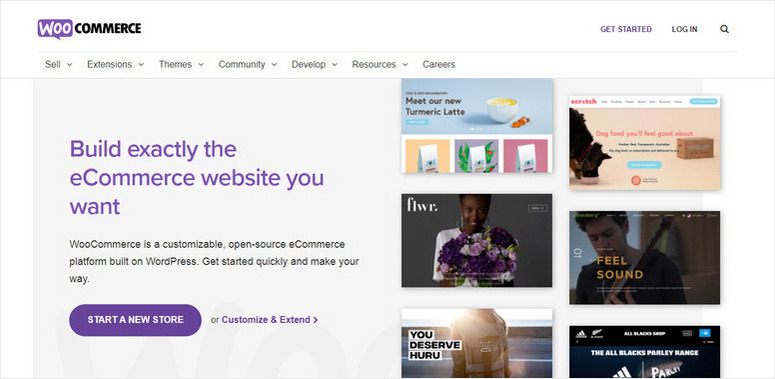
WordPress is the most popular website builder in the world. It’s known as a content management system and it lets you create a website in minutes. You don’t need to know any coding or have prior experience to do this.
If you want to add a feature or fix a problem, chances are you’ll find a plugin or tool to do this for you – all by just pointing and clicking. This is because WordPress is open source. That means anyone can contribute to its development so there are developers all around the world that are constantly creating new themes, tools, and solutions to help you do anything you want without ever touching code.
Added to this, you’ll find other tools that integrate with WordPress. You’ll be able to find online software and service providers to improve jewelry sales, carry out jewelry market research, identify your demographic, and so much more.
All you have to do is select a theme that suits the design you want. Then, there’s a native builder called the Block Editor as well as third-party options (like SeedProd, Elementor, and Beaver Builder) to edit and customize your site.
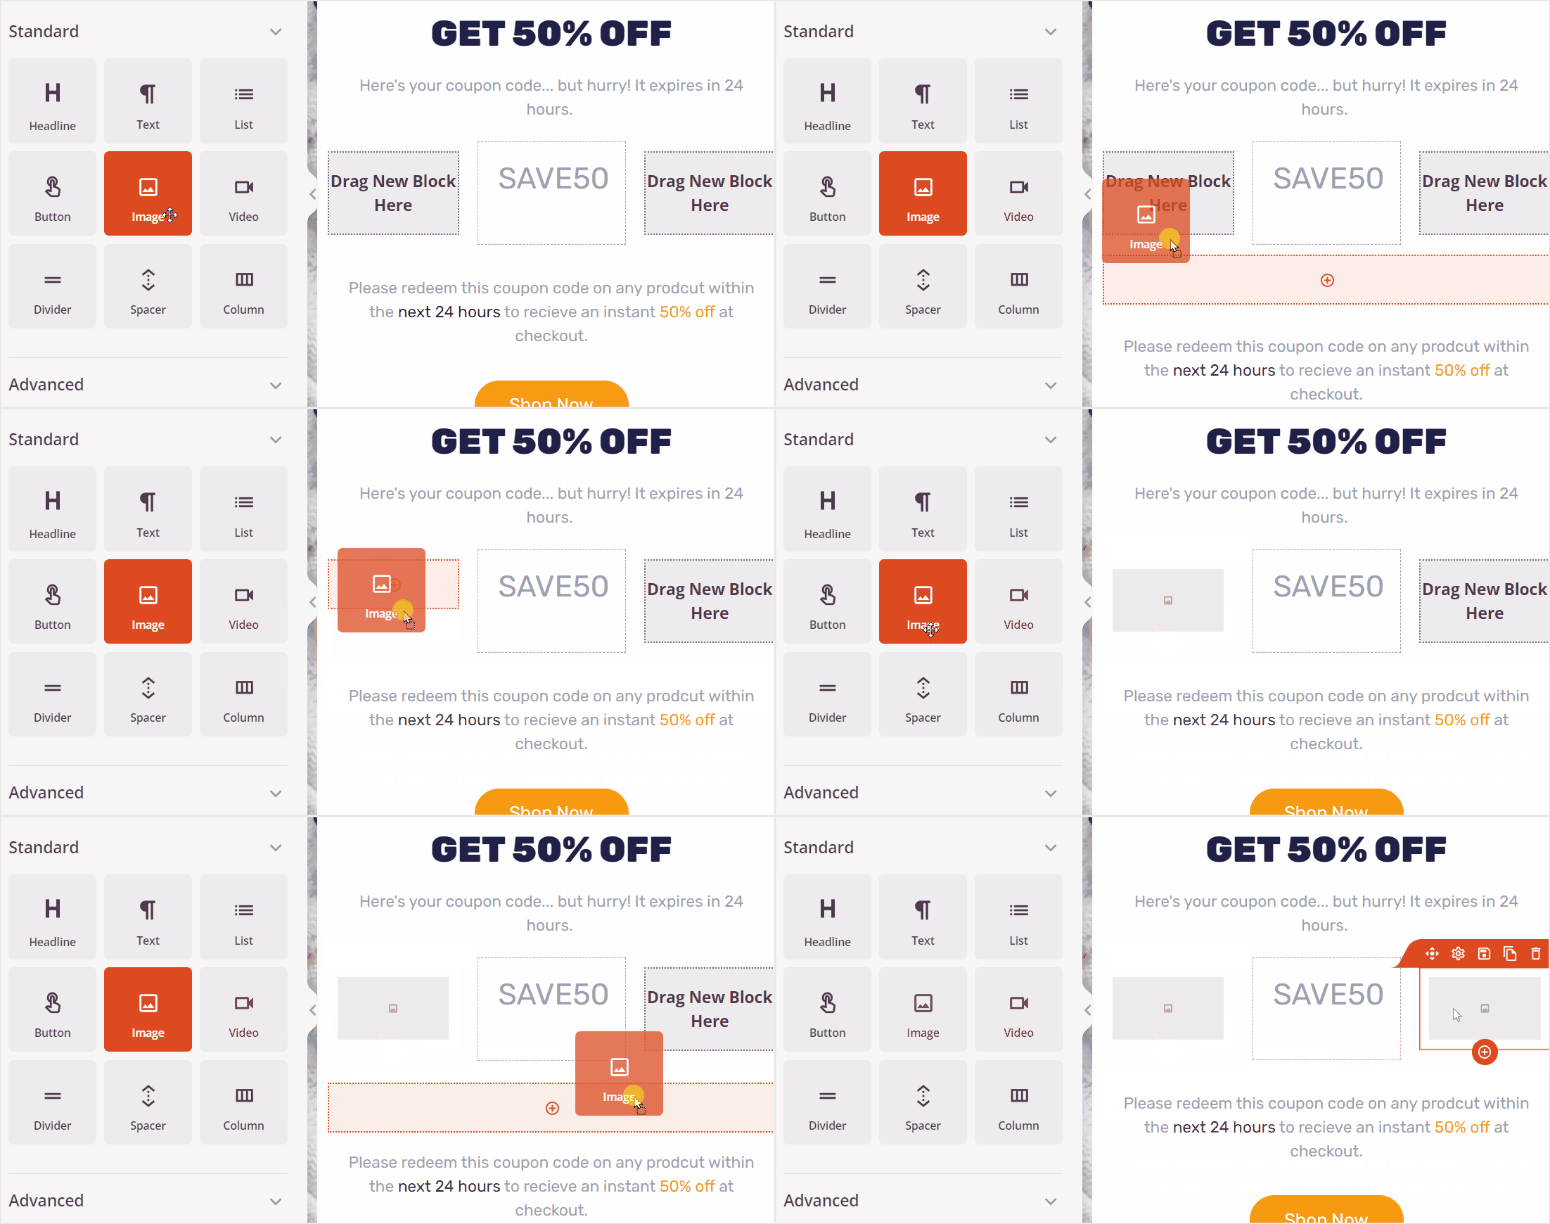
So you can easily create all sorts of pages like homepage, contact us, about us, shipping & refund policy, privacy policy, basically every possible page you’ll need. You can even publish separate pages for different jewelry lines. Plus, you’ll also get to start a blog where you can keep publishing fresh content to target search engines to build your brand organically (that is without ads).
Now to add your products, you’ll need a tool called WooCommerce. It is the #1 eCommerce plugin for WordPress. It’s free to use and you simply need to install it on your site in 1 click. Once you do this, you’ll get options to create product listings complete with descriptions, pricing, specifications, and more.
WooCommerce makes it easy to set up shipping, taxes, inventory, and pretty much everything you’ll need for your online store.
The only thing you need to keep in mind when you pick this platform is that you need to get your own web hosting plan and domain name.
- Web hosting plan gives you access to a server where your website will live. All its files and database will be stored here.
- Domain name is your website’s address like www.isitwp.com.
We recommend signing up for Bluehost’s plan where you’ll get a reliable web hosting service + a free 1-year domain registration starting at just $2.75 per month. You’ll also get a free SSL certificate to make your site secure and free CDN (content delivery network) to make your site fast.
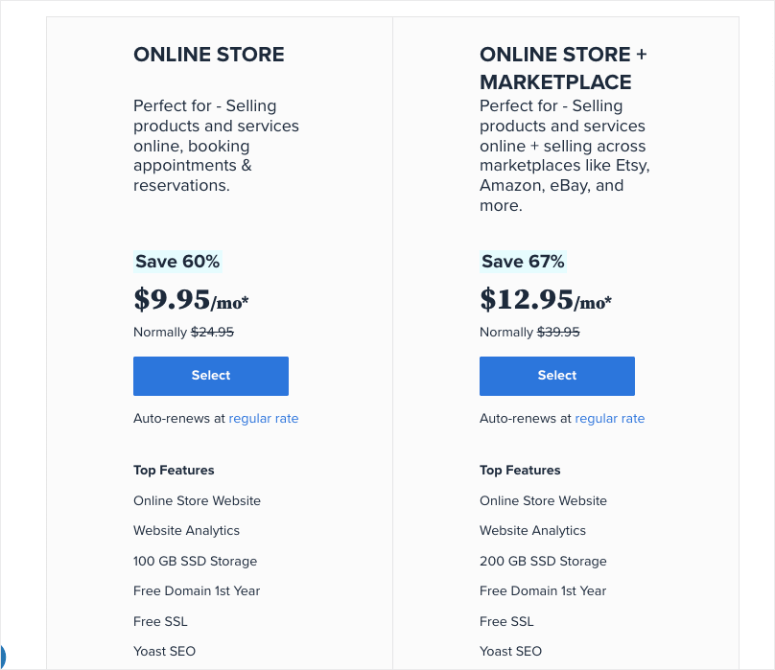
Bluehost even offers a plan designed for WooCommerce stores that starts at $9.95 per month. This is the most ideal plan for you. It comes with WordPress and WooCommerce preinstalled. You’ll also get access to features like:
- Email marketing
- Unlimited products
- JetPack (free website tools you may need)
- Website traffic analytics
- Payment processing
- Manual order creation
- Discount codes
- 1-year free website backup
You can choose either plan and we’ll show you how to set up your store the right way in the tutorial below.
How to Set Up Your Online Jewelry Store
In this tutorial, you’ll learn how to create a website with products and a blog. Here are the steps you’ll need to take:
After the tutorial, we’ll also show you the best ways to grow your site.
Step 1: Sign up for Bluehost
The first thing you need to do is sign up for a Bluehost plan. If you want the cheaper web hosting plan, visit our Bluehost Exclusive Offer page that lets you get started at $2.75 per month.
You’ll need to click on the Get Started Now button, select your plan, and follow the instructions on screen.
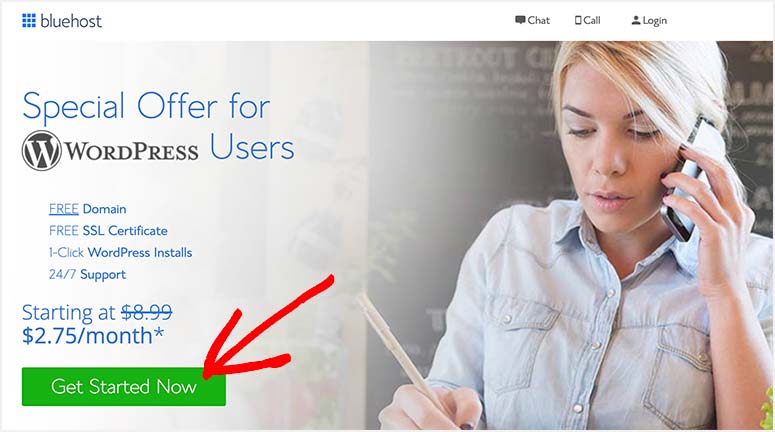
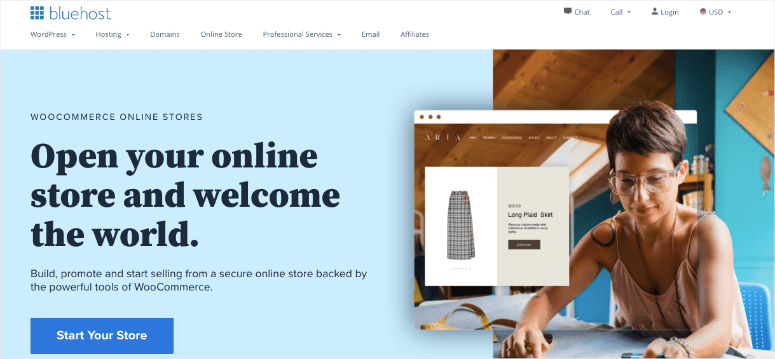
If you prefer the WooCommerce plan that comes with security, then head over to the Bluehost WooCommerce website and click on the Start Your Store button. The following steps for both plans will be similar, however, we’ll stick to the WooCommerce plan here.
Next, you can select your plan. Bluehost offers Standard and Premium plans. You can choose to sign up for 1 month, 12 months, or commit to a 36-month plan. The 36-month plan gives you the highest savings, but when you’re just getting started, the 12-month plan is also an affordable choice with a big discount.
On the next page, Bluehost will give you the option to set up your domain. If you already have a domain name, you can enter it in the box on the right. Otherwise, you can search for your preferred store name under ‘Create a new domain’.
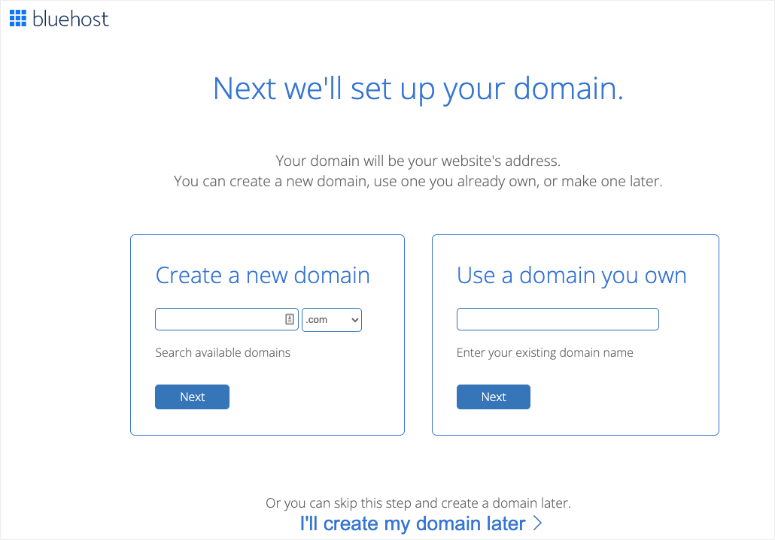
Tip: More often than not, you’ll find that the domain name you want is already taken. You can use our Free Domain Name Generator to search for available business name ideas.
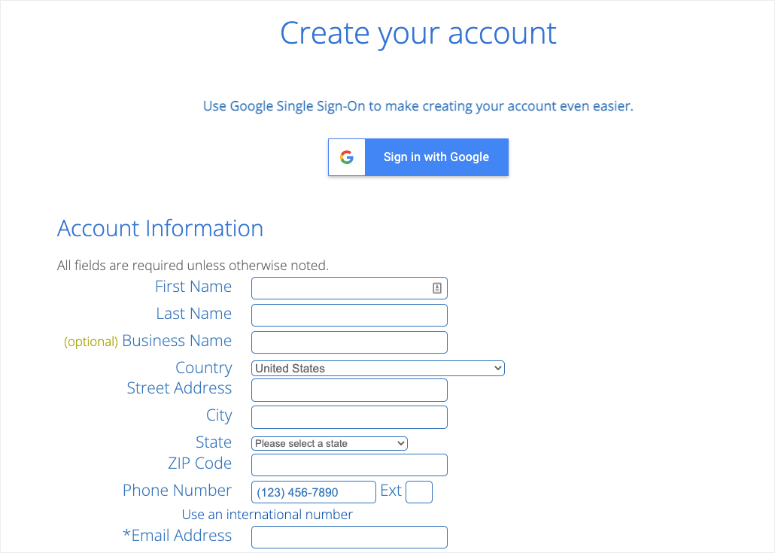
Next, you’ll need to enter your details such as your name and address.
Then double check your plan selection.
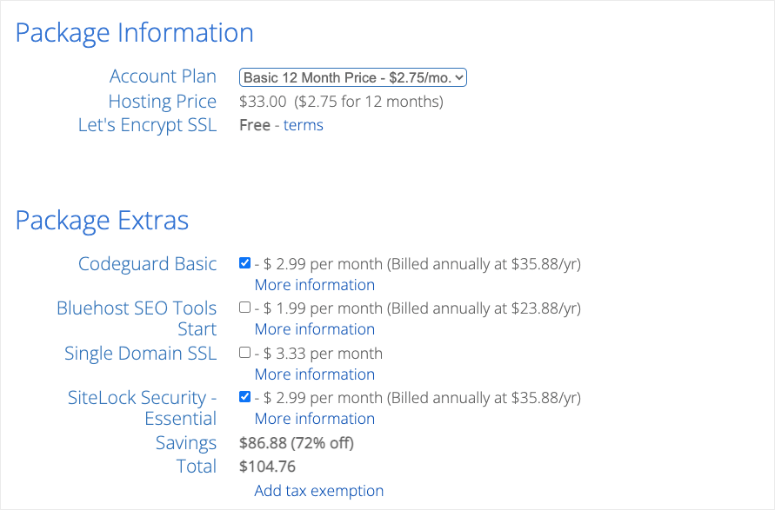
After that, there’s a section called Package Extras. You can choose the ones you need but truth be told, you don’t need these right now. You can buy them later if you like but we’ll show you how to get them for free using other tools and services.
Finally, enter your payment details and checkout.
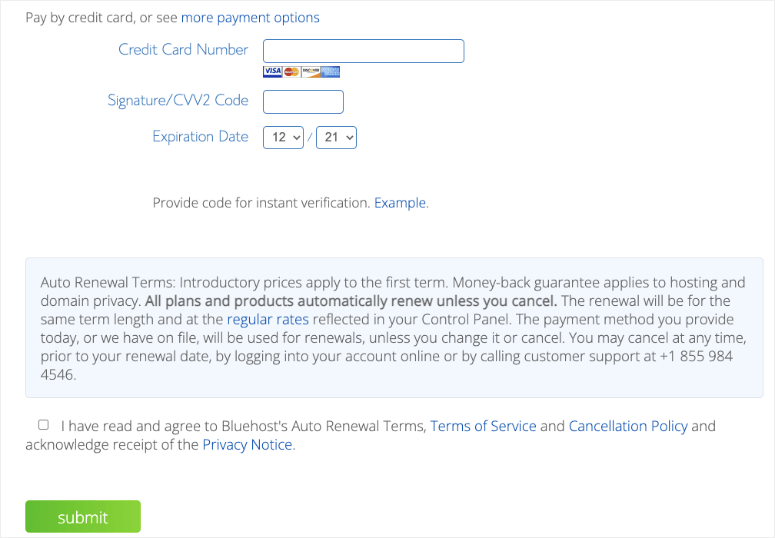
That’s it! You’re now the proud owner of your own web hosting account.
Step 2: Set Up the Basics
In this step, we’ll cover the following:
- Set Up WordPress
- Configure SSL
- Set Up WooCommerce
1. Set Up WordPress
The best part about signing up for Bluehost is that it auto-installs WordPress and WooCommerce.
When you log into your account, you’ll be greeted with a popup informing you that WordPress and WooCommerce have been pre-installed. So you really don’t have to worry about any WordPress installation. All you have to do is log into your site using your credentials.
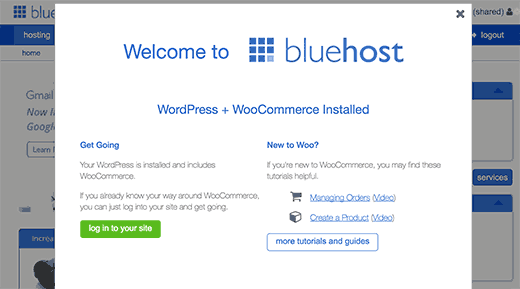
Next, you’ll see the Bluehost dashboard with an option to log into WordPress.
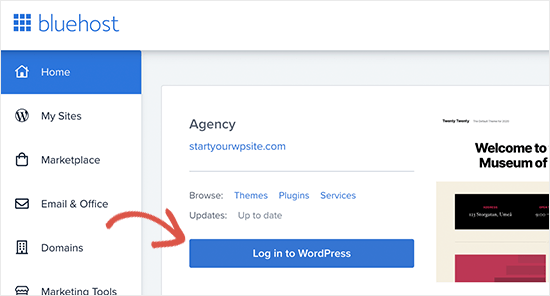
This will take you to your WordPress admin panel where you can manage your website.
2. Configure SSL Certificate
Before you do anything here, you should know Bluehost preinstalls a free SSL Certificate on your domain. This will secure any data sent to and from your website to prevent hackers from misusing it. SSL is absolutely necessary for eCommerce stores because you need to keep your customers’ personal and payment information safe.
Though the SSL is already installed, you need to change one small setting so that your site uses HTTPS and not HTTP.

Go to the Settings » General page and change your WordPress Address and Site Address to use https instead of HTTP. You can also change your site title and tagline in this page.
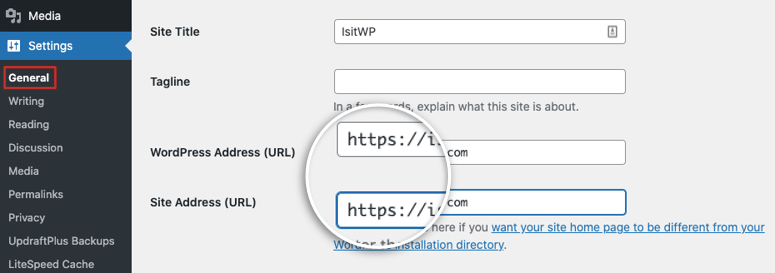
Save your changes at the bottom of the page and that’s it. If you’re curious to know more about SSL, you can read our guide: How to Add SSL and HTTPS in WordPress (Step by Step).
Now you can move ahead to setting up WooCommerce.
3. Set up WooCommerce
From the menu on the left, select WooCommerce. You’ll see a setup wizard which makes it easy to cover all the steps you need to take.
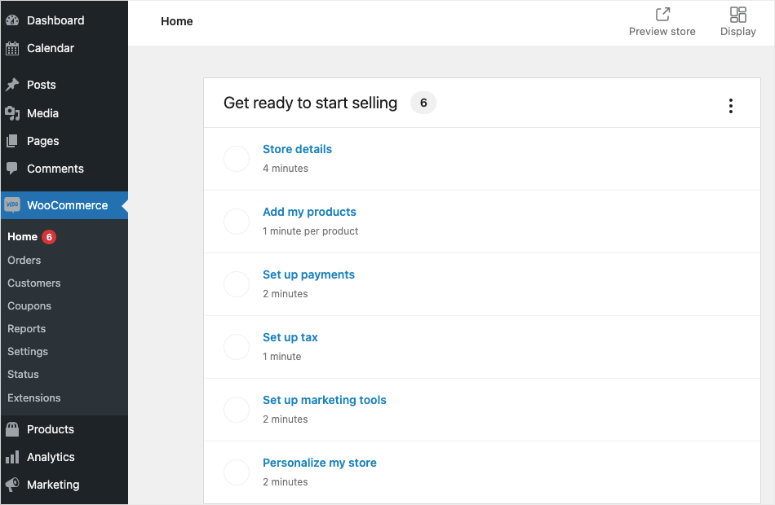
You’ll need to enter your store’s address, industry, product types, and business details. Once you’ve completed the setup stage, you can add products to your store.
Step 3: Add Products
Adding products to your store are easy. You can get started in the setup wizard and it will give you options to create a product using a template or manually from scratch. You can also import your products from a CSV file or other eCommerce services.
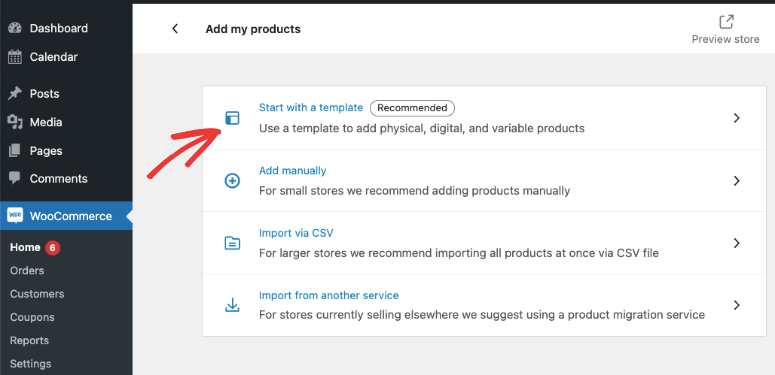
We recommend starting with a template. This will open up a box with 3 options: Physical, Digital, or Variable. For this tutorial, we’ll show you how to set up a physical product.
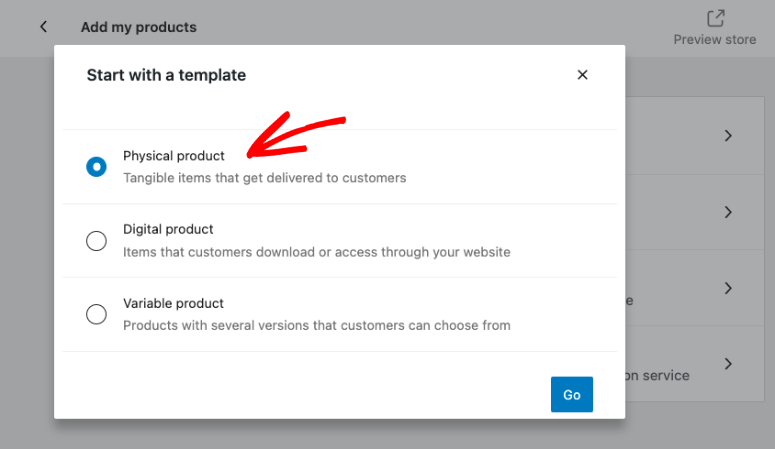
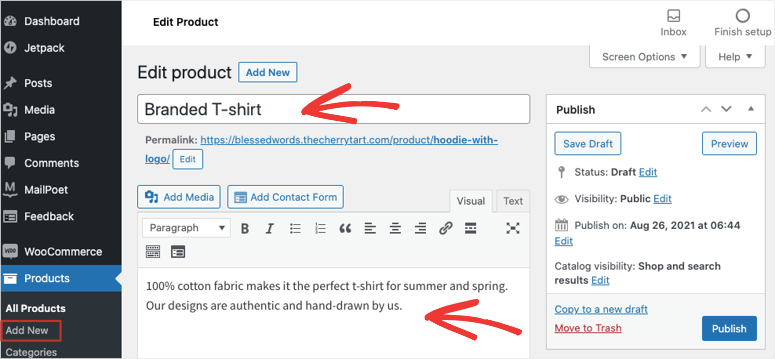
When you hit Go, the product editor will open. Notice that you can access this anytime using the menu on the left by navigating to Products » Add New page in your WordPress admin area.

First, you need to enter a product title and then provide a detailed description. Keep in mind that the data you enter here not only helps customers find what they’re looking for but it also helps with SEO (search engine optimization). So make sure you enter keywords like what gemstones and precious metals are used.
In the right-hand menu, you can also set your product categories and tags. We recommend giving your product at least one category to distinguish the type of jewelry like costume jewelry or fine jewelry. You can use categories and tags to mark necklaces, rings, earrings, and anklets. You could even categorize jewelry designers.
Next, scroll down to the ‘Product Data’ section below.
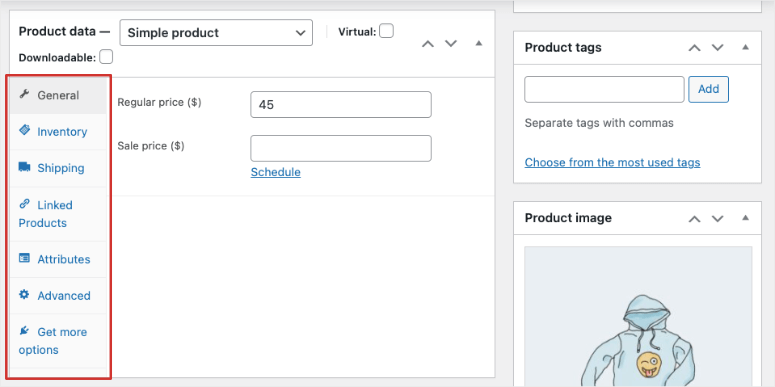
You need to decide on your price point and enter the Regular Price of your jewelry product. If it’s on sale, then you can set a Sale Price too.
In this section, you can explore more options to manage your jewelry listings. You can add inventory, attributes, and shipping details. It also lets you link products that are similar or go together.
After this, you can optionally enter a short description of your jewelry. This appears in areas where the long product descriptions will not fit.
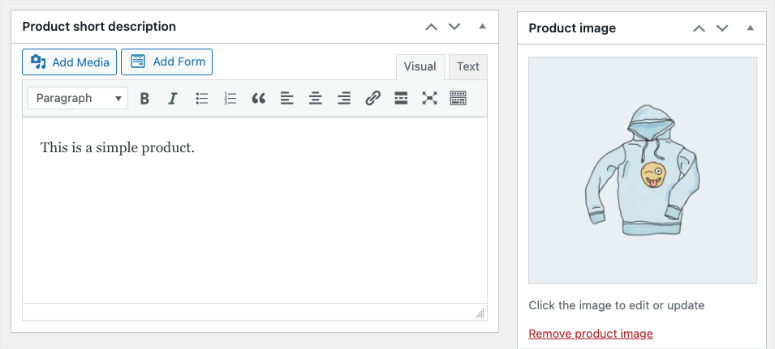
Next, click on the ‘Product Image’ in the right-hand side of the screen and upload images of your jewelry.
Most business owners focus on getting the product photography right so that potential customers can see that they are getting high-quality products. But in many cases, they forget to make sure these images can load on your customer’s device.
If you use large high resolution files, chances are your images won’t load. So while you want to make sure the pictures look stunning, you also need to optimize them for the internet. You can use a tool to optimize all your images. See: 6 Best Image Optimization Plugins for WordPress (Compared).
Once you’ve entered all the details for your product, simply click on the Publish button at the top right corner of your screen.
When you do that, your jewelry product listing will go live. You can follow the same steps to add more product listings.
Step 4: Add a Payment Gateway
With WooCommerce, you’ll get a long list of popular payment gateways to choose from. The most popular are PayPal and Stripe (credit cards).
To connect WooCommerce to a payment gateway, you can select it from the setup wizard. Just so you know where to access this page from later, you can go to the WooCommerce » Settings page and switch to the Payments tab.
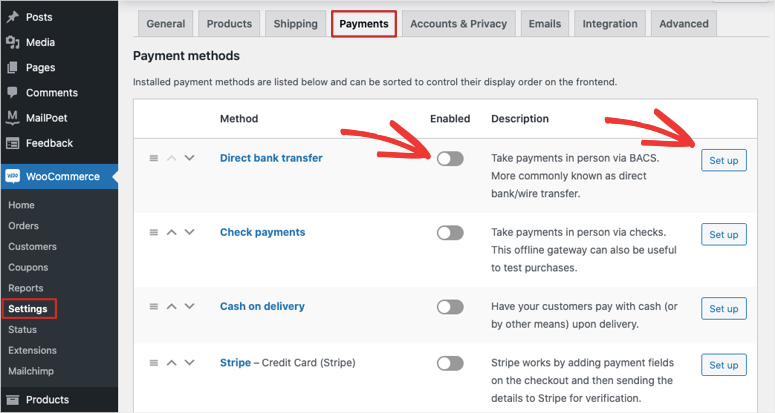
Then, in the ‘Enabled’ column, use the toggle switch to enable the payment methods you want to use.
After you enable the option, click on the Set Up button next to it and follow the instructions to add it to your site.
Now you’re ready to sell online.
For more detailed steps, we’ve covered this in our guide: How to Accept Credit Card Payments in WordPress
Step 5: Customize Your Website
One of the reasons we recommend WordPress is because you get access to countless themes and website designs. There are thousands of free and paid options which can leave you wondering which one to pick.
We’ve narrowed it down to 19 Best Free eCommerce Themes for WordPress.
However, not all of them are ideal for a jewelry store.
By default, Bluehost may install the Storefront theme for you, or you may be using some other default theme right now.
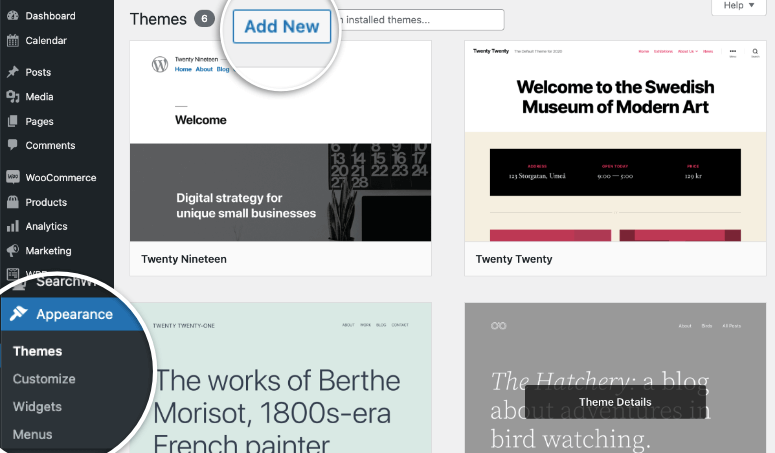
You can explore new themes under the Appearance » Themes page. Select the Add New button to view available themes.
Here, you can filter by popular and latest themes. You can also search for themes for your business. If you decide to purchase a third-party theme, then they’ll give you a zip file which you can upload on this page.
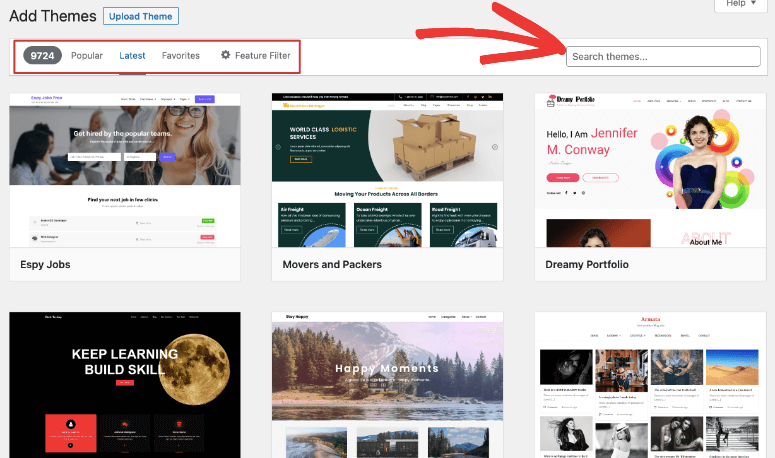
Once you have found the theme you like, you can install and activate it. For help with installing WordPress themes, check out our beginner’s guide to installing a WordPress theme.
Most WordPress themes are designed in a way that’s easy to customize them. So you can change the fonts, colors, header styles, background, and more.
Simply go to the Appearance » Customize page to launch theme customizer. You’ll see a live preview of your site with customization options in the left column.
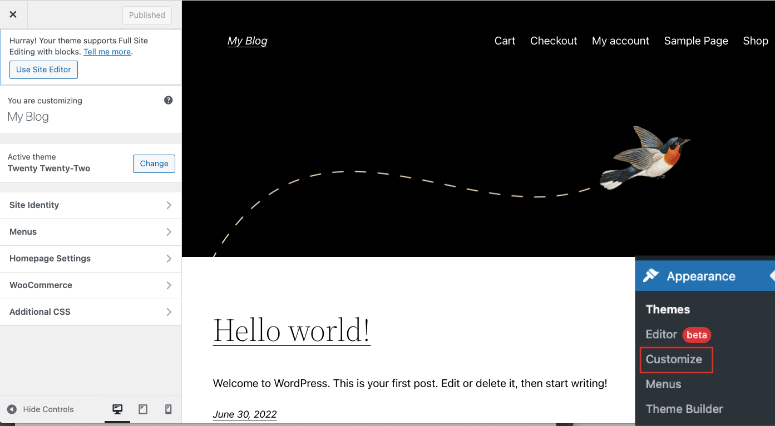
In the taskbar on the left, you’ll get options to customize your site identity, menus, homepage, and WooCommerce store. Depending on the theme you’ve selected, you may see more options here to change your footer, header, widgets, buttons, and more.
As you make changes here, you can preview your store on desktop, tablet, and mobile at the bottom of the taskbar. This lets you check if your jewelry store looks good on any device.
Once you’ve finished making changes using the theme customizer, you just need to click the Publish button on the top left. This saves your changes and makes them live on your new business website.
If you feel this customizer isn’t enough, you can explore other website builders that work on top of WordPress. The most popular ones include SeedProd, Divi, Elementor, WPBakery, and Beaver Builder.
If you need more help with customizing your site, we’ve got you covered: How to Customize a WordPress Website [Beginner’s Guide].
With that, you’ve successfully set up your own jewelry business online.
The BEST Ways to Grow Your Website
At IsItWP, we want to see you succeed. So we’ll give you tips on how to grow your website the right way.
A common mistake website owners make is that right from the start, they choose the wrong tools for their site. Or they try to grow their site with free tools that just don’t work.
And once these processes are set in place, they forget about it and never come back to get the right solution. So to help you avoid these common mistakes, we’ll give you our recommendation of the most essential tools that every WooCommerce store needs. These tools are proven to work and actually generate results.
Keep in mind that you may not need all the tools in this list right away, but we recommend that you bookmark this article. That way, you can come back to it later to find tools that you need as your site grows.
Here are our recommendations for some of the most essential plugins to create a successful jewelry business:
MonsterInsights – The best WordPress analytics plugin helps you easily connect to Google Analytics and track data of your site and customer base right inside your WordPress dashboard.
WPForms – #1 form builder for WordPress, trusted by 6+ million websites. You can use it to build registration, login, contact forms, customer review, surveys, polls, etc.
AIOSEO – The best WordPress SEO plugin that will help your store rank higher in Google and other search engines
WP Mail SMTP – The best plugin to resolve email deliverability issues. This will make sure emails from and to your website are being delivered. With WooCommerce, this plugin is essential as you need to make sure customers get their receipt, login information, etc.
OptinMonster – #1 conversion optimization toolkit to create campaigns for your target audience that will help you get more subscribers and sales.
TrustPulse – The best tool for any eCommerce business to gain your customer’s confidence and get them to make the purchase.
Sucuri – Protect your website and jewelry brand from hackers, data theft, and malware attacks.
Duplicator – Automated regular backups for your website so that you never lose your customer data, order information, shipping details, and so on.
These plugins should be in any online business plan and can be used by startups, entrepreneurs, small businesses, and large corporations.
Aside from these plugins, we have meticulously created lists of the best of best plugins you may need for your own online store:
- 35 Best WooCommerce Plugins to Grow Sales Rapidly
- 7 Best WooCommerce Review Plugins to Get More Product Ratings
- 7 Best WooCommerce Upsell & Cross-Sell Plugins
These posts will help you grow your online jewelry business with the right marketing strategy.
And one more thing, when you run an online store, there’s a lot more at stake since you’ll be handling customer orders and personal information like name, address, and credit card details. WooCommerce stores need to take cybersecurity even more seriously. We’ve compiled a step-by-step guide that’s easy to follow: How to Protect your WooCommerce Site (Steps + Security Tools).
With that, you have everything you need to create, customize, and grow your online jewelry store.

Comments Leave a Reply