Do you want to migrate to WordPress from any CMS or website?
It’s totally fine if you already have built a website on any platform or CMS. As your business grows, anytime you can migrate your website to WordPress, no matter which CMS you use. Not only is it cheaper to run a site on WordPress, but it also gives you endless possibilities to enhance your site with any features you can think of, like integrating an eCommerce storefront, forums, niche social network, etc.
In this article, we’ll show you how to migrate to WordPress from any CMS or website.
The Ultimate WordPress Migration Guide
Here are the exact steps we’ll cover in our step-by-step WordPress migration guide:
- Identify Your Website Platform: Static or CMS
- Choose a WordPress Hosting
- Install WordPress and Select a Theme
- Export Your Existing Website
- Import the Website Into WordPress
- Manage Redirects and Permalinks
- Things to Do After Migration
Why Should You Move Your Website to WordPress?
WordPress is the most popular website builder in the world. It’s highly flexible and easy to customize. A lot of biggest brands in the world are using WordPress to manage their sites.
WordPress can be managed without any coding or programming knowledge. It also comes with many built-in features that make it the top choice for beginners and developers alike.
Let’s take a look at some key reasons that make people choose WordPress over other platforms.
SEO-Friendly: Whether yours is a small business site, portfolio site or any other, WordPress makes it easy to optimize your site for SEO. You can choose a custom SEO-friendly permalink structure with a few clicks. By installing an SEO plugin, you can easily add meta description, meta title, and other SEO information, without having to hard code your site.
Easy to Customize: With the advent of Gutenberg editor and WordPress Customizer, using WordPress is now easier than ever!. Just make any edits and see the changes instantly right within your dashboard without having to preview the page.
For more reasons, check out our complete guide on why you should use WordPress.
Before you start, it’s important to know that there are two kinds of WordPress platforms. WordPress.com, which is a hosted solution and WordPress.org, which is a self-hosted platform. For this guide, we’ll use self-hosted WordPress.org as it gives you full control over your site.
Let’s start migrating to WordPress from any CMS or website, step by step.
Note: Before you dive in, this tutorial assumes you have a dynamic CMS-based website. If you have a static/HTML site, you might want to hire a professional developer to move your website to WordPress.
Step 1: Identify Your Website Platform: CMS or Static
The first thing you need to do is to find out whether the source website is built on top of a Content Management System or just a static / HTML site. A content management system lets you customize your site from the backend.
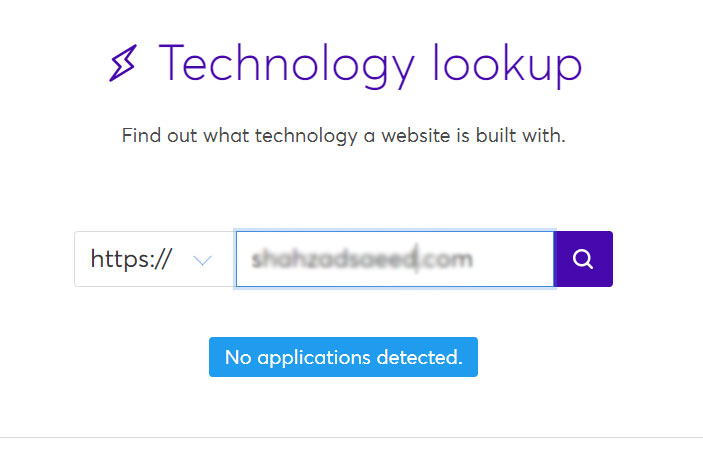
You can find out whether your site is dynamic or static by going to Wappalyzer.com. Then enter your site’s domain name in the box and figure out if it uses any application.
If your website is not developed on any CMS or application, then you might want to hire a professional developer to move your site to WordPress.
Migration process differs based on the application your website is built with.
- Proceed to the next step if your site is built with a custom CMS
- Blogger to WordPress migration guide
- Wix to WordPress migration guide
- Weebly to WordPress migration guide
- Medium to WordPress migration guide
- Godaddy Website Builder to WordPress migration guide
Step 2: Choose a WordPress Hosting
To start a website on self-hosted WordPress.org, you’ll have to own a domain name and a web hosting account.
A domain name is a URL (for example, isitwp.com) that people will type in their browsers to access your website. A web hosting is a space where you’ll store all your content and files. For more details, check out the differences between a domain name and web hosting.
While there are dozens of WordPress hosting out there, we recommend using Bluehost. It’s one of the most popular web hosting providers and an officially recommended hosting service by WordPress.org.
We’ve negotiated a deal with Bluehost to offer our users a free domain name, free SSL certificate, and great discount on web hosting.
Click Here to Claim This Exclusive Bluehost Offer »
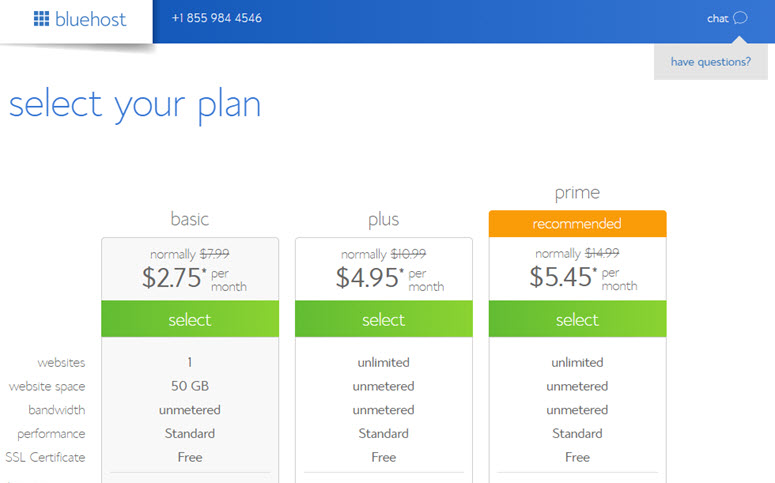
Go to Bluehost website and click on the Get started button. Next, you need to select a hosting plan for your new WordPress website. Let’s choose the basic plan as you’re just getting started. It includes a free domain name and free SSL certificate. You can always upgrade later as your site grows.
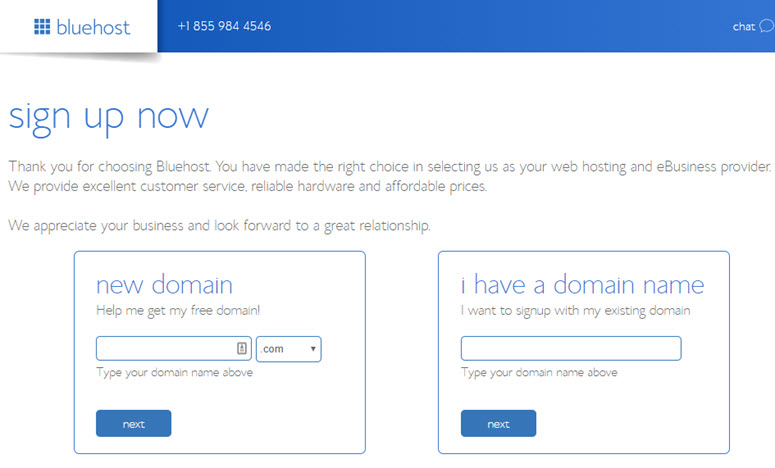
After that, you need to select a domain name. You can either use an existing domain that you own or register a new one for free.
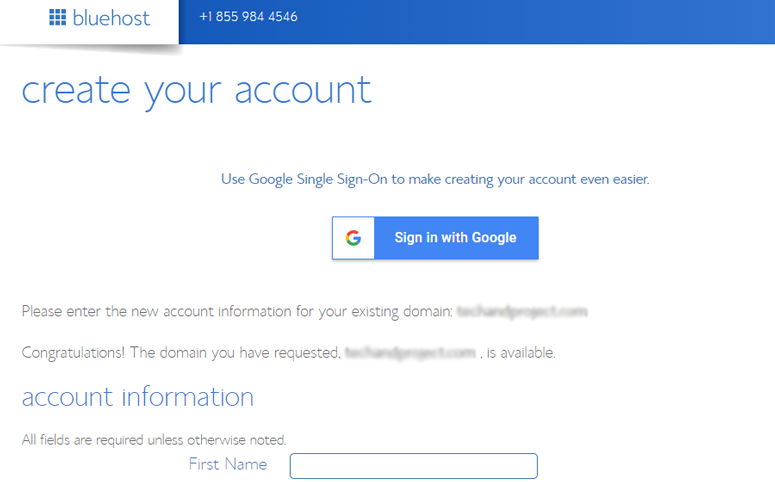
On the next page, you need to enter your account information. For easy registration, you can sign in with Google and complete the setup in a few clicks.
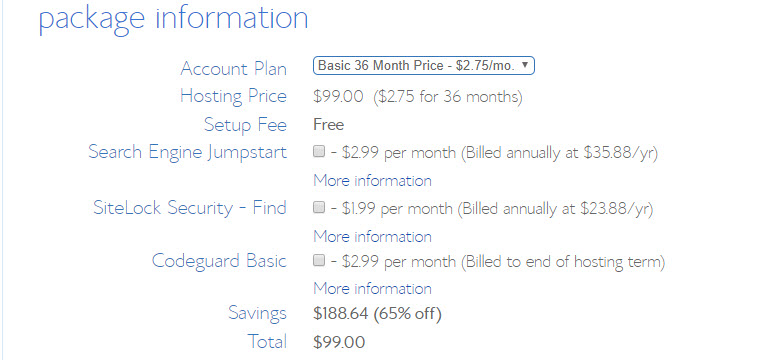
Now, scroll down to the package information box. There are multiple options, including a basic plan for 12 months, 24 months, or 36 months. You can also see that a few addons are preselected, adding up the total price. We recommend unchecking the addons because you won’t need these right away. You can always purchase them later whenever you want.
To get the best price on web hosting, select the 36-month plan.
Moving ahead, you need to scroll down further to enter your payment details. You have to agree to their ‘Terms of Service’ and then, click Submit.
In the next step, you need to create a password for your hosting account. You’ll receive an email with details on how to log in to your web hosting control panel (cPanel) where you can manage your hosting files, emails, and support.
For more details on Bluehost, check out our complete Bluehost review.
Step 3: Install WordPress and Select a Theme
After purchasing the domain name and web hosting, you need to install WordPress. Many web hosting providers, including Bluehost, offer 1-click WordPress installation to save you time.
You need to go to your Bluehost account. From there, you can click on the WordPress icon to add the name and tagline of your website. You also need to choose your WordPress theme and click on the Install button.
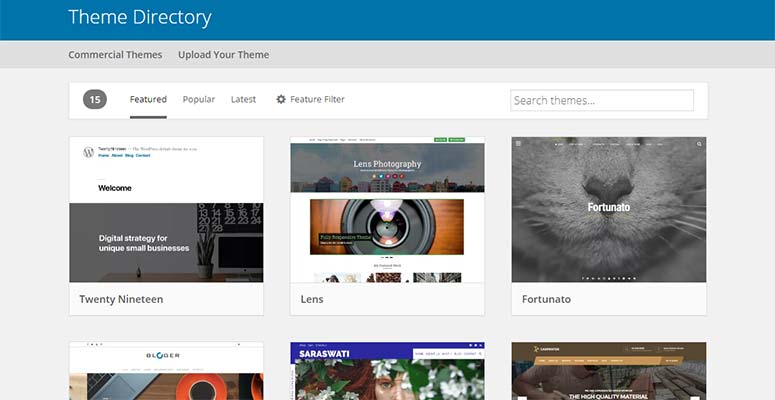
Since there are thousands of free WordPress themes, it’s intimidating to find the right one for your site. All themes have different features and options. A good theme should include beautiful template design, navigation menu, sidebars, widget support, shortcodes, and page templates.
You might also want to check out the best and most popular WordPress themes of all times.
For the sake of this guide, we’ll use the Astra Theme. It’s a popular and multipurpose WordPress theme built to create any website.
Step 4: Export Your CMS-Based Website
Exporting an existing or source website from a CMS is so easy. In the admin section of your site, there’ll be an option to export the XML file with complete content, media, and database. You’ll need to store this file on your computer for the migration.
Step 5: Import Your CMS-Based Website into WordPress
To import a CMS-based site in WordPress, the first thing you need to do is to install and activate WP All Import plugin. For more details, you should check out our guide on how to install a WordPress plugin.
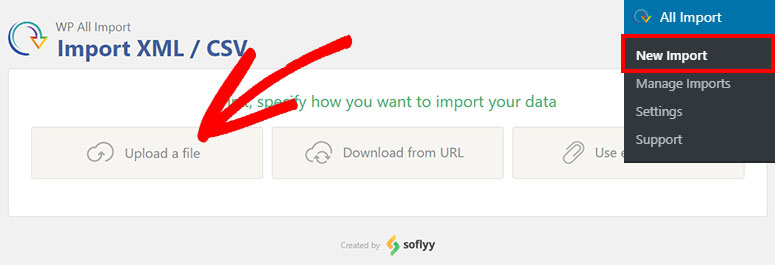
Once activated, you need to visit All Import » New Import in the WordPress admin area. From there, click on the Upload a file button.
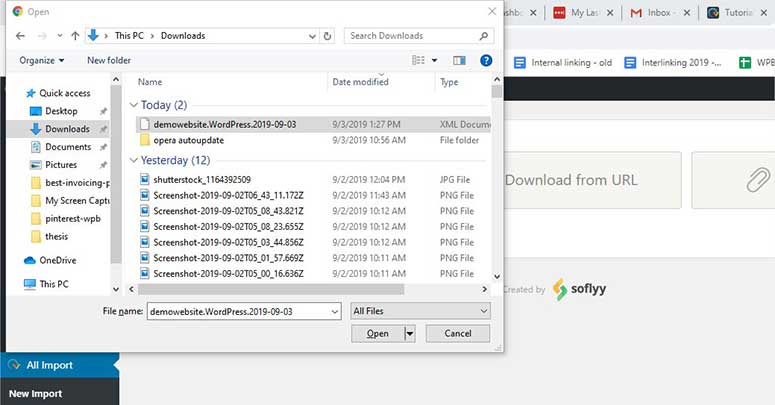
It will open a dialog box where you need to select the XML file that you’ve exported. Click on the Open button to continue.
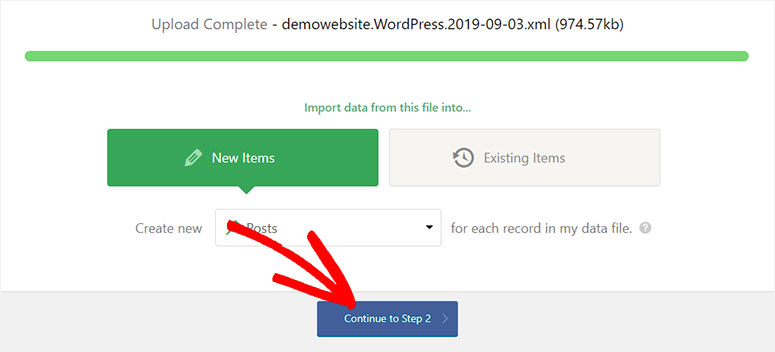
As you upload the file, you’ll see a progress bar showing the progress of the uploading process.
Next, you need to click on the Continue to Step 2 button.
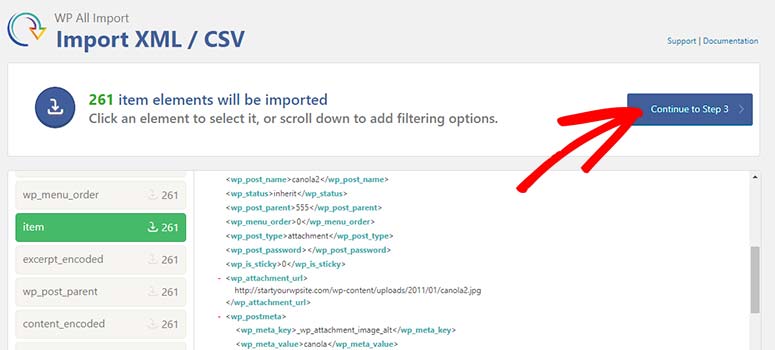
There are multiple elements to import in WordPress. You should select an element and click on the Continue to Step 3 button.
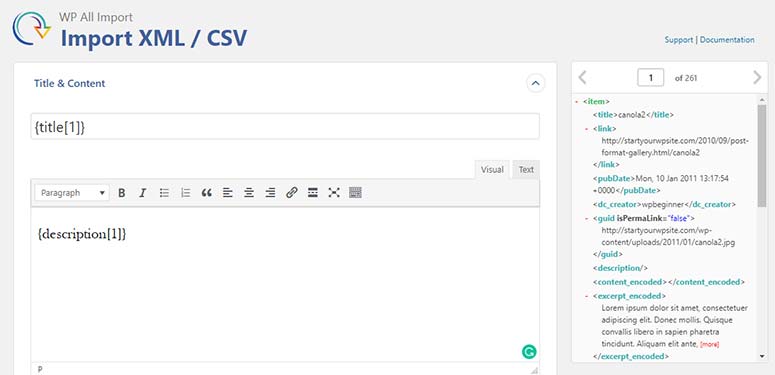
Now you need to drag and drop the title and description in the respective fields from the right side of the screen.
Scroll down and click on the Continue to Step 4 button.
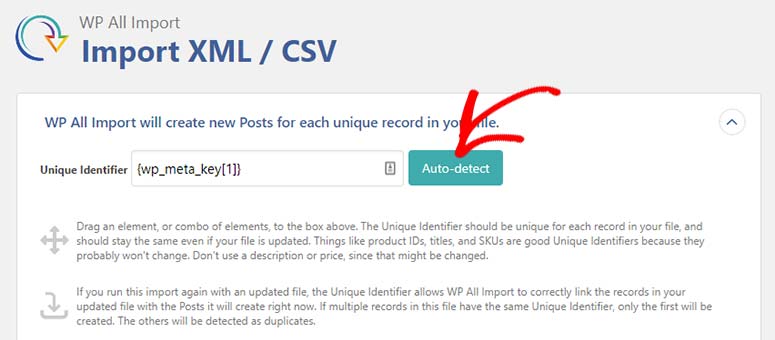
In the next step, you need to click on the Auto-detect button for Unique Identifier field. It will fill the field with the correct element automatically.
Scroll down to the bottom and click on the Continue button.
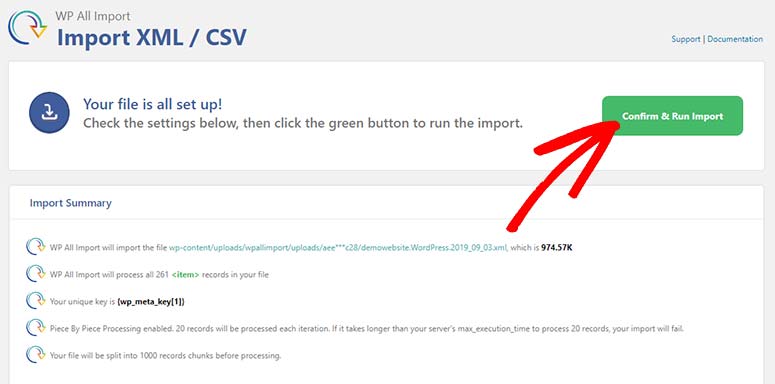
Once you’re all set, click on the Confirm & Run Import button. All the data from the XML file will be imported into WordPress.
You’ll also see a success message after the import is finished.
Step 6: Manage Redirects and Permalinks
You need to add redirects on your website to preserve search engine rankings. When a user visits an old URL, it’ll redirect to the same page on your new WordPress site.
Simply follow this step by step guide on setting up redirects in WordPress.
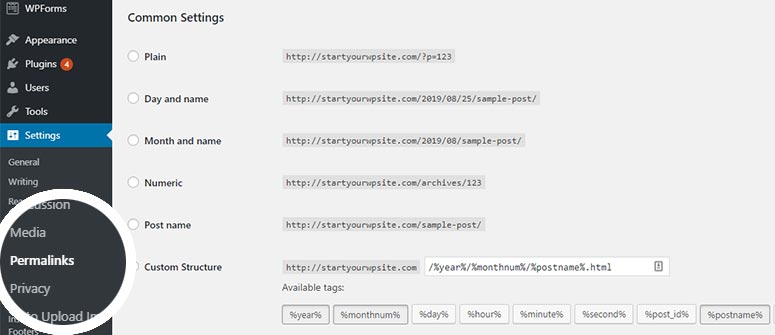
The next thing you need to do is to manage the permalinks structure. In the WordPress admin area, visit Settings » Permalinks to select a URL format.
You can also create a custom permalink structure if you’d like.
Step 7: Things to do After Migration
After a successful migration to WordPress, the next thing you need to do is to leverage the full potential of WordPress.
There are thousands of free and premium WordPress plugins available on the market. These plugins will help you boost the functionality of your website within a few clicks. You might also want to check out our list of must-have WordPress plugins.
Take a look at some of the most popular plugins that you need to install on your WordPress website after the migration:
- WPForms: It’s the most beginner friendly WordPress contact form plugin. You can use WPForms to add a contact form, survey form, user registration form, and any type of custom form on your website.
- MonsterInsights: It’s the most popular Google Analytics plugin. This plugin will show complete insights and traffic reports within your WordPress dashboard, so you can improve the website and grow your traffic.
- OptinMonster: OptinMonster helps you convert your visitors into subscribers and customers. It’s the most powerful lead generation and conversion optimization plugin in existence. You can also use their Exit-Intent® technology to display offers and deals to the abandoning visitors and ask them to subscribe to your email list.
- BackupBuddy: This plugin will help you maintain backups of your WordPress website. In case, if anything goes wrong or your website is hacked, you can restore everything within a few minutes using BackupBuddy.
- Sucuri: Talking about malware and hacking, Sucuri is a popular WordPress security plugin. It secures your website from all kind of malicious activities and hackers.
Your website may look fine and running smoothly, but it’s recommended to test the site on multiple browsers to look for any possible errors. For more details, check out this guide on troubleshooting common WordPress errors.
We hope this article helped you learn how to migrate to WordPress from any CMS. You may also want to check out our guide on how to transfer WordPress from a local server to a live site.




Interesting and insightful article! Thx for useful pieces of advise