Are you looking for a way to move your website from Weebly to WordPress? Weebly is a great web building platform for beginners, but you’ll eventually realize that it limits you in terms of features. That’s when it’s time to turn to WordPress, the most powerful website builder on the market.
In this article, we’ll show you how to move your website from Weebly to WordPress.
Why Should You Move Your Website From Weebly to WordPress?

Before we begin, take a look at this list of steps we’ll cover in the guide:
- Setting Up WordPress
- Exporting Your Website from Weebly
- Importing Your Weebly Website to WordPress
- Creating Redirects
- Managing Permalinks / URL Structure
- Customization and Plugins
- Troubleshoot Errors
Most beginners start their websites with the first solution they find on the internet. Some of these web building platforms, like Weebly, are also free of cost which is attractive for startups. However, after your site begins to grow, you’ll need more features and functionalities.
For instance, check out just a few of the features Weebly is lacking:
Easy SEO:
On Weebly you can optimize your page title, meta descriptions, etc. to boost SEO. Although, if you’re not familiar with SEO, Weebly doesn’t tell you what to do. But with a WordPress plugin such as All in One SEO, and other SEO tools, improving your site SEO is much easier because of the clear tips and instructions it provides.
No Third-Party Apps or Tools:
Weebly offers a number of tools and apps to add more features to your website such as a contact form, photo gallery, blog, etc. But, if Weebly doesn’t offer a certain tool or app that you want, you’re out of luck. On the other hand, WordPress has over 55,000 plugins to choose from, so you’ll be able to find everything you need.
eCommerce Fees and Limitations:
Creating and growing an online store can be more difficult with Weebly. For example, Weebly charges a 3% transaction fee on top of the fee you’ll already be charged by payment processors like PayPal or Stripe. So, for beginners who want a create an online store, you’ll be paying double the transaction fees. In order to remove Weebly’s transaction fee, you need to upgrade to their Business plan which costs $25/month.
It won’t be long before you realize that Weebly isn’t living up to your expectations.
It’s time for a better solution: WordPress. It’s the most simple, easy-to-use platform that doesn’t compromise on free plugins and addons. Many top brands use WordPress for their websites and blogs.
But how can you move your complete website from Weebly to WordPress without losing any content? It sounds difficult, but it isn’t.
Our friends at WPBeginner created an amazingly simple tool to help you transfer Weebly to WordPress (we’ll talk more about it later in this article). Using their tool, you can easily move all your website content and media files from Weebly to WordPress.
Ready? Let’s go!
Step 1: Setting Up WordPress
The first thing you’ll need before setting up WordPress is a domain name and web hosting. A domain name is your website’s name like example.com or isitwp.com; and web hosting is the space on the internet where you upload your content, media files, etc. You should check out our article on the differences between domain name and web hosting for more details.
Normally, domain names have different prices based on TLDs and domain registrars. A simple domain name costs between $11 & $15 per year. However, you can purchase web hosting in the range of $7 & $15 per month for a starter / basic website.
For our users, we worked out a deal with Bluehost. They’re the most popular web hosting company and are officially recommended WordPress hosting partners. Bluehost is offering IsItWP readers a free domain name, free SSL certificate, and 70% off on web hosting.

If you’re looking for alternative options, then check out our expert picks of the best WordPress hosting providers. Most of them are offering discounts to IsItWP users.
After purchasing your domain name and web hosting, go ahead and install WordPress. For easy instructions, you can check out our complete WordPress installation guide.
Once installed successfully, you can begin the process of moving your Weebly website to WordPress.
Step 2: Exporting Your Website from Weebly
As discussed previously, we’ll be using the Weebly to WordPress Importer tool to help you move Weebly to WordPress.
This tool helps export all your content and media files from Weebly in a format that’s supported by WordPress. Because of this, you can easily import your website data into WordPress using an importer plugin.
Note: We tested this tool before recommending it to our users. It works perfectly without breaking anything.
Visit the Weebly to WordPress Importer tool’s website and add your Weebly URL in the first field.
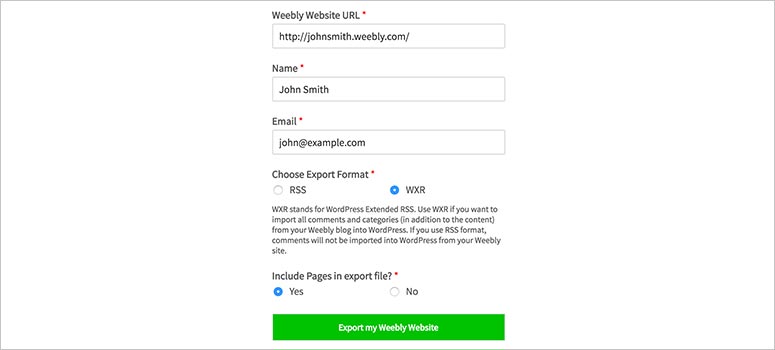
After that, enter your name, email address, and choose a format to export your Weebly site. We recommend you to export your website in the default WXR format.
It’ll also ask if you want to export website pages with other content. By default, it’s marked Yes which means the pages will be exported. You can mark this option as No if you don’t want the pages to be exported or simply proceed without changing anything.
Click on the ‘Export my Weebly Website’ button to continue.
The importer will process in the background. Once ready, it’ll show you a success message with a downloadable link that you can use to import your Weebly website into WordPress.

You’ll need the XML file for WordPress. Simply right-click on the ‘Download Your Weebly Export File’ button and select the ‘Save Link As…’ option. It’ll download the export.xml file you need for WordPress.
Step 3: Importing Your Weebly Website to WordPress
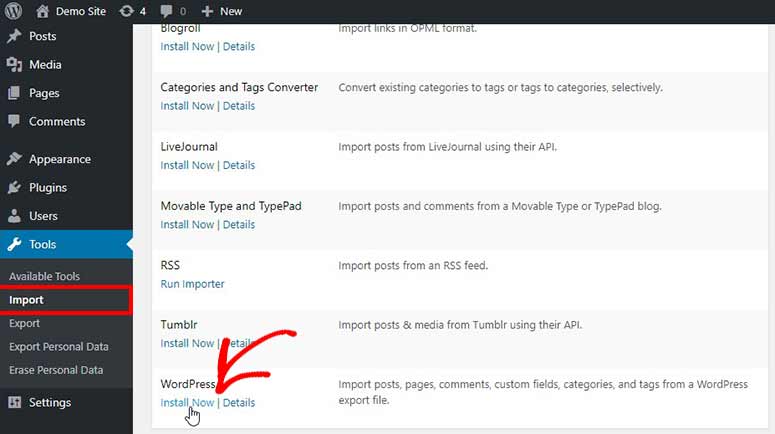
To import your Weebly website, you’ll need to log into your WordPress admin area. From there, you’ll need to go to the Tools » Import page. On this page, you’ll see multiple importers but you’ll need to use the WordPress importer.
Go ahead and click on the ‘Install Now’ link below the WordPress importer and it’ll be installed without changing or loading the page.
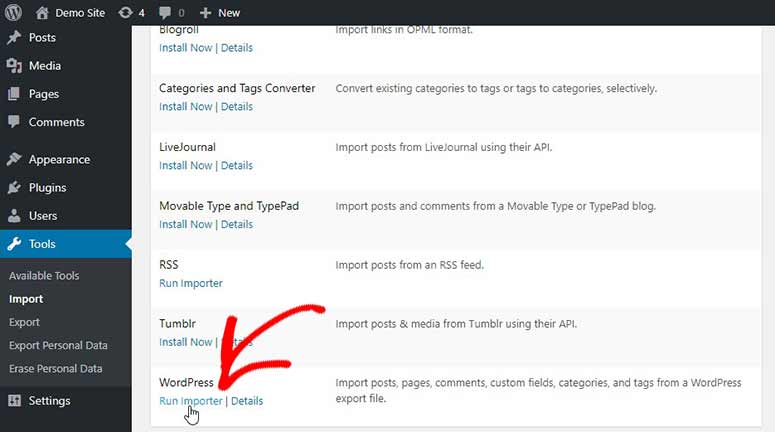
After the successful installation, you’ll see that the options are now changed. Click on the ‘Run Importer’ link below the WordPress importer to continue.
Next, you should click on the ‘Choose file’ button and select the export.xml file that you downloaded in the previous step.
Make sure to click on the ‘Upload file and import’ button. It’ll take you to a new page where you need to assign authors to your content.
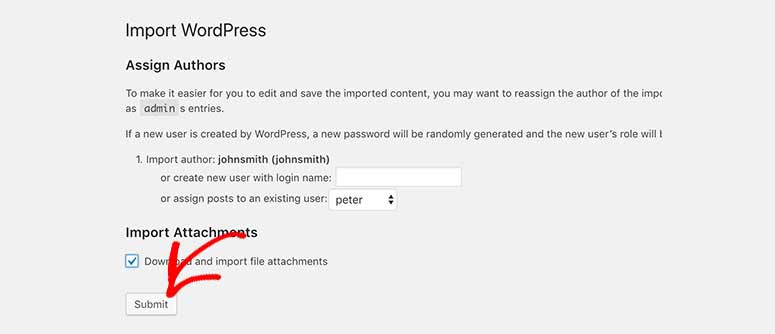
There’ll be multiple options for you, including importing your authors from Weebly, creating new authors, or assigning the articles to existing users in WordPress.
You’ll also need to mark the ‘Download and import file attachments’ setting which will help import your images and media files from Weebly to WordPress.
Once you’re ready, click on the ‘Submit’ button and the importer will run in the background. It’ll take some time depending on the size of the content and media files, so be patient.
After successfully importing your Weebly website, it’ll show you a message to update your credentials (password and user roles).

What’s next?
You can go ahead and check your WordPress pages, posts, and other content to make sure that everything is fine. We also recommend you check your media files that have been imported from Weebly.
However, if you find out that the importer missed some of your content, then you can repeat the process to import the remaining content from Weebly to WordPress. Don’t worry about the repetition as the importer will only import the leftover content.
Step 4: Creating Redirects
When using a custom domain name (https://example.com) for your Weebly website, you’ll need to redirect it to your new WordPress hosting. This’ll enable your users to see your web pages correctly.
To create redirects, you’ll need to log into your Weebly admin account and visit the ‘Domains’ page. From there, you’ll need to click on your custom domain and go to the settings menu. You’ll find the option to edit nameservers.
Simply click on the ‘Change’ button, and it’ll show the primary and secondary nameservers fields. If you purchased Bluehost web hosting, then the nameservers will be ns1.bluehost.com and ns2.bluehost.com
Note: If there’re any errors with these nameservers, then you can contact the support team for help.
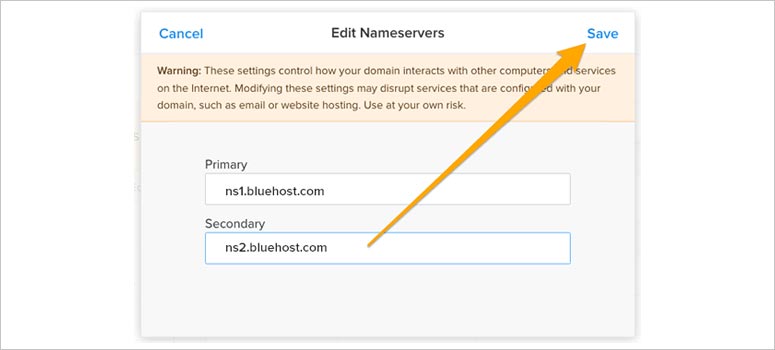
Make sure to click on the ‘Save’ button.
It’ll take 24-48 hours for the nameservers to update properly. After that, your users will see your WordPress website.
If your Weebly website was built on a subdomain (https://mysite.example.com), then you should follow these steps:
First, you’ll need to log in to your Weebly account and edit your site. From there, you can go to Settings » SEO.
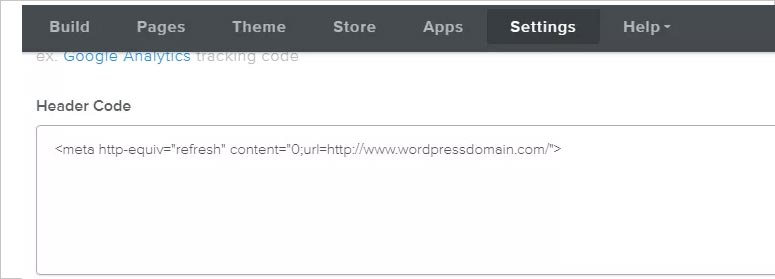
In these settings, you’ll need to search for the header code section and add this line of code:
<meta http-equiv="refresh" content="0;url=http://www.wordpressdomain.com/">
You’ll need to change the URL (http://www.wordpresdomain.com/) to your WordPress website URL.
Once replaced, you’ll need to click on the Save and Publish buttons. Next, visit your Weebly site URLs, and the page will be redirected to your new WordPress site.
Step 5: Managing Permalinks / URL Structure
You’ll need to fix the URL structure for your users. Otherwise, they may see a 404 error on your web pages after migration. This error occurs because the URL didn’t match up during the redirection.
To fix the permalinks / URL structure, you’ll need to go to the Settings » Permalinks page in your WordPress admin area. From there you’ll need to select the custom structure for URLs and enter /blog/%postname% in the given field.
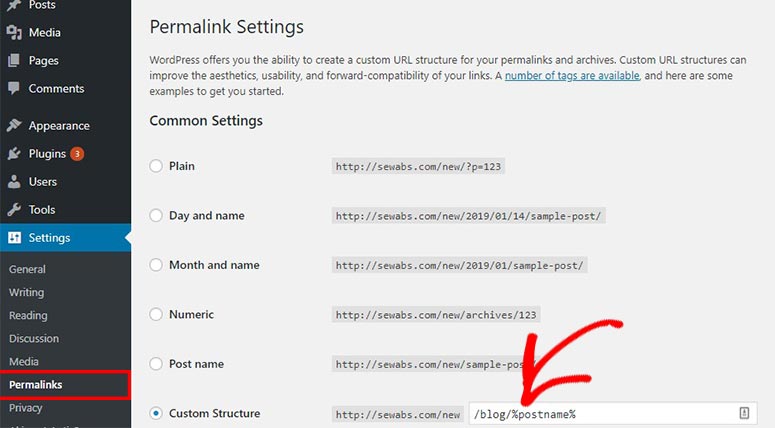
Once added, click on the ‘Save Changes’ button. That’ll fix the issues with your posts.
But Weebly uses .html in the URLs for pages which means you need to manage that issue separately from posts.
To add .html into the URL structure of WordPress pages, you’ll need to install and activate the Add Any Extension to Pages plugin. Check out our guide on how to install a WordPress plugin for assistance.
Once activated, you’ll need to go to Settings » Add Any Extension to Pages to manage the options. In the ‘Extension’ field, you’ll need to add .html and click on the ‘Update Settings’ button.

After that, you can go back to the Settings » Permalinks page and hit the ‘Save Changes’ button to properly update your WordPress URLs.
Your site has been moved from Weebly to WordPress successfully.
Step 6: Customization and Plugins

It’s time to personalize your WordPress site. You can use the default block editor (also known as Gutenberg). You can also opt for third-party builders like SeedProd, Thrive Architect, and Divi. These give you more features and flexibility with how you customize your site’s design.
See our full guide on How to Customize a WordPress Website [Beginner’s Guide].
Next, you can check out our article on the best WordPress plugins that you MUST use. These plugins will help add more features and functionalities to your website.
We also recommend you check out our selection of the best WordPress themes for specific niches:
- Best WordPress themes for travel blogs
- Best WordPress education themes
- Best photography themes for WordPress
- Best WordPress business themes for your business website
- Best WordPress multi-purpose themes for all websites
These themes were selected by our experts. However, with a little searching, you can find many other WordPress themes on the internet that match your interests and needs.
Step 7: Troubleshoot Errors

We want to make sure that you don’t see any errors, so we’ve listed a few common issues that users may face after migration. Take a look:
Common WordPress Errors:
You may see the common WordPress database connection error. We recommend you follow our complete step-by-step guide on how to fix the error establishing a database connection in WordPress.
External Images Issue:
Generally, the WordPress importer should import all your images from Weebly and store them in the WordPress media library. However, if you find out that the images were not properly imported, then we recommend you follow this guide on how to import external images in WordPress.
So that’s about how to export Weebly site to WordPress properly.
We hope this guide helped you learn how to move Weebly to WordPress. Next, you may be interested in learning more about WordPress and how to get the most out of it. See our guide on Best Free Websites and Resources to Learn WordPress (Beginners & Developers).

It did not work for me. It seems like it could not find my Weebly site, maybe it is because I have a host called Hostgator. I have started my Weebly site through their hosting account. Then I have sent my XML sitemap to Google search console bot the Weebly to WordPress downloader cannot find my site.
This importer didn’t work for me 🙁
Julia,
Could you please elaborate, like what error message you’ve seen or the possible reason for why it didn’t work, etc?
Having issues with the exporter as well. Error message is, “Could not find any content in your weebly blog to export. Did you enter the correct URL? Go Back”