
Do you want to let visitors sign up for events or buy tickets on your website?
Event registration forms make it easy for visitors to give you their details to sign up for events like webinars, workshops, and music concerts, just to name a few. But these forms can do more than that. You can use them to grow your email list, follow up with registrants, and track conversions so that you can improve future events.
From this step by step guide, you’ll learn how to create an online event registration form in WordPress, the easy way. We’ll also show you how to sell event tickets and deliver automated email confirmations using the same form.
What Do You Need to Create an Online Event Registration Form?
The best way to create an online event registration form in WordPress is by using a form builder plugin. These form builders make it easy to create forms without using any coding.
They come with premade templates that you can customize by pointing and clicking. This way, you won’t have to spend days designing a form. You can create the form in under 5 minutes and start taking registrations right away.
Among the popular form builders, we recommend WPForms, the most beginner-friendly WordPress form plugin on the market.
WPForms has 1,200+ of built-in form templates, so you’ll find a template for just about any form you want to create. There’s also a dedicated registration form template that is prefilled with all the fields you’ll need for event registrations.
All you have to do is customize it to suit your brand and there’s a drag and drop form builder for that. It makes it easy to add more fields, change the text, and configure form settings.
Once your form is ready, you can display it anywhere on your WordPress site using the WPForms widget. No shortcodes needed!
Aside from this, the reason we recommend WPForms is because it comes with advanced features that you won’t get with other plugins. For starters, you can add event tickets to your form and integrate with payment gateways so customers can buy tickets instantly.
Next, every form you create comes with built-in spam protection that automatically blocks bad bots and fake entries.
Added to that, you can enable conditional logic to display follow-up questions based on the user’s answer. That way, users can choose the event they want to register for and you can display custom questions only for that event.
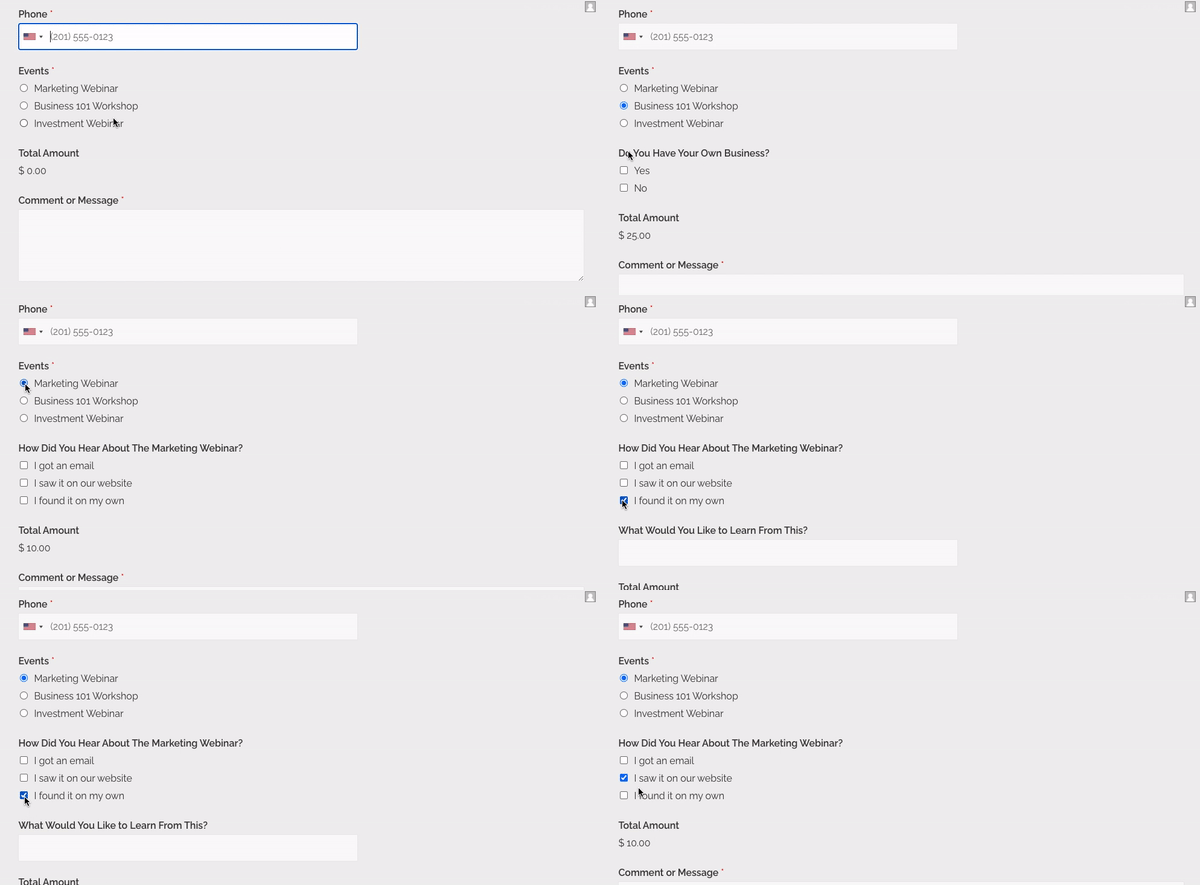
And there’s more! You can even create automated email notifications that will be delivered to your customer the second they submit the form. This lets you send welcome emails, seat confirmations, or even deliver digital tickets!
In a nutshell, WPForms has features that go above and beyond your expectations. You can create, customize, and track your forms right inside your WordPress dashboard. You’ll never need to look at another form builder again.
With that said, let’s look into the step-by-step process of creating an online event registration form in WordPress using WPForms.
Step 1. Install and Activate the WPForms Plugin
The first thing you’ll need to do is to visit the WPForms website and sign up for an account.
There’s a free version but to access the online registration template and payment options, you’ll need to subscribe to the WPForms Pro or Elite plan.
Once you’ve signed up, inside your WPForms account, go to the Downloads tab and click on the Download WPForms button.
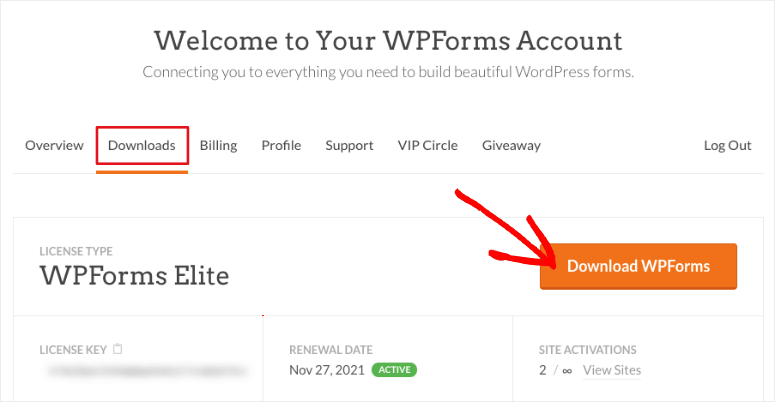
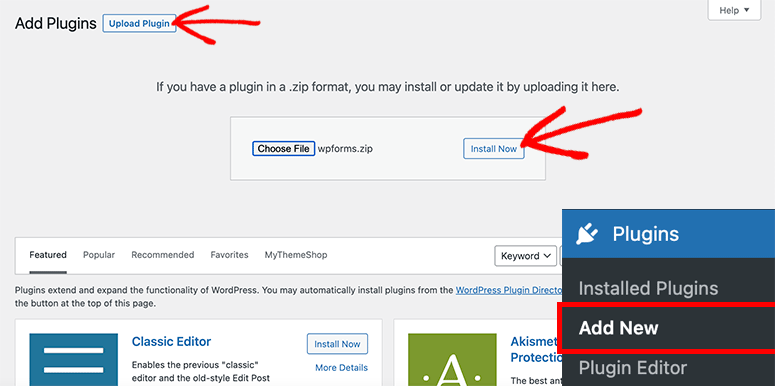
After downloading the plugin, you’ll need to visit the Plugins » Add New page in your WordPress admin area and click on the Upload Plugin button.
Choose the WPForms plugin file from your computer and click on the Install Now button.
For more details, you should check out our guide on how to install a WordPress plugin.
Step 2. Install and Activate the Form Templates Pack Addon
Before you create the form, you’ll want to install a WPForms addon to get access to the entire list of templates. Head over to the WPForms » Addons page. Here you can search for the Form Templates Pack Addon and install and activate it.
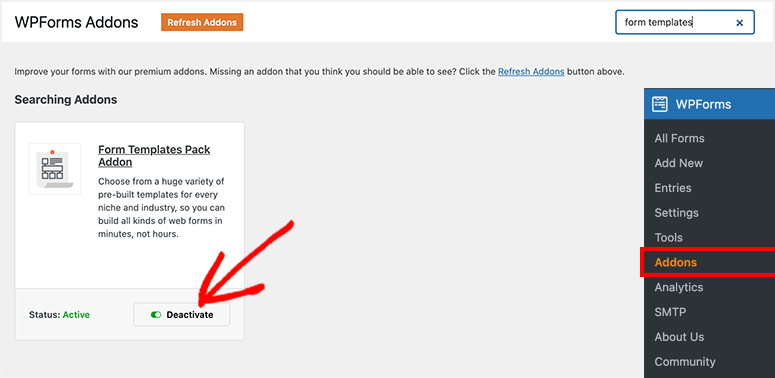
After activating the addon, can go ahead and start creating your online event registration form in WordPress.
Step 3. Create a New Online Event Registration Form
Now that you have everything ready, go to the WPForms » Add New page from your WordPress admin area.
This will launch the WPForms form builder on your screen.
You can start by entering the name for your new form and searching for the online event registration form template below.
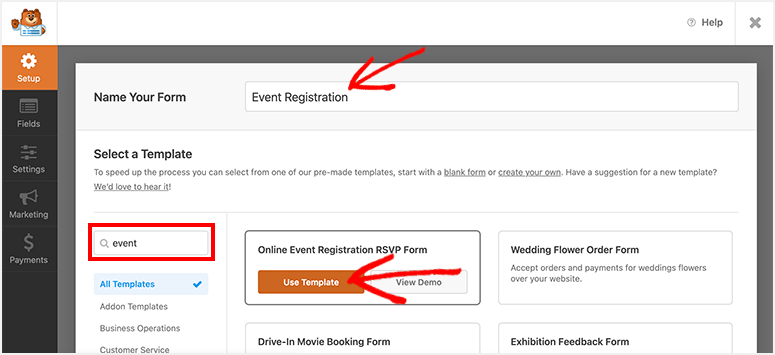
Move your mouse over the template and click on the Use Template button.
The form template will now load on your screen. You’ll find the WPForms custom fields on the left side and the event registration form preview on the right side.
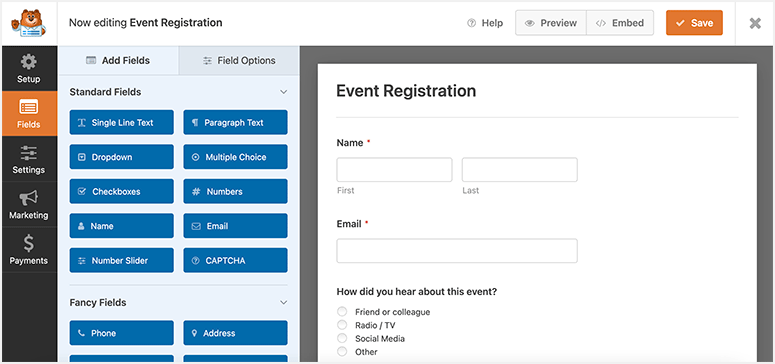
By default, the form comes with all required fields. You can also add a new field by dragging it from the left side to your form preview on the right side.
So for instance, if you want users to be able to select and buy event tickets, you can add a Checkbox Items field. This lets users select any one option from the list.
If you plan on listing the price of the tickets, then you can even add the Total field as well. This will dynamically calculate and display the total cost based on the user’s selection.
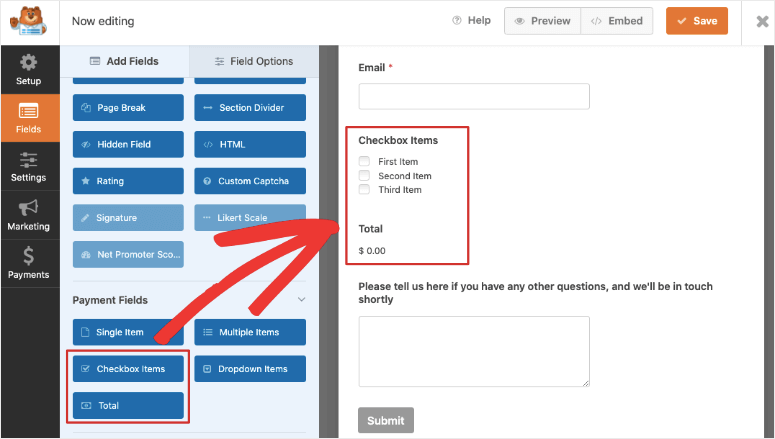
Now, if you want users to be able to select multiple events, then you’ll want to add the Multiple Items field to your form instead.
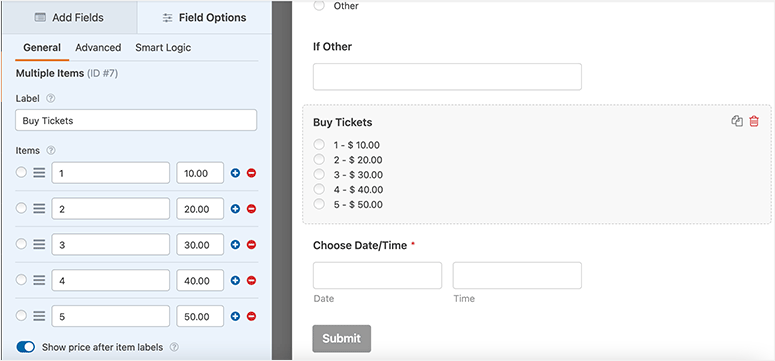
You can list multiple events and let users register for as many as they want in the same form.
Now when you select this form field, in the left editing taskbar, you’ll see options to add the price against each item so users can see the cost before choosing their tickets.
Like this, you can add and customize as many form fields as you need.
Once you’re done with the customization of your form, go ahead and click on the Save button at the top right corner of your screen.
Step 4. Manage Event Registration Form Settings
WPForms gives you full control over your form’s configurations. You’ll find these options under the Settings tab from the left navigational menu.
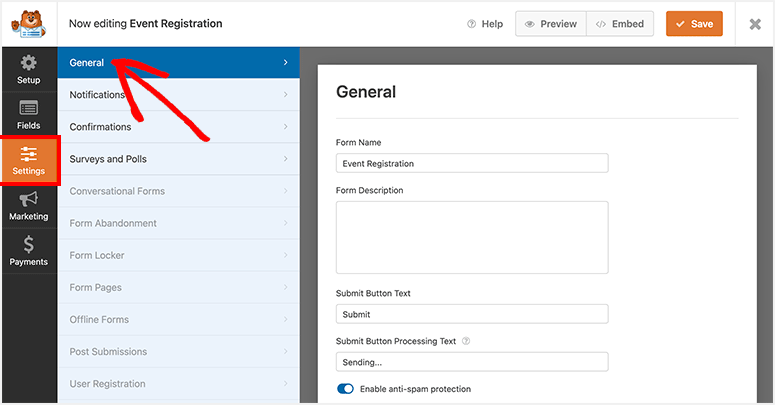
In the General settings, you can add or update the following options:
- Form name
- Form description
- Submit button text
- Submit button processing text
- Enable anti-spam
- Enable Google reCAPTCHA
- Disable storing entry information in WordPress
- Disable storing user IP address
After this, in the Notifications settings tab, you can manage the email notifications on form submissions.
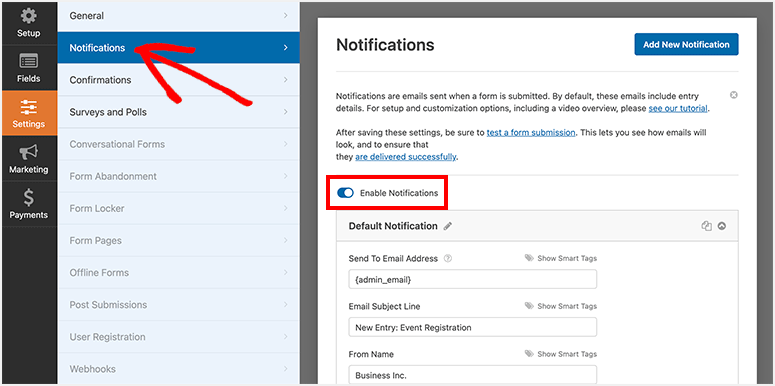
By default, it’ll send you a notification on every submission to your WordPress admin email. You can customize the notification email subject, message, email address, and other details as you like.
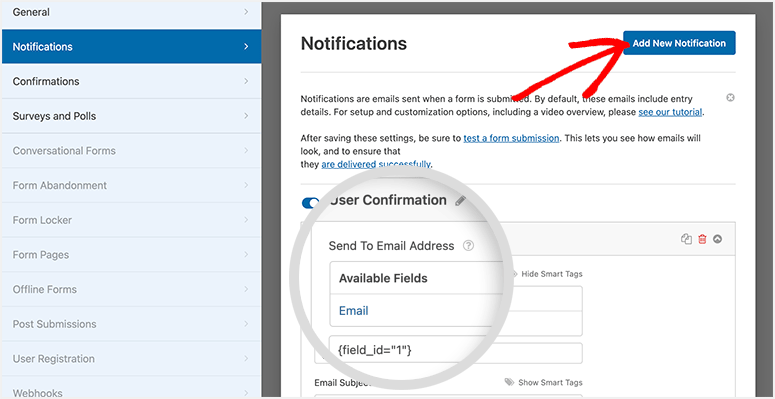
It also lets you create a new notification for your attendees. This is where you can create emails to send seat confirmation messages, order info, event details, welcome emails, and so on.
When you create a new notification, click on the Show Smart Tags option to select the email field. WPForms will automatically detect the email address entered by the user and send the email notification to them.
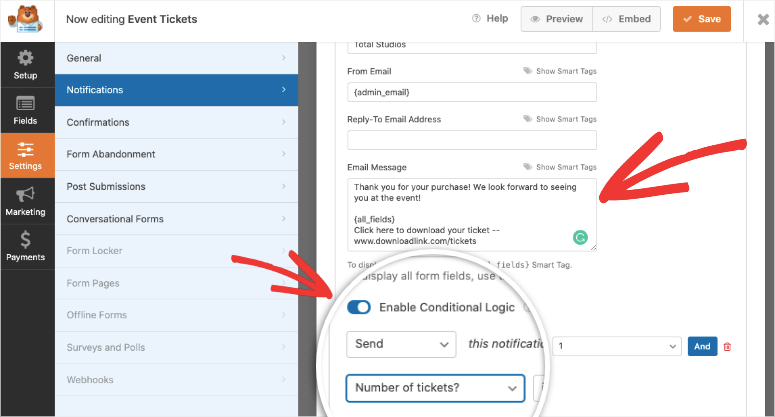
Below this, there are options to customize the subject line and email body. You’ll also get options to add conditional logic so you can send the email only if certain conditions are met. This lets you deliver the right ticket based on which event the user selected.
For more on this, see our guide: How to Set Up the Right Form Notifications & Confirmations.
Once you’re satisfied with the settings, click on the Save button from the top right corner of your screen.
Step 5. Customize Your Online Event Form Confirmations
Aside from email notifications, WPForms also lets you control what happens after the user submits the form. You can display a confirmation message or redirect them to a new page.
To set this up, open the Confirmations setting tab.

You’ll see 3 confirmation options:
- Message: If you don’t change any settings, your users will get a default confirmation message. You can also customize the success message in this option.
- Show Page: If you want users to see a specific page on submitting the form, then this is where you add the page link. You can create a custom thank you page or landing page to engage users further on your website.
- Go to URL (Redirect): If you want to send your users to a different website, then select this option and add the URL of the website.
Once you’ve added your confirmation type and made the changes, hit the Save button to store these settings.
Step 6. Connect to Your Email Account
WPForms integrates with all popular email providers like Constant Contact, AWeber, and Mailchimp. You can connect your account and have all your leads added to your contact list instantly.
Under the Marketing tab, select your email provider. WPForms will prompt you to install and activate the email marketing addon.
Then you can follow the onscreen instructions to connect your email account.
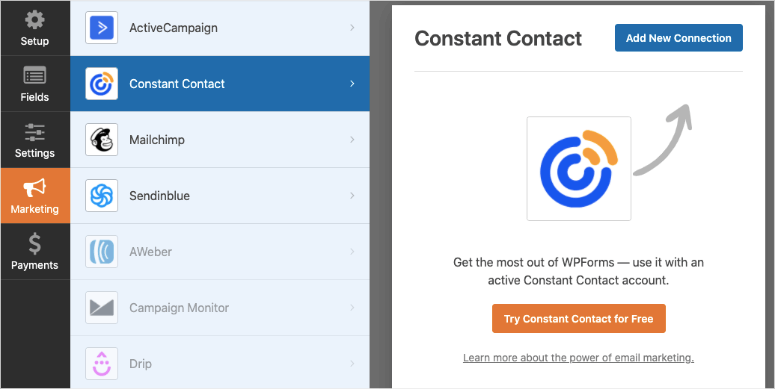
Once you’re connected, you can tag and segment your leads so that you can send personalized emails according to what they signed up for.
Now, if you want to accept payments online for ticket sales, we’ll show you how to do that in the next step. If not, you can skip ahead to the final step where you’ll publish the form.
Step 7. Add a Payment Method to Your Online Event Form
WPForms lets you add multiple payment options to your online event registration form. So if you want users to pay online for tickets, all you have to do is enable a payment addon and connect your account.
WPForms supports these payment options:
To integrate one of these options, in the form builder, open the Payments tab from the left menu. Choose a payment method, for example, PayPal Standard. WPForms will then display a prompt to activate the PayPal Standard Addon.
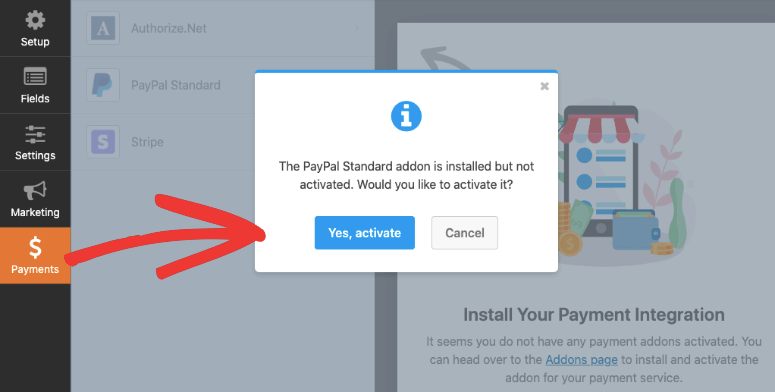
Once activated, you’ll see a form appear in the same tab.
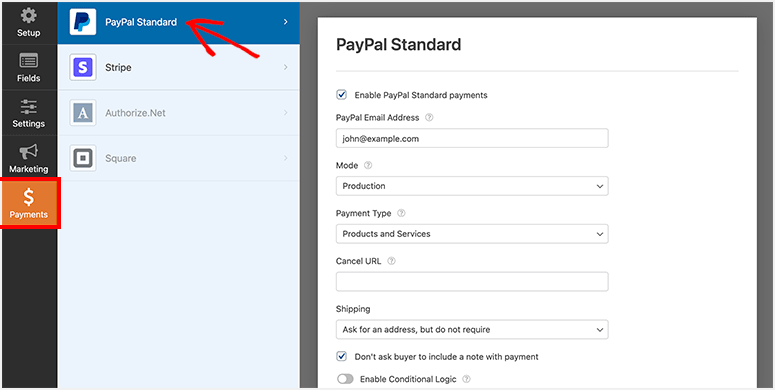
You can enter your PayPal account details. Then choose Production mode and select Products and Services as payment type.
Other settings include your PayPal email address, shipping details, and so on. Once you save your settings, your payment integration is ready.
Step 8. Publish and Display Online Event Registration Form in WordPress
Now your online event registration form is ready to go live on your WordPress site.
WPForms makes it easy for beginners to add forms in WordPress without any technical knowledge. You can add your event registration form to the pages, posts, sidebar, and other widget-ready areas.
For this guide, we’ll show you how to add your event registration form to a page or blog post.
You’ll need to create a new page/post in WordPress or edit an existing one. Then click on the plus (+) icon in the block editor and select WPForms.
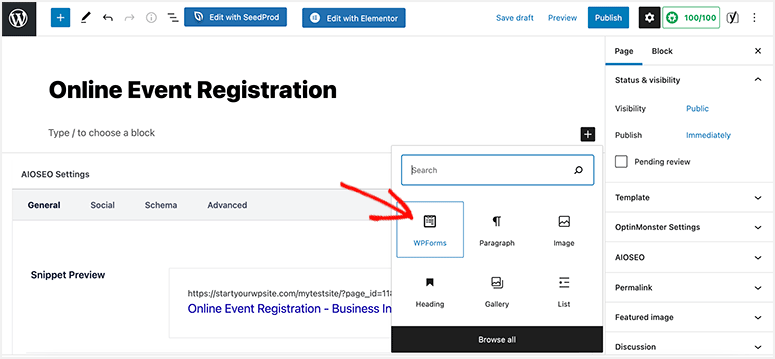
Next, you’ll need to select the Event Registration form in the dropdown, and it’ll show you the preview of your form in the block editor.
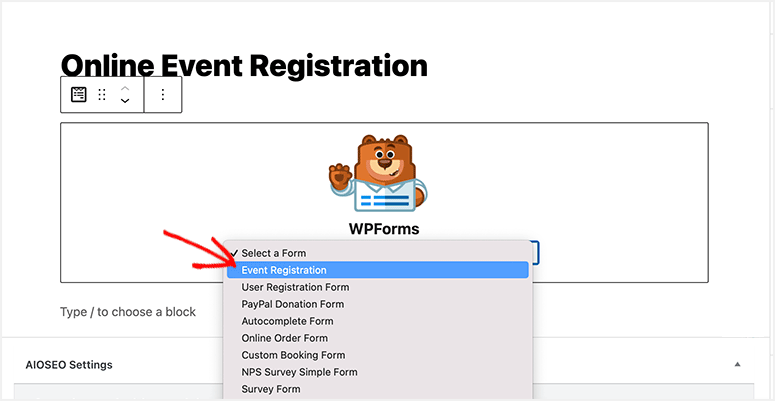
You can add event-specific content to your page and optimize for SEO to sell more tickets online.
Once the page is ready, you can click on the Publish/Update button. Now when you visit your site, you’ll see the form live in action. We recommend testing it to make sure you’ve set it up correctly so that you can make adjustments if needed.
If you would like your users to have an option to add the event to their calendar, follow this helpful guide from WPForms: How to Include an Add to Calendar Option to Your WordPress Forms.
That’s all for now. We hope this article has helped you learn how to create an online event registration form in WordPress.
You may also want to check out our helpful guides:
- How to Create Autocomplete Address Form in WordPress
- How To Reduce Form Abandonment and Boost Conversions
- How to Stop Contact Form Spam in WordPress (Step by Step)
These articles will further help you add more features to improve user experience, increase form completion, and stop spam activities to improve your online registrations.

Thank you for sharing such valuable information!