Are you looking to add push notifications to your website?
Web push notifications are one of the best ways to improve traffic, engagement, and sales. They offer real-time communication directly to your users’ devices.
No need to open emails or messages; just a popup with all the necessary information. Web push notifications are easy to use, affordable, and grab users’ attention without distracting them.
In this article, we will compare two of the best push notification plugins: PushEngage vs OneSignal. We will look at their pricing, features, and how to use their web push alert feature.
PushEngage Overview
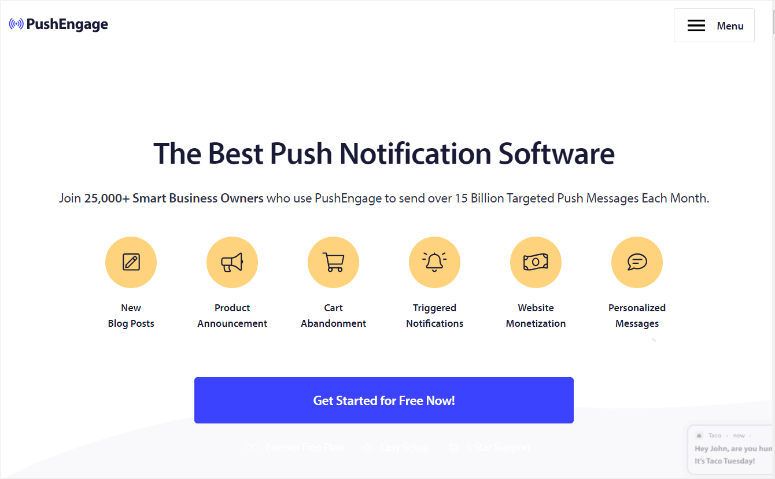
PushEngage is the best push notification plugin because it is packed with practical features and is easy to use.
In fact, you do not need to have any coding experience to use it. With PushEngage, you can set up different types of web notifications, such as new blog alerts, product announcements, cart abandonment, triggered campaigns, and more.
You can also use PushEngage to display social proof to your website visitors, helping you improve SEO, conversions and sales. This also means it can help you gain the trust of first-time visitors.
As a result, PushEngage is great for eCommerce stores, SaaS companies, bloggers, and small businesses that want to level the playing field.
This marketing tool can help you send web push notifications in an easy and convenient way. Your users do not need to open your website or be connected to the internet. They will receive the notification as soon as they are online.
This WordPress plugin can also send mobile and iOS push notifications, making it great for cross-channel communication.
OneSignal Overview
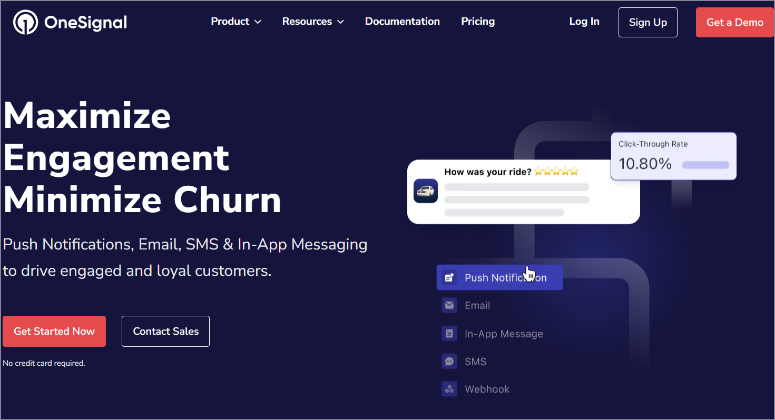
OneSignal is a popular web push notification plugin that also supports mobile push notifications, email, and in-app messaging. This makes it a more complete cross-channel communication plugin, allowing you to reduce plugin dependency and ensure your site does not bloat up.
You can quickly personalize the notifications with dynamic content and user-specific information.
Unlike PushEngage, which focuses on user-friendliness, OneSignal is a more developer-focused platform with a wider range of integrations and customization options. In case a native tool connection is not available, OneSignal comes with API access for custom integrations and advanced use cases.
“This push notification platform is designed to handle high volumes of notifications, making it suitable for large companies and apps with large user bases.
This also makes it a good choice for businesses needing a scalable solution.
If you are looking for more options, here is a list of the 8 best push notification tools and software.
PushEngage Vs. OneSignal: Which is Better?
Now that you have a better understanding of these two web push notification plugins let’s dive into the comparison article.
We have divided this article into several sections so that you can quickly navigate through it. Just click on a link below to jump to that section.
- Installation & Set Up
- Customization
- Ease of Use
- Features
- Documentation & Support
- Pricing
- Pros & Cons
- Final Verdict
Installation & Set Up
PushEngage
One of the things we really liked about PushEngage is how easy it is to install and set up. First, it offers different plans, ensuring that everyone finds a package within their budget. You also get a free plan to test out this push plugin before making a purchase.
To get started, head to your WordPress plugin repository and search for “PushEngage.” Then, install and activate it as you would any other plugin. You can also go to the plugin’s official website and purchase a premium plan.
If you have issues with this, check out this article on how to install a plugin.
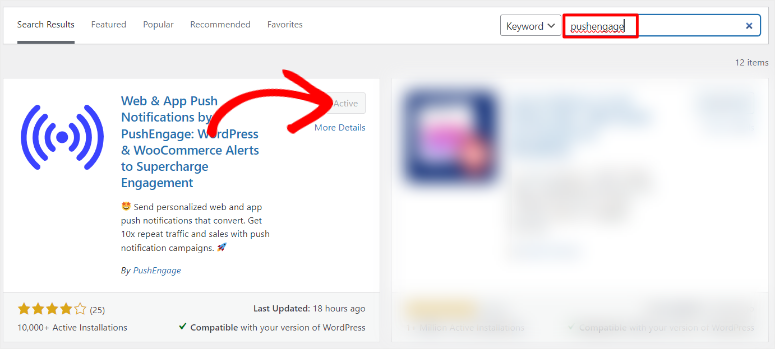
Once you install the plugin, you will be redirected to a page where you can “Connect Your Site” or “Launch Set Up Wizard.”
Both these options will walk you through the setup process, allowing you to quickly create your first push notification campaign.
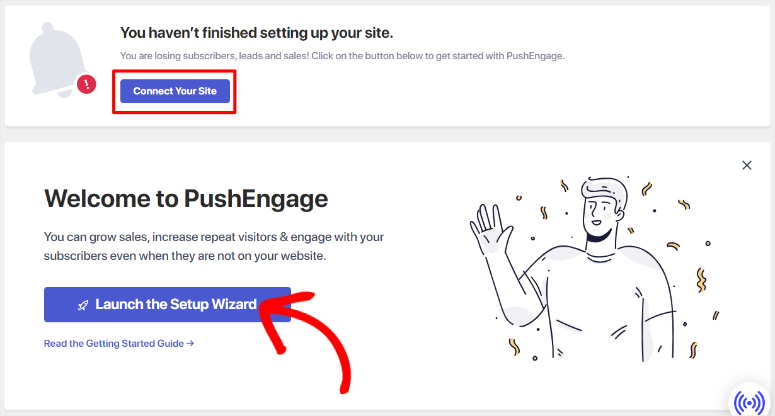
When you select Connect Your Website, PushEngage will take you to a page where you can either “Connect to an Existing Account” or “Claim a Free Account.” Select “Claim a Free Account” if it is your first time using this tool.
You can create an account by manually entering your email and details. You can also sign up using your Google account or Shopify, which gives you plenty of flexibility.
Next, select your industry from a dropdown menu and enter your company size. Below this, enter your credit card information, even if you are using the free version of the plugin.
While adding credit card information on a free account can discourage some, it helps reduce fraud and ensures a good user experience.
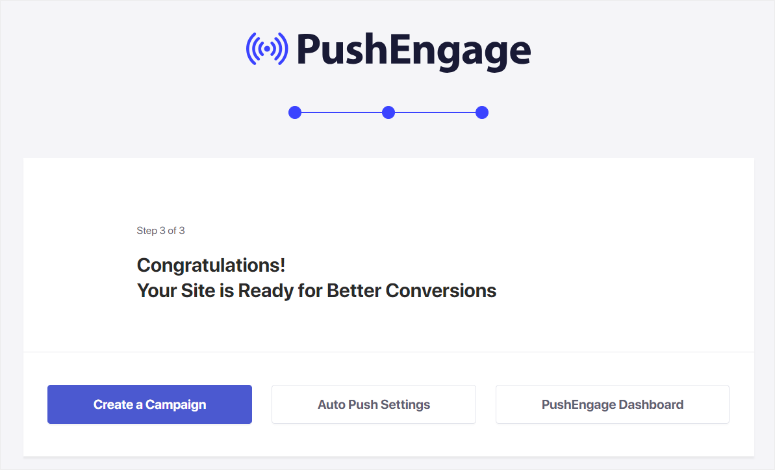
And just like that, you have successfully installed and set up PushEngage. On the next page, you can Create a new Campaign, go to Auto Push Settings or the PushEngage Dashboard.
OneSignal
Now to install and set up OneSignal, you will go through a very similar process as with PushEngage.
First, go to your WordPress repository, search for “OneSignal,” and install and activate it like you would any other plugin.
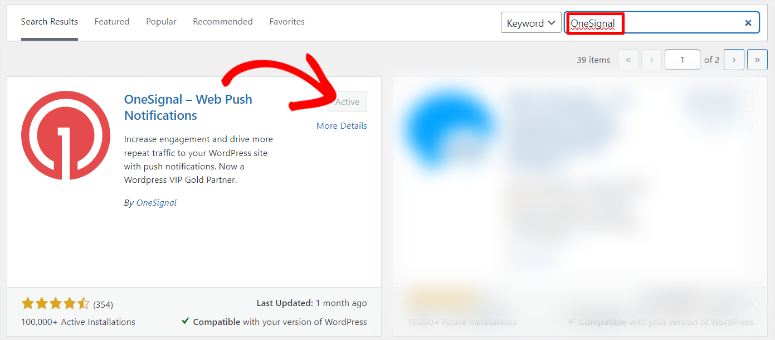
After this, go to the new menu option in your WordPress dashboard called “OneSignal,” which will open a page with two tabs, “Setup” and “Configuration.”
Go to “Setup,” where you will create a OneSignal account first. You can sign up manually with OneSignal by adding your email and password, just like PushEgange.
But, you can also sign up using your Google, Facebook, or GitHub account. This gives you more flexibility to choose the method that is most convenient for you.
Once this is done, provide all the required personal and website information and name your first app or website.
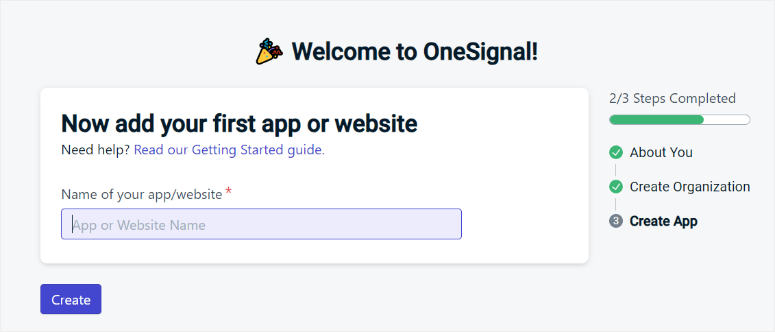
You will then be redirected to the Quick Start Guide, where you can start configuring the plugin.
Here, select “Set Up Messaging Channels for your App” to expand the options. Then, select the messaging channel you want to create. For this example, we selected “Push Notifications.”
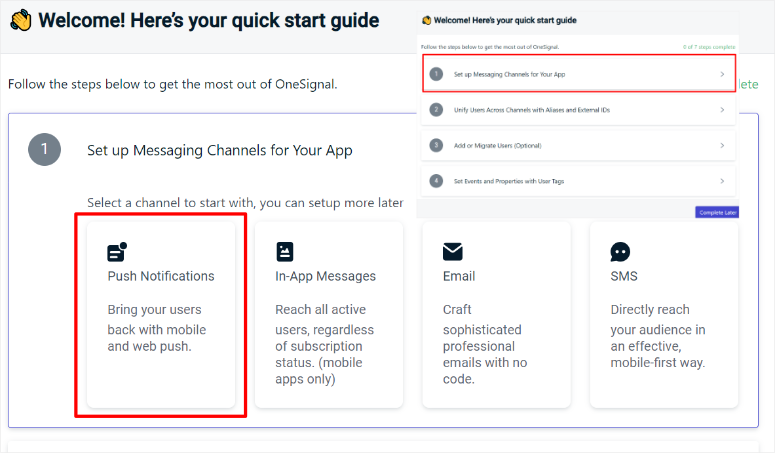
After this, select the type of push notification you want to set up from the tabs. Here, we selected “Web” for our example.
On the next page, select the type of site integration you want from Typical Site, WordPress Plugin or Website Builder, or Custom Code. For this comparison, we went with the WordPress plugin, as this is also the easiest way to set up OneSignal.
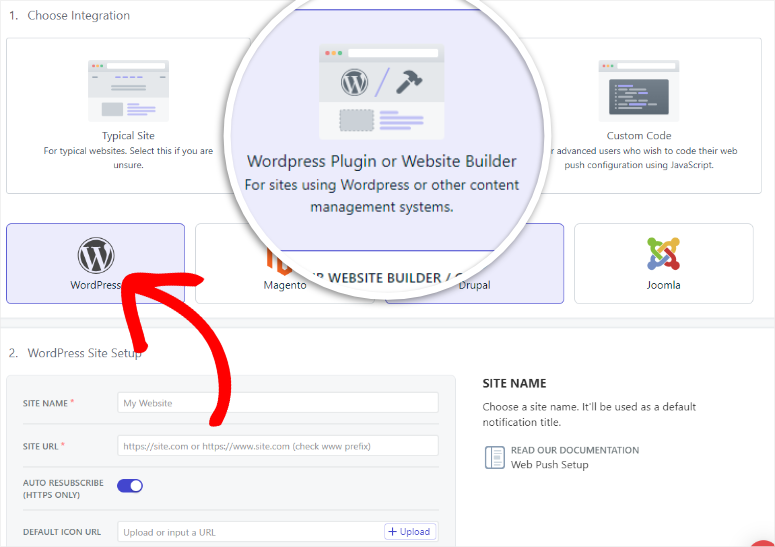
Follow this up by selecting the type of builder you want to use. Once you select WordPress from the tabs, enter your website URL and Site Name. You also have the option to upload a Default URL push notification icon and activate Auto Resubscribe with toggle buttons.
When you are happy with the settings, hit Save.
On the next page, copy the App API and Safari Web ID if you want to display the push notification on iOS as well.
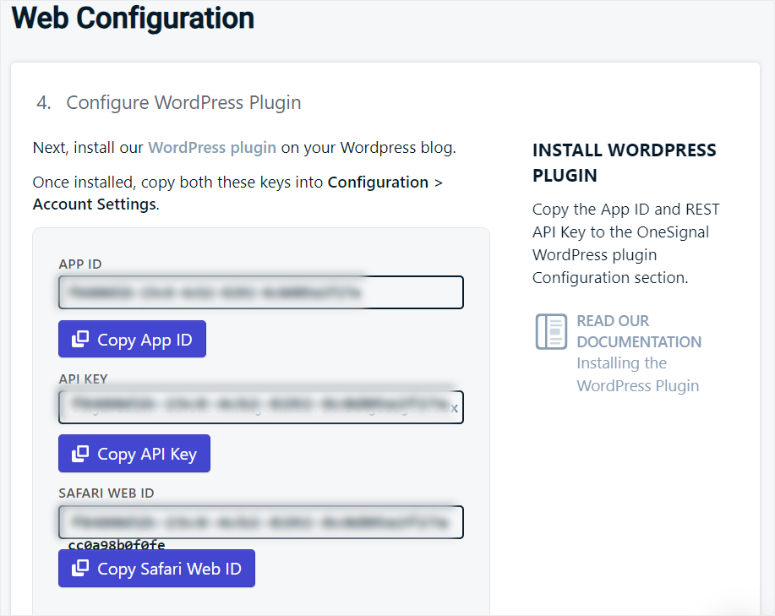
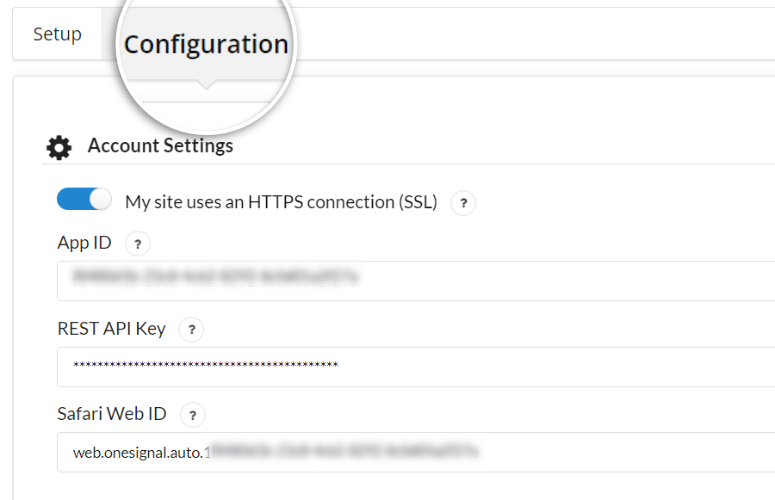
Finally, return to the OneSignal menu option in your WordPress dashboard and select Configuration. In the text bars provided, paste the keys you copied from your OneSignal account, scroll to the button, and hit Save.
Congratulations! You can now install and set up OneSignal.
Installation & Set Up Winner: PushEngage
PushEngage is super easy to install and set up. Plus, most of the setup processes are done on your WordPress dashboard, so you will not need to switch between different platforms. It automates most of the process for you ensuring even if you have no experience setting up plugins, you can do it yourself.
For example, it automatically adds the tool’s API code when you connect your PushEngage account to WordPress.
On the other hand, OneSignal has a longer process, as you will need to select your site builder, set messaging channels, and more. There is a lot of back-and-forth between your WordPress dashboard and OneSignal account, which can be confusing for beginners.
Because of this, PushEngage is the clear winner when it comes to installation and setup.
Customization
PushEngage
After installing PushEngage, there are a lot of customization options you can set up to make it convenient for you, your team, and your users.
To customize PushEngage, go to PushEngage » Settings in your WordPress dashboard. Then, start with the Site Details tab, where you can quickly activate Geolocation with a toggle button.
This will help with geotargeting, allowing you to send web push notifications according to a user’s location and time zone, making their experience more personalized.
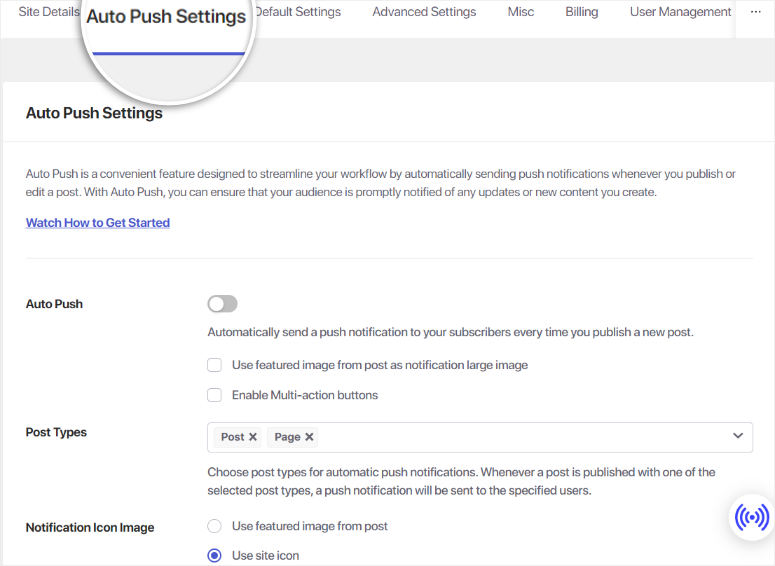
Then move to the Auto Push Settings tab. Use the Toggle button to activate “Auto Push,” which allows PushEngage to send a notification when you edit or publish a new post.
Here, you can also set whether the plugin should use the featured image from the post as a large image and activate multi-button notifications.
To add to this, you can decide if you want to have an automatic notification for posts, pages, or both. Finally, select if you want to use the featured image or the site icon for the notification’s large image.
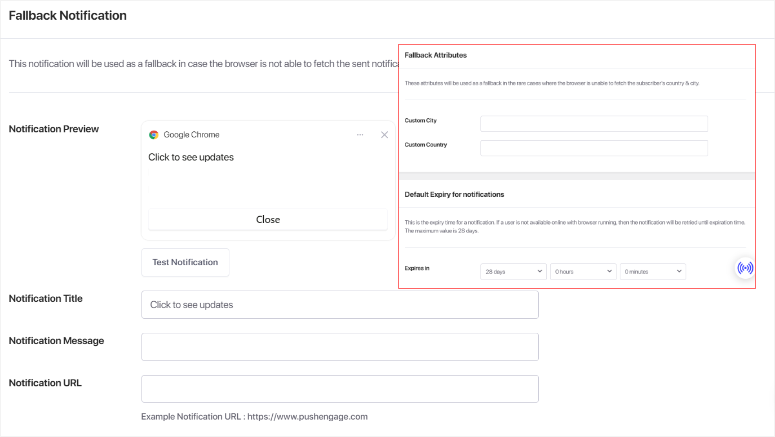
In the Default Settings tab, set the “Fallback Notification” option.
This is an alert PushEngage sends when a push notification to a user fails. You can set the title, message, and URL of the fallback notification to direct the user to the next steps. You can also customize the message to explain that the push notification failed, improving user experience.
Below this, you can also add Fallback Attributes when the browser is unable to fetch the subscriber’s country or city. This ensures that the message is more personalized even if PushEngage cannot detect their location.
With PushEngage, you can set the “Default Expiry” for notifications. This means that the notification will only expire if the user stays offline for the specified amount of time you are set.
Even though most customizations for this plugin are made in WordPress, you need to access the PushEngage dashboard for user management.
But do not worry—PushEngage makes user management just as easy.
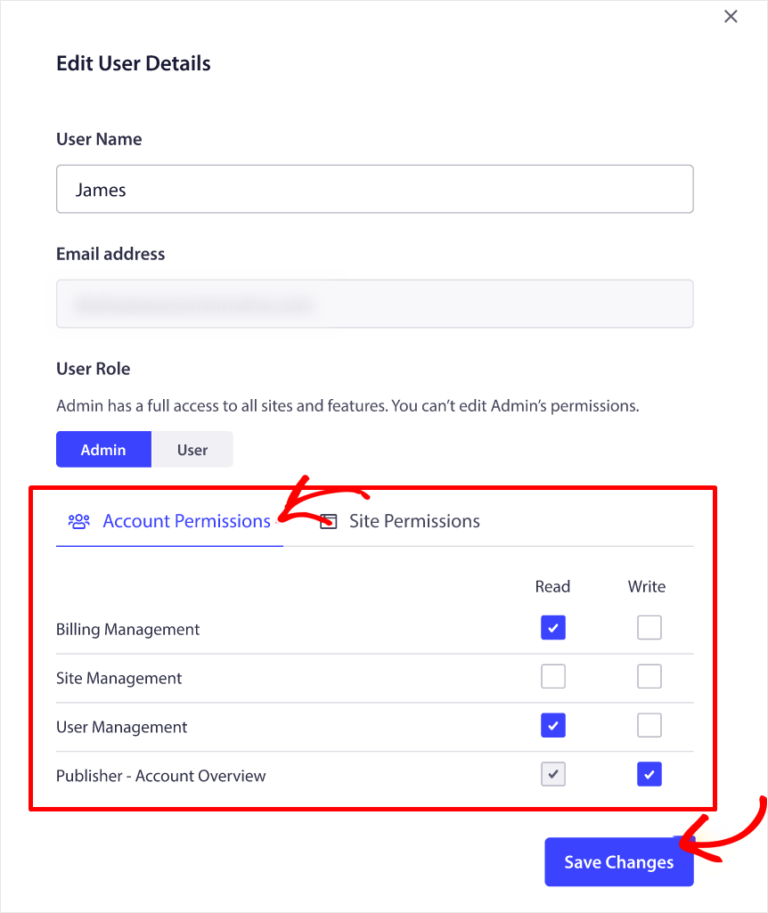
All you have to do is go to your PushEngage account and select the dropdown menu under your profile. After this, select “User Management,” and create or remove users.
Through the Account Permissions tab, you can also use checkboxes to grant different people permission to read or write. These permissions include Billing Management, Site Management, User Management, and Publisher.
Now, if you want to customize the designs of your push notifications optin popups, you can use either your WordPress dashboard or your PushEngage account.
Both of these options have a similar interface meaning you will not experience a learning curve.
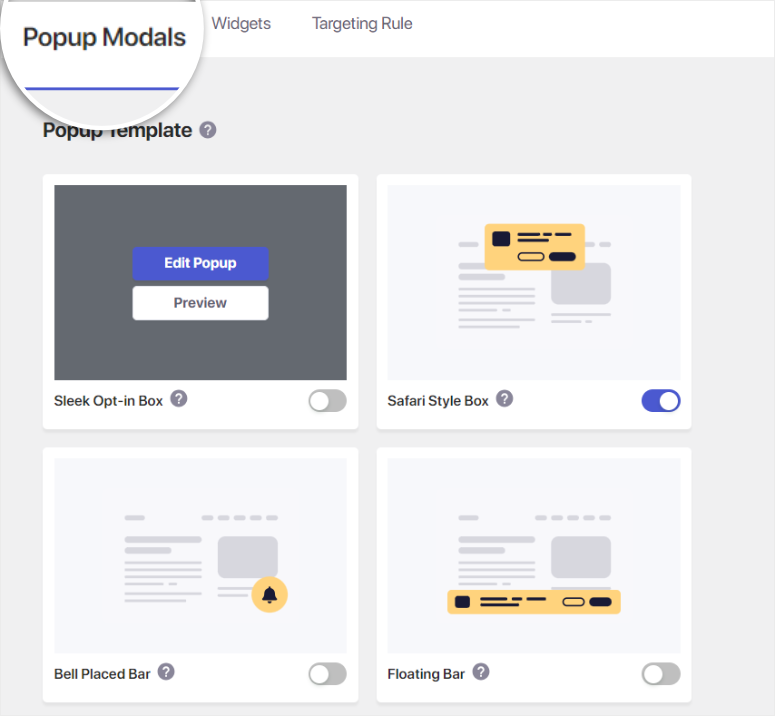
To get started with the WordPress method, go to PushEngage » Designs. Then, from the tabs on this page, select “Popup Modals.”
Here, select the type of optin popup you want to use from Sleek Opt-in Box, Safar Style Box, Bell Placed Bar, Floating Bar, Push Single Step Opt-in, and Large Safari Style Box.
When you hover over any of these optin options, you will see the Preview and Edit Popup buttons. When you select this option, you can preview the popup in the mobile or desktop views.
The preview window will appear as a popup on the same page, making it convenient for you to quickly check if it is right for you. This ensures you have the complete user experience from your user’s point of view.
When you select “Edit Popup,” you will be redirected to your PushEngage account, where you can edit it on either Mobile or Desktop view.
Here, first add the Message, Site Name, and Allow Button Label. You can customize these texts to make them more personalized to your audience or leave the placeholder text.
Next, customize the colors of the Background, the Allow button, and the Close Icon. You can use a color chart or color code, whichever is easier for you. After this, set the position of the optin popup by simply clicking the options displayed.
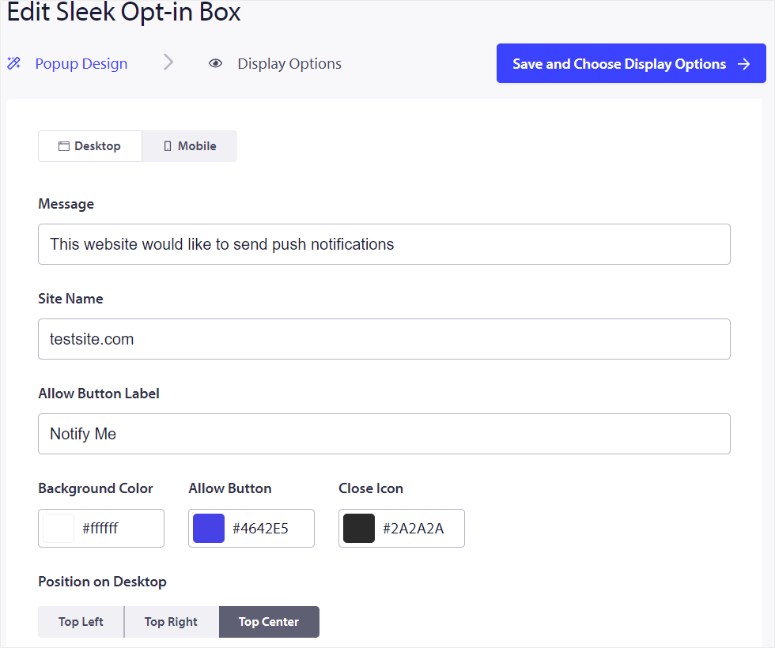
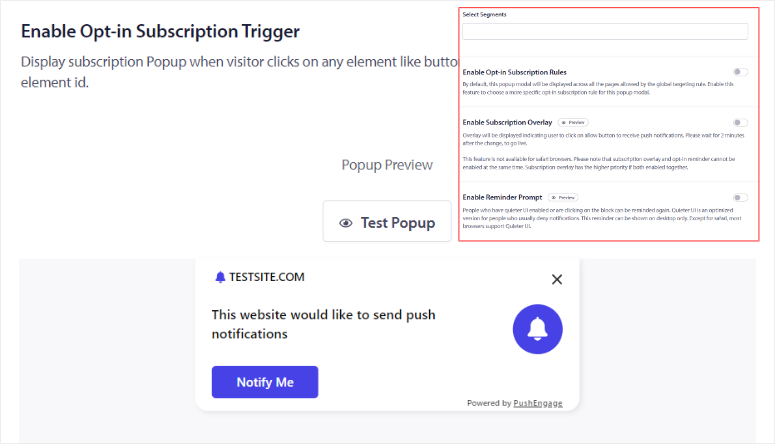
Below this, activate the different functionality using toggle buttons. These include options to enable :
- Opt-in Subscription Rules
- Subscription Overlay
- Reminder Prompt
The best thing about PushEngage is you can use the preview screen next to these options to see how the optin popup develops in real-time. Once you are happy with the results, select the “Test PopUp” button to see how it will appear from a user’s point of view.
Finally, “Save And Choose Display Options” to move to the next step.
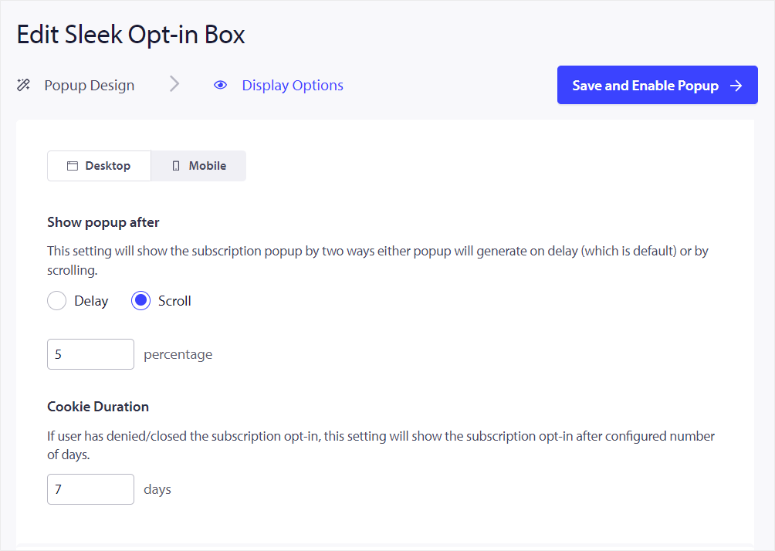
On the next page, you can also edit the optin popup for mobile and Desktop. You can set the popup to appear after a delay or scroll.
If you select Delay, set the amount of time in seconds PushEngage should wait before showing the popup. For Scroll, you will set the scroll percentage instead.
Then follow this by setting “Cookie Duration.”
When a user closes the optin popup, this setting will show it to the user again after a specified time. This automates the process and ensures you do not send the user too many notifications.
To add to this, you can also “Edit Subscription Management Widget.”
You will not experience a learning curve as this edit page looks the same as the Popup Modals editing page. This allows you to follow the same steps.
OneSignal
For OneSignal, most of the customization features are also made in WordPress. In your WordPress dashboard, go to OneSignal » Configurations and scroll until you see “Sent Notification Settings.”
Here, you will use toggle buttons to set whether OneSignal should use the post’s featured image and whether it should use the post’s featured image for Chrome’s large notification image.
Below this, set the duration of the notification. You can either decide to have it on until the user closes it, have it on Mac OS, or switch it on for all devices.
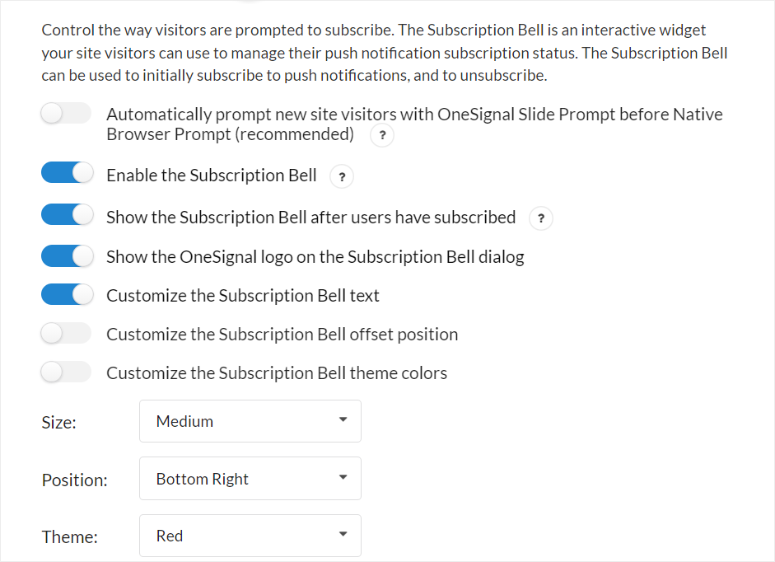
After this, use a toggle button to set up an automatic prompt for new users to sign up for your push notifications. This push alert will appear before they are shown the native browser prompt, increasing the chances that your users will become subscribers.
Next, use toggle buttons to customize the following:
- Enable the Subscription Bell
- Show the Subscription Bell after users have subscribed
- Customize the Subscription Bell text
- Show the OneSignal logo on the Subscription Bell dialog
- Customize the Subscription Bell offset position
- Customize the Subscription Bell theme colors
Still, on the same page, OneSignal allows you to personalize the size, position, and theme of the push notification with a dropdown menu.
With OneSignal, you can also show a customized message when someone unsubscribes, blocks, or subscribes. To add to this, you can also add a message for new subscribers and subscribers.
All these fields can be customized so that they include a message that is more personalized for your audience.
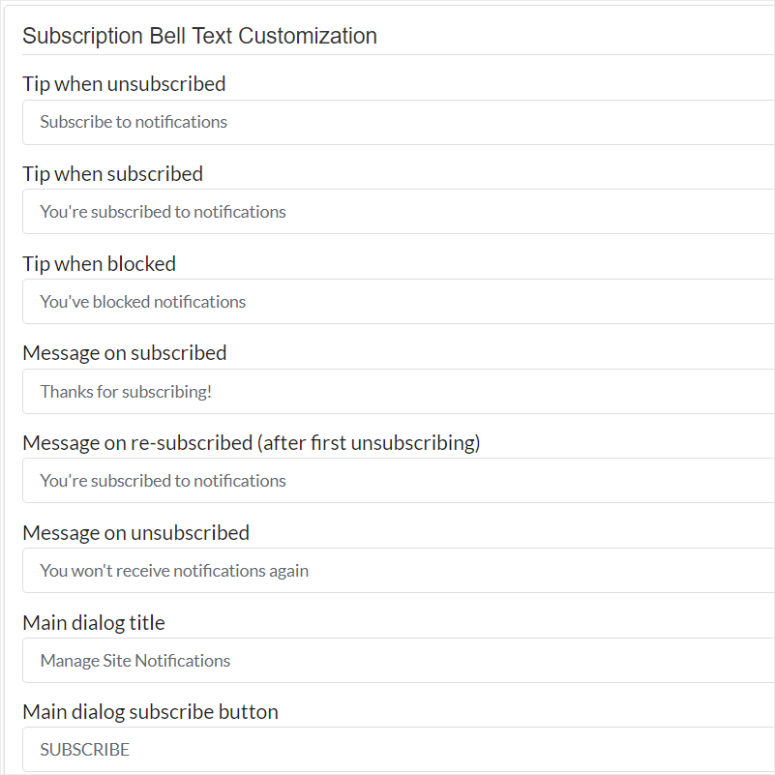
Like PushEngage, OneSignal allows you to automatically send out a push notification when you create a new post.
But in this case, you will use a toggle button to enable the plugin to send a push notification when you create a post with the native WordPress Editor. You can also automate a new push alert when you publish a post from a third-party WordPress page builder plugin.
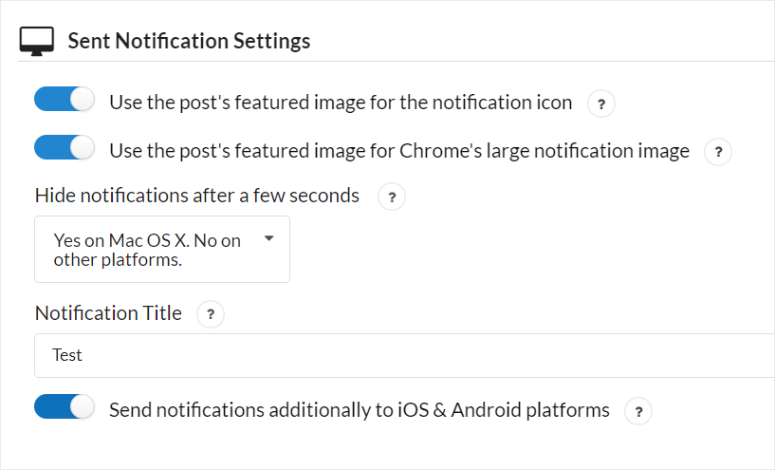
Like PushEngage, you will need to log into your OneSignal account for user management.
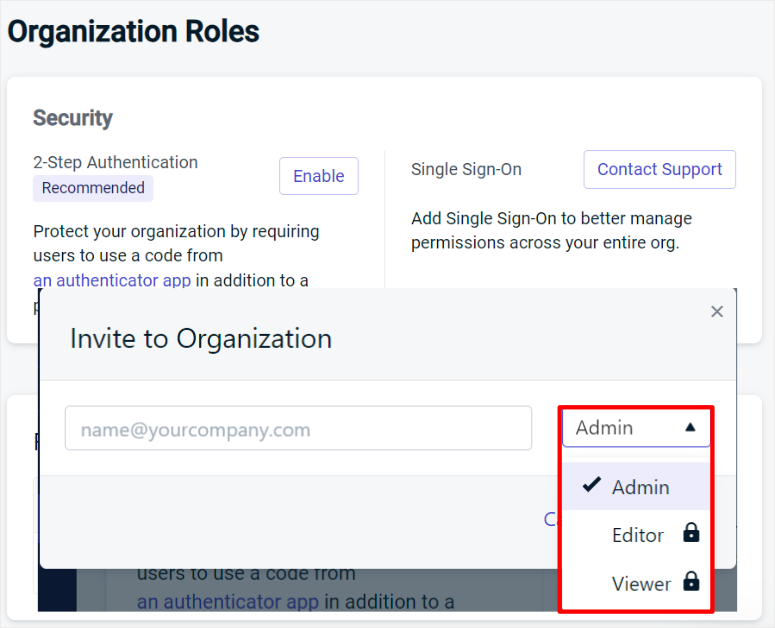
In your OneSignal dashboard, first, select the app or website to open its menu options on the left. Then, scroll the menu options and locate Settings » Role.
Here, you can invite your team using their email addresses and set their roles, which include Admin, Editor, and Viewer. The role you give the user will also define their access level.
The Admin role gives the user all permissions. The Editor role gives the user permission to create, edit, and delete different campaigns. They can also view analytics and export the data. While the Viewer role only gives the user access to analytics and summary tables of messages sent.
The best part about OneSignal user management is that you can force your team members to use 2-factor verification. This can help improve security and make it easier for your team to log into the OneSignal dashboard.
You can also add a Single Sign-on to ensure you manage permissions better across your entire organization.
Customization Winner: PushEngage
One thing we love about PushEngage customization options is that they are conveniently placed in the settings menu.
Plus, all the different customizations are well organized in separate tabs to ensure you easily find the options you are looking for. You can also quickly edit the customization options using toggles or checkboxes.
On the other hand, OneSignal customization options have been condensed to a long list in the configuration tab. This can make it hard for a beginner to find and customize them.
Ease of Use
PushEngage
The team behind PushEngage ensures that this push plugin is super simple to use. This is clear from how user-friendly it is to set up a campaign.
This push notification software even provides a step-by-step walkthrough for using and accessing different features after you complete the setup process.

To get started, go to PushEngage » Push Broadcasts in your WordPress dashboard. Again, you can also use the PushEngage account to create a campaign.
Now, you can either create a push campaign from scratch or from a template.
PushEngage comes with plenty of templates that you can start building. Because of so many options, these templates are arranged in categories; you can also search for the one you want or use the dropdown menu.
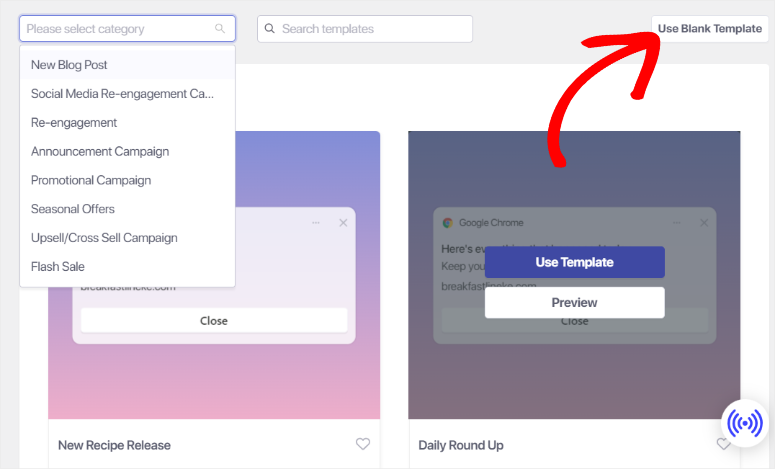
Plus, you can view the preview of each template before editing it to make sure it is right for you.
When you select Preview, you will be redirected to a page where you can view how the push notification will appear in different browsers and devices.
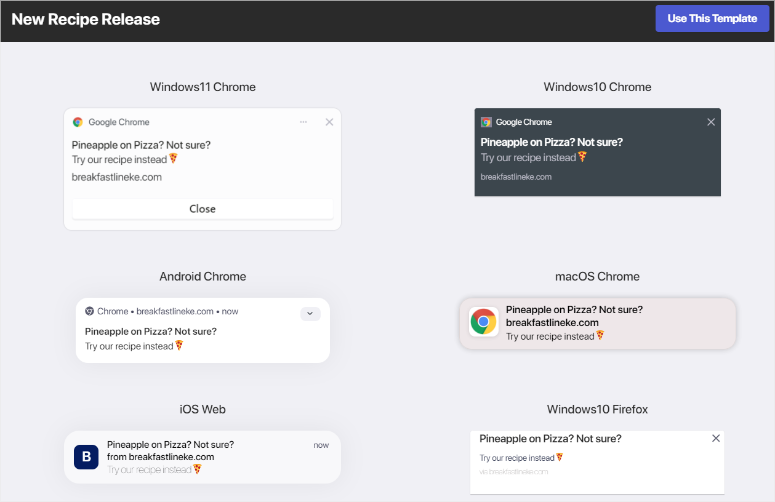
Once you identify a template that is right for the campaign, select Use Template to open the campaign editor.
In the campaign editor, you will see that each template comes with placeholder content that you can quickly replace.
You can also add emojis to your text to grab the attention of your users.
Here, first fill out the Notification Title, Message, and URL. Then, upload a Notification Icon Image, which is often your site icon.
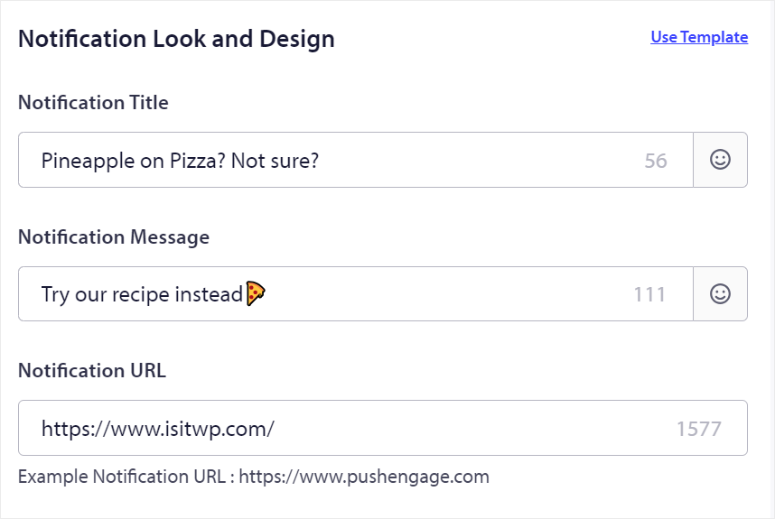
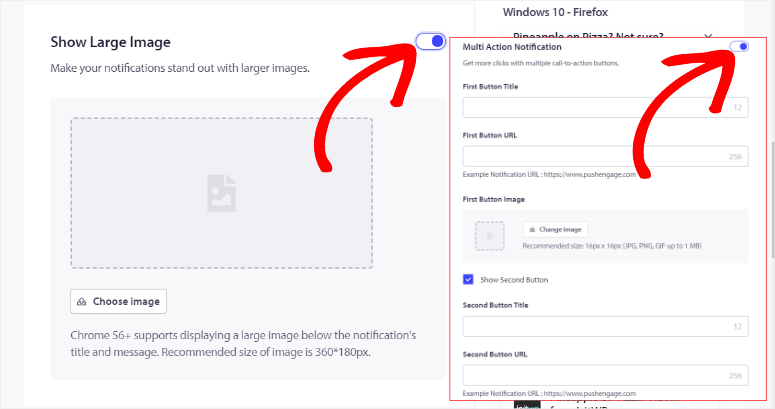
After this, activate Show Large Image with a toggle button. A new upload area will appear next where you can use recent files, upload a new image, use the image library from Unsplash, or upload an image using its URL.
You can also activate “Multi-Action Notification” with a toggle button. This opens more options, including the First Button Title, URL, and Image.
Then use the checkbox to Show Second Button, which you will fill out the same way you did the First Button options.
Below this, use another toggle button to activate Notification Duration. This will keep the notification open for a specified amount of time until the user interacts with it.
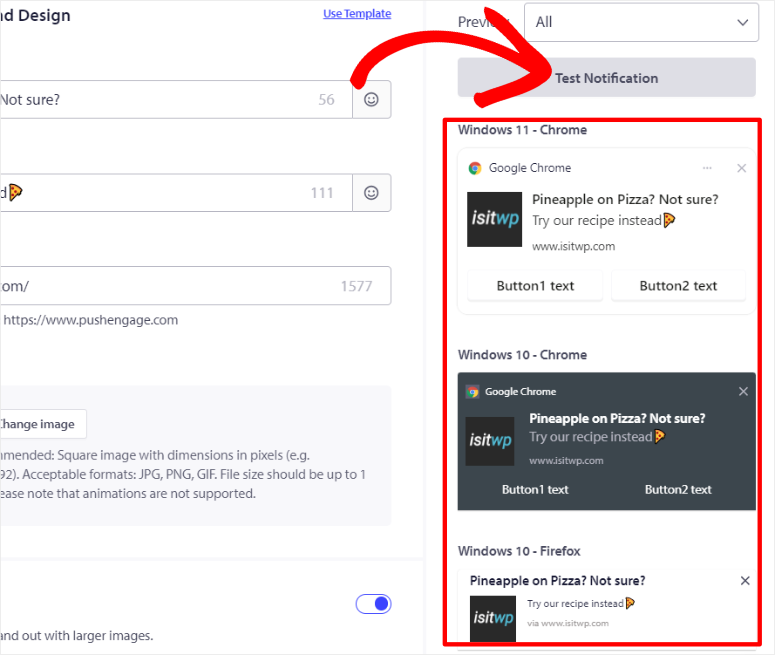
To add to this, the PushEngage campaign editor displays all the device and browser previews on the same page, allowing you to see how the push campaign develops in real time.
You can also “Test Notification,” which will display the push notification on your screen so that you can experience it from a user’s perspective.
When you are happy with your push broadcast, select “Save & Select Audience.”
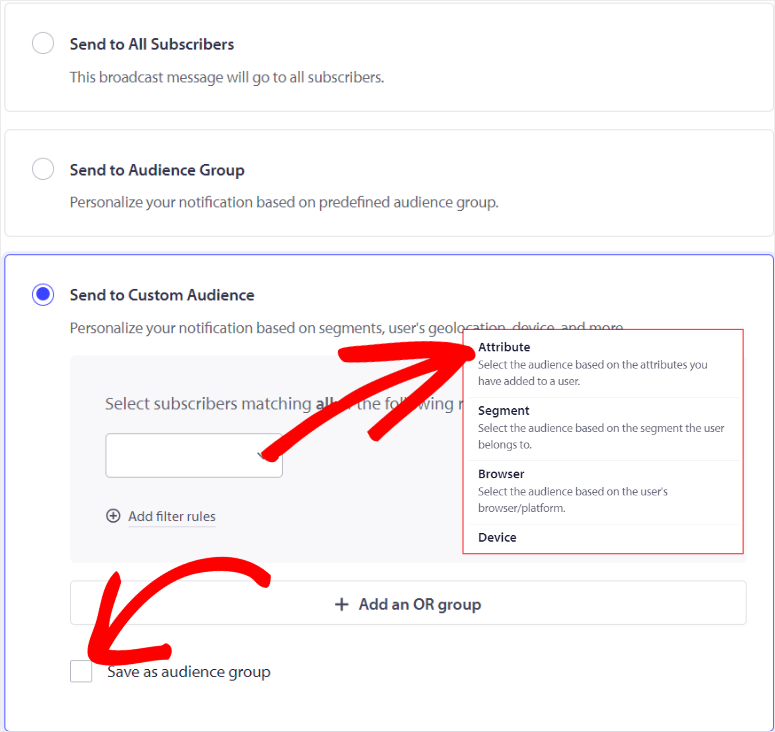
On the next page, you can decide to send the push notification to all your subscribers, to an audience group, or to a customized audience. If you select Audience Group, add the segments or groups you want to send the push notification to from the dropdown menu.
If you select Custom Audience, set the filter rules from the dropdown options. You can set rules according to segments, attributes, browsers, devices, subscription dates, and more.
To add to this, you can also set the filter rules according to location and specify it as far as country, state, and city.
You can also add multiple custom groups by selecting “+ Add an OR Group.” To make it easier for you to use the custom audience later, use the checkbox to “Save as Audience Group.”
Now, select “Save/Schedule” to complete the process. And just like that you can create a push broadcast with PushEngage.
OneSignal
Now, with OneSignal, you can only create a push notification from its dashboard.
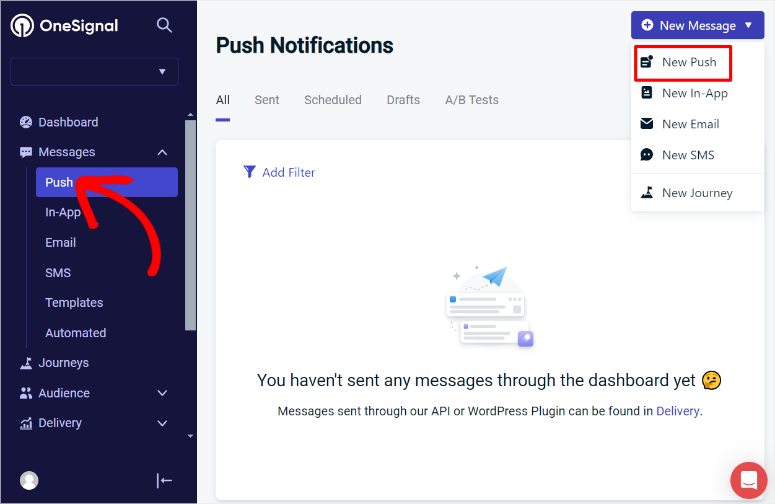
Once you’ve logged in to your OneSignal account, select the website or app you want to create a push notification for from the list.
On the next page, select the “+ New Message” drop-down menu at the top right corner and hit “New Push.”
Then, on the OneSignal push Notification builder, first set the “Campaign Name,” which you will use for internal purposes.
After this, use a checkbox to set the audience. You can either select “Send to Total Subscriptions” or “Send to Particular Segment(s).”
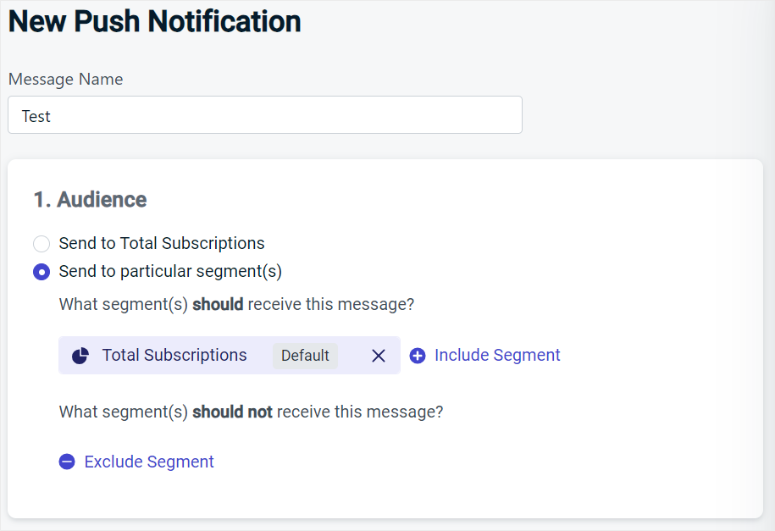
OneSignal comes with premade segments that include Active Subscriptions, Engaged Subscriptions, and Inactive Subscriptions.
Plus, if you create your own segments, they will appear on this list as well. Simply hit the Plus (+) sign next to the segment you want to add to the campaign.
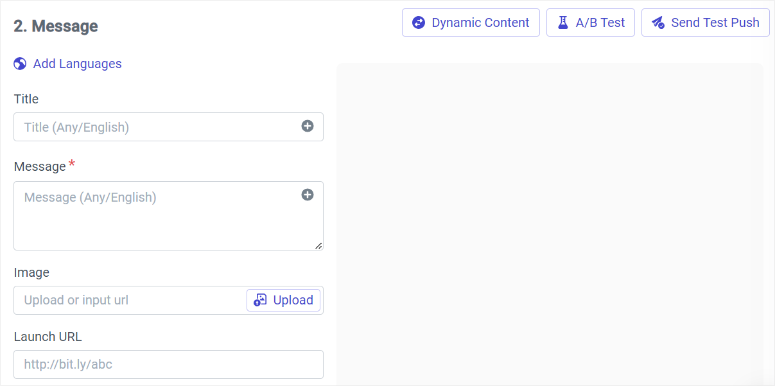
Then, move to the message section to “Add Languages” using checkboxes.
One thing that really caught our eye is that OneSignal will automatically detect the language set on the user’s browser, helping you widen your audience. If the language you want is not on the list, you can Import it with a click of a button.
Below this, add the Message Title, the message itself, the image, and the launch URL.
You can add emojis and a personalization tag to the message body and title. This ensures that each message sent to your users is personalized and grabs their attention, increasing the click-through rate.
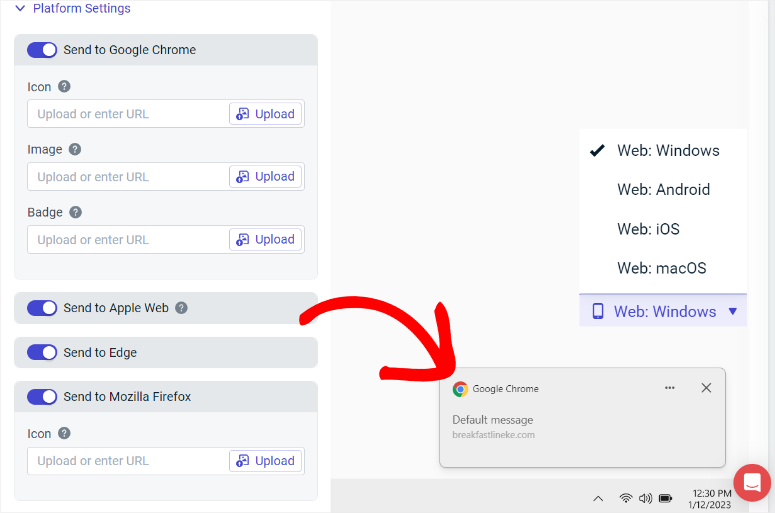
Next, expand the “Platform Settings.”
Here, use toggle buttons to decide which browsers you want to send the push notification to. You will also upload the icon, image, and badge for the Google Chrome browser campaign.
Then, scroll to the Priority section, where you can set it to “Normal” or “High.”
This will ensure that on Android 8.0+ devices, priority is ignored in favor of Categories, while on Android 6.0-7.0 devices, setting priority to high wakes the device out of doze mode, and on Android 5.0-7.0 devices, it displays a heads-up (HUD) notification.
Below this, use the Chrome Action Buttons to add Action IDs, Button Labels, Icon URLs, and Launch URLs. You can add a second Action Button to make the push notification multi-action.
You can use the preview window on the right of the screen to see how your push notification is developing.
But with OneSignal, you will only see one device or browser preview at a time. To see a preview of another browser, you must select it from the dropdown menu below the current preview window.
When you are happy with your push notification, move to Deliver Schedule.
Here, you can use checkboxes to schedule or send the push notification immediately. You can also optimize the delivery by selecting Send to Everyone, Intelligent Delivery, or Custom Per User TimeZone.
Intelligent Delivery is a very handy feature that sends the push alert when the user is most active. This increases the chances that they will click on the push notification.
And just like that, you can now send a push notification with OneSignal.
Ease of use Winner: PushEngage
PushEngage takes the win because it is simpler to use than OneSignal.
It provides a user-friendly campaign setup directly from the WordPress dashboard or through the PushEngage account. You can choose the one most convenient for you.
PushEngage offers plenty of templates organized by categories helping you start the building process. It comes with real-time previews across devices and browsers, all displayed at the same time so you can quickly compare.
On top of this, it offers a straightforward editing interface with options to easily add emojis, large images, and multi-action buttons. It also allows for in-depth audience targeting and filtering, all within a single, seamless workflow.
On the other hand, OneSignal requires more steps and navigating through multiple pages and dropdown menus to complete notification building.
Plus, it only offers one device or browser preview at a time, making PushEngage more efficient and easier for users to create and manage push notifications.
Features
PushEngage
Cart Abandonment
Cart abandonment reminders are a game-changer for eCommerce businesses. This is because a large percentage of shoppers leave items in their carts without completing the purchase.
PushEngage addresses this by sending automated messages to remind customers of their incomplete transactions.
These notifications can include personalized details, such as items left in the cart and their prices, increasing recovery chances
By retargeting users with these high-visibility notifications, you can effectively nudge customers to return and complete their purchases.
This can help boost sales and reduce abandoned cart rates.
Triggered Campaigns
PushEngage goes beyond simple broadcasts.
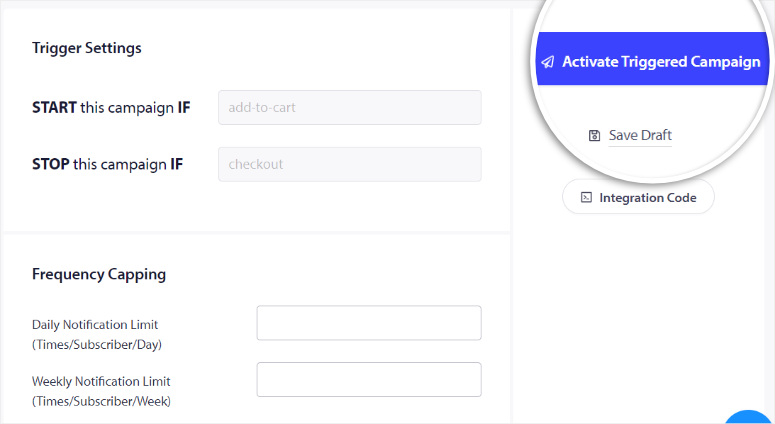
It can help you create triggered campaigns that automatically send notifications based on user actions and behavior.
Did someone browse a product but not buy it? Send them an automatic message about it! Did they visit your site but not subscribe to your newsletter? Remind them with a triggered push notification!
Whether it’s cart abandonment, browsing without purchasing, or any other specific behavior, these campaigns ensure that users receive timely and relevant messages.
You can use price-drop campaigns, back-in-stock alerts, and more to help drive more conversions
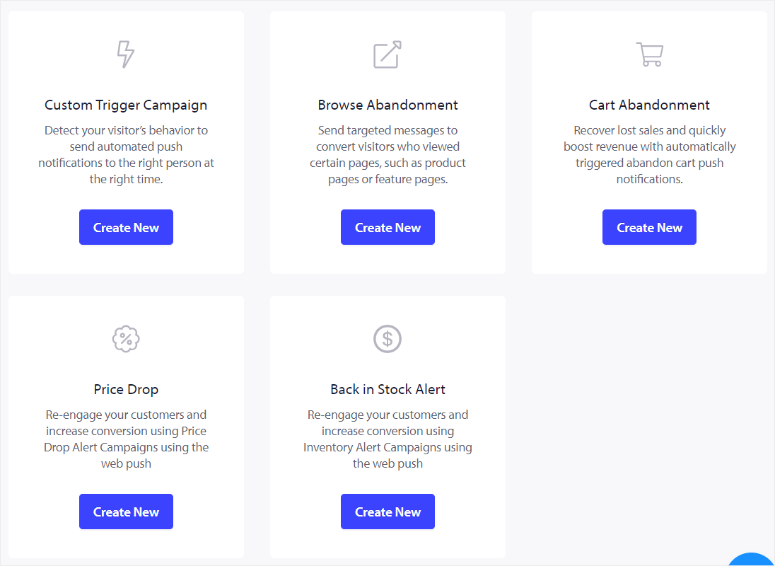
These behavior-driven campaigns also enhance engagement by addressing users’ specific actions and needs at the right moment.
Campaign Styling and Customization
PushEngage offers amazing styling and customization options, ensuring your push notifications stand out and reflect your brand. This also allows you to maintain brand consistency in your push notifications campaigns.
You can customize every aspect of your notifications, including title text, images, CTA buttons, and landing page URLs. This push plugin also provides various opt-in styles, such as single-step, floating bar, and Safari-style boxes.
This flexibility allows you to create visually stunning and brand-aligned notifications that users recognize and trust. This push notification provider also allows you to preview and edit templates in real-time.
This ensures your notifications look professional and engaging across all devices and browsers.
Smart Segmentation and Grouping
PushEngage’s smart segmentation and grouping features allow for hyper-specific targeting, ensuring that notifications are relevant to each user.
You can automatically group users based on criteria such as location, device type, subscription page, and browsing behavior. You can also create custom segments using geolocation, language, and user attributes like name and interests.
As a result, you can send tailored messages that resonate with your audience.
Such precise targeting boosts engagement and click-through rates as users receive content that matches their preferences and actions.
This makes PushEngage a powerful tool for personalized marketing.
Built-in Analytics
PushEngage helps you understand how well your push notifications are performing with its built-in
real-time analytics and goal tracking.
It shows important metrics such as clicks, views, conversions, subscription rates, geographic data, and more.
To add to this, you can see a complete report of your push notification statistics, track user demographics and device data, and analyze the performance of individual notifications.
This and the goal-tracking feature allow you to assign value to actions taken on your site, identify high-performing campaigns, and pinpoint areas for improvement.
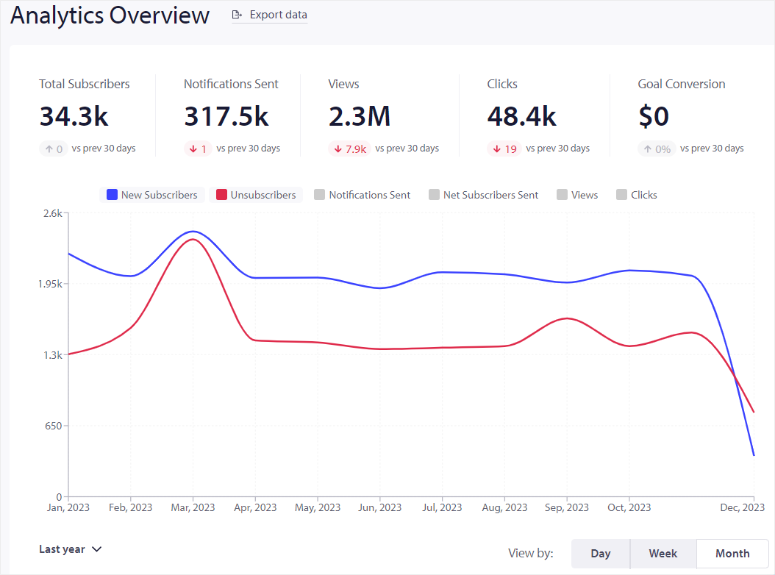
As a result, you can use the data to optimize your strategies for higher engagement and better results.
Drip Campaigns
PushEngage allows you to create automated drip campaigns. These are a series of notifications sent to users at specific intervals or based on their actions.
Drip campaigns are a great way to nurture leads and re-engage inactive subscribers. They can also help keep your audience informed about your latest content or promotions.
You can personalize your drip campaigns with custom messages and target them to specific audience segments based on location, interests, browsing behavior, and more.
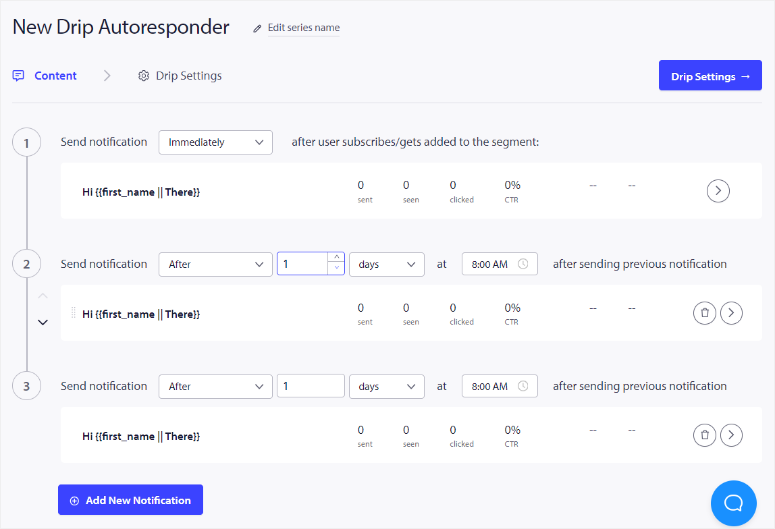
This user-friendly feature enables you to create customized sequence messages. They can help you guide your users through your sales funnel, increasing conversions.
Drip autoresponder automation saves you time and also improves user experience by delivering the right content at the right time.
Campaign Scheduling
PushEngage lets you schedule your push notifications in advance, ensuring they are sent at the best time for your audience.
You can schedule notifications to go out immediately or later at a specific date and time.
PushEngage also supports recurring notifications, ideal for promoting regular events like webinars or sales. This reduces the risk of messages getting lost due to time zone differences.
To add to this, you can schedule offline notifications, which are sent as soon as subscribers come online.
Campaign scheduling helps maintain consistent communication with your audience, improves engagement, and ensures that your messages are timely and relevant.
A/B Testing
PushEngage A/B testing allows you to compare two versions of your push notification to see which one performs better.
You can A/B test different elements of your notifications, such as the title, message, image, CTA button, and more. This helps you optimize your notifications for maximum engagement and click-through rates.
PushEngage offers Intelligent A/B testing, which sends variations of your notification to a small portion of your audience. It then automatically identifies the winner based on the click-through rate.
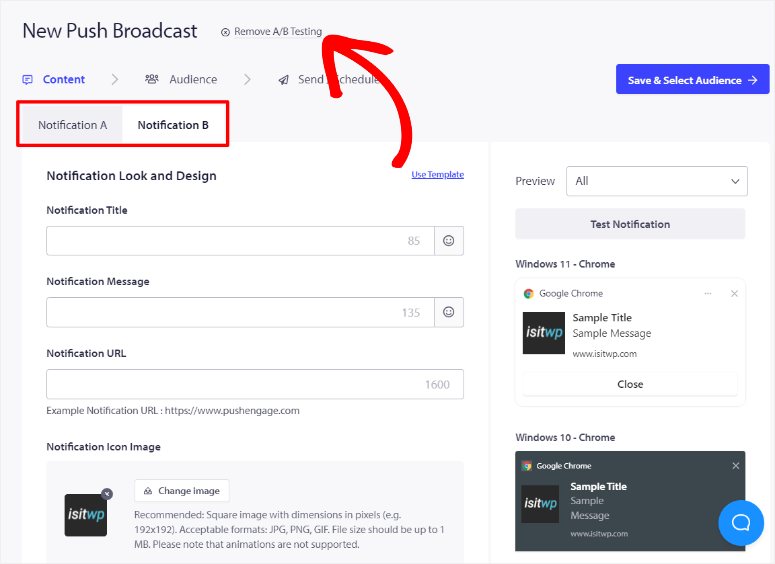
This data-driven approach helps improve click-through rates and conversions by identifying the most effective strategies.
With actionable insights from these tests, you can continuously optimize your notifications for better results.
- Apart from the features above, here are a few more you can expect from PushEngage.
Multi-Action Notifications: Allows you to include multiple call-to-action buttons in a single push notification. This can Increase user interaction by providing multiple response options directly within the notification. Multi-action notifications are Ideal for surveys, feedback, promoting multiple products, or offering various links for the user to follow. - Mobile App Push: PushEngage supports mobile push notifications for both iOS and Android mobile apps. This helps keep users engaged with timely updates, offers, and reminders directly on their mobile devices.
- Multi-Site Support: You can manage push notifications for multiple websites from a single PushEngage account, ensuring consistent communication across all your online properties. This means you do not need multiple PushEngage accounts, streamlining the notification process.
- Welcome Notifications: Automatically send a welcome message to new subscribers, helping them feel welcomed. This can help you direct new users to important pages or offers right after they subscribe. Such notification can increase initial engagement and set a positive tone for future interactions.
- RSS-to-Push: You can automatically send push notifications based on updates from your RSS feed. This helps ensure that your users are instantly informed about new blog posts or content updates. So you can keep your audience up-to-date with minimal manual effort.
- GDPR Compliance: PushEngage is designed to help you comply with GDPR regulations and handle user data responsibly. It ensures you have explicit consent from users before sending notifications. On top of this, it provides options for users to manage their subscription preferences.
OneSignal
Live Activities
When using push notifications, Live Activities enhances user engagement by displaying real-time updates directly on iOS lock screens.
Available on iOS 16.1 and later, this feature lets users track live events like delivery status, sports scores, financial updates, and more. These activities can be seen for up to eight hours, even in Focus or Do Not Disturb modes.
With OneSignal’s API and SDK support, implementing live activities is quick, saving developers time and effort.
Apps using Live Activities have shown a significant increase in 30-day retention rates. This offers an excellent way to keep your app relevant and engaging.
Targeted Segmentation
OneSignal allows you to segment your audience based on various factors like demographics, app usage, and behavior. It helps you deliver highly relevant messages by creating detailed filters to divide your audience.
By segmenting your audience, you can ensure your messages reach the right people, enhancing engagement and conversion rates.
OneSignal comes with built-in segments such as Subscribed Users, Engaged Users, Active Users, and Inactive Users, making it easy to use.
But you can also create your own unique segments depending on your audience.
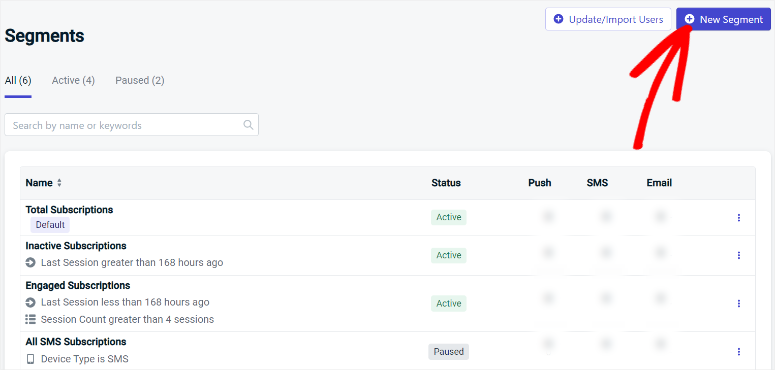
For example, if you run a blog, you can create segments to target active users with new content. On the other hand, you can re-engage inactive users with special offers if you run a WooCommerce store.
In a nutshell, this feature allows for personalized campaigns that resonate with specific user groups, driving higher interaction and loyalty.
Powerful Analytics
Understanding how your push messages perform is crucial to run a successful campaign.
OneSignal’s analytics dashboard provides deep insights into message delivery, opens, clicks, and more.
It also offers user-level data on actions triggered by your messages.
You can view message sends, receives, and clicks, enabling in-depth analysis and optimization of your messaging strategies
To add to this, the Confirmed Delivery feature lets you know exactly when a message reaches a user’s device, giving you valuable insights into message delivery success. You can easily export reports to CSV for further analysis and storage.
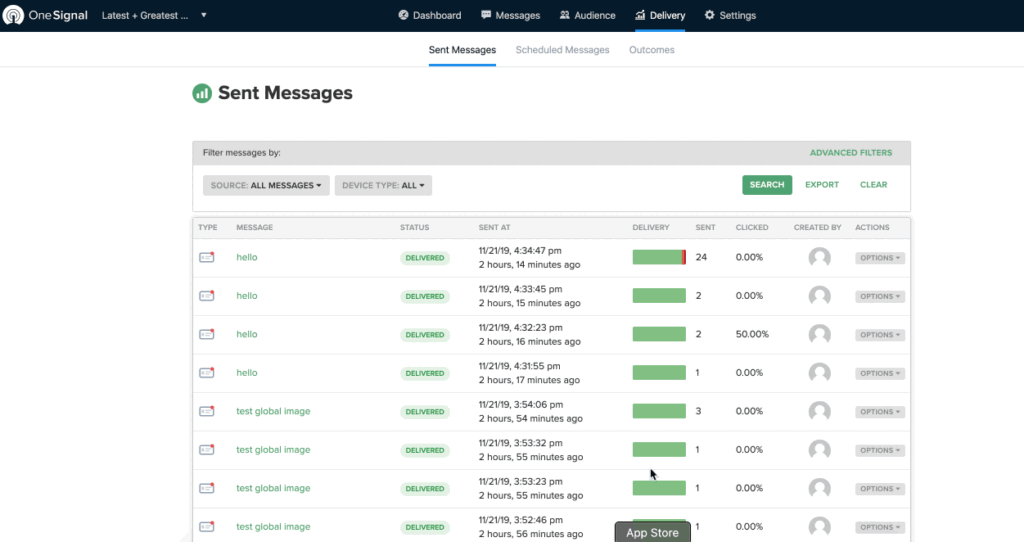
This data-driven approach helps refine your communication strategies, ensuring your messages are effective and impactful.
Personalization
Personalization is key to creating meaningful connections with your users, and OneSignal excels in this area. It uses real-time user behavior, preferences, and cross-channel engagement data to personalize push delivery.
To add to this, you can tailor message delivery based on user attributes, events, location, language, and more.
As a result, you can send automated messages and personalize them to connect with individual users.
This not only improves user experience but also drives higher retention and conversion rates, making your communication efforts more effective.
A/B Testing
A/B Testing with OneSignal allows you to optimize your messaging campaigns by experimenting with different content variations.
You can test different tones, images, emojis, icons, sounds, and app icon badges to discover what works best with your users. It works across various devices, ensuring you optimize messaging on all browsers.
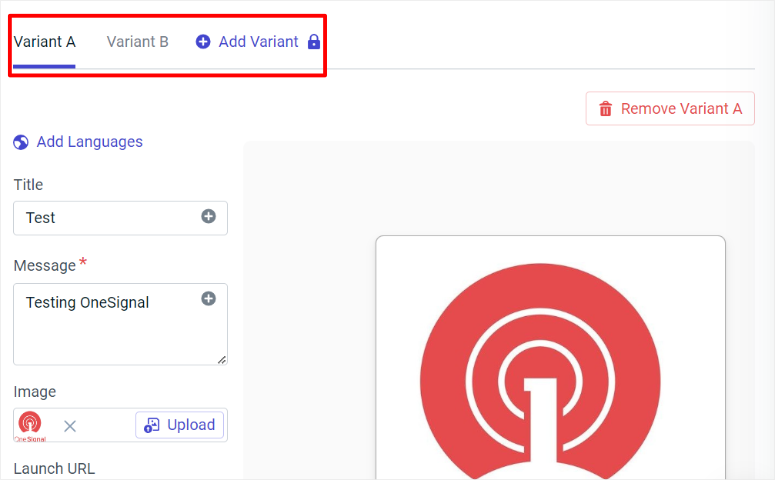
OneSignal also automatically creates control groups and sends text messages to a small percentage of users. It then detailed reports on all the findings so you can analyze them further.
Localization
OneSignal allows you to communicate with users in their preferred language and time zone, creating a more personalized experience. This localization can help you expand your audience and reach global users.
It automatically detects the language settings on a user’s device or browser and translates and tailors content for them.
OneSignal supports over 40 languages. This ensures your messages connect with users worldwide without the need to duplicate campaigns for different regions.
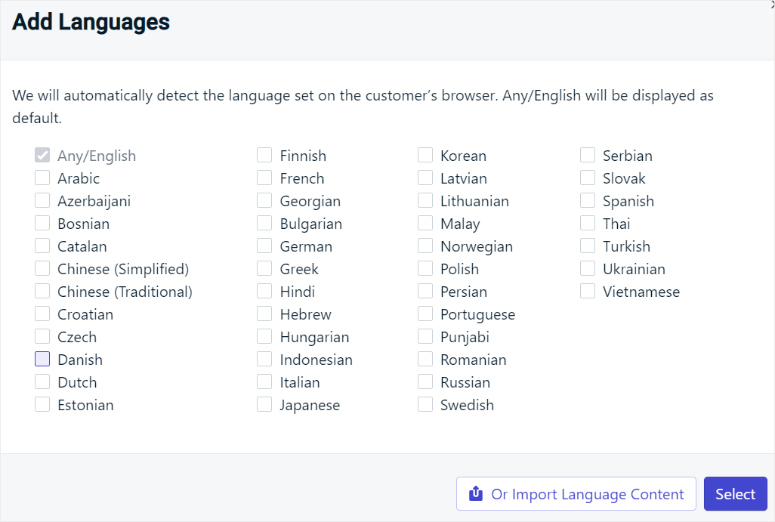
This streamlined approach saves time while maintaining the personal touch that can help boost user engagement and satisfaction.
Journeys
Journeys lets you create dynamic, automated workflows that guide users through personalized messaging sequences based on their attributes or behavior.
This visual workflow builder is user-friendly and requires no coding, making it for beginners. By automating your messaging, you can trigger real-time interactions and sequence related campaigns into streamlined experiences.
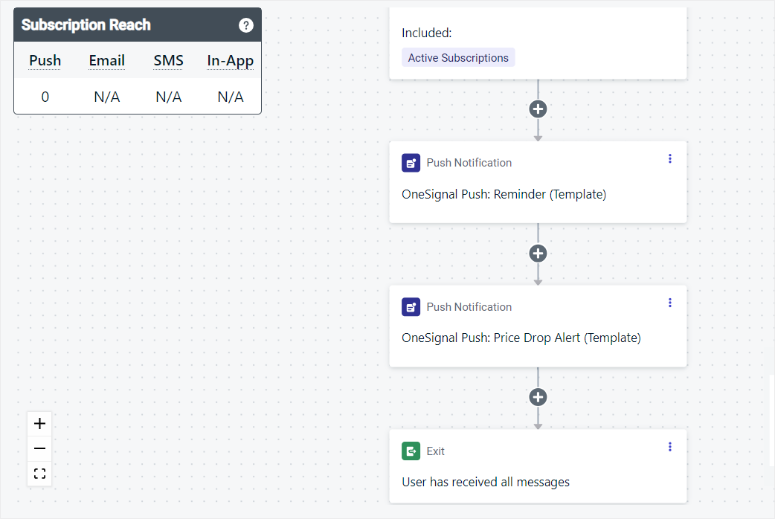
Journeys can help you with onboarding, re-engagement, or sales campaigns. For example, It can automatically send a welcome message to new users, followed by a series of helpful tips to get them started. Or, re-engage inactive users with special offers.
Intelligent Delivery
OneSignal’s Intelligent Delivery feature ensures your messages reach users at the best time based on their past engagement data.
This personalization means each user, whether a night owl or an early riser, receives notifications when they are most likely to engage.
By automatically determining the best send time for each user, this OneSignal enhances the effectiveness of your campaigns.
This ensures users receive relevant information in a more personalized way.
Apart from these, you can also expect the following features from OneSignal.
- Templates: Quickly launch new campaigns using pre-designed templates. You can personalize these templates and even include dynamic content. You can also create and save message templates for consistent branding, ensuring uniform messaging across different campaigns.
- In-App Messaging: Send messages directly within the app to engage users in real time. This can help you guide users through onboarding and feature updates, enhancing their experience. OneSignal allows you to customize these messages to match the app’s design and user flow. You can also activate messages based on specific user actions or behaviors for timely and relevant communication.
- SMS: Send text messages for time-sensitive information and urgent alerts. You can customize these SMS messages for targeted communication, ensuring relevance and personalization. Plus, you can plan and schedule SMS campaigns in advance for timely delivery. SMSs help you reach a broad audience effectively.
- Message Throttling: Regulate the rate at which messages are sent to ensure controlled delivery. This helps you prevent server strain and user notification fatigue by avoiding message overload. You can customize OneSignal to set limits on messages per second or minute, maintaining stability and consistent performance during high-traffic events.
- Email: Create and send email campaigns directly from OneSignal. A template editor allows you to design emails with flexibility and creativity. You can also segment your audience for more relevant email communication, enhancing engagement. Plus, you can track metrics like open rates and click-through rates to measure the success of your campaigns.
Features Winner: Tie
OneSignal and PushEngage tie when it comes to features because their features cater to diverse marketing needs.
Both platforms excel in push notifications, A/B testing, and user segmentation, allowing businesses to tailor their messages for maximum impact. They provide detailed analytics and personalization options to fine-tune campaigns and enhance user engagement.
They can help with cart abandonment reminders, triggered notifications, or multi-channel messaging.
Their versatile features make them equally powerful in driving engagement, conversions, and overall customer satisfaction.
Documentation & Support
PushEngage
If you are looking for PushEngage documentation or support, you can quickly access it from the homepage on the Help Center menu option.
It opens a dropdown menu that contains Documentation, FAQs, Demo, and Support. At the bottom of the page, PushEngage offers live chat using LiveChat. This provides a quick and affordable way to communicate with their support team in real time.
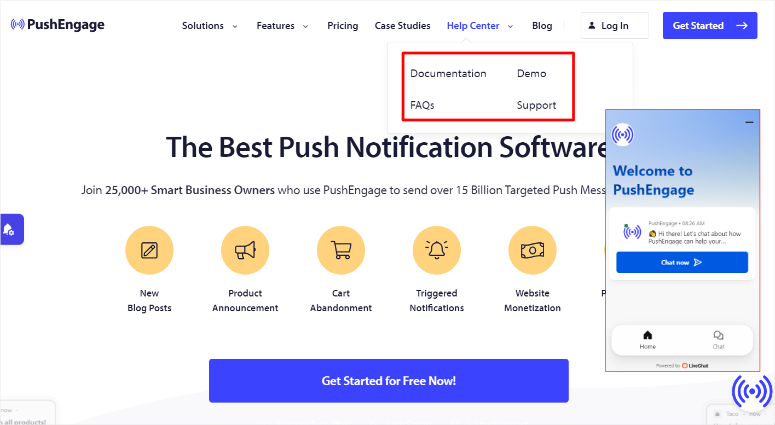
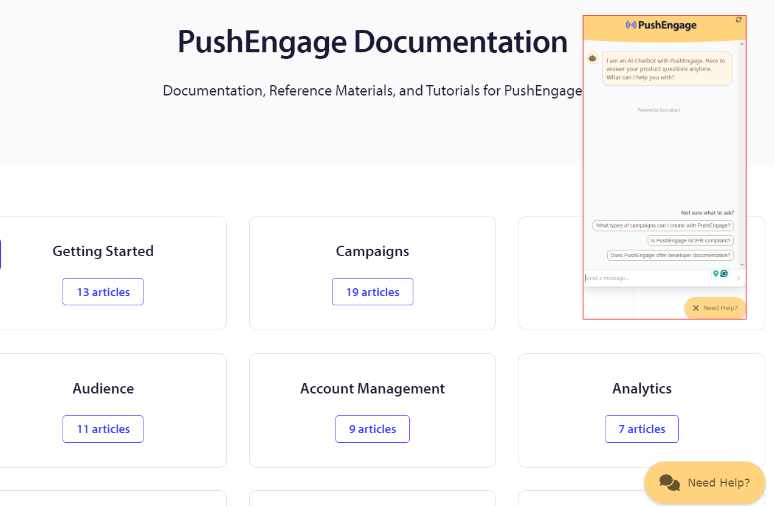
When you select Documentation, you will open a page with articles arranged in categories placed in tile tabs.
This makes it easy for you to navigate through the tutorials and articles. You also find a search bar on the documentation page to help you find exactly what you are looking for quickly.
When you select one of these tile tabs, you will be predicted to a list of all the articles in that category. They are arranged in order, allowing you to follow the tutorials step by step. You will also see a search bar and article categories on the left incase you need to access more documentation.
You can also access a chatbot on the documentation pages which allows you to access quick questions without navigating through the resources.
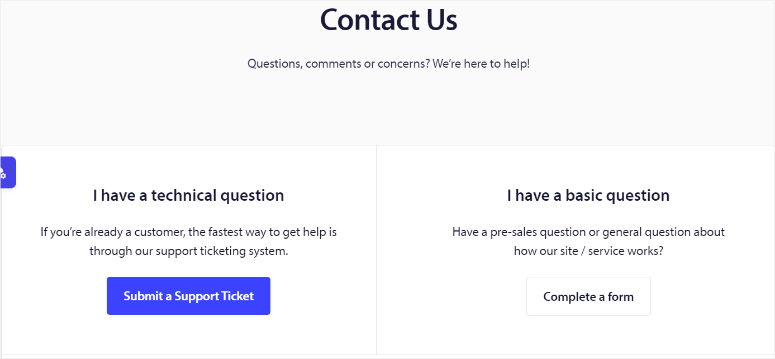
Apart from live chat, you can also contact support through a support ticket if you are a customer.
This is a short and precise form that requires you to fill out your website, email, topic from a dropdown and subject. Then, you will fill out the message area to describe the problem you are having in detail.
If you are not a customer, fill out their contact form. Just like the support ticket, the contact form is short and precise. You will provide your details, write out your message, and submit it.
OneSignal
As mentioned, OneSignal is more developer-focused. As a result, it has a broader set of resources to help you navigate the tool.
On OneSignal’s homepage, you will first see the Resource menu, which gives you access to Podcasts, eBooks, Customer Case Studies, Videos, and Video Demos.
Next to the Resource menu is the Documentation menu.
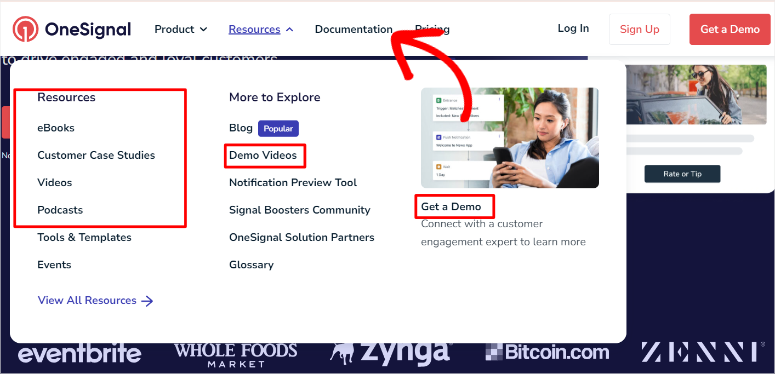
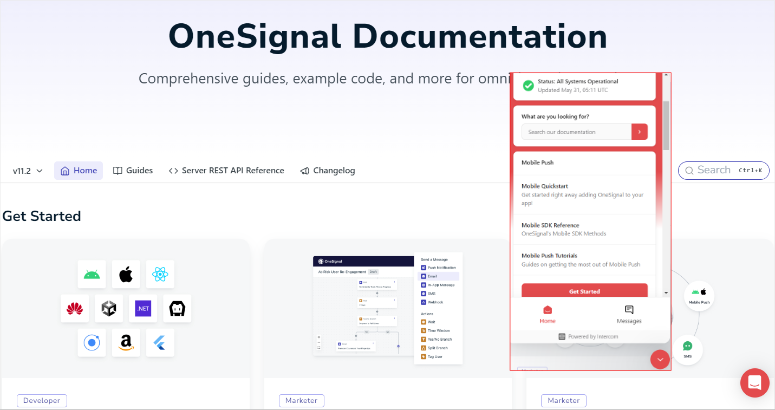
This opens a page with individual articles arranged in categories. There is also a search bar to help you quickly find the tutorial you are looking for.
You can also access the documentation through the chat box at the bottom of the website. The chat box has a search box, which you can use to find the article you are looking for.
The tabs below the search bar direct you to the tutorial category you are looking for. To add to this, the chat box also has links to help you get started with the different OneSignal products.
Now, the best way to contact OneSignal support is also through the live chat. But you can only access live chat if you are logged into your OneSignal account.
This allows you to communicate with their customer support team and get answers if you don’t find what you are looking for in the documentation.
The other way to contact support is to email them directly. The support email is in your WordPress dashboard under OneSignal » Set Up. Scroll to the bottom of the page to find troubleshooting options, WordPress Setup Guides, and the support email.
If you are a more visual person, you can submit your details to OneSignal, and they will provide you with a demo video.
Documentation & Support Winner: OneSignal
While PushEgnage documentation is easy to follow and navigate, OneSignal offers more resources and content formats. You get podcasts, videos, eBooks, customer case studies, and more, ensuring you use the resources you find most easy to understand.
You can also get a demo video by reaching out to support, providing even more resources. The live chat option also provides you with a quick way to contact OneSignal support.
Plus, the chat box also offers a portal where you can access all the documentation and OneSignal products.
But, we will appreciate how easy and convenient it is to contact PushEngage using the support ticket and contact us forms.
Pricing
PushEngage Pricing
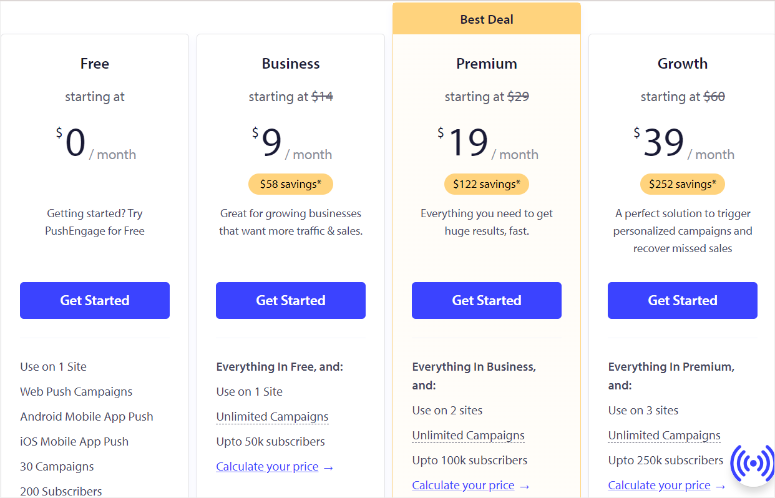
PushEngage offers a forever free version of the plugin to get you started. This plan allows you to have up to 200 subscribers and send up to 30 campaigns per month. You also get features like targeted optin campaigns and trigger smart optin campaigns. For the free plan, PushEngage offers limited support.
For the paid version of the plugin, PushEngage offers 3 plans. All the premium plans allow you to set up unlimited campaigns.
- Business Plan Starting from $9/ Month: This plan allows you to use it on 1 site and has a 50k subscriber limit. It has features like audience grouping, RSS auto-push, URL-based segmentation, and more. For the Business Plan, PushEngage offers standard support.
- Premium Plan Starting from $19/ Month: This plan allows you to use it on 2 sites and has a 100k subscriber limit. It comes with features like goal targeting, form abandonment, optin conversion metrics, and more. For the Premium Plan, PushEngage offers priority support.
- Growth Plan Starting from $39/ Month: This plan allows you to use it on 3 sites and has a 250k subscriber limit. It comes with features like custom trigger campaigns, back-in-stock alerts, waterfall campaigns, personalized smart tags, and more. For the Growth Plan, PushEngage offers VIP support.
Now, if your website traffic is higher than the packages provided, you can contact support for the customized Enterprise Plan. On this plan, you get unlimited subscribers, unlimited notifications and no subscriber limit. You will also get a custom volume and quote.
OneSignal Pricing
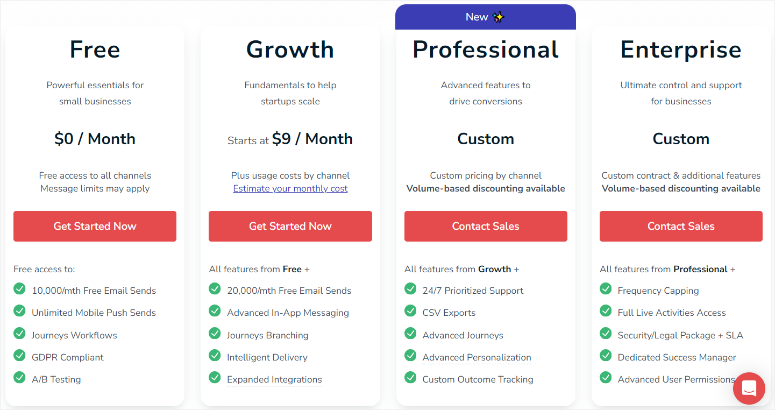
Like PushEngage, OneSignal offers a free plan but with a slightly different structure. Instead of a subscriber limit, they focus on the number of emails sent.
The free plan allows you to send up to 100,000 emails and includes features like Journeys, workflow, A/B testing, and more.
OneSignal offers 3 premium plans.
The Growth Plan starts from $9/ Month. With this plan, you can send up to 20k emails a month. You also get features like in-app messaging, intelligent delivery, journey Branching, and more.
For the professional and Enterprise plans, you will need to contact support to get a quote. These plans offer features like CSV exports, live activities, frequency capping, and more.
Pricing Winner: PushEngage
While both OneSignal and PushEngage offer free plans, their pricing models are slightly different. PushEngage focuses on subscriber limits, and OneSignal focuses on email volume.
PushEngage wins because its plans offer more features than the cheaper plans and have a more straightforward pricing model.
Unless you have more than 250K subscribers, you do not need to get a custom quote. But, with OneSignal, you need a custom plan for all packages above the Growth Plan.
Pros & Cons
PushEngage
Pros:
- Free plugin version available
- Easy installation and setup process
- Offers a wide range of customization options
- Supports both web and mobile
- Provides real-time previews
- Comes with many pre-made templates
- Automated push notifications
- Smart Segmentation and hyper-specific targeting
- Built-in analytics
- Drip campaigns
Cons:
- Need a pro plan to unlock all features
- Requires credit card information even for the free version
OneSignal
Pros:
- Free plugin available
- Cross-channel support like email and SMSs
- Real-time updates on iOS lock screens
- Designed to handle high volumes of notifications
- Automatically detects user browser language
- Provides dynamic content
- Intelligent Delivery system
- Detailed audience segmentation
- Easy message personalization
- Two-factor authentication for teams
Cons:
- Need a pro plan to access all features
- Need to contact support for packages higher than the Growth Plan
- Long installation and setup process
- Only offers one device or browser preview at a time
- Dependency on OneSignal dashboard
Final Verdict: PushEngage vs OneSignal
Both PushEngage and OneSignal are powerful tools for adding push notifications to your WordPress site.
PushEngage excels at ease of use and extensive customization options. It also comes out on top of automated cart abandonment reminders.
This can significantly boost sales by encouraging customers to complete their purchases. Its triggered campaigns can quickly send notifications based on user actions, ensuring timely and relevant messages.
OneSignal also offers impressive features, including real-time updates through Live Activities and powerful audience segmentation. But its features can be a little complicated, especially for beginners, because they are more developer-focused.
Its analytics are in-depth, providing structured insights into message performance. Personalization is another strong point, with tailored message delivery based on user behavior.
The Intelligent Delivery feature ensures messages reach users at the best times, enhancing engagement. But, OneSignal’s more complex setup and developer-focused approach might be challenging for those without technical expertise.
PushEngage offers more straightforward plans with a focus on subscriber limits, while OneSignal’s pricing is based on email volume, which can be less transparent for higher-tier plans.
Both platforms provide free plans, but PushEngage’s pricing model is easier to understand and generally offers more features at lower price points.
So, who wins?
It’s a close call! PushEngage takes an edge for its user-friendliness and customization power and is the best WordPress push notification plugin.
But if you’re on a tight budget or need features like in-app messaging and email, OneSignal is a good option.
At the end of the day, the best way to decide is to read this comparison and select a push notification plugin based on your needs.
Congratulations! You now have a better understanding of PushEngage and OneSignal. If you have any more questions check out our FAQs below.
FAQs: PushEngage vs OneSignal
What is a push notification?
A push notification is a message sent from an app or website to a user’s device. It is a handy way for apps to send quick updates or reminders directly to your lock screen, even when you’re not actively using the app itself. Push notifications are used to alert users about important updates, new messages, promotions, or reminders.
Is PushEngage free?
Yes, PushEngage offers a free plan that allows you to have up to 200 subscribers and send up to 30 campaigns per month. This plan includes features like targeted opt-in campaigns and trigger smart opt-in campaigns. For more advanced features and higher subscriber limits, you can choose from their paid plans starting at $9 per month.
What is the difference between push notifications and web push?
Push notifications are messages sent by apps to a user’s mobile device or desktop. Web push notifications, on the other hand, are sent by websites and appear on a user’s desktop or mobile browser. The key difference is that push notifications come from mobile apps, while web push notifications come from websites. Both are designed to re-engage users with timely and relevant information.
What is the best notification app for Android phones?
PushEngage is the best push notification plugin for both mobile and web. Its powerful push notification services help businesses reduce cart abandonment with automated reminders. It also offers smart segmentation to target specific user groups effectively. Plus, PushEngage comes with many customization options to ensure notifications are visually appealing and consistent with your brand.
That’s it! We hope you enjoyed reading this comparison article on OneSignal vs PushEngage. If you need more help, here is an article on How to Add Push Notifications to WordPress to Drive Traffic.
On top of that, here are other articles you may be interested in reading.
- How to Create Automated Recent Sales Notification Popups (An Easy Guide)
- 8 Best Push Notification Tools for Your WordPress Website
- How to Notify Subscribers of New WordPress Posts
The first tutorial walks you through how to create automated recent sales notification popups. The next post lists 8 of the best push notification tools for WordPress. While the last article teaches you how to notify subscribers of new WordPress posts.

Comments Leave a Reply