Are you looking to set up download tracking in WordPress?
Downloadable content is a great lead magnet tool because it offers your users something valuable in return for their information.
Tracking these downloads allows you to know what type of content your users like, allowing you to capitalize on that and offer similar content.
As a result, download tracking helps you understand your audience better to make better data-driven decisions.
In this article, we’ll show you how to easily set up download tracking in WordPress with Google Analytics.
This tutorial will also teach you how to track downloads directly from your WordPress dashboard. You will not need to switch between different platforms, which will make it easier for you.
Importance of Download Tracking
As mentioned, as an admin, tracking downloads helps you gain more insights into the most popular type of content that your users like. But before that, it will help you determine whether having downloadable content on your site is actually an advantage.
The reality is that creating downloadable content takes time and effort. It may even require you to get an expert to create content like eBooks, Whitepapers, tools, templates, infographics, and so on.
By tracking these downloads, you can be certain that your users are actually interested in the content and what type of content you should invest in.
Here are other reasons why you should track downloads.
- Measuring Engagement: Downloading is a form of user engagement. Tracking downloads allows you to calculate how many visitors actively interact with your content by downloading it.
- Improving Marketing tactics: You can use this data to promote your most popular downloads more prominently or optimize targeted marketing campaigns around specific types of content.
- Generating Leads: As mentioned, downloads create a conversion point where visitors are willing to exchange their contact information for valuable content. Tracking downloads allows you to measure the effectiveness of your lead-generation efforts and refine your strategies to attract more leads.
- Tracking Campaign Performance: If you’re running marketing campaigns with downloadable resources, tracking downloads can help you assess their effectiveness. By comparing download metrics across different campaigns, you can determine which drives the most engagement, page views, and conversions.
- Identify Broken Downloads: You can track download attempts to identify and fix any broken download links on your website. This can help improve your user experience by ensuring users always get the downloadable content they select.
- Content Repurposing: Once you identify popular content, you can convert it into different formats, such as videos, blog posts, and so on. This allows you to extend the lifespan of your content assets and continue providing value to your audience over time in the content type that is most appealing to them.
Now that you understand the importance of download tracking, let us walk you through step-by-step how to set it up in WordPress with Google Analytics 4.
Step 1: Install and Activate MonsterInsights
Connecting your WordPress site to Google Analytics is crucial for collecting download data.
While you could manually add the Google Analytics tracking code to your website, MonsterInsights offers a more streamlined and beginner-friendly approach.

This is because MonsterInsights is the best Google Analytics plugin. It allows you to track your downloads or any other event on your site without adding a line of code or using Google Tag.
Check out the latest MonsterInsights review here.
To start, go to the official MonsterInsights website and sign up for a plan. Unlike many traffic monitoring plugins, MonsterInsights offers “File tracking” on all its packages, even the basic plan (Plus Plan).
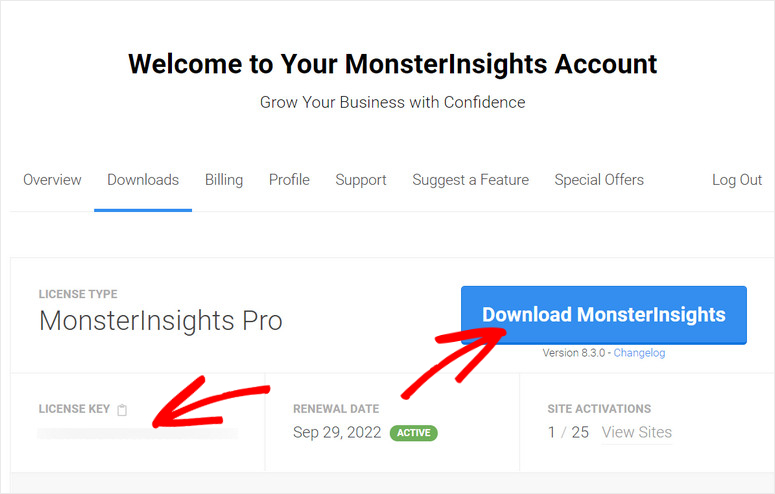
Once you buy a plan, log in to your MonsterInsights account and head to the Downloads tab.
Here, download the plugin’s ZIP file to your computer and also copy the License Key; you will need it later to activate the plugin.
Next, head to your WordPress dashboard and select Plugins » Add New Plugin. Upload the MonsterInsights ZIP file you downloaded earlier to your WordPress dashboard and hit “Install.”
If you get any issues, you can check out this article on how to install a plugin.
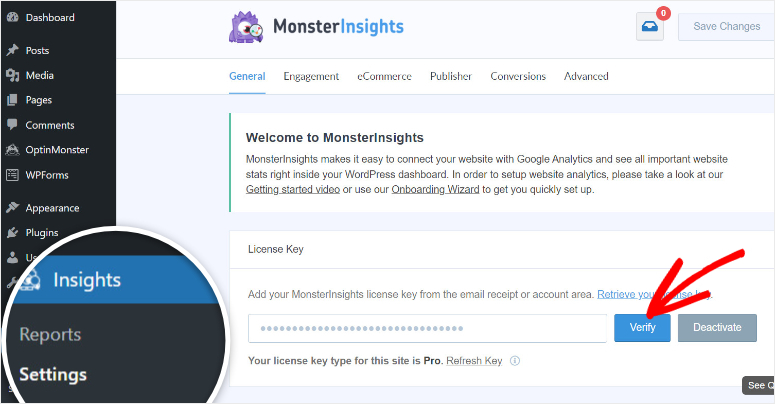
Once it installs, Activate the plugin, and a new menu option called “Insights” should appear in your WordPress menu options.
Then, proceed to Insights » Settings and go to the “General” tab. Next, paste the code you copied from your MonsterInsights dashboard and hit “Verify.”
That’s it! You have fully installed the monsterInsights plugin on your WordPress. The next step is to connect it to GA4.
Step 2: Sign Up for Google Analytics & Connect to MonsterInsights
Now that MonsterInsights is installed and activated on your WordPress site, the next step is to sign up for a Google Analytics account and connect it to MonsterInsights.
Google Analytics provides powerful tools for tracking website traffic, user behavior, and engagement metrics. But, because of all the data it provides, it can confuse beginners.
MonsterInsights, other than allowing you to view all the Google Analytics data from your WordPress dashboard, also simplifies the data. This includes download tracking!
To sign up, visit the Google Analytics website and select “Get Started Today” to create an account. Creating an account is straightforward, and all you have to do is follow the steps Google Analytics provides.

If you are facing any issues, check out this article on how to set up Google Analytics 4 on your WordPress site.
Once your account is set up, you’ll be provided with a tracking code that you’ll need if you want to connect to your WordPress site manually.
The excellent news is that MonsterInsights simplifies this process by seamlessly integrating with Google Analytics without using this code.
So, to connect Google Analytics to MonsterInsights, go to Settings » General in your WordPress dashboard, then scroll down and select “Launch Setup Wizard.”

The MonsterInsights setup wizard will help you set up the initial steps quickly and follow a specific order so you do not forget anything.
With the setup wizard, tell MonsterInsights the type of site you are running on the first page.

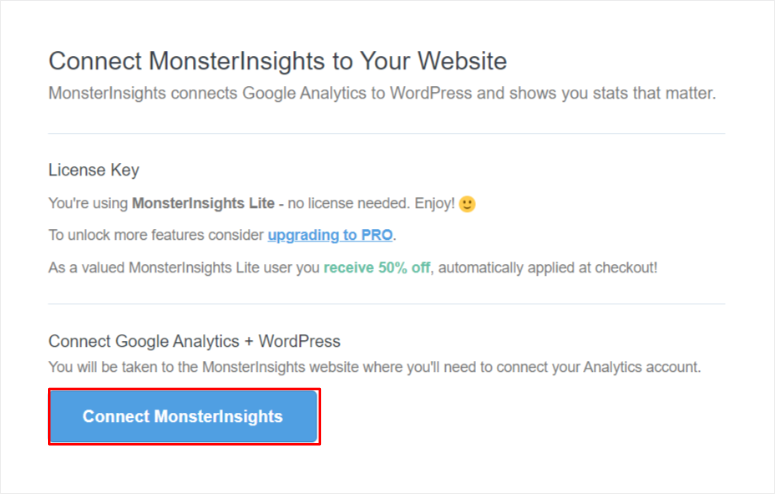
Then, on the next page, select “Connect MonsterInsights.” This will open a popup window with all the Google Accounts signed in on the computer.
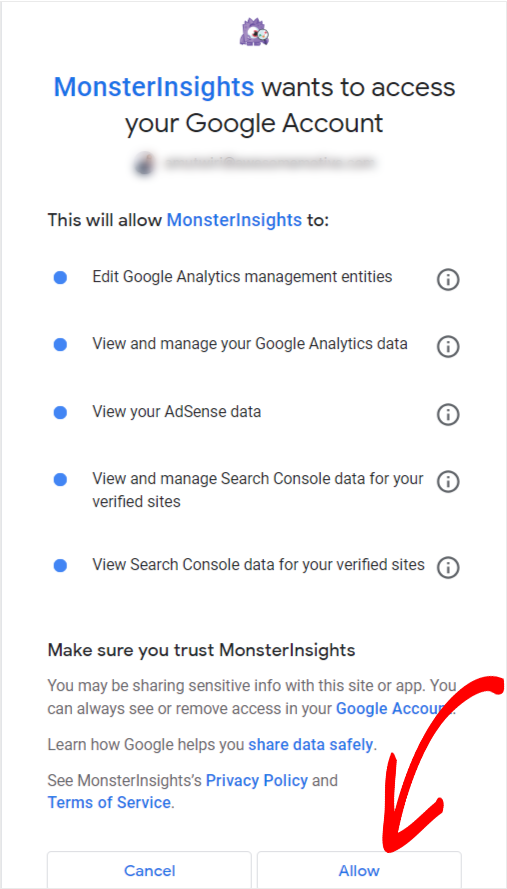
Select the Gmail account you used to sign up to Google Analytics. Then, hit “Allow” to permit MonsterInsights to access your Google Account.
Finally, on the last page of the MonsterInsights Setup Wizard, use the checkboxes to define what you want it to track other than Tracking downloads on WordPress.
Then, select Continue to complete the setup.
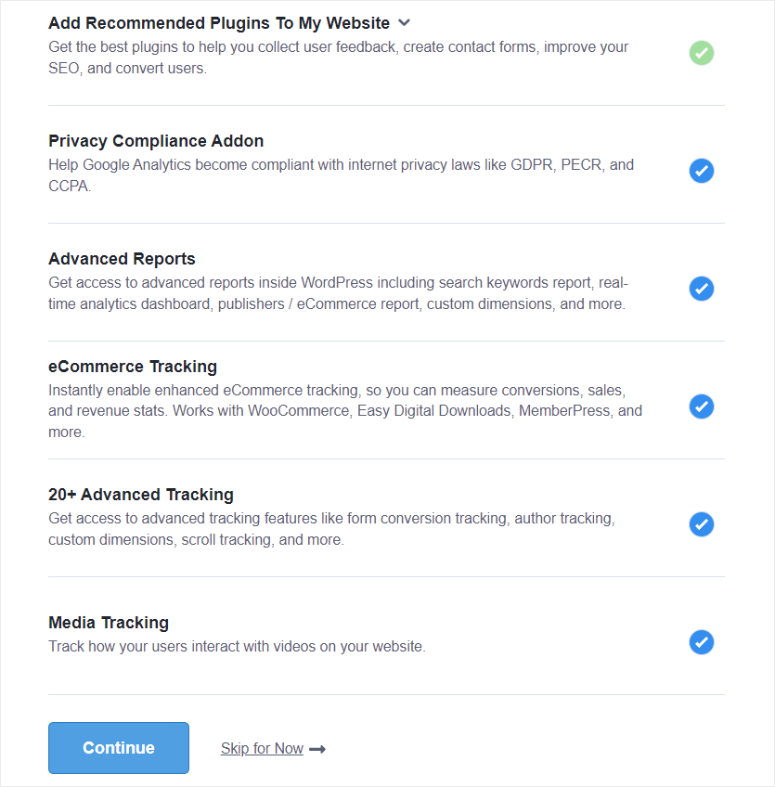
Once connected, MonsterInsights will automatically begin tracking website data using Google Analytics, including file downloads.
Step 3: Add More File Extensions to Track Downloads
By default, MonsterInsights will also automatically track downloads for popular file types like PDFs, documents, spreadsheets, presentations, and ZIP files.
This covers most of the downloadable content offered on most WordPress websites. But if you provide resources in less popular formats, you should expand your download tracking capabilities.
MonsterInsights allows you to add any additional file extensions you want to track beyond the default list. This ensures you capture data on all downloadable resources, regardless of format.
To do this, head over to your WordPress dashboard and navigate to Insights » Settings.
Then, locate the “Engagement” tab in the Settings menu and select it. Follow this by scrolling down until you see the section labeled “File Downloads.”
Here, you’ll see a text field displaying the default file extensions MonsterInsights tracks. Simply enter any additional file extensions you want to track and separate them using commas.

For example, to track MP4 downloads, add “,mp4” to the existing list.
After adding all the file formats you want, hit “Save Changes.” This ensures that MonsterInsights starts tracking downloads for your newly added file extensions.
Step 4: Analyze Top Downloads Directly in WordPress
Once your tracking setup is complete, you can easily access and analyze file download reports directly within your WordPress dashboard.
To view the download report, navigate to the Insights tab in your WordPress dashboard and select Reports.
From there, click on “Publishers” and scroll down to the section labeled Top Download Links.
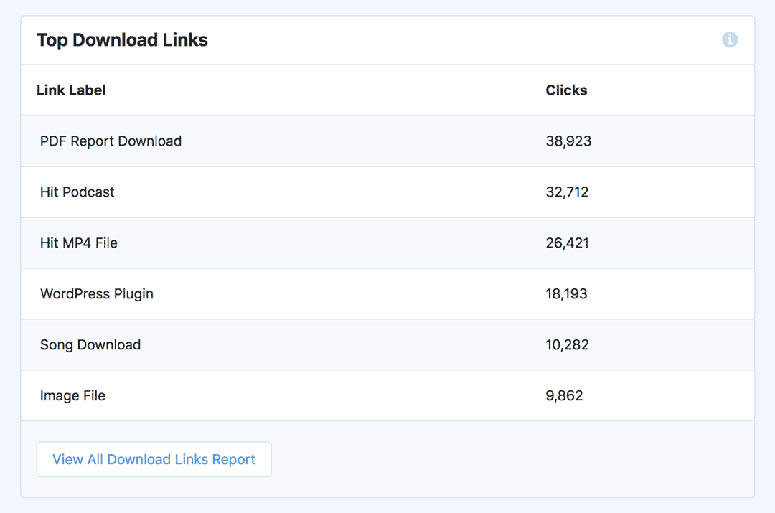
This report lists your website’s most frequently downloaded files. Each entry displays the file name and the number of clicks each download has received.
Reviewing this data lets you gain valuable insights into which files are the most popular among your website visitors.
As mentioned, this information can be used to analyze your content creation strategy and produce similar content that connects most with your audience.
But, you can also view the downloads insights directly in your GA4.
While MonsterInsights offers a convenient overview of your top downloads within WordPress, Google Analytics 4 (GA4) provides even more detailed reports about your file download activity.
To do this, you can simply select “View All Download Links Report,” which will redirect you to your Google Analytics 4 dashboard under Downloads.
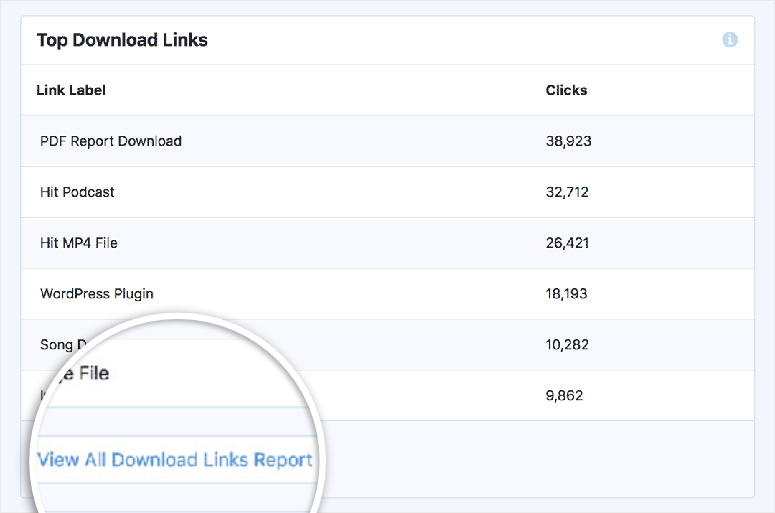
But you can also view this data directly in your GA-4 dashboard.
First, go to your Google Analytics 4 property and navigate to the “Explore” section to build your custom report.
Then, select the Plus(+) sign in the “Dimensions” section to import the following dimensions:
- File Name: This is the actual filenames of downloaded resources.
- Link Text: This displays the text users click to initiate the download.
- Page Location: This shows you the specific page where the download link is located.
- Event Name: This ensures you’re focusing on “file_download” events.
Once you’ve imported the dimensions, you can organize your report using drag and drop functionality to make it more user-friendly and meet your needs.
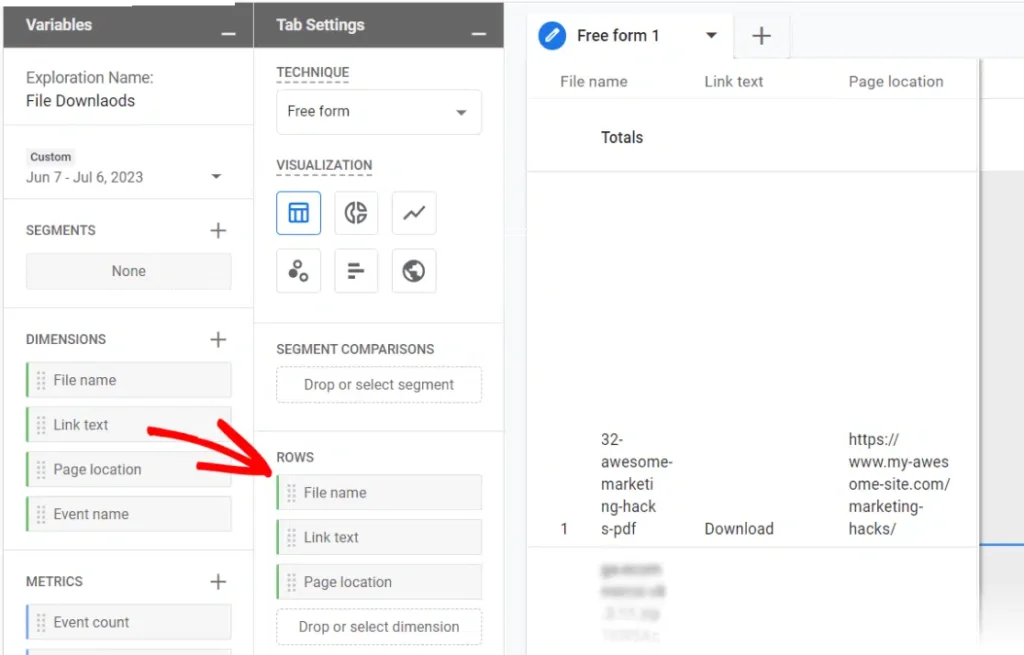
Drag File Name, Link Text, and Page Location to the Rows section. This will ensure that Google Analytics displays each download metric with its details in separate rows.
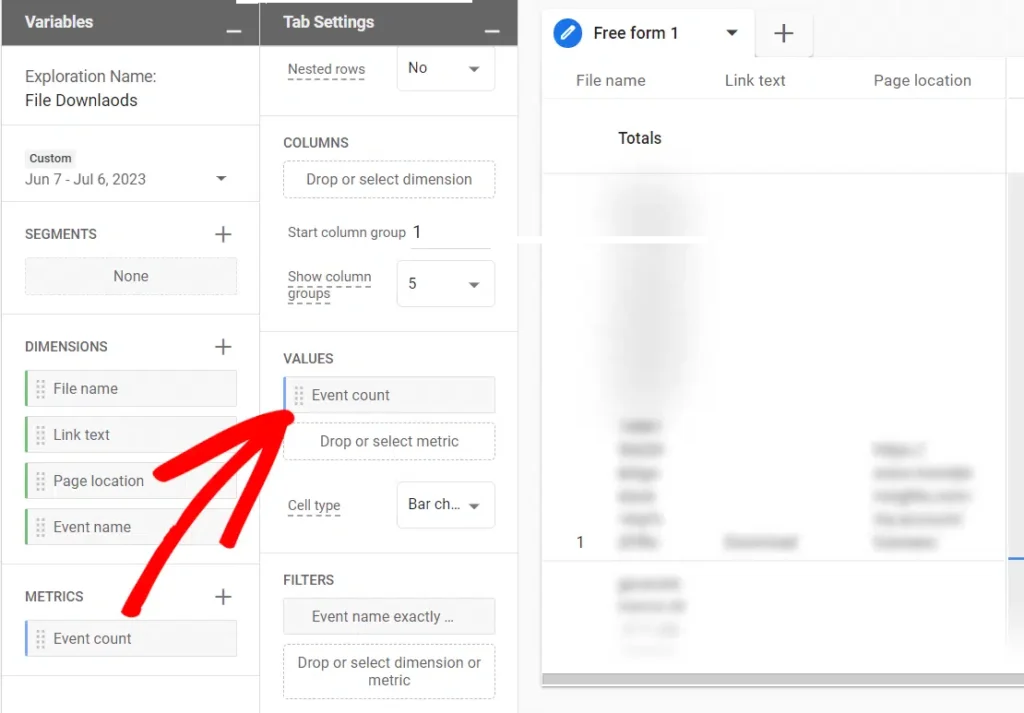
Then, select the Plus(+) sign in the “Metrics” section and add the Event Count block using the drag and drop feature to the Values section. This ensures Google Analytics displays the number of times each file was downloaded.
Finally, locate “Event Name” in the Dimensions box and drag it into the Filters box. Choose “exactly matches” and input “file_download” as the value.
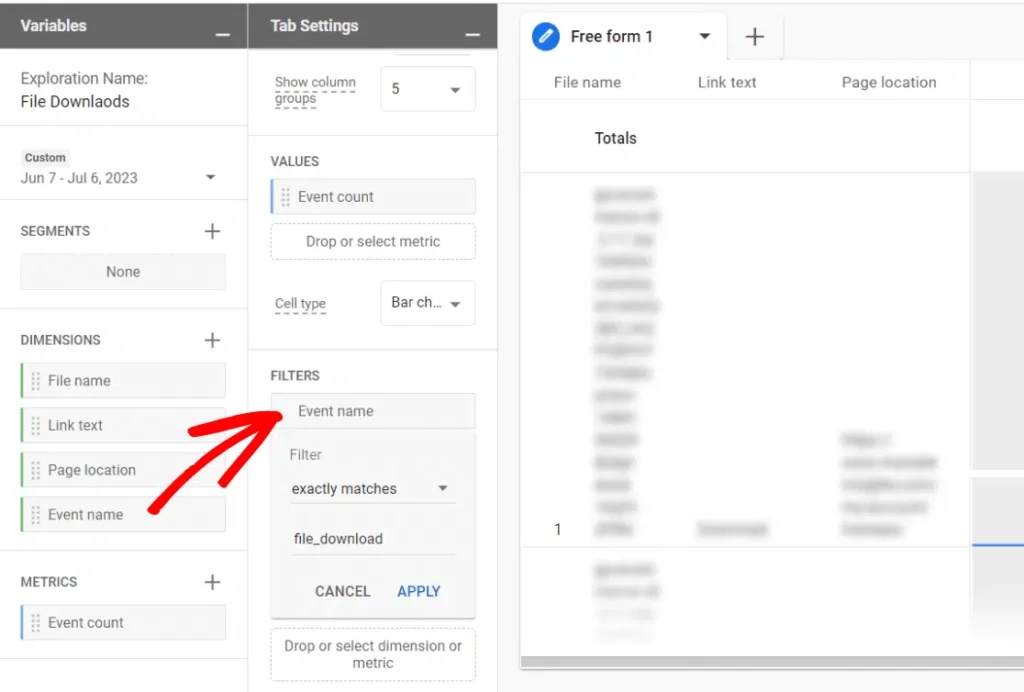
Then, hit Apply to add the filter to your GA4.
Great! You can now create a custom GA4 report focused on file downloads. This allows you to gather deeper insights from your file download activity from your Google Analytics account.
With that, you can now set up tracking for your WordPress downloads directly in your dashboard and set up filters to view your download analytics in GA4. If you have more questions, check out our FAQs below.
FAQs: How to Set Up Download Tracking in WordPress With Google Analytics
Which MonsterInsights plan tracks downloads?
All of Them! Any MonsterInsights plan you purchase allows you to set up download tracking. This is a core functionality that MonsterInsights offers across all its premium plans. But if you want to track advanced Google Analytics metrics like form and eCommerce conversions, you will need the Pro or Agency plans.
Does MonsterInsights offer a free plugin?
Yes! MonsterInsights offers a free plugin. All you have to do is head to your WordPress repository and search for it. Once you locate it, install and activate it like any other plugin. Finally, connect it to your Google Analytics account, and you can start tracking your WordPress data.
How long does Google Analytics 4 take to start working?
It takes about 24-48 hours before Google Analytics 4 reports start reflecting. But it begins collecting data (working) immediately after you add the tracking code or set up MonsterInsights. This delay occurs when GA4 cleans, organizes, and aggregates the collected data.
What is the best Google Analytics WordPress plugin?
MonsterInsights is undoubtedly the best Google Analytics plugin. It makes it super easy to connect GA4 with your WordPress dashboard and view the data there. Plus, once you connect the two platforms, you can automatically monitor metrics like traffic and downloads without adding a single line of code.
That’s it! We hope you enjoyed learning about how to set up download tracking in WordPress with Google Analytics. If you are looking for another way to set up Google Analytics check out this comparison article on ExactMetrics vs MonsterInsights: Which Is Better?
To add to that, here are other articles you may be interested in reading.
- How to Set Up Google Analytics eCommerce Tracking for WooCommerce
- How to Set Up WordPress Conversion Tracking (Step by Step Guide)
- The best way to Add Google Analytics to WordPress (With & Without Plugin)
The first article teaches you how to set up eCommerce tracking for WooCommerce in WordPress. The next post walks you through how to set up conversion tracking. While the last article gives you insight into how to add Google Analytics with and without a plugin.

Comments Leave a Reply