Do you want to create a travel booking form to easily capture leads on your site?
A travel booking form makes it possible for customers to book tickets, tour packages, and hotels on your website. It’s the simplest and most easy way to collect customers’ travel information and requirements efficiently.
In this post, we’ll show you the easiest way to create a booking form for a travel agency in WordPress.
Why Create a Travel Booking Form?
Many travel agents create websites to provide online booking information and reservation services to their customers.
With a professional booking form, you can gather all the information such as contact details, email address, phone, number of attendees, date, and more.
Some of the benefits of using travel booking forms are:
- Provide Customized Solutions: Depending on the type of event or tour you are offering, you can tailor your booking form the way you want. So you’ll get everything you need to know about the customers’ preferences with a single form.
- Maximizes Reservations: As an online booking form is available on your website 24/7, it gives you the opportunity to get more bookings and reservations for your travel packages.
- Saves Time and Resources: Customers can browse the packages on your site and make their reservations in a few clicks. You won’t need to communicate directly with the customers unless they have a query that’s not already answered on your site.
- Fast and Reliable Payments: Along with other information, you can add an online payment option to your travel booking forms. This way, the bookings are only confirmed after customers successfully make payments.
- Increases Customer Satisfaction: These forms not only help you improve sales and productivity as a business but also make the customer’s experience smoother.
You can use the information collected with your forms to create email marketing campaigns. This will help you win over customers and stand out from the competition.
The best part is that you can do all of this and reap online benefits without using expensive apps and complex programs.
With that, let’s learn how to create a travel agency booking form in WordPress.
Creating a Booking Form for Travel Agency
You’ll find several form builder plugins on the market but when it comes to building professional-looking forms, WPForms is the best choice.
WPForms is the #1 drag and drag form builder for WordPress sites. It comes with powerful features that let you create any type of form for your websites including booking forms.
In fact, at IsItWP, we’ve used WPForms to build all sorts of forms that we need.
What we love is that there are 1,200+ pre-built form templates so you don’t need to create one from scratch. You can choose a booking form template and customize it to suit what your travel agency has to offer.
The WPForm form builder is very easy to use. You only need to drag and drop the required form fields to the form preview.
Here are a few highlights of this form builder:
- Responsive form templates
- Customizable form notifications and confirmations
- Built-in entry management system
- Integration with popular email marketing services
- eCommerce form fields
- Form spam protection option
- Multiple payment methods with providers like PayPal and Stripe
- Conditional logic and conversational forms
…and more. There’s so much that WPForms has to offer to build the perfect forms for your travel site.
So there are a number of good reasons why we’re recommending WPForms. One of the other reasons being that you can continue to use WPForms for other needs on your site such as accepting payments, collecting email leads, preventing spam, and making your site more interactive.
Now that you know which form builder plugin to use, let’s start creating a booking form for a travel agency step by step.
Step 1: Install and Activate WPForms
First, you’ll need to sign up for a WPForms account. WPForms offers a free version that comes with all the basic features you need to create forms on WordPress.
For more advanced features and integrations with payment gateways, you can upgrade to the premium version. In this tutorial, we’ll be using the pro version to explore all the neat features this plugin has to offer.
Once you sign up, you can access your WPForms dashboard. Here, open the Downloads tab and find the plugin download file along with your license key.
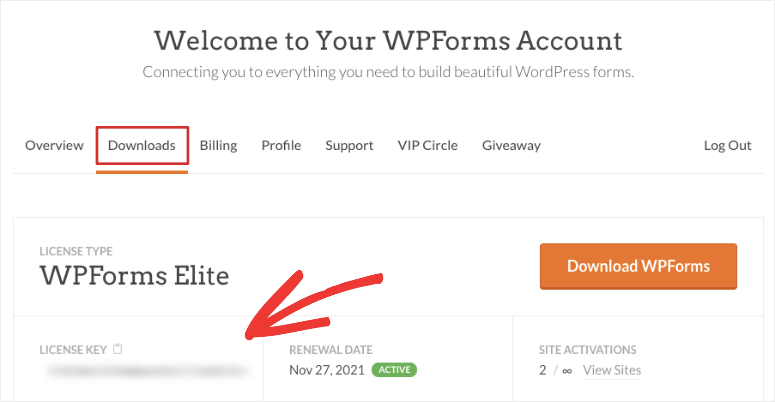
You need to install the plugin file on your WordPress site. Never installed a plugin before? No worries! Check out our guide on how to install a WordPress plugin.
After you install and activate the plugin, go to the WPForms » Settings tab on your WordPress dashboard. You’ll need to enter your license key here.
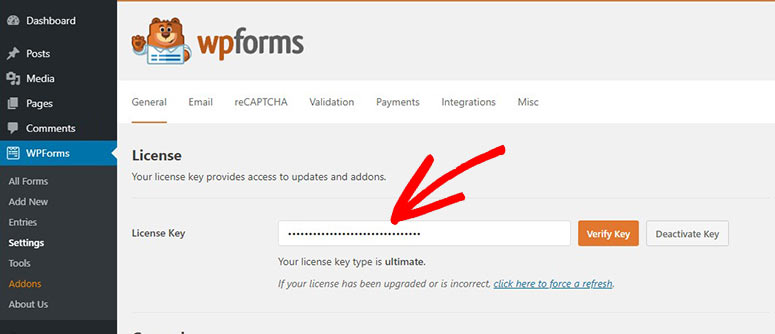
Then, click on the Verify Key button to activate your WPForms account.
Now, you need to set up the payment method for your travel booking form.
Step 2: Integrate with Payment Service
To accept payments on your booking form, you have to install a payment gateway addon. WPForms lets you connect with many payment services with the help of addons.
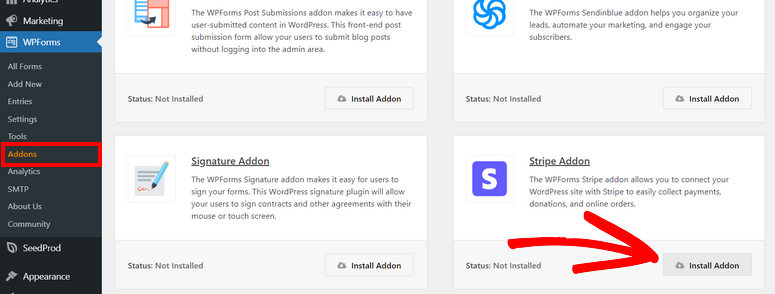
You’ll be able to install the addons from the WPForms » Addons tab on your admin panel. Here, you’ll see addons for Stripe, PayPal, and more.
For this tutorial, we’re going to install the Stripe addon to accept card payments. But you can use any of these payment services depending on your choice.
After you install the addon, navigate to the WPForms » Settings page and click on the Payments tab. Here, you can connect your Stripe account or set up other payment options.
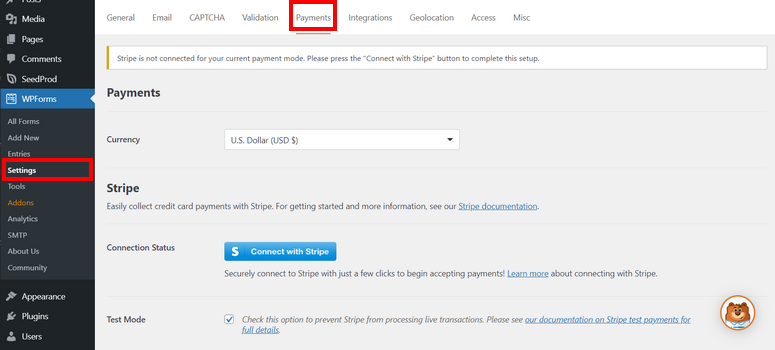
There are also options to use the Test Mode to check your connection status with Stripe and your WordPress site. So you can make sure everything is working correctly without accidentally accepting payments from customers.
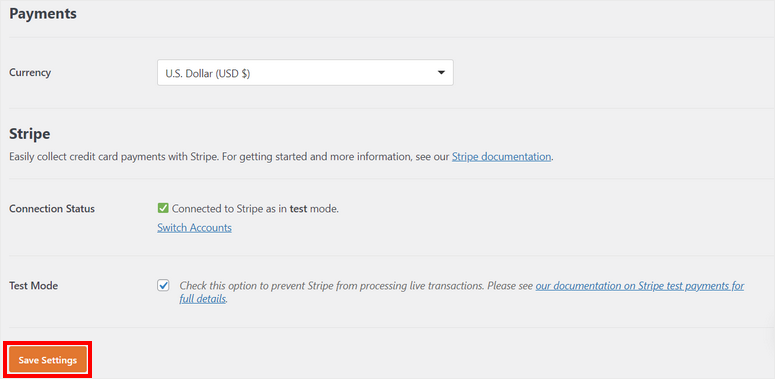
Don’t forget to click on the Save Settings button at the bottom of the page.
You are now ready to create your travel booking form in WordPress.
Step 3: Create a Travel Booking Form
To create a new form, head over to the WPForm » Add New tab on the WordPress dashboard. You’ll see the templates library in the next window.
Here, you can search for a travel booking form template of your choice or start from scratch.
We’re using the Tour Booking Form template for this tutorial. It includes all the form fields to collect the contact and travel details from the customers.
You can preview any template to see which fields are included. When you find a suitable form template, enter a name and click on the Use Template button.
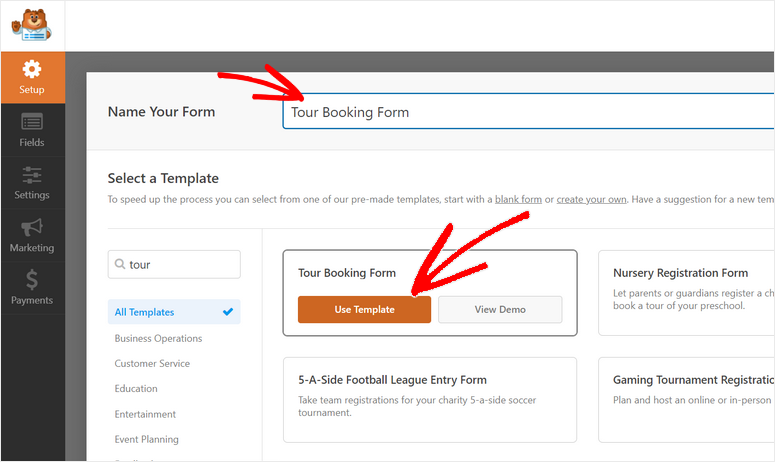
This launches the drag and drop builder so you can customize the template as you like. Here, you’ll find all the form customization options in the left menu panel and the form preview on the right side of the form builder.
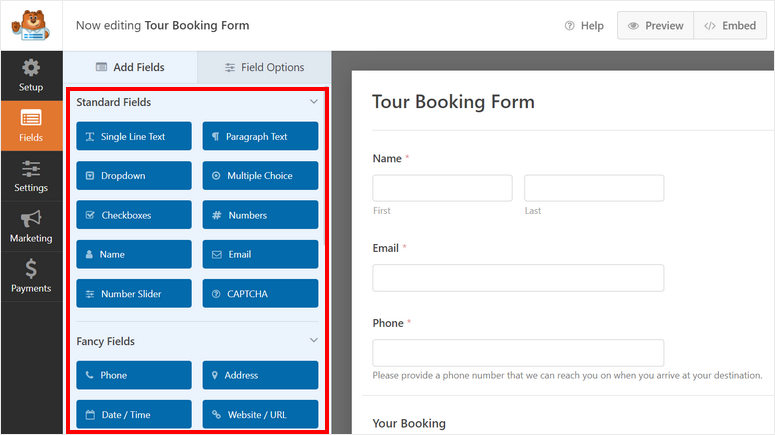
Keep in mind that the templates from WPForms are designed to be ready to use so you’ll only need to make minimal changes here. You’ll see all the necessary fields already added to collect contact information and booking requests.
To add a new field to your travel booking form, simply drag the form field from the left menu and drop it in the form preview.
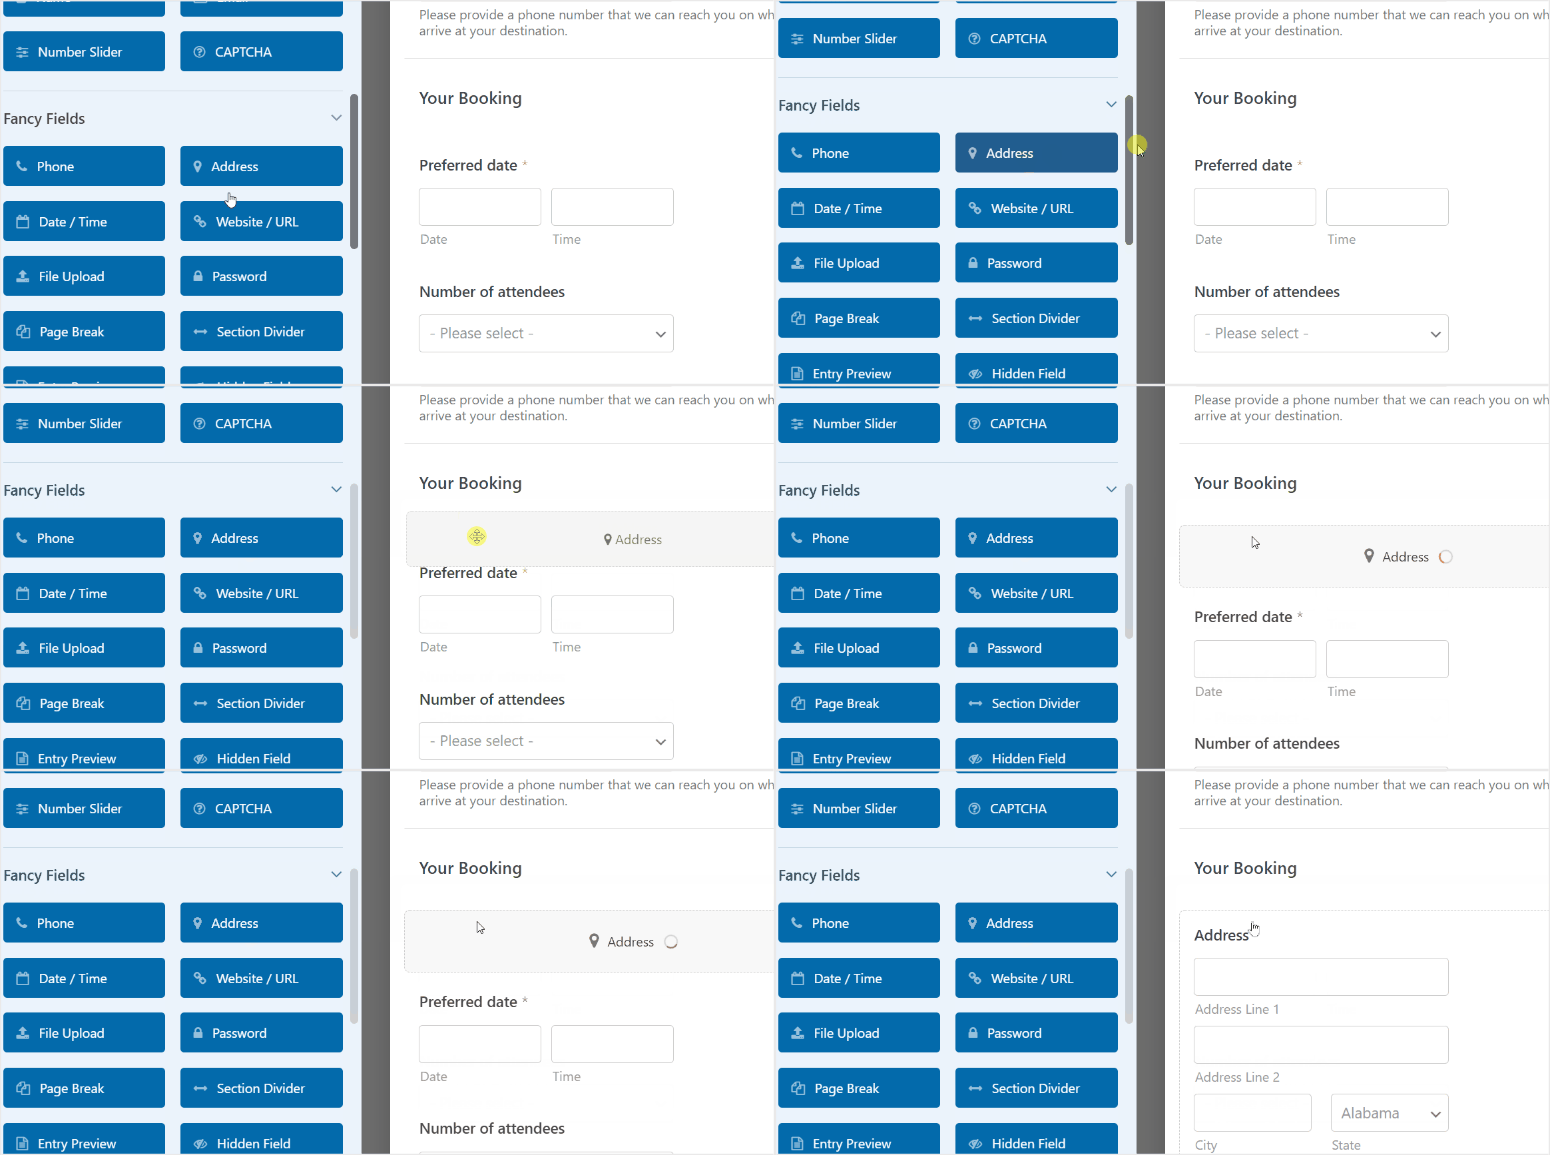
You can collect phone numbers, addresses, emails, customer comments, and much more. You can even allow them to upload travel documents such as a copy of their passport, visa, and ID proof.
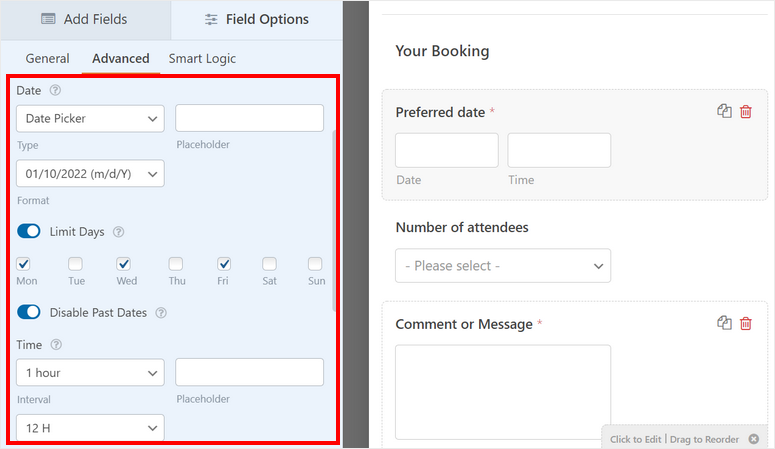
Next, you may want to customize the existing form fields. For this, just click on the form field and you’ll see customization options open on the left.
For instance, when you select the Preferred date field, you’ll see all the settings to choose the date format, limit days, and disable past dates. There is also the option to choose the method for selecting the date on your booking form.
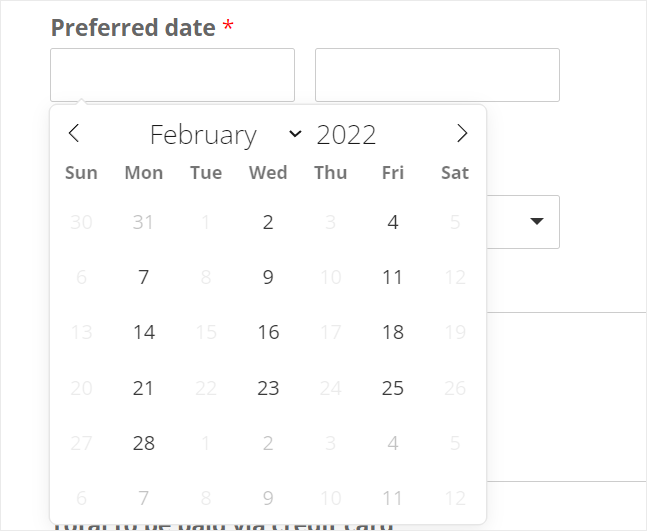
This is how the date picker will look to your customers browsing your website.
Next, you can also edit the pricing plans for travel fees depending on the number of attendees. On the Number of attendees field options, you can add the number of people and the prices for each variation.
To show prices on the booking form, make sure you enable the Show price after item labels here.
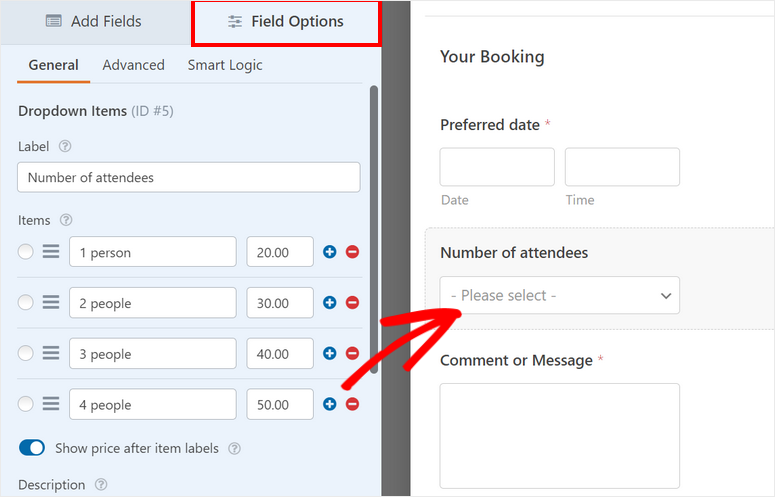
Now customers can choose packages depending on whether they want an individual, couple, or group travel plan. Like this, you can customize every form field to change the label and settings.
A neat feature of WPForms that we must mention is that you can add dropdown menus, checkboxes, and multiple choice. So in case you want to give customers options, say to buy travel insurance for their trip, you can simply drag and drop a checkbox and customize the label.
Once you’re done customizing the form fields, click on the Save button.
Now, let’s set up the payment option for your online form.
Step 4: Add Payment Method
In the earlier step, we installed the Stripe addon to accept credit card payments. So, we’ll need to add the Stripe Credit Card form field from the Payments Fields section.
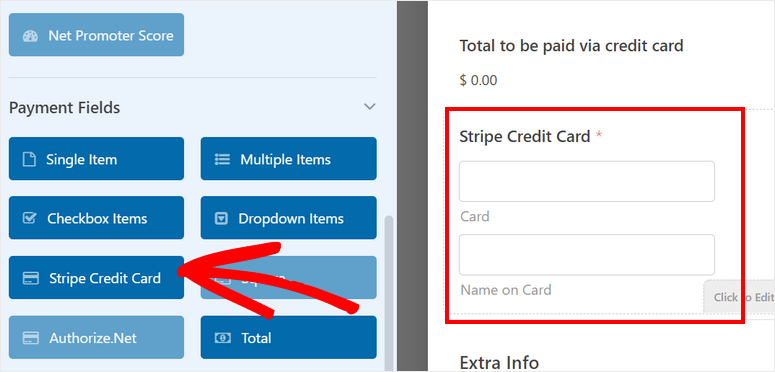
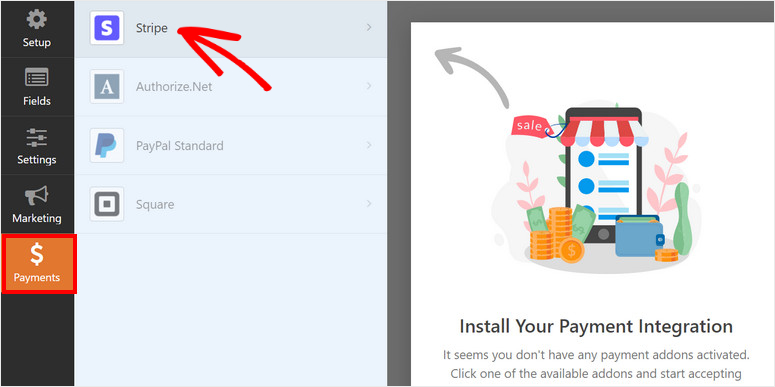
Then, go to the Payments tab on the left menu and choose your payment method.
On the Stripe page, check the Enable Stripe payments box.
Here, you can change the payment description and choose the email address where you want to send the payment receipt. Next, select the Email field from the dropdown menu to send the receipt to the customer’s email address.
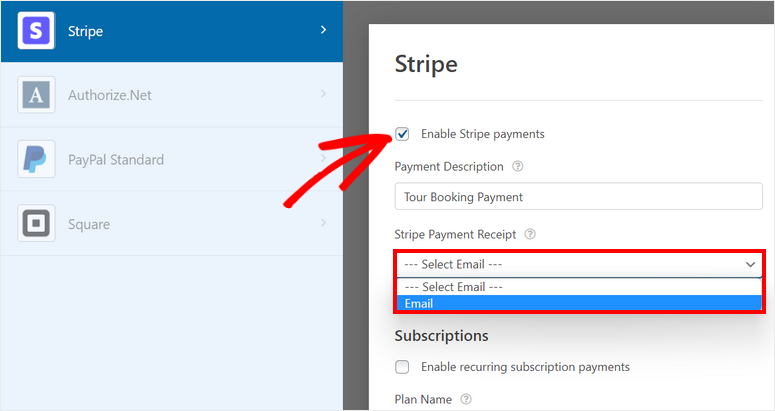
Make sure you save your settings when you’re done.
Next, we’ll show you how to configure the form settings for your booking form.
Step 5: Configure Travel Booking Form Settings
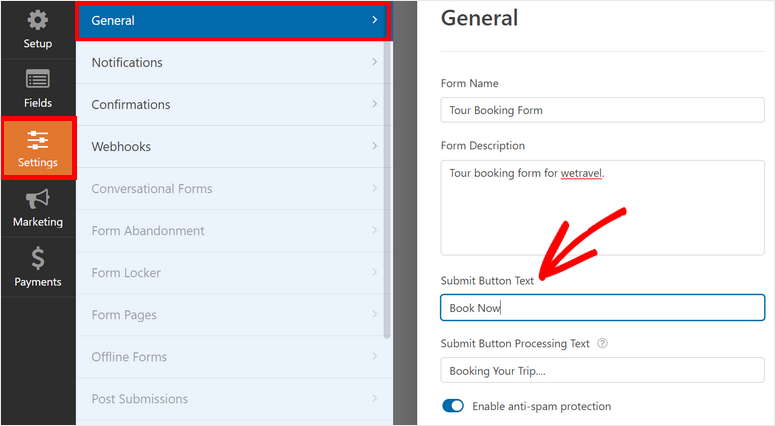
On the Settings » General tab, you can change the form name, description, submit button text, and more.
By default, every form created with WPForms comes with anti-spam protection enabled. However, if you have other security measures in place, there’s an option to disable it here. We recommend leaving it on.
After you save your settings, you’ll need to set up form notifications and confirmations.
Step 6: Set Notifications and Confirmations
With WPForms, you can control what happens after a customer books a tour using your travel booking form. It lets you send email notifications and confirmations to:
- Notify yourself and your team members about new bookings
- Send customers their booking details and confirm their booking
- Display a thank you message after a successful booking
- Redirect customers to a different page after form submission
This will help smoothen your workflow and automate many follow-up tasks.
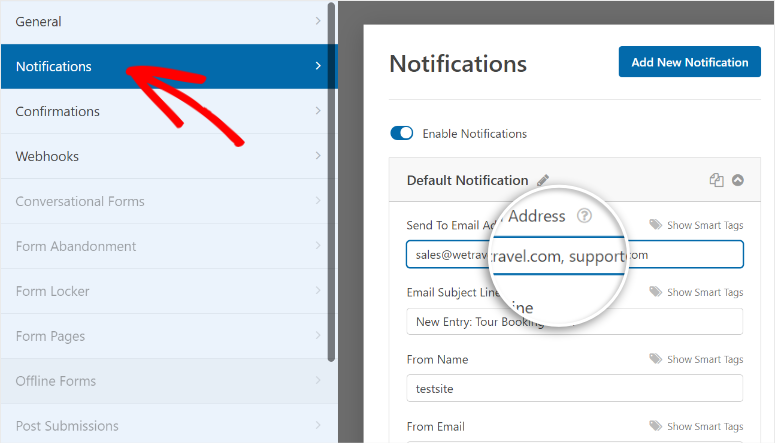
To set up email notifications, open the Settings » Notification tab on the form builder. By default, WPForms has an admin notification sent to the WordPress admin email.
You can change that and add more email addresses of your team members. Make sure to separate multiple email addresses with commas.
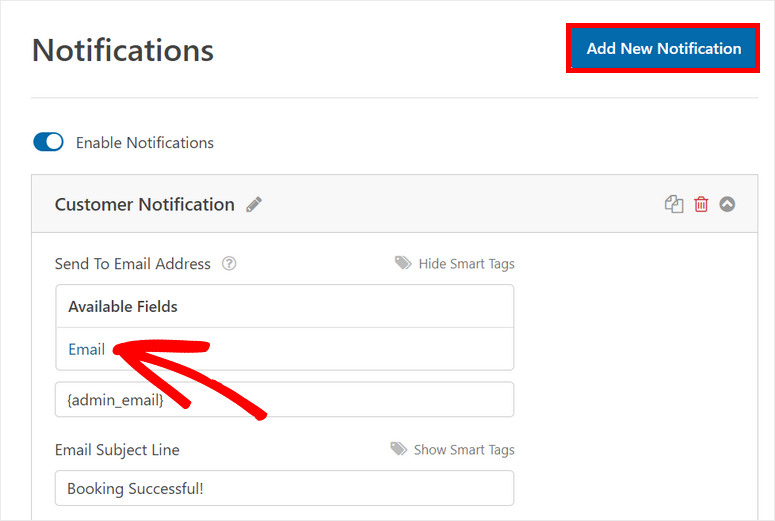
Moreover, you can send the customers a notification to confirm their contact and booking details. To add this functionality, click on the Add New Notification button on the top right corner of the settings.
In the Send To Email Address field, you can select the Email form field using the Show Smart Tags option. This way the email address is sent to the email address entered by the customers in the form.
Then, you can customize the subject line, form name, and email body to match your travel agency’s style. To add a copy of the booking details in the email notification, use the {all_fields} smart tag.
You can even enable the Stripe completed payments options to send the email notifications only after the payment made by the customer is successful.
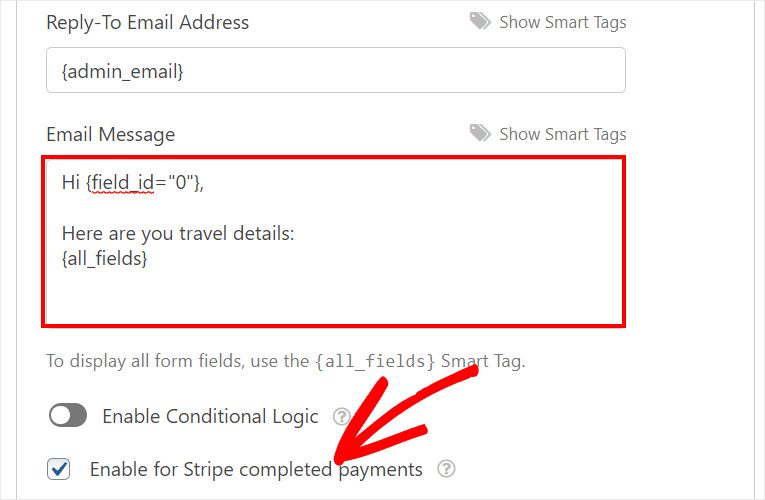
You’ll also see an option to enable conditional logic. This allows you to send the email only if certain conditions are met. With this option, you can create separate notifications or confirmation emails that will go to customers that book different trips.
Next, you need to add the confirmation message for your travel booking form. For this, go to the Settings » Notification tab and you’ll see the confirmation settings.
WPForms lets you choose from 3 options for the confirmation action after a successful booking:
- Show a custom message
- Redirect to a different page on your site
- Redirect to external website or page
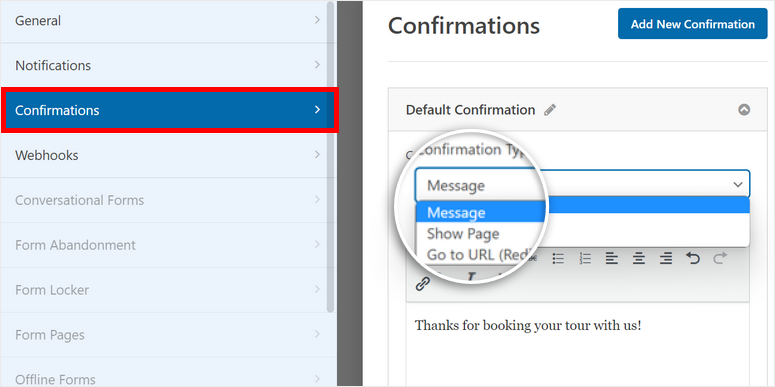
If you want to display a confirmation message on the front end, then you can enter a custom message on the editor.
For more details on this, see our guide on how to set up the right notifications and confirmations.
Once you’re done with the settings, click on the Save button.
Step 7: Connect with Email Marketing Provider
WPForms allows you to connect your email marketing account with the booking form itself. This will let you automatically add new contacts and client information to your email lists in Constant Contact, Mailchimp, SendinBlue, and other popular email service providers.
You can also set up autoresponder emails and drip campaigns to welcome new customers and engage with them in the long run. So by syncing your email account to your online booking form, your entire booking process will be a whole lot easier.
To set this up, in the Marketing tab, select the email marketing service of your choice. Then, you can follow the instructions onscreen to sync your booking form with your email account.
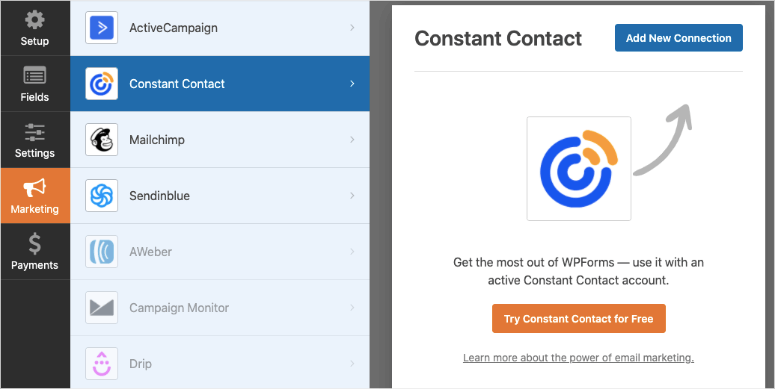
You’ll need to log into your email account and depending on your email provider, you may have to enter an API key that you can find inside your email account.
It’s that simple. Now, all you need to do is publish the travel booking form so that customers can start booking on your site.
Step 8: Insert Travel Booking Form on Your Site
WPForms lets you insert the travel booking form on any page, post, or widget area on your WordPress site. You’ll find readymade blocks and widgets for WordPress so you won’t have to embed complicated code snippets or even shortcodes.
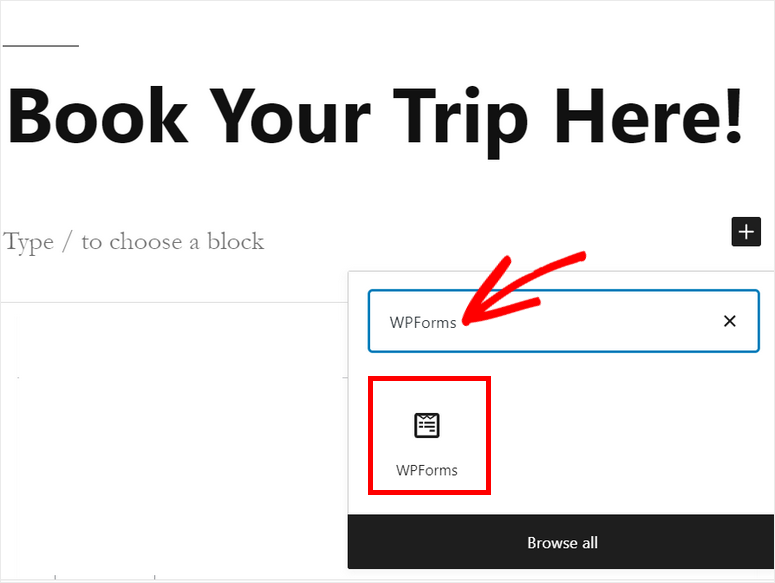
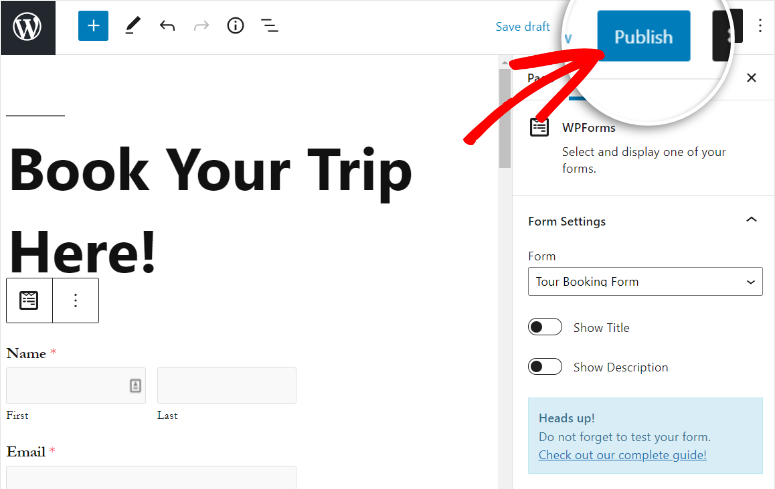
If you’re using the WordPress block editor, search for the WPForms block and add it to your page or post.
Then, you can select the travel booking form you created from the dropdown menu.
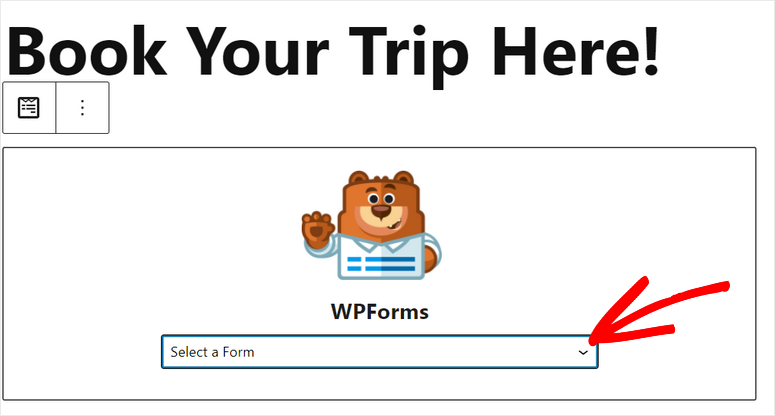
You’ll see the form preview on the text editor after you add the booking form. There are also options to show the form title and description.
You can preview your page to see how it looks and then hit the Publish button to make it go live on your site.
If you use the WordPress classic editor, there’s an easy option in there too. In the post editor, you’ll find an Add Form button. Simply click on it and select the booking form to add it to any page or post.

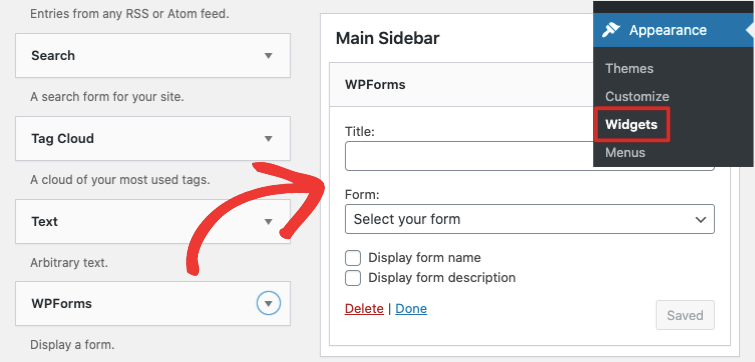
You can even add your booking forms on the widget-ready areas like a footer or sidebar. Head over to the Appearance » Widgets tab and drag and drop the WPForms widget into the sidebar or footer menu on the right.
Then, you can select the form you want using the dropdown menu. All that’s left to do is save your settings.
That’s it! You’ve done it!
You now have a professional-looking online booking form for your travel agency site. Now, your visitors will be able to easily book their tours on your site.
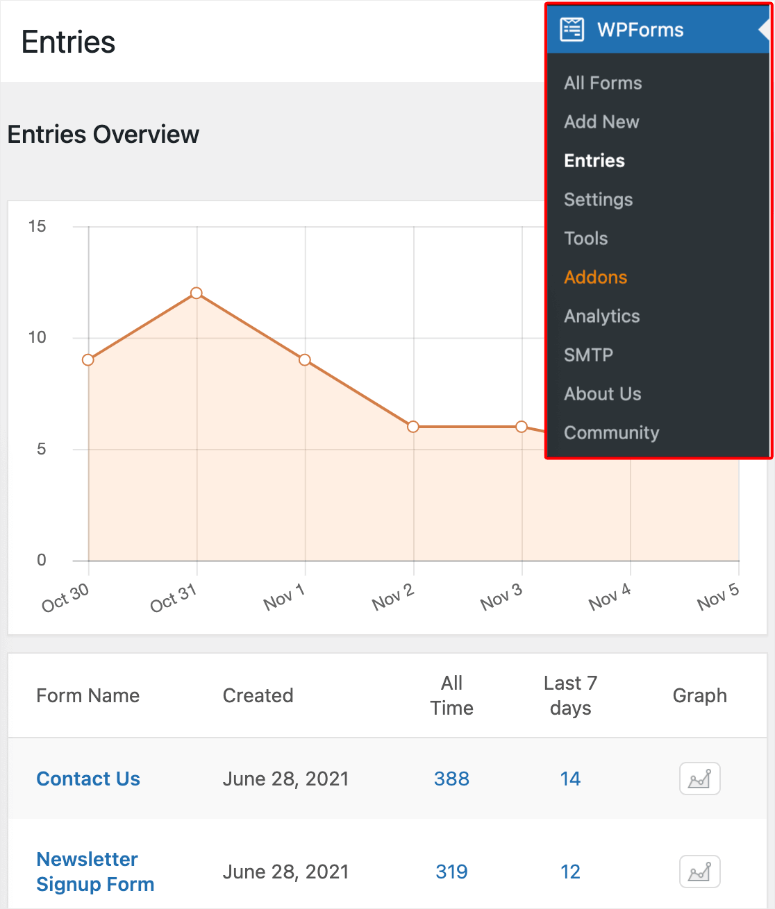
Want to view your bookings together? Head over to WPForms » Entries page. You can view the statistics for all your forms and then select the booking form to view the details of each customer.
Finally, if you’re using a page builder like SeedProd or Elementor, WPForms works seamlessly with them. You can customize the background, fonts, and add colors to match the rest of your website.
With SeedProd, you can create customized booking pages and even add social media handles, countdown timers, and eCommerce elements like ‘add to cart’ and ‘checkout’ buttons.
Now that you know how to use WPForms, you can create all types of WordPress forms that include:
- Inquiry forms
- Application forms
- Reservation forms
- Request a quote forms
- Event registration forms
- Survey and polls
- Signup forms
- Product order forms
- and so much more…
And that’s all for today! We hope this article helped you easily learn how to create a booking form for your travel agency.
Next, you can check out these resources to boost conversions on your travel booking form:
- How to Set Up WordPress Form Tracking in Google Analytics
- How To Reduce Form Abandonment and Boost Conversions
- 8 Best Email Capture Tools & Form Builders for WordPress
These posts will help you track your form submissions and reduce form abandonment on your website. The last one will help you generate more leads and grow your email list.

Is it possible for the visitor to have a dashboard that displays all the forms they have filled in?
Effectively, this would be a frontend version of the “All Entries” listing that is limited to displaying that user’s sumbissions.