
Do you want to integrate your WordPress forms with different web applications and services?
If you need a simple way to send data on a web application straight from your WordPress form, webhooks are the perfect solution. With a webhook form, you don’t need to take the help of a third-party connector like Zapier.
In this post, we’ll show you how to use webhooks on your WordPress forms so you can easily send real-time data to your favorite apps and services.
But first, if you’re a beginner, we’ll cover what webhooks are and why they are important. Keep in mind the method we’ll use today doesn’t need you to have any coding skills.
What are Webhooks?
Webhooks allow two web applications to communicate with each other. So for instance, if someone submits a purchase order form on your website, you can send that data to your Slack channel to update your product team that an order has been placed. You can do this when you get a new lead or subscriber as well.
In technical terms, webhooks are user-defined HTTP callbacks that are triggered by an event in a source system and sent to the destination system.
This means when an event or trigger takes place on your website, automated messages are sent to a connected service. A trigger can be anything like blog comments, product purchase user registrations, and form submissions.
If you’re wondering why you should use webhooks, here are some benefits:
- Transfer information between two services/apps automatically
- Automate tasks and slash admin time
- Cut down the cost of using connector services like Zapier and Hubspot to process data in apps.
Webhooks are incredibly useful for developers and tech-savvy WordPress users.
With that, let’s start our step-by-step guide on how to create a webhook form in WordPress.
Creating a Webhook Form in WordPress [Easy Method]
There are many ways you can use webhooks to send your WordPress form submissions to other web applications.
We’ll be using WPForms for this tutorial as it offers a Webhooks Addon that’s easy for anyone to use, including beginners. There’s absolutely no coding involved.
WPForms is the best form builder plugin for WordPress sites. And what you need to know is that it offers tons of premade templates and ready-to-use form fields that let you create all types of WordPress forms. This includes product order, registration, appointment booking, simple contact forms, and more.
WPForms comes with a drag and drop form builder that makes customizing forms a piece of cake. It has tons of addons and integrations that you can use to connect to email, payment, and marketing apps.
With its Webhooks Addon, you can easily connect your WordPress with any service or app. All it takes is a few clicks to enable this functionality.
Also, WPForms allows you to use conditional rules to trigger a webhook action based on the user’s form response. So only if a field’s value is met, then the webhook will run. This gives you more control over what data you want to send and to which app.
You can connect to tons of apps and services. For this tutorial, we’ll show you how to connect to Slack. But remember, you can use the same steps to connect to other apps and endpoints as well.
Step 1: Create a New Slack App
By connecting your webhook form to Slack, you can automatically send messages and information from your website to your Slack channels. You can update your team members or departments when a person submits a form, abandons a form, and more.
Now in order to send data from WordPress to another service using webhooks, you’ll need to create a bridge between the two apps. So to connect to Slack, you’ll need to create a Slack app (the bridge).
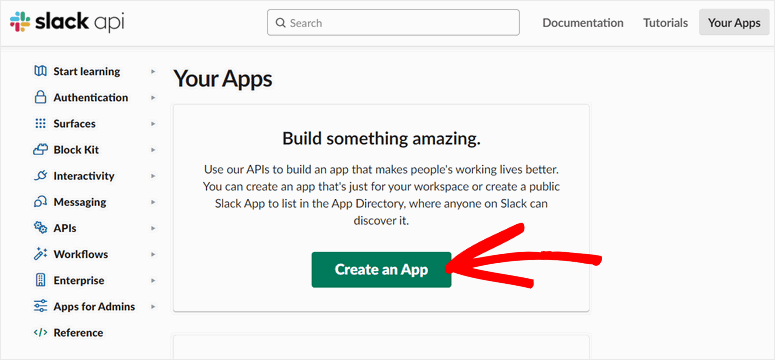
If you’re new to this, don’t worry, it’s quite easy and we’ll walk you through it step by step. First, you’ll need to open the Slack API page and click on the Create an App button.
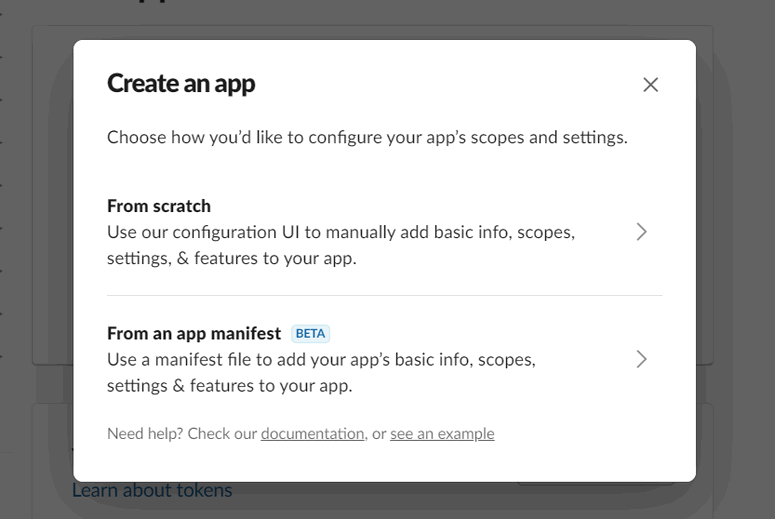
In the next popup window, you can choose how you want to create an app with Slack. There are two options:
- From scratch
- From an app manifest.
Here, we are going to create a Slack app from scratch. It sounds like a lot of work but it really only takes a few clicks.
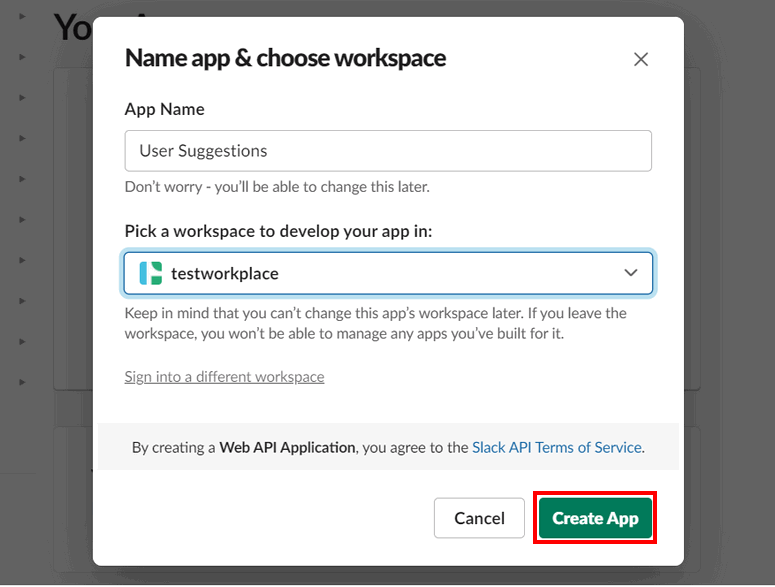
Then, you’ll see the popup where you can add the name of the app and choose your Slack workplace. Once you are done, click on Create App.
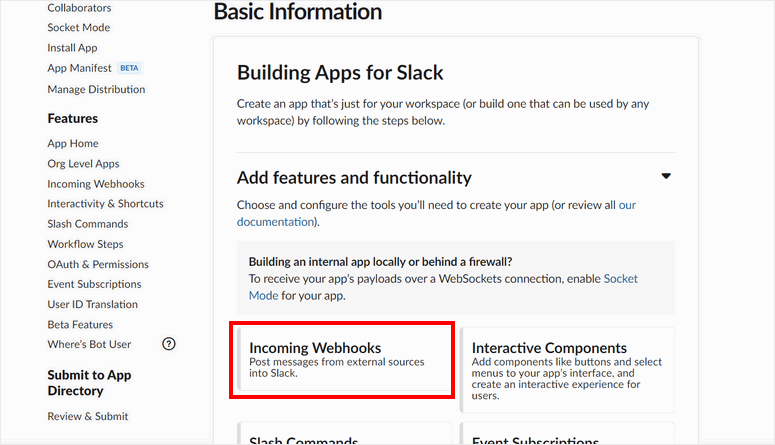
This opens up the Basic Information page. Here, you need to click on the Incoming Webhooks option.
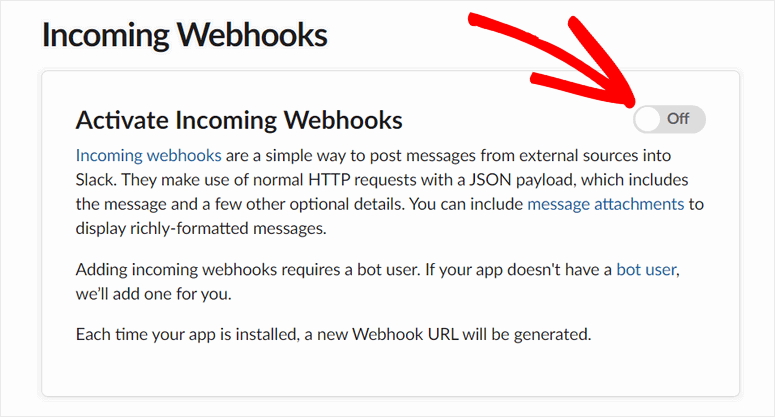
In the next screen, enable the Activate Incoming Webhooks settings. This lets you post messages on Slack from external services.
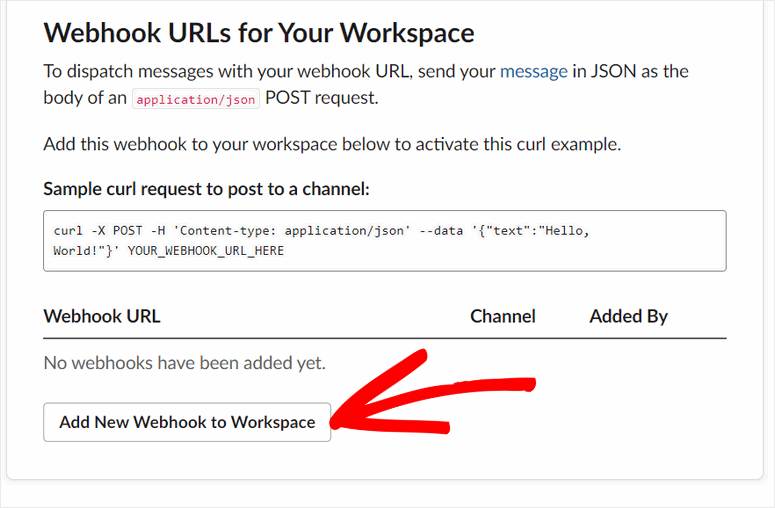
Once enabled, you’ll see the Webhooks URLs for Your Workspace section on the page.
Now, you need to create a new webhook to get information from your WordPress form. So, click on the Add New Webhook to Workspace button.
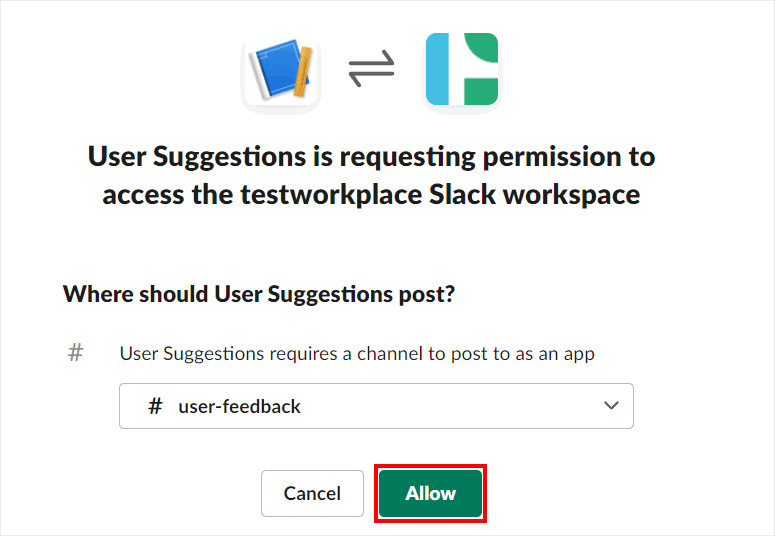
Next, you can see the popup where you can select a Slack channel to post your form submissions.
After choosing a Slack channel, click on Allow.
Now, you’ll be able to see the new webhook URL for your Slack app.
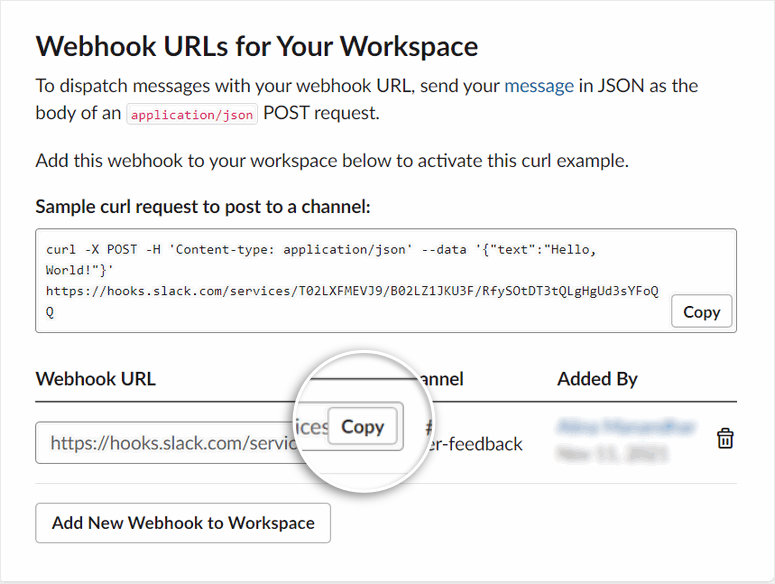
All you have to do now is copy the Webhook URL. You’ll need it a few steps later.
Step 2: Install and Activate WPForms
Once you have your webhook URL, you can add it to your WordPress form.
To get started, sign up for an account on the WPForms website.
There’s a free version of the plugin but you’ll need the premium version to access advanced form features like webhooks. WPForms comes with a 100% risk-free money-back guarantee so you can try the service before you make a commitment.
After you sign up, you’ll find the plugin download file and license key in the Downloads tab.
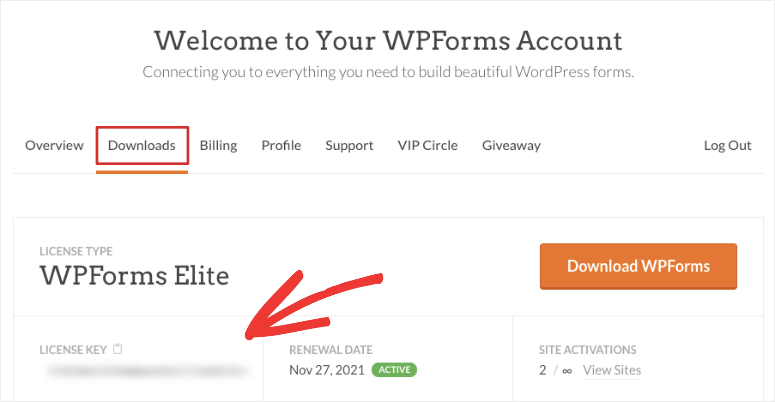
Now, head over to your WordPress dashboard and install the plugin. If you want more details, you can check our guide on how to install a WordPress plugin.
Once you install and activate WPForms on your site, you’ll need to enter your license key to enjoy all your premium features and addons.
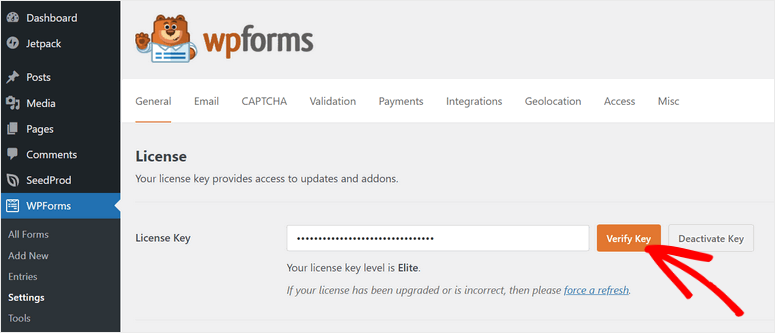
Before you start creating your form, you need to install the Webhooks Addon.
For this, go to WPForms » Addons tab and you’ll find tons of addons that help you extend the functionality of your WordPress forms. Here, click on the Install Addon button for Webhooks Addon.
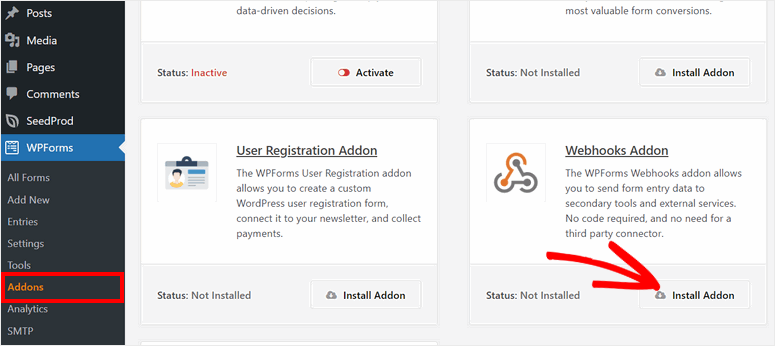
Now, you are ready to create your webhook form in WordPress.
Step 3: Create a Webhook Form
To create a new form, head over to the WPForms » Add New page where you’ll see a list of premade templates. These templates come pre-filled with the fields you’ll need based on the purpose of your form. The template library includes:
- Simple Contact Form
- Request a Quote Form
- Donation Form
- Billing/Order Form
- Survey Form
- Suggestion Form
…and more! For this tutorial, we’ll choose the Suggestion Form template because we created a Slack app for user feedback in the previous step. Feel free to choose one that best suits what you need.
All you have to do is give your form a name at the top of the page. Then choose any template depending on your needs or you can choose the blank template to start from scratch.
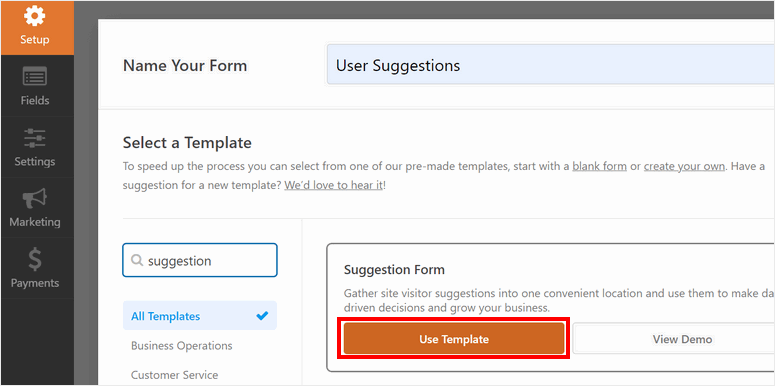
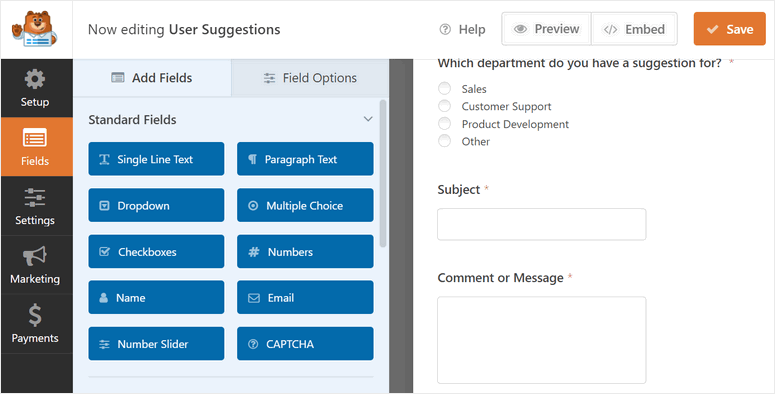
After you select a template, you’ll see the drag and drop form builder in the next window.
If you want to add more fields, simply drag and drop new fields from the left menu into the form preview.
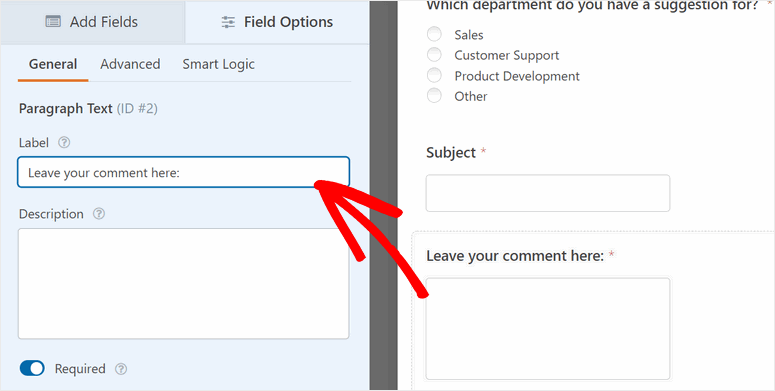
WPForms offers many customization options so you can click on any field to edit them. It lets you change the field names, description, and more advanced settings.
Once you’re done adding your form fields, click on the Save button.
In the next step, we’ll learn how to set up webhooks for this form and connect your Slack app.
Step 4: Set Up a Webhook for Slack
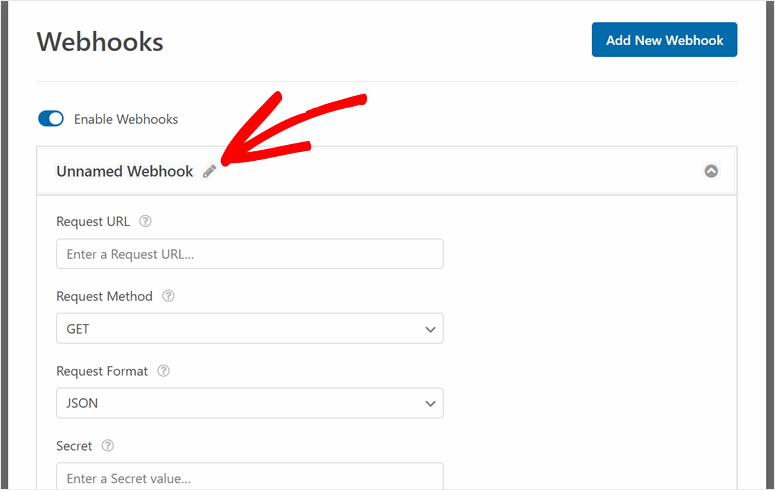
For webhooks to work on your form, you need to navigate to the Settings » Webhooks tab and click on the Enable Webhooks option.
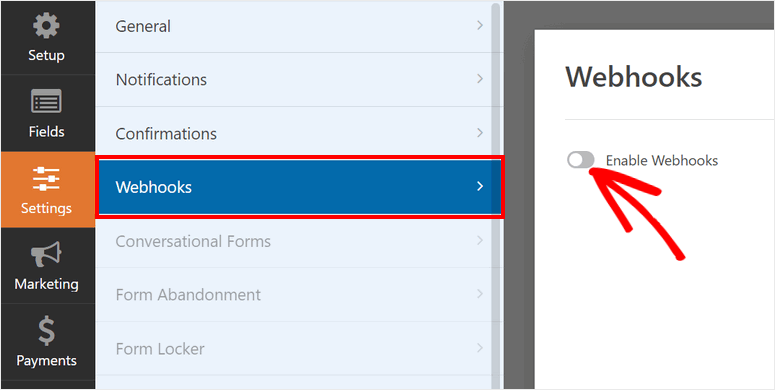
A new webhook will be created which you can edit to set up your Slack integration.
First, you can change the name of the webhook. This will help you recognize it later.
Now remember the Webhook URL you copied from your Slack app in Step 1? You’ll need to paste it here in the Request URL option. This will let you connect your WordPress form with other services like Slack.
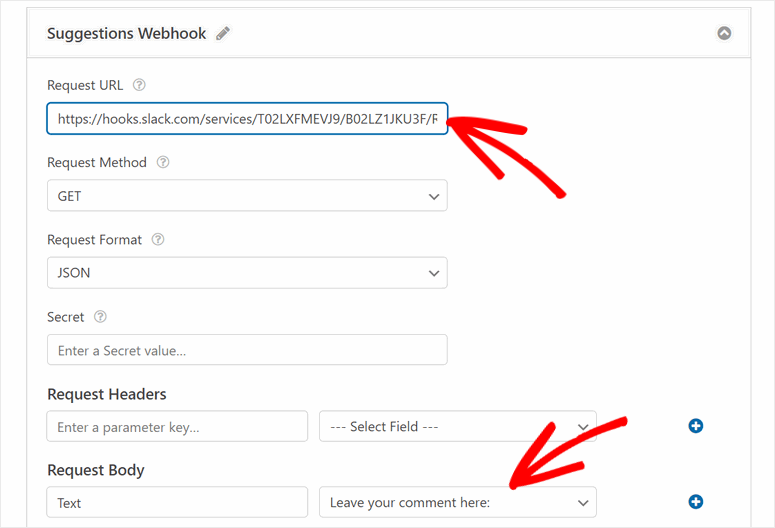
After this, you’ll see various settings for setting up your webhook. We’re going to discuss what each one does and what to add to these fields here.
- Request Method: It lets you choose what type of connection you want to create with your connected service. There are many types of HTTP methods that you can use based on what type of connection you’re looking to create:
- GET: This will get data from the submitted form and send the details to a connected app.
- POST: This will send the data to a secondary service. We’ll use the the HTTP POST request as we need to post data from your form to your Slack channel.
- PUT: This lets you update data when your webhook runs.
- PATCH: This lets you replace data when your webhook runs.
- DELETE: This enables you to delete information when this specific webhook runs.
- Request Format: This option will show the server which type of content you are sending over. This is a bit technical but basically, there are two different request format types available:
- JSON: Formats your data in an application/json format and will set the content type as charset=utf-8.
- FORM: Formats your data in an application/x-www-form-urlencoded format, and will set the content type as charset=utf-8.
- Secret: If you are a developer and want to integrate your own API for authentication then you can use a secret key. But for our tutorial, we don’t need this option so we’ll leave this blank.
- Request Headers: This sends specific values when the request is sent to the app. When the webhook runs, the fields will be auto-generated. We’ll leave this field blank as well.
- Request Body: For this option, you need to set up the message type and select a field to post messages. As the users will be entering suggestions in text format, we’ll set the Key to Text. Then, select the field where the users will enter their message.
After you’re done with the settings of the webhook request, click on the Save button.
Step 5: Set Up Form Notifications
Next, you can set up email notifications for the WordPress form. This lets you send automated emails to the admin, any team member, and the customer/user once they submit the form.
To set up these email workflows, head over to the Settings » Notifications tab, check the Enable Notifications option to see the default settings.
Here, you can customize the notification settings and add recipient email addresses.
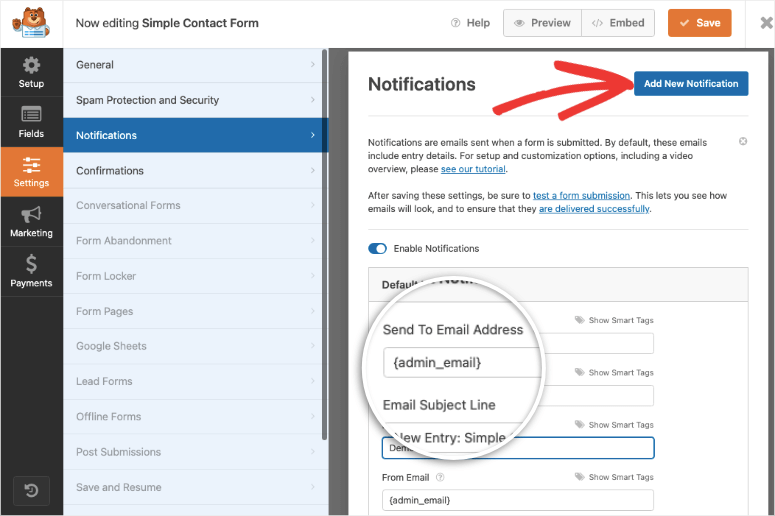
WPForms also lets you send automated email notifications to the form users as well. To set this up, click on the Add New Notification button on the top-right corner of the page.
Then, you need to use the Show Smart Tags option and select Email. With this tag, WPForms will auto-detect the email address entered by the user in the form.
In the Email Message section, you can add your custom message and use the {all_fields} smart tag to show all form data the user entered.
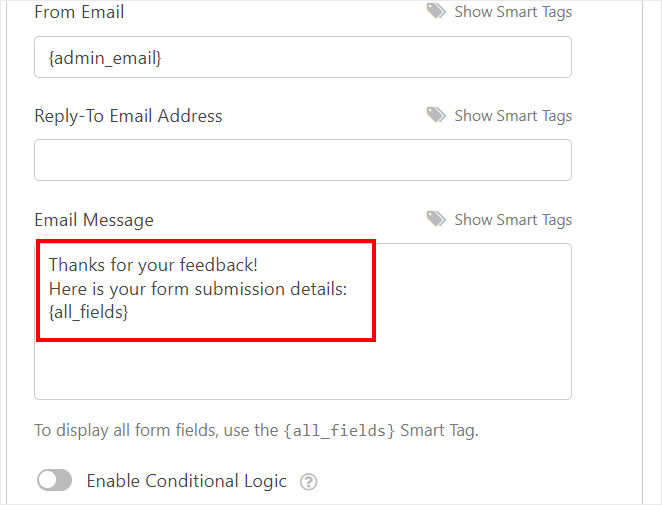
Don’t forget to save your settings at the end.
Step 6: Customize Confirmation Message
WPForms also lets you display confirmation messages on the front end of your site after users successfully submit the form.
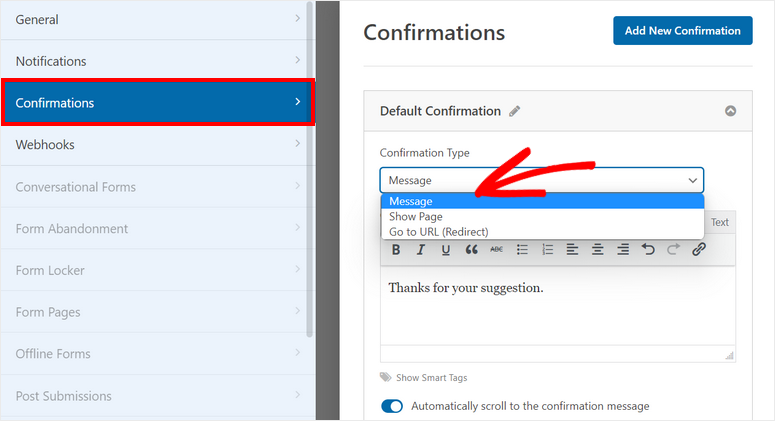
In the Settings » Confirmations tab, you’ll see the confirmation settings. By default, the Confirmation Type is set to ‘Message’ but there are 3 options in this menu:
- Message: Add a confirmation message that is displayed on the frontend after customers submit their order.
- Show Page: Redirect your users to any page on your site.
- Go to URL (Redirect): Send users to a specific URL.
To learn more about this, you can check our guide on how to set up form notifications and confirmations the right way.
Once you’re done with the settings, click on the Save button.
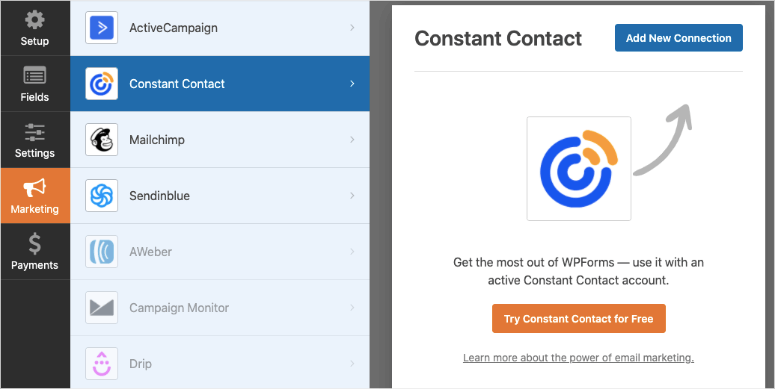
We must also mention here that WPForms lets you integrate with your prefered email service like Constant Contact and Mailchimp.
You simply need to access this under the Marketing tab and follow the onscreen instructions to connect your email account. In most cases, you’ll need to provide an API key that you can generate with email provider.
If you want to connect online forms to a payment gateway as well, you can learn to do that here: How to Create an Online Order Form
All you need to do now is publish your webhook form on your WordPress site.
Step 7: Publish Webhooks Form on Your Site
To start sending form submissions to external services, you need to publish the webhook form first. With WPForms custom block, you can add your forms to any page or post on your WordPress site.
For this tutorial, we’ll add the form to a new page on our site. So navigate to the Pages » Add New tab on your WP admin panel. In the block editor screen, add a new block and search for ‘WPForms’.
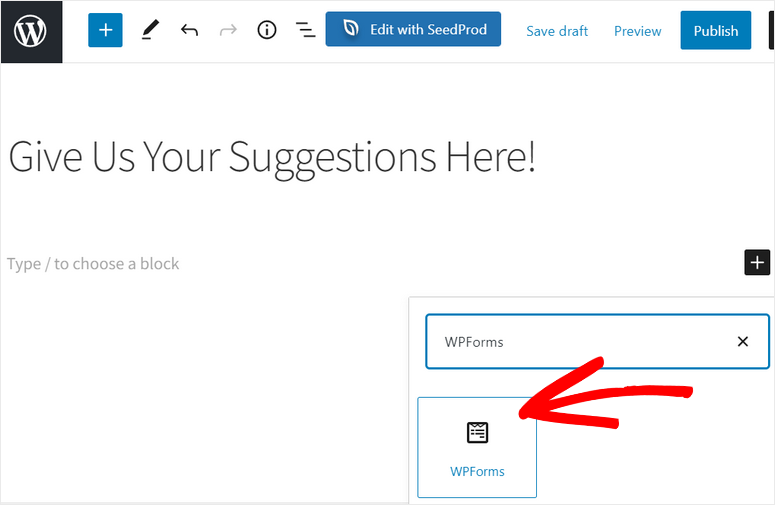
When you add the WPForms block to your page, you’ll see a dropdown menu that lets you select the webhook form you just created.
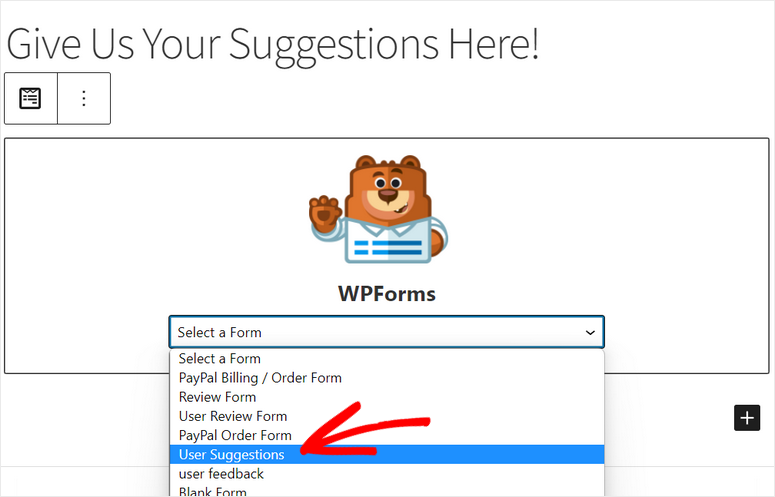
Then, you can publish your page on your site.
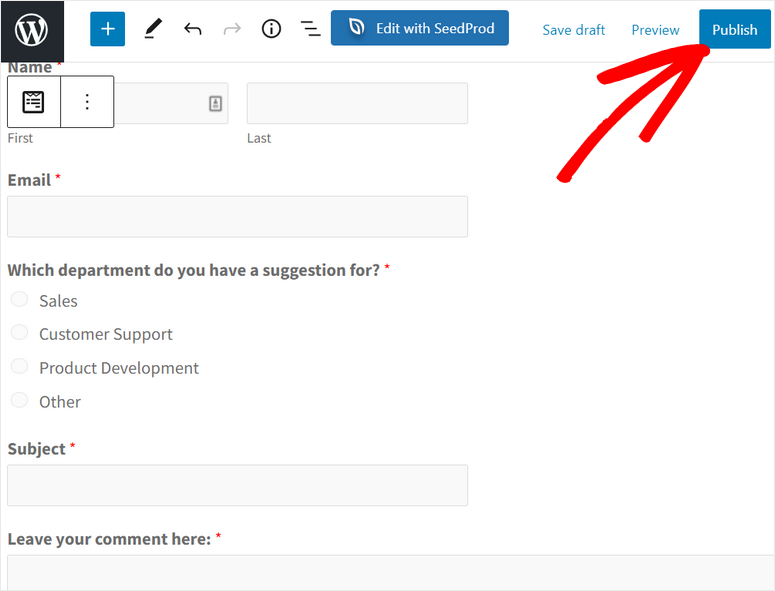
If you’re using WordPress classic editor, you can add the form using the Add Form button on the editor.

You can even insert your webhook form on a widget-ready area like a footer or sidebar. To do this, head over to the Appearance » Widgets tab and drag and drop the WPForms widget into the sidebar or footer menu on the right.
Then, you can select the form you created from the dropdown menu and save your changes.
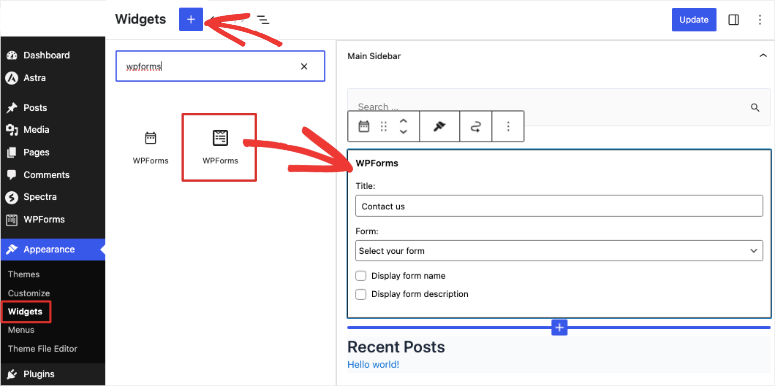
Now your webhooks form is published on your site. When users fill out and submit the form, you’ll receive Slack notifications from your website.
Like this, you can use WPForms to connect to different apps using webhook URLs. You get complete control over the data you want to fetch and send to other apps.
That’s all! We hope this post helped you learn how to use Webhooks on your WordPress forms. With WPForms, you can create a webhook form and connect with a third-party service with ease.
You can also use it to create other professional WordPress forms such as order forms, booking forms, registration forms, and more. You may also want to learn how to use WPForms to save form data in your WordPress database.
For your next steps, you can check these resources out:
- How to Add ‘Save and Continue Later’ Option to WordPress Forms
- How To Reduce Form Abandonment and Boost Conversions
- Best Email Capture Tools & Form Builders for WordPress
These posts will help you add the save and resume later functionality on your WordPress forms and reduce form abandonment rates. The last one will help you grow your email marketing list.

Comments Leave a Reply