Are you looking for a reliable WordPress security plugin?
WordPress is one of the most popular Content Management Systems (CMSs) today with nearly half of the websites we have today running on it. As a result, there are many potential threats from cybercriminals looking for vulnerabilities.
To protect your website, you need a good WordPress security plugin that is easy to use and reliable.
In this article, we will review Solid Security, one of the best WordPress security plugins today. We will discuss different areas such as ease of use, how to set it up, key features, and more.
Why is WordPress Security so Important?
As mentioned, almost half of all the websites on the internet today use WordPress as their CMS. With such a large pool of websites, the number of threats and cybercriminals targeting the platform is high.
Most of these criminals target WordPress websites for 2 reasons.
The first and most common is data theft.
When someone registers on your site, they often provide their name, email address, and password, among other information. Cybercriminals collect this information and sell it to other parties for monetary gain.
To add that, they can use the email addresses and passwords obtained from your site to try to access your clients’ financial accounts.
This is because, many people often use the same email and password across multiple sites, even though it is not recommended. It is just easier to remember one password for everything rather than have separate ones.
Cybercriminals know this and are banking on it, quite literally.
On the other hand, if you run an eCommerce website, cybercriminals may target your user’s payment information such as PayPal details or credit card information. Once they have this information, they may sell it on the dark web or simply use it themselves.
The second most popular reason for a cyber attack is ransom.
Some cybercriminals will steal a website and lock you out. They will then reach out and tell you to give them a certain amount of money if you want your site back.
This can be very frustrating as even after the payment, these criminals can decide to still keep your site and ask for more money, creating an endless loop. Many people simply opt to open a new site and start afresh.
As you can see, a lack of WordPress security, at the very least, can expose your users’ information. And at the very worst, can destroy your business completely.
Here are other reasons to uphold WordPress security.
- Maintain your site reputation
- Maintain your users’ trust
- Avoid your site being flagged by Google
- Avoid legal issues
- Reduce the spread of malware
The good news is Solid Security can help protect your website without the need for expert assistance or coding experience.
But, before you purchase this security plugin, we suggest you start by running your website through this free WordPress security scanner. This will help you identify your site’s weakpoints so you can see if Solid Security is the right fit for you.
With that said, let’s see what this security plugin is all about.
What is Solid Security?
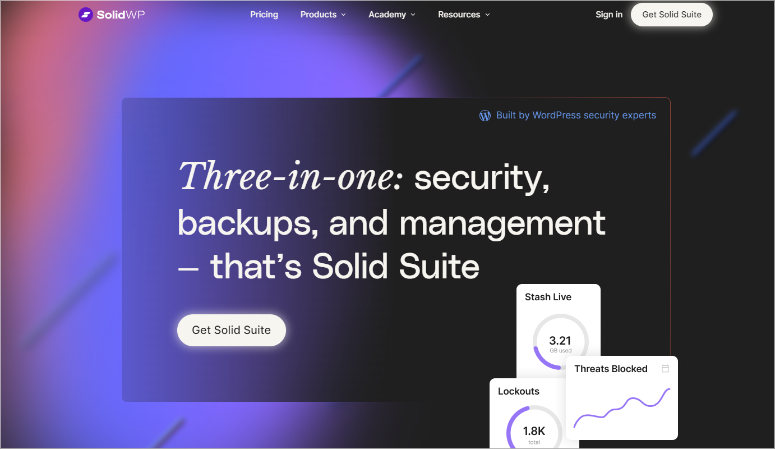
Solid Security was formally called iTheme Security, a product from iThemes. iThemes was a company that designed beautiful themes that had a good reputation for security. But, they have since changed their business model and that is a big reason for the name change.
Today, iThemes is called SolidWP, and iTheme Security is now Solid Security. Here is what their other products are now called.
- BackupBuddy is now Solid Backup
- iTheme Sync is now Solid Central
- iTheme Training is now Solid Academy
But for this review, we will only be focusing on Solid Security.
So, with that said, what exactly is Solid Security?
This is a 3-in-1 security plugin that can help you secure your site, create site backups, and help with site management. It has easy-to-use features to help you prevent brute force attacks and unauthorized people from gaining access to your site.
Solid Security also improves your site security by protecting your user signing page, the most common way brute force attacks happen. It does this by creating a passkey, which can be biometric or manual, and adding a 2-factor authentication process for your users.
To add to this, you can set it up so that your users are automatically required to create a strong password. This adds another layer of protection without you ever needing to get involved.
You can also use Solid Security to scan your site for vulnerabilities through its partnership with Patchstack. This partnership allows for automatic virtual fixes of vulnerable software before it becomes a problem.
Now, let’s see if the name change from iTheme Security to Solid Security has affected the quality of this plugin. We have broken down the review into several sections to help you follow it better.
- Installation & Set Up
- Customization
- Ease of Use
- Features
- Support & Documentation
- Pros & Cons
- Pricing
- Solid Security Alternatives
- Final Verdict
Installation & Set Up
Solid Security makes it super easy to install both its free version and premium plugin straight from its official website. On its site, you will see a Basic and Premium tab displayed, which allows you to move between the two easily.
If you select the “Basic” plan, you will be redirected to WordPress.org where you can download Solid Security Lite. You can also download the free version by going to your WordPress dashboard and accessing your plugin repository.
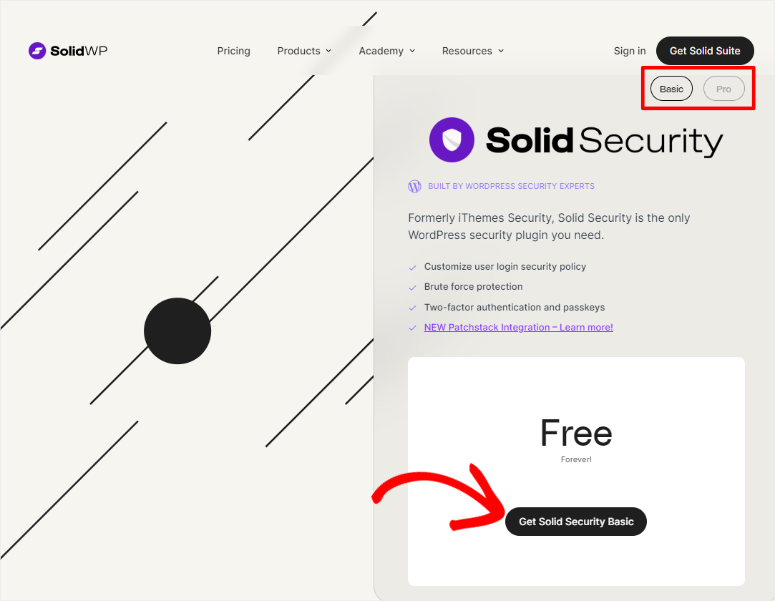
Now, for the premium version, Solid Security will charge you according to the number of sites you have, unlike most plugins which have standard packages. This allows you to pay for exactly what you need, saving you money.
To install Solid Security Pro, you will first download the Zip file from its official site. Then, follow the same steps you would to install any other plugin.
If you experience any problems, check out this article to learn more about how to install a plugin.
With the plugin installed and active, we will look at its setup process next.
As mentioned, security is a sensitive WordPress area. It can be difficult for beginners to keep track and not miss anything.
That is why Solid Security aims to ensure that once you configure the plugin, you don’t need to worry about anything else. It will help you with monitoring and fixes.
So once the plugin is activated, you will be automatically redirected to its setup wizard. Here, the plugin will ask you a few questions about your website. This will help Solid Security set up your website security in the best way.
The first question is if your site is an eCommerce, network, non-profit, blog, portfolio, or brochure. This will help the plugin determine the next steps of your website security setup.
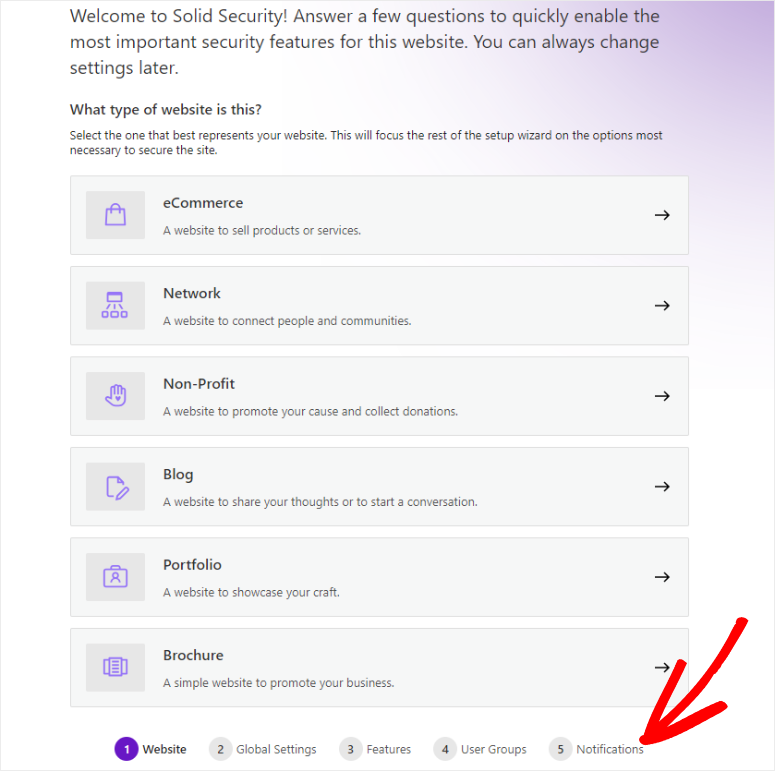
You will also disclose if you are setting up the website for yourself or a client. If you are setting it up for a client, it will allow you to add restrictions on what security features your clients can access.
This is because Solid Security understands that some clients may not be experienced in WordPress, and giving them access to such sensitive information may create vulnerabilities.
Next, using a toggle button, you can decide if you want to add a password policy for all your users. This will ensure they do not create a weak password or one they have not previously used.
To add to this, you will add authorized IPs in the text box provided and specify how Solid Security will identify users’ IP addresses.
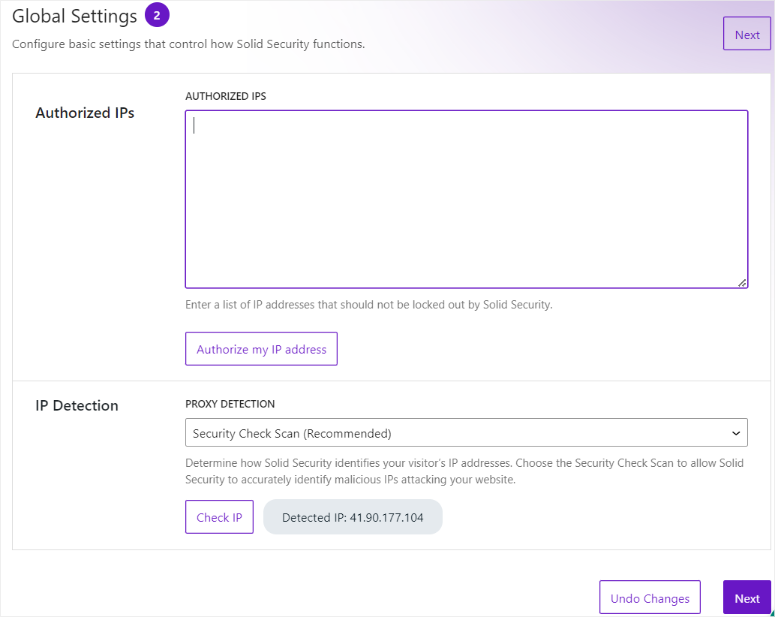
You can set it up so that Solid Security carries out a scheduled automated or manual security check scan. This feature ensures Solid Security accurately identifies malicious IPs attacking your website in the best way for you.
Still, with the setup wizard, you can also enable most of the security features you want.
Of course, you can do it later. But if you are a beginner, this is a great opportunity to set them up in one go.
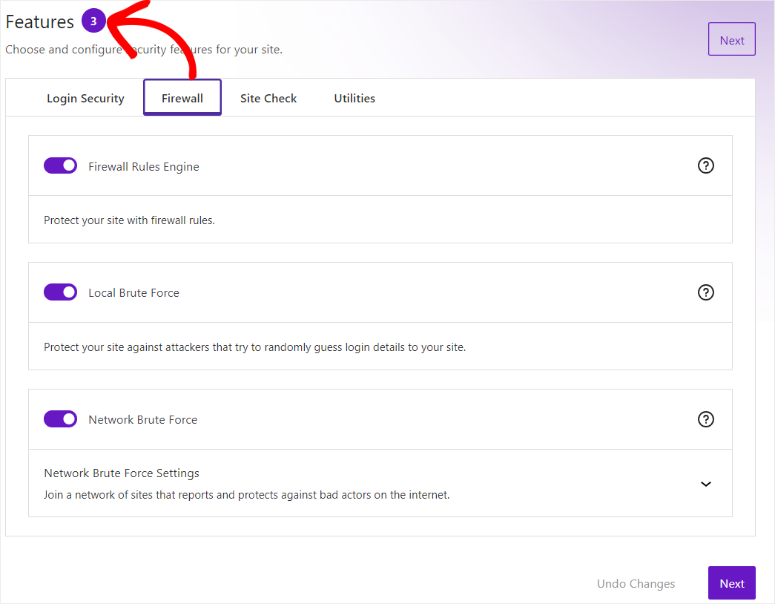
When you get to the “Features” step in the setup wizard, you will see several tabs, which include Login Security, Firewall, Site Check, and Utilities.
Each of these tabs open to a set of toggle buttons which allows you to activate the feature. Once you enable a feature, Solid Security will open more options underneath it so you can customize further.
You will also set up “User Groups” using the setup wizard to define the role of every member on your site.
This can make it easier to enforce security rules, tightening what each member can access or do on your site.
Some examples of common User Groups include Admins, Editors, Authors, and more. But if your users do not fit into any of these groups, this security plugin, allows you to create Custom User Groups.
Finally, in the setup wizard, you will set up “Notifications.”
You do this by adding a “From Email” and marking a checkbox next to the Admin you want to receive them. It is important to pay close attention to this step, as this is how Solid Security will alert you or your team members of any vulnerabilities or attacks.
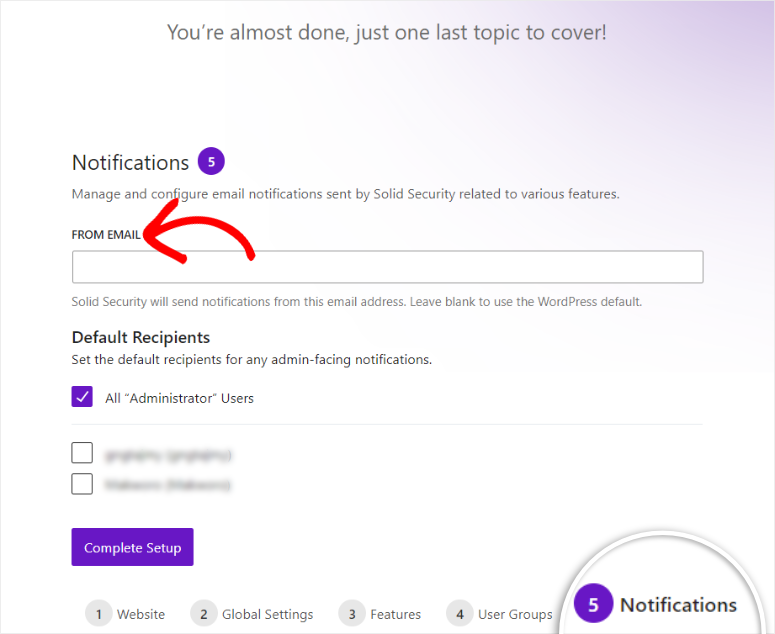
Once you set up notifications, you should have the plugin ready to go!
Customization
With the setup process complete, Solid Security makes it easy for you to take the next step by giving you the option to either go to Solid Security’s “Dashboard” or “Settings.”
To customize this plugin, go to Settings.
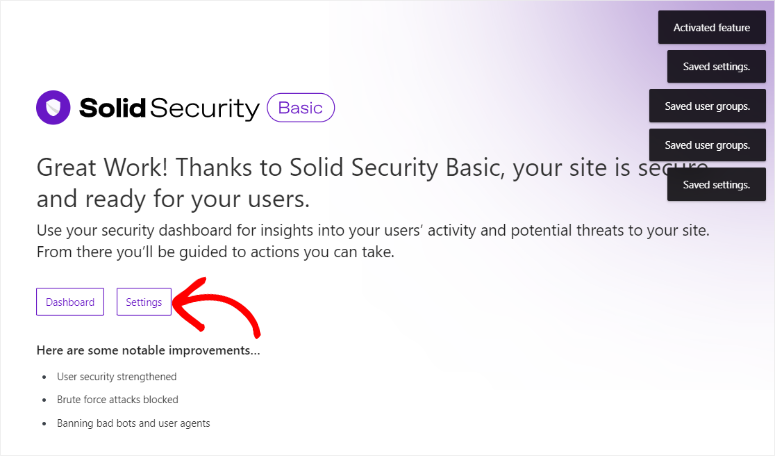
On this page, the first thing you will notice is a vertical menu on the left that consists of Global Settings, Features, User Groups, Notifications, and Advanced. Even though some of the functionality you see here, you may have already configured with the setup wizard, you can still adjust them if you want.
First, let’s look at the “Global Settings” menu.
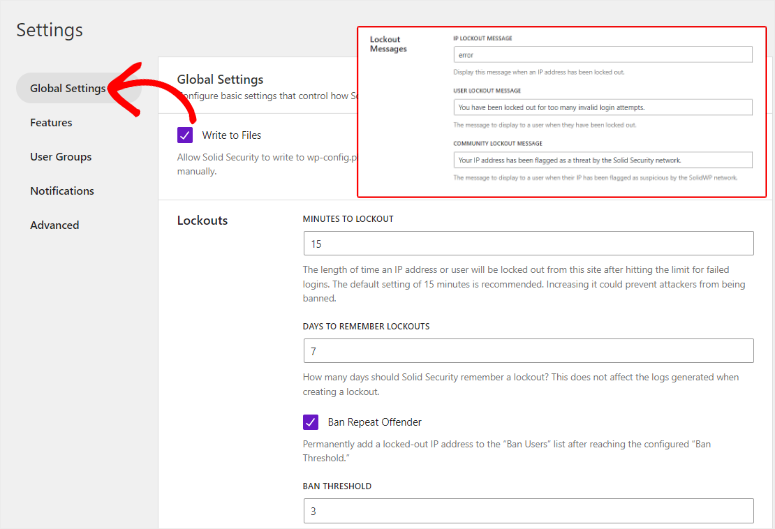
The first thing you will customize on this menu is to allow Solid Security to automatically write on wp-config.php and .htaccess with a checkbox. This will allow the plugin to determine how WordPress interacts with your database and cache and handle security.
Below this checkbox, you will set up lockout options to tell the plugin what to do in case of failed login attempts.
So, you will first set in minutes how long an IP or user account will be locked out when they reach the maximum login attempts. The plugin recommends 15 minutes as any higher could prevent hackers from getting banned.
Next, you will state in days how long you would want Solid Security to remember lockouts. You can follow this up by using a checkbox to enable the plugin to ban repeat offenders. Below this, you can also add a threshold to ban repeat offenders permanently on your site.
Another interesting feature we noticed about Solid Security is it allows you to display “Lockout Messages.”
This feature allows you to show an explanation as to why the subscriber cannot log in, improving the user experience for genuine people. But at the same time, this message can help deter hackers as it will tell them they have been found out, your site is protected, and you have been notified of the attempted hack.
Below the Global Settings menu is the “Features” menu.
Here, you will find 4 tabs like you did during the setup wizard, which include Login Security, Firewall, Site Check, and Utilities. Let us discuss each of these tabs in detail below.
The first is the “Login Security” tab.
On this tab, you can enable a 2-factor authenticator with a checkbox. But with Solid Security, you can set what type of 2-factor authentication you want.
So, below this box, click on the down arrow to open the options.
You can allow all methods, all methods except email, or select them manually. The authentication methods provided by Solid Security are:
- Mobile App: Your users can use any popular 2-step authenticator like Google Authenticator or Microsoft Authenticator app.
- Email: A verification code will be sent to the email address the user used to register.
- Backup Authentification Codes: These are codes provided by the plugin. Your user stores them in a secure location if both email and mobile app 2-factor verification fails, then they have a backup option.
Next, you can use a checkbox to disable first login 2-factor authentication. What this means is that the first time a user activity logs into your website after registering, they will not go through two-factor authentication. This simplifies the process and ensures more users complete the signup process.
Finally, on this tab, you can customize an onboarding message to welcome new users in a friendly way or offer instructions for the next step. This can help you start building a relationship with your visitors turning them into loyal users while growing your brand.
Next, in the Features, is the “Firewall” tab.
Here, the first thing you can do is “Ban Users” with a toggle button. Then, below it, you can mark the Default Ban checkbox. This is a blacklist of potentially harmful IPs flagged by HackRepair.com which you can use as a starting point to protect your site.
To add to this, you can also enable the “Firewall Rules Engine” with a toggle option. With this, you can state the maximum number of violations per IP before a ban and the minutes to remember an IP.
Finally, you will enable Local Brute Force with a toggle button to lock out hackers trying to guess your username and password.
Here, what stands out is that you can use a checkbox to immediately lock out any user who tries to sign in with the user name “Admin.” This is because most hackers usually try to log in to WordPress sites by guessing the password and username. And the guess “Admin” is usually at the top of that list.
So locking out anyone as soon as they attempt to use this term will ensure they are locked out before they make any progress or try to use more advanced hacking methods.
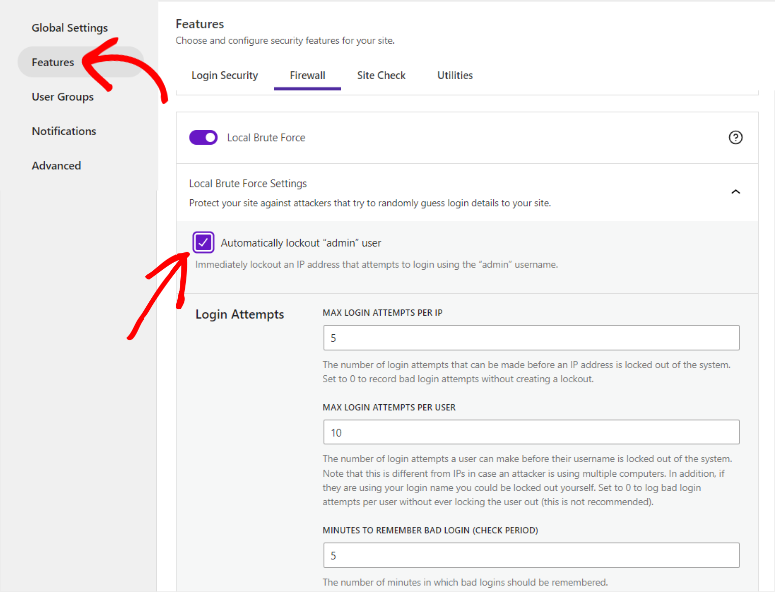
Below this, you can state how many login attempts a user or an IP can attempt before being locked out. And the number of minutes in which bad logins should be remembered.
Next is the “Site Check” tab.
On this tab, you can enable the File Change toggle option. Then, below it, you can add which files and folders to exclude from getting a notification for unexpected file changes. Here, you can add cache files or folders that are often affected by other plugins and themes in your site to reduce the number of alerts you get.
You can then use another toggle button to enable Site Scan Scheduling. When on, Solid Security will carry out a site scan twice every day, to ensure everything is running smoothly.
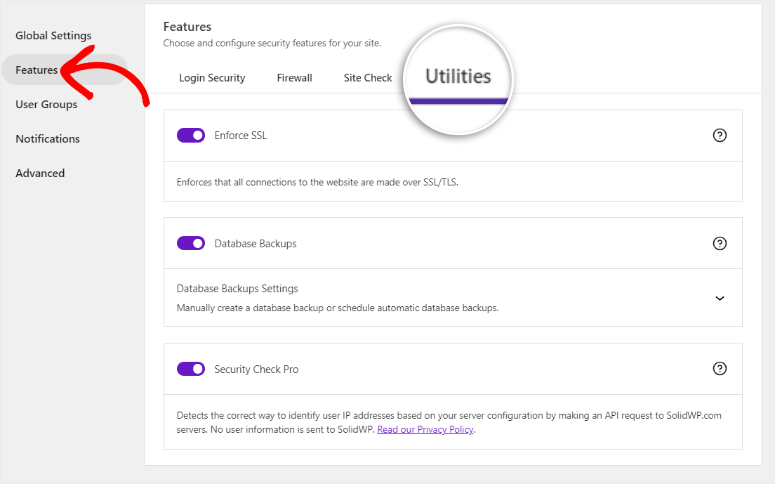
Now to the “Utilities” Tab next.
Solid Security allows you to activate Enforce TLS and SSL certificates to ensure all connections to your site are secure. Below this, you can state if you want manual or automatic database backups. Then, you can state if you want the backup sent to your email, stored locally, or both.
Next, let us move to the “Advanced” menu.
As the name suggests, the Advanced menu is used to make complex changes to your site. The good thing is Solid Security has simplified this process to allow you to make these advanced changes by marking checkboxes.
To add to this, beneath each checkbox, you get a simple, yet detailed explanation of how that option will affect your site.
With that said, there are two areas we would like to mention in this tab.
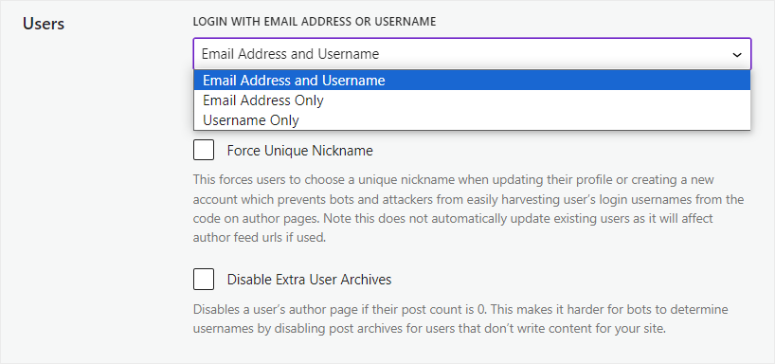
The first is the Users section.
Here, you can decide if you want users on your site to log in with an email, username, or both. By selecting only one option, either email or username, you can add an additional layer of protection. This is because the hacker will have a harder time finding the additional information.
Below this, you can force the user to create a unique nickname to help prevent bots or hackers from scraping usernames from comments or author bios.
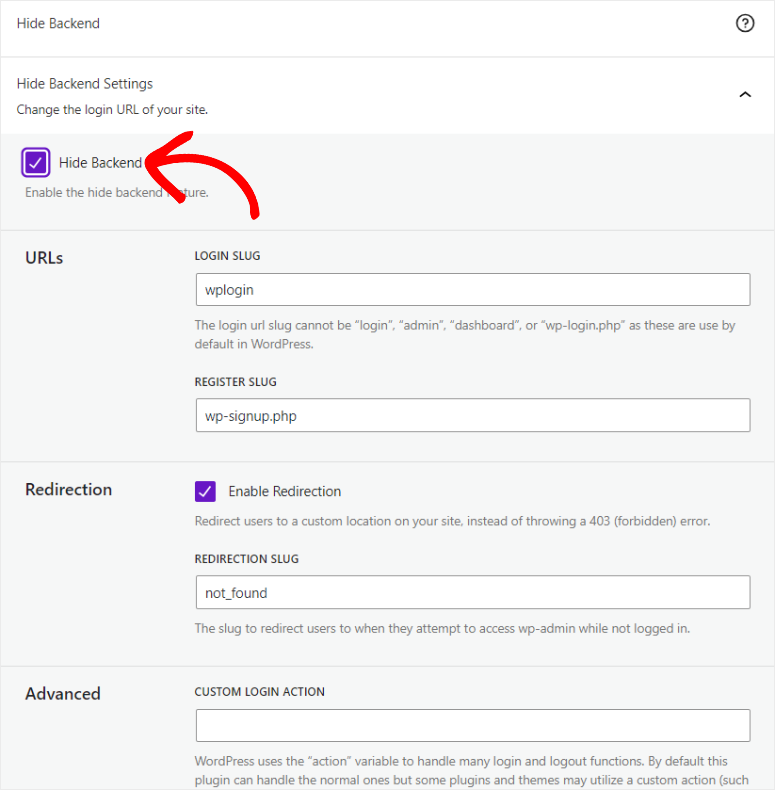
Another helpful security feature you can set up here is “Hide Backend.”
This feature allows you to change your WordPress login slug from login, admin, wp-login, or any other common login URL. Instead, it helps you create a unique login page slug that hackers cannot easily locate.
Another interesting thing about this feature is that if someone attempts to find your login page from these common options, they will be redirected to another page. On this page, you can display a message to deter the hacker, letting them know you are on to them.
Ease of Use
Matters WordPress security is one of the most complex subjects you can face as a website owner. This is because it involves many advanced features that can be confusing.
But what really stood out to us is how easy it is to use Solid Security.
As mentioned, when you complete the setup wizard, you will be asked to either go to “Settings,” which we have reviewed in the customization section. The other button you can select is “Dashboard” which we will review now.
You can also access the Solid Security dashboard by going to Security » Dashboard in your WordPress backend.
The Solid Security dashboard gives you a visual look at the security state of your website. This allows you to see what you need to do, what the plugin has done for you, and what you have done well.
First, at the far right corner, you will see an “Alert” button which will display all the notifications from Solid Security. These alerts include security threats, vulnerabilities identified, changes in logs, and more.
You can fix them by simply selecting the message, and the plugin will tell you what it is about and how to remedy it. The best thing about this Alert bar is that, it appears across all the Solid Security menus, allowing you to stay in the loop even if you do not visit the dashboard.
Next to the Alert icon, you will find the Settings button, which will redirect you back to the Solid Security settings menu, where you can customize the plugin when you want.
Next, below these icons is the “Edit Dashboard Cards” button.
This allows you to reorganize, add, or remove the options in the dashboard. You can completely remove features that are not a priority to you, or add others that fit your needs.
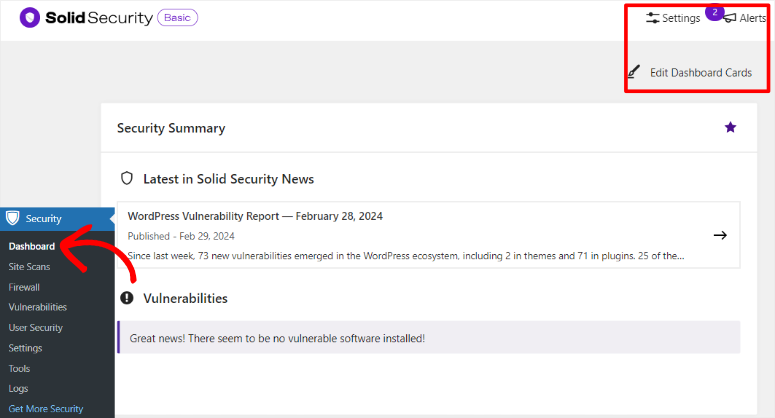
To add to this, you can also drag and drop the different sections on this screen to where you want them to appear. This ensures your dashboard is not only unique to you but all the most important features and metrics appear where you prefer.
So, let’s discuss the Solid Security dashboard in its default format.
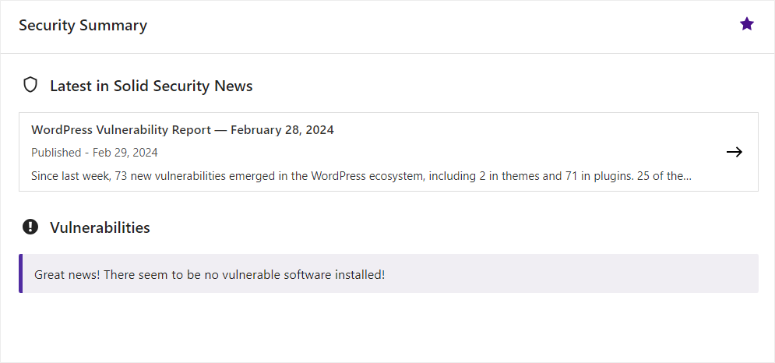
The first thing you will notice is the latest Solid Security News. This section updates you on the latest news involving WordPress security and everything around it.
For example, Solid Security will compile weekly reports for you about what vulnerabilities were found and where they were found. They discuss the specific plugin, theme, or tool that led to the vulnerability so you can avoid it or be more careful handling it.
Below the news section, Solid Security conveniently places the vulnerabilities it detected on your site. This section is prominently placed on this dashboard to ensure it is one of the first things you notice, because of how important it is to your site.
Next, you will see the “Ban Overview” graph.
It details Login attempts, Logins Attempts Using “Admin,” and CAPTCHA. You can use this information to quickly tell if anyone attempted to access your site using “Brute Force” and how they tried to do it. As a result, you can better protect your site using the information you get from this section.
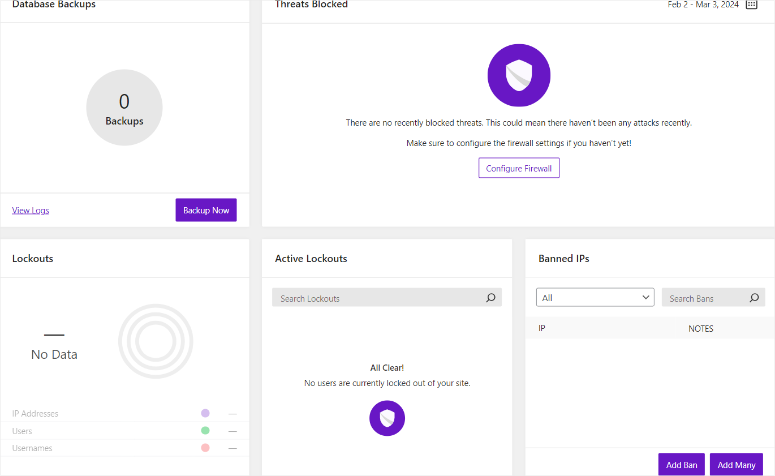
Next, we have the Backups section, which also displays the backup size. To add to this, you can quickly create a new backup or view your logs here with a click of a button.
The Threats Blocked section is the most prominent tab displayed on this dashboard, and for good reason.
This section monitors attempts on your site and blocks them through the firewalls you have set up through the plugin. It displays the action taken, the firewall rule that led to this action, the IP that was blocked, and a details button.
Below this, is the “Lockout” graph.
Here, Solid Security displays lockouts based on IPs, users, and Usernames. You can use this information to know what is the most common way hackers try to access your site. Then, next to this tab is the “Active Lockouts” section, which lists all the current people who cannot access your site in real time.
The next section displays a list of all “Banned IPs.”
You can search for a specific banned IP and add notes next to each entry. This can help you understand your site security better. To add to this, you can quickly add more IPs to the ban list one at a time or, if you have a long list, in bulk.
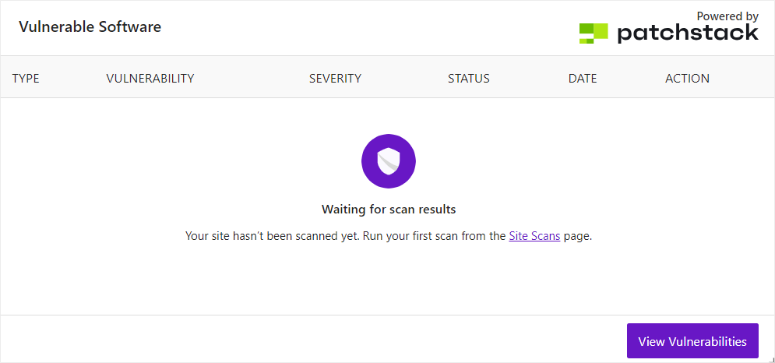
Finally, at the very bottom of your Solid Security dashboard, is the Vulnerability Software section powered by Patchstack.
This is a feature only available for premium users, so you will need to buy a plan before using it.
This feature scans for vulnerabilities in real-time. Then, it lists the type of vulnerability, what it causes, how it affected your site, the severity and if it was able to fix it or not. If the plugin is not able to fix the vulnerability, it will provide you with steps to fix it manually.
Features
Site Scans
Solid Security from SolidWP has one of the best and easy-to-follow malware scanners we have seen. It lists all the areas in your site that can be vulnerable, such as Inactive Users, Rogue Install, Plugins, Themes, WordPress Core Files, Google Safe Browsing, Two Factor, And Password.
If you’re unsure why the plugin is scanning a specific part of your site, just hover over it in the scanning timeline, and you’ll get more details.
Now, Solid Security scans all these areas individually and lets you know if it detects any security issues. It then lists the Type, Scan Info, Severity, and Action of each vulnerability it spots, helping you take action.
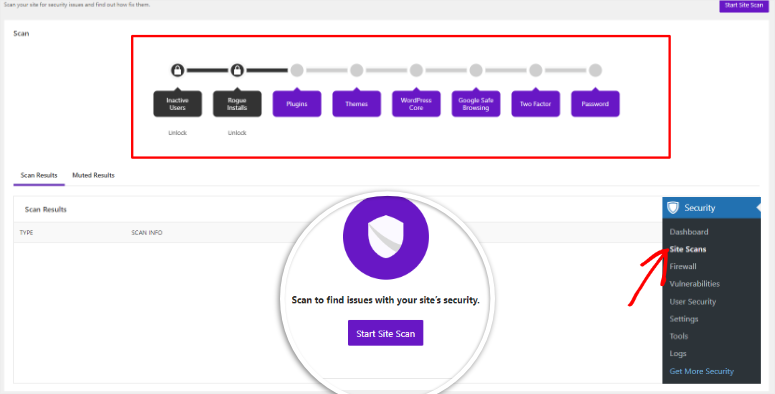
To add to this, if the plugin picks up on something that it feels is a vulnerability but it is not, you can mute those results. This allows you to only see the issues that matter and not get constant notifications from the plugin.
Firewall
One of the most powerful features of Solid Security (formally, iThemes security) is its firewall functionality.
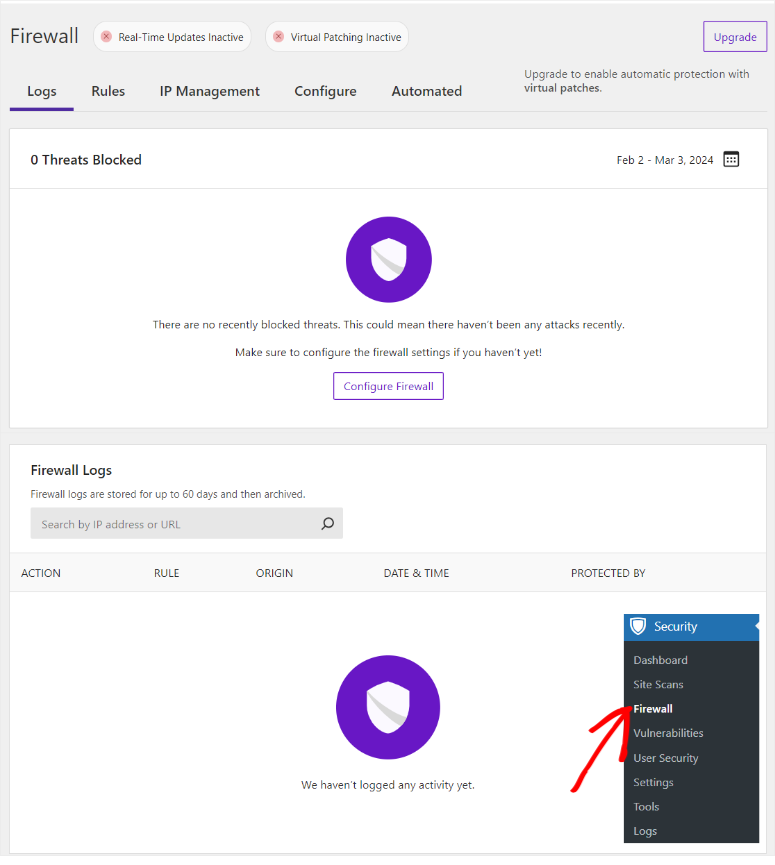
First, it displays a log of all threats blocked in real time, helping you act quickly before your site is compromised. To assist with this, Solid Security comes with Virtual Patching from its partnership with Patchstack.
This feature helps you analyze incoming traffic for any malicious activity and quickly blocks it before it reaches its intended target. This can help block any hacking attempts as soon as the hacker reaches your site.
What really stands out about the firewall feature is that you can “create rules” to automate your site security.
To do this, begin by specifying the area of your website you want the rule to impact in the “Field” box. The dropdown menu in the “Field” box provides options such as Content Type, URL, Request Method, Header, Cookie, and IP Address.
Next, in the “Operator” dropdown, indicate when the rule should take effect. Choose from options like Equals, Contains, Does Not Contain, Is In, or Is Not In. Then, in the “Value” field, input the specific target, such as a URL or an IP address, that you want to focus on.
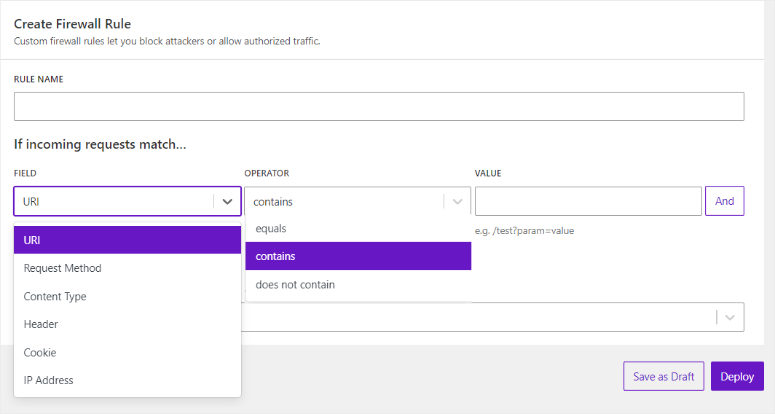
Finally, specify what Action the plugin should take. When a situation arises when the rule applies, should it Block, Redirect, Log Only, or Allow?
The best thing about firewall rules from Solid Security is you can use them to make exceptions and allow certain things, not just for blocking.

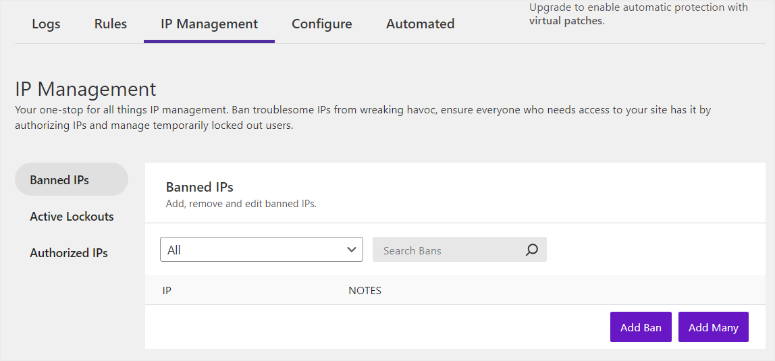
Now, the firewall feature also comes with an “IP Management” Tool.
Here you can view banned IPs and add to the list one by one or in bulk. You can also add notes for each banned IP to help you keep track of them better.
Plus, the IP Management tool makes it super easy to monitor active lockouts. It allows you to view, ban, or release locked-out users and IP addresses.
To add to this, you can also add a list of authorized IPs. Or use a checkbox to authorize the plugin to temporarily authorize IPs automatically.
This ensures that Solid Security will not block the last IP the administrator used for the next 24 hours. As a result, this can make it easier for you to use a device other than yours if you cannot access your default PC, making it more convenient for you.
Check out this article to learn How to Restrict User Login to One Device in WordPress.
User Security
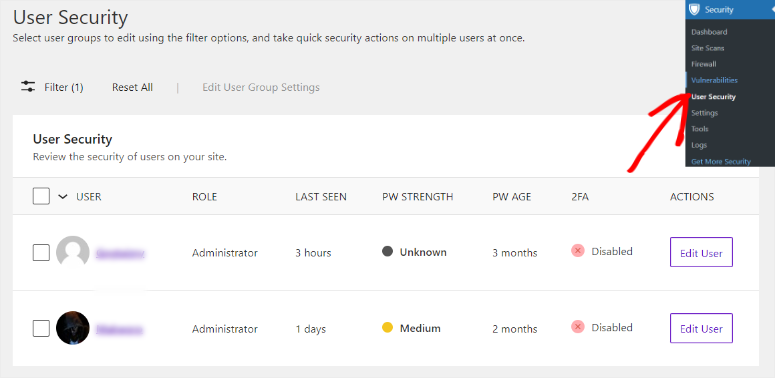
Another thing that stands out about Solid Security is that it does everything with so much detail. And one feature that really showcases this, is User Security.
Here, this security plugin lists all the users on your site at an individual level. It breaks down their role, last seen, password strength, age of the password, and if the user has two-factor authentication.
One of the most common places a site gets vulnerabilities from is its users. This is because not many are keen to follow the best security protocols to protect your site.
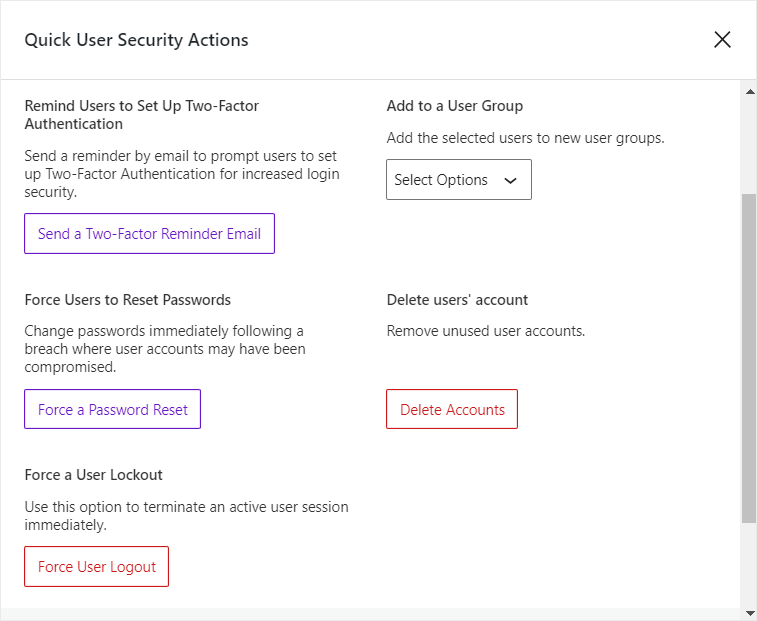
But with the User Security “Edit User” Section, you can send the user an email to remind them to set up 2-factor authentification. To add to this, if you feel the password they have is outdated or not strong enough you can force them to change it.
Now, sometimes forcing them to change their password may not be the best option, especially if they present an active threat. So Solid Security from SolidWP can force them to log out immediately, stopping them in their tracks. If another drastic measure is needed to protect your site better, or a user has been inactive for too long, Solid Security allows you to delete their account.
User Security is not just about taking measures on individuals. You can also use it to add a user to a group, such as an author, editor, admin, and more. This gives you a quick way to edit user roles without following the default WordPress method.
Check out this article to learn How to Secure Your WordPress Forms with Password.
Support & Documentation
As you have seen above, Solid Security is very easy to use. But every good plugin needs good support and documentation to assist its customers further.
So, the moment you get to the SolidWP homepage you will quickly notice that they take a step further in helping you learn how to use their products better.
First, they offer Solid Academy, a free resource that contains tutorials and guides to teach you how to use WordPress as a whole. They also host a live monthly session on YouTube where peers discuss the latest WordPress news.
But if you are an advanced user, they offer premium courses that get in depth on everything WordPress. To add this, you get certification once you complete their premium courses to show that you have completed their course.

Another unique resource you can use is the weekly vulnerability report, which helps you keep track of the latest plugin or theme vulnerabilities that have been documented. To access this newsletter, you can simply sign up for it, and you do not need to have an active install of the plugin.
But if you are using the plugin, you can access this weekly vulnerability report in the Solid Security dashboard in your WordPress backend, as discussed earlier.
Speaking of your Solid Security dashboard, you can also get help while logged in to your WordPress dashboard. All you have to do is select the Help icon in the far right corner of the plugin’s dashboard, and you will be redirected to the “Solid Help Center.”
To access the Solid Help Center, if you are not logged in, you can go to the SolidWP homepage and then go to Resources » Support. Then, on the next page, select “Online Documentation.”
On the Solid Security Help Center page, you will see the documentation arranged in tabs for the different products from the company.
All you need to do is click on a specific tab, and you will be redirected to a page listing all the help resources. This makes it super easy to find what you are looking for.
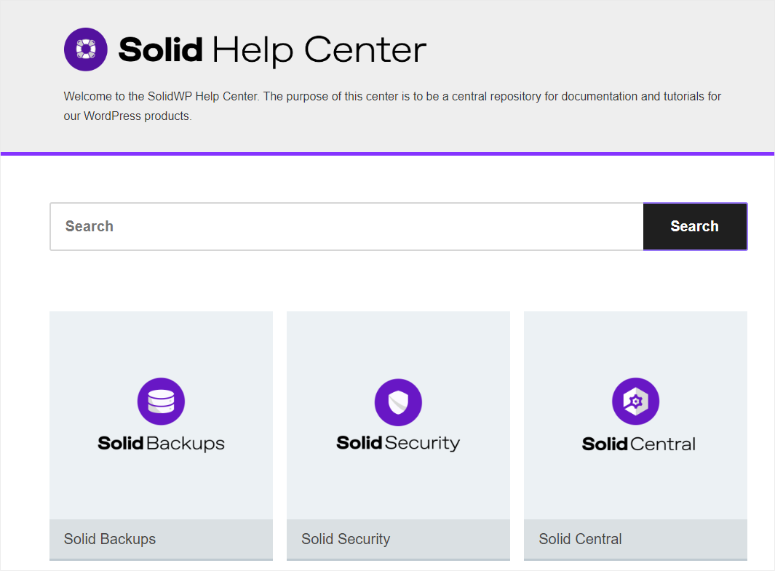
But, you can also use the search option to help you find the exact topic you are looking for. The beauty of this is the search results will also display breadcrumbs to show you the path taken to reach the result. This can help you find more information about the topic from their resource center.
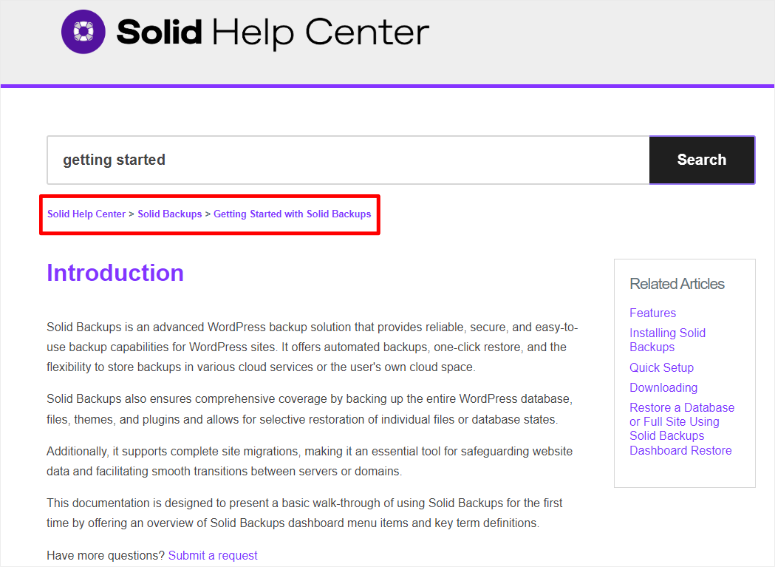
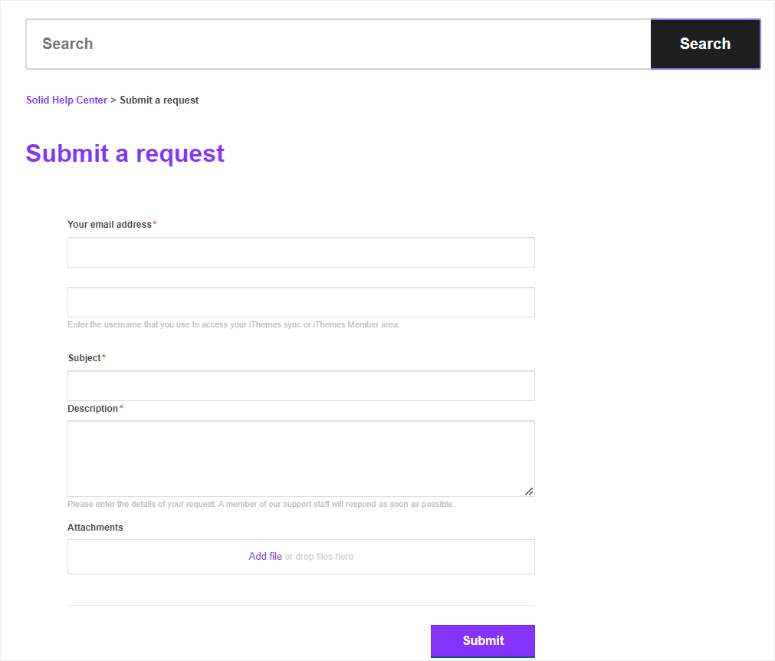
Now, if you do not find the information you are looking for in the Solid Help Center, you can submit a ticket.
You can submit a ticket whether you are their client or just looking for more information about the topic. To help ensure you don’t spend much time trying to reach them, the form is short and to the point.
All you have to fill out is your email address, a description of the issue and an attachment of a screenshot or something similar to better tell them your problem.
Pros & Cons
Pros:
- Plenty of features available on the free plan
- Easy to use
- Real-time security updates
- Multiple ways to add 2-factor authentication
- Easy to identify brute force login attempts
Cons:
- Premium plans can be expensive for beginners
- Can only be used on WordPress sites
Pricing
Solid Security from SolidWP offers a free plan that you can first use before making a purchase. This free version is incredibly powerful and can help most small business maintain their security. But if you want to access all its features, you will need to purchase a plan.
Solid Security offers 5 plans that you can select with a sliding bar, making it fun and easy to use. All the premium plans have the same upgrades; the only difference is the number of sites you can use the plan on.
Some of the premium features you get on the paid plan and not the free version include:
- Password Expiration
- WordPress User Security Check
- Refuse Compromised Passwords
- Version Management
- Magic Links & Passwordless Login
- Settings Import & Export
- WordPress Core Online File Comparison
For example, the cheapest package is the 1-site package for $99. This is great for someone who just owns one site. While the most expensive plan is $499 for 50 sites. This is great for agencies that want to help their customers protect their websites.
If you have more than 50 sites, you should reach out to solidWP for a custom quote.
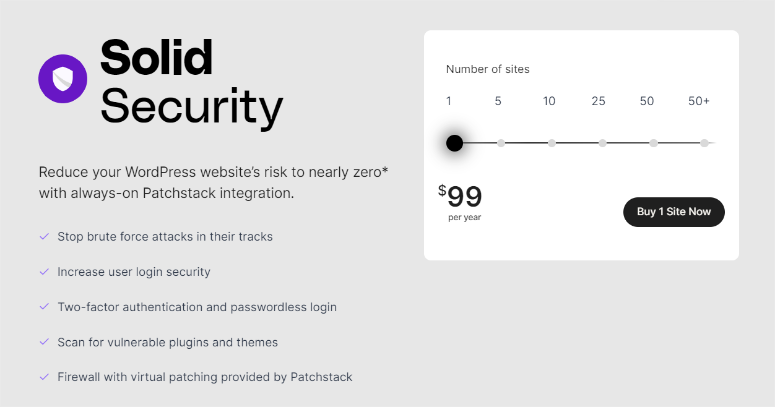
But we should point out that you can purchase Solid Security as part of the Solid Suite. This way, you can buy all of the SolidWP plugins in one go. The pricing for Solid Suite starts from $199 for one site.
Solid Security Alternatives
Searching for the best security plugin for your website?
Sucuri stands out as the go-to alternative for Solid Security.
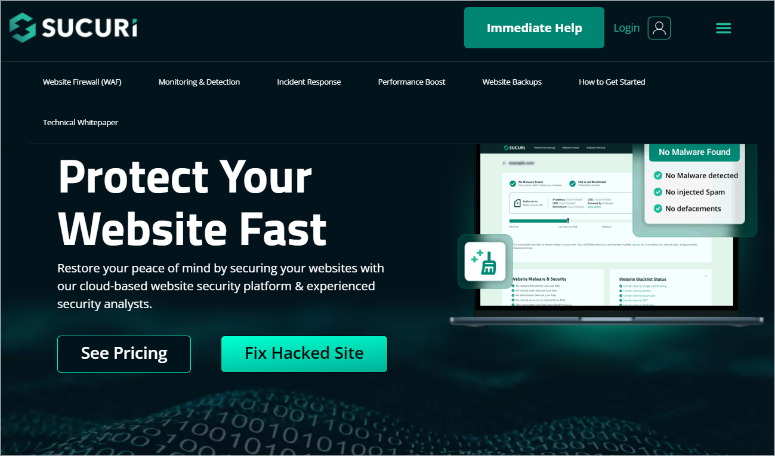
Sucuri is one of the best security plugins because it offers a strong defense system for your WordPress site and is easy to use.
It goes the extra mile with its DNS-level firewall for effective brute force protection and stopping any DDoS before they become a concern. Unlike Solid Securty, Sucuri’s 1-click hardening ensures quick WordPress security, simplifying the security processes for you.
To add to this, Sucuri Security has a friendly user-friendly interface. Since it comes with many proactive security measures, it is perfect for beginners and small businesses.
It also comes with continuous monitoring, file integrity checks, and post-hack security measures, providing comprehensive ways to protect your site. This means even after an attack is dealt with, Sucuri Security will continue to monitor the situation and ensure it does not happen again.
What makes Sucuri shine is its 24/7 support, guaranteeing quick responses to security threats as soon as you spot them.
If you want to learn more about this security plugin, check out our complete Sucuri review here.
Another Solid Security alternative you can consider is WordFence Security.
Wordfence Security is another amazing free security plugin that can help safeguard your site from hackers.
After testing both plugins, we found that, while WordFence Security may be a good basic security plugin, it puts a significant load on your server and has a clunky user interface. (See our full WordFence Security review for more details.)
Solid Security does have some features that may slow down your site, such as the File Change Detection features, but overall, it works better. Keep in mind: any plugin that carries out continues malware scanning will take up resources.
However, because Security Security is so customizable, you can pick and choose which features to enable. You can easily avoid the ones that may slow down your site, or only run them during low traffic periods.
Final Verdict
After using this security plugin ourselves we can say that without a doubt, Solid Security is one of the best tools to help you protect your site. It can assist you set up everything from the moment you install it with its setup wizard, ensuring every part of your site is fully protected.
It is also super light, meaning it does not affect your site speed or performance, making it great for SEO as well.
This WordPress plugin also ensures that many of its processes are automated, meaning once you set it up you do not need to touch it again.
What was also really impressive is that the free version of Solid Security had many powerful features. This can help reduce the WordPress security budget without compromising on quality.
If you want an easy-to-use security plugin packed with features, then you should definitely consider Solid Security.
That’s it! We hope you enjoyed our review on Solid Security. If you have any more questions, check out our FAQs below.
FAQs: Solid Security (iThemes Security) Review
Is Solid Security free?
Yes, Solid Security offers a forever free plugin that you can download from their official website or from your WordPress repository. If you want to unlock all its features you will have to purchase a premium plan.
Does Sucuri remove malware?
Absolutely! Sucuri specializes in removing malware from websites. It can detect and eliminate malicious code, providing a thorough cleanup to ensure your site is free from malware.
Is WordPress secure?
Yes, WordPress is a secure Content Management System (CMS), but its security depends on users taking the necessary precautions. Being one of the most popular CMS platforms, WordPress is a common target for hackers. So, to enhance your security you should use security plugins like Sucuri and Solid Security.
What is a firewall in WordPress?
A WordPress firewall is a protective barrier that monitors and filters incoming and outgoing traffic to and from a WordPress website. It acts as a security layer, helping prevent unauthorized access, malicious attacks, and potential threats. But, it can be hard to set it up without WordPress security experts. But a good security solution for this is to use Solid Security which will allow you to configure a custom firewall without coding.
Congratulations! You can now make a better decision on which security plugin to use on your site. If you are running an eCommerce site, here is an article on How to Protect your WooCommerce Site (Steps + Security Tools).
To add to that, here are additional articles you may be interested in reading.
- The Complete WordPress Security Guide (Beginner Friendly)
- 8 Best WordPress Firewall Plugins for Security & Protection
- How to Perform a WordPress Security Audit (Step by Step)
The first article will walk you through everything you need to learn about WordPress security through a beginner-friendly guide. The next post discusses the 8 best WordPress firewall plugins. While the last article teaches you how to perform a WordPress security audit.
Now that you have tested Solid Security and reviewed it, we can confidently give it 4 out of 5 stars. Here’s the breakdown of our review scores:


 4.0 / 5.0


 5.0 / 5.0


 5.0 / 5.0


 4.0 / 5.0


 4.0 / 5.0


 4.0 / 5.0
This article is waaaay out of date! iThemes has morphed into Solid WP. They forgot to mention this to their legacy customers and as a result we are unable to log in to our WP admin due to the security features that were integrated into WP.
Gonna have to dig in to the server to deactivate the themes somehow
Hey Stewart,
Thank you for your comment. We have now updated it to account for the name change and new direction the company is taking. Please have a look and let us know if we missed anything you think we should tell our readers about. We really do appreciate your feedback.
Thanks.
Just wondering, I have Wordfence installed on 1 site and it has just noticed a few abandoned plugins that need to be removed. I have iThemes security on most other sites and I don’t think it spotted those plugins. Does iThemes security detect and alert about abandoned or otherwise dodgy plugins?
Hope you realise, when you have many WP websites, let’s say 100, Wordfence would cost you a kidney… And of course as a developer your should keep track of you plugins yourself and message any client that could be vulnerable… But hey, what am I saying, many developers don’t even tell the client they have to update and maintain their WP and I am dreaming about protecting the old clients. Yea, many developers should get a new job because they do their job so badly…
The support from this company is bad. They waste time sending generic emails that do not solve the issue. The condensing manner in the way they respond is alarming.
ithemes seem to have good plugins, but very bad support – they take over a week to reply. when their hosting has an issue or you are stuck restoring a site for backup – a week or so offline is a long time to wait.