Are you looking for a web push notification service? Do you want to know if PushEngage is the right choice for your WordPress site?
PushEngage is the best and most popular web push notification software on the market. It’s easy to set up and send push notifications to your WordPress website users without editing any code.
With years of WordPress experience under our belt, one of the biggest issues we face is encouraging returning visitors. Any experienced WordPress expert would tell you that it is more likely that a user will visit your site only once.
But we know that returning visitors are more likely to buy or engage on a site.
So we needed a solution to encourage returning visitors.
We Focused on web push notifications because they offered instant communication. They immediately alert users about our new posts, whether they are on our site or not.
We tried PushEngage because it helped us personalize our web push notifications. We could also customize each push notification, improving the click-through rate.
Because of this, we have used PushEngage on many of our websites as our primary web push notification plugin. With this hands-on experience, we are happy to share our insights and educate you on everything PushEngage.
In this PushEngage review, we’ll go over the features, pricing, and other factors to determine whether PushEngage offers everything you need to send web push notifications to your users and subscribers.
PushEngage Review
We’ll be reviewing the PushEngage service in-depth, so we’ve created a table of contents for you to make it easier to navigate this post. Feel free to skip to the section that interests you the most.
- PushEngage Overview
- PushEngage Features
- PushEngage Support
- PushEngage Pricing
- Conclusion: Is PushEngage the Best Push Notification Service?
PushEngage Overview
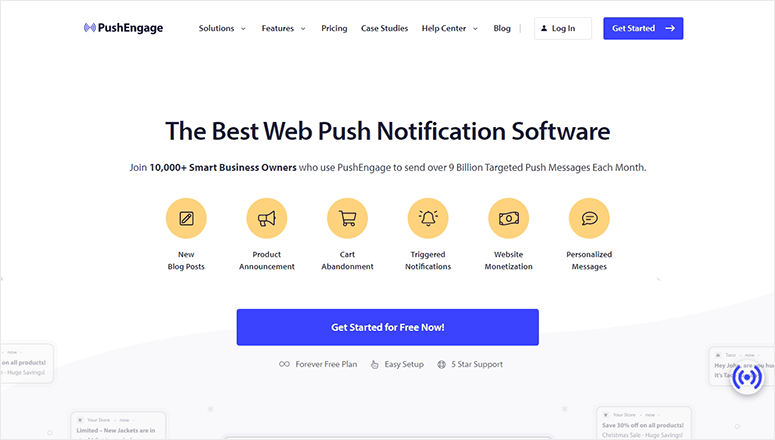
PushEngage is the best web and mobile push notification service on the market. It’s super helpful to increase traffic and engage users on your website.
You can send any kind of web push notification with PushEngage in just a few clicks. This includes:
- New blog posts
- Product announcements
- Cart abandonment
- Personalized messages
- Social proof messages
- Triggered notifications
PushEngage is easy to use, and you don’t need any special technical skills to send notifications to your users. It offers an intuitive dashboard with complete stats and graphs.
Creating a notification is as easy as posting a status on a social channel. You can add your notification title, message, URL, and image.
It also lets you customize call-to-action buttons to engage more users and increase the click-through rate (CTR).
The best part is that PushEngage has a plan for everyone. If you’re a startup with a limited budget, you can send push notifications for free or buy a basic plan.
PushEngage pricing is based on the total number of subscribers. The free version allows up to 200 subscribers, which is a perfect fit for personal bloggers, small businesses, and startups to send web push notifications.
The Business plan lets you add up to 50,000 subscribers with unlimited campaigns, custom segmentation, advanced analytics, notification scheduling, and more.
PushEngage Premium plan is best for SaaS and large businesses having up to 100,000 subscribers. It comes with timezone notifications, drip autoresponders, goal tracking, priority customer support, and A/B testing options.
PushEngage Growth plan is best for eCommerce stores. You can get up to 250,000 subscribers and custom trigger campaigns, smart cart abandonment, browse abandonment, back in stock alerts, price drop alerts and so much more.
That’s PushEngage in brief. Now let’s dive into PushEngage features for complete information on each and all push notification options.
PushEngage Features
PushEngage has a lot to offer for sending web and mobile push notifications. It has a WordPress plugin as well as a Shopify app making it easy to get started on some of the most popular website platforms.
PushEngage also easily integrates with any other platform including WooCommerce, Wix, Magneto, BigCommerce, PrestaShop, Joomla, Drupal, and any HTML website.
Plus, PushEngage notifications will work on Chrome, Firefox, Safari, Edge, Opera, Samsung, and UC Browser. They also work on both Android and iOS devices.
Now let’s explore its features to see if it’s the right fit for your business.
1. Simple Web Push Notifications
PushEngage lets you create, schedule, and send web and mobile push notifications.
It has a simple and easy-to-use dashboard with clear instructions. All you have to do is add a notification title, message, URL, icon, and image.
To create a simple push notification, you need to log in to your PushEngage account. From there, you need to visit the Notifications » Create » New Notification page.
If you want to send a blog post, you should add a title, message, URL, and icon. You can add a custom notification title and message, which means it’s not necessary to be the exact blog post title.
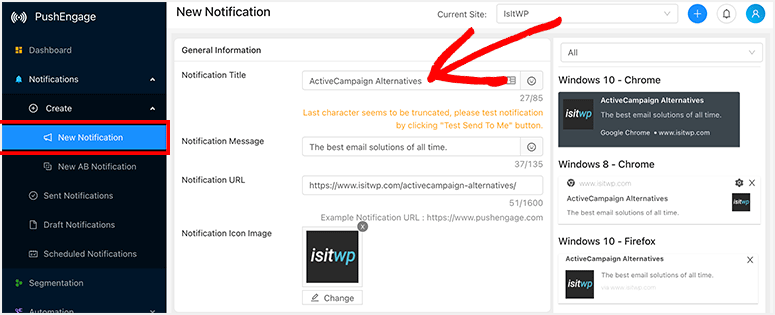
There’s a character limit for the title and message. You’ll also find the preview of your notification for different browsers and operating systems on the right side of the page.
Once you add the information, you can select a preview or choose All to see the preview for all browsers and operating systems.

The preview appears for the following combinations:
- Windows 10 – Google Chrome
- Windows 8 – Google Chrome
- Windows 10 – Firefox
- macOS – Google Chrome
- Android – Google Chrome
Next, to add an image, enable the Notification Large Image option. Then you can upload a featured image to your push notification. The recommended size for the large image is 360 x 180.
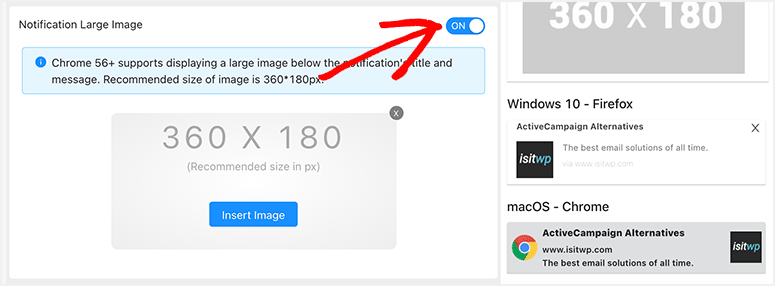
The large image will also appear in the notification preview, so you’ll know the final look of your notification before it goes out to users.
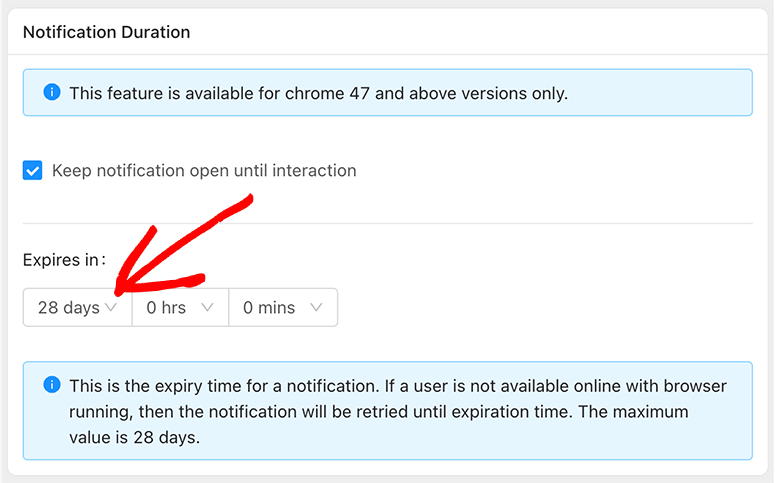
After that, you need to select the notification duration. This will determine the time to expire a notification from the browsers.
For example, if your notification expires in 28 days (maximum time), the notification will remain in the browser tray and appear to your users when they open the browser within 28 days. After the expiry time, it’ll disappear automatically.
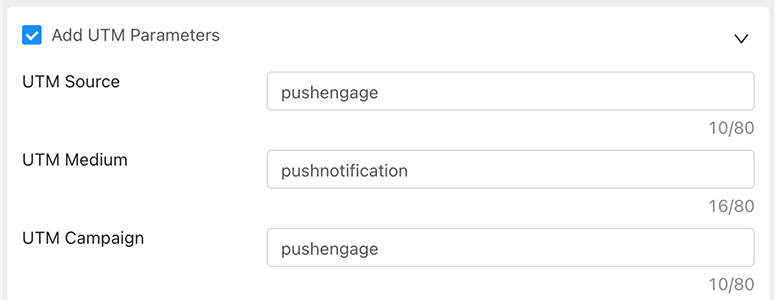
Next, PushEngage lets you add UTM parameters to track visitors from web push notifications in Google Analytics.
It also allows you to choose an audience to send notifications. In the Select Audience section, you can select subscribers based on date range, segments, location, and device type.
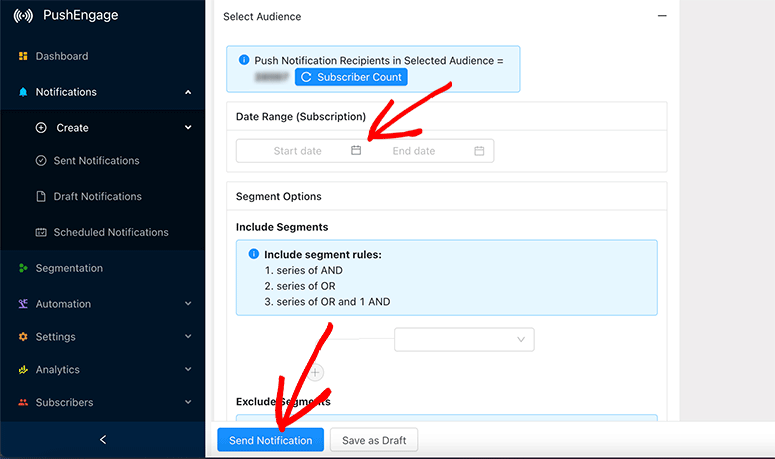
Now you need to scroll to the bottom of the page and click on the Send Notification button.
You can also draft notifications to send later by clicking on the Save as Draft button. You can find drafts on the Notifications » Draft Notifications page.
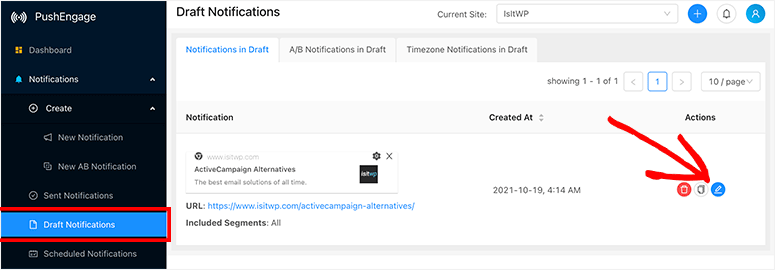
This way, you can create and store draft notifications ahead of time. When you’re ready, you can edit the draft to make changes and send it to your users.
Check out this comparison article on PushEngage vs OneSignal to see how they match up on sending web push notifications.
2. A/B Notifications Test
A/B split test is a modern way to determine users’ preferences. It’ll help you find which web push notification is more likable to your users and improve the click-through rate (CTR).
To create A/B notifications, you’ll need to visit the Notifications » Create » New AB Notification page.
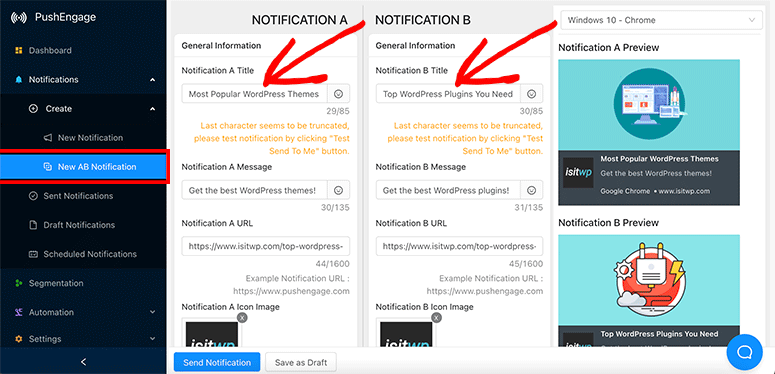
It has similar options to simple web push notifications. However, you’ll need to create two notifications here.
Everything will be the same, including notification image, duration, UTM codes, and audience selection.
PushEngage offers an Intelligent AB Test option. You can enable this setting to select a sample size to send the A/B notifications.
We recommend you run the A/B split test on 10% – 20% of your audience.
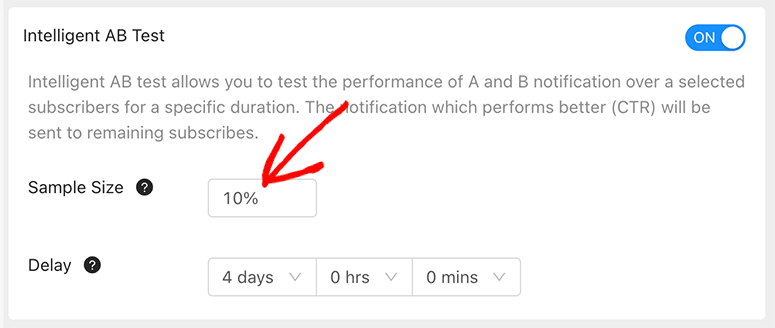
You also need to select a delay time and ensure that it’s less than the notification duration you set before.
For example, if you choose 28 days as the notification expiry duration, you can add a delay time of no more than 27 days.
However, the best practice is to keep the delay time as low as 3-4 days or a week.
After the delay period ends, PushEngage will automatically send the winner notification (based on more clicks) to the rest of your subscribers.
You can test notifications before sending them to users. On the right side of your screen, you’ll see the notifications preview and test buttons.
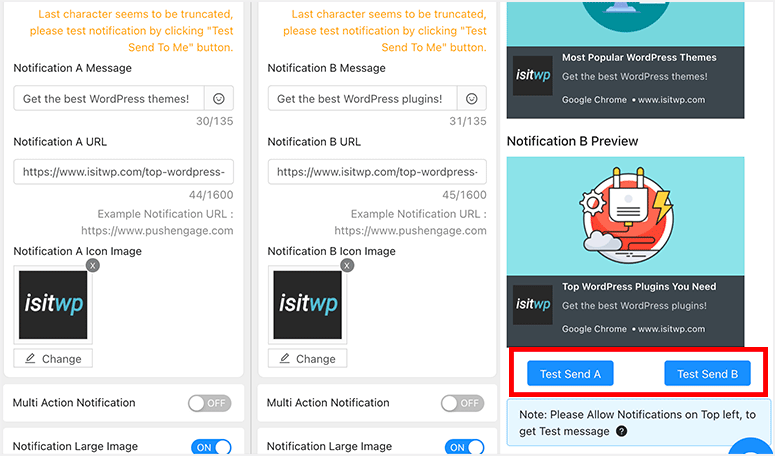
Click on the Test Send A or Test Send B button to see your A/B notifications in action.
Once you’re satisfied with the notifications and settings, click on the Send Notification button.
3. Notification Scheduling
PushEngage lets you schedule web push notifications ahead of time. It works for simple and A/B notifications.
When you’re creating a new notification, you’ll find a Scheduling Options section with other settings.
If Send the Notification setting is set to Now, you’ll see the Send Notification button at the bottom of the page.
You can change the notification setting to Later, and it’ll display the scheduling options below.
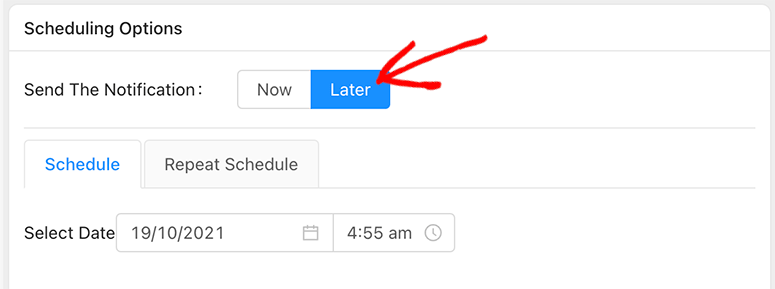
It lets you select a date and time to send out the notification. All notifications will be scheduled based on the timezone settings that you set up in your PushEngage account.
Timezone Notifications
Timezone notifications help improve CTR and engagement. You can enable this option to create and schedule several copies of your message automatically.
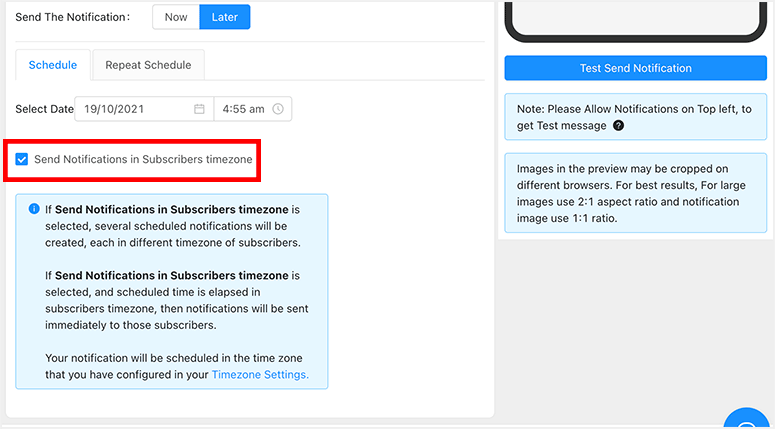
PushEngage will send notifications to users according to their active time zones.
Repeat Schedule
PushEngage allows you to send notifications automatically on the schedule that you set for your messages.
In the Repeat Schedule tab, you can select the days to send your notification.
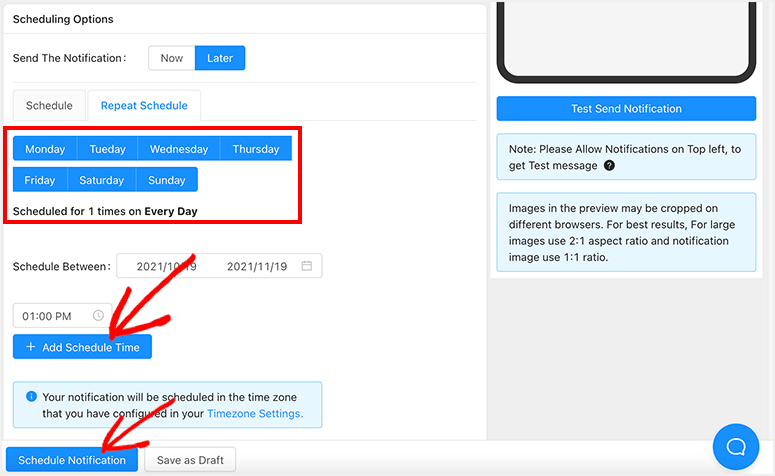
It’ll let you select the scheduling period using a date range option. For example, you can send the same notification to your users for an entire month.
You can also select a scheduling time or add multiple scheduling times for repeat notifications.
After adjusting the notification settings, click on the Schedule Notification button.
4. Subscribers Segmentation
Segmentation helps divide users into lists, so you can send targeted notifications to users and get more clicks and engagement on your website.
PushEngage offers smart segmentation that works automatically. You can add multiple segments based on popular pages on your website.
When users subscribe to your notifications, they’ll be added to a specific list depending on the web page from where they subscribed.
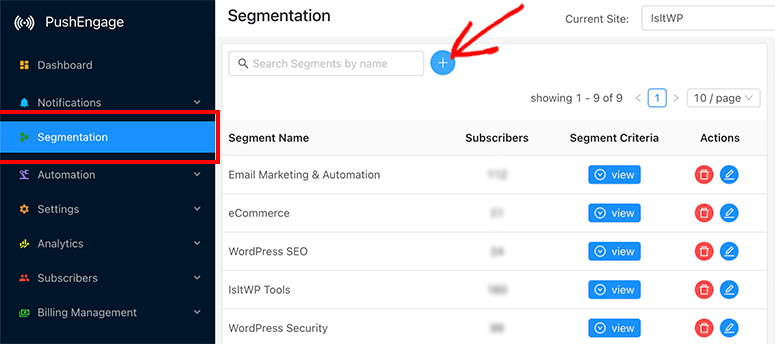
Visit the Segmentation page on your PushEngage account. Click on the plus (+) icon to add a list.
A popup will open where you need to enter a name for your new segment. Now enable the Segment on Page Visit option.
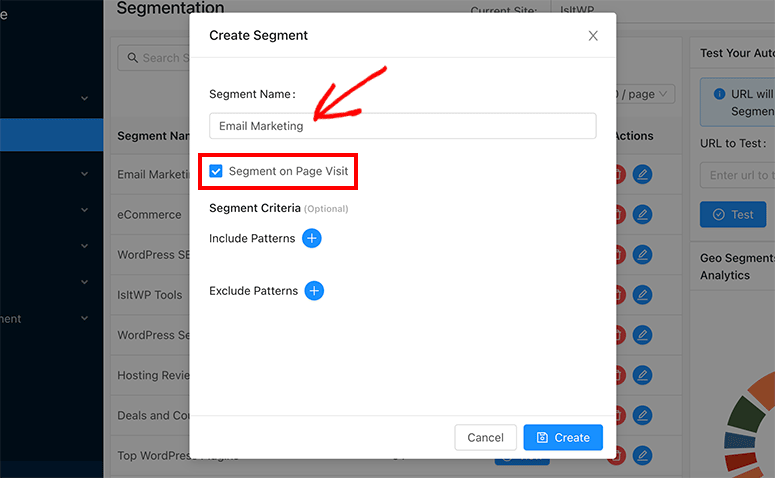
In the Segment Criteria, include multiple patterns to add users to your list. The best practice is to select Contains from the dropdown and add the last part of the link to your WordPress page.
For example, if your page URL is https://example.com/my-projects, you’ll only need to enter my-projects in the field.
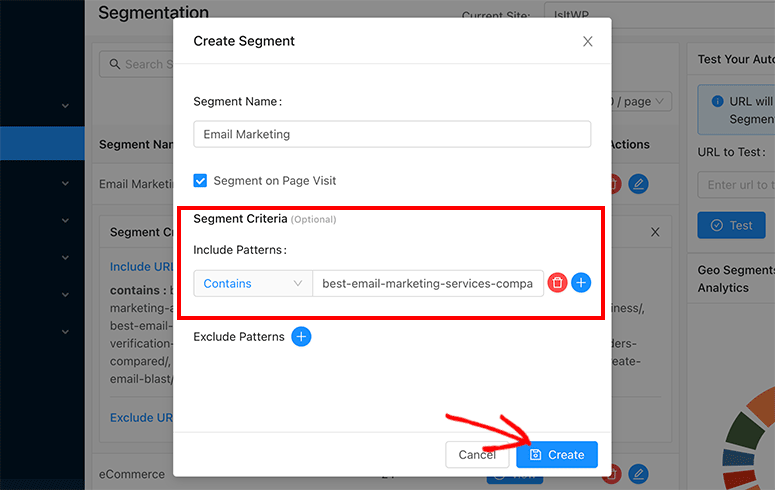
You can repeat the process to add multiple patterns for the same category. After adding and excluding patterns, click on the Create button.
We recommend creating multiple lists to divide users and send targeted notifications to boost your CTR.
5. Drip Autoresponders
PushEngage has several automation options. The premium plan users can access Drip Autoresponders, which is the best way to welcome your new subscribers automatically.
Drip campaigns are designed to engage users without manually sending web push notifications. Once you set up a campaign, it’ll send notifications based on your settings and schedule.
In your PushEngage account, you need to visit the Automation » Drip Autoresponder page. There you’ll find all your drip campaigns and their statistics.
Click on the Create Drip Autoresponder button to create a new drip campaign.
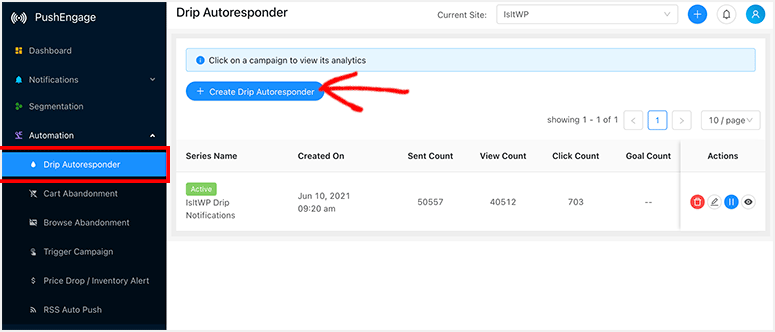
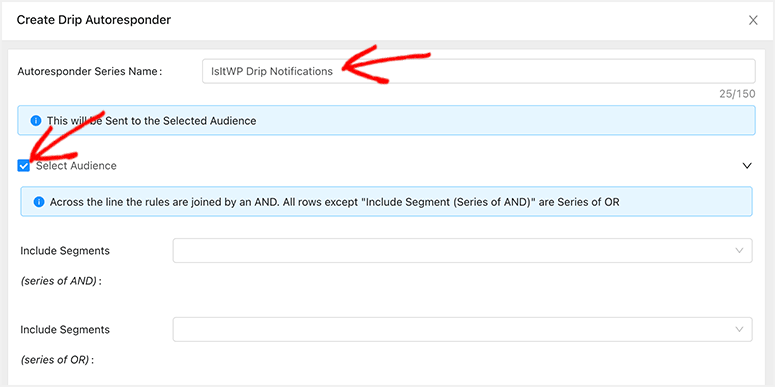
It’ll open the drip campaign setup page. Start by entering a name for your new autoresponder series.
You can select an audience based on the following options:
- Segments
- Location
- Browser
- Device
It also lets you add UTM codes to track website visitors from your drip campaign.
Now comes the main part, where you can start adding notifications. The process is similar to a simple web push notification.
However, you need to select when to send the first notification. For example, send immediately after a user subscribes to your WordPress notifications.
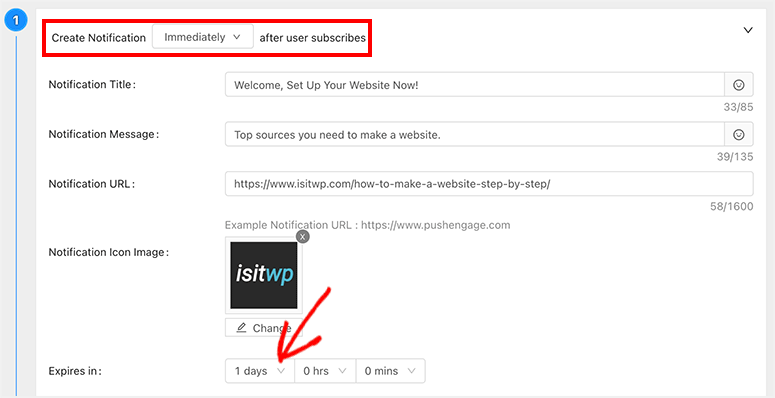
You can welcome new users and redirect them to your most important WordPress page.
The notification settings are the same, including the title, message, URL, icon, and large image.
You can add multiple notifications by clicking on the New Notification button on the same page.
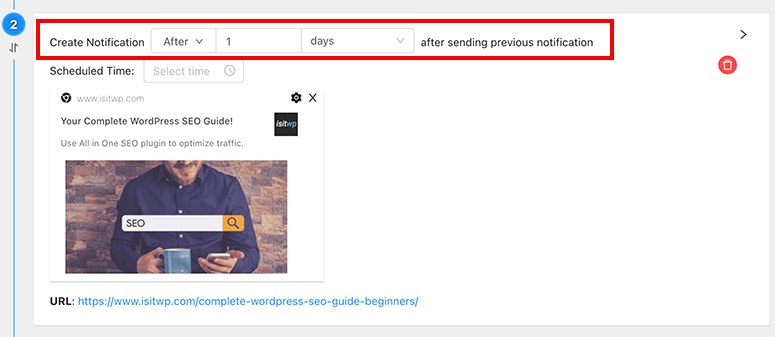
The best practice to send the second notification is when your welcome notification expires. This is why we recommend you set an expiry date for 2-3 days or at your discretion.
Since this is an automated series, you would want to send regular notifications to your users automatically.
Once your drip autoresponder series is ready, click on the Create and Launch button.
6. Multi-Action Notifications
Multi-Action Notifications are not sent separately, but they’re a part of your simple push notifications, AB test notifications, and drip notification series.
When creating a new web push notification, you can enable the multi-action option. It’ll allow you to add two buttons to your push notification.
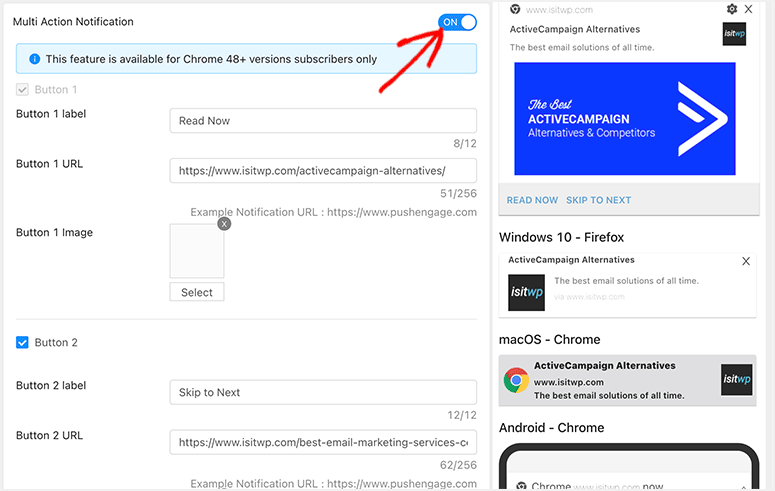
These buttons will work as call-to-actions (CTAs) and help increase the CTR and drive traffic to your website.
The CTA buttons will also replace the default Close button on your notification specifically for the subscribers using Windows 10 with Google Chrome browser.
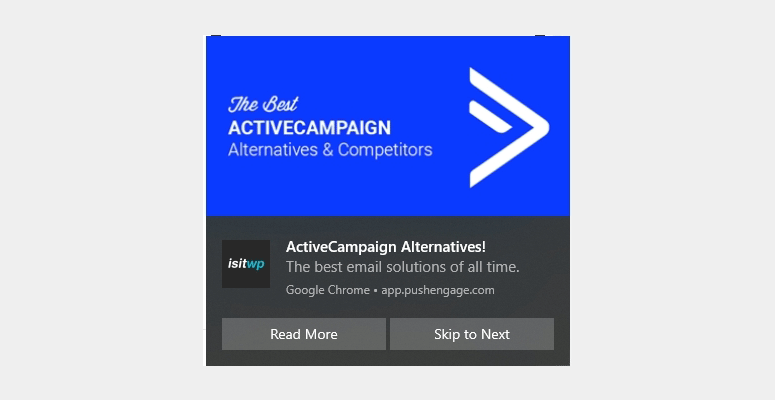
The best practice is to add a label and URL for both buttons to engage users. This helps boost your CTR and engagement on your website.
Bonus Tip For IsItWP Users
You may send a multi-action notification to a specific segment/list of users, and it’ll break your CTR records. More CTR will lead to more traffic and engagement on your WordPress website.
7. Analytics and Statistics
PushEngage provides complete statistics on your subscribers’ count, unsubscribes, notifications sent, net sent count, views, clicks, and more.
When you log in to your PushEngage account, you’ll see the summary of statistics and summary analytics graph on your dashboard.
The top section shows the number count for notifications sent manually, automated notifications, active subscribers, total views, total clicks, and CTR. It has an average value and weekly information for each category.

Below that, you’ll find simple summary analytics to understand the day-to-day growth in a graphical view.
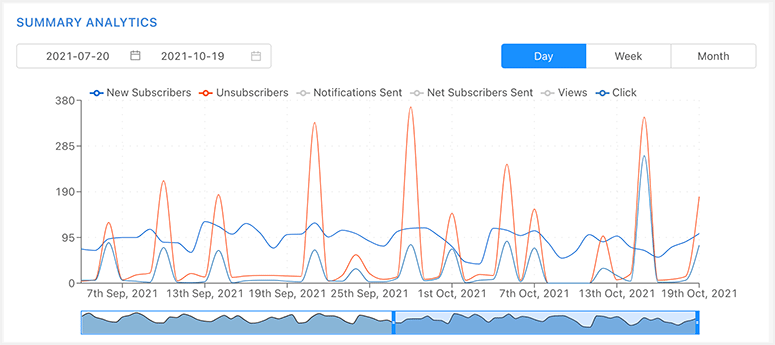
It lets you select a date range to check push notification analytics and statistics. You can also switch to the week or month view to see the changes in the analytics graph.
If you’re looking for more details on your subscribers, you need to visit the Analytics Subscriber Statistics page from your PushEngage account.
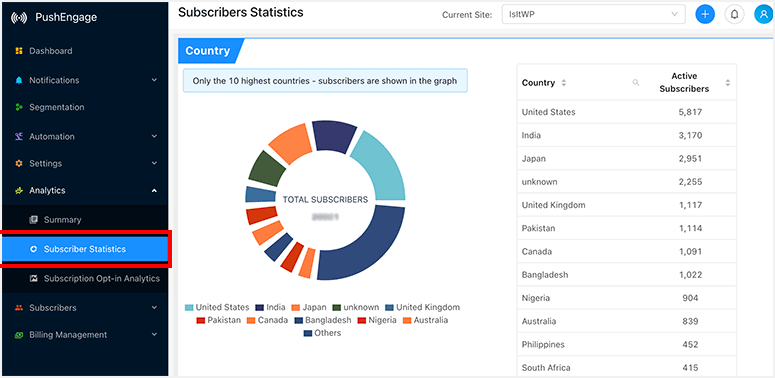
There you’ll find a breakdown of your subscribers based on country, device, and browser in statistical and graphical views.
PushEngage Support
PushEngage has live chat support on their website for primary and general queries. However, if you’re a paid customer, you can access their dedicated support team based on your pricing plan.
The team of experts will help you send the best push notifications to engage more users on your WordPress website.
PushEngage Pricing and Plans
PushEngage offers four pricing plans. These plans are designed to help startups, beginners, small businesses, large businesses, eCommerce stores, and enterprises.
Prices are based on the total number of subscribers.
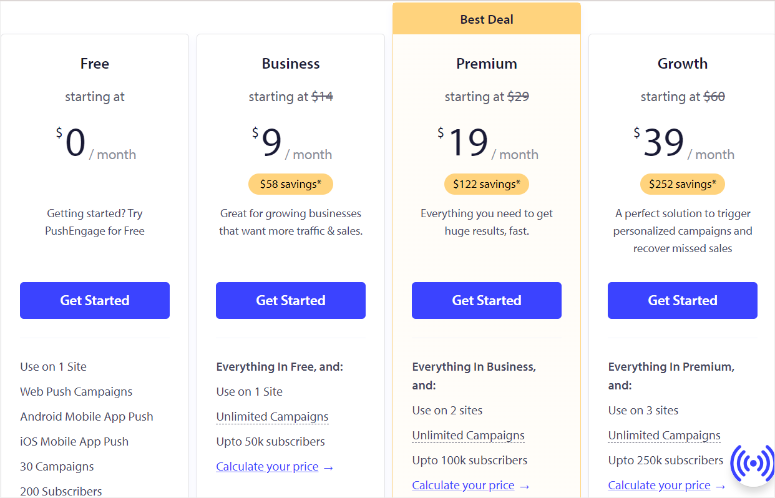
If you choose to pay annually, you can save up to 35% on the total price of web push notifications.
- Free: The PushEngage free WordPress plugin allows up to 200 subscribers. It lets you create up to 30 campaigns per month.
- Business: This plan is perfect for small businesses. It costs $9 per month (billed annually) and allows up to 50,000 subscribers. You can create unlimited campaigns and up to 40x (total subscribers in your account) notifications. It also lets you create 25 custom segments,custom branding, and access standard customer support.
- Premium: The PushEngage Premium plan is suitable for large businesses and can be used on 2 sites. It costs $19 per month (billed annually) and lets you add up to 100,000 subscribers. You can create 40 custom segments, add two sub-accounts, send A/B test notifications, create drip autoresponder campaigns, and more.
- Growth: This is the top-tier plan that starts at $39 per month. It’s well-suited for enterprise businesses and large-scale eCommerce stores for up to 250,000 subscribers. It comes with everything unlimited. You get 24/7 VIP customer support, a dedicated success manager at your service, integration engineer support, timezone settings, abandoned cart campaigns, inventory alerts, and much more.
PushEngage paid plans have a 14-day money-back guarantee – no questions asked. This means you can use the service and send notifications without worry.
You can also calculate the total price for paid plans by scaling the subscriber count.
For example, if you want to buy a Business plan with 10,000 subscribers, you can set the limit, and it’ll display the price.
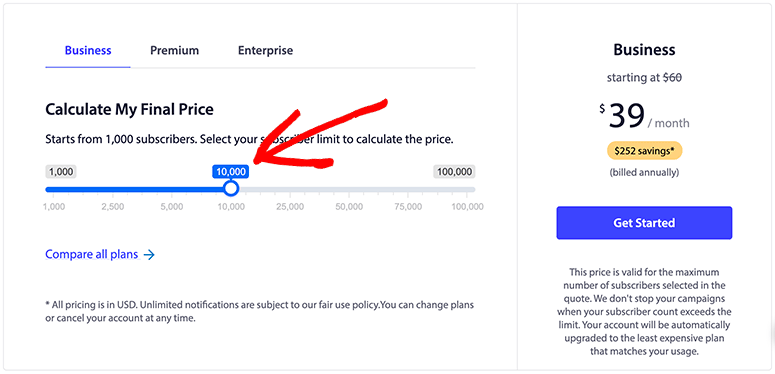
PushEngage also shows a complete comparison of features for all their plans.
This feature comparison will help you decide which web push notification plan is the perfect fit for your business website.
You can upgrade or downgrade to any plan, so feel free to pick a PushEngage plan and send web push notifications right away.
Conclusion: Is PushEngage the Best Web Push Notification Service?
PushEngage is indeed the best web push notification service for small businesses. It helps you grow your website traffic, engage users, and convert potential leads into customers.
You’ll love its ease of use and powerful features. It’s definitely at the top of our list of the must-have marketing tools today.
The most significant PushEngage features include:
- Web and mobile push notifications
- Drip autoresponder campaigns
- Multi-action notifications
- A/B split test notifications
- Powerful subscribers segmentation
- Timezone targeted notifications
When it comes to PushEngage pricing, you’ll find a plan for all businesses. If you run a personal blog with limited subscribers, you can also benefit from the PushEngage free plan.
PushEngage is by far the best web push notification service. We use PushEngage on most of our websites and fully recommend it to our users.
That’s all we have for you. We hope this PushEngage review helped you decide if it’s the right web and mobile push notification service for your WordPress website.
If you’re ready to use this tool to skyrocket growth, sign up for your 100% risk free PushEngage account here. Then you can follow our guide to get started: How to Add Push Notifications to WordPress to Drive Traffic.
We recommend using push notifications along with email marketing for the best results with your audience. Check out our guide: 8 Best Email Marketing Providers for Small Business.
Next, you’ll want to see our guides:
- 7+ Best Email Automation Tools to Improve Your Email Marketing
- 6 Best Live Sales Notifications Tools to Boost Revenue
- 15 Conversion Rate Optimization Tools to Skyrocket Growth
These articles will further help you get started with marketing automation, compare sales tools, optimize your website for conversion and growth, and more.
Here’s our overall rating of PushEngage:


 5.0 / 5.0


 5.0 / 5.0


 5.0 / 5.0


 5.0 / 5.0


 5.0 / 5.0


 5.0 / 5.0

Nice article! It is helpful because sometimes we get unnecessary notifications. It will be helpful for people who want to turn on or off the notification in their androids.