Do you want to set up a WordPress staging site?
A WordPress staging site is a clone of your live site where you can test new features, themes, and plugins before deploying them into the live site. That way you can fix bugs and test changes before adding them to your live site.
In this tutorial, we’ll show you how to properly set up a WordPress staging site.
Setting Up a WordPress Staging Site
Some web hosting providers offer a 1-click staging setup, which is the easiest and recommended way to set up a staging site.
Bluehost, WP Engine and SiteGround are some of the few hosting providers that offer a one-click staging setup. If your web hosting provider doesn’t offer a 1-click staging setup, then you might want to migrate your hosting to a web host that offers a staging option. Alternatively, you can also build a staging site with a WordPress plugin or even manually.
Here’s a table of contents of what we’ll cover in this tutorial:
- How to Build a Staging Site with a WordPress Plugin
- How to Build a Staging Site on Bluehost
- How to Build a Staging Site on WP Engine
- How to Build a Staging Site on SiteGround
How to Build a Staging Site With a WordPress Plugin
Duplicator is a powerful WordPress backup plugin that can be used to create a backup or migrate your site.
It uses a process of creating a package of your website’s files and database. You can then store this package safely in the cloud or on your local computer so you always have a copy of your website.
You can also use this package to create a clone or a staging site.
To create a staging site using Duplicator, you need to have access to your web hosting’s cPanel.
That said, we’ll show you how to create a staging site where you have full control over the environment.
Step 1: Create a Subdomain
First, you will need to create a subdomain for your staging site from your hosting provider. For this tutorial, we will use Bluehost.
In your Bluehost dashboard, go to Domains » Subdomains. On the next page, enter a new subdomain name for your staging site. Use something distinguishable and task-specific like “staging,” then hit Add Subdomain.
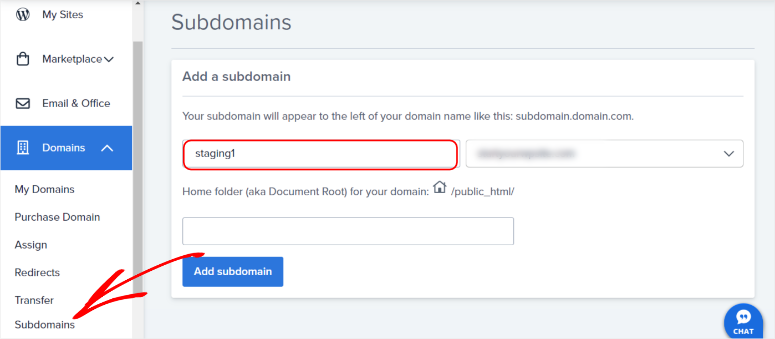
Your staging site URL will look something like “staging.mysite.com.” Once you create a subdomain, you will be redirected to the list of your site’s subdomains.
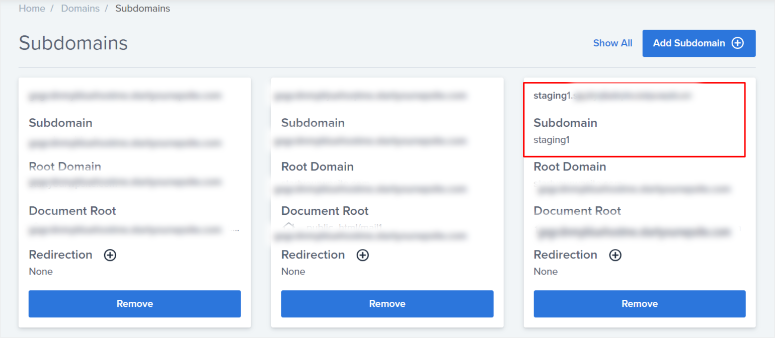
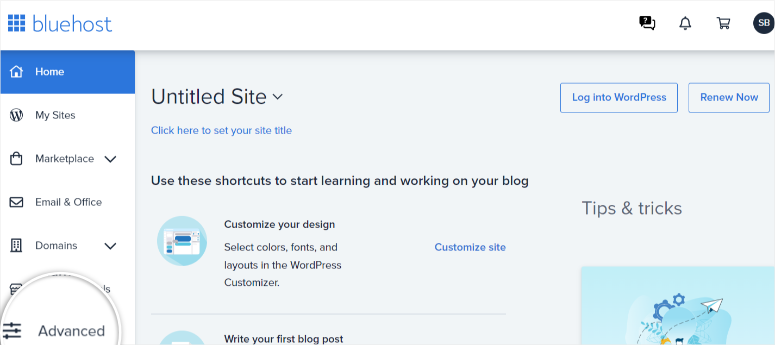
Next, still on Bluehost’s dashboard, go to the Advanced menu, which will redirect you to your cPanel.
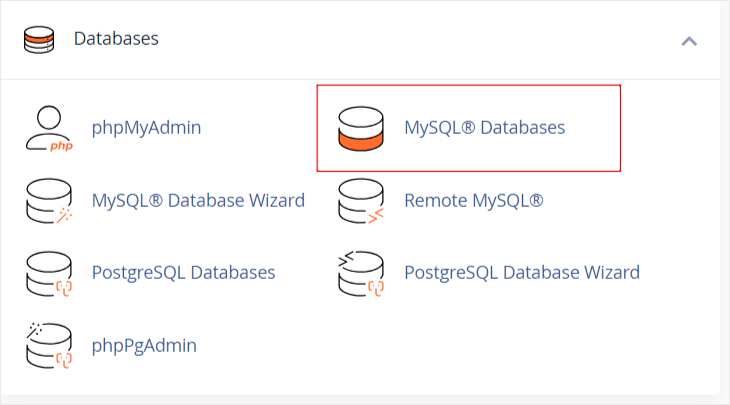
In your cPanel, navigate to the Databases tab, then go to MySQL Databases.
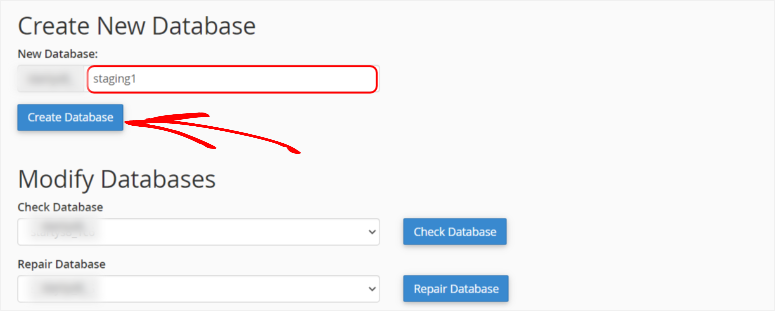
Here, create a new database. We suggest you give it a name you can quickly associate with your staging site, like “staging.” Hit Create Database and let the page reload.
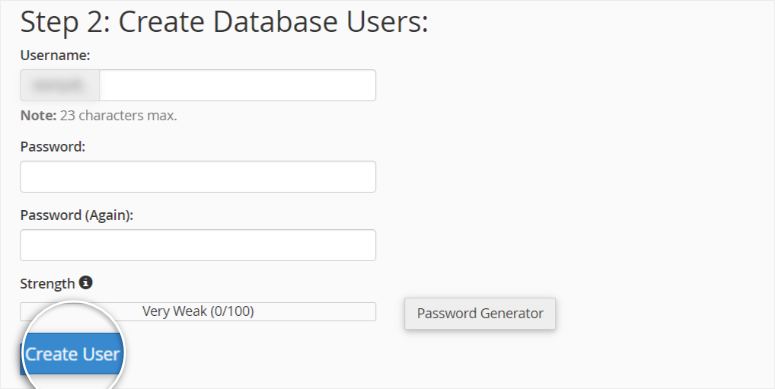
Next, add a new username and password for your new profile. Hit Create and let the page reload again.
Scroll down this page to see an option to connect the user and database. You should see a list of usernames and databases you have created in a dropdown menu. Select the username and database you have just created and Add.

Next, you will be redirected to a Privilege page. Give All Privileges and Proceed to Make Changes.
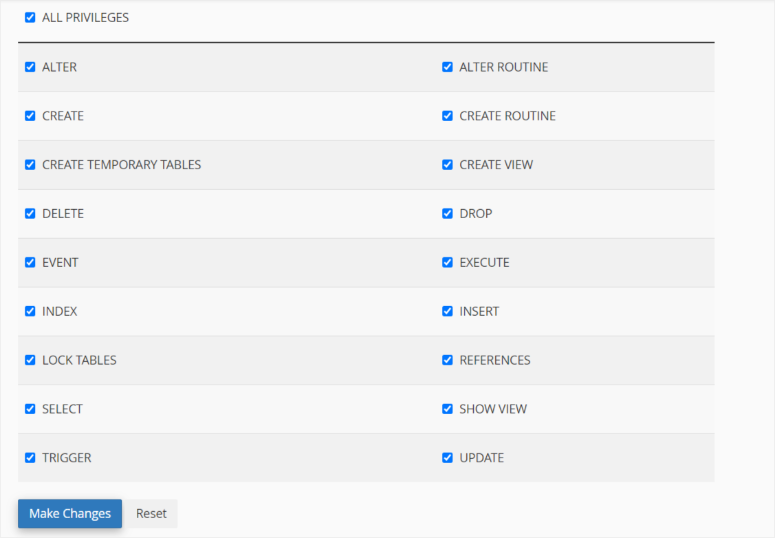
Congratulations! You have successfully set up a subdomain.
Step 2: Set Up Duplicator
With your subdomain ready, let’s move to the WordPress dashboard to set up Duplicator. Note that both the free and the premium versions of Duplicator can help you create a staging site because the feature is available on both.
Setting up both the free and premium Duplicator versions is quick and straightforward. Follow our tutorial on how to set up a plugin if you need help with either.
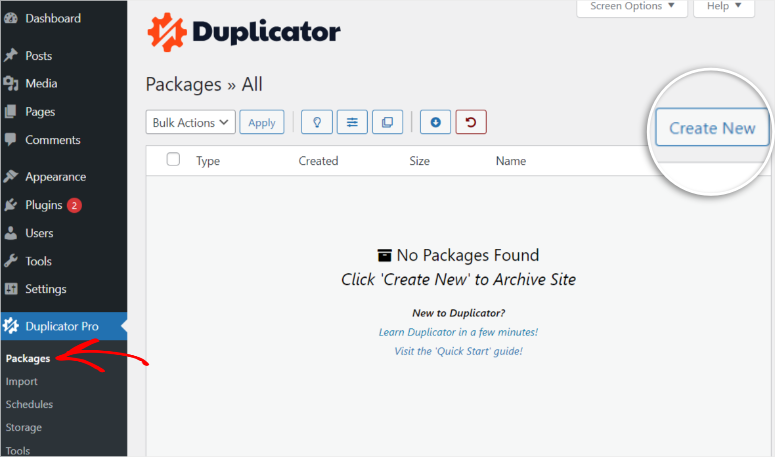
Once you install and activate the plugin, go to Duplicator » Packages and Create a new package.
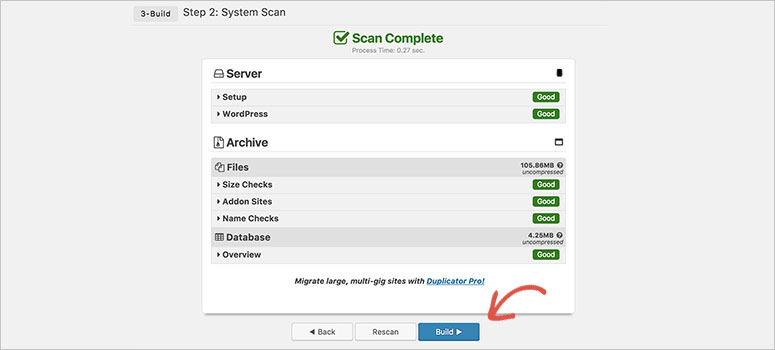
On the next page, Duplicator will run tests to ensure no errors, and your site is ready for cloning. If all tests are successful, you should see “Good” written in green next to every line of text. Now proceed to Build.
Wait a few minutes for Duplicator to create files; the page should automatically reload after completion. Then, download both the Archive File and Archive Installer.

Just a quick overview: Your site files reside in the Archive File. On the other hand, the Archive Installer will help us install the staging site without setting up WordPress or configuring anything. This makes it relatively easier to create a staging site manually. Such features are just some of the perks of using Duplicator to create a staging site and, indeed, for migrating and backing up a website.
Step 3: Set Up The Staging Site
With our Archive File and Archive Installer ready, we will need to upload them to our staging site’s subdomain next.
We can either use cPanel or an FTP client. Using an FTP client like Filezilla may require more experience with WordPress. However, an FTP client is an excellent way of uploading large databases without an error message.
For this tutorial, we will use the cPanel. However, check out this tutorial if you want to learn how to use an FTP portal to move the files instead.
Login into your cPanel directly or through your hosting dashboard by selecting Advanced. Next, head over to the File tab, and find File Manager, which will open a list of files.
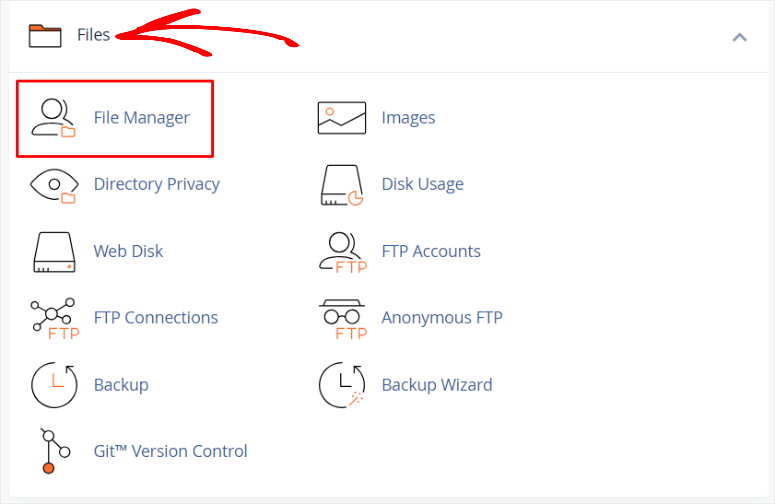
On the list of files on your left, find the root folder, ‘public_html.’ In this folder, scroll and find the staging site’s folder.
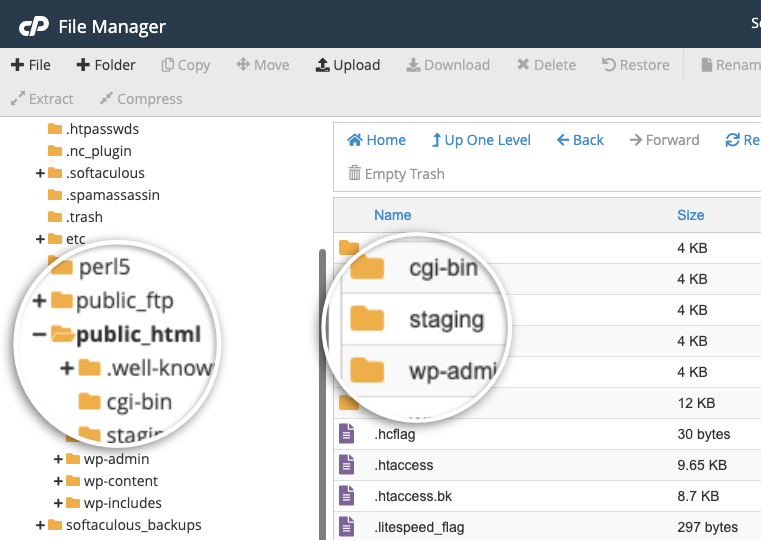
Delete everything in this folder, then find the Upload tab at the top of the page. Once you select it, you will be redirected to upload the Archive File and Archive Installer.
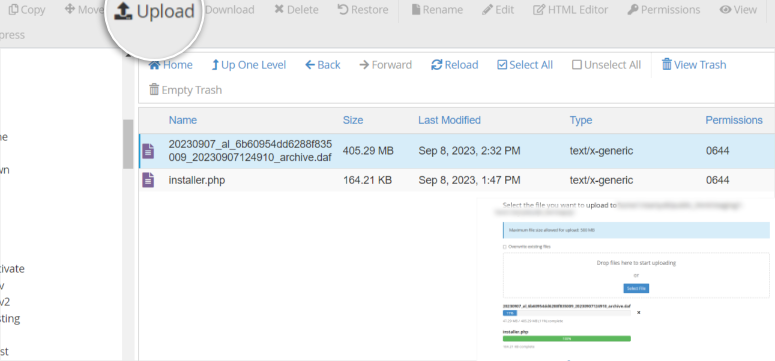
And just like that! You have successfully created a staging site.
FTP Client Alternative Route: Remember the processes of using your cPanel and an FTP client portal are the same when transferring staging files. You will still go to the public_HTML root file, find the subdomain folder, delete everything, and finally upload the Archive File and Archive Installer to your staging site through an FTP portal.
Step 4: Staging Site Deployment
With the staging site ready, open its subdomain URL in a new tab. Insert in the URL:
“https://yoursubdomain.example.com/installer.php“
For the example we have used in this tutorial, it should look something like:
“https://staging.mysite.com/installer.php”
Replace ‘staging’ with the subdomain name you create, and replace ‘mysite’ with your domain name. Once you hit enter, this URL should redirect you to the Duplicator installer wizard.
Go to the Setup and use the database information you created earlier to fill out this section, and Validate.
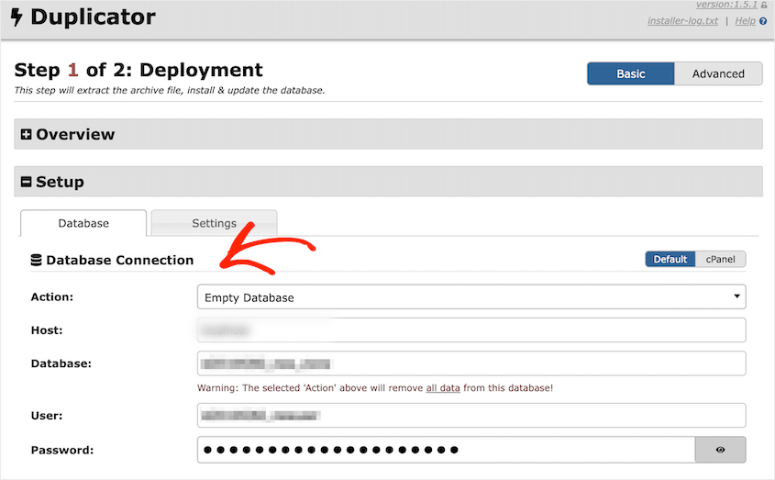
Duplicator will run its validation process to check for errors. Once done and all tests pass, proceed to Next.
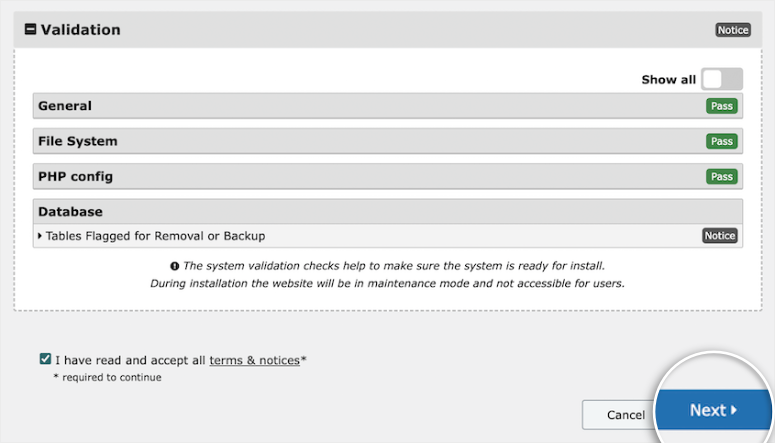
The next step is automated; Duplicator will unpack your WordPress files and upload your database to your staging site. Once completed, you will see a page showing your install results.
Next, log into your staging site’s WordPress dashboard and run tests.
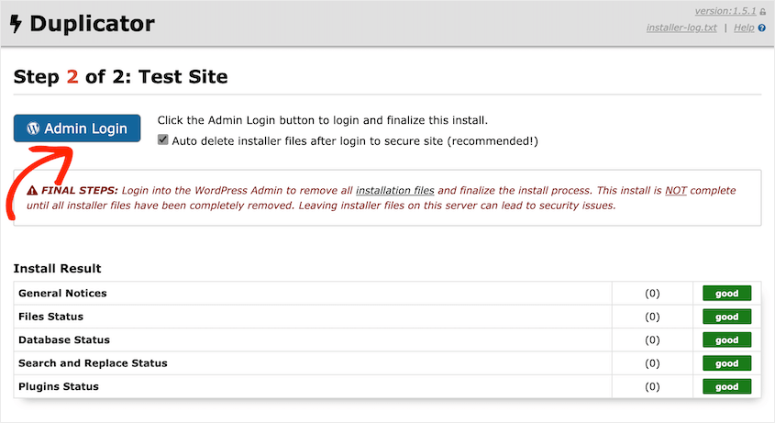
You have completed making a staging site manually using Duplicator.
Test new plugins, check for security threats, test user experience, and run any other tests you need on your staging site.
But remember, we mentioned that manually setting up a staging site offers better security. So, we will add a password to protect our staging subdomain and directory.
Head over to cPanel; in the Files section, select Directory Privacy.
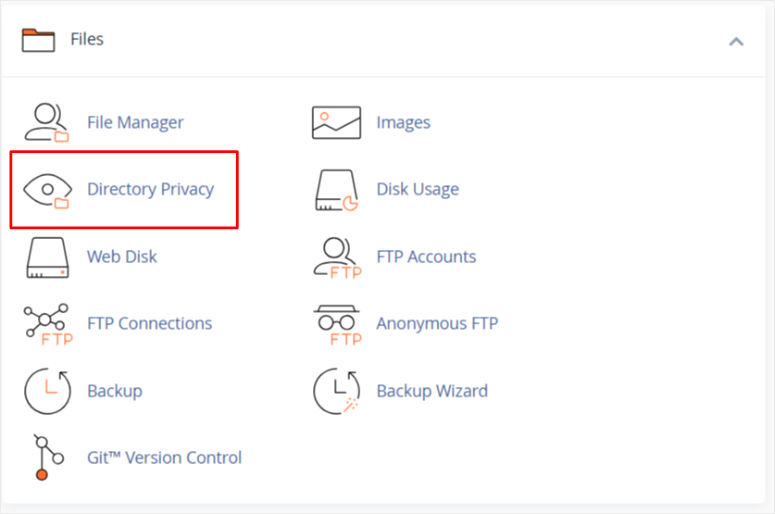
Next, open the ‘public_html’ root file and find your subdomain file. Select edit and proceed.
On the next page, you will check the box that says, “Password protected this directory.” The folder name of the staging subdomain should appear in the bar below the check box automatically. Hit Save.
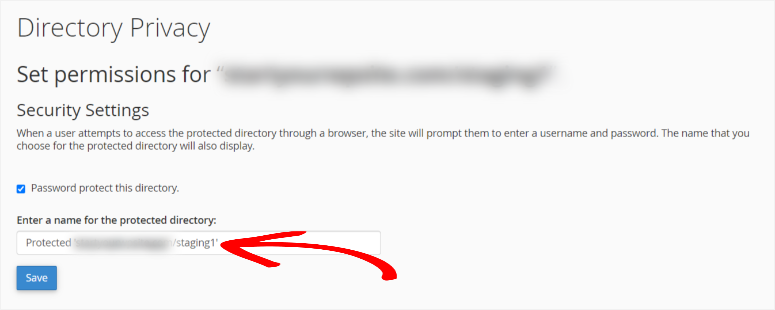
Now when someone tries to access your directory through a browser, they will be prompted to insert the username and password for the profile.

Step 5: Move Changes From Staging to Live
It is essential to create a backup of your live site before deploying staging changes. This will ensure you can recover your site in case of anything.
Check out this tutorial if you want to learn how to back up your site with Duplicator ».
To move your staging changes to your live site, first, you need to back up your staging site.
On the staging site, make sure you have Duplicator installed. Then go to Duplicator » Packages and create a package.
Once ready, download the package, which includes both the Archive File and Archive Installer

Move to your live site’s WordPress dashboard. Go to the Duplicator Pro » Import page.
Drag and drop the downloaded archive file into this import box.
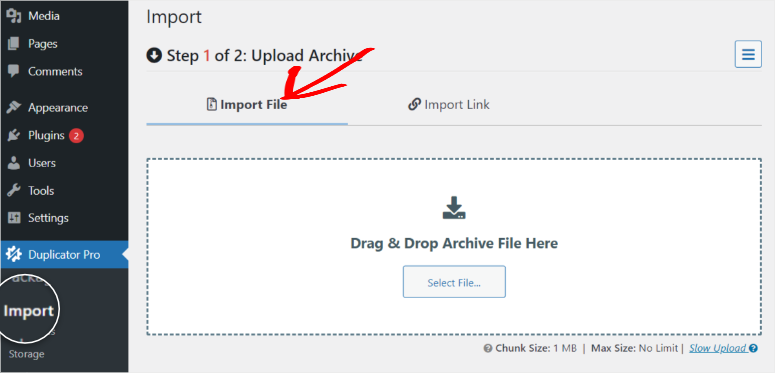
Then, you’ll be able to view details about the uploaded package. To import it, hit Continue.
And you are done! You have created and deployed your staging site and finally uploaded changes to your live site.
How to Build a Staging Site on Bluehost
Bluehost is one of the largest hosting companies today that offers a 1-click staging site creation process. This 1-click staging solution is available on all Bluehost packages.

With a Bluehost plan, you can log into your account dashboard. Here, you should see a Bluehost menu on the left of your WordPress dashboard. Next, go to Staging.
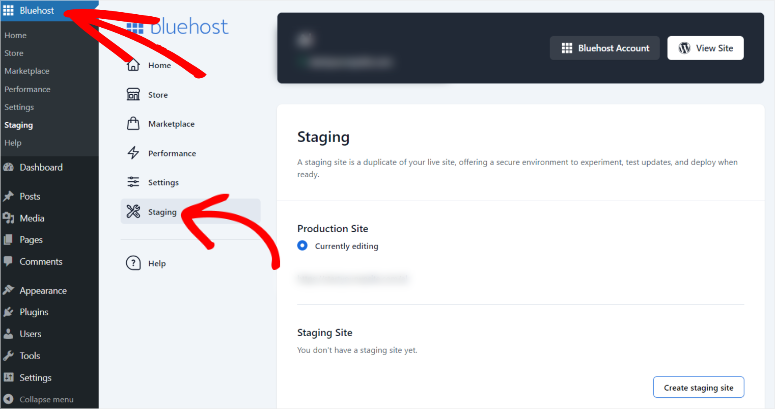
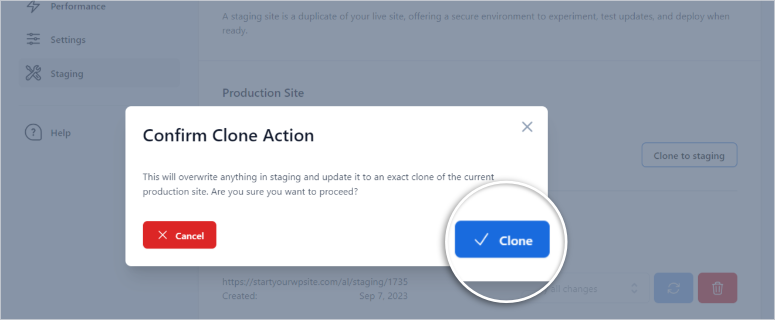
Below the Production Site section, there’s a Staging Site section with a button to “Create staging site”. By clicking on it, a new popup window will appear.
This will ask you to confirm if you would like to create a clone of your site.
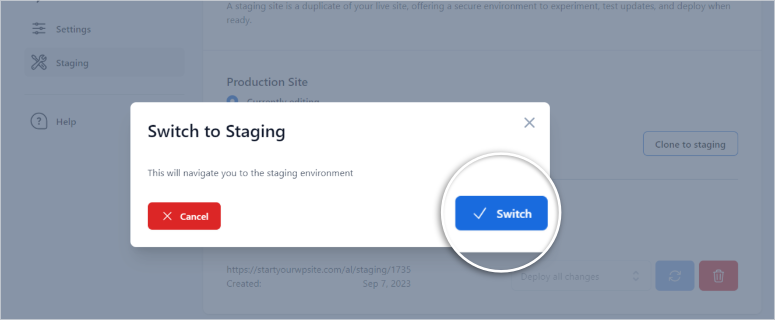
Next, another popup will ask if you want to Switch to Staging from the current production site.
Bluehost will take you through the staging wizard and create the staging environment for you. After the process is complete, your WordPress dashboard should reload.
Now, you should notice a red button at the top of your WordPress dashboard, indicating you are on the staging site.
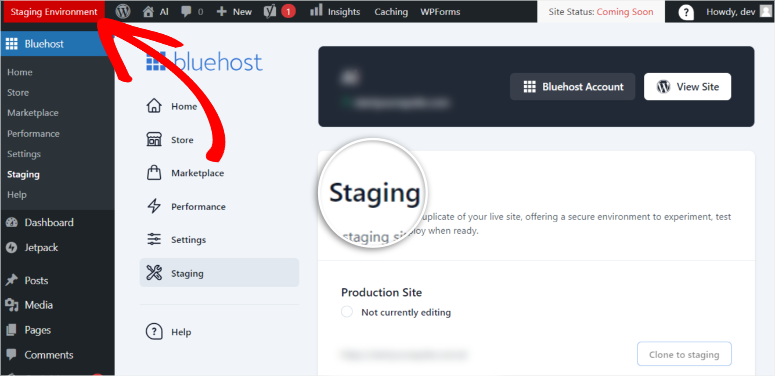
At this stage, you can use this clone site to make changes and test what you need to. With peace of mind, try out new features, change your site structure, test updates, and check for security issues without affecting your main site.
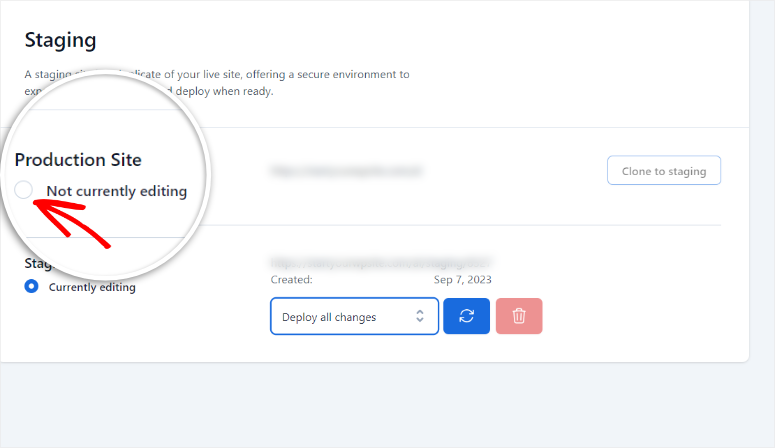
When you are ready to implement these changes, like previously, go to Bluehost » Staging on your WordPress dashboard and select the ‘Production Site’ button.
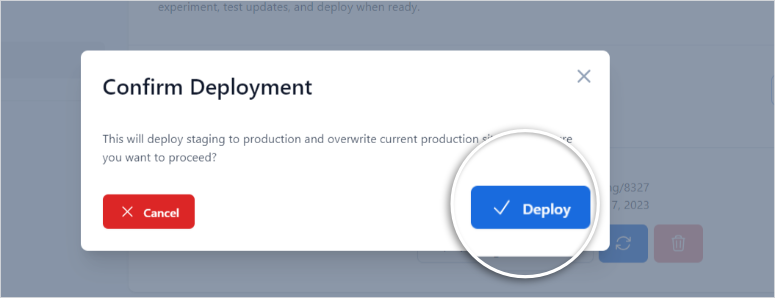
A popup window will appear next, asking you to Confirm Deployment.
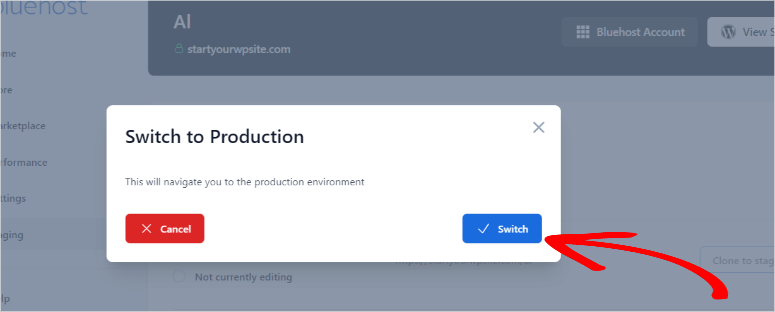
Next, another popup will ask if you want to switch to the Production Environment to complete the process.
Let your WordPress dashboard reload. You will notice the red staging button at the top of your WordPress dashboard will disappear, indicating you are on the Live site once more.
All the changes you made during staging should now also be live!
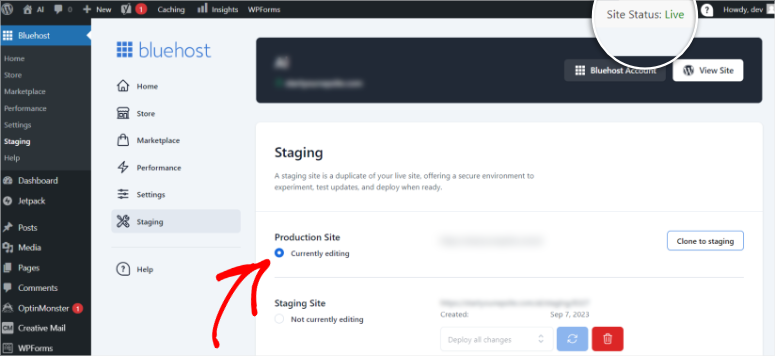
Well done! You have now used Bluehost to create a staging site.
How to Build a Staging Site on WP Engine
WP Engine is one of the best managed WordPress hosting companies. With WP Engine, you don’t have to worry about your site’s security, performance, speed, and backup because their platform comes bundled with all these features.
Aside from that every WP Engine plan also offers a 1-click staging environment setup.
In order to setup the staging site on WP Engine, you need to log into your WP Engine dashboard and click on your site for which you want to create a staging website.

After that, click on the Add Staging option to build a staging environment.
Start by entering a name for your new staging site. Click on the Create Environment button to launch your staging site.
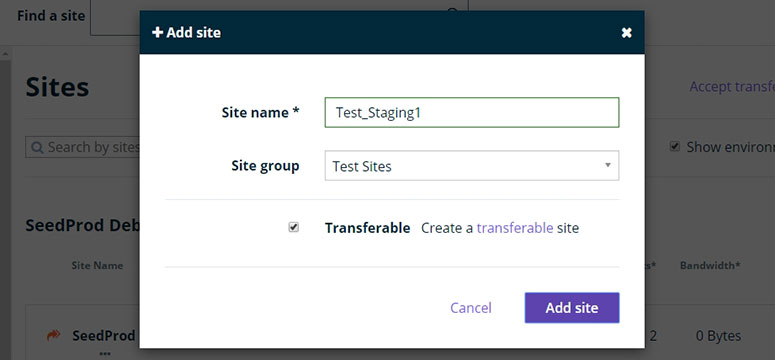
The new staging site will be a blank WordPress website. You can switch to your production site from the left menu.
To clone your production site content in your staging site, you need to click on the Copy To button and click on the Staging option.
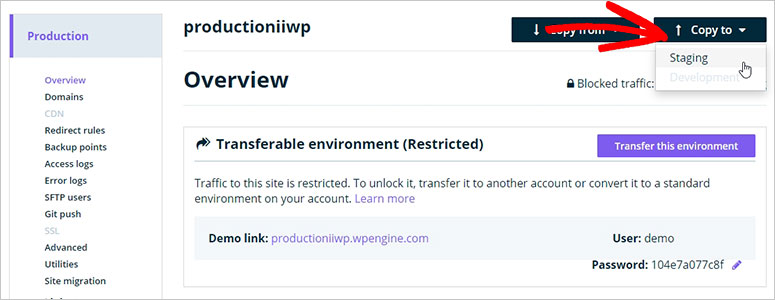
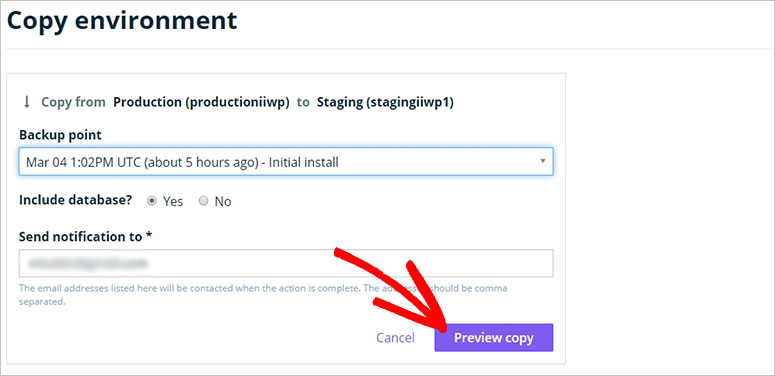
Then choose a backup point and click on the Preview Copy button to continue to the next step.
Next, you’ll see a popup that prompts you to confirm that you want to copy the live website’s content to the staging environment. Click on the Copy Environment button.
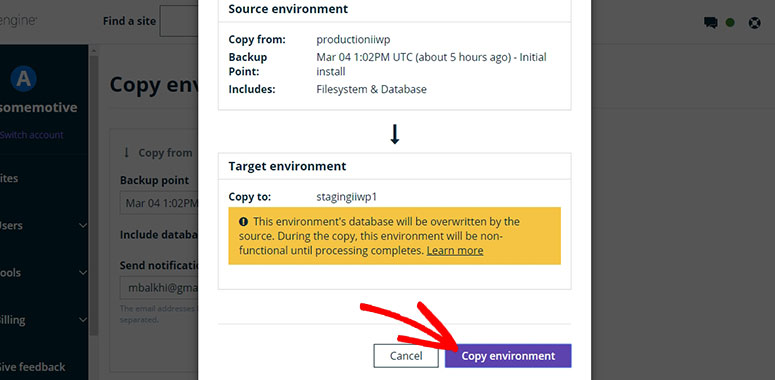
That’s it! You’ve set up a staging site on WP Engine and clone your production site content successfully.
Migrate Your Staging Site to Live Site on WP Engine
First off, navigate to Staging » Backup Points from the left menu. Then, click on the Backup Now button.
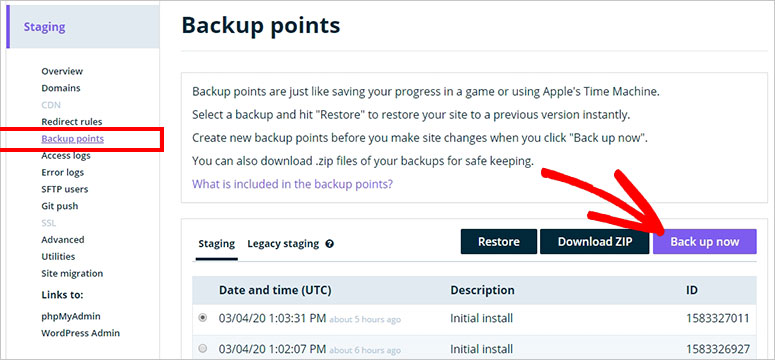
A popup will prompt you to enter the backup description and an email address to send a notification when the backup is ready.
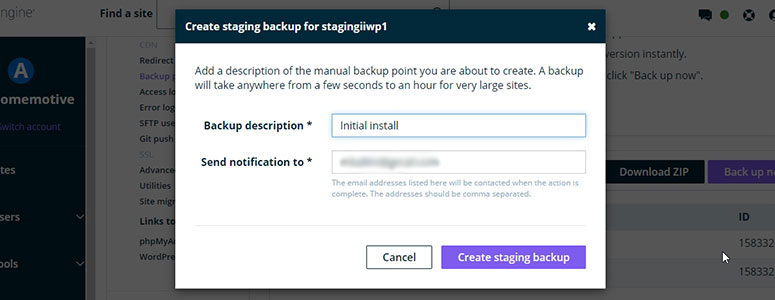
Click on the Create Staging Backup button to continue.
Once the backup is processed, you can go ahead and click on the Copy To option.

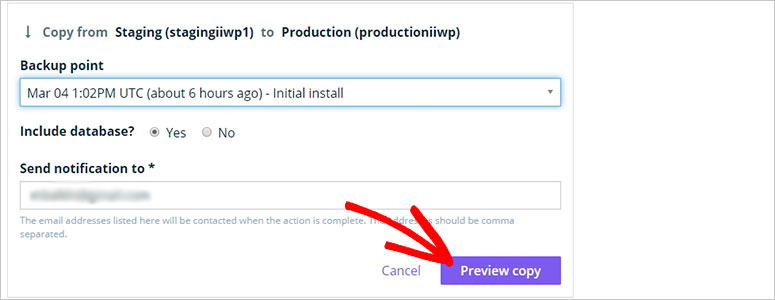
Now, choose the backup point that you’ve added when setting up the staging environment and click on the Preview Copy button.
A popup will open where you need to confirm that you want to move your staging site to the live site. Click on the Copy Environment button to continue.
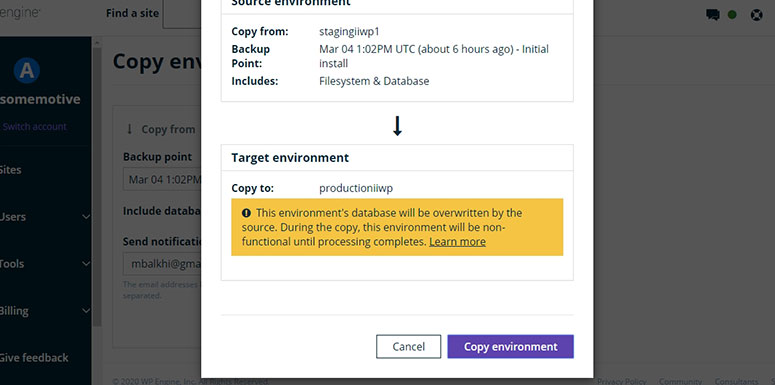
You’ll get a notification on your email address when the migration process is completed.
How to Build a Staging Site on SiteGround
SiteGround is a leading web hosting company on the market that also comes with a 1-click staging site setup with their premium plans: GrowBig and GoGeek.
If you’ve subscribed to SiteGround with any of these hosting plans, then it’s easy to set up a staging site for you.
Start by logging in to your SiteGround‘s account and click on the Site Tools button. From there, you need to visit WordPress » Staging from the left menu.
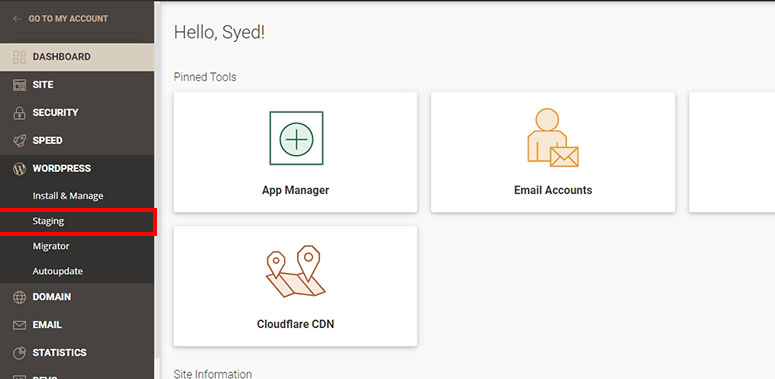
Next, enter the name of your staging site and click on the Create button.

In a few seconds, you’ll see a success message and your staging site will be ready. You can scroll down to Manage Staging Copies section and click on the arrow icon to log into the WordPress admin area of your staging site.
That’ it! You’ve successfully created a staging site. You’re all set to start implementing new features and test for bugs.
Migrate Your Staging Site to Live Site on SiteGround
When you’re done making changes in the staging environment, you can go ahead and migrate your staging site to the live website.
To do that, go to WordPress » Staging in your SiteGround Site Tools dashboard. Then, scroll down until you find Manage Staging Copies section.
Find the staging copy you’ve created in the previous step and click on the 3 vertical dots next to it. Now, click on the Full Deploy option.
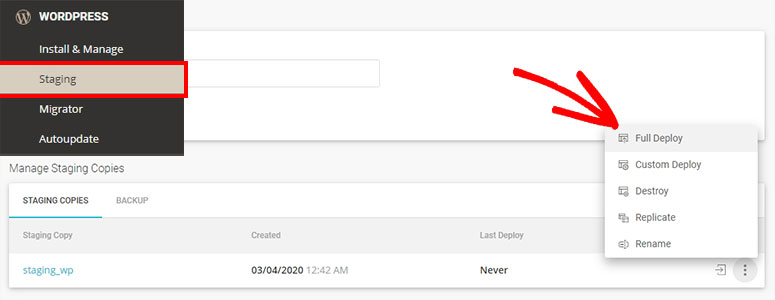
Now you’ll need to confirm the deployment. Then click on the Confirm button to continue.
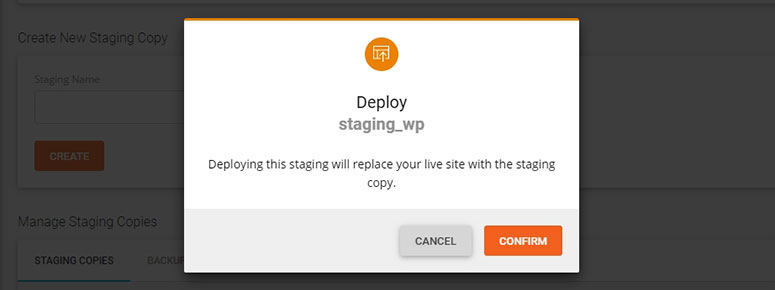
You need to wait for a few minutes for the process to complete and then, you’ll see a success message.
We hope this article helped you learn how to set up a WordPress staging site. Next, we answer some commonly asked questions
FAQs: How to Set Up a WordPress Staging Site
Is a staging site and a dev site the same thing?
A staging site is essentially a clone of your live website where you can test changes, updates, or new features before implementing them on the live site. It’s a safeguard against potential errors or issues that could disrupt your live site. A dev site is primarily used by developers for coding and creating entirely new features or functionalities. It’s where the initial work happens before it’s ready for testing on the staging site.
Which is better, staging locally or staging a live site?
When you stage a live site, you replicate the actual server environment and conditions, making it more likely to uncover any server-related issues or conflicts that might arise when the changes go live. Local staging, while useful for some testing, may not catch all potential problems that could occur in the live environment.
What is the difference between UAT and a staging environment?
The staging environment is where changes and updates are thoroughly tested by the development team before being deployed to the live site. It’s primarily an internal testing phase to catch and resolve issues. UAT, on the other hand, is the User Acceptance Testing phase, where real users or stakeholders evaluate the staged site for usability and functionality. UAT ensures that the site meets the end-users’ expectations and requirements before it goes live. The Duplicator plugin can be invaluable for setting up and managing both staging and UAT environments.
Is QA and staging the same?
Staging is a phase where changes or updates are rigorously tested in an environment that mirrors the live site, with the goal of identifying and fixing any issues or bugs. QA, on the other hand, is a broader process that covers various testing phases, including staging. QA includes activities like functional testing, regression testing, performance testing, and more to ensure the overall quality and reliability of the website. Staging is part of the QA process. It focuses on the technical aspects of testing changes before they are accepted for wider QA testing. The Duplicator plugin can be a valuable tool for creating stable and secure staging environments, contributing to a great QA process.
Can a backup be used as an alternative to a staging site?
A backup can be considered a partial alternative to a staging site in certain scenarios. Backups capture a snapshot of your live site at a specific point in time, allowing you to restore it if something goes wrong during changes. However, backups lack the interactive testing capabilities of a staging site. Staging sites provide a controlled environment for actively testing and refining changes without affecting your live site. While backups offer a safety net, staging sites are preferable for comprehensive testing and development. They allow you to make, assess, and perfect changes before applying them to the live site.
We hope you enjoyed learning more about how to create a staging site. Here are 8+ Best WordPress Page Builders & Theme Builders to help make your WordPress experience better.
Plus, here are some additional resources we think would be beneficial to you.
- 9 Best Staging Plugins for Your WordPress Website (Compared)
- How To Create a WordPress Test Site? (3 Easy Ways)
- Duplicator Vs. UpdraftPlus Vs. BackupBuddy – Which One is Better?
The first two articles will teach you more about testing and staging sites. While the last article will help you compare specific backup features from some of the best backup plugins today.

Comments Leave a Reply