
Want to grab your visitors’ attention using a sticky floating bar in WordPress?
With a sticky floating banner or bar, you can display a message at the top or bottom of your website without disturbing the user’s experience. This lets you promote email signups, products, flash sales, social media accounts, and display any custom message. For instance, you may want to display cookie settings to ask the visitor for permission to track their data as they browse your site.
In this step-by-step guide, we’ll show you the easiest way to create a WordPress floating banner. Before we begin the tutorial, let’s be clear on what exactly a sticky floating bar is.
What is a Sticky Floating Bar?
A sticky floating banner stays on the top or the bottom of your webpage as your visitors scroll the page.

These bars are always visible to the user and they can interact with your message at any time during their browsing journey.
Sticky bars are designed to be flexible and serve multiple purposes. So you can tailor them to show any message you want. To give you a few examples, you can add welcome discounts for new visitors or promote a newly added product to maximize visibility.
When used the right way, you can use floating bars to:
- Improve your sales and revenue through flash sales, discounts, and deals
- Drive traffic to your online content (podcasts, articles, guides, videos, and more)
- Increase website engagement and conversions
- Generate leads and subscribers to grow your email marketing list
- Boost social media engagement and followers
- Increase brand awareness
There are plenty of ways you can use sticky bars to your advantage. With that, let’s learn how to create an engaging WordPress floating banner for your site.
Creating a Sticky Floating Banner for WordPress
There are quite a few floating bar plugins for WordPress but not all of them offer the features you need to create and customize one with ease.
We’re going to show you how to create one in under 5 minutes without touching a single line of code using our favorite floating banner tool called OptinMonster.
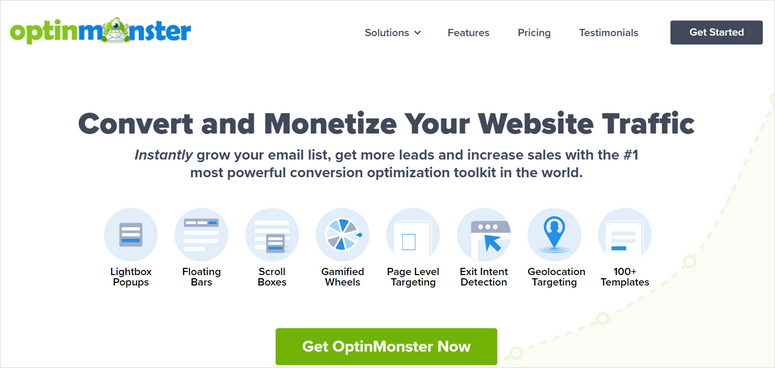
OptinMonster is the #1 lead generation tool that lets you create eye-catching marketing campaigns for converting your visitors to customers. These include floating bars, popups, slide-ins, inline forms, and more.
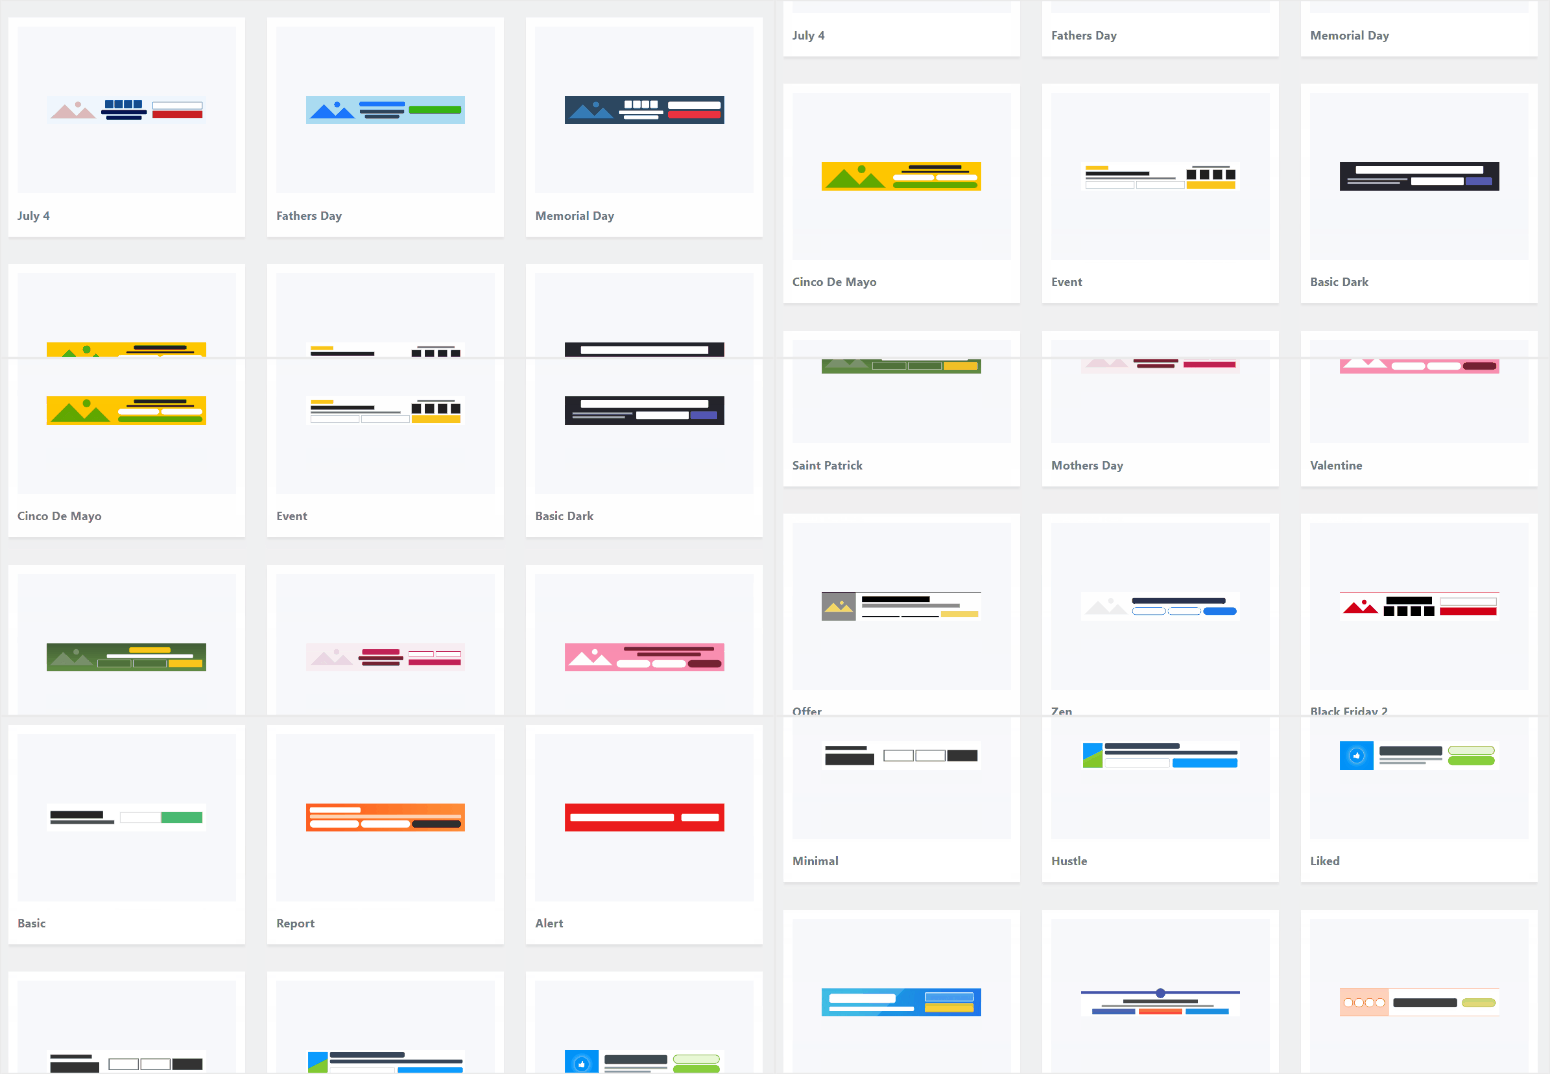
OptinMonster comes with a library of 50+ pre-designed floating bar templates so you won’t have to start from scratch.
You’ll find designs for announcements, discounts, popular holiday offers, newsletter subscriptions, and much more.
You can preview and select a template of your choice. Then there’s a drag and drop builder that’s so easy to use. You can customize your text, image design, colors, and more all with clicks of your mouse button.
What’s more, OptinMonster lets you set targeting rules so that you can display your floating banners to the right people at the right time and place. For instance, you can set up your campaign to appear only to new users or ones that are about to exit your website. It also allows you to retarget and follow up on your leads to improve engagement.
Added to that, OptinMonster tracks and displays all the important stats you need right inside its dashboard. You can see the number of visitors who viewed and clicked on your WordPress floating banner, and even how much money you make from the campaign.
To give you a glimpse at what you can do with OptinMonster, these are a few sample campaigns:
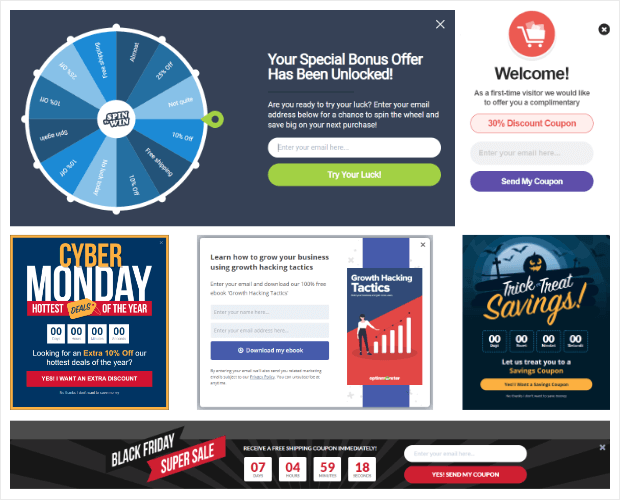
The best thing about OptinMonster is that it gives you the flexibility to create and manage all your campaigns including floating bars right from your WordPress dashboard.
Now, let’s waste no time and start creating our WordPress floating banner with OptinMonster.
Step 1: Install and Activate OptinMonster Plugin
First, you need to sign up for an OptinMonster account. The plugin starts at $9 per month with a 30-day money back guarantee.
Then, you’ll need to install the OptinMonster plugin to connect the account to your site.
The connector plugin is available free so you can easily download it from your WordPress dashboard. For more details, you can check out our guide on how to install a WordPress plugin.
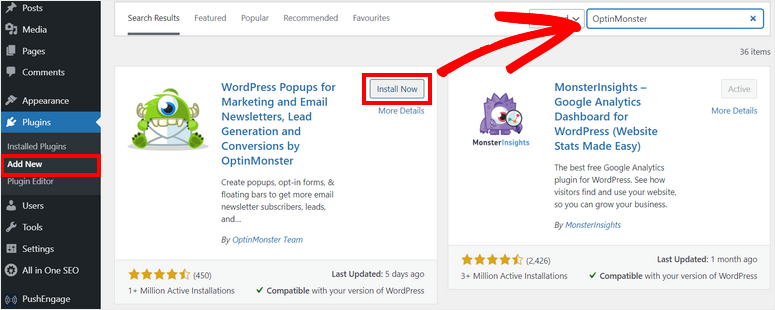
When you install and activate the OptinMonster plugin on your site, it will launch a setup wizard. You’ll get the option to connect your newly created account.
Keep in mind if you’re signed in to your OptinMonster account in another tab, the plugin will auto-detect it and sync your website.
Now, you can start creating your first WordPress floating banner with OptinMonster.
Step 2: Create New Floating Bar Campaign
OptinMonster allows you to create and customize floating banners inside your WordPress admin dashboard.
For this, go to the OptinMonster tab, and you can see different types of lead generation campaigns such as popup, floating bar, fullscreen, inline, and more.
To create a WordPress sticky bar campaign, we’ll choose the Floating Bar option.
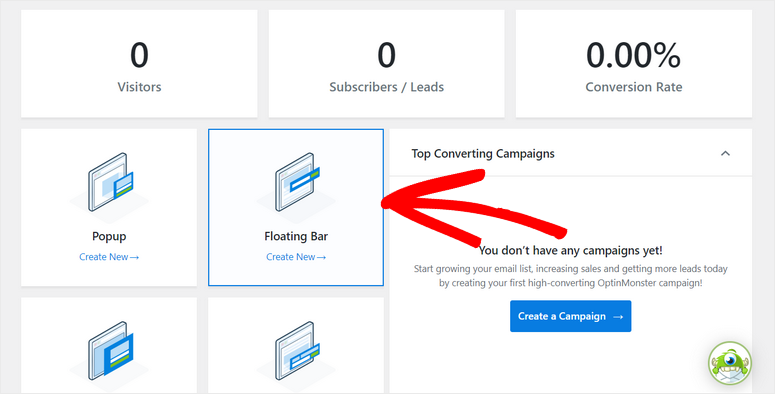
This will launch the template library consisting of stunning floating banner templates that you can choose from.
Here, you can hover over any template to preview the sticky floating bar on the same page. When you’ve found the best design for your campaign, click on the Use Template button to create your floating banner.
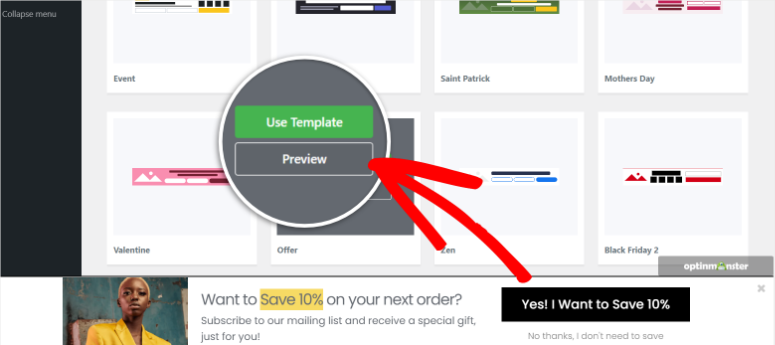
This will open a popup window where you can give your floating bar campaign a name.
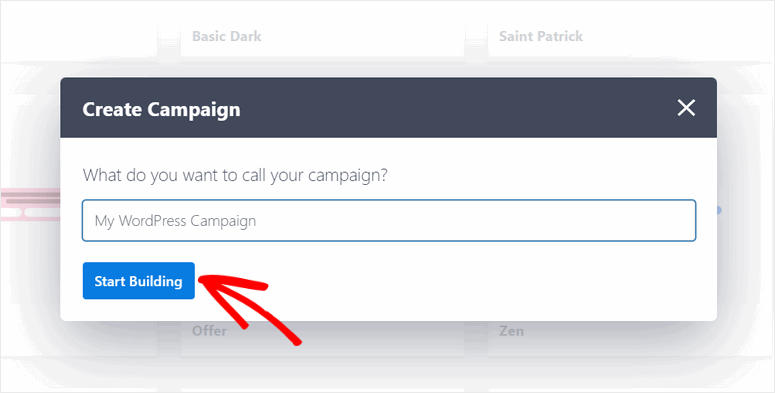
Then, click on the Start Building button to launch the OptinMonster campaign builder.
Step 3: Customize your WordPress Floating Banner
In the campaign builder, you’ll see all the element blocks on the left and the preview of your sticky bar on the right side. Here, you can easily drag and drop the required blocks on your banner.
You’ll find the 12 blocks that you can use to make your banner more engaging and interactive.
Some of the useful element blocks are:
- Countdown
- ChatBot
- Social Icons
- Optin Fields
- Yes/No Button
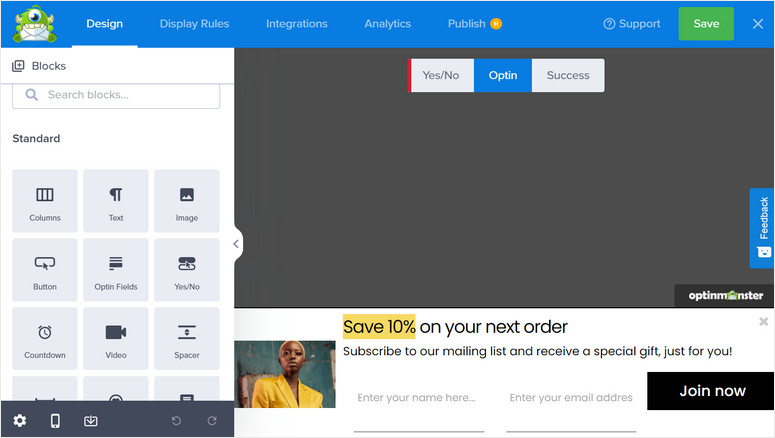
1. Edit Content Blocks
If you want to customize any content block, simply click on it and you’ll see the block editor open in the left taskbar.
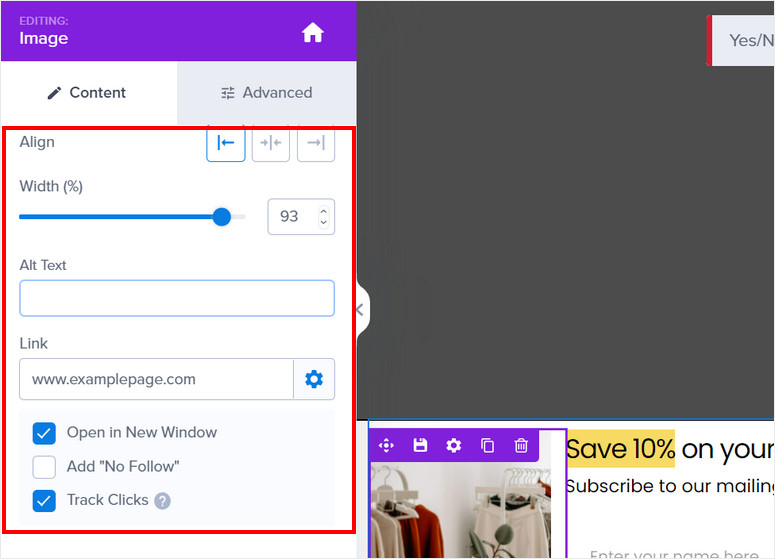
For example, you can replace the image by uploading your own or choosing one from the existing media library. You can also change the image settings such as opacity, width, alt text, and more.
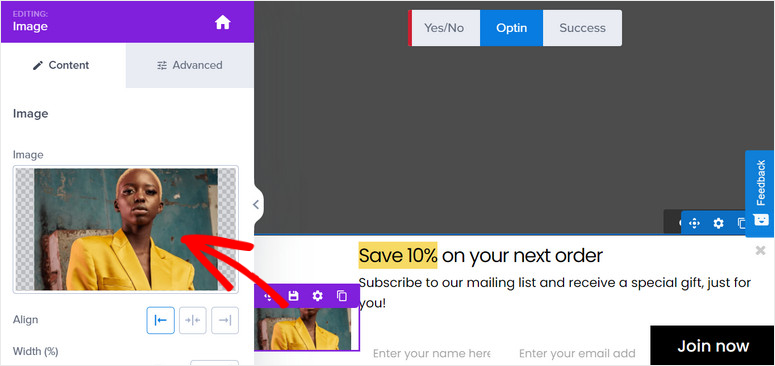
Along with that, OptinMonster allows you to add links to your images so that users can click on them to be redirected to the page of your choice. There’s an option to make the link URL open in a new window and you can enable click tracking to see how many people click on the image.
In the same way, you can change the text of the content in your floating banners and edit the optin button too. All you have to do is select the element in your preview and enter your custom text.
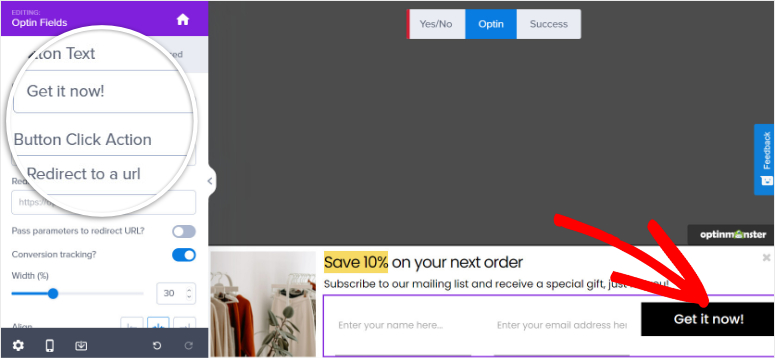
Once you’re done customizing your content blocks, click on the Save button.
2. Configure Campaign Settings
OptinMonster lets you edit the campaign settings inside the builder. For this, you’ll need to click on the Settings icon on the bottom-left of the campaign builder.
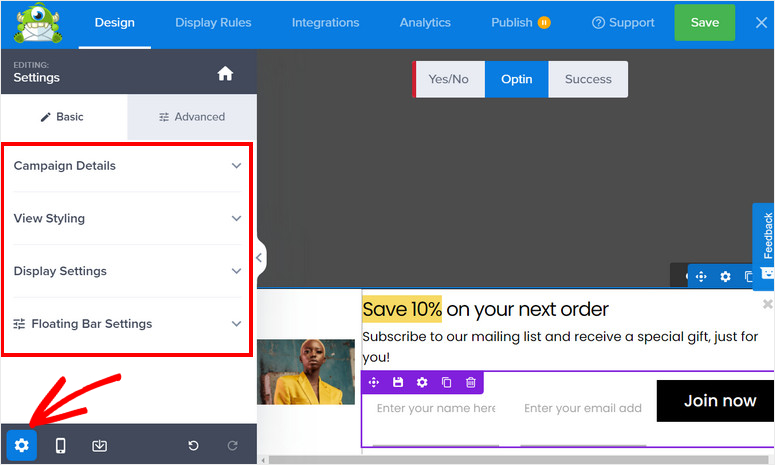
Then, you’ll see the 4 main settings on the left side and the floating bar live preview on the right side of the page. The settings include:
- Campaign Details: Lets you edit the campaign name, description and other information about your floating bar.
- View Styling: Gives you tons of design and style settings to match your website branding.
- Display Settings: Choose the number of times to display your campaign to the visitors.
- Floating Bar Settings: Change the position of your floating bar from top to bottom and vice versa.
Because OptinMonster’s templates look and function great out of the box, you won’t need to customize them much except change a few details to match your campaign goals. But you can easily make changes to the design and styling if you need.
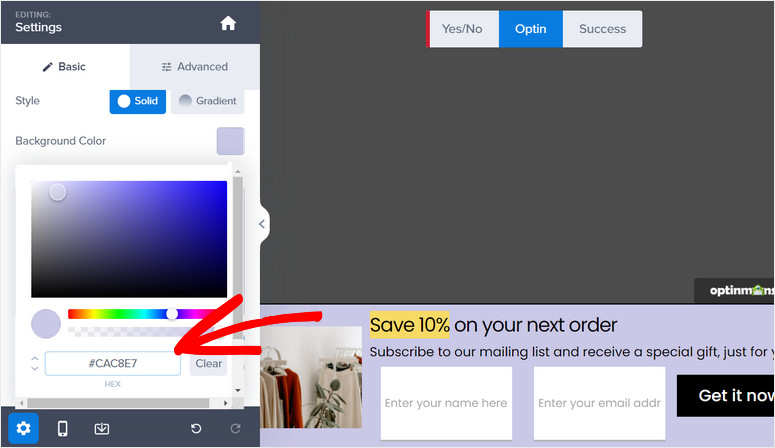
On the View Styling option, you can change the overall styling and design option. The basic settings let you edit the style, background color, image, close button, and more.
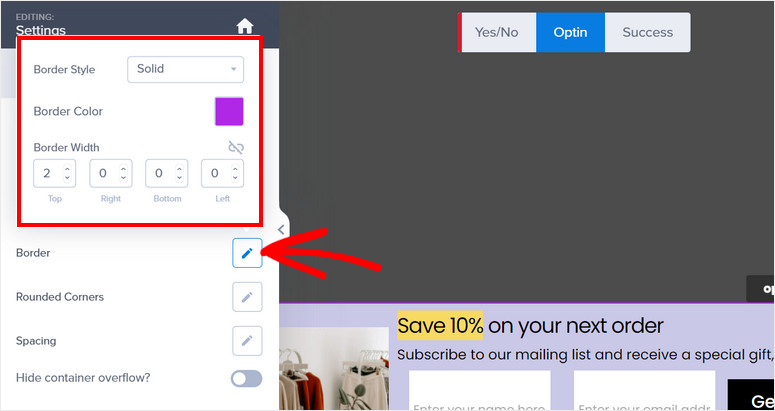
The advanced settings allow you to customize even the little details such as border, spacing, shadow, and more.
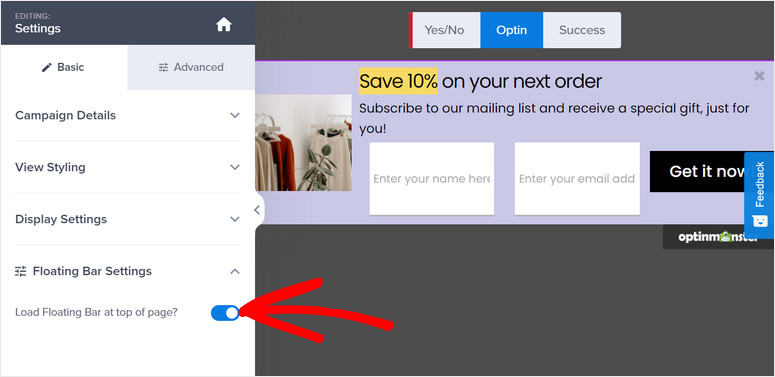
By default, OptinMonster shows floating banners on the bottom of your site but you can change that and shift it to the top.
For this, go to Floating Settings and enable the Load Floating Bar at Top of Page option there.
Don’t forget to save your settings after you’re done.
Now, we’ll learn about the display rules that you can set for your floating banner campaign to target visitors.
Step 4: Set Targeting Rules to Display Your Floating Banner
Optinmonster offers powerful audience targeting features to optimize conversions and generate leads from your campaigns.
To add new targeting rules, you’ll need to navigate to the Display Rules tab at the top of the editor.
Then, you can see the default ruleset which displays your banner if a visitor stays on any page of your site for 5 seconds.
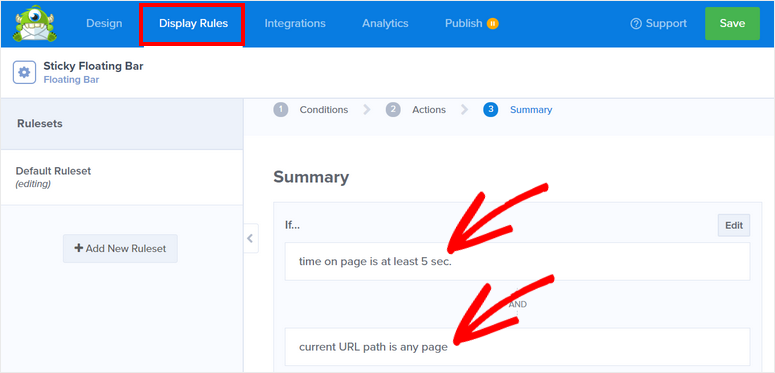
If you want to change the display rule, you can click on the Edit button or click on the existing rule, and you’ll see the list of predefined display rules offered by OptinMonster.
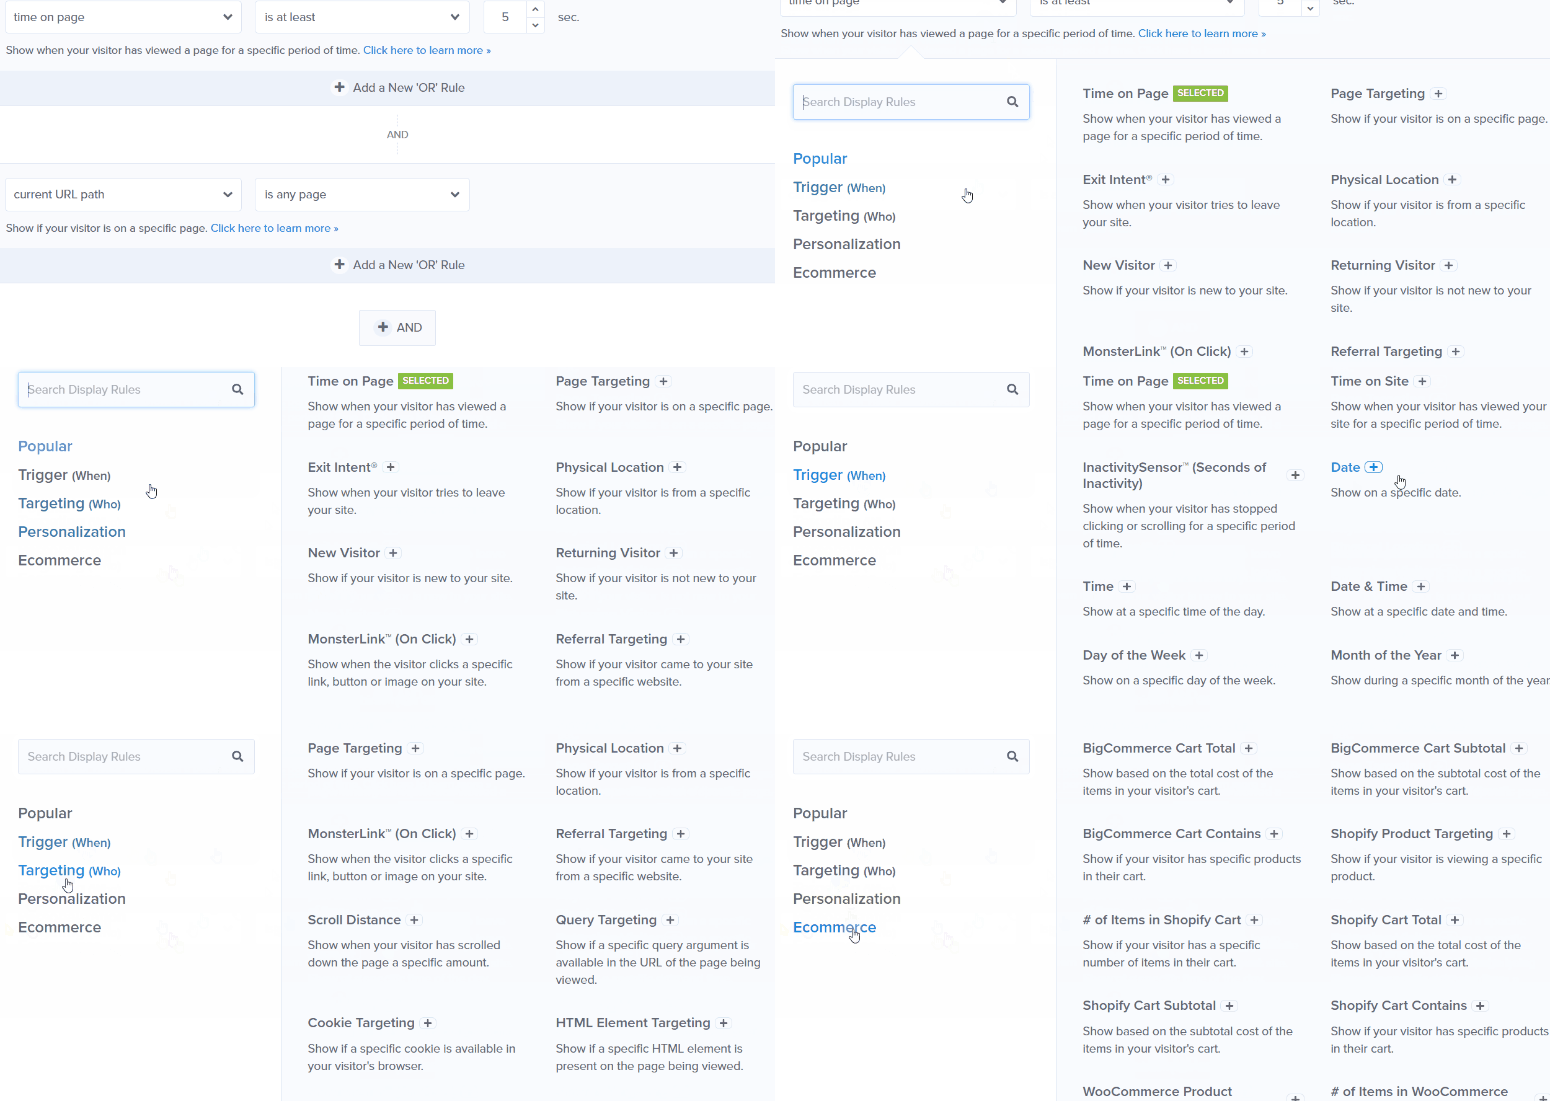
All the rules are organized into different tabs so you can easily find the targeting rule for your campaign. A few highlights include:
- Scroll Distance: Display only once a visitor has scrolled a certain depth on the page
- Time and Date: Target specific holidays, days of the week, and time periods to run flash sales or limited time offers
- Physical Location: Engage with users based on their geographical area to localize the campaign offer
- Visitor’s Device: Show/Don’t show campaigns based on whether a user is on desktop or mobile
To add a rule, all you have to do is click on it. It’s that simple!
You’ll never need to add coding or work with complex settings to target your audience. Next, we’ll show you how to connect your campaign to your email account so all your new leads will be automatically added to your contact list.
Step 5: Connect to Your Email Provider
OptinMonster integrates with all the major email marketing services like Constant Contact, Aweber, ActiveCampaign, and ConvertKit.
When you sync your email account, you can collect email addresses and send automated emails to your new subscribers. OptinMonster also comes with built-in options to segment your leads so that your list stays organized and you can send relevant emails based on what they signed up for.
To connect to your email provider, open the Integrations tab in the campaign editor.
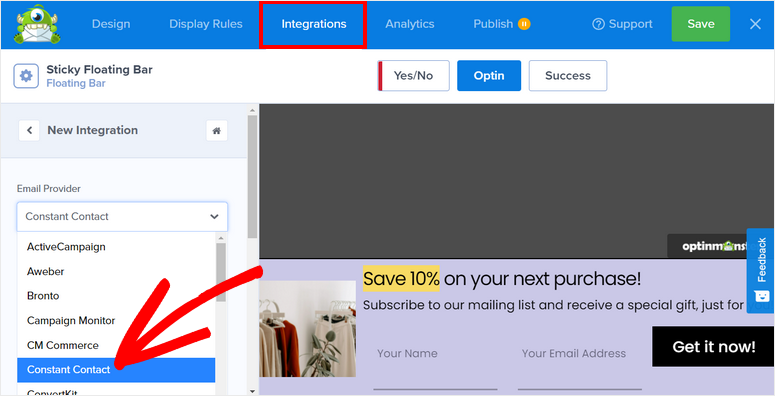
Here, you can choose your email provider and sign in to your account. Some providers need an API to work which you can find inside your email account settings.
Don’t forget to save your settings after setting up your integration.
Now you’re all set to publish your sticky floating banner campaign on your WordPress site
Step 6: Publish Your WordPress Floating Banner
Head over to the Publish tab in the editor and you’ll see options to see a live preview of your campaign. When you’re ready, all you have to do is change the status to Publish.
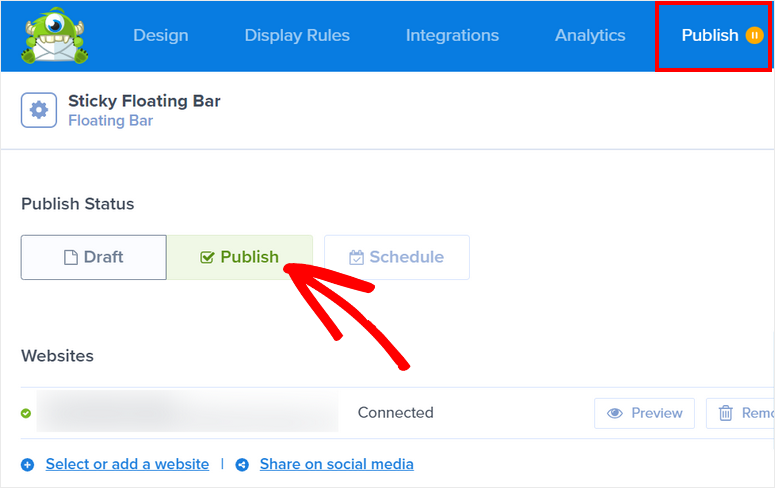
After you click on the Publish button, you’ll see the campaign status change to ‘Published’.
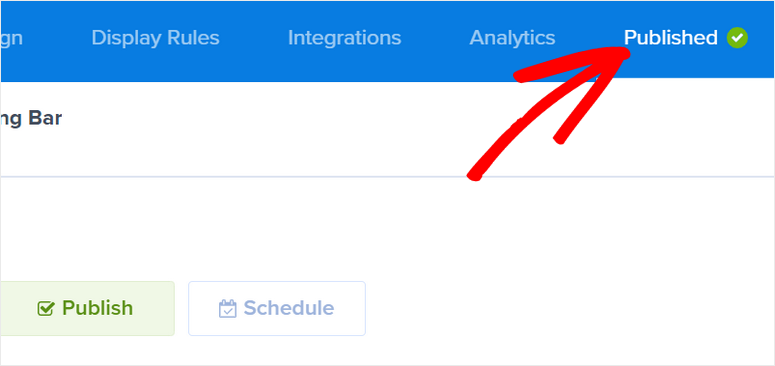
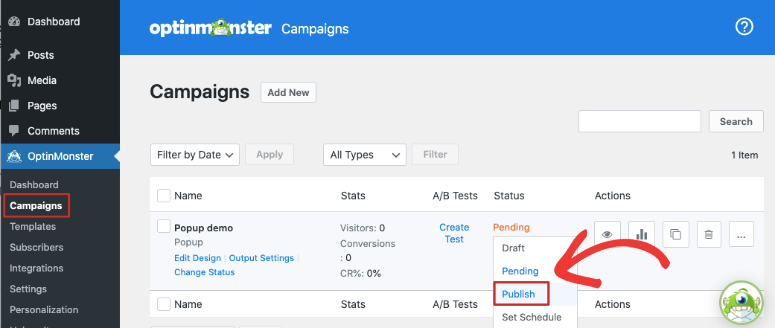
Head over to your WordPress dashboard and open the OptinMonster » Campaigns tab. Make sure the status is set to Publish here as well.
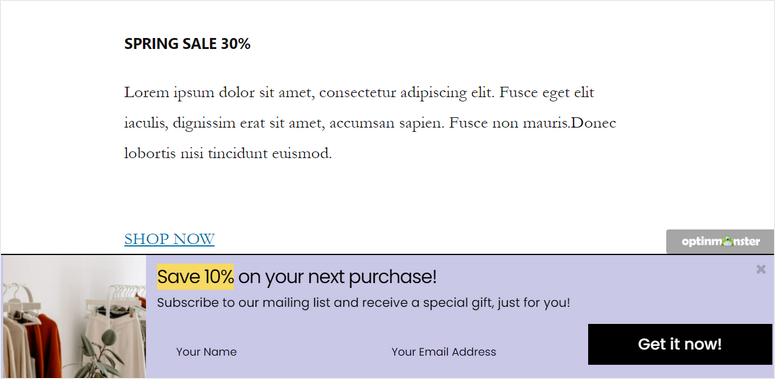
Now when you visit your site, you should see your floating bar campaign appear according to the display rules you set.
And that’s it for today! We hope this article helped you easily learn how to create a sticky floating banner for your WordPress site.
Now that you know how to use OptinMonster, you can go ahead and create more high-converting campaigns on your site like popups, slide-ins, coupon wheel games, and more.
Next, to generate more leads and conversions on your site, you’ll definitely want to read these articles:
- How to Create a Lead Capture Page in WordPress
- How to Create a Popup in WordPress (Step by Step)
- Make a High-Converting Squeeze Page
These posts show you more opportunities to target your users to get them to engage and subscribe to your brand.

Comments Leave a Reply