
Do you want to create a test site to run experiments and try new things without affecting your live site?
A test site lets you set up a safe environment where you can try and test things before you roll out new changes on your live site.
In this step by step guide, we’ll show you how to create a test site using 3 methods. We’ll also show you how to merge changes so that you won’t have to replicate the work on your live website.
What Makes a Good Test Site in WordPress?
A staging or test site is a clone of your live website where you can safely test anything you want such as new themes, plugins, updates, and other changes.
You can hide it from the public so only you can see what’s being tested on the staging site.
Many developers use a local environment to test changes and then migrate the changes from localhost to live server. But sometimes, this causes issues because what works on local may not work when it’s on the live server.
With a test site, you won’t face such problems. But you’ll need to make sure you set up a stable and efficient test environment.
Here’s what we recommend in a test site:
- Quick and easy set up
- Option to merge changes with live site
- Choose what changes you want to add to your live site
- Hidden from public and search engines
- Merge without breaking the live site
Keeping these factors in mind, below, we’ll show you 3 methods to create a test site.
Creating a WordPress Test Site
There are multiple ways to set up a test site and each method caters to a different purpose:
- Staging Plugins: This is the most recommended method because you can set up a staging site without touching any code. You’ll be able to merge your changes at the click of a button.
- Web Hosting: You can create a test site for free from inside your hosting account. This is a manual method that needs a fair amount of technical skill. It’s also risky as even a small error can break your site.
- Temporary Test Site: This lets you create a temporary test site with a brand new WordPress installation. You don’t need a domain name or hosting plan to use this. Such test sites come in handy to check out how WordPress works, quickly test plugins and themes, and more.
1. Create a Test Site Using A WordPress Plugin
Not too long ago, you needed to hire a developer and good coding skills to set up a staging environment but WordPress plugins make it easy as 1 click.
Plugins will make sure your test site is hidden from visitors and search engines. And you’ll be able to safely merge your changes without worrying about your WordPress website breaking.
And the best part is you’ll always have a support team that you can reach out to for help.
Now there are plenty of good staging plugins you can use. Here are the ones we recommend:
You can learn more about these plugins in our comparison of the Best Staging Plugins for Your WordPress Website.
For this tutorial, we’ll show you how to create a test site with WP Stagecoach.
WP Stagecoach the easiest and fastest way to set up a WordPress test site. It has a simple set up so it’s a great choice for beginners.
It also has advanced options that give developers more freedom in managing the test site.
Ready to create your test site? Let’s dive right into the steps.
Step 1: Install and activate WP Stagecoach
The first thing you’ll want to do is sign up for a WP Stagecoach account.
Once you’ve done that, you’ll get a plugin to install on your site along with an API key. If you need help installing the plugin, follow our guide on How to Install a WordPress Plugin.
Once you activate the plugin on your site, WP Stagecoach will appear in your WordPress admin menu. Open the plugin’s settings page and enter your WP Stagecoach username and API key.
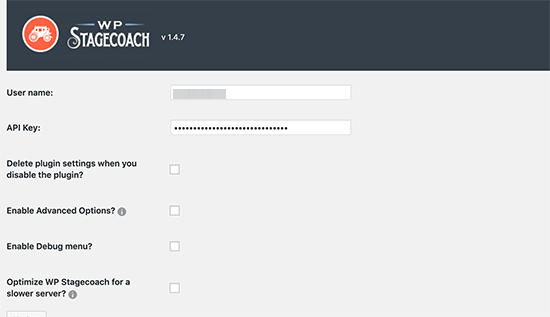
In case you don’t have these details, you’ll find it under the Account page inside your WP Stagecoach account.
Once you’ve done that, WP Stagecoach will let you create your first test site.
Step 2: Create a Test Site
In the WP Stagecoach dashboard, you’ll see a welcome message and an option to create a staging site.
All you need to do is enter a URL for your test site.
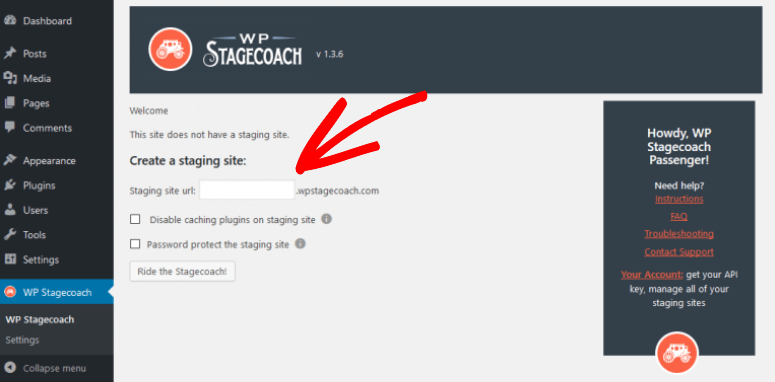
Then you’ll see options to disable caching plugins and password protect the site.
We strongly recommend adding a password to the site. This will make sure your test site is hidden from the public and search engines.
When you’ve entered all the details, click on the ‘Ride the Stagecoach’ button. The plugin will automatically take a backup of your WordPress site and then create a test site.
Once your test site is ready, you’ll see URL links to the site and the admin area. Simply click on the link and enter your credentials to access the site.
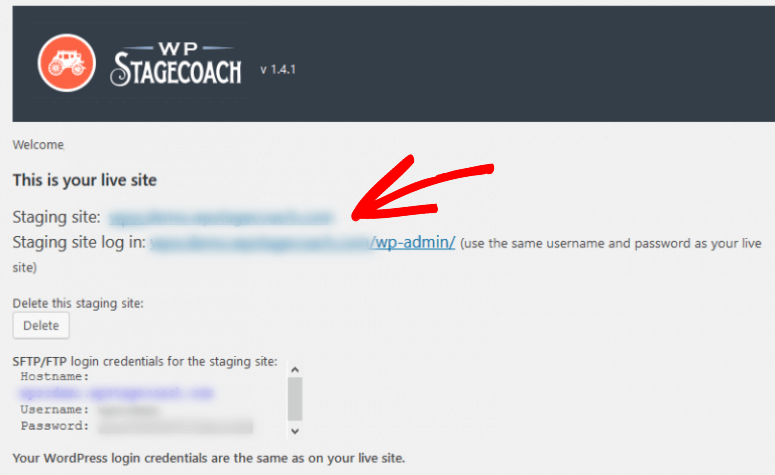
Now you can experiment freely and make all the changes you want. The test site is a fully functional WordPress site, so you can use it just as you would a normal WordPress site.
Step 3: Merging Changes with Live Site
When you’re happy with your test site, you won’t have to go back to your live site to replicate the changes.
WP Stagecoach lets you import your changes to your live site. Head over to WP Stagecoach » Import Changes page and click on the Check for Changes button.
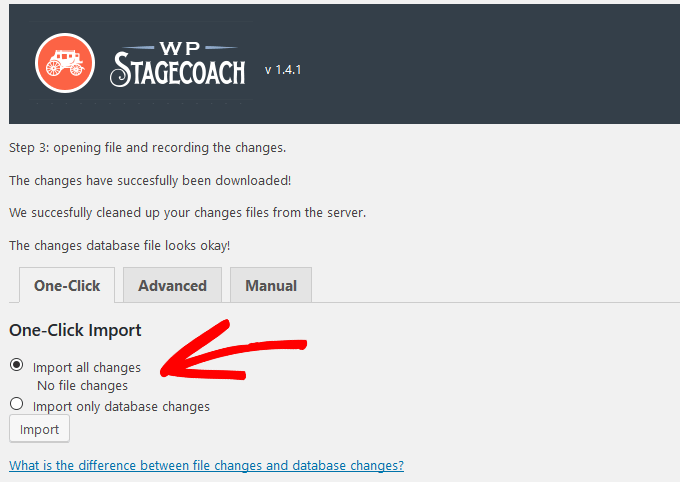
The WordPress plugin will now scan your test site for changes you’ve made and then show you options to import them.
You can select to import only file changes, only database changes, or all changes. Next, click on the Import button to continue.
The plugin will show you the progress of the import and will notify you when it is done. All you have to do is view your live site and see that the changes were successfully imported.
We recommend deleting the test site once you’re done with it. Stagecoach will delete all the temporary WordPress files created as well.
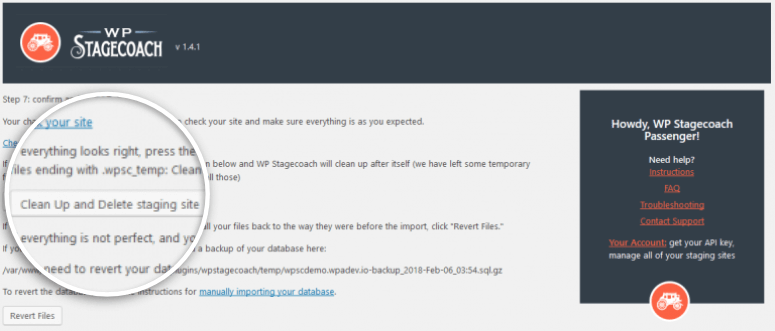
Next time you want to run tests, you can create a new test site with the latest changes and work from there. This will ensure you never merge an old test version with your live site.
2. Create a Test Site Using Your Web Host
You can create a test site with your web host for free but there are a few downsides that you should be aware of.
To begin with, you can set up a test site manually only if your hosting provider grants you access to cPanel. If you are using a managed WordPress hosting plan, you most likely won’t have access to cPanel.
Added to that, the test site runs on the same server as your live site. This will add more load to your server and slow down your live site.
It’s much simpler to use a plugin. Having said that, you can set up a WordPress staging site with your web host in 2 ways:
- Using Softaculous Apps Installer inside cPanel
- Manually by creating a subdomain with a copy of your site’s files and database
1. Softaculous Apps Installer
If your web host provides the Softaculous Apps Installer, you can easily set up a WordPress test site on your own.
Log in to your web host account and open cPanel » Softaculous Apps Installer.
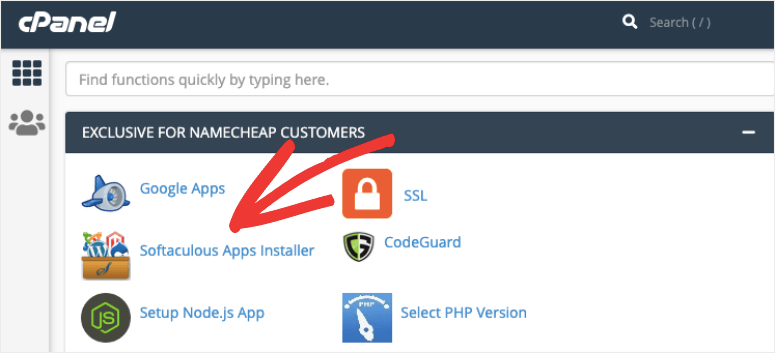
Next to your site’s name, you’ll see a list of icons to create a clone, backup, or staging site. Select the ‘Create Staging’ icon to set up your test site.
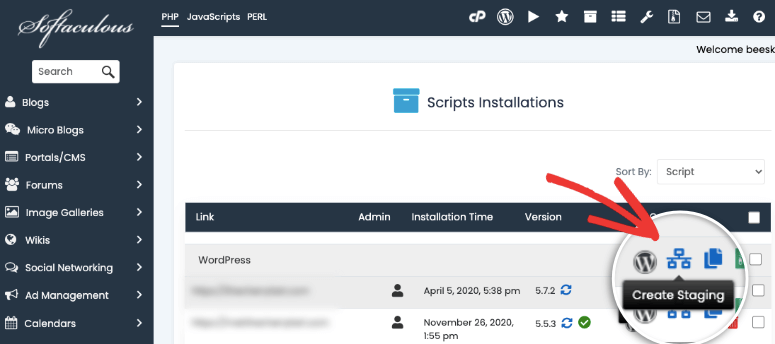
On the next page, you can add a site name, create a new database, and disable search engine view.
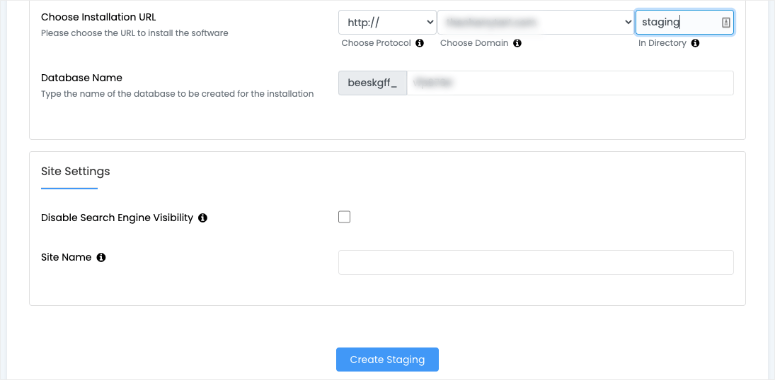
Softaculous will then copy your site and create the test environment for you. You’ll get a link to your site along with the credentials to log in.
When you’re done testing, you can use the Push to Live option to merge the changes with your live site.

If you don’t have this app installer inside your cPanel dashboard, then you can follow the steps below to manually create one.
2. Manually Creating a Test Site
Before we begin, you should know that setting up a test site manually needs a fair amount of technical knowledge. It’s also prone to error so we don’t recommend it for beginners.
There’s also no option to merge the changes with your live site. So you’ll have to make the changes on your live site manually.
With that in mind, you can follow the steps below to manually create a test site.
Step 1: Create a Subdomain
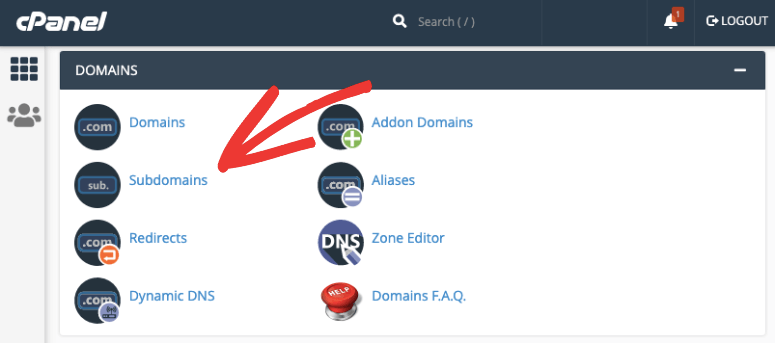
The first thing you need to do is log in to your web hosting account and open cPanel. Inside, navigate to the Domains section and select Subdomains.
Here you can add a subdomain name. We’ll name it ‘staging’.
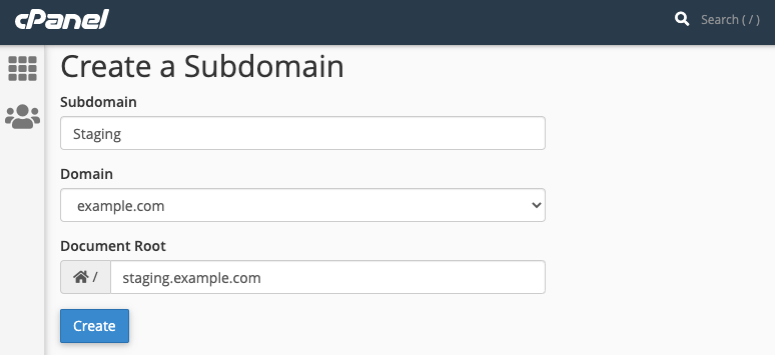
Then click on the ‘Create’ button and your subdomain is ready.
Step 2: Download a copy of your files and database
To clone your WordPress website, you’ll need to copy all its contents to your new subdomain.
To access your WordPress files, go to cPanel » File Manager. You’ll want to find the folder called ‘public_html’, then right-click and compress it.
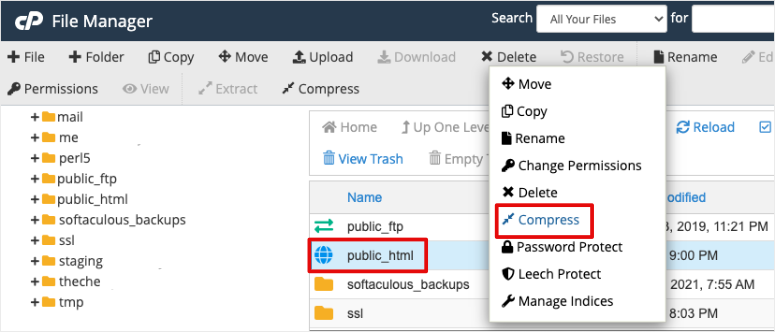
This will create a zip file of your WordPress files. When the zip file is ready, download it to your computer.
Next, inside cPanel, go to phpMyAdmin section. This is where your WordPress database is stored.
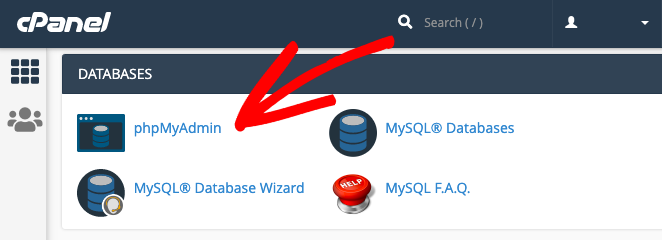
You’ll see your database on the left panel. In case you see multiple databases and don’t know which is your website’s database, you can go to the File Manager » public_html folder.
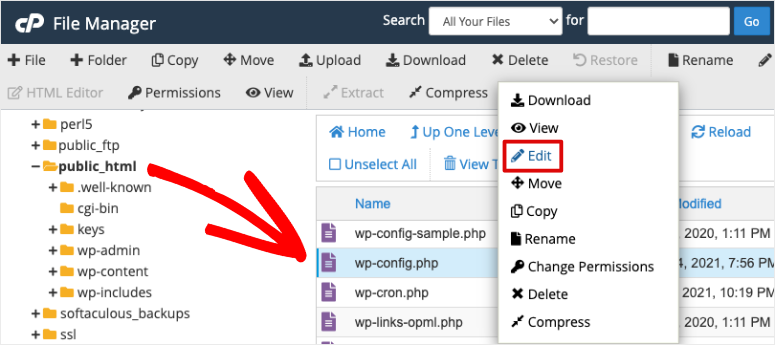
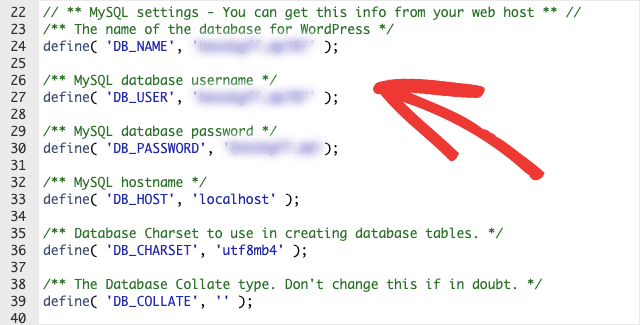
Here, find and edit the wp-config.php file. Inside this file, you’ll see your database name and password, like so:
Once you know your database, select it and use the Export option to create a copy.
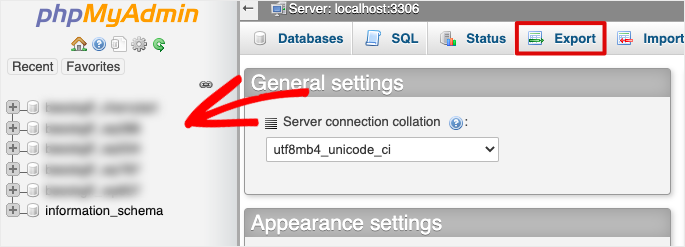
On the next page, you’ll see options to change the method and format. We recommend using the default settings – Quick method and SQL format.
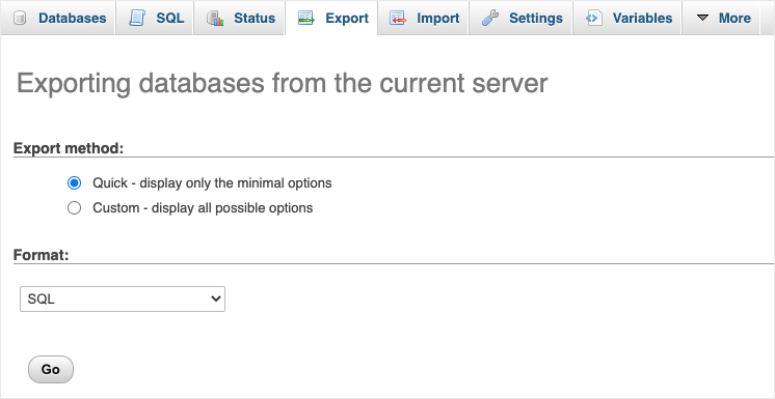
When you click on Go, a .sql file will download to your computer.
Step 3: Upload your WordPress Files to Subdomain
Now that you have your WordPress files and database ready, you need to upload them to your staging site.
To do that, first head over to File Manager » public_html folder.
Find the folder with name you used to create the subdomain. Our subdomain folder is called ‘Staging’ followed by the domain name.
Inside this folder, use the Upload option to choose the zip file of your WordPress files from your local computer.
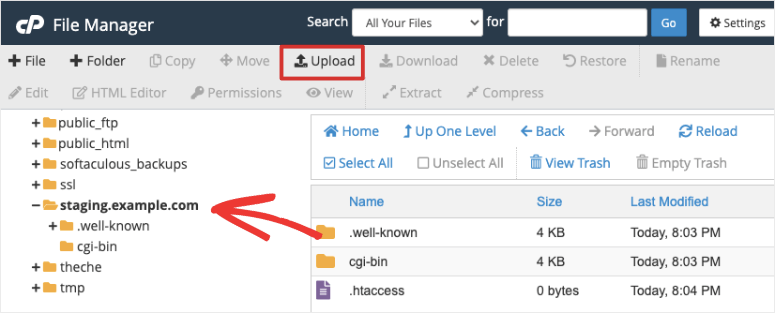
Once you upload it, simply right-click and unzip the file. Now your WordPress files are copied. Next, you need to add the database.
Step 4: Upload your Database to Subdomain
To upload the database copy of your live site, you’ll first need to create an empty database.
Head back to the cPanel dashboard and navigate to the Databases » MySQL Databases page. Here you can create a new database.
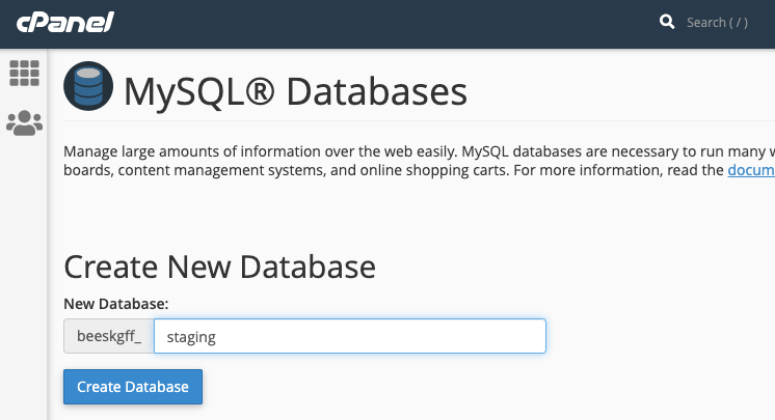
When you do that, scroll down and you’ll see more options to create a MySQL user. You’ll need to add a username and password.
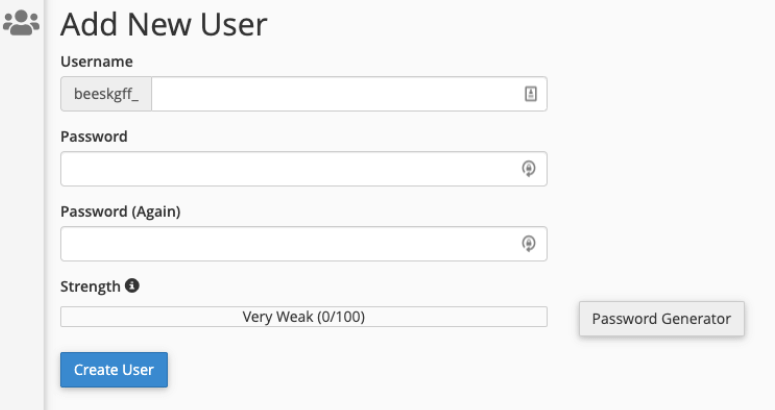
Then in the next section, assign the user to the new database you created.
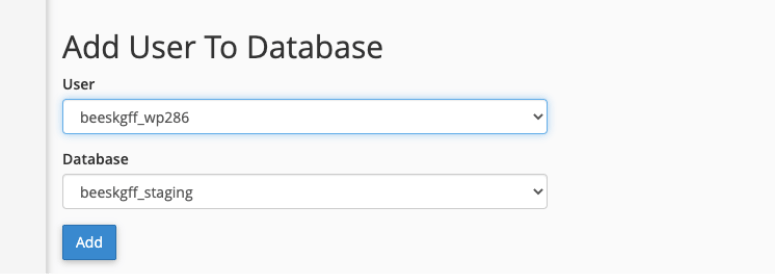
At this point, we suggest that you make note of your database name, user, and password. You’ll need it in the next step.
Head back to the phpMyAdmin » Databases page. First, choose the new database you just created and select the Import option.
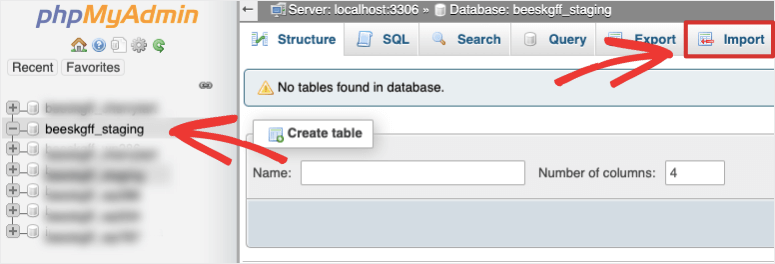
Now you can select the database file from your computer and upload it. With that, your database and files are copied to your staging site.
Step 5: Update Database Details in the wp-config File
The wp-config file contains all your database information. This means when you import a database, it will have the old details. You need to update it to match the new database you just created.
In cPanel, open the File Manager » Subdomain folder. We named this folder staging.example.com so we’ll open that.
Inside, you need to find and edit the wp-config file.
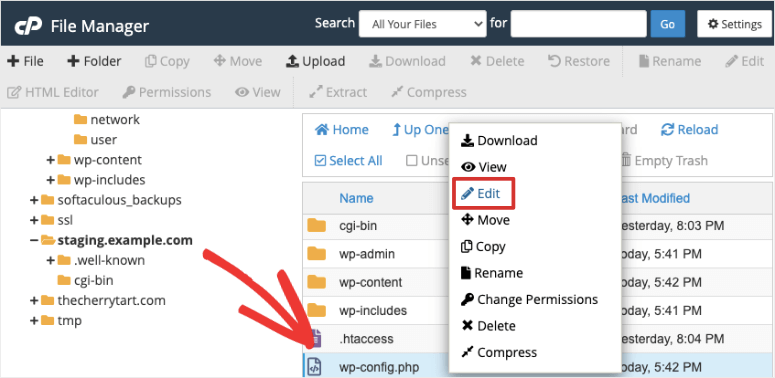
Here, you can enter your new database name, user, and password that you noted down earlier.

Now your test site is ready. To access it, use this site URL: staging.yourdomain.com. In case you named your subdomain something else, replace the word ‘staging’ with the one you chose.
The wp-admin login credentials for the test site will be the same as your live WordPress site.
Once you’re done using the test site, it’s important that you delete it. The testing site puts an extra load on your server which can affect the speed of your live website.
Step 6: Copying Test Site Changes to Live
When you’re happy with the changes you’ve made on your WordPress test site, you can make the same changes on your live site.
If you want to merge your changes, you can use the same method in reverse to copy the files and database back to your live site.
We strongly DO NOT recommend this method because it’s prone to errors. If you choose to try it, take a complete backup of your site so that you have a copy to restore if things go wrong.
That said, you need to export your files and database from your subdomain, and then import them into the public_html folder.
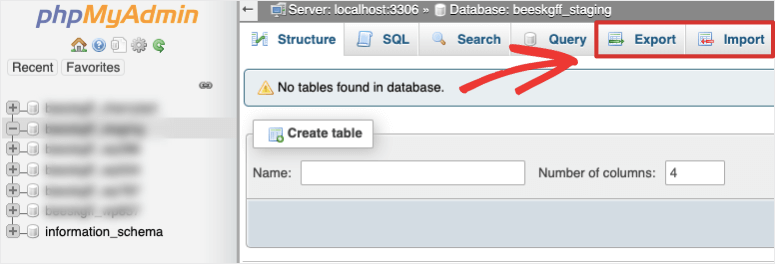
Make sure you change the database details back to the original information in the wp-config file as well.
With that, you’ve learned to manually create your own WordPress test site. Up next, we want to show you an easy way to set up a dummy WordPress site that you can use for all sorts of purposes.
3. Create a Temporary Test Site Without Installing WordPress
If you want to create a test site without installing WordPress or setting up a domain and hosting plan, you’ll love jurassic.ninja.
It lets you create a temporary WordPress site that’s private to you. You can use it to:
- See how WordPress works and learn how to use it
- Test out a plugin/theme to make sure it’s safe
- Take screenshots of a fresh installation for your blog posts or documentation
All you have to do is head over to the jurassic.ninja site and click on the ‘Create’ button. It will automatically set up a temporary website for you with a fresh WordPress install.
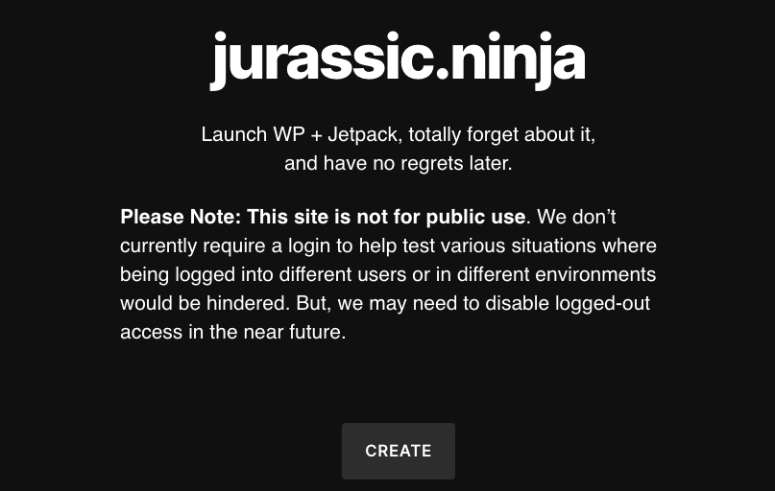
You can click on the link provided and start using your site to learn, test, or simply have fun with it.
With that, you’ve learned 3 ways to create a WordPress test site.
If you want our verdict, the best method is to use a staging plugin. You can quickly create a test site and merge your changes with your live site. But the most important factor is that you’ll never have to worry about breaking your live site in the process.
We hope you found this tutorial on creating a WordPress test site helpful. If so, you’ll definitely want to see these resources:
- How to Boost WordPress Performance & Speed (Expert Advice)
- How to Automate Lead Verification in WordPress (Step by Step)
- The Ultimate List of Tools and Software for Small Businesses in 2021
These posts will give you more tools and tutorials to help you improve and grow your website.

Hi, thanks for this info it’s just what I was looking for at the moment.
So I have two questions.
Could you use the staging plugin to let a freelance developer in?
Also when a staging has been created if it’s no longer needed is it ok just to hit delete in C-panel?
Thanks
Hey Julian, we’re glad you found the post helpful. Yes, most staging plugins let you password protect the test site. You can simply give the developer the username and password to log in.
Once you’re done with the test site, we recommend deleting it right away. Staging plugins usually let you delete it from their dashboard. You can delete the staging folder in cPanel too but always make sure it’s the right folder you’re deleting to avoid breaking your site.